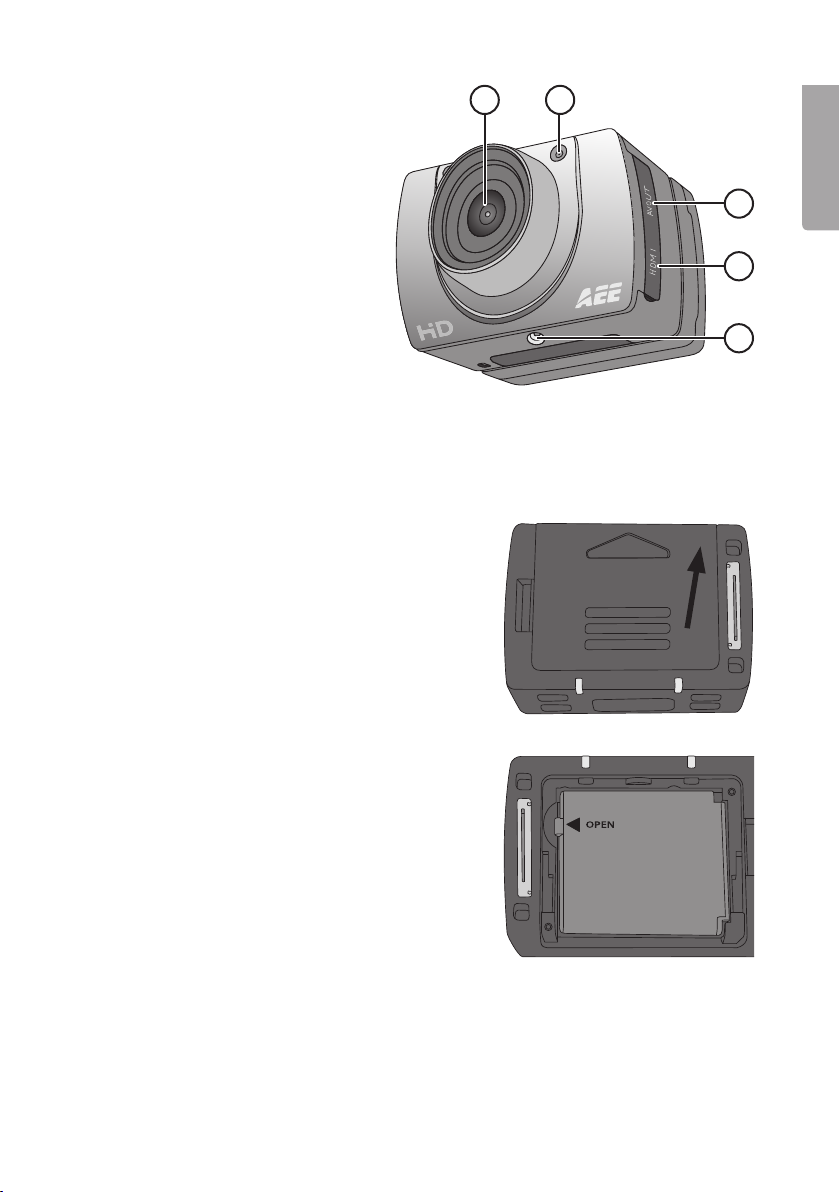
Clas Ohlson SD20 1080P User manual

EnglishSvenskaNorskSuomi EnglishSvenskaNorskSuomiDeutsch
Ver. 20130704
Action camera FullHD
Actionkamera FullHD
Actionkamera FullHD
Actionkamera FullHD
Action-Kamera FullHD
Art.no. Model
38-4968 SD201080P

2

3
English
Action camera FullHD
Art.no 38-4968 ModelSD201080P
Please read theentire instruction manual before use and save it for future reference.
Wereserve theright for any errors in text or images and for making any necessary
technical changes to this document. Ifyou should have any questions concerning
technical problems please contact our Customer Services.
Safety
• The camera must be fitted inside thewaterproof protective case if it will be
exposed to moisture andrain.
• Do not expose thecamera to impacts, knocks or strong heat.
• Do not leave thecamera in bright sunlight for prolonged periods.
• Keep thecamera and memory card away from strong magnetic fields or
radiowaves from speakers or antennas, etc.
• Do not allow children to play with thecamera.
Caution: Laser beams can cause eye damage. Do not point thelaser
beam directly into your or anyone else’s eyes.
Caution: Use this product only according to the purpose described in
this instruction manual. Do not modify the product in any way, since this
may increase the risk of someone being exposed to harmful laser beams.
Product description
• Video recording in FullHD.
• Still camera 5 megapixels, autoexposure
and auto white balance.
• Audio recording
• Still photography
• Detachable TFT colour display screen
• Voice-activated recording
• Date and time display
• 3 × digital zoom
• Laser indicator
• USB 2.0
• Mini HDMI output
• Indicator for battery capacity, memory
capacity and charging.
• Waterproof protective case. IP68,30m.
• Strap
• Bag
• A remote control is available as
anaccessory (sold separately).

4
English
1 2 3 4 5 6 7 8
9
10
11
12
13
18
19
20
21
14 15 16 17
Buttons and functions
1. Recording button
2. Green LED to indicate recording
inprogress.
3. [POWER] On/off
4. Microphone
5. Red LED to indicate charging status.
Flashing light: charging in progress.
Constant light: fully-charged battery.
Constant light in video-recording
mode.
6. LCD display
7. Shutter button for still photography
8. [VOX] Voice-activated recording on/off
9. TFT display
10. [M] Button to open settings menu
11. [+] Navigate up, zoomin
12. [<] Navigate toleft
13. [-] Navigate down, zoomout
14. [
] Open playback/display mode
15. [OK] Confirm choice
16. [PUSH] Detach theTFT display
screen from thecamera.
17. Attachment point for
accompanyingstrap
18. Speaker
19. Slot for Micro SDcard
20. [>] Navigate toright
21. Mini USB connection

5
English
22 23
24
25
26
22. Camera lens
23. Laser
24. AV out
25. Mini HDMI output
26. Attachment point for
accessory or tripod
Getting started
Inserting thebattery
1. Push up thebattery cover.
2. Insert thebattery as shown on
thesticker in thebattery holder.
3. Gently push thebattery down so that
it is right down in thebattery holder.
Toremove thebattery, grasp theplastic
tab by theOPEN arrow and pull
straight up.

6
English
Memory card
Only use memory card type MicroSDHC, max. 32GB.
Format thecard in thecamera before use.
NB: Ifthecard has previously been used in another device, remember that all
recorded material on thecard will be deleted when it is formatted. Makesure that you
transfer any material you want to keep to another location.
Formatting
1. Insert thememory card into its slot (19).
2. Switch on thecamera by sliding [POWER] to theON position.
3. Press [M] to open themenu.
4. Press [>] twice to get to theSetupmenu.
5. Press [+] or [-] several times to get to theFormat menu.
6. Press [OK] to open themenu.
7. Press [>] to select theright symbol.
8. Press [OK] to format.
Charging
• Connect theaccompanying USB cable to thecamera’s USB connection (21) and
to acomputer or other USB charger.
• The LED light (5) will indicate charging status. Flashing light: charging in progress.
Constant light: fully-charged battery.
• Time required to fully charge battery: approx. 3.5hours.
• The camera will automatically switch to maintenance charging once thebattery is
fully charged.
4. Mount the TFT screen onto the camera, being very careful to line it up straight with
the camera before pressing it securely into place. The screen’s connectors may
be damaged if the screen is fitted at an angle. Thescreen is easily detached from
theside with thePUSHbutton, but requires slightly more force on theside with
thescreen’s connection to thecamera.

7
English
Use
Switch on thecamera by sliding [POWER] to theON position.
LCD display
The LCD display on thetop of thecamera shows thefollowing icons:
Video-recording mode
Audio-recording mode
Flashes once for each still photograph.
Indicates that thecamera is switched on.
Shows battery status.
Indicates that thecamera is connected to acomputer or USB charger.
Indicates remaining memory capacity.
When video recording is in progress, time elapsed is shown in thedisplay, e.g. 005:20.
Thesame time is also shown in theTFT display.
TFT display
The following icons are shown:
Indicates that thecamera is in standby mode for video recording.
Shows battery status.
Indicates that amemory card has been installed.
Shows remaining memory capacity as a%.
Current video resolution is shown: 1080p, 960p, 720/60, 720/30 WVGA.
Date and time setting
1. Press [M] to open themenu.
2. Press [>] twice to get to theSetupmenu.
3. Press [+] or [-] several times to get to theDate/Timemenu.
4. Press [OK] to open themenu.
5. Select value using [<] [>] (the value is highlighted yellow).
6. Press [OK] to activate (the value is highlighted red).
7. Press [+] or [-] to change thevalue.
8. Press [OK] to confirm.
9. Press [M] twice to exit menumode.

8
English
Menus
Press [M] once to get to thecamera’s 3 menus. Press[<] [>] to switch between
Camcorder (video camera), Camera (camera) and Setup (settings).
Navigate themenus in thesame way as described in theButtons and functions
section above. Confirm your choice with [OK] and exit themenu by pressing [M].
Camcorder
Videocamera, contains thefollowing sub-menus:
• Resolution: Setting of video resolution 1080p (Full HD), 960p, 720/60, 720/30 and
WVGA (848×480). WVGA yield longer recording time, but poorer image quality.
NB: Use720p for thebest results in scenes with alot of movement.
• Laser Sync: Laserpointer that, when activated, switches on when recording starts
and off when it stops. Indicated by anicon in thetop left corner of theTFT screen.
Thelaser pointer makes it easy to aim thecamera correctly when filming. Thelaser
pointer can be switched on manually at any time by holding down therecording
button (1) for 3 seconds. Switchoff by holding down thebutton again for
3seconds. Thelaser pointer can also be switched on direct from standby mode
by holding down therecording button (1) for 3 seconds.
• Capture Mode: Selectaudio or video recording.
Camera
Stillcamera, contains thefollowing sub-menus:
• Single Shot: Stillphotography, one picture at atime.
• Treble Shot: Takes3 pictures in rapid succession.
• Continuous: Setthetimer to take photos at any of thefollowing intervals: every
2seconds, every 3 seconds, etc. Thefollowing time intervals are possible: 2, 3,
5, 10, 20, 30. Picture-taking continues until theshutter button is depressed again,
thememory becomes full (“Insufficient Memory” will be shown in thedisplay) or
thebattery runsout.
• Self timer: Delayed shutter release; set delay as 0, 5or 10 seconds.
• Resolution: Setimage resolution. 3M (2048×1536), 5M (2592×1944) or
8M(3200×2400, interpolated). Remember that higher-resolution images take up
morespace on thememory card.
Setup
Settings, contains thefollowing sub-menus:
• Beep: Buttonsound on/off. Thebutton sounds for photographing and video
recording are not affected. Thesecannot be switched off.
• Self Lamp: Turn the video rec/photo indicator off and on.
• Time Display: Switchdisplay of time and date on/off for recording of videofiles.
• Loop Record: Whenthis function is switched on, thevideo recording is
automatically saved every 15 minutes. Ifthefunction is switched off, therecording
is saved every 30 minutes.

9
English
• Auto Standby: Settime for automatic return to standby mode after inactivity.
0, 2, 5or 10 minutes. To activate thecamera from standby mode, press
any of thebuttons for start of video recording (1) or theshutter button for
still photography(7). Thecamera can also be activated by sliding theon/off
button(3) to OFF and then back to ON. Ifany activity takes place during theset
time period, theAuto Standby time will start again from thebeginning once
theactivityconcludes.
• TV Standard: Setting of video system for viewing recorded material on TV.
NTSC or PAL. NTSC is recommended.
NB: Iftheformat is changed while thecamera is connected to aTV with
anAVcable, unplug thecable from thecamera for thesettings to be updated.
• Format: Formatting thememory card. SeetheGetting started-Memory card
section above.
• Default: Resettheaction camera to thefactory settings.
• Language: Changelanguage using [<] [>]. OnlyEnglish, traditional Chinese and
simplified Chinese are available as options.
• Frequency: Select50 or 60 Hz. 60 Hz is recommended.
• Date/Time: Setting of date and time. SeetheUse-Date and time setting
sectionabove.
Video recording
1. Switch on thecamera and select video-recording mode. SeetheMenus-
Camcorder-Capture mode section above.
2. Start recording by pressing thebutton for recording (1).
3. Zoom in/out using [+]/[-]. NB: Nozoom function in 1080pmode.
4. Press thebutton for recording again to conclude and save therecording.
• If thecamera is switched off by mistake during anongoing recording, therecording
is saved before thecamera switches off.
• If thebattery runs out during anongoing recording , therecording is saved and
a“Low Battery” message appears in theTFT display.
• If thecamera is not switched off manually when this message appears, it will
automatically switch to standby mode.
• If thememory becomes full during anongoing recording, thefiles are saved and
therecording is switched off automatically.
Still photography
1. Zoom in/out using [+]/[-]. NB: Nozoom function in 1080pmode.
2. Take still photos by pressing theshutter button (7).
3. See theUse-Menus-Camera section above for description.

10
English
Audio recording
1. Switch on thecamera and select audio-recording mode. SeetheMenus-
Camcorder-Capture mode section above.
2. Start recording by pressing thebutton for recording (1).
3. Press thebutton for recording again to conclude and save therecording.
NB: Whenthecamera is activated from standby mode, it is set to video-recording mode.
Voice-activated recording
• If thecontrol for voice-activated recording (8) is set to ON, video recording starts
when thecamera senses acertain noise level, e.g. voice command or othersound.
NB: Thissystem only works in quiet environments.
• If thecamera is switched on and [VOX] (8) is ON and thenoise level around
thecamera is very low, thecamera will switch to standby mode once theset time in
Auto Standby has elapsed (see theUse-Menus-Setup-Auto Standby section above).
• If thecamera senses noise in standby mode, it will be activated and recording will
commence. Thecamera will continue to record as long as it can sense noise and
will finish recording 2 minutes after thenoise has ceased.
• The camera can be activated from standby mode when voice-activated recording
is switched on by pressing any of thebuttons for start of video recording (1) or
thebutton for still photography (7).
Playback/viewing mode
Press [
] (14) to open theplayback menu. Themenu has 2 sub-menus:
Recordand Capture.
Record
Videoand audiofiles.
1. Press [OK] to open themenu; thelast recorded file is shown. Press[<] [>] to
change file.
2. Press [-] to view recorded files as miniatures. Selectfile using [<] [>] or [+] [-] and
press [OK] toopen.
Control playback of video as follows:
• [OK] Start and stop playback.
• [+] [-] Volume
• [<] [>] Fast-forward or rewind. Pressonce to fast-forward at 2 × speed.
Pressonce to fast-forward at 4 × speed. Press[OK] to return to normal playback.
• [
]: Pause/play

11
English
Control playback of audio files as follows:
• [OK]: Startand stop playback.
• [+] [-]: Volume
• Audio files cannot be fast-forwarded or rewound.
Press [
] to exit playback/viewing mode.
Capture
Stillphotos.
1. Press [OK] to open themenu; thelast picture taken is shown. Press[<] [>] to
change picture.
2. Press [-] to view thepictures as miniatures. Selectfile using [<] [>] or [+] [-] and
press [OK] to open thepicture.
3. Press [+]/[-] if you want to zoom in in thepicture.
4. Press [OK] in azoomed image to determine [<] [>] function of thekeys.
Theycan be used to move round in thepicture up/down or right/left.
Deletion of files plus start of slide show and setting ofDPOF
Deletion and protection against deletion for video and audiofiles
1. Press [
] to open theplayback menu. Themenu has 2 sub-menus:
Recordand Capture.
2. Press [OK] to open Record.
3. Press [M]. Thefollowing sub-menus are shown:
- Delete One: Todelete one file. Press[OK] and select file using [<] [>].
Press[OK] for selected file and select YES/NO. Press[OK] to confirm.
- Delete all: Todelete all files. Press[OK]. SelectYES/NO. Press[OK] to confirm.
- Protect: Protect against deletion. Press[OK] and select file using [<] [>].
Press[OK] to lock (a lock symbol appears in thedisplay). Thefile can now
only be deleted by formatting thememory card. Pressagain/repeat to unlock
thefile; it can then be deleted asusual.
4. Press [M] to exit themenu.
Deletion and protection against deletion for still pictures plus slide show
and setting ofDPOF
1. Press [
] to open theplayback menu. Themenu has 2 sub-menus:
Recordand Capture.
2. Press [OK] to open Capture.
3. Press [M]. Thefollowing sub-menus are shown:
- Delete One: Todelete one file. Press[OK] and select file using [<] [>].
Press[OK] for selected file and select YES/NO. Press[OK] to confirm.
- Delete all: Todelete all files. Press[OK]. SelectYES/NO. Press[OK] to confirm.

12
English
- Protect: Protect against deletion. Press[OK] and select file using [<] [>].
Press [OK] to lock (a lock symbol appears in thedisplay). Thefile can now
only be deleted by formatting thememory card. Pressagain/repeat to unlock
thefile; it can then be deleted asusual.
- Autoplay: Press[OK] to start slide show. Press[M] to stop and return to
themenu. Press[M] again to return to normal picture display.
- DPOF (Digital Print Order Format): On/off. Standard for print-out of photocopies.
Whenthememory card is removed from thecamera and inserted into aprinter
or photo machine, theselected pictures can automatically be printed out.
4. Press [M] to exit themenu.
Connection to TV with accompanying AVcable
• Connect thecamera to aTV by connecting theAV cable to thecamera’s
AV-OUT(24) and to theAV-IN on yourTV.
NB: Thecable’s RCA contacts are colour-marked. TheAV-input on your TV is
colour-marked in thesame way. Matchyellow to yellow, etc.
• Remember to change theinput settings on your TV so that it receives thesignals
from AV-IN (see user manual for your TV). Playback/view thefiles in thesame way
as described in thePlayback/viewing mode section above.
Connection to TV with HDMI cable
Suitable cable 38–3298 (sold separately).
• Connect theHDMI cable to thecamera’s HDMI output (25) and to HDMI-IN on
yourTV.
• Remember to change theinput settings on your TV so that it receives thesignals
from HDMI-IN (see user manual for your TV). Playback/view thefiles in thesame
way as described in thePlayback/viewing mode section above.
Transferring files to computer
1. Connect theaccompanying USB cable to thecamera’s USB connection (21) and
to aUSB input port on acomputer.
2. Transfer thefiles as appropriate and use asuitable media player to view
therecorded files.
- File format, video: MOV
- File format, image: JPEG
- File format, audio: WAV

13
English
Fitting thewaterproof protective case
The camera must be fitted inside thewaterproof protective case if it will be exposed to
moisture andrain. To enable thecamera to fit in thewaterproof case, theTFT screen
must be detached.
1. Detach thescreen as described in theGetting started-Inserting thebattery
sectionabove.
2. Open thewaterproof case and place thecamera inside.
3. Position thecamera so that thebutton to start film recording and thebutton for
still photography sit under thetwo buttons on thecase. Thecamera can then be
started and stopped while inside thecase.
4. Close thecase and lock with thesnaplock.

14
English
Care and maintenance
Keep thecamera dry, cool and free fromdust.
Troubleshooting chart
Shaky image when
recording in1080p.
• Try switching to720p.
Poor or no picture when
connecting to aTV.
• Check that theconnection cables are undamaged
and correctly connected.
• Set your TV to receive signals from thecorrect
input, AV or HDMI. Seetheuser manual for yourTV.
Waste disposal
When disposing of your product, you must comply with local regulations.
Ifyou are unsure about procedures, contact your local authority.
Specifications
Objective Wideangle 170°, f/2,8
Pixels 5 Mega CMOS SENSOR (2592×1944)
Battery Lithium ion, 1000mAh
Power consumption 350 mA @ 3.7 V (MAX)
Recording duration, video 1080p: 1.5–2hours.
Recording duration, audio approx. 3hours
Standby time,
voice-activated recording approx. 250hours
Storage temperature -20 to 60°C
Operating temperature -10 to 50°C
Operating humidity 15–85 % RH
Memory card MicroSDHC, max. 32 GB (sold separately)
Video resolution 1080p (1920×1080), 720p (1280×720),
WVGA (848×480), QVGA (320×240)
File format, video MOV
File format, audio WAV
Image format JPEG 3M (2048×1536), 5M (2592×1944),
8M (3200×2400, interpolated).
USB 2.0
Operating system Windows XP/Vista or later, Win7/MacOS
Laser wavelength 640–660 nm
Output power CL II <1 mW
Weight WithTFT screen: 108 g, without screen: 82g
Dimensions 60×51×42mm

15
Svenska
Actionkamera FullHD
Art.nr 38-4968 Modell SD201080P
Läs igenom hela bruksanvisningen före användning och spara den sedan för fram-
tida bruk. Vireserverar oss för ev. text- och bildfel samt ändringar av tekniska data.
Vidtekniska problem eller andra frågor, kontakta vår kundtjänst (se adressuppgifter
påbaksidan).
Säkerhet
• Kameran måste vara monterad idet vattentäta skyddshöljet om den ska utsättas
för fukt ochväta.
• Utsätt inte kameran för slag, stötar eller starkvärme.
• Låt inte kameran ligga iihållande solljus under enlängre period.
• Håll kamera och minneskort på avstånd från starka magnetfält eller radiovågor från
t.ex. högtalare eller antenn.
• Låt inte barn leka med kameran.
Varning! Laserstrålning kan orsaka ögonskador.
Riktainte blicken direkt mot laserstrålen.
Varning! Användendast produkten till de ändamål som anges här i bruks-
anvisningen. Modifiera inte produkten på något sätt, det kan leda till att
någon utsätts för skadlig laserstrålning.
Produktbeskrivning
• Videoinspelning iFullHD
• Stillbildskamera 5 megapixlar,
autoexponering och autovitbalans.
• Ljudinspelning
• Stillbildsfotografering
• Avtagbar TFT-färgdisplay
• Röststyrd inspelning
• Visning av datum ochtid
• 3 × digital zoom
• Laserindikering
• USB 2.0
• Mini-HDMI-utgång
• Indikering av batterikapacitet,
minneskapacitet och laddning.
• Vattentätt skyddshölje. IP68, 30m.
• Bärrem
• Väska
• Fjärrkontroll finns som tillbehör,
säljsseparat.

16
Svenska
1 2 3 4 5 6 7 8
9
10
11
12
13
18
19
20
21
14 15 16 17
Knappar och funktioner
1. Avtryckare för videoinspelning
2. Grön LED som indikerar att
inspelningpågår.
3. [POWER] På/av
4. Mikrofon
5. Röd LED som indikerar
laddningsstatus. Blinkande sken:
laddning pågår. Fastsken: fulladdat
batteri. Lysermed fast sken vid
videoinspelning.
6. LCD-display
7. Avtryckare för stillbildsfotografering
8. [VOX] Röststyrd inspelning på/av
9. TFT-display
10. [M] Knapp för att öppna
inställningsmenyn
11. [+] Navigera uppåt, zoomain
12. [<] Navigera till vänster
13. [-] Navigera neråt, zoomaut
14. [
] Öppna uppspelnings-/
visningsläge
15. [OK] Bekräfta val
16. [PUSH] Ta bort TFT-displayen
frånkameran.
17. Fäste för medföljande bärrem
18. Högtalare
19. Plats för Micro-SD-kort
20. [>] Navigera tillhöger
21. Mini-USB-anslutning

17
Svenska
22 23
24
25
26
22. Kameralins
23. Laser
24. AV-out
25. Mini-HDMI-utgång
26. Fäste för tillbehör eller stativ
Att kommaigång
Montera batteriet
1. Skjut upp batteriluckan.
2. Sätt i batteriet på det sätt som dekalen
ibatterihållaren visar.
3. Tryck försiktigt ner batteriet så att det
ligger helt nere i batterihållaren. Ta ur
batteriet genom att ta tag i plastfliken
vid OPEN-pilen och dra rakt upp.

18
Svenska
Minneskort
Använd endast minneskort av typen MicroSDHC, max 32GB.
Formatera kortet ikameran innan det används.
Obs! Omkortet tidigare använts iannan enhet kom ihåg att allt inspelat material
raderas på kortet när det formateras. Setill att föra över materialet till annan plats om
du vill ha detkvar.
Formatering
1. Sätt iminneskortet på sin plats (19).
2. Slå på kameran genom att skjuta [POWER] till lägeON.
3. Tryck [M] för att öppnamenyn.
4. Tryck [>] två gånger för att komma till Setup-menyn.
5. Tryck [+] eller [-] flera gånger för att komma till Format-menyn.
6. Tryck [OK] för att öppnamenyn.
7. Tryck [>] för att välja den högra symbolen.
8. Tryck [OK] för att formatera.
Laddning
• Anslut den medföljande USB-kabeln till kamerans USB-anslutning (21) och till
dator eller annan USB-laddare.
• LED-lampan (5) visar laddstatus. Blinkande sken: laddning pågår.
Fastsken: fulladdat batteri.
• Tid till fulladdat batteri ca 3,5 timmar.
• Kameran går automatiskt över till underhållsladdning när batteriet är fulladdat.
4. Montera TFT-skärmen. Obs! Tryck försiktigt skärmen raktin mot kameran,
skärmens anslutning kan skadas om displayen vinklas. Skärmengår lätt att ta bort
från sidan med PUSH-knappen och något tyngre från sidan där skärmens anslutning
till kameran finns.

19
Svenska
Användning
Slå på kameran genom att skjuta [POWER] till lägeON.
LCD-displayen
I LCD-displayen på kamerans ovansida visas följande ikoner:
Videoinspelningsläge
Ljudinspelningsläge
Blinkar engång vid varje stillbildsfotografering.
Indikerar att kameran är påslagen.
Visar batteristatus.
Indikerar att kameran är ansluten till dator eller USB-laddare.
Indikerar kvarvarande minneskapacitet.
När videoinspelning pågår visas förfluten tid idisplayen t.ex. 005:20. Sammatid visas
också iTFT-displayen.
TFT-displayen
Följande ikoner visas:
Indikerar att kameran står istandbyläge för videoinspelning.
Visar batteristatus.
Visar att minneskort är installerat.
Visar återstående minneskapacitet i%.
Aktuell videoupplösning visas: 1080p, 960p, 720/60, 720/30 WVGA.
Inställning av tid ochdatum
1. Tryck [M] för att öppnamenyn.
2. Tryck [>] två gånger för att komma till Setup-menyn.
3. Tryck [+] eller [-] flera gånger för att komma till Date/Time-menyn.
4. Tryck [OK] för att öppnamenyn.
5. Välj värde med [<] [>] (värdet gulmarkeras).
6. Tryck [OK] för att aktivera (värdet rödmarkeras).
7. Tryck [+] eller [-] för att ändra värdet.
8. Tryck [OK] för att bekräfta.
9. Tryck [M] två gånger för att gå ur menyläget.

20
Svenska
Menyer
Tryck [M] engång för att komma till kamerans 3 menyer. Tryck[<] [>] för att flytta
mellan Camcorder (videokamera), Camera (kamera) och Setup (inställningar).
Navigera imenyerna på samma sätt som beskrivs iavsnitt Knappar och funktioner ovan.
Bekräfta val med [OK] och gå ur menyn genom att trycka [M].
Camcorder
Videokamera, innehåller följande undermenyer:
• Resolution: Inställning av videoupplösning 1080p (Full HD),960p, 720/60, 720/30
och WVGA (848×480). WVGA ger längre inspelningstid men sämre bildkvalitet.
Obs!Använd 720p för bästa resultat iscener med mycket rörelse.
• Laser Sync: Laserpekare som när den är aktiverad slås på när inspelningen
startas och slås av när den stoppas. Indikeras av enikon högst upp till vänster
på TFT-skärmen. Laserpekaren gör det enkelt att rikta kameran rätt vid filmning.
Laserpekaren kan när som helst slås på manuellt genom att inspelnings-
knappen(1) hålls ner i3 sekunder. Stängav genom att hålla in knappen
i3sekunder igen. Laserpekaren kan även slås på direkt från viloläget genom
attinspelningsknappen(1) hålls ner i3 sekunder.
• Capture Mode: Väljljud- eller videoinspelning.
Camera
Stillbildskamera, innehåller följande undermenyer:
• Single Shot: Stillbildsfotografering, enbild itaget.
• Treble Shot: Ta3 bilder isnabbföljd.
• Continous: Ställtimern för att ta ettfoto med något av följande intervall: varannan
sekund, var 3:e sekund osv. Följande tidsintervall finns: 2, 3, 5, 10, 20, 30.
Fotograferingen fortsätter tills avtryckaren trycks ner igen, minnet är fullt
(”Insufficient Memory” visas på displayen) eller tills batteriet är förbrukat.
• Selftimer: Självutlösare, ställ in fördröjning 0, 5eller 10 sekunder.
• Resolution: Ställin bildupplösning. 3M (2048×1536), 5M (2592×1944) eller
8M(3200×2400, interpolerat). Tänkpå att högre bildupplösning tar mer plats
påminneskortet.
Setup
Inställningar, innehåller följande undermenyer:
• Beep: Knappljud på/av. Knappljuden vid fotografering och videoinspelning
påverkas inte. Dessagår inte att stänga av.
• Self Lamp: Slå av och på indikeringslampa som visar att videoinspelning eller
fotografering pågår.
• Time Display: Slåpå/av visning av tid och datum vid inspelning av videofil.
• Loop Record: Närfunktionen är påslagen sparas videoinspelningen automatiskt
var 15:e minut. Omfunktionen är avslagen sparas inspelningen var 30:eminut.
Table of contents
Languages:
Other Clas Ohlson Action Camera manuals