Clas Ohlson SM-9088UR User manual

EnglishSvenskaNorskSuomi
Car Stereo with
CD/MP3 and USB/SD
Bilstereo med MP3 och USB/SD-uttag
Bilstereo med MP3 og USB/SD-uttak
Autostereot, joissa MP3-soitin sekä
USB-/SD-liitäntä
Art.no. Model
38-2453 SM-9088UR Ver. 201003

2
ENGLISH
Car Stereo
with CD/MP3 and USB/SD
Art.no. 38-2453 Model SM-9088UR
Please read the entire instruction manual before using and save for future use.
We apologise for any text or photo errors and any changes of technical data.
If you have any questions concerning technical problems please contact our
Customer Service Department (see address on reverse.)
Description
Car stereo with:
- CD player
- Playback of MP3
- Connection for USB and SD memory card
- FM radio with RDS
- Removeable front
- Power 4 x 40 W
Safety
Read the entire manual before installing.
NOTE!
- Incorrect installation voids the warranty.
- If the cables are cut the warranty is not valid.
- If the place for installation does not have ISO plugs, use the included
ISO plugs with cable for installation.

3
ENGLISH
1. Remove the mounting frame
from the stereo (insert the
included keys to release
the pins and pull the frame
backwards).
2. Insert the free mounting frame
in the space and fold out the
tabs that lock the car stereo
in position (2) in the mounting
space (1).
3. Pass the car’s ISO plugs
through the mounting frame.
4. Connect the ISO plugs and the
antenna and try all functions.
5. Push the car stereo into the
mounting frame so the pins
on the sides come in the right
position.
Installation
Installation in mounting frame (DIN)
- Only use the included or recommended mounting accessories for
correct installation.
- Do not install the car stereo in a way that interferes with the driver’s visibility.
Also do not install in a way that may harm passenger or driver during quick
deceleration.
- Avoid installation where the car stereo may be exposed to direct sun light,
strong heat or vibrations.
- If the angle of installation exceeds more than 30°
the device’s functions can not be guaranteed.

4
ENGLISH
Removal of the car stereo
1. Remove the front panel and
remove the outer frame (a)
carefully with your fingers
according to the markings
in the figure (b).
2. Insert the included keys in the
space between the mounting
frame and the car stereo (c).
The keys should be pushed in
until a “click” is heard.
3. Pull carefully on the keys and
the car stereo to remove it.
4. Remove the ISO plugs and the
antenna plug.
Removable front panel
Remove the front panel
1. Shut off the device with the
ON/OFF button.
2. Push the RELEASE button.
3. Carefully remove the front panel.
Attach the front panel
1. Attach the front panel with
the rights side first (arrow A)
towards the car stereo (arrow B)
according to the figure.
2. Push carefully in the front
panel’s left side until a “click”
is heard.

5
ENGLISH
AMP
7 8
1
3 4
5
7 8
6
2 2
1
3 4
5 6
Antenna socket
20-Pin connector
WhiteRed
RCA to RCA Cable
(not included)
ISO-connector
ISO-connector
4 pins + 8 pins
B A
Antenna jack
Connections
The car stereo has the following connections: Antenna input, quick-connector ISO,
1x RCA low-level output.
Pin Cable colour Connect to
A4 Yellow +12 Volt continuous
A5 Blue Motor antenna
A7 Red + 12 V via ignition
A8 Black (-) Earth
B1 Purple Rear right speaker (+)
B2 Purple with black stripe Rear right speaker (-)
B3 Gray Front right speaker (+)
B4 Grey with black stripe Front right speaker (-)
B5 White Front left speaker (+)
B6 White with black stripe Front left speaker (-)
B7 Green Rear left speaker (+)
B8 Green with black stripe Rear left speaker (-)

6
ENGLISH
1611 12 13 714
9
15
3810452
Basic functions
1. [] Panel lock
Press the button to release the front panel.
2. ON/OFF switch button.
3. [DISP] Display
Press to change the display information: Clock > Program type PTY > Frequency
4. [MODE] Function switch
Press to choose function: Radio > CD/MP3 > USB/SD
5. Volume control/Equalizer
- Turn to adjust the volume.
- Press to choose sound settings: VOL > BAS > TRB > BAL > FAD.
- Choose sound setting and adjust by turning the volume control.
Push the volume knob to confirm.
6. [B/LOUD/ENTER] Memory bank/Bass boost
- Press to change memory bank: FM1 > FM2 > FM3 > AM (MW) (in radio mode).
- Press and hold to turn on or off “Loudness” (bass boost).
7. Signal indicator
Displays the strength of the reception for the radio signal.
8. [M1 – M6] Memory for stations
Press a memory button to select the stored frequency. The more segments that
are lit, the better the reception is.
Store frequencies:
1. Select desired frequency with the selector [9].
2. Press and hold the desired memory button for approx. 2 seconds
to store the frequency.
9. [], [] Switch track/Search frequency
- Push to automatically search for a station.
- Press and hold to choose manual search.
Push several times to choose the frequency up/down.

7
ENGLISH
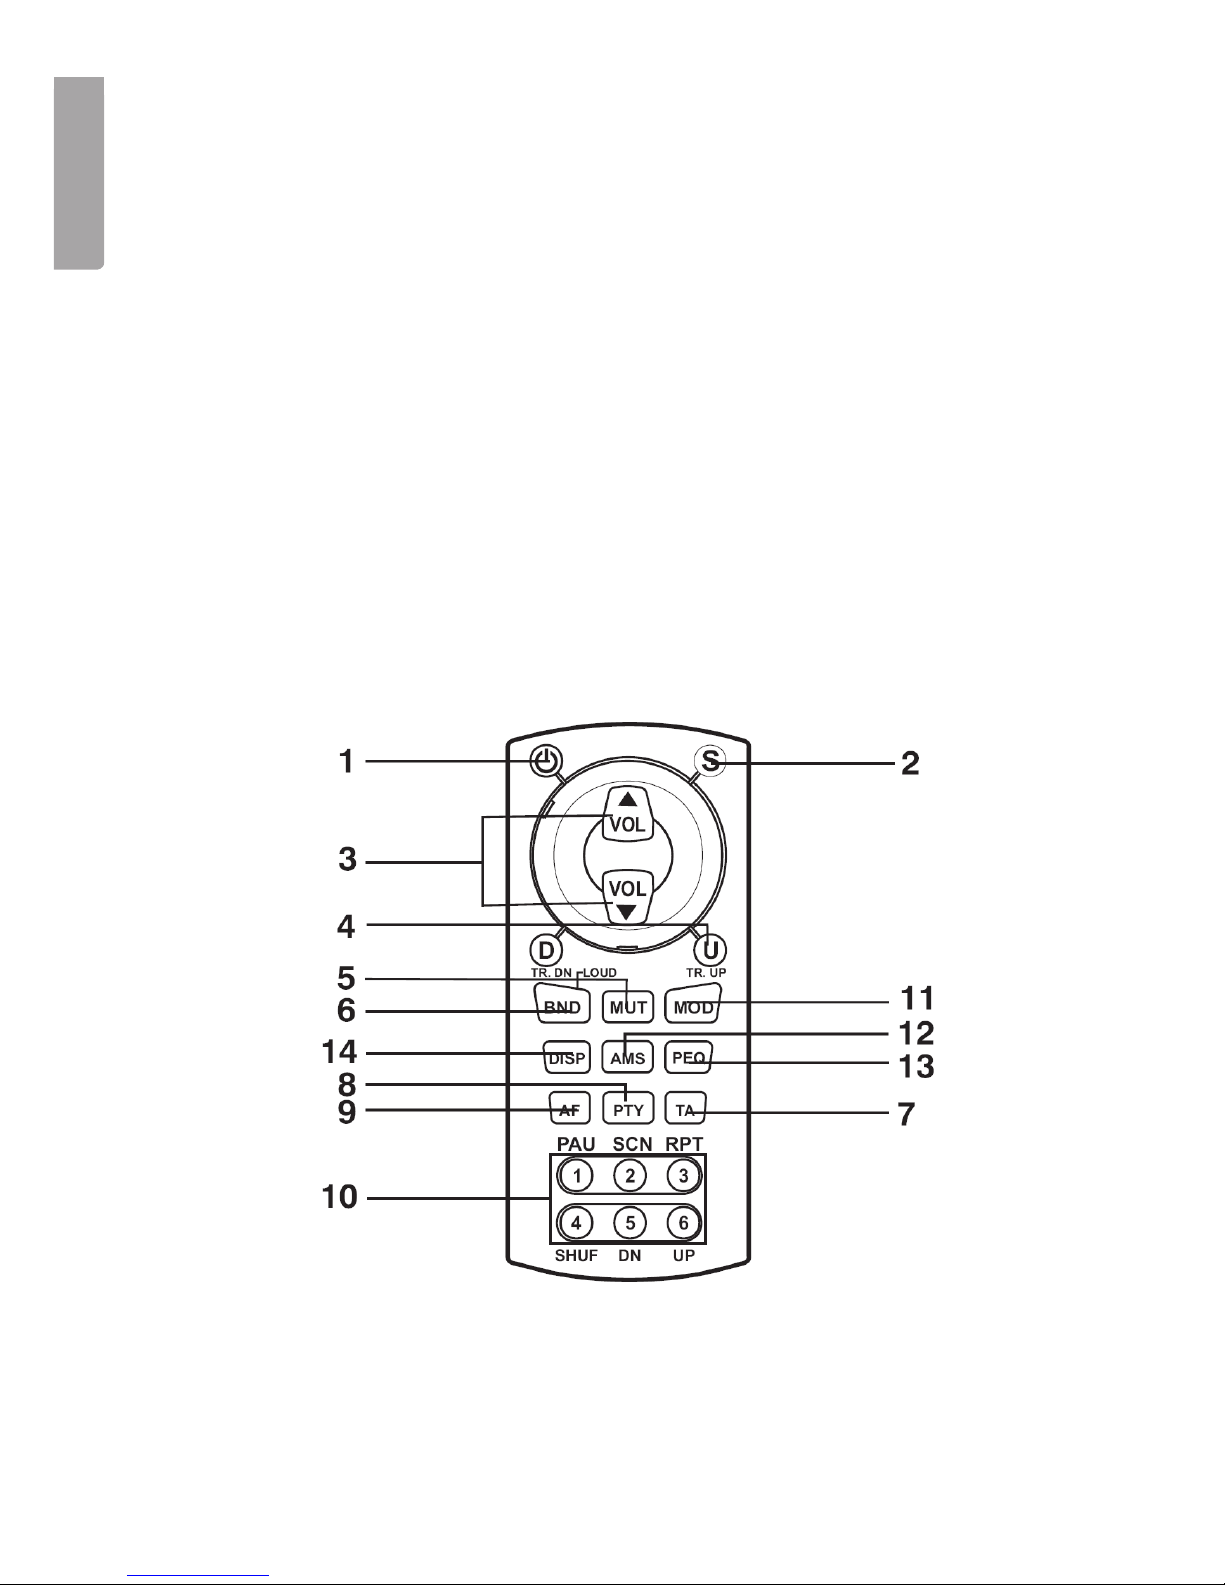
10. [AS/PS] Automatic storage of stations
Press and hold to automatically search and store found stations in the memory.
11. [AF] Alternative frequency
Displays all receivable frequencies that the FM station transmits. The radio
automatically switches to the strongest transmitter.
- Press to turn on or off the AF mode. “AF” is indicated on the display when
the function is activated.
12. [TA] Traffic announcement
Press to turn on or off. “TA” is indicated on the display when the function is
activated.
When the function is activated and a traffic announcement is sent out the following
happens:
- When playing of CD/MP3 the device automatically switches to radio reception.
- If the volume is set to low, it will increase to make sure the announcement is
heard.
Press [TA] for a while to switch between TA local (only strong stations) or TA
distance (even weaker stations). Set mode is shown on the display.
EON TA LOCAL or EAN TA DISTANCE.
Note: If TA is activated the automatic search function stops only on stations that
send RDS.
13. [PTY] Program type
Codes for different types of programs that make it possible to search desired
information.
Press repeatedly to choose mode: PTY Music Group > PTY Speech Group >
PTY Off. Current PTY code is shown on the display.
- Press any of the buttons M1 to M6 to choose between the different PTY codes.
Button Music type Program type
M1 Pop, Rock News, information
M2 Popular music Sports, education
M3 Classical Culture
M4 Jazz, Country Weather, finance, children program
M5 National, older music Religion, debate
M6 Folk music Travel
When you have chosen a PTY code the radio searches the frequency band to try and
find a station that matches the category.
14. [ ] EJECT
Press to remove the CD.
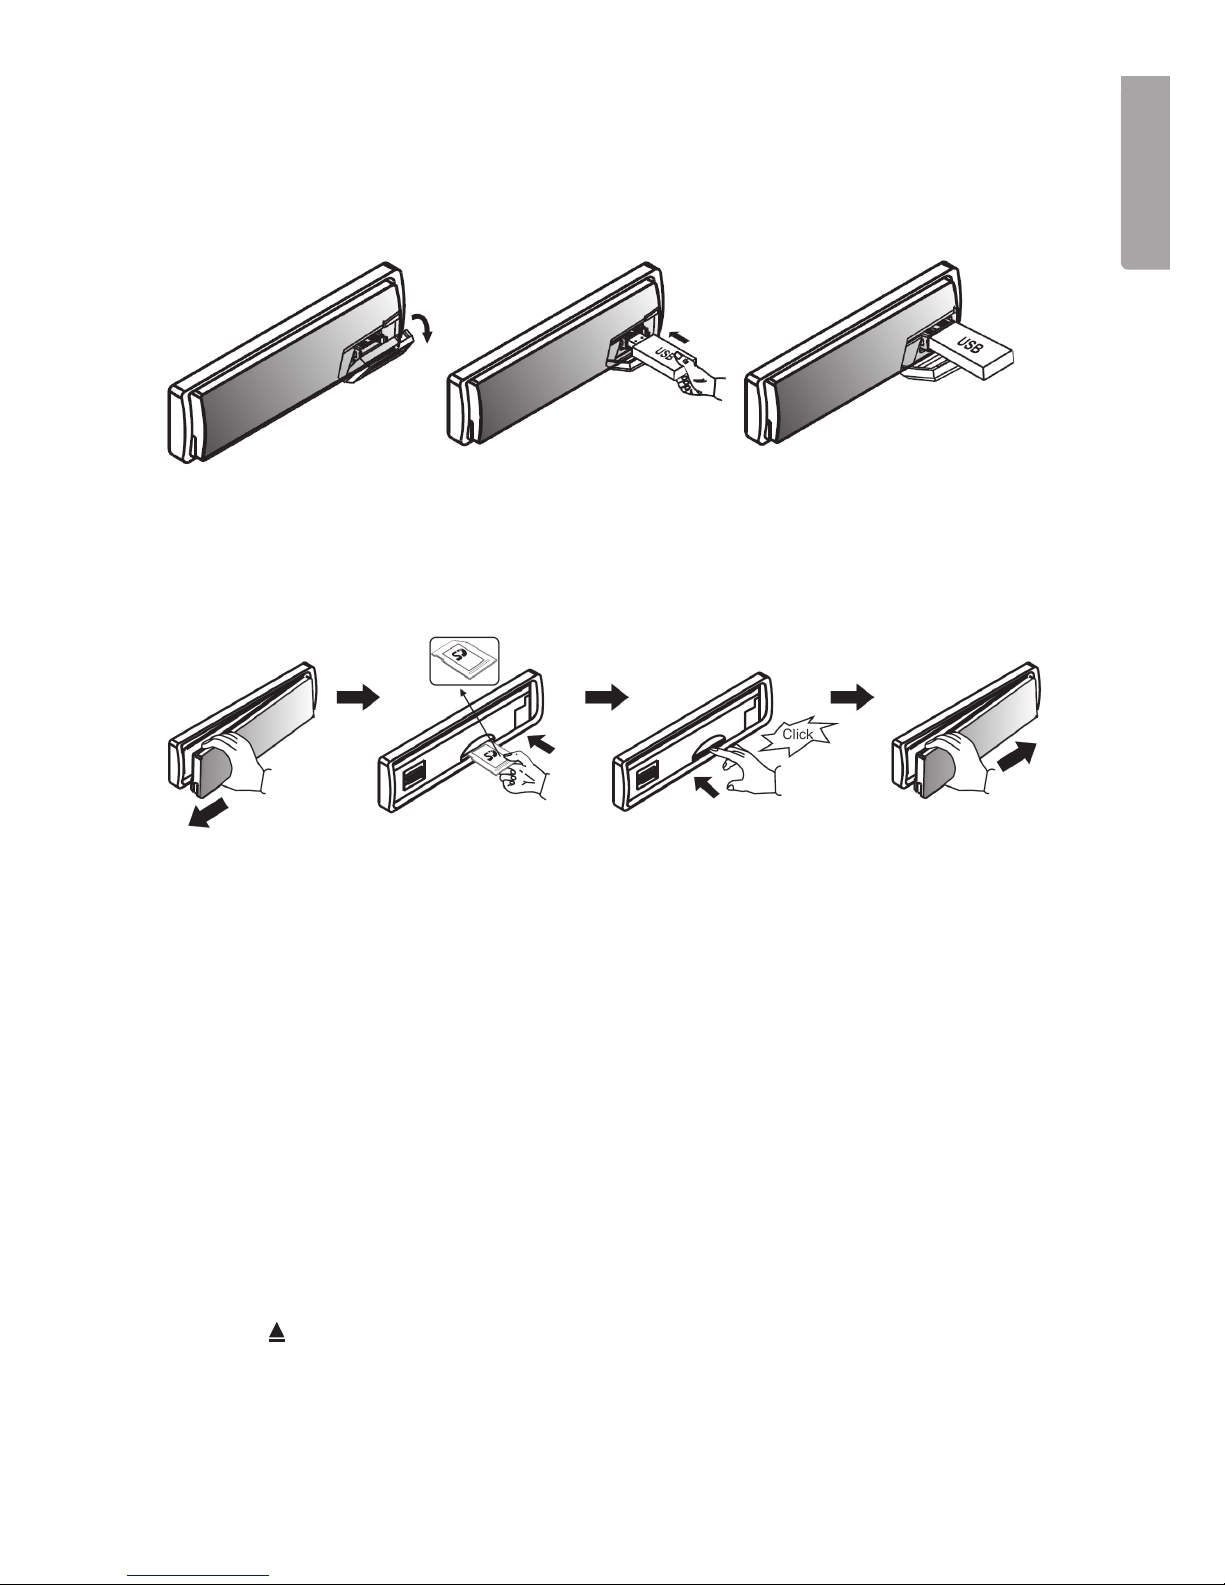
15. [USB] – Connection for USB memory
Fold down the cover and insert a USB memory.
16. Connection for SD/MMC memory card (behind the front panel)
Release the front panel and insert an SD card.
17. RESET (reset button)
Resets the device to original setting. The button is on the car stereo behind the
front panel.

8
ENGLISH
Display of the built-in clock
The built-in clock is controlled by the radio’s RDS receiver and is set automatically
when a station that transmits RDS information is received.
- Set the radio receiver on a channel that transmits RDS information.
If the reception is good the clock will set automatically after a few minutes.
- Press repeatedly on DISP [3] to show the clock on the display.
Use
CD playback
1. Insert a CD in the CD compartment with the label side up.
2. The playing starts automatically from the first track.
3. Press shortly on or [9] to choose previous or next track.
Press and hold or to quick search backwards or forwards in a track.
4. Use the buttons M1 to M6 [8] to control the playback:
a. [1 /] PAUSE – Press to pause the playback.
b. [2 SCN] SCAN – Press to play the first 10 seconds of every track.
c. [3 RPT] REPEAT – Repetition of all tracks.
d. [4 SHF] SHUFFLE – Press to choose random playing.
5. Press [14] if you want to remove the CD.
MP3 playback from CD
1. Insert a CD containing MP3 files in the CD compartment with the label side up.
2. The display will show “READING” for a short while and then “MP3 T01” before
the playing automatically starts from the first file.
3. Press the buttons [5 DN] or [6 UP] to choose desired folder on the CD.
4. Press shortly on or [9] to choose previous or next track. Press and hold
or to quick search backwards or forwards in a track.
5. Use the buttons M1 to M6 [8] to control the playback:
a. [1 /] PAUSE – Press to pause the playing.
b. [2 SCN] SCAN – Press to play the first 10 seconds of every track.
c. [3 RPT] REPEAT – Repetition of all tracks.
d. [4 SHF] SHUFFLE – Press to choose random playing.
6. Press repeatedly on the DISP button [3] to show the MP3 information*, also
known as an ID3-TAG, in the following order:
TITEL > ARTIST > ALBUM NAME.
* requires that information is saved on the file.
7. Press [14] if you want to remove the CD.

9
ENGLISH
MP3 playing from a USB memory/SD memory card
1. USB: Fold down the flap [15] for the USB connection and insert a USB memory
containing MP3 files.
SD/MMC: Shut off the device and release the front panel. Insert a SD memory
card containing MP3 files in the space designated for the card [16] behind the
front panel.
2. The display will show “USB PLAY” for a short while and then “MP3 T01” before
the playing automatically starts from the first file.
3. Press the buttons [5 DN] or [6 UP] to choose desired folder on the CD.
4. Press shortly on or [9] to choose previous or next track.
Press and hold or to quick search backwards or forwards in a track.
5. Use the buttons M1 to M6 [8] to control the playing:
a. [1 /] PAUSE – Press to pause the playing.
b. [2 SCN] SCAN – Press to play the first 10 seconds of every track.
c. [3 RPT] REPEAT – Repetition of all tracks.
d. [4 SHF] SHUFFLE – Press to choose random playing.
6. Press repeatedly on the button DISP [3] to show the MP3 information*, also
known as ID3-TAG, in the following order: TITEL > ARTIST > ALBUM NAME
* requires that information is saved on the file.
7. Press [14] if you want to remove the CD.

10
ENGLISH
Listening to the radio
1. Press MODE [4] to switch to radio mode. Current frequency will show
in the display.
2. Choose memory bank with the button B/LOUD/ENTER [6].
3. Press one of the memory buttons M1 to M6 [8] to quickly get a stored frequency
from the memory and push and [9] to automatically search frequency.
4. To switch to manual search, press and hold and . Within 2 seconds set
desired frequency with the buttons and .
5. Adjust the volume with the volume control [5] .
Store frequencies to the memory:
1. Search or set the desired frequency with the buttons and [9].
2. Press and hold the desired memory button [8] for approx. 2 seconds to store
the frequency.
Description of the remote control

11
ENGLISH
Button Radio CD MP3
1. ON/OFF switch.ON/OFF switch. ON/OFF switch
2. Select (S) Chooses volume,
base, treble, fade,
and balance.
Chooses volume,
base, treble, fade,
and balance.
Chooses volume,
base, treble, fade,
and balance.
3. VOL / Adjusts volume,
base, treble, fade,
and balance.
Adjusts volume,
base, treble, fade,
and balance.
Adjusts volume,
base, treble, fade,
and balance.
4. TR UP/DN Frequency up/
down.
Next/previous
track.
Next/previous
track.
5. MUT Mutes the volume. Mutes the volume. Mutes the
volume.
6. BND Switch memory
bank/activate bass.
Activates bass
boost.
Activates bass
boost.
7. TA TA, traffic notice. - -
8. PTY PTY, programcodes. - -
9. AF AF, alternative
frequency list.
- -
10. Number button 1 Memory 1 Pause Pause
Number button 2 Memory 2 Intro scan Intro scan
Number button 3 Memory 3 Repetition Repetition
Number button 4 Memory 4 Random playing. Random playing.
Number button 5 Memory 5 - Folder down.
Number button 6 Memory 6 - Folder up.
11. MOD Switch to CD/MP3/
AUX.
Switch to radio/
AUX.
Switch to radio/
AUX.
12. AMS Automatic station
storing/searching.
- Menu
13. PEQ Preset Preset Equalizer settings
14. DISP Display clock/RDS
information.
Display clock/
track/playing time.
Display clock/
MP3 info.

12
ENGLISH
Care and Maintenance
Use a soft damp cloth to clean the product. Never use solvents or strong detergents.
The front panel’s connecting plugs can be cleaned with a cotton earbud dipped in
a light cleaning solution etc.
Troubleshooting Guide
Problem Possible cause Remedy
The device does
not start.
The car’s ignition is not
turned on.
Turn on the ignition.
The fuse is broken.Check and change the fuse.
The disc cannot
be played.
The disc is not compatible.Try another disc.
The disc is not properly in-
serted.
Insert the disc with
the label up.
The disc is dirty.Clean the disc.
The temperature inside of
the car is too high.
Wait until the car has
cooled down.
Condensation on the lens. Shut off and wait for an hour
or more.
No sound.The volume is turned down.Adjust the volume.
The speakers are not con-
nected properly.
Check the connections.
The buttons do
not work.
The micro processor may
need to be reset.
Press “Reset” behind the front
panel.
The front panel is loose.Attach the front panel
properly.
The sound
disappears.
The device is at a too high
angle (max 30 °).
Adjust the installation.
The disc is dirty or faulty.Clean or switch the disc.
No radio
reception.
Antenna cord is not
connected.
Check the connections.
The signals are too weak.Choose another frequency/
station.
The display shows
ERROR 1.
The micro processor may
need to be reset.
Press “Reset” behind the front
panel.
The display shows
ERROR 2.
The micro processor may
need to be reset.
Press “Reset” behind the front
panel.
The clock
displays “NO
CLOCK”.
The clock is set automatically
by the RDS information.
The radio station may not be
transmitting RDS information
or the reception is too weak.
Switch to a stronger signal.

13
ENGLISH
Disposal
Follow local ordinances when disposing of this product. If you are unsure about how
to dispose of this product contact your municipality.
Specifications
FM
Frequency range: 87.5–108 MHz
Channel step 50 kHz
Middle frequency 10.7 MHz
Stereo seperation 25 dB at 1 kHz
Signal static relationship 50 dB
AM/MW
Frequency range 522 - 1620 kHz
Middle frequency 450 kHz
Signal static relationship 40 dB
CD player
Signal static relationship 70 dB
Frequency response 5–20,000 Hz
General
Input 11–14 V DC
Polarity Minus to earth
Speaker impedance 4 ohms
Output 4 x 40 watts

14
SVENSKA
Bilstereo med MP3
Art.nr 38-2453 Modell SM-9088UR
Läs igenom hela bruksanvisningen före användning och spara den sedan
för framtida bruk. Vi reserverar oss för ev. text- och bildfel samt ändringar av
tekniska data. Vid tekniska problem eller andra frågor, kontakta vår kundtjänst
(se adressuppgifter på baksidan).
Presentation
Bilstereo med:
- CD-spelare
- Uppspelning av MP3
- Anslutning för USB-minne och SD-minneskort
- FM-radio med RDS
- Löstagbar stöldfront
- Effekt 4 x 40 W
Säkerhet
Läs igenom hela bruksanvisningen innan montering!
OBS!
- Vid felaktig inkoppling upphör garantin att gälla!
- Om kablarna på bilstereon klipps upphör garantin att gälla.
- Om platsen för montering saknar ISO-kontakter, använd de medföljande
lösa ISO-kontakterna med kabel för montering.

15
SVENSKA
Installation
Montering i monteringsram (DIN)
- Använd endast medföljande eller rekommenderade monteringstillbehör för
korrekt installation.
- Installera inte bilstereon så att den skymmer förarens sikt eller så att den kan
skada förare eller passagerare vid eventuell snabb inbromsning.
- Undvik att installera bilstereon på sådant sätt att den utsätts för direkt solljus,
stark värme eller starka vibrationer.
- Om installationsvinkeln överstiger mer än 30° kan
apparatens funktioner ej garanteras.
1. Ta av monteringsramen från
stereon (tryck in de medföljande
nycklarna så att spärrarna släp-
per, och dra ramen bakåt).
2. Tryck in den lösa monterings-
ramen i bilens uttag och vik ut
några av låsflikarna (2) så att de
låser fast monteringsramen
i monteringshålet (1).
3. Dra fram bilens ISO-kontakter
genom monteringsramen.
4. Anslut ISO-kontakterna och an-
tennen och prova alla funktioner.
5. Tryck in bilstereon i monte-
ringsramen så att spärrarna på
sidorna kommer i läge.

16
SVENSKA
Borttagning av bilstereon
1. Ta bort frontpanelen och avlägs-
na den yttre ramen (a) försiktigt
med fingrarna vid markeringarna
(b) enligt bilden.
2. Sätt i de medföljande nycklarna
i springorna mellan monte-
ringsramen och bilstereon (c).
Nycklarna ska tryckas in tills ett
”klick” hörs.
3. Dra försiktigt i nycklarna och
bilstereon för att avlägsna
bilstereon.
4. Ta bort ISO-kontakterna och
antennkontakten.
Löstagbar frontpanel
Ta bort frontpanelen
1. Stäng av apparaten med
AV/PÅ-knappen.
2. Tryck in RELEASE-knappen.
3. Ta bort frontpanelen försiktigt.
Sätta dit frontpanelen
1. Sätt dit frontpanelen med den
högra sidan först med pilen A
mot pilen B enligt figuren.
2. Tryck försiktigt på frontpanelens
vänstra sida tills ett ”klick” hörs.

17
SVENSKA
AMP
7 8
1
3 4
5
7 8
6
2 2
1
3 4
5 6
Antenningång
20-stiftskontakt
VitRöd
Lågnivåkabel
RCA/RCA
(medföljer ej)
ISO-anslutning
ISO-anslutning
4 stift + 8 stift
BA
Antennkabel
Anslutningar
Bilstereoapparaten har följande anslutningar: Antenningång, snabbkoppling ISO,
1 st RCA lågnivåutgång.
Stift Kabelfärg Kopplas till
A4 Gul +12 Volt kontinuerligt
A5 Blå Motorantenn
A7 Röd + 12 Volt via tändning
A8 Svart (-) Jord
B1 Lila Höger bakre högtalare (+)
B2 Lila med svart rand Höger bakre högtalare (-)
B3 Grå Höger främre högtalare (+)
B4 Grå med svart rand Höger främre högtalare (-)
B5 Vit Vänster främre högtalare (+)
B6 Vit med svart rand Vänster främre högtalare (-)
B7 Grön Vänster bakre högtalare (+)
B8 Grön med svart rand Vänster bakre högtalare (-)

18
SVENSKA
1611 12 13 714
9
15
3810452
Grundfunktioner
1. [] Panelspärr
Tryck på knappen för att lossa frontpanelen.
2. Strömbrytare
Av/På-knapp.
3. [DISP] Display
Tryck för att ändra visning i displayen: Klocka > Programtyp PTY > Frekvens.
4. [MODE] Funktionsväljare
Tryck för att välja funktion: Radio > CD/MP3 > USB/SD.
5. Volymratt/Equalizer
- Vrid för att justera ljudvolymen.
- Tryck för att välja ljudinställningar: VOL > BAS > TRB > BAL > FAD.
- Välj ljudinställning och justera genom att vrida volymratten. Tryck på
volymratten för att bekräfta.
6. [BAND/LD/ENTER] Minnesbank/Basförstärkning
- Tryck för att ändra minnesbank: FM1 > FM2 > FM3 > AM (MW) (i radioläget).
- Tryck och håll in för att slå på eller av ”Loudness” (basförstärkning).
7. Signalmätare
Visar styrkan på mottagen radiosignal (i radioläget).
8. [M1 – M6] Stationsminnen
Tryck på en minnesknapp för att snabbt ta fram den lagrade frekvensen.
Fler tända segment desto starkare mottagning.
Lagra frekvenser:
1. Välj önskad frekvens med frekvensväljaren [9].
2. Tryck och håll in önskad minnesknapp i ca 2 sekunder för att lagra frekvensen.
9. [] Byt spår/Sök frekvens
- Tryck för att automatiskt söka station.
- Tryck och håll in för att välja manuell sökning. Tryck sedan upprepade gånger
för att välja frekvens upp/nedåt.

19
SVENSKA
10. [AS/PS] Automatisk stationslagring
Tryck och håll in för att automatiskt söka och lagra funna stationer i stationsmin-
net.
11. [AF] Alternativ frekvens
Visar alla hörbara FM-stationer som sänder samma information. Radion byter
automatiskt om till den starkaste sändaren.
- Tryck för att slå på eller av AF-läget. ”AF” visas i displayen när funktionen
är aktiverad.
12. [TA] Trafikmeddelande
Tryck för att slå på eller av funktionen. ”TA” visas i displayen när funktionen
är aktiverad.
När funktionen är aktiverad och ett trafikmeddelande sänds ut händer följande:
- Vid uppspelning av cd/MP3 växlar enheten automatiskt till radiomottagning.
- Om volymen är låg, höjs den så att meddelandet hörs.
Tryck på [TA] länge för att växla mellan TA-lokal (endast starka stationer) eller TA-
distans (även svagare stationer). Inställt läge visas på displayen: EON TA LOCAL
eller EAN TA DISTANCE.
Obs! Om TA är aktiverat stannar den automatiska stationssökningen endast på
stationer som sänder RDS.
13. [PTY] Programtyp
Koder för olika typer av program som gör det möjligt att söka önskad information.
Tryck upprepade gånger för att välja läge: PTY Music Group > PTY Speech
Group > PTY Off.
Aktuell PTY-kod visas på displayen.
- Tryck på någon av knapparna M1 till M6 för att välja bland de olika
PTY-koderna:
Knapp Musiktyp Programtyp
M1 Pop, Rock Nyheter, information
M2 Populärmusik Sport, utbildning
M3 Klassisk Kultur
M4 Jazz, Country Väder, finans, barnprogram
M5 Nationell, äldre musik Religion, debatt
M6 Folkmusik Reseprogram
När du valt PTY-kod söker radion igenom frekvensbandet för att försöka hitta en
station som har matchande program.
14. [ ] EJECT
Tryck för att ta ur cd-skivan.
15. [USB] – Anslutning för USB-minne
Fäll luckan nedåt och sätt i ett USB-minne.
16. Anslutning för SD/MMC-minneskort (bakom frontpanelen)
Tag loss frontpanelen och sätt i ett SD-kort i anslutningen.
17. RESET (återställningsknapp)
Återställer apparaten till fabriksinställningar. Knappen är placerad på bilstereon
bakom frontpanelen.

20
SVENSKA
Visning av den inbyggda klockan
Den inbyggda klockan styrs av radions RDS-mottagare och ställs automatiskt då en
radiostation som sänder RDS-information tas emot.
- Ställ in radiomottagaren på en kanal som sänder RDS-information (t.ex. Sveriges
Radios P3 eller P4). Är radiomottagningen god ställs klockan in automatiskt efter
några minuter.
- Tryck upprepade gånger på DISP [3] för att visa klockan i displayen.
Användning
CD-uppspelning
1. Sätt i en cd-skiva i cd-facket med etiketten vänd uppåt.
2. Uppspelningen startar automatiskt från det första spåret.
3. Tryck kort på eller [9] för att välja föregående eller nästa spår.
Tryck och håll eller in för att snabbspola bakåt eller framåt i spåret.
4. Använd funktionsknapparna M1 till M6 [8] för att styra uppspelningen:
a. [1 /] PAUS – Tryck för att pausa uppspelningen.
b. [2 SCN] SCAN – Tryck för att spela upp de 10 första sekunderna på alla spår.
c. [3 RPT] REPEAT – Repetition av samtliga spår.
d. [4 SHF] SHUFFLE – Tryck för att välja slumpvis uppspelning.
5. Tryck på [14] om du vill ta ur cd-skivan.
MP3-uppspelning från CD-skiva
1. Sätt i en cd-skiva innehållande MP3-ler i cd-facket med etiketten vänd uppåt.
2. Displayen visar en kort stund ”READING” och sedan ” MP3 T01” innan uppspel-
ningen startar automatiskt från den första filen.
3. Tryck på knapparna [5 DN] eller [6 UP] för att välja önskad mapp på cd-skivan.
4. Tryck kort på eller [9] för att välja föregående eller nästa spår. Tryck och håll
eller in för att snabbspola bakåt eller framåt i spåret.
5. Använd funktionsknapparna M1 till M6 [8] för att styra uppspelningen:
a. [1 /] PAUS – Tryck för att pausa uppspelningen.
b. [2 SCN] SCAN – Tryck för att spela upp de 10 första sekunderna på alla spår.
c. [3 RPT] REPEAT – Repetition av samtliga spår.
d. [4 SHF] SHUFFLE – Tryck för att välja slumpvis uppspelning.
6. Tryck upprepade gånger på knappen DISP [3] för att visa MP3-informationen*,
s.k. ID3-TAG, i följande ordning: TITEL > ARTIST > ALBUMNAMN.
* Krävs att information finns sparad på filen.
7. Tryck på [14] om du vill ta ur cd-skivan.
Table of contents
Languages:
Other Clas Ohlson Car Stereo System manuals
Popular Car Stereo System manuals by other brands

JL Audio
JL Audio Stealthbox SB-GM-AVAL/12TW3 installation guide

Lanzar
Lanzar VBD 1400 owner's manual

Audiovox
Audiovox Jensen Phase Linear UMP8015 owner's manual

Caliber
Caliber RMD 210 instruction manual

Sony
Sony XM-ZR604 - AMPLIFIER 4 CHANNEL operating instructions

AudioBahn
AudioBahn ADD51T operating instructions