Clavitech GDP-1100 User manual


1) Read these instructions.
2) Keep these instructions.
3) Heed all warnings.
4) Follow all instructions.
5) Do not use this apparatus near water.
6) Clean only with dry cloth.
7) Do not block any ventilation openings,install in accordance with the manufacturer s instructions.
8) Do not install near any heat sources such as radiators, heat registers,stoves,or other apparatus (including am
plifiers) that produce heat.
9) Do not defeat the safety purpose of the polarized or grounding-type plug.A polarized plug hase two blades
with one wider than the other.A grounding type plug has two blades and a third grounding prong.The wide blade
or the third prong are provided for your safety,if the provided plug does not fit into your outlet.consult an elec
trician for replacement of the obsolete outlet.
10) Protect the power cord from being walked on or pinched particularly at plugs.convenience receptacles,and
the point where they exit from the apparatus.
11) Only use attachments/accessories specified by the manufacturer.
12) Use only with the cart,stand,tripod,bracket,or table specified by the manufacturer,or sold with the
apparatus.When a cart is used,use caution when moving the cart/apparatus combination to avoid injury from
tip-over (Figure 1).
13) Unplug this apparatus during lightning storms or when unused for a long periods fo time.
14) Refer all servicing to qualified service personnel.Servicing is required when the apparatus has been dam
aged in any way,such as power-supply cord or plug is damaged,liquid has been spilled or objects have fallen
into the apparatus,the apparatus has been exposed to rain or moisture,does not operate normally,or has been
dropped.
WARNING:To reduce the risk of fire or electric shock,do not expose this apparatus to rain or
moisture.
CAUTION:Apparatus shall not be exposed to dripping or splashing and no objects filled with
liquids,such as vases,shall be placed on the apparatus.
(Figure 1)
Thank you forpurchasing this digitalinstrument.For perfect operation andsecurity,please
read the manualcarefully and keepit for futurereference.
Precaution
Safety Precautions
Important Safety Instructions
RISK OF ELECTRIC SHOCK
DO NOT OPEN
CAUTION
The lightning flashwith arrowhead symbolwithin an equilateraltriangle is in
tended to alertthe user tothe presence ofuninsulated dangerous voltage
within the products enclosure thatmay be ofsufficient magnitude toconstitute a
risk of electricshock to persons.
The exclamation pointwithin an equilateraltriangle is intendedto alert theuser
to the presenceof important operatingand maintenance(servicing) instructionsin
the literature accompanyingthe product.

Your digital pianois a high-qualitydigital piano with88 standard
touch sensitivity keyboardand combines themost advanced PCM
tone generation technology. This digitalpiano lets yourecord your
performances and Registration settingsto a USBDisk. Each user
song lets you recordup to sixteenindependent tracks. In orderto
obtain maximum performance andenjoyment, please read this
manual thoroughly while tryingout the various featuresdescribed.
Thanks For Using Our Digital Piano

Contents
................................ 3
4
4
4
4
6
6
7
8
8
8
8
10
10
10
11
12
13
14
14
15
16
17
17
18
18
18
19
19
19
20
20
20
21
21
22
Panel Control
Connectors
Using AC Power Jack
Basic Operation
Auto Accompaniment
Selecting a Style
Start a Style
Synchro Start
Starting the Accompaniment with an
Introduction
Adding Fill In
Stopping the Accompaniment
Adjusting theAccompaniment Volume
Variation
One Touch Setting
Harmony
Chord Function
Using Headphones
Using Foot Pedals
Using MIDI IN/OUT Jack
Using Line IN/OUT Jack
Using USB-MIDI
Power Switch
Adjust the Volume
Demo Play
Voice
Selecting a Voice
Dual Mode
Split Mode
Playing Portable Grand Piano
Adjusting Keyboard Volume
Effect
Digital Effect
Touch Button
Transpose
Octave Mode
Twin Mode
....................................
...................
.......................
.......................
............
.............
........................
............................
..............................
........................
..................................
..............................................
..........................
...................................
...................................
.......
.........
............................................
...............................
...............................
....................................
...............................
..................................
...................
..........................
..................................
...............................
.................................
.......
.....................................................
......................................
1
..............................
........................
......................................
............................
22
22
23
23
25
26
26
27
27
28
28
30
30
31
32
32
33
33
34
34
35
35
37
40
41
41
41
42
43
43
45
46
47
48
49
50
Full Keyboard
Tap/Tempo
Metronome
User Style
Function
Pan
Reverb and Chorus Depth
Master Tune
Midi In
Midi Out
Local On/ff
Auto Track
Play Mode
Style
Registration Memory
Song Recording
Factory Set
Appendix
AutoAccompanimentFingering
Voice List
Style List
Percussion Voice List
MIDI Implementation Chart
Specifications
Memorizing the Settings
Recalling the Settings
Saving the Registration Data to USB
Disk
Use Registration Data from USB
Delete REG File from USB
Quick Recording
Multi Track Recording
Delete Song
File Button
Filter Button
Adjusting Song's Volume
Assembly Instructions
..................................
..................................
...................................
.............................................
............
................................
........................................
.....................................
.................................
..................................
...........................................
....................
..............
............................................
.........................
..........
............................
.........................
.............
...................................
......................................
....................................
.................
.................................
..................................
................................
...................................................
....................................
...................
.........
...................................
.............................
......................................
...................
......
.............................
.................

2
Rear Panel
MASTERVOLUME
MIN MAX
LOW HIGH
BASS
TREBLE
POWER
ON
OFF CHORD SYNCHRO
TAP/TEMPO METRONOME
INTRO/ENDING START/STOP FILLIN
ACCOMP. O.T.S.
VARIATION
KB.VOL TRANSPOSE
SPLIT DUAL HARMONY FULLKEYBOARD TWIN
MULTI DISPLAY
ENTER
FUNCTION VOICE/STYLE
GRAND PIANO
1 2 3 4 5 +
6 7 8 9 0
-
STORE/BANK
FILE
M1 M2 M3 M4 M5 SAVE
RECORD PLAY/LOAD TRACK FILTER USB VOLUME
REVERB
TOUCH
CHORUS
DEMO
OCTAVE
ACCOMPANIMENT CONTROL KEYBOARD CONTROL VOICE/STYLE SELECTION USB FUCTION
MULTI DELETE
CHORD SYNCHRO
TAP/TEMPO METRONOME
INTRO/ENDING START/STOP FILL IN
ACCOMP. O.T.S.
VARIATION
KB.VOL TRANSPOSE
SPLIT DUAL HARMONY FULL KEYBOARD TWIN
OCTAVE
ACCOMPANIMENT CONTROL KEYBOARD CONTROL
ENTER
FUNCTION VOICE/STYLE
GRAND PIANO
1 2 3 4 5 +
6 7 8 9 0
-
STORE/BANK
FILE
M1 M2 M3 M4 M5 SAVE
RECORD PLAY/LOAD TRACK FILTER USB VOLUME
REVERB
TOUCH
CHORUS
DEMO
VOICE/STYLE SELECTION USB FUCTION
MULTI DELETE
21
17 18 19 20
16
LINE OUTLINE OUT
LINE INLINE IN PEDALPEDAL
USBUSB
MIDI INMIDI IN MIDI OUTMIDI OUTPHONES1PHONES1 PHONES2PHONES2
CAUTION
AC POWER
1234
56
7
8910
11 12
13 14
Top Panel
15

Panel Contents
1. POWER ON/OFF
2. MASTER VOLUME fader
3.
4. MULTI DISPLAY
5. ACCOMPANIMENT CONTROL
[ ACCOMP. ] button
[TAP/TEMPO] button
[METRONOME] button
[O.T.S] button
[CHORD] button
[SYNCHRO] button
[INTRO/ENDING] button
[START/STOP] button
[FILL IN] button
[VARIATION] button
6. KEYBOARD CONTROL
[ OCTAVE ] button
[ KB.VOL ] button
[ TRANSPOSE ] button
[SPILT] button
[DUAL] button
[HARMONY] button
[FULL KEYBOARD] button
[TWIN] button
7. [FUNCTION] button
8. [ENTER] button
9. VOICE/STYLE SELECTION
[VOICE/STYLE] button
[GRAND PIANO] button
Number Buttons [0]-[9]
[+] and [-] Buttons
BRIGHTNESS fader
10. USBFUNCTION
[STORE/BANK] button
[M1]-[M5] buttons
[SAVE] button
[FILE] button
[RECORD] button
[PLAY/LOAD] button
[TRACK] button
[FILTER] button
[USB VOLUME]button
11.[REVERB] button
12. [CHORUS]button
13. [TOUCH]button
14. [DEMO]button
15. USB
RearPanel
16. [PHONES1]Jack
[PHONES2] Jack
17. [LINEOUT] Jack
[LINEIN] Jack
18. [USB]Jack
19. [PEDAL]Jack
20. [MIDIOUT] Jack
[MIDI IN]Jack
21. [POWER]Jack
3
Connectors
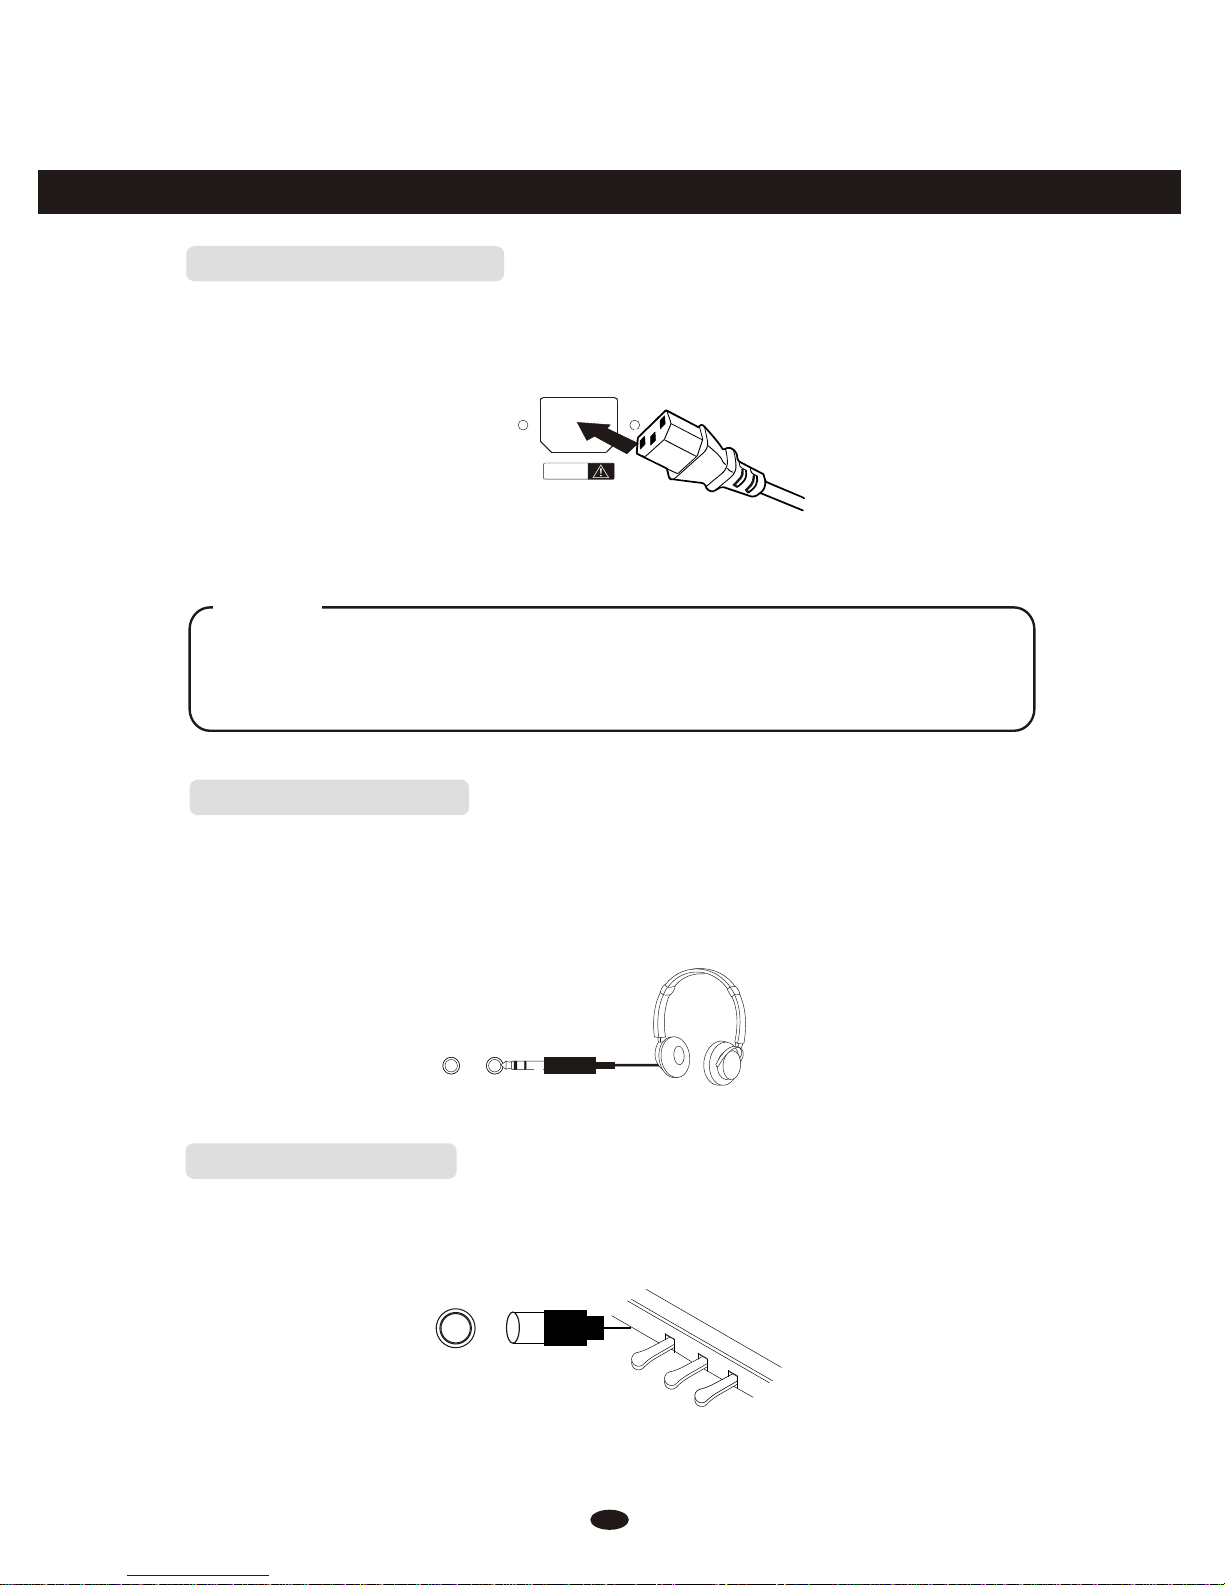
UsingAC Power Jack
Connect the power cableto theAC power jack onthe rear panel ofthe piano
body.
Plug the power cableinto anAC power outlet.
Using Headphones
Caution
1.Ensure the pianois turned offwhen connecting and disconnecting the power.
2.Turn thevolume switch to reachthe minimum level beforeturning on
the power
Twosets of standard stereoheadphones can be pluggedin here for private
practice or late-night playing.The internal speakersystem is automatically shut
off when apair of headphones isplugged into PHONES jacks.
PHONES 2PHONES 1
4
CAUTIONCAUTION
AC POWERAC POWER
Using Foot Pedals
Connect the plug ofthe foot pedal unitto the pedal jackon the rear panel.
2. Sostenuto Pedal (Center)
If you play anote or chord onthe keyboard and pressthe sostenuto pedal while
the notes are held,those notes will besustained as long asthe pedal is held,but
all subsequently played noteswill not be sustained.
SOSTENUTO
It performs the samefunction as the damperpedal on an actualacoustic piano,
letting you sustain thesound of the voiceseven after releasing your fingers from
the keys.
SUSTAIN
1. DamperPedal (Right)
5
3. Soft Pedal (Left)
The Soft Pedal controlsthe sound volume. Pressthe pedal to decreasethe
output sound volume.
SOFT

NOTE
Using MIDI IN/OUTJack
MIDI (Musical Instrument DigitalInterface) is a world-standardcommunica-
tion interface which allowselectronic musical instruments tocommunicate with
each other,by sending and receivingcompatible note, program changeand other
types of MIDI data.
MIDI IN Receives MIDIdata from another MIDIdevice.
MIDI OUT TransmitsMIDI data to anotherMIDI device.
MIDI OUT MIDI IN
MIDI IN MIDI OUT
6
Using LineIN/OUT Jack
The audio output fromother sound system connectedto the LINE INjack on
the rear panel canbe mixed with thesound of the unit.This function isconvenient
when you want toplay along with afavourite song.
LINE IN
Stereo
System
The Line out jackcan be used todeliver the output ofthe piano to akeyboard
amplifier, stereosound system, mixing consoleor tape recorder.
LINE OUT
Stereo
System
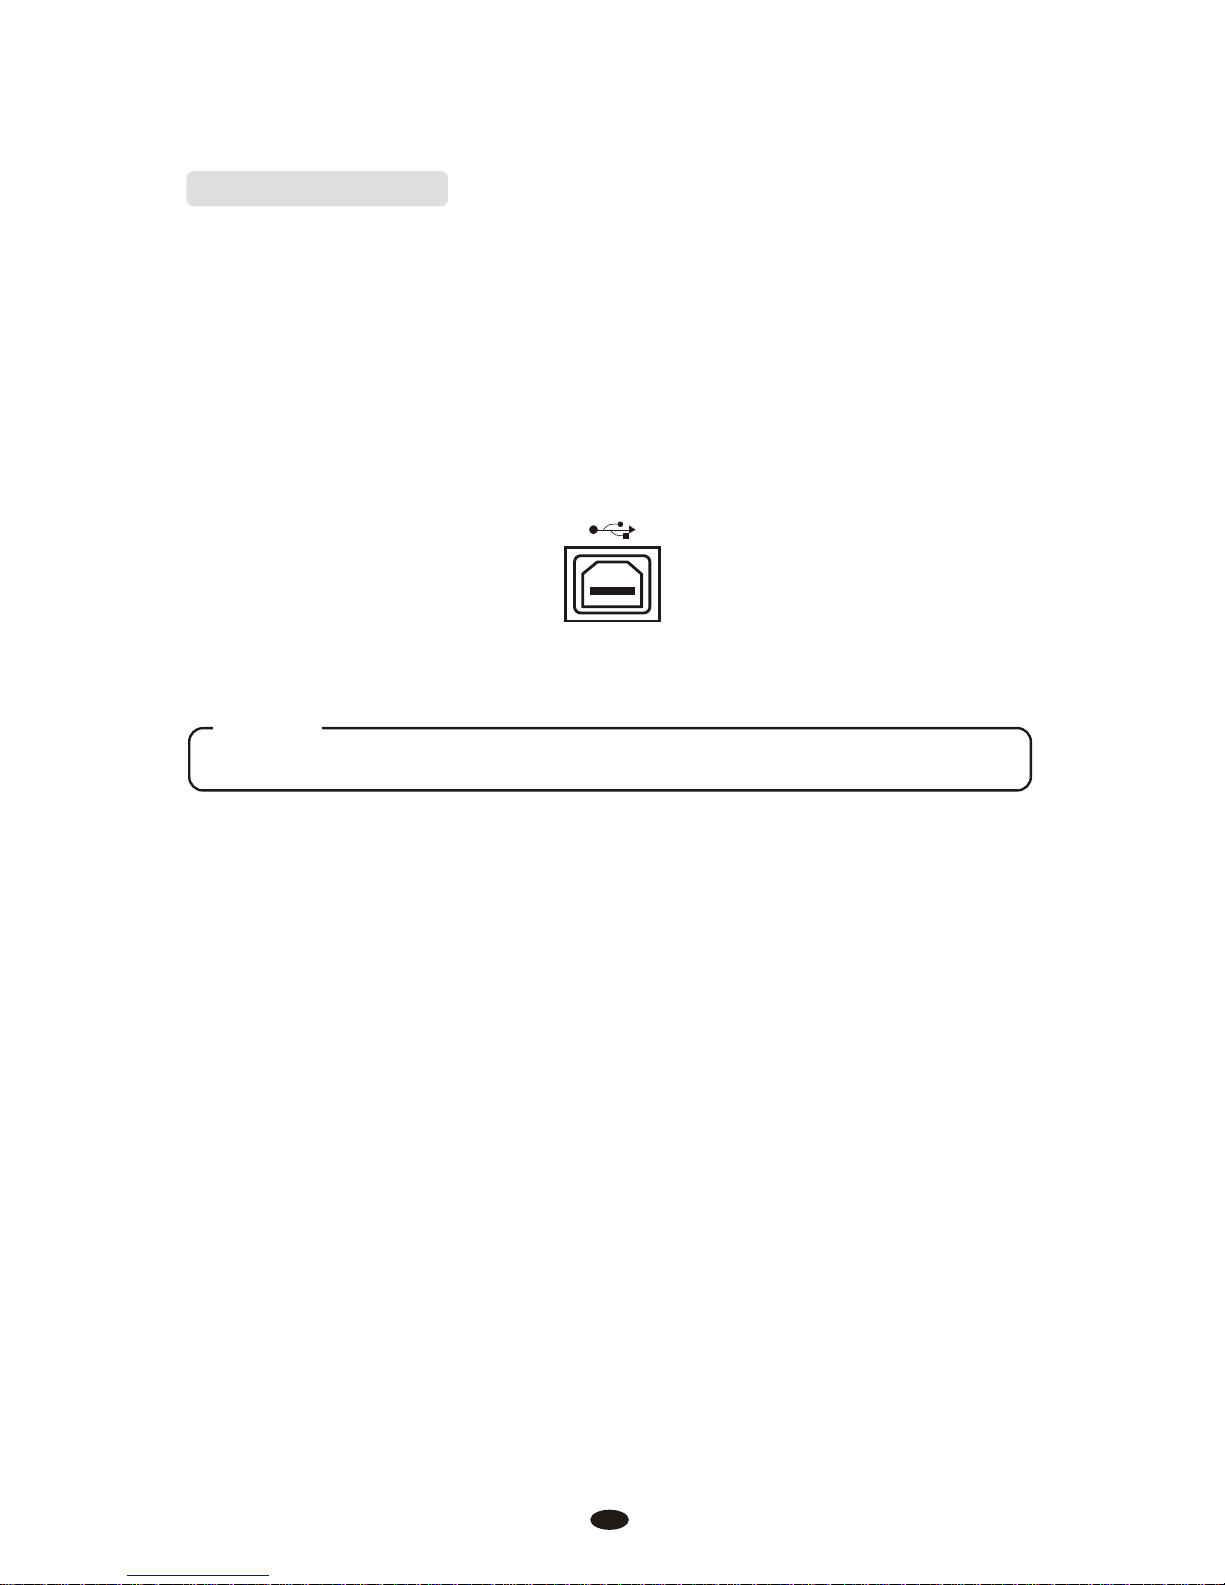
Using USB-MIDI
This product allows thetransfer of MIDI overUSB. There isa specific way in
which the MIDI signals arerouted for maximum flexibility. In a standardDigital
Piano, the built-in keyboardsends MIDI signals tothe internal sound bankas
well as the 5-pinMIDI output.
In this digital piano,the keyboard not nolysends MIDI to theinternal sound
bank (just like normal)but also sends MIDIsimultaneously to the internalMIDI
connection which hooks upinside the device tothe AudioInterface.
It is theAudio Interface that controlsthe USB-MIDI.
7
USBUSB
USB DISK Can notbe used while usingUSB-MIDI Function
NOTE
Basic Operation
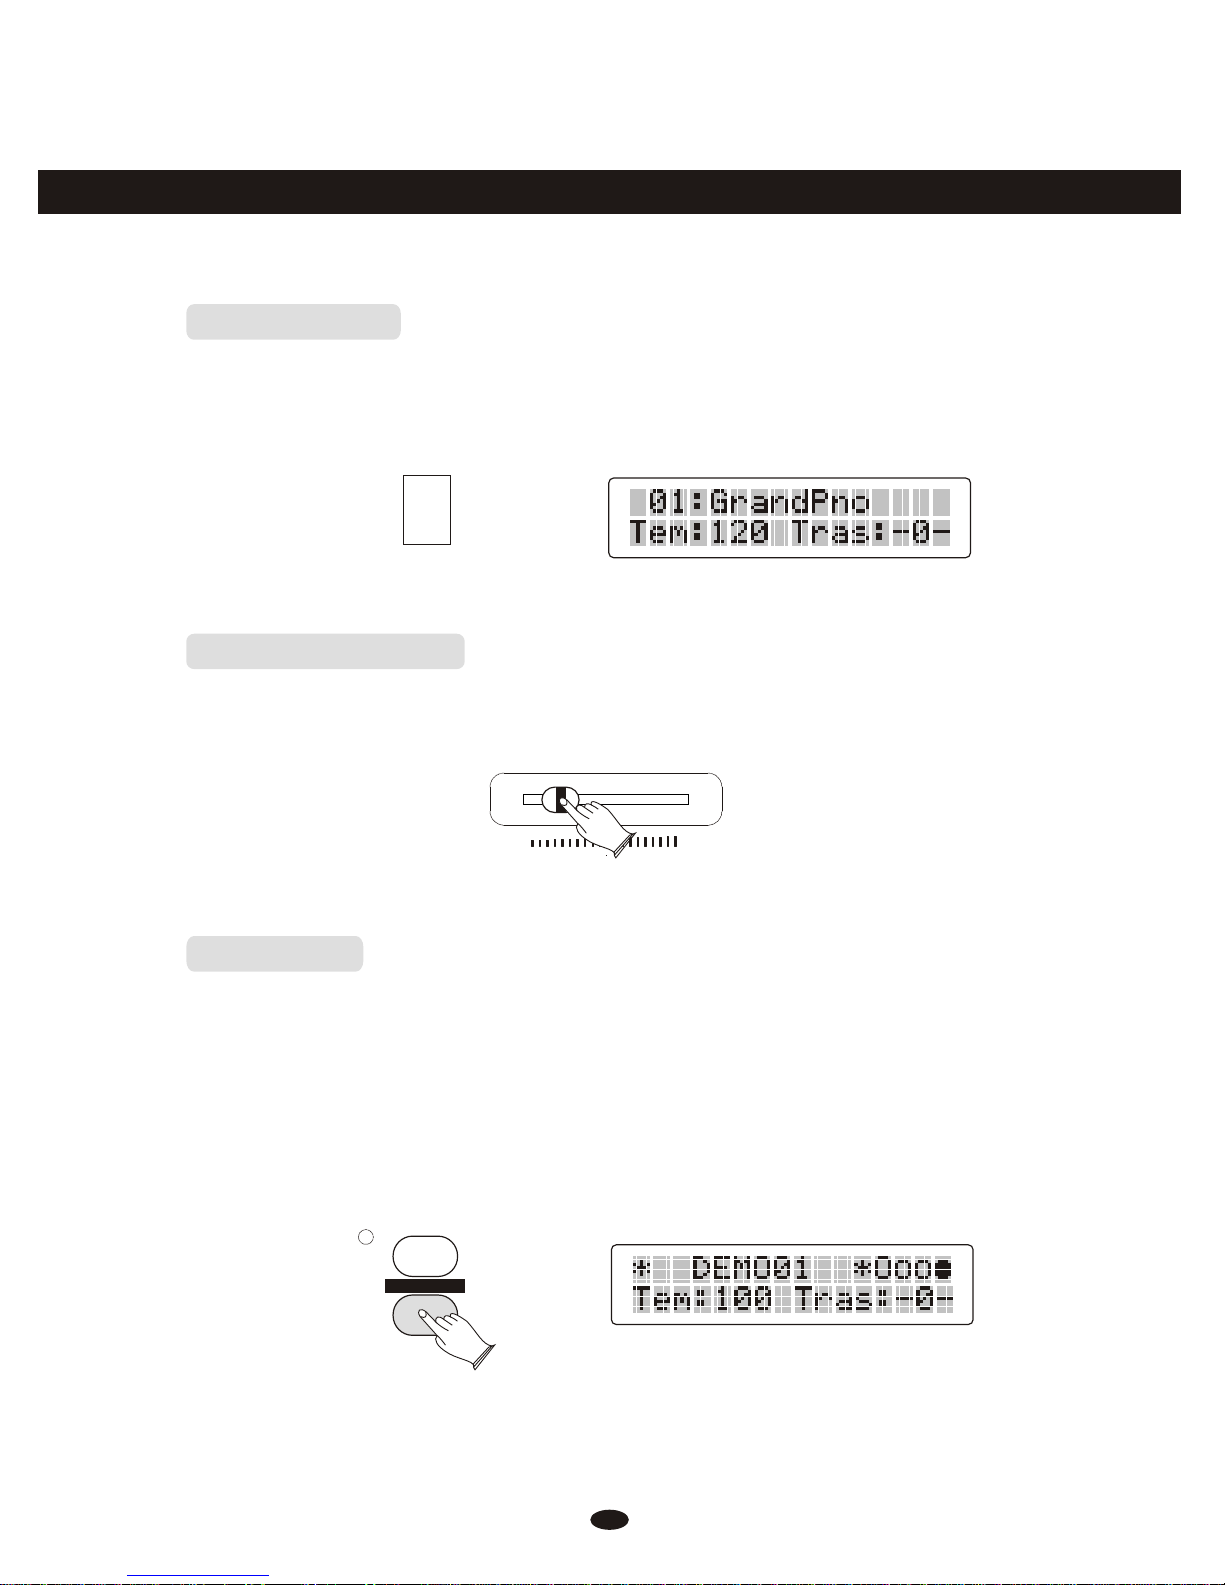
Power Switch
Adjust the Volume
Turn thepower on by pressingthe [POWER] switch, thepanel LCD display
will light.
Use [MASTER VOLUME]control to adjust thevolume to your desiredlevel.
Demo Play
There are 6 presetpiano songs that youcan play individually. Here's how you
can select and playthe demo songs .
1. Listen to theDemo Song
Press [DEMO] button toplay the demo songsin sequence. Use [+]and [-]
button or number [1-6]to select the numberof the song youwant to play.
8
ON
OFF
POWER
MASTER VOLUMEMASTER VOLUME
MINMIN MAXMAX
CHORUSCHORUS
DEMODEMO

2. Stop Playing
Press [DEMO] button againto stop playing.
3.Adjusting the sound
The [TREBLE] fader can be used to adjust the sound of the piano. If the TREBLE
fader is pushed to the far left the high frequency of the sound will be decreased,
if it is pushed to the right, the high frequency will be increased. Pushing the [BASS]
fader to the left will decrease the bass frequency while turning it to the right will
increase the bass frequency.
9
CHORUSCHORUS
DEMODEMO
LOWLOW HIGHHIGH
BASSBASS
TREBLETREBLE

Voice
Selecting aVoice
Your instrument has 128(01-128)GM standard voices. 10(129-138)different
drum percussion kits and1 set of soundeffect that youcan select and play.
When [VOICE/STYLE] button islit, the voice modeis selected and thecurrent
voice number and thename will display onthe LCD Display section.
Use [+] and [-]button or number buttons[0-9] to select thedesired voice
according to the voicelist.
VOICE/STYLEVOICE/STYLE
GRAND PIANOGRAND PIANO
1122334455++
6677889900
--
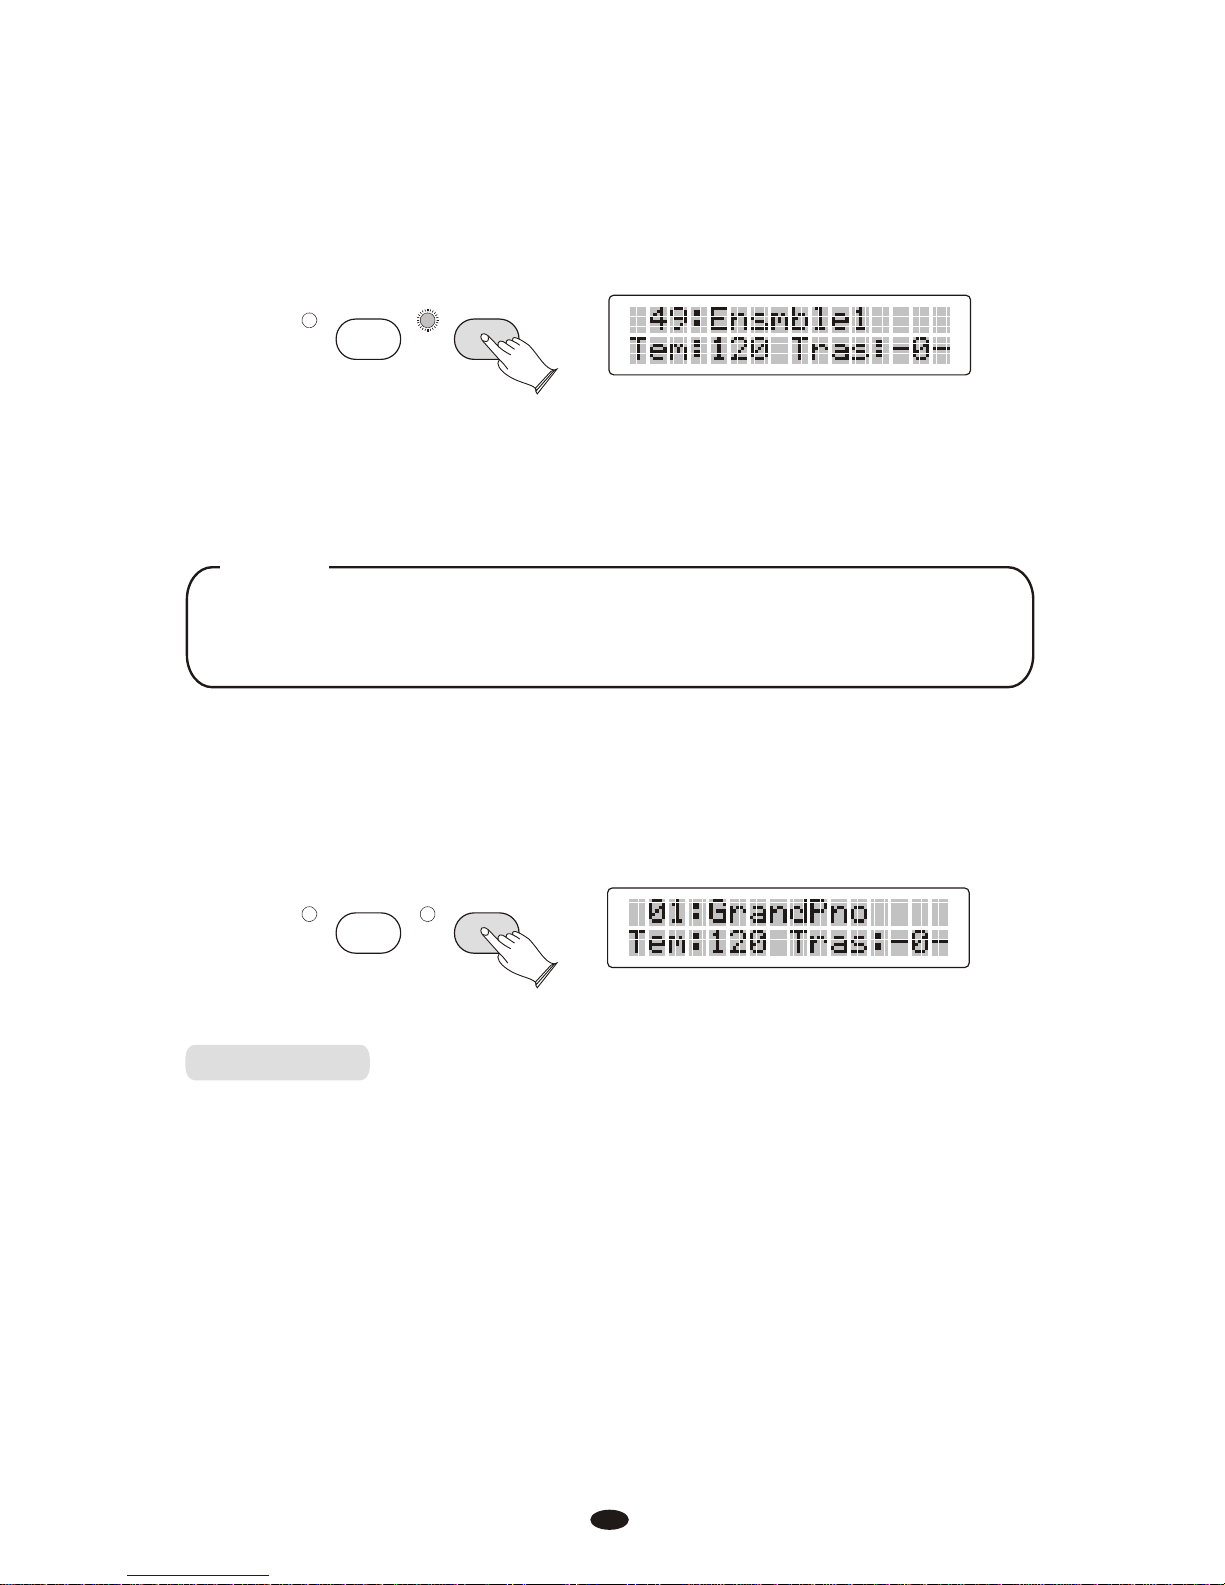
Dual Mode
Press [DUAL] button toselect layer voice mode,two voices will sound
simultaneously when you playkeyboards.
10
1. Select DualVoice
Press [DUAL] button , the Dual indicator is flashing, use the number [0]-[9] or [+]
and [-] button to select the second voice.
2. Setting the DualVoice Volume
3. Exitthe DualMode
Press [DUAL] again, theDual indicator turns off and the Dualmode is no
longer active.
SPLITSPLIT DUALDUAL
Reference: Adjusting Keyboard Volume(P.13).
To change the dualvoice Pan, Octave andReverb/Chorus Depth, please
see the details in[FUNCTION] section (P.26).
NOTE
SPLITSPLIT DUALDUAL
Split Mode
Press [SPLIT] button toselect split mode, yourkeyboard will be splitinto two
sections which means different voices canbe played with theleft and right hands
at the same time.
1. SelectSplit Voice
Press [SPLIT] button, the Split indicator isflashing, and use [0-9]buttons or [+]
and [-] button toselect the left voice.
11

SPLITSPLIT DUALDUAL
2. Changingthe SplitPoint
Hold down the [SPLIT]button for about 2second, then play anyof the keys on
the keyboard to selectthe split point.
3. Settingthe SplitVoice Volume
Reference:Adjusting KeyboardVolume(P.13).
4. Exitthe SplitMode
Press [SPLIT] again, theSplit indicator turns off and the Splitmode is no
longer active.
To change the splitvoice Pan, Octave andReverb/Chorus Depth, please
see the details in[FUNCTION] section (P.26).
NOTE
SPLITSPLIT DUALDUAL
Playing Portable GrandPiano
Press [GRAND PIANO] button.
This convenient functionlets you instantly callup the Grand Pianovoice.
VOICE/STYLEVOICE/STYLE
GRAND PIANOGRAND PIANO
12
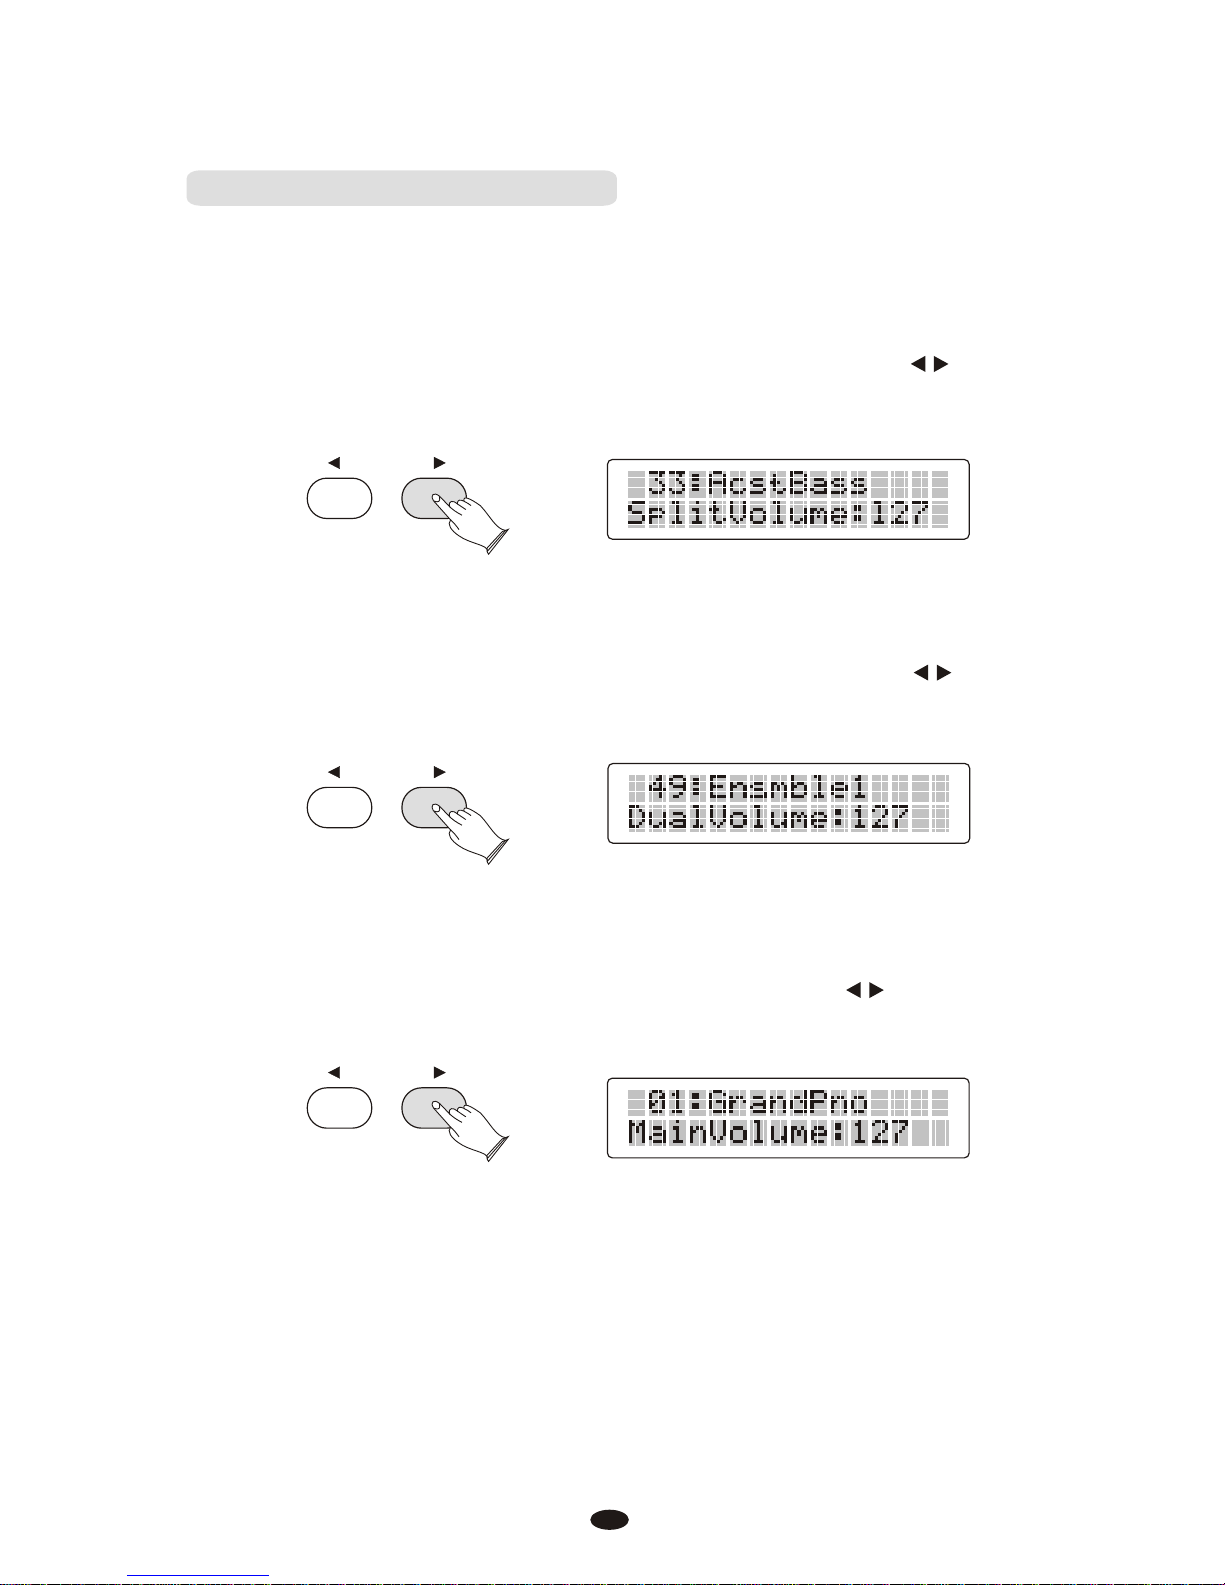
2. Dual Voice Volume
In Dual mode, whenthe Dual indicator isflashing, press [KB.VOL / ] button
can adjust the Dualvoice volume, while thedual indicator is lit.
3. Main Voice Volume
You can adjust themain voice volume bypressing [KB.VOL / ] button when
the dual or splitCursor does not flash.
Adjusting KeyboardVolume
Use this function canadjust the SplitVoice Volume, Dual Voice Volume and
the Main Voice Volume.
1. Split Voice Volume
In Split mode, whenthe Split indicator isflashing, press [KB.VOL / ] button
can adjust the splitvoice volume, while thespilt indicator is lit.
KB.VOLKB.VOL
KB.VOLKB.VOL
KB.VOLKB.VOL
13
Effect
Digital Effect
This function allows youto perform the overallsound in a realisticstyle.
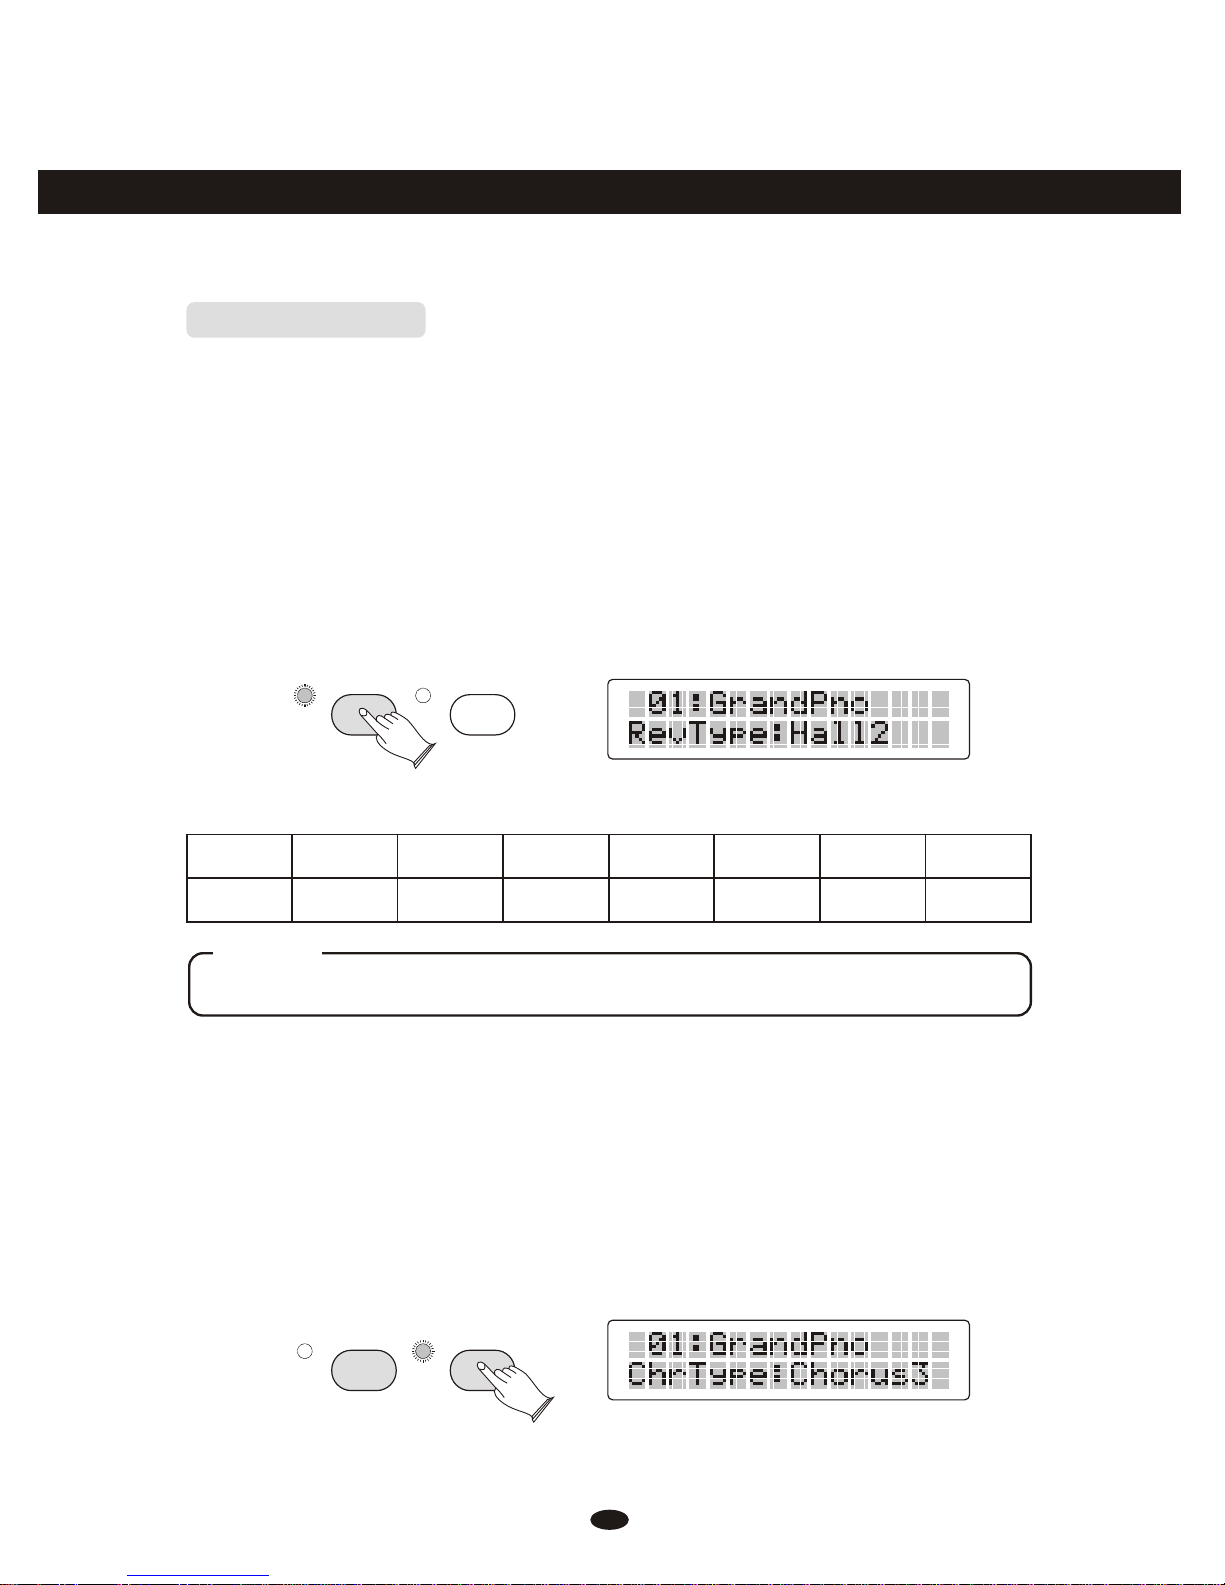
1. Reverb
The [REVERB] button selectsa number of digitalreverb effects thatyou can
use for extra depthand expressive power.
Press [REVERB] button canturn off orturn on the reverbeffect.
Press [REVERB] button, use numberbutton or [+] and[-] button to selectreverb type.
No reverb is producedwhen you select OFFRev Off .Default type: Hall2
1 2 3 4 5 6 7 8
Room1 Room2 Room3 Hall1 Hall2 Plate Delay PanDelay
Press [REVERB] button repeatedlyto turn on orturn off thereverb effect.
NOTE
REVERBREVERB CHORUSCHORUS
Adjusting ReverbDepth
Reference: Reverb andChorus Depth(P.26).
The reverb types inthe list below canbe selected from thereverb display.
14
2.Chorus
Shimmering, broadening effect.Press [CHORUS] button, use[+] and [-]
button to select chorustype. No chorus isproduced when you select'OFF', and
the indicator is off.
REVERBREVERB CHORUSCHORUS

The chorus types inthe list below canbe selected from thechorus display.
1 2 3 4 5 6 7 8
Chorus1 Chorus2 Chorus3 Chorus4 Feedback Flanger ShtDelay FbDelay
Press [CHORUS] button repeatedlyto turn on orturn off thechorus effect.
NOTE
Adjusting Chorus Depth
Reference:Reverb andChorus Depth(P.26).
Touch Button
The touch function providesfour different typesof keyboard touch sensitivity
that can be selectedto match differentplaying styles.
Press the [TOUCH]button, use [+] and[-] button to selectthe touch sensitivity
type .
15
TOUCHTOUCH
No Name
00
01
02
03
Fixed
Hard
Normal
Soft
Means that regardless of howhard you play, the keyboard will transmita velocity
value of 100.
is defined as a curvewhich makes it easier toplay quietly.The curve generates
lower velocities for the sameforce
is defined as a curvewhich will be mid-way betweenthe other two.
is defined as a curvewhich makes it easier toplay loudly.The curve generates
higher velocities for the sameforce.
Description

16
Setting Fixed Touch Value
Hold down [TOUCH]button, LCD will display:TouchFixed:100.
TOUCHTOUCH
Use [+] and [-] button or [0-9] number buttons to select the touch sensitivity defaul
value .
1122334455++
6677889900
--
When touch is selecting, press [+] and [-] button simultaneously to reset the touch
to default value (100).
Transpose
The Transposefunction allows you tochange the pitch ofthe instrument in
semitone steps, up toa maximum setting of12 semitones (a maximumof one
octave up or down).
Use [TRANSPOSE / ]button to transpose upor down as required.The
transposition range is from -12 (down one octave) through 0 (normal
pitch) to 12 (up one octave).
TRANSPOSETRANSPOSE
TRANSPOSETRANSPOSE
Table of contents
Other Clavitech Musical Instrument manuals


