Clear One BMA 360 User manual

BMA 360
Quick-Start Guide
BMA 360
2QSG-0086-001v1.1 March 2021
Quick-Start Guide
© 2021 ClearOne, Inc. All rights reserved.
Information in this document is subject to change without notice.
Document: QSG-0086-001v1.1 March 2021
Important Safety Information
1. Read, follow, and keep all instructions.
2. Do not use these devices near water.
3. Clean only with dry cloth.
4. Do not block any ventilation openings. Install in accordance with manufacturer instructions.
5. Do not install near any heat sources such as radiators, heat registers, stoves, or other apparatus (including
amplifiers) that produce heat.
6. Do not defeat the safety purpose of the polarized or grounding-type plug. A polarized plug has two blades with one
wider than the other. A grounding type plug has two blades and a third grounding prong. The wide blade or the
third prong are provided for your safety. If the provided plug does not fit into your outlet, consult an electrician for
replacement of the obsolete outlet.
7. Protect the PoE injector’s power cord from being walked on or pinched particularly at plugs, convenience
receptacles, and the point where they exit from the apparatus.
8. Only use attachments/accessories specified by the manufacturer.
9. When a cart is used, use caution when moving the cart/apparatus combination to avoid injury from tip-over.
10. Unplug this apparatus during lightning storms or when unused for long periods of time.
11. Refer all servicing to qualified service personnel. Servicing is required when the apparatus has been damaged in
any way, such as power-supply cord or plug is damaged, liquid has been spilled or objects have fallen into the
apparatus, the apparatus has been exposed to rain or moisture, does not operate normally, or has been dropped.
12. Disconnect the apparatus from the AC mains with the mains plug. This plug shall remain readily operable.
13. Never push objects of any kind into this product through cabinet slots as they may touch dangerous voltage points
or short out parts that could result in fire or electric shock.
14. This product can interfere with electrical equipment such as tape recorders, TV sets, radios, computers and
microwave ovens if placed in close proximity.
15. Class 2 Wiring IS REQUIRED. Only qualified personnel should wire and install.
16. Underwriters Laboratories (UL) requires these safety notifications:
WARNING: TO
PREVENT FIRE
OR
ELECTRICAL
SHOCK
HAZARD, DO
NOT EXPOSE
THIS
PRODUCT TO
RAIN OR
MOISTURE
THE LIGHTING FLASH
AND ARROWHEAD
WITHIN THE TRIANGE IS
A WARNING SIGN
ALERTING YOU OF
DANGEROUS VOLTAGE
INSIDE THE PRODUCT.
THE EXCLAMATION POINT
WITHIN THE TRIANGLE IS A
WARNING SIGN ALERTING
YOU OF IMPORTANT
INSTRUCTIONS
ACCOMPANYING THE
PRODUCT.
CAUTION: TO REDUCE THE RISK OF ELECTRIC
SHOCK, DO NOT REMOVE COVER (OR BACK)
NO USER SERVICEABLE PARTS INSIDE. REFER
SERVICING TO QUALIFIED SERVICE PERSONNEL.
SEE MARKING ON BOTTOM/BACK OF PRODUCT
RISK OF ELECTRIC SHOCK DO
NOT OPEN
AVIS RISQUE DU CHOC ELECTRIQUE
- NE PAS OUVRIR
Use only in
non-tropical
locations.
Use only at
altitudes of
2000 meters
or less.
CAUTION
SALES AND INQUIRIES
Headquarters Headquarters Sales Tech Support
5225 Wiley Post Way Suite 500 Main: +1.801.975.7200 Tel: +1.801.975.7200 Tel: +1.801.974.3760

BMA 360
3QSG-0086-001v1.1 March 2021
Quick-Start Guide
Operating Requirements
System Power and Thermal
• Power Source: PoE injector
• Power Consumption:
• 100-240VAC, 50/60 Hz
• 23 Watt typical without speaker amp
• 55W at 1/3 power x 4 @ 1kHz
• Thermal: 270 BTU/hr at max power
• Operating Temperature: 14 °F/-10 °C to 104 °F/40 °C
ambient temperature.
System Part Number
BMA 360: 910-3200-208-U
BMA 360 INTERNATIONAL: 910-3200-208-I
Packing List
BMA 360
Inspect it carefully. If the shipment shows obvious signs of
damage, retain the original box and packing material for
inspection by the carrier. Contact the carrier immediately.
ClearOne is not responsible for product damage incurred
during shipment.
System Diagram
Three daisy-chained BMA 360 microphone arrays, with 2x30 W and 4x15 W speaker configurations, connected to a
CONVERGE Pro 2.
Note 1: International Version (Part
No. 910-3200-208-I) P-Link input
port is shown in the drawing. US
Version (Part No. 910-3200-208-U)
P-Link input is accessed through
a permanently connected CAT 6
pigtail cable that is terminated with
an RJ-45 receptacle.
BMA 360
4QSG-0086-001v1.1 March 2021
Quick-Start Guide
Connect Speakers
A good time to connect external speakers is before you mount the BMA 360 in the ceiling.
With speaker wire (not included), connect external speakers to the Phoenix Euroblock connectors.
Mount the BMA 360
Mount Options
• Dropped (suspended) ceiling
• Hard ceiling, both recessed and surface
• VESA
This quick-start guide provides instructions to mount the BMA 360 to a dropped ceiling. Information for optional
mounting is available at ClearOne’s Resource Library.
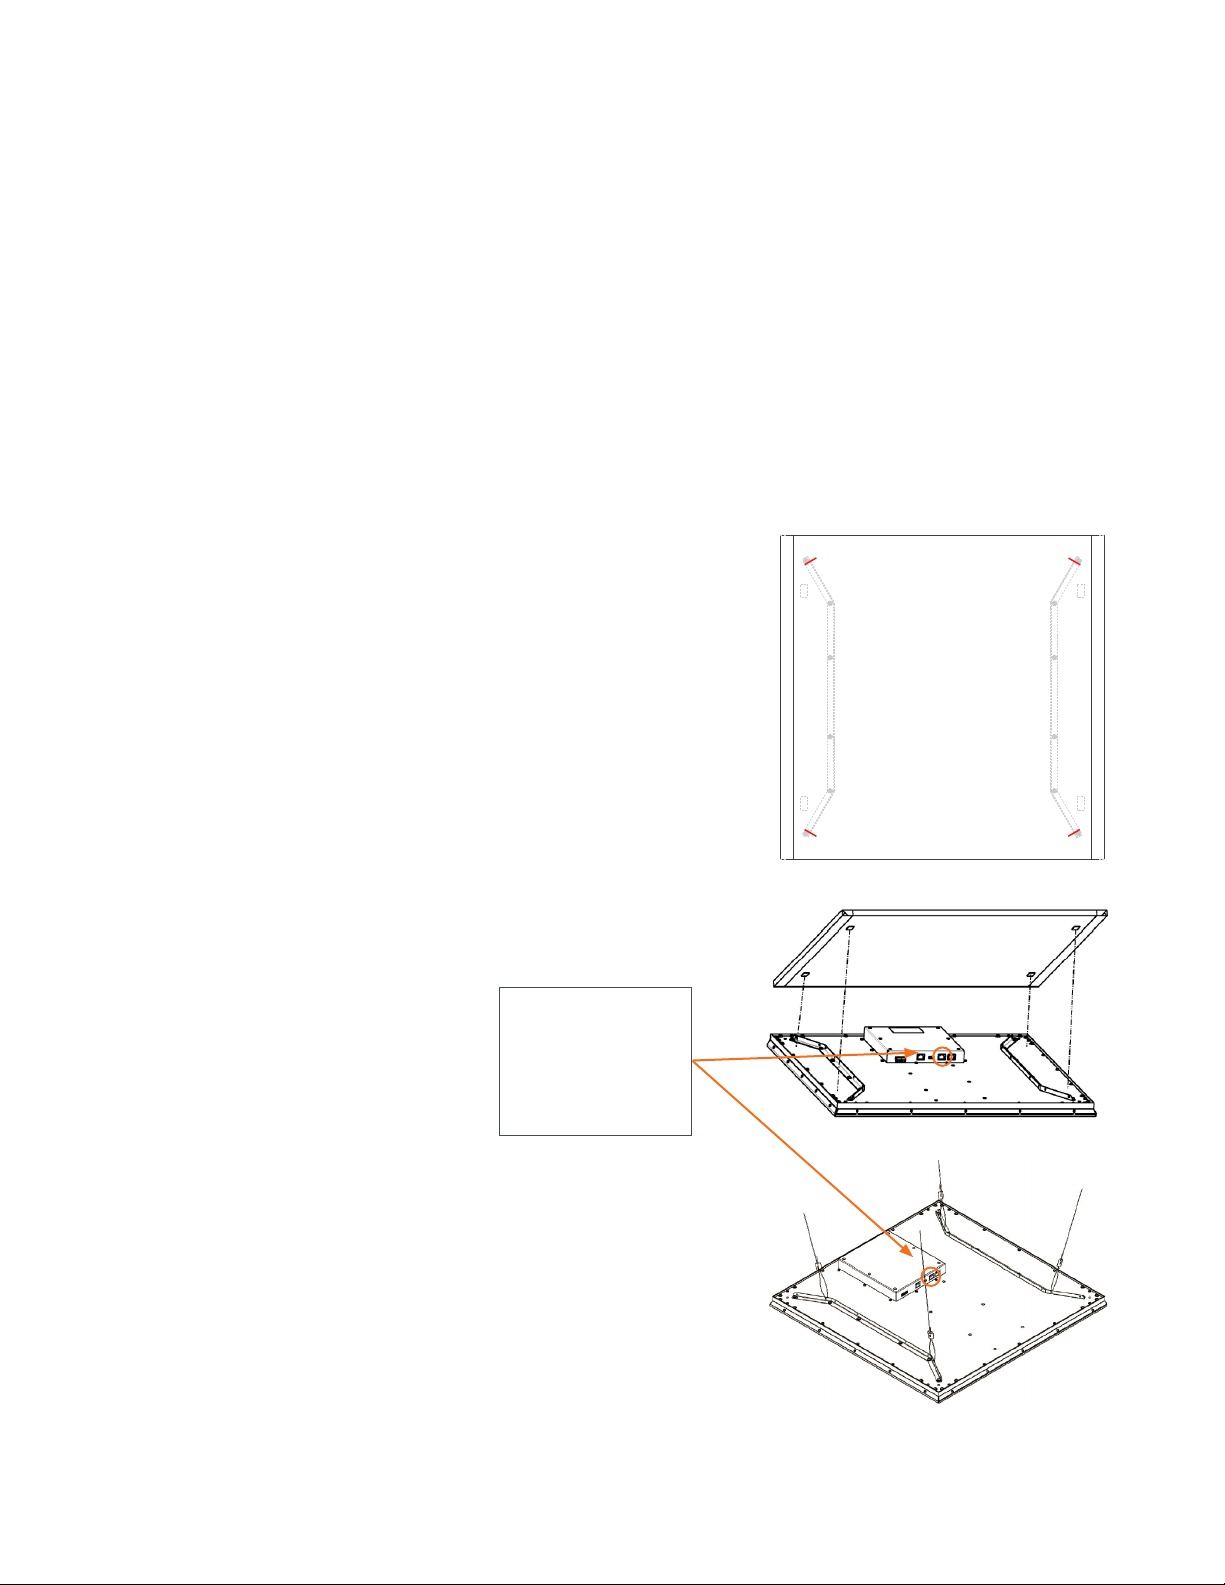
Dropped Ceiling Mount
ClearOne recommends the use of 1/8 inch seismic cables (not included) as described here. To install the plenum shield,
complete steps 1 & 2. If you do not plan to install the shield, start at step 3.
1. Cut four 1-inch slots in the shield at the indicated locations.
2. Remove the liner from the adhesive in four places on the underside of
the shield, then thread the cables through the cut slots.
3. Attach the cables to the BMA 360 at four points as shown.
4. Lift the BMA 360 into place and attach the cables to structure.
Note 1: International Version
(Part No. 910-3200-208-I)
P-Link input port is shown in
the drawings. US Version (Part
No. 910-3200-208-U) P-Link
input is accessed through a
permanently connected CAT 6
pigtail cable that is terminated
with an RJ-45 receptacle.
BMA 360
5QSG-0086-001v1.1 March 2021
Quick-Start Guide
Hard Ceiling
For hard ceilings, ClearOne offers both a recessed-mount kit and a surface mount kit. Installation information is available
in the following two guides:
• BMA Recessed-Mount Kit Installation Guide
• BMA Surface-Mount Kit Installation Guide
VESA
The BMA 360 incorporates a VESA-mount hole pattern that supports pole mounting.
Connect the BMA 360
Connect the BMA 360 to the CONVERGE Pro 2 unit via P-Link connections CAT6-23AWG solid core RJ45 cables.
Warning:
• Power over Ethernet (PoE) equipment used with a BMA 360 must meet the IEEE 802.3af, 802.3at or 802.3bt
standards.
• When speakers are connected, you must provide power via the PoE++ port on the BMA 360.
Important: Please note the following PoE requirements:
• No speakers: 36W PoE, connected via P-Link or PoE++
• Speakers: Requires 90W PoE or 70W PoE. Must be connected via direct PoE++ port on the BMA 360.
ClearOne recommends the following PoE power supply kits:
• 36W: ClearOne part number: 910-3200-202
• 70W: ClearOne part number: 910-3200-207
• 90W: ClearOne part number: 910-3200-209
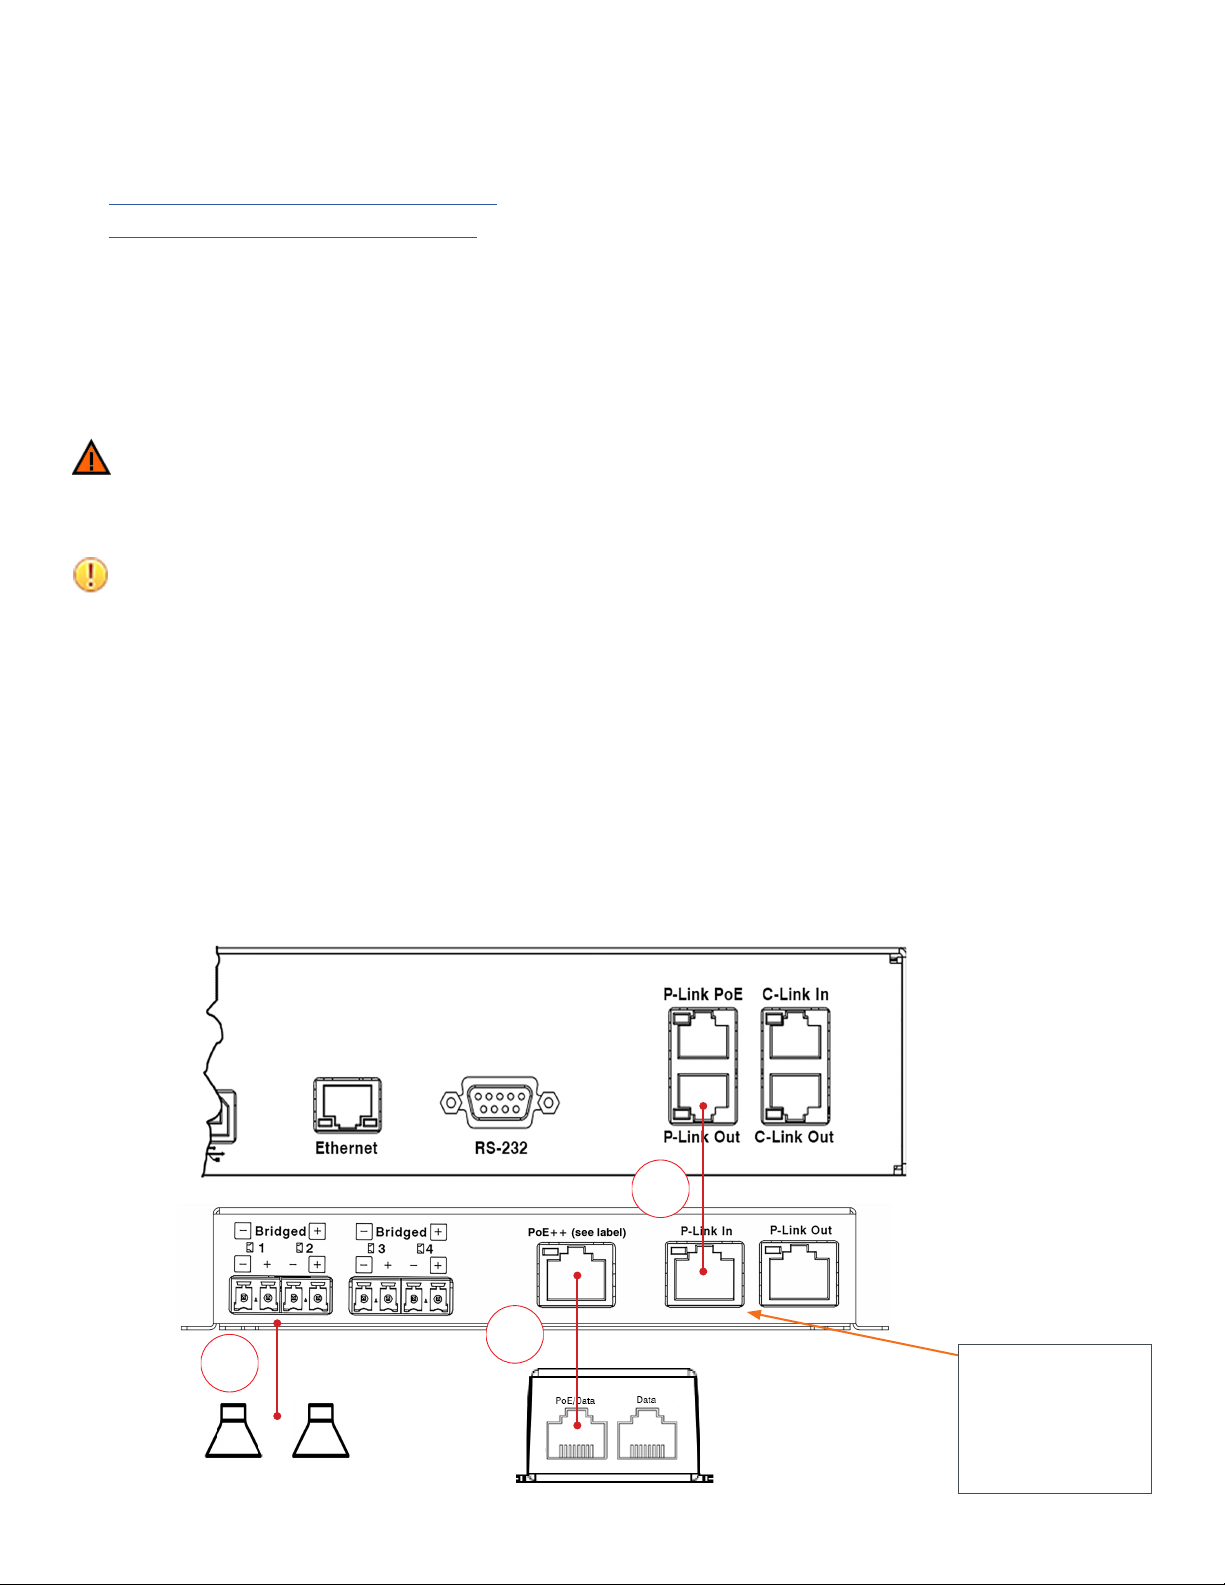
On the BMA 360 back plane, make the following connections:
1. If you have not already done so, connect the external speakers to the BMA 360.
2. With a CAT6 cable, connect the BMA 360 P-Link In connector to the CP2 P-Link Out connector.
3. With a CAT6 cable, connect the BMA 360 PoE++ connector to the PoE injector.
1
3
2
BMA 360
CP2
PoE Injector
Note 1: International Version
(Part No. 910-3200-208-I)
P-Link input port is shown in
the drawings. US Version (Part
No. 910-3200-208-U) P-Link
input is accessed through a
permanently connected CAT 6
pigtail cable that is terminated
with an RJ-45 receptacle.
Other manuals for BMA 360
1
Table of contents
Other Clear One Speakers manuals


Popular Speakers manuals by other brands


Cambridge Audio
Cambridge Audio Aero 9 installation guide

Logitech G
Logitech G G560 Setup guide

Yamaha
Yamaha NS-AW194 installation instructions

Würth
Würth BTS 18-40 operating instructions

Richen Industrial
Richen Industrial BTS-40 user manual

Acoustic Arc International
Acoustic Arc International BD-9787-N instruction manual