ClearClick VT33 User manual

1
ClearClick®All-In-One Vintage-
Style Turntable (Model VT33)
Quick Start Guide & User’s Manual
5-Year Warranty +
FREE USA-Based Tech Support
If you have any issue or question regarding this product,
contacting us directly is the fastest way to resolve the
issue. We are ClearClick®, a small USA-based business,
and we stand behind our products with a 5-year warranty &
free USA tech support. If you have any issues with our
product, please contact us at support@clearclick.com.
www.ClearClick.com

2
Extend Your Warranty for FREE!
Extend your warranty by one year for free simply by registering
your product at: www.ClearClick.com
Thank You!
Thank you for your purchase of the ClearClick® All-In-One
Vintage-Style Turntable (VT33)! We appreciate your business.
At ClearClick®, we try to make our technology as clear to
understand and use as possible. But if you get stuck at any point,
you qualify for FREE USA-based tech support as a ClearClick®
(Make sure you explain your issue in detail and tell us that you’re
using our ClearClick® All-In-One Vintage-Style Turntable, Model
VT33). Our USA-based tech support team members will normally
reply to you within 24-48 business hours, usually sooner.)
Safety Instructions –Please Read & Follow
WARNING: DO NOT EXPOSE THIS APPLIANCE TO RAIN OR MOISTURE.

3
Safety Instructions (Continued)
1. !! NORTH AMERICAN VOLTAGE ONLY!! Outside
North America, this product requires a voltage transformer. Using this
device with voltage over 120V will instantly destroy the device.
2. Keep these instructions.
3. Heed all Warnings.
4. Follow all instructions and do NOT allow children around this device.
5. Do not use this apparatus near water or spill liquids on it.
6. Clean only with a dry cloth.
7. Do not block any ventilation openings. Install in accordance with the
manufacturor’s instructions.
8. Do not install near any sources such as radiators, heat registers, stoves,
or other apparatus (including amplifiers) that produce heat.
9. Do not defeat the safety purpose of the polarized or grounding –type plug.
A polarized plug has two blades with one wider than the other. A grounding
type plug has two blades and a third grounding prong. The wide blade or the
third prong are provided for your safety. When the provided plug does not fit
into your outlet, consult an electrician for replacement of the obsolete outlet.
10. Protect the power cord from being walked on or pinched particularly at
plug, convenience receptacles, and the point where they exit from the
apparatus.
11. Only use attachments/accessories specified by the manufacturer.
12. Unplug this apparatus during lightning storms or when unused for long
periods of time.
13. Refer all servicing to qualified service personnel. Servicing is required
when the apparatus has been damaged in any way, such as power-supply
cord or plug is damaged, liquid has been LED or objects have fallen into the
apparatus, the apparatus has been exposed to rain or moisture, does not
operate normally, or has been dropped.

4
QUICK START –Setting Up The Device
1. Securely plug the power plug into a power outlet.
!! Important Note For Users Outside USA, Canada, and
Mexico !! This device is ONLY compatible with standard North
American 110V-120V voltage. DO NOT USE WITH VOLTAGES
OVER 110V-120V, as this will instantly and permanently damage
the device!
2. Turn on the device by pushing the “VOLUME”(right) knob
inward.
3. Set the “FUNCTION”(left) knob to the desired function.
QUICK START –Listening To AM/FM Radio
1. Turn on the device by pressing the “VOLUME” (right)
knob inward.
2. Set the “FUNCTION” (left) knob to “AM”or “FM.”
3. Rotate the “TUNING”knob to set the desired radio
station.
4. Use the volume control knob to adjust the volume.

5
QUICK START –Playing Records
1. Turn on the device by pressing the “VOLUME” (right)
knob inward.
2. Set the “FUNCTION” (left) knob to “PHONO.”
3. Set the SPEED SELECTOR to 33, 45 or 78 RPM
according to the speed of the record.
4. Remove the stylus guard of the tone arm and place the
tone arm on the record carefully.
5. Use the volume control knob to adjust the volume.
At the end of record, lift up the tone arm and return it to tone
arm rest carefully.
QUICK START –Playing CDs
1. Turn on the device by pressing the “VOLUME” (right)
knob inward.
2. Set the “FUNCTION” (left) knob to “CD.”
3. Press the OPEN/CLOSE button to open the CD door.
4. Place a CD in the tray with the labeled side facing up.
5. Press the OPEN/CLOSE button again to close the CD

6
door.
6. Press the PLAY/PAUSE button to start playback.
7. To pause playback, press the PLAY/PAUSE button.
Press the PLAY/PAUSE button again to resume playback.
8. To stop playback, press the STOP button.
6. Use the volume control knob to adjust the volume.
7. To repeat a single track, choose the track that you want to
repeat, then press the PLAY BUTTON to start the track. Press
the REPEAT BUTTON once to repeat this track.
8. To repeat all tracks, press the REPEAT twice to repeat all
tracks. Once the CD ends, it will start over again from the
beginning of the CD.
QUICK START –Playing Cassette Tapes
1. Turn on the device by pressing the “VOLUME” (right)
knob inward.
2. Set the “FUNCTION” (left) knob to “TAPE.”
3. Insert a tape into the cassette slot (right side of device).
Ensure the tape is fully inserted in the slot.
4. The tape will automatically start playing. Use the volume

7
control knob to adjust the volume.
5. To fast forward, HALFWAY press the eject button on the
cassette tape slot. To stop fast forwarding, repeat this
process.
6. To stop and eject the cassette tape, press the eject
button on the cassette tape slot completely.
7. When one side of the tape finishes playing, the cassette
will automatically stop.
8. NOTE: Remove the tape from the unit when it is not in
use or stopped.
QUICK START –Playing Music via Bluetooth
1. Turn on the device by pressing the “VOLUME” (right)
knob inward.
2. Set the “FUNCTION” (left) knob to “BT.”
3. On your phone, tablet, or computer, search for the
Bluetooth device named “ClearClick VT33.” Connect to
this device.
4. Start playing music on your phone, tablet, or computer.

8
5. Use the volume control knob on the turntable to adjust
the volume. (Note: You may also need to adjust the
volume on your phone or tablet.)
QUICK START –Playing Music via Line-In/Aux-In
1. Turn on the device by pressing the “VOLUME” (right)
knob inward.
2. Set the “FUNCTION” (left) knob to “AUX.”
3. Using a 3.5mm-to-3.5mm aux cable, connect your phone,
tablet, or MP3 player to the radio’s “AUX-IN” jack in the
back of the device.
4. Start playing music on your phone, tablet, or MP3 player.
5. Use the volume control knob on the turntable to adjust
the volume. (Note: You may also need to adjust the
volume on your phone or tablet.)
QUICK START –Playing Music via USB Drive
1. Turn on the device by pressing the “VOLUME” (right)
knob inward.
2. Set the “FUNCTION” (left) knob to “USB.”
3. Plug in a USB drive that contains music files (MP3,APE,

9
FLAC, WAV and WMAfiles). NOTE: The USB drive
must be 64GB or less.
4. The turntable will start playing tracks form the USB drive.
Use the volume control knob on the turntable to adjust
the volume.
5. To pause playback, press the PLAY/PAUSE button. Press
the PLAY/PAUSE button again to resume playback. To
stop playback, press the STOP button.
6. Press the FORWARD SKIP BUTTON to skip next track.
Press the BACKWARD SKIP BUTTON to skip previous
track.
7. To repeat a single track, choose the track that you want
to repeat, then press the PLAY BUTTON to start the track.
Press the REPEAT BUTTON once to repeat this track.
8. To repeat all tracks, press the REPEAT twice to repeat all
tracks. Once the USB ends, it will start over again from
the beginning of the USB.

10
QUICK START –Recording Music to USB Drive
1. Put a USB drive (64GB or less) into the USB slot.
2. Change the mode to a mode (such as PHONO or FM).
3. Press the R (recording) button (to the left of the CD
player).
4. The device will record music to the USB drive.
5. To stop recording, press the R (recording) button (to the
left of the CD player) again.
6. After you stop recording, the files will be saved in files
marked “RECORD”on the USB drive.
7. NOTE: Do not switch modes while recording. Do not
remove the USB drive until you stop recording.
PROGRAMMED PLAYBACK (CDs)
(Advanced Feature)
1. Press the PROGRAM BUTTON in “CD”mode (with CD
stopped playing). P01 will be shown on display.
2. Press the FORWARD SKIP BUTTON or BACKWARD
SKIP BUTTON to select the tracks.
3. Press the PROGRAM BUTTON again to store the
selected track number.
4. Repeat step 2 and 3 above to program other tracks.

11
5. Press the PLAY/PAUSE button to start programmed
playback.
6. To erase the programmed sequence, press the STOP
button twice, OR the programmed tracks will also erase
when the CD DOOR is opened.
12
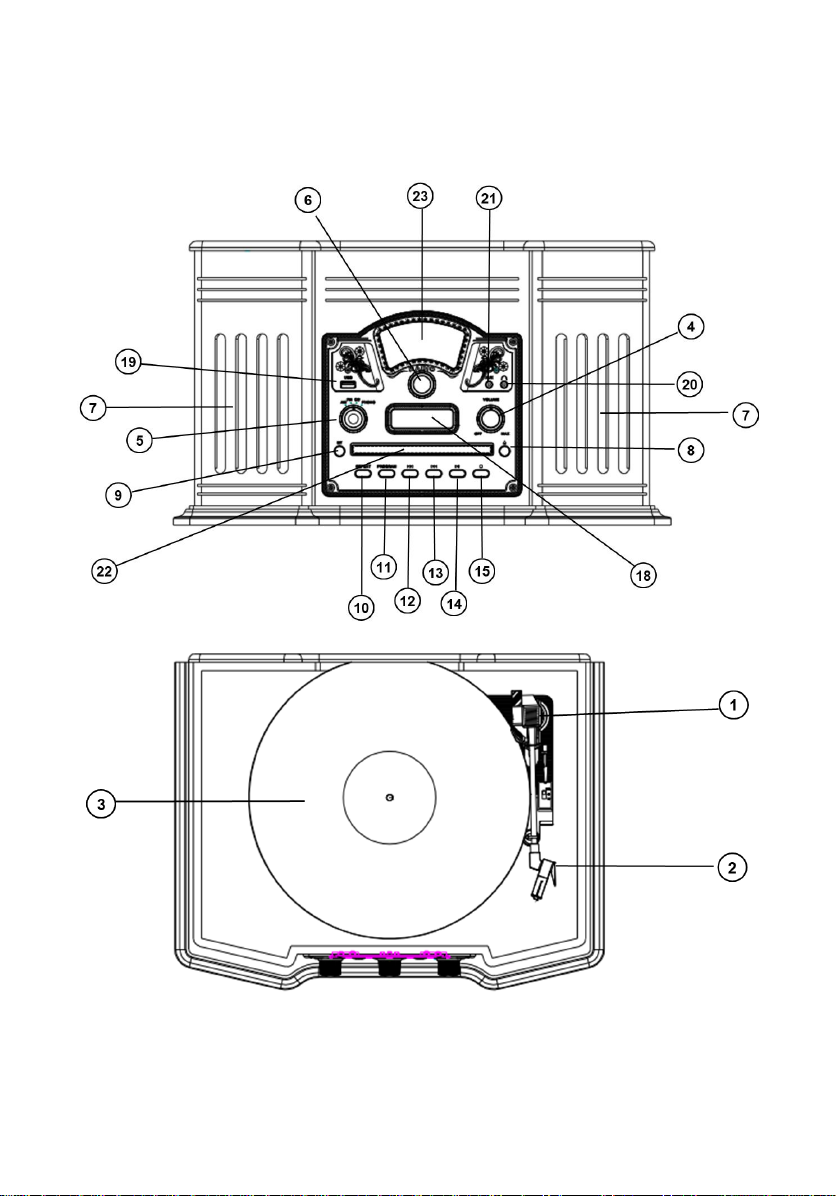
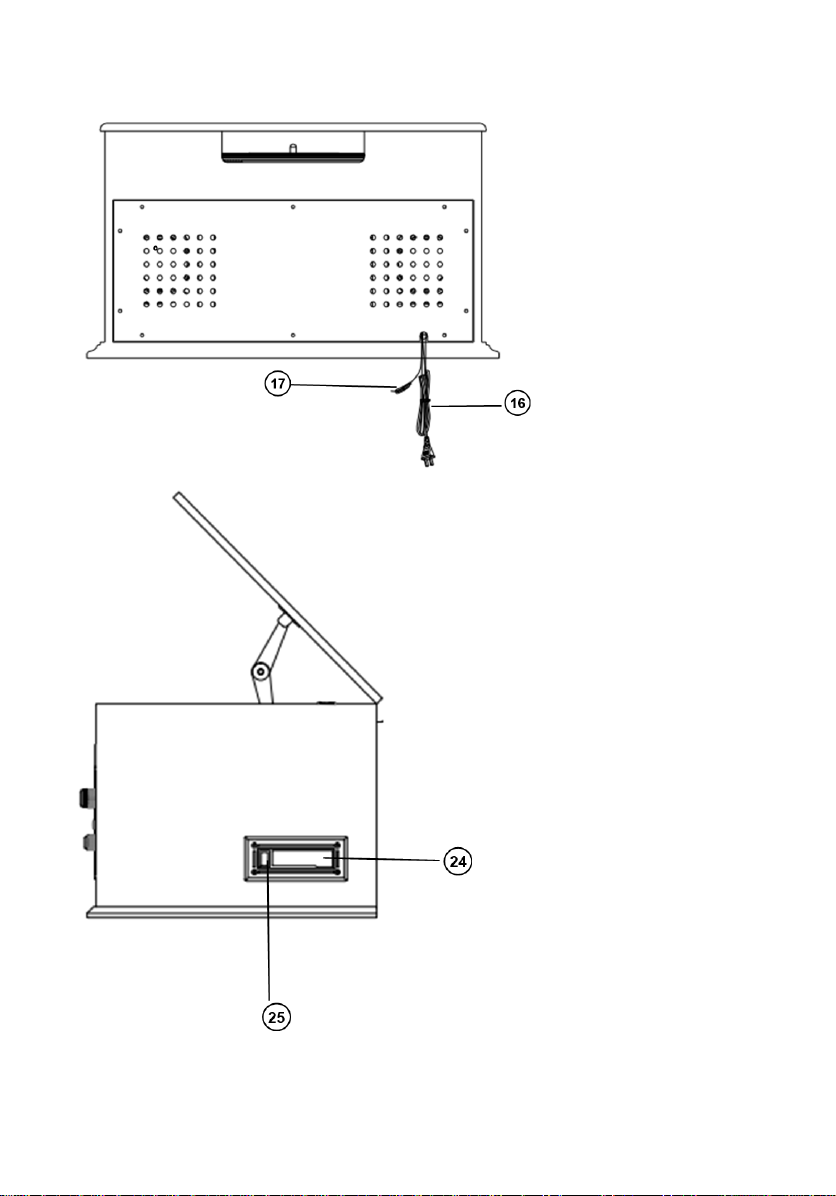
Device Diagram & Features
13

14

15
Troubleshooting
1. The USB function isn’t working.
Make sure your USB drive contains files in the following
formats: MP3,APE, FLAC, WAV and WMA files.
Make sure your USB drive is 64GB or less.
2. In Bluetooth or aux-in mode, the radio’s volume is
turned up all the way, but the sound isn’t loud enough.
Make sure you have turned up the volume on your phone,
tablet, or MP3 player as well.
3. I need further assistance or information on the
product’s warranty.
Just email us at support@clearclick.com, and we’ll get right
back to you! If you haven’t heard back from us within 1-2
business days, please check your “Spam” folder in your
email.

FCC Statement
Changes or modifications not expressly approved by the party
responsible for compliance could void the user's authority to
operate the equipment.
This equipment has been tested and found to comply with the
limits for a Class B digital device, pursuant to Part 15 of the FCC
Rules. These limits are designed to provide reasonable protection
against harmful interference in a residential installation. This
equipment generates uses and can radiate radio frequency
energy and, if not installed and used in accordance with the
instructions, may cause harmful interference to radio
communications. However, there is no guarantee that
interference will not occur in a particular installation. If this
equipment does cause harmful interference to radio or television
reception, which can be determined by turning the equipment off
and on, the user is encouraged to try to correct the interference
by one or more of the following measures:
-- Reorient or relocate the receiving antenna.
-- Increase the separation between the equipment and receiver.
-- Connect the equipment into an outlet on a circuit different from
that to which the receiver is connected.
-- Consult the dealer or an experienced radio/TV technician for
help
This device complies with part 15 of the FCC rules. Operation is
subject to the following two conditions (1)this device may not
cause harmful interference, and (2) this device must accept any
interference received, including interference that may cause
undesired operation.
This equipment complies with FCC radiation exposure limits set
forth for an uncontrolled environment. This equipment should be
installed and operated with minimum distance 20cm between the
radiator & your body.
16

Table of contents
Other ClearClick Turntable manuals


 Service manual")


