ClearSounds CS-CLA7BT User manual

1 – ENGLISH
FRANÇAIS ESpAñoL ENGLISH
CS-CLA7BT
Bluetooth Amplified Neckloop Accessory
CLA7BT-EN,SP,FR.indd 1 9/9/08 10:45:01 AM

2 – ENGLISH
3 – ENGLISH
Congratulations on your purchase of the CLA7BT
Amplified Powered Neckloop from ClearSounds®
Communications, Inc. The CLA7BT has been
developed to facilitate the use of a Bluetooth
capable cellular phone, landline phone, or
audio device with a t-coil equipped hearing aid
for hands-free wireless operation.
Features:
• 30dBAdjustableAmplification
• CompatiblewithstandardBluetoothVersion
1.2/2.1Devices
• 30footrange(maximum)
• User-friendlycontrolsandeasypairing
• Greatformobile,officeandhome
applications.
The CLA7BT generates an amplified induction
(loop)signalthatispickedupbythetelecoil
ofyourhearingaid(s).ThisoptionintheHA
is activated by setting the hearing aid(s) to
the“T”or“MT”position.PleasereadthisUser
Manualcarefullyinordertogettheverybest
resultsfromyourCLA7BT.Thiswilltellyouhow
tosetuptheCLA7BTcorrectlyandexplainall
thefeaturestoyou.
The CLA7BT is compatible with most cellular
phones and audio devices which support
Bluetoothwirelesstechnology.Wehopeitwill
CLA7BT-EN,SP,FR.indd 2 9/9/08 10:45:01 AM

2 – ENGLISH
3 – ENGLISH
give you many years of successful operation.
Pleasekeepthismanualforeasyreference.
Pleasevisitourwebsiteatwww.clearsounds.
comto:
• Registeryourproduct
• Downloadadditionalmanualsand
troubleshootingtips
PLEASE SAVE THESE INSTRUCTIONS
IMPORTANT SAFETY INSTRUCTIONS
This product is a mobile solution built on
Bluetooth technology. Please read the
instructionsbeforeusingyourCLA7BT.
Electromagnetic Interference/Compatibility:
Nearly every electronic device is susceptible
to electromagnetic interference (EMI) if
inadequatelyshielded,designed,orotherwise
configuredforelectromagneticcompatibility.
Facilities:Toavoidelectromagneticinterference
and/or compatibility conflicts, turn off your
CLA7BT in any facility where posted notices
instructyoutodoso.Hospitalsorhealthcare
facilities may be using equipment that is
sensitivetoexternalRFenergy.
Aircraft:Wheninstructedtodoso,turnoffyour
devicewhenonboardanaircraft.Anyuseofa
CLA7BT-EN,SP,FR.indd 3 9/9/08 10:45:01 AM

4 – ENGLISH
5 – ENGLISH
devicemustbeinaccordancewithapplicable
regulationsperairlinecrewinstructions.
MedicalDevices:Ifyouuseanypersonalmedical
devices, consult the manufacturer of your
devicetodetermineifitisadequatelyshielded
fromRFenergy.Yourphysicianmaybeableto
assistyouinobtainingthisinformation.
WARNING: To avoid the possibility of electrical
shock, do not use this product near water (For
example, near a bathtub, wash basin, kitchen
sink or laundry tub, in a wet basement or near a
swimming pool) while in the bathtub or shower
or when you are wet.
WARNING: Avoid using the telephone during
electrical storms. There may be a remote risk
of electric shock from lightning. If the electrical
storm is present in your immediate area,
possibility of electrical shock exists.
WARNING: Do not use a phone if you suspect
a gas leak in the area. The phone’s electrical
contacts could create a spark, which could
ignite any heavy concentration of leaking gas.
Table of Contents
SafetyPrecautionsandInstructions............... 3
FeatureLocation ............................................. 5
ImportantFactsonChargingtheCLA7BT ....... 6
PairingyourCLA7BTtoyourCellPhone.......... 8
CLA7BT-EN,SP,FR.indd 4 9/9/08 10:45:01 AM

4 – ENGLISH
5 – ENGLISH
PairingyourCLA7BTtoAdditionalDevices... 10
WearingtheUnit........................................... 10
TurningyourCLA7BTOnandOff .................. 11
MakingandReceivingCallsUsingBluetooth12
LEDIndicator ................................................ 16
AudioTones .................................................. 16
UsingyourCLA7BTasaPersonalAudio
Neckloop.................................................. 17
TroubleshootingGuide.................................. 18
WarrantyInformation.................................... 20
FEATURE LOCATION
CLA7BT-EN,SP,FR.indd 5 9/9/08 10:45:01 AM

6 – ENGLISH
7–ENGLISH
IMPORTANT FACTS ON
CHARGING THE CLA7BT
FIRST TIME USE:
BeforeusingyourCLA7BTforthefirsttime,you
needtochargeitsself-containedLI-Ionbattery
for24hours.
RECHARGING:
When you hear 5 rapid beeps through your
hearingaidorrepeatedat20secondintervals
andtheLEDindicatorturnsredyouwillneedto
rechargethebattery.
After the battery is fully charged, the LED
indicatorwillturnoff.Ittakesapproximately1
to1.5hourstofullychargethebattery.Donot
chargeformorethan24hours.
Over extended periods of time, the battery
will gradually wear down and require longer
chargingtimes.Thisisnormal.Themoreyou
talkonthephoneusingyourCLA7BTtheless
standbytimeyourbatteryhas.
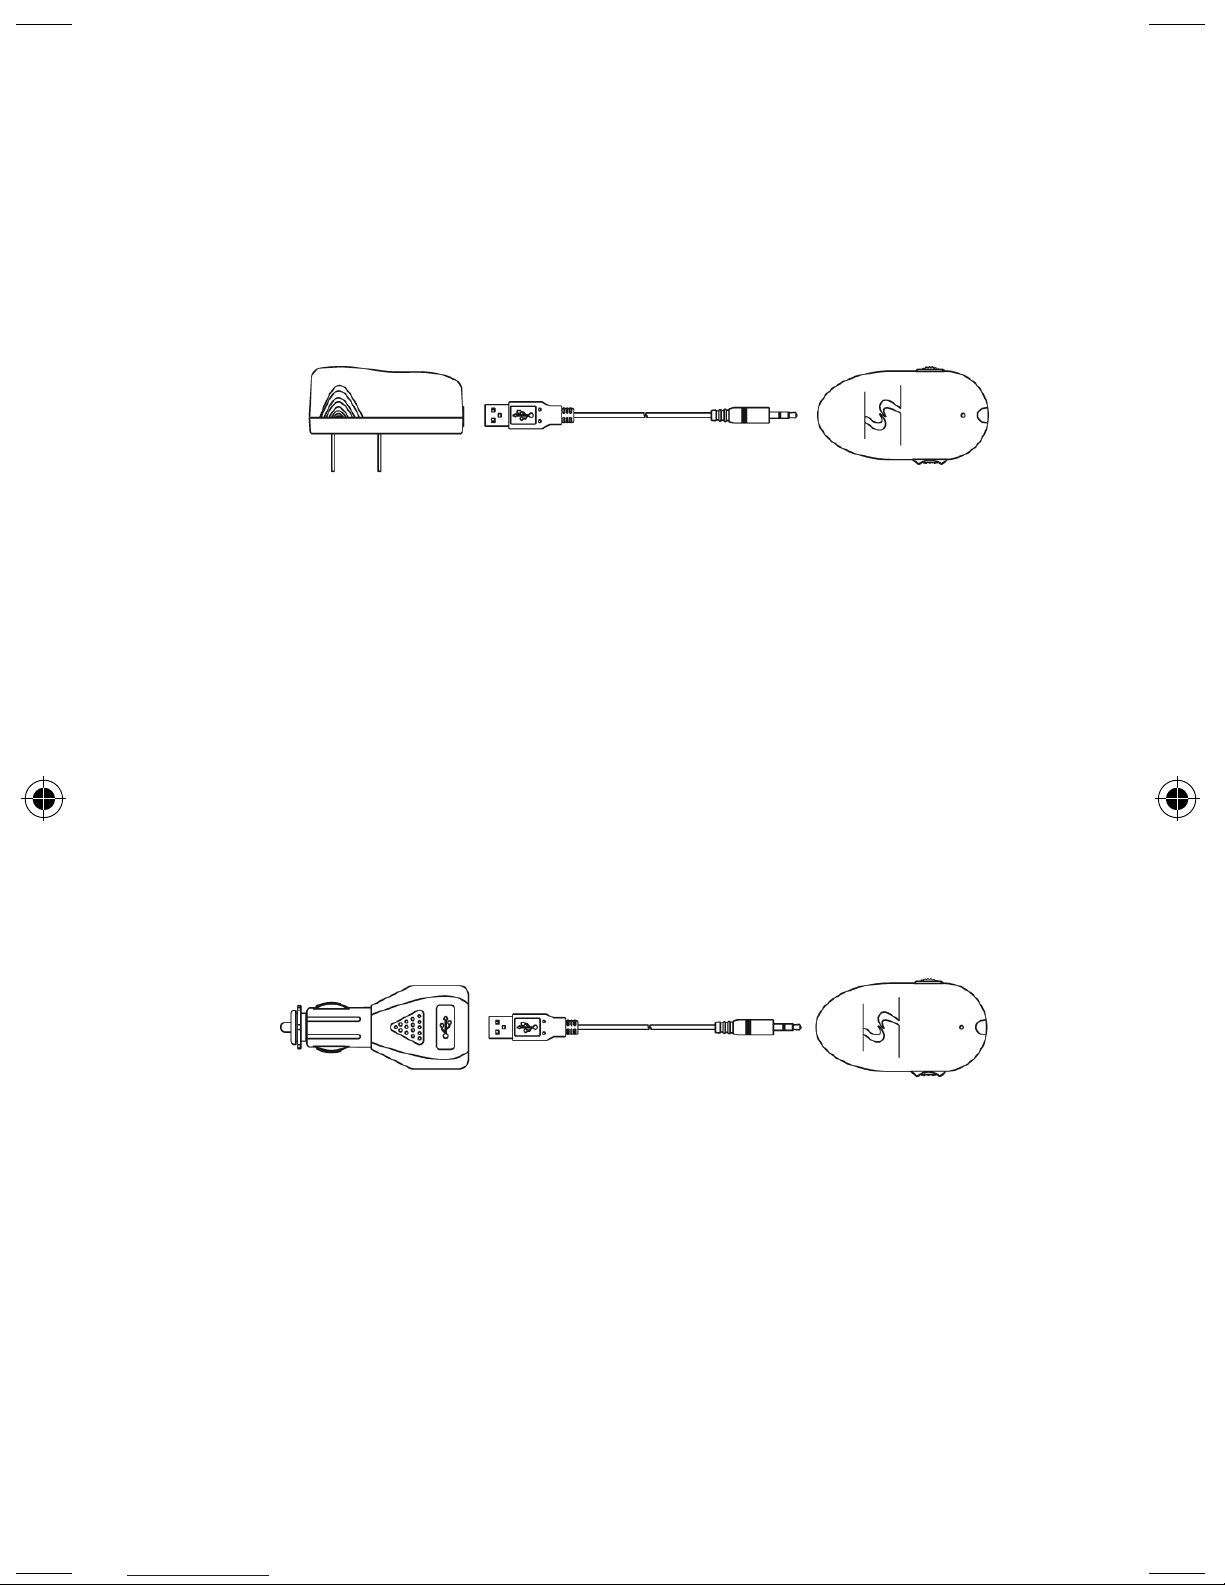
HOW TO CHARGE:
1 UsingACPowerSupply-Connectthe
3.5mmendoftheUSBcableintothe
chargingportoftheCLA7BT,andthen
connecttheotherendintotheUSBjack
ofthebasecharger.Plugthebasecharger
CLA7BT-EN,SP,FR.indd 6 9/9/08 10:45:01 AM

6 – ENGLISH
7–ENGLISH
intoastandardACwalloutlet.TheCLA7BT
isfullychargedwhenthelightgoesout.
Afterafullchargeremovethechargerfrom
thewalloutletanddetachtheUSBcable
fromtheunit.
2 UsingCarCharger-Connectthe3.5mm
endoftheUSBcableintothechargingport
oftheCLA7BT,andthenconnecttheother
endintotheUSBjackofthecarcharger.
Plugthecarchargerintothecigarette
lighterofyourvehicle.TheCLA7BTisfully
chargedwhenthelightgoesout.Aftera
fullchargeremovethechargerfromthe
cigarettelighteranddetachtheUSBcable
fromtheunit.
3 UsingaLaptop-Connectthe3.5mmend
oftheUSBcableintothechargingportof
theCLA7BT,andthenconnecttheotherend
intoaUSBjackonyourPC.TheCLA7BT
isfullychargedwhenthelightgoesout.
Afterafullchargeremovethecablefrom
thePCanddetachtheUSBcablefromthe
unit.
CLA7BT-EN,SP,FR.indd 7 9/9/08 10:45:01 AM

8 – ENGLISH
9 – ENGLISH
NOTE: During charging you cannot use the
Amplified Power Neckloop. The batteries will
have approximately 14 hours of talk time and
200 hours of standby time before needing
recharging. Battery life will depend on actual
usage and amplification levels.
PAIRING YOUR CLA7BT TO
YOUR CELLULAR PHONE.
“Pairing” Creates a link between devices
equipped with Bluetooth wireless technology
and the CLA7BT, and allows the phone to
remember the Neckloop’s unique ID; you can
addittoalistofpaireddevicesinthephone.
The CLA7BT should be paired once with the
phonebeforeuse.Ifthepairinginformationor
logisdeletedfromyourphone,theunitmust
be paired again with the phone prior to use.
OnceyourCLA7BTandphonearepaired,your
CLA7BTautomaticallyconnectstoyourphone
if the phone supports that protocol. Some
phones may ask if you want to connect to a
Bluetoothdevice.Youneedtocheckwithyour
phone’smanualonhowBluetoothworkswith
thephone.
CLA7BT-EN,SP,FR.indd 8 9/9/08 10:45:01 AM

8 – ENGLISH
9 – ENGLISH
With the CLA7BT and phone in close proximity
1 WithyourCLA7BToff,pressandholdthe
MultiFunctionButtonontheleftsideof
yourneckloopformorethan3seconds.
AftertheLEDindicatorlightsupsteadily,
theneckloopisinpairingmode.
2 Performadevicediscoveryfromyourphone
(forthedetailondevicediscoveryforyour
phone,refertoyourowner’smanual).
Whenthescaniscomplete,thephone
displaysthedevicesfound
3 SelectBT107fromthelistofdevices
discoveredandconfirmperthe
requirementsofyourphone.
4 Whenpromptedbythephone,enterthe
passkey0000.Yourphonewillconfirm
thatbondingoccurredandtheCLA7BTwill
confirmitpairedsuccessfullywith10rapid
flashes.
5 Thephoneinformationisnowstoredinthe
CLA7BTmemory.
NOTE: Make sure the neckloop and phone you
are using are no more than 10m/33 feet apart,
so they are within operable range.
Iftheneckloopisnotsuccessfullypairedwithin
2 minutes, it will automatically leave pairing
mode.Ifyoustillwantpairing,youwillneedto
repeatthestepslistedabove.
CLA7BT-EN,SP,FR.indd 9 9/9/08 10:45:01 AM

10–ENGLISH
11 – ENGLISH
PAIRING YOUR CLA7BT TO
ADDITIONAL DEVICES.
YourCLA7BTcanstorepairinginformationfor
uptoeight(8)differentdeviceswithBluetooth
wireless capability. Devices are stored in a
“PairedDevice List” in thememoryina time
sequence.Whenanattempttopairmorethan
eightdevicesismade,theoldestpaireddevice
isremovedfromthememorylist.Anyofthe
eightpaireddevicescan initiateaconnection
totheCLA7BT.
The neckloop will automatically initiate a
connection (once turned on) with the last
devicetowhichitwasconnected.Ifyouwant
to connect the CLA7BT to another device in
the paired device list, you must initiate the
connectionfromthatdevice.Whenanyofthe
eight devices initiates a connection to your
neckloop,thatdevicethen becomesthe “last
connected”device.
WEARING THE UNIT
1. Placethewirearoundyourneckandinsert
theroundconnectorplugintotheNeckloop
QuickDisconnectplug,formingaloop.
IMPORTANT:TohavetheNeckloopoperate
properly,youwillneedtobesurethe
QuickDisconnectconnectionjackhasbeen
CLA7BT-EN,SP,FR.indd 10 9/9/08 10:45:01 AM

10–ENGLISH
11 – ENGLISH
securelyclickedinplace.Therewillbetwo
distinctclicks.
2. MakesureyourCLA7BTispairedtothe
deviceyouwishtouse
3. Switchyourhearingaidto“T”or“MT”
modewhenreadytomakeorreceiveacall.
TURNING YOUR CLA7BT
ON AND OFF
To turn the CLA7BT ON
PresstheMulti-Functionbuttononthesideof
theCLA7BT.Aseriesof4tones(lowtohigh)
canbeheardfromyourhearingaidwhenitis
int-coilmodeandtheLEDflashes2times(0.1
seconds)
To turn the CLA7BT OFF
PresstheMulti-Functionbuttononthesideof
theCLA7BT.Aseriesof4tones(hightolow)
canbeheardfromyourhearingaidwhenitis
int-coilmodeandtheLEDflashes2times(0.5
seconds)andtheLEDisoff.
Receiving Volume Adjustment
The receiving volume can be adjusted during
a call. Use the volume control knob located
ontherightsideoftheunitwhenitisbeing
worn.Thevolumesettingonthecellphoneor
otherdevice willaddorremoveamplification
CLA7BT-EN,SP,FR.indd 11 9/9/08 10:45:01 AM

12 – ENGLISH
13 – ENGLISH
fromtheoverallsystem.Ifamplificationislow,
checkthevolumelevelonbothunits.Ifthere
is distortion or other interference, lower the
volumeononeorbothoftheunits.Toomuch
amplificationcancausedistortion.
MAKING AND RECEIVING
CALLS USING BLUETOOTH
The CLA7BT supports both Hands-Free and
Headset Profiles. Accessing call functions
dependsonwhichprofileyourphonesupports.
You can activate all functions for Hands Free
Profileusingthefollowingtable.
NOTE:Somephonesdonotsupportallfeatures
listed.Pleaseconsultyourphoneuser’sguide.
WhenpressingtheMulti-Functionbutton,you
can:
Press and Release– refers to duration of less
than0.8seconds.Youshouldhear1beepto
confirmtherequestedaction.
PressandHold–referstoadurationofmore
than 0.8 but less than 1.6 seconds. While
holdingthemulti-functionbuttonyouwillhear
onebeep,releasetheMulti-Functionbuttonto
confirmtherequestedaction.
Press and Extend Hold – refers to a duration
of more than 3 seconds. While holding the
multi-functionbuttonyouwillhearonebeep,
CLA7BT-EN,SP,FR.indd 12 9/9/08 10:45:02 AM

12 – ENGLISH
13 – ENGLISH
release the Multi-Function button to confirm
therequestedaction.
Device Status Action
Function Phone CLA7BT Hands Free Profile
PowerON -- oFF PressandHold
theMulti-Function
Buttonuntilthe
Neckloopispowered
ON.Aseta4tones
plays(lowtohigh)
andLEDflashes2
times(0.1Secon,
0.5Secoff)
Pairing/
Bonding -- oFF PressandExtend
HoldtheMulti-
FunctionButton
untiltheLEDis
steadilyON.The
neckloopcanthen
bediscoveredby
anotherBluetooth
Devicefor2minutes.
PowerOFF -- ON(idle) PressandExtend
HoldtheMulti-
FunctionButton
untiltheneckloop
ispoweredOFF.A
setof4tonesplays
(hightolow)andthe
LEDisoff.
Makea
VoiceDial
Call
ONandthe
phonemust
support
voicedialing
fromhands
freedevice
ON(idle) PressandRelease
theMulti-function,
speakthenameof
thenumberyouwant
dialed,thephone
willdialthenumber.
CLA7BT-EN,SP,FR.indd 13 9/9/08 10:45:02 AM

14 – ENGLISH
15 – ENGLISH
Device Status Action
Function Phone CLA7BT Hands Free Profile
Redialing
Last
Number
oN ON(idle) PressandHold
theMulti-Function
buttontorecallthe
lastphonenumber
dialed,number
dialedautomatically
Receiving
ACall oN
(ring) ON(ring) PressandRelease
theMulti-Function
buttontoanswer
thecall.
EndingA
Call oN
(oncall) ON(oncall) PressandRelease
theMulti-Function
buttontoendthe
call.
Rejecting
aCall oN
(phonering) ON(ring) PressandHold
theMulti-Function
buttontorejectthe
call.
PutCallon
Hold oN
(oncall) ON(oncall) PressandHold
theMulti-Function
buttontoplace
currentcallonHOLD.
Resume
aCallOn
Hold
ON(active
callonHold) On(activecall
onHold) PressandHoldthe
Multi-FunctionButton
toretrievethecall.
Answering
2nd
Incoming
Call
oN
(oncall) oN
(oncall) PressandHold
theMulti-Function
Buttontoputthe
1stcallonholdand
answerthe2ndcall.
ToSwitch
Between
2active
calls
oN
(oncall) oN PressandHold
theMulti-Function
Buttontoplacethe
2ndcallonholdand
returntothefirst.
CLA7BT-EN,SP,FR.indd 14 9/9/08 10:45:02 AM

14 – ENGLISH
15 – ENGLISH
Device Status Action
Function Phone CLA7BT Hands Free Profile
Transfer
callfrom
Neckloop
toPhone
oN oN
(oncall) PressandExtend
HoldtheMulti-
FunctionButtonto
turntheNeckloopoff
(4tonesHItoLo)
callistransferredto
phone.
Transfer
Callfrom
Phoneto
Neckloop
oN
(oncall) OFF(previously
paired) PressandHold
theMulti-Function
Button,once
connectionis
establishedthecall
istransferredtothe
Neckloop.
User
initiated
Reconnect
oN
(idle) oN
(notconnected) PressandRelease
theMulti-Function
Button,theneckloop
willtrytoreconnect
tothelastconnected
device.
Notes: If the link disconnects (for example, the
device is out of range) the neckloop tries to
re-establish the link.
Theneckloopwillautomaticallytrytoconnect
tothelastconnectedphonewhenPoweredOn
forthefirst90seconds.
CLA7BT-EN,SP,FR.indd 15 9/9/08 10:45:02 AM

16 – ENGLISH
17–ENGLISH
LED INDICATOR
Low Battery: once the voltage is lower than
3.4V,theLEDindicatorwillturnred.
LEDIndicatorstatuswithNoChargerAttached
LED Status Neckloop Action
oFF PowerOFF
ON(Steadily) PairingMode
10RapidFlashes PairingSuccessful
Flashesat3secondintervals(0.1
secondsON,2.9secondsOFF) Standby(NoAudioConnection)
Flashesat8secondintervals(2.0
secondsON,6.0secondsOFF) ConnectedtoAudio
LEDIndicatorstatuswithChargerAttached
LED Status Neckloop Action
oFF ChargingComplete
ON(Steadily) Charging
Note: When the neckloop is paired to the phone
and there is no operation for five (5) minutes,
the blue flashing LED turns off to save battery
and to make the wearer less conspicuous. To
confirm the CLA7BT is on, press and release the
Multi-Function button on the neckloop resets
the timer, and the flashing resumes.
AUDIO TONES
Audio Tone Neckloop Action
Seriesof4tone(lowtohigh) PowerON
Seriesof4tones(hightolow) PowerOFF
CLA7BT-EN,SP,FR.indd 16 9/9/08 10:45:02 AM

16 – ENGLISH
17–ENGLISH
Audio Tone Neckloop Action
SingleHighTone PairingSuccessful
RingTone IncomingCall
SingleHighTone EndCall
5RapidHightonesrepeatedevery
20seconds BatteryLow
NoAudioIndication(deteriorating
audioquality) OutofRange
SingeLowTone(dependsonphone) InitiateVoiceActivation
DualHI/LOWtoneifsupportedby
thephone. Voicetagnotrecognized
5Rapidtonesrepeatedevery60
secondsafterthephonegoesout
ofnetworkserviceformorethan20
seconds.
NoNetwork/Services
(handsfreeprofile)
USING YOUR CLA7BT AS A
PERSONAL AUDIO NECKLOOP
YourClearSoundsCLA7BTcanalsobeusedas
anamplifiedAudioNeckloopwithanyaudioor
otherdevicethatsupportsstandardBluetooth
connections.Followthesamepairingmethods
as was done when pairing with a cell phone
and follow the pairing instructions for your
audiodevice.Yourcellphoneoraudiodevice
mayneedtohaveaconnectiontotheCLA7BT
activated when switching between devices or
there can be an automatic connection, check
with your various Bluetooth devices for their
methodofoperation. Guide
CLA7BT-EN,SP,FR.indd 17 9/9/08 10:45:02 AM

18 – ENGLISH
19 – ENGLISH
TROUBLESHOOTING GUIDE
No Sound
1 MakesureHearingAidT-coilisturnedon
andfunctional.
2 Batterymaybedead.
3 VerifythattheQuickDisconnectisfully
seated.
4 VerifythattheCLA7BTisturnedon.
5 Verifythatthephoneoraudiodeviceis
turnedon.
6 ChecktoverifythattheCLA7BTispaired
andconnectedwiththedevice.
Weak Sound
1 Weakbattery.
2 TurnupthevolumeontheCLA7BT.
3 Turnupthevolumeonthephone.
4 Checkyourhearingaid–weakbattery.
5 Checkyourhearingaid–weakornon-
functionalt-coil
The CLA7BT Amplified Powered Neckloop has
beendesignedtogiveyouyearsofdependable
service.Toensuretheutmostinperformance,
follow these guidelines in caring for your
CLA7BTNeckloop:
1 Keeptheunitoutofthereachofsmall
children.
CLA7BT-EN,SP,FR.indd 18 9/9/08 10:45:02 AM

18 – ENGLISH
19 – ENGLISH
2 IftheCLA7BTisnotinusedonotstore
theCLA7BTwithbatteryunchargedforan
extendedlengthoftime.
3 StoreyourCLA7BTinadryplace.
4 DonotexposeyourCLA7BTtoexcessive
moisture,humidityorsteam.
5 Avoiddroppingorknockingtheunit.
6 AvoidelectricshockbykeepingtheCLA7BT
awayfromwater(i.e.bathroom,kitchen
sink,etc.)
7 KeepthebatteryinyourCLA7BTcharged
andbeawarethatyourCLA7BTwillstop
functioningwhenthebatteriesarenot
charged.
8 Donotcleanwithharshchemicals,cleaning
solventsorabrasivedetergents.Toclean,
wipewithasoftclothslightlydampenedin
amildsoap-and-watersolution.
Specifications
Maximum Gain:
•30dBinWideband(300to3400Hz)
•Upto40+dBwithfullcellularvolumeor
othertypedeviceatfullvolume.
•Dimensions:
•BaseSize:2.5”X1.25”X.75”
•Weight:0.10lbs.
CLA7BT-EN,SP,FR.indd 19 9/9/08 10:45:02 AM

20–ENGLISH
21 – ENGLISH
• PowerRequirements:
• Batteries:RechargeableLi-IonBattery–
Included
LIMITED ONE-YEAR WARRANTY
The neckloop is warranted by ClearSounds
against manufacturing defect in material
and workmanship under normal use for one
(1)year fromthedateofpurchase.Charging
Components are warranted by ClearSounds
against manufacturing defect in material and
workmanshipforaperiodofninety(90)days.
Should you experience a problem, contact
our customer service department or visit our
websiteatwww.clearsounds.com.
Be sure to save your sales receipt as proof
of purchase date should you need warranty
service.
Withinaperiodofoneyearfrompurchasedate,
ClearSounds Communications® will repair or
replace (our discretion) your neckloop, if a
defect in materials or workmanship is found.
Ifweelecttoreplaceyourneckloop,we may
replaceitwithaneworreconditionedproduct
of the same or similar design. Repair or
replacementwillbewarrantedforaperiodof
90daysortheremainderofthewarrantyperiod
(from original purchase date), whichever is
CLA7BT-EN,SP,FR.indd 20 9/9/08 10:45:02 AM
This manual suits for next models
1
Table of contents
Languages:
Popular Accessories manuals by other brands

IFM
IFM OID25 Series operating instructions

MHS Boilers
MHS Boilers XenoROL XR40 Installation, operation & maintenance manual

PCB Piezotronics
PCB Piezotronics 066A02 Installation and operating manual

Waterpik
Waterpik Water Flosser CC-01 Series quick start guide

Emos
Emos TGE-5 manual

ROSE DISPLAYS
ROSE DISPLAYS ANOFRAME SQUARE WITH NO HANGING manual