Clek FLLO Wiring diagram

January 2017
Fllo Inflatable Belt
Supplementary Instructions
® Clek and Fllo are registered trademarks of Clek Inc.
For a complete list of Clek Inc. trademarks please visit clekinc.com/trademarks.
Table of Contents
Installing/Removing Rear-Facing Car Seat ............................................................. 1
Installing Rear-Facing Car Seat With Inflatable Vehicle Belt ............................... 1
Removing Rear-Facing Car Seat Installed With Inflatable Vehicle Belt .................. 7
Installing/Removing Forward-Facing Car Seat ........................................................ 8
Installing Forward-Facing Car Seat With Inflatable Vehicle Belt .......................... 8
Removing Forward-Facing Car Seat Installed With Inflatable Vehicle Belt ........... 14

1
WARNING — DEATH or
SERIOUS INJURY can occur
• Use these instructions to replace the “Installing Rear-Facing Car Seat
with Vehicle Belt” section in your car seat manual.
• Not all inflatable vehicle belts are safe for use with this car seat. Contact
Clek Customer Service at 1-866-656-2462 to determine if the inflatable
belts in your vehicle are approved for use with this car seat.
• Always use these supplementary instructions in addition to the instructions
found in your car seat manual. Your car seat manual contains other
important information about the use and installation of this car seat.
• Never use the Rear-Facing Belt Lock-offs when installing this car seat
Rear-Facing using an inflatable vehicle belt.
• This car seat must be held tight at all times by the lap portion of the lap/
shoulder belt.
− Refer to the vehicle owner’s manual for information regarding
car seat installation and inflatable vehicle belt use with a car seat.
Installing Rear-Facing Car Seat With Inflatable Vehicle Belt
2
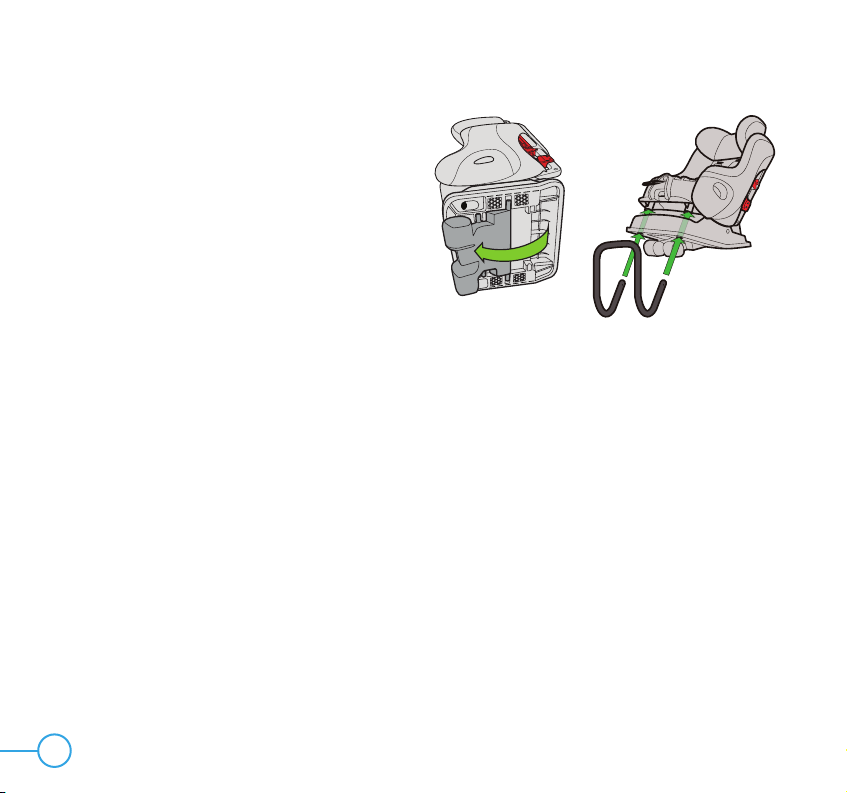
Step 1
Prepare car seat for Rear-Facing Installation:
• Rotate Recline Foot to Rear-Facing
position by pulling on edge of Recline
Foot and rotating it towards the front of
the seat until it locks in to position, as
shown in Figure 1.
• Remove Seat Cushion and install Anti-
Rebound Bar. See “Installing/Removing
Anti-Rebound Bar” in your car
seat manual.
Step 2
Select a forward-facing vehicle seating
location which has an inflatable vehicle
belt which can be used with this car seat.
Figure 1
lowered recline foot
Raised recline foot
3
Figure 2
Step 3
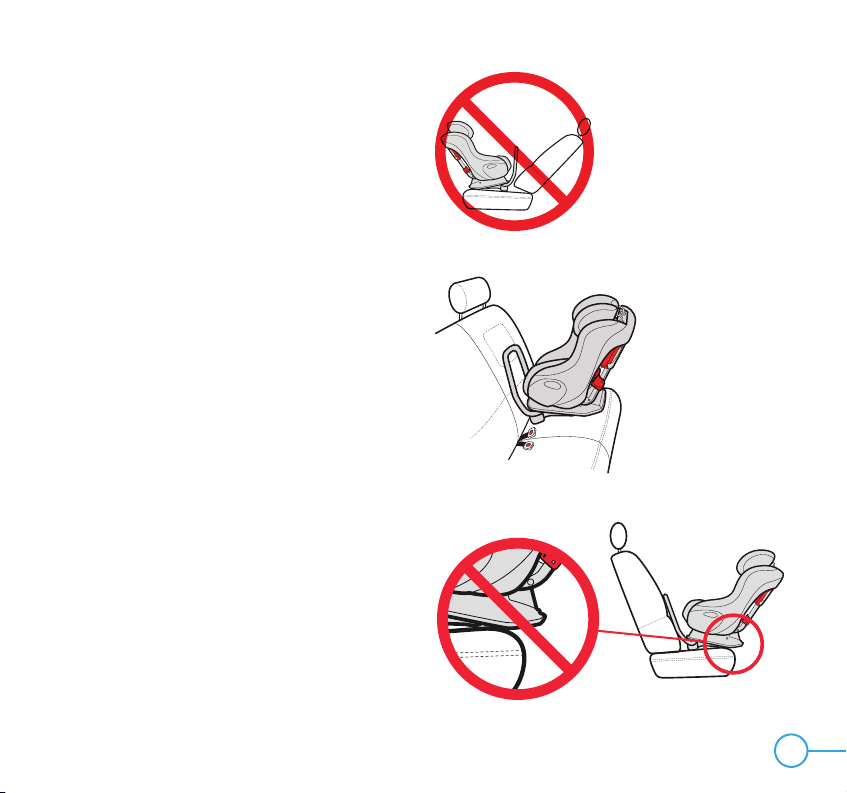
If the vehicle seat back is adjustable, make
sure the seat back is locked in a more upright
position. Refer to vehicle owner’s manual for
recommended seat back angle. DO NOT
install or use this car seat while the vehicle
seat back is excessively reclined, as shown
in Figure 2.
Step 4
Place car seat Rear-Facing in the vehicle seat
location selected with Rear-Facing Belt Path
toward vehicle seat back and centered in
seating position as shown in Figure 3.
IMPORTANT: Car Seat base must NOT
extend beyond the edge of the vehicle seat
cushion as shown in Figure 4.
Figure 28
Figure 3
Figure 4

4
Step 5
Position the seat so that the Rear-Facing Level
Reference Line appropriate for the child’s
weight is parallel with the ground as shown
in Figure 5.
• If using with an infant under 10 kg (22lb),
position the seat with the more reclined
Reference Line (top line) parallel to
the ground.
• If using with an older child who is over
10 kg (22lb), position the seat with the
more upright Reference Line (bottom line)
parallel to the ground.
Step 6
Route vehicle belt through the Rear-Facing Belt
Path and over both Rear-Facing Belt Lock-offs
and buckle vehicle belt, as shown
in Figure 6.
Position lap portion of inflatable lap/shoulder
belt under both forward Belt Tabs and check
that Crotch Strap is not under the vehicle belt.
Figure 5
Figure 6

5
Figure 7
Step 7
Switch the the lap portion of the lap/shoulder
belt to the automatic locking mode by pulling
the lap portion of the lap/shoulder belt all the
way out by holding the webbing and pulling
upwards, as shown in your vehicle manual.
Step 8
Tighten vehicle belt to secure the car seat
• Press down in center of car seat to
depress the vehicle cushion and pull
down on the lap portion of inflatable
lap/shoulder belt to tighten as shown
in Figure 7.
NOTE: The lap portion of the inflatable lap/
shoulder belt MUST remain tight and not
lengthen when pressure is released from the
seat. If the lap portion of the inflatable lap/
shoulder belt does not remain tight, go back
to Step 7 and refer to your vehicle manual.

6
Step 9
Check for secure installation. Gripping car
seat at top of armrests, pull car seat front
to back and left to right to check for secure
installation as shown in Figure 8. Vehicle
belt MUST stay tight and child restraint
should not move more than 2.5 cm (1 in.)
in any direction.
• If vehicle belt still does not stay tight or
car seat cannot be securely installed,
try a different vehicle seat location or
install using UAS, see “Installing Rear-
Facing Car Seat With UAS” in your car
seat manual.
Step 10
Verify that the Rear-Facing Level Reference
Line appropriate for the child’s weight is
parallel to the ground as shown in Figure 9.
S t ep 11
Install Seat Cushion, see “Removing/Installing
Seat Cushion” in your car seat manual.
Figure 8
Figure 9
7
Step 1
Unbuckle vehicle belt.
• Pressing down in center of car seat to
reduce tension on vehicle belt will make
it easier to unbuckle vehicle belt as
shown in Figure 10.
Step 2
Remove Seat Cushion, see “Removing/
Installing Seat Cushion” in your car
seat manual.
Step 3
Remove vehicle belt from Rear-Facing
Belt Path.
Step 4
Remove this car seat from vehicle.
Step 5
Install Seat Cushion, See “Removing/
Installing Seat Cushion” in your car
seat manual.
Figure 10
Removing Rear-Facing Car Seat
Installed With Inflatable Vehicle Belt

8
Installing Forward-Facing Car Seat With Inflatable Vehicle Belt
WARNING — DEATH or
SERIOUS INJURY can occur
• Vehicle belt must be routed through Forward-Facing Belt Path and
contained in both red Forward-Facing Belt Guides when using car
seat Forward-Facing.
• Use these instructions to replace the “Installing Forward-Facing Car Seat
with Vehicle Belt” section in your car seat manual.
• Not all inflatable vehicle belts are safe for use with this car seat. Contact
Clek Customer Service at 1-866-656-2462 to determine if the inflatable
belts in your vehicle are approved for use with this car seat.
• ALWAYS use these supplementary instructions in addition to the
instructions found in your car seat manual. Your car seat manual contains
other important information about the use and installation of this car seat.
• Forward-Facing Belt Lock-off must be left completely open when installing
with an inflatable vehicle belt.

9
Step 1
Prepare car seat for Forward-Facing
Installation:
• Check that the Recline Foot is in the
Forward-Facing position as shown in
Figure 11. If needed, grasp forward
edge of Recline Foot and rotate towards
the back of the seat, pressing it in to the
recess in the seat bottom.
• If the Anti-Rebound Bar is attached,
remove it now. See “Installing/Removing
Anti-Rebound Bar” in your car
seat manual.
Figure 11
lowered recline foot
Raised recline foot
WARNING — DEATH or
SERIOUS INJURY can occur (continued)
• ALWAYS secure the Top Tether.
• This car seat must be held tight at all times by the lap portion of the
lap/shoulder belt.
− Refer to the vehicle owner’s manual for information regarding
car seat installation and inflatable vehicle belt use with a car seat.

10
Figure 13
Step 3
If the vehicle seat back is adjustable, make
sure the seat back is locked in a more upright
position. Refer to vehicle owner’s manual for
recommended seat back angle. DO NOT
install or use this car seat while the vehicle
seat back is excessively reclined, as shown
in Figure 13.
Step 4
Remove Tether Hook from its storage location
on back of car seat. See “Top Tether
Storage” in your car seat manual.
• Lengthen Top Tether belt by pressing
and holding Tether Adjuster while
pulling strap as shown in Figure 14.
• Place Tether Hook in the seat of the
car seat.
Figure 14
Step 2
Select a Forward-Facing vehicle seating
location which has a vehicle belt which
can be used with this seat and a top tether
anchor point as shown in Figure 12.
Figure 12

11
Step 5
Place car seat Forward-Facing in the vehicle
seat location selected, and route vehicle belt
through the Forward-Facing Belt Path. Take
care not to put vehicle belt between Harness
and back of seat, and buckle vehicle belt, as
shown in Figure 15.
• Check that the lap portion of the
inflatable lap/shoulder belt is contained
in both red Forward-Facing Belt Guides.
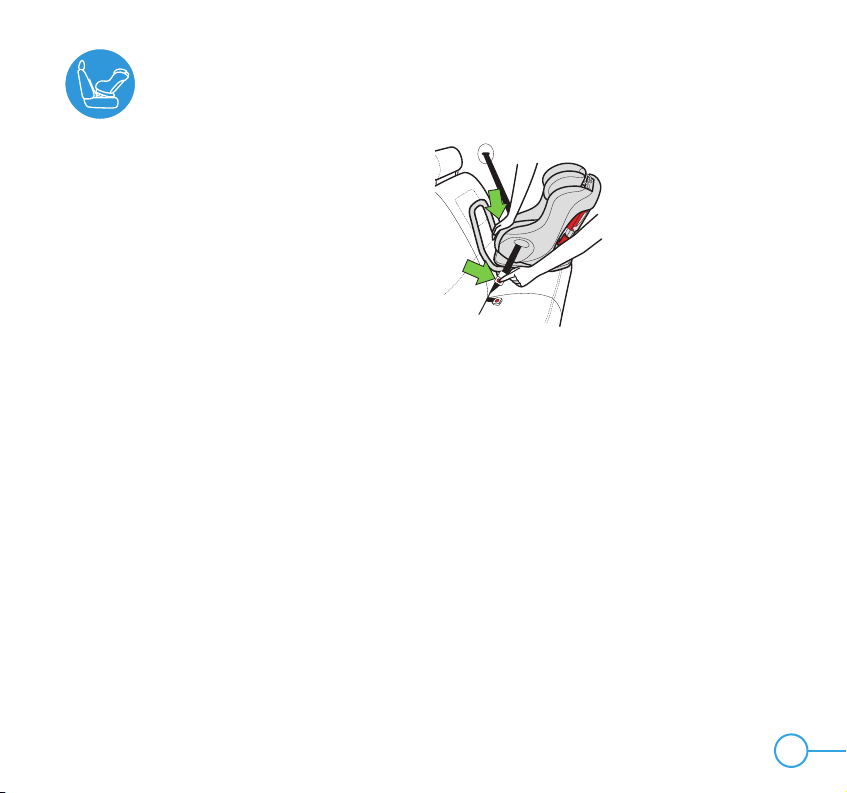
Step 6
Open the Forward-Facing Belt Lock-off on the
same side of the seat as the vehicle shoulder
belt anchor point. Place the vehicle shoulder
belt through the Forward-Facing Belt Lock-off
as shown in Figure 16.
Step 7
Switch the the lap portion of the inflatable
lap/shoulder belt to the automatic locking
mode by pulling the lap portion of the belt
all the way out by holding the webbing
and pulling upwards, as shown in your
vehicle manual.
Figure 15
Figure 16

12
Step 8
Center car seat in the vehicle seating position
chosen, and tighten vehicle belt to secure the
car seat.
• Press down in center of car seat to
depress the vehicle cushion and pull
down on lap portion of inflatable vehicle
belt to remove excess slack, as shown in
Figure 17.
• Check that Forward-Facing Belt Lock-off
is all the way open with Lock-tab rotated
completely down and as close to the
back metal support bar as possible, as
shown in Figure 18.
IMPORTANT: NEVER lock or partially close
Forward-Facing Belt Lock-off when using an
inflatable vehicle belt.
IMPORTANT: The lap portion of the inflatable
lap/shoulder belt MUST remain tight and not
lengthen when pressure is released from the
seat. If the lap portion of the inflatable lap/
shoulder belt does not remain tight, go back
to Step 7 and refer to your vehicle manual.
Step 9
Check that the entire belt is laying flat,
placed correctly through both red Forward-
Facing Belt Guides and NOT between the
Harness and seat, as shown in Figure 19.
Figure 18
Figure 17
Figure 19
Figure 92 Figure 93

13
Step 10
Attach Tether Hook to vehicle top tether
anchor as shown in Figure 20 or Figure 21
and pull firmly on free end of strap until Top
Tether is snug.
Refer to vehicle owner’s manual for
recommended Top Tether routing and
identification of top tether anchor point.
S t ep 11
Check for secure installation. Gripping car
seat at top of armrests, pull car seat front
to back and left to right to check for secure
installation as shown in Figure 22. Vehicle
belt and Top Tether must stay tight and child
restraint should not move more than 2.5 cm
(1 in.) in any direction.
• If vehicle belt does not stay tight or
car seat cannot be securely installed,
try a different vehicle seating location
or install using UAS. See “Installing
Forward-Facing Car Seat With UAS”
in your car seat manual.
Figure 20
Figure 22
Figure 21

14
Step 1
Loosen Top Tether by pressing and holding
Tether Adjuster while pulling strap as shown
in Figure 23.
Step 2
Remove Tether Hook from vehicle tether
anchor.
• Pull in and hold retention spring
on Tether Hook, then remove hook
from tether anchor as shown in
Figure 24 and 25.
Step 3
Unbuckle inflatable vehicle belt and remove
from Forward-Facing Belt Path.
• Pressing down in center of car seat to
reduce tension on vehicle belt will make
it easier to unbuckle vehicle belt as
shown in Figure 26.
Removing Forward-Facing Car Seat
Installed With Inflatable Vehicle Belt
Figure 23
Figure 24
Figure 25
Figure 26
Figure 78

15
Step 4
Remove this car seat from vehicle.
Step 5
Store the Top Tether, see “Top Tether
Storage” in your car seat manual.

16
Keep this Instruction Manual for future use. Store with car seat
manual in Shoulder Harness Access Panel on back of this car seat.
www.clekinc.com
Clek Inc.
226 Lesmill Road
Toronto, Ontario Canada
M3B 2T5
1-866-656-2462
FL16US
WARNING
• Read and understand product
labels and all instructions in
this manual and in your vehicle
owner’s manual before installing
or using this car seat.
• Failure to properly install or
use this car seat or follow these
warnings and those on this car
seat’s labels can result in serious
injury or death to the child
in a sharp turn, sudden stop
or crash.
C03-1422- C1-US January2016
2016 Fllo Instruction Manual
This car seat is designed for use either Rear-Facing or Forward- Facing by children who meet
all of the following requirements:
HeigHt WeigHt Age
25 – 43 in.
64 – 110 cm
14 – 50 lb
6.4 – 22.7 kg
Able to sit
upright alone
HeigHt WeigHt Age
30 – 49 in.
76 – 124 cm
22 – 65 lb
10 – 29.5 kg
2+ years
recommended
(min. 1 year)
Other manuals for FLLO
1
Table of contents


