Clever Casa 132915001 User manual

Codice n / Item No.:
132915001/132915002
Importato e distribuito da: HSE24 S.p.A.
Via delle Arti 171 - 00054
Fiumicino - RM - Italia
http://www.hse24.it/
MADE IN CHINA
Assistenza Clienti : 840 724 724 ( Lun - Ven 8.00 - 21.00 )
MANUALE DI ISTRUZIONI / INSTRUCTION MANUAL
Prima di utilizzare il vostro prodotto, leggere attentamente le istruzioni
contenute in questo manuale.
Before using, please read carefully
this instruction manual.
CLEVER CASA FERRO DA STIRO CORDLESS
CORDLESS STEAM IRON
IMPORTANTI ISTRUZIONI DI SICUREZZA
Quando si utilizza il ferro da stiro, è necessario seguire sempre le
precauzioni di sicurezza di base, incluse le seguenti:
LEGGERE TUTTE LE ISTRUZIONI PRIMA DELL'USO
1. Usare il ferro solo per l'uso previsto.
2. Per evitare il rischio di scosse elettriche, non immergere il ferro in acqua
o altri liquidi.
3. L’indicatore deve essere sempre ruotato su "0” prima di collegarlo o
scollegarlo dalla presa di alimentazione. Non tirare mai il cavo di
alimentazione per scollegare il ferro dalla presa. Aerrare la spina e
tirare per disconnettere.
4. Non permettere che il cavo tocchi superci calde. Lasciare rareddare
completamente il ferro prima di riporlo. Avvolgere il cavo di
alimentazione attorno al ferro quando lo si ripone.
5. Scollegare sempre il ferro dalla presa elettrica quando si riempie con
acqua o si svuota e quando non è in uso.
6. Non utilizzare il ferro con un cavo danneggiato o se il ferro è caduto o è
danneggiato. Per evitare il rischio di scosse elettriche, non smontare il
ferro portarlo da un tecnico qualicato per l'esame e la riparazione. Un
riassemblaggio errato può causare il rischio di scosse elettriche quando
si usa il ferro.
7. È necessaria una stretta supervisione per qualsiasi apparecchio utilizzato
da o vicino ai bambini. Non lasciare il ferro incustodito mentre è
collegato o su un'asse da stiro.
8. Possono vericarsi ustioni dovute al contatto con parti metalliche calde,
acqua calda o vapore. Prestare attenzione quando si rovescia un ferro
da stiro a vapore , potrebbe esserci acqua calda nel serbatoio.
9. Se l'indicatore di malfunzionamento si accende, il ferro da stiro non
INDICE
IMPORTANTI ISTRUZIONI DI SICUREZZA
ISTRUZIONI SPECIALI
CONSERVARE QUESTE ISTRUZIONI
DESTINAZIONE D’USO
DATI TECNICI
DESCRIZIONE DELL’APPARECCHIO
SISTEMA ANTI-CALCARE
SISTEMA ANTI-GOCCIA
SPEGNIMENTO AUTOMATICO
ISTRUZIONI GENERALI
PREPARAZIONE ALLA STIRATURA
STIRATURA A VAPORE
STIRATURA A SECCO
FUNZIONE SPRAY
PULIZIA
AUTOPULENTE
STOCCAGGIO
CONSIGLI PER LA STIRATURA
GARANZIA
pag.1-2
pag.2
pag.2-3
pag.3
pag.3
pag.4
pag.4
pag.4
pag.5
pag.5
pag.5
pag.6
pag.6
pag.7
pag.7
pag.7
pag.7
pag.8-9
pag.10
1

ISTRUZIONI SPECIALI
funziona normalmente. Scollegare dall'alimentazione e far riparare il
ferro da personale di assistenza qualicato.
10. Non posizionare le mani sotto il ferro.
11. Collocare il ferro da stiro su una supercie piana e stabile.
12. Questo articolo non può essere usato da bambini sotto gli 8 anni di
età se non supervisionati e messi a conoscenza o che abbiano le giuste
capacità siche e mentali.
1. Per evitare un sovraccarico del circuito, non utilizzare un'altra
apparecchiatura ad alto wattaggio sullo stesso circuito.
2. Se è assolutamente necessario un cavo di prolunga, è necessario
utilizzare un cavo da 10A. I cavi classicati per meno amperaggio
potrebbero surriscaldarsi. Bisogna fare attenzione a sistemare il cavo in
modo che non possa essere tirato o inciampato.
CONSERVARE QUESTE ISTRUZIONI
Più specicamente:
NON lasciare che bambini o persone inesperte utilizzino l'apparecchio
senza supervisione.
Non immergere MAI il ferro, il cavo o la spina in alcun liquido.
NON lasciare che il ferro caldo tocchi tessuti o superci inammabili.
NON lasciare l'apparecchio inutilmente collegato. Scollegare la spina dalla
presa di corrente quando l'apparecchio non viene utilizzato.
Non toccare MAI l'apparecchio con mani bagnate o umide.
NON usare il cavo di alimentazione o l'apparecchio per estrarre la spina
dalla presa.
NON lasciare l'apparecchio esposto alle intemperie (pioggia, sole, ecc.).
NON lasciare il ferro senza supervisione quando è collegato
all'alimentazione.
NON riempire d'acqua il serbatoio prima di rimuovere la spina dalla presa.
NOTA!
Non usare additivi chimici, sostanze profumate o decalcicanti. La
mancata osservanza delle suddette normative comporta la perdita della
garanzia.
DESTINAZIONE D’USO
Il ferro da stiro serve per stirare capi di bucato. Per uso domestico e non commericale.
Nota! Pericolo di incendio! Collocare il ferro da stiro in posizione verticale anche in caso di brevi interruzioni.
DATI TECNICI
Alimentazione: 220-240V-50/60Hz
Potenza: 2000-2400W
Lunghezza del cavo di alimentazione della base : 1.9 M
Misura della piastra: 20x12 cm
32
DESCRIZIONE DELL’APPARECCHIO SPEGNIMENTO AUTOMATICO
- Se il ferro (collegato alla base e acceso) è rimasto per ca. 30 secondi in posizione orizzontale, il riscaldamento si
spegne. Quando il riscaldamento si spegne, la spia di spegnimento automatico (K) lampeggia.
- Se il ferro (collegato alla base e acceso) è rimasto per ca. 8 minuti, il riscaldamento si spegnerà. Quando il
riscaldamento si spegne, la spia di spegnimento automatico (K) lampeggia. Quando si solleva di nuovo il ferro, la
spia di spegnimento automatico (K) diventerà permanente. Quando la spia di accensione (H) si accende, il ferro
riscalda di nuovo. Quando la spia dell'alimentazione (H) si spegne, è possibile utilizzare il ferro.
ISTRUZIONI GENERALI
Quando si usa il ferro per la prima volta, si può notare una leggera emissione di fumo e sentire alcuni suoni
prodotti dalle plastiche in espansione. Questo è abbastanza normale e si interrompe dopo poco tempo. Si consiglia
inoltre di passare il ferro sopra un normale panno prima di usarlo per la prima volta.
PREPARAZIONE ALLA STIRATURA
Prima di eettuare una stiratura, controllare l’etichetta di lavaggio sul prodotto da lavare.
Nota: Inizia a stirare i capi che richiedono una bassa temperature ciò riduce i tempi di attesa (il ferro impiega meno
tempo a riscaldarsi che a rareddarsi) ed elimina il rischio di bruciare il tessuto.
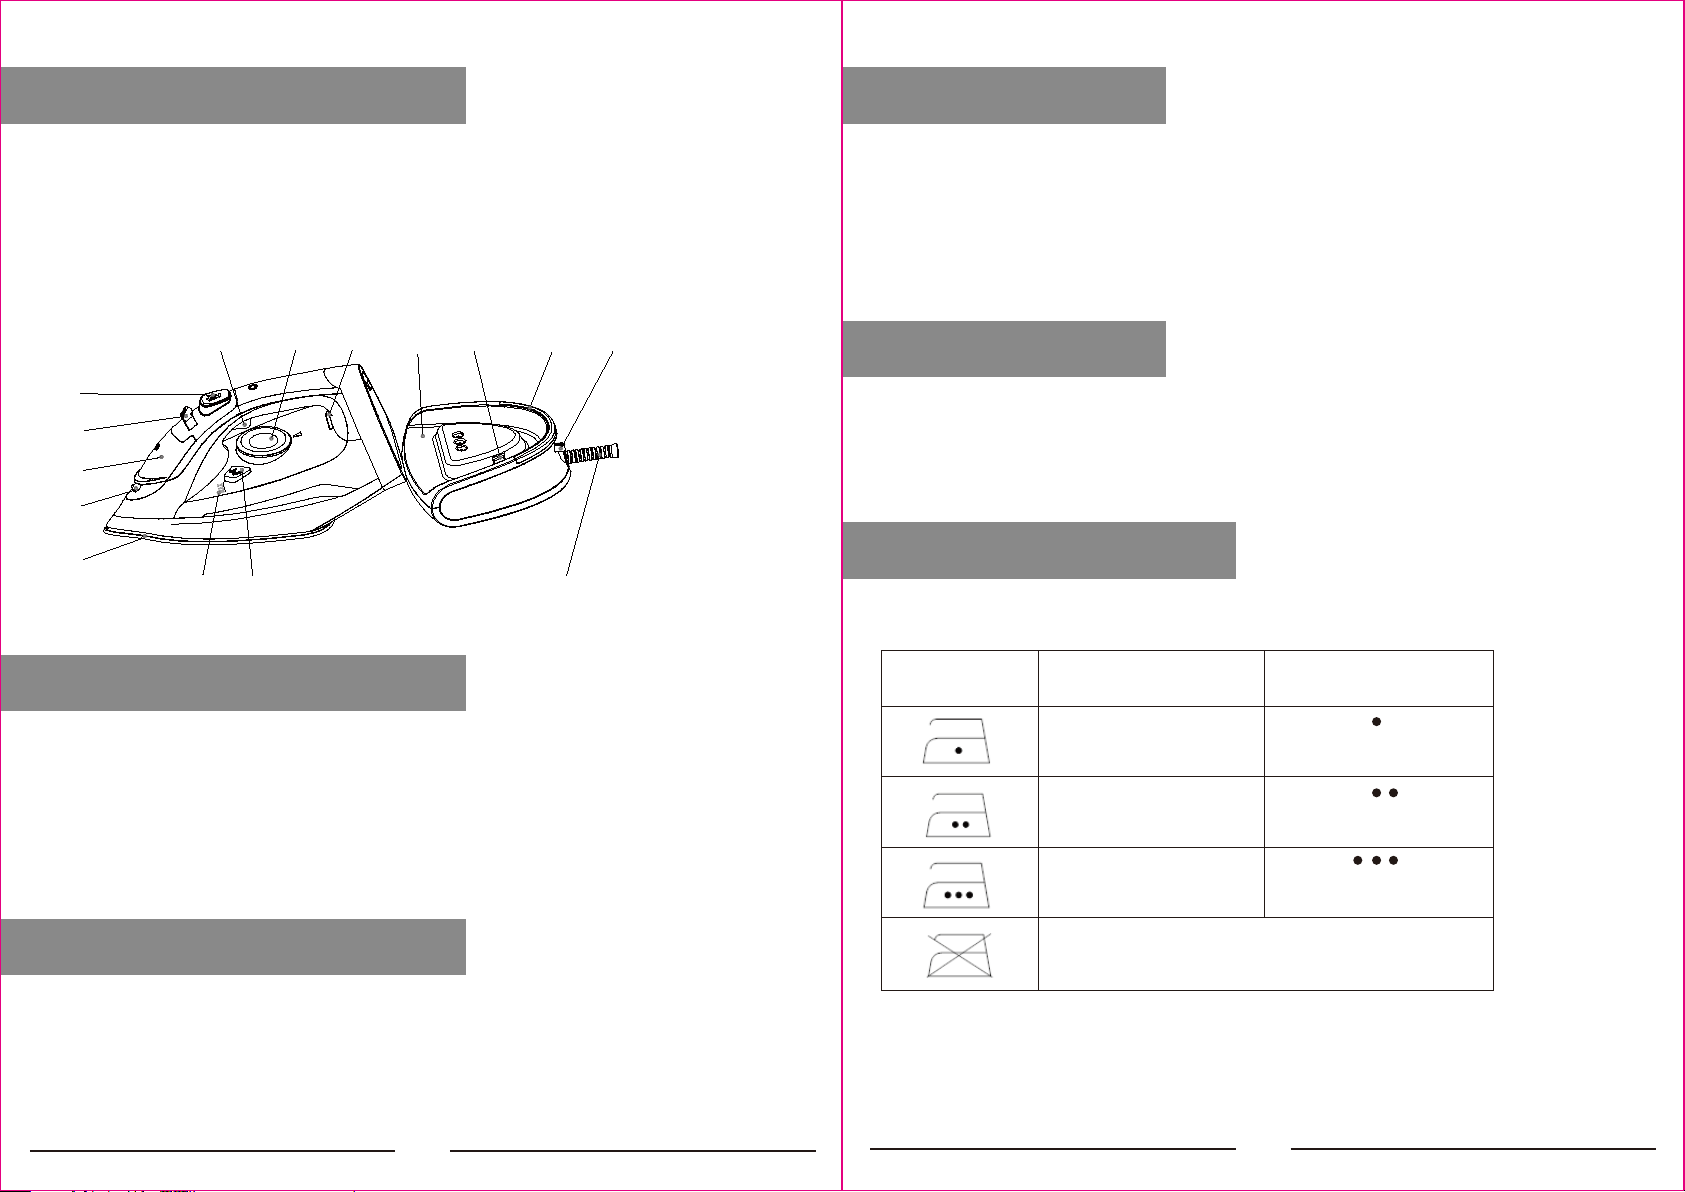
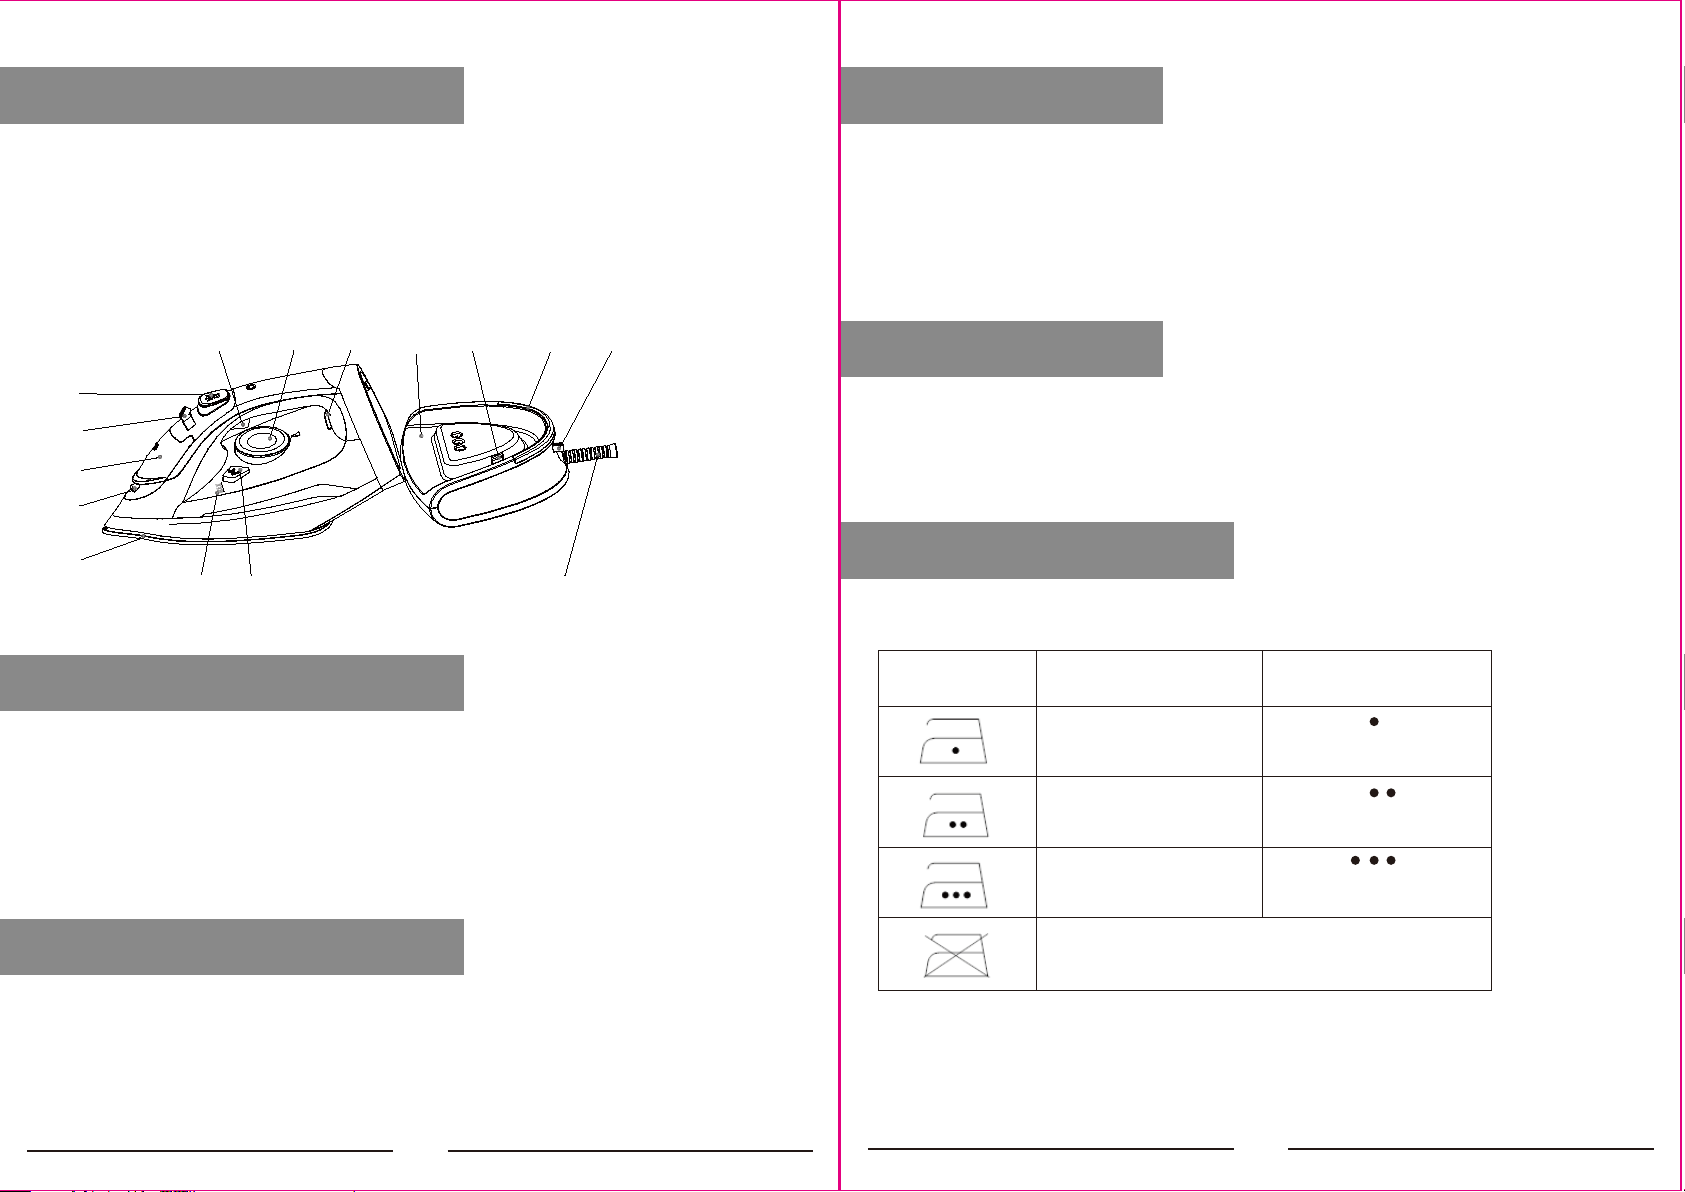
Etichetta Tessuto Regolazione termostato
Sintetici Basse temperature
Seta-lana Medie temperature
Cotone-lino Alte temperature
Tessuto non stirabile
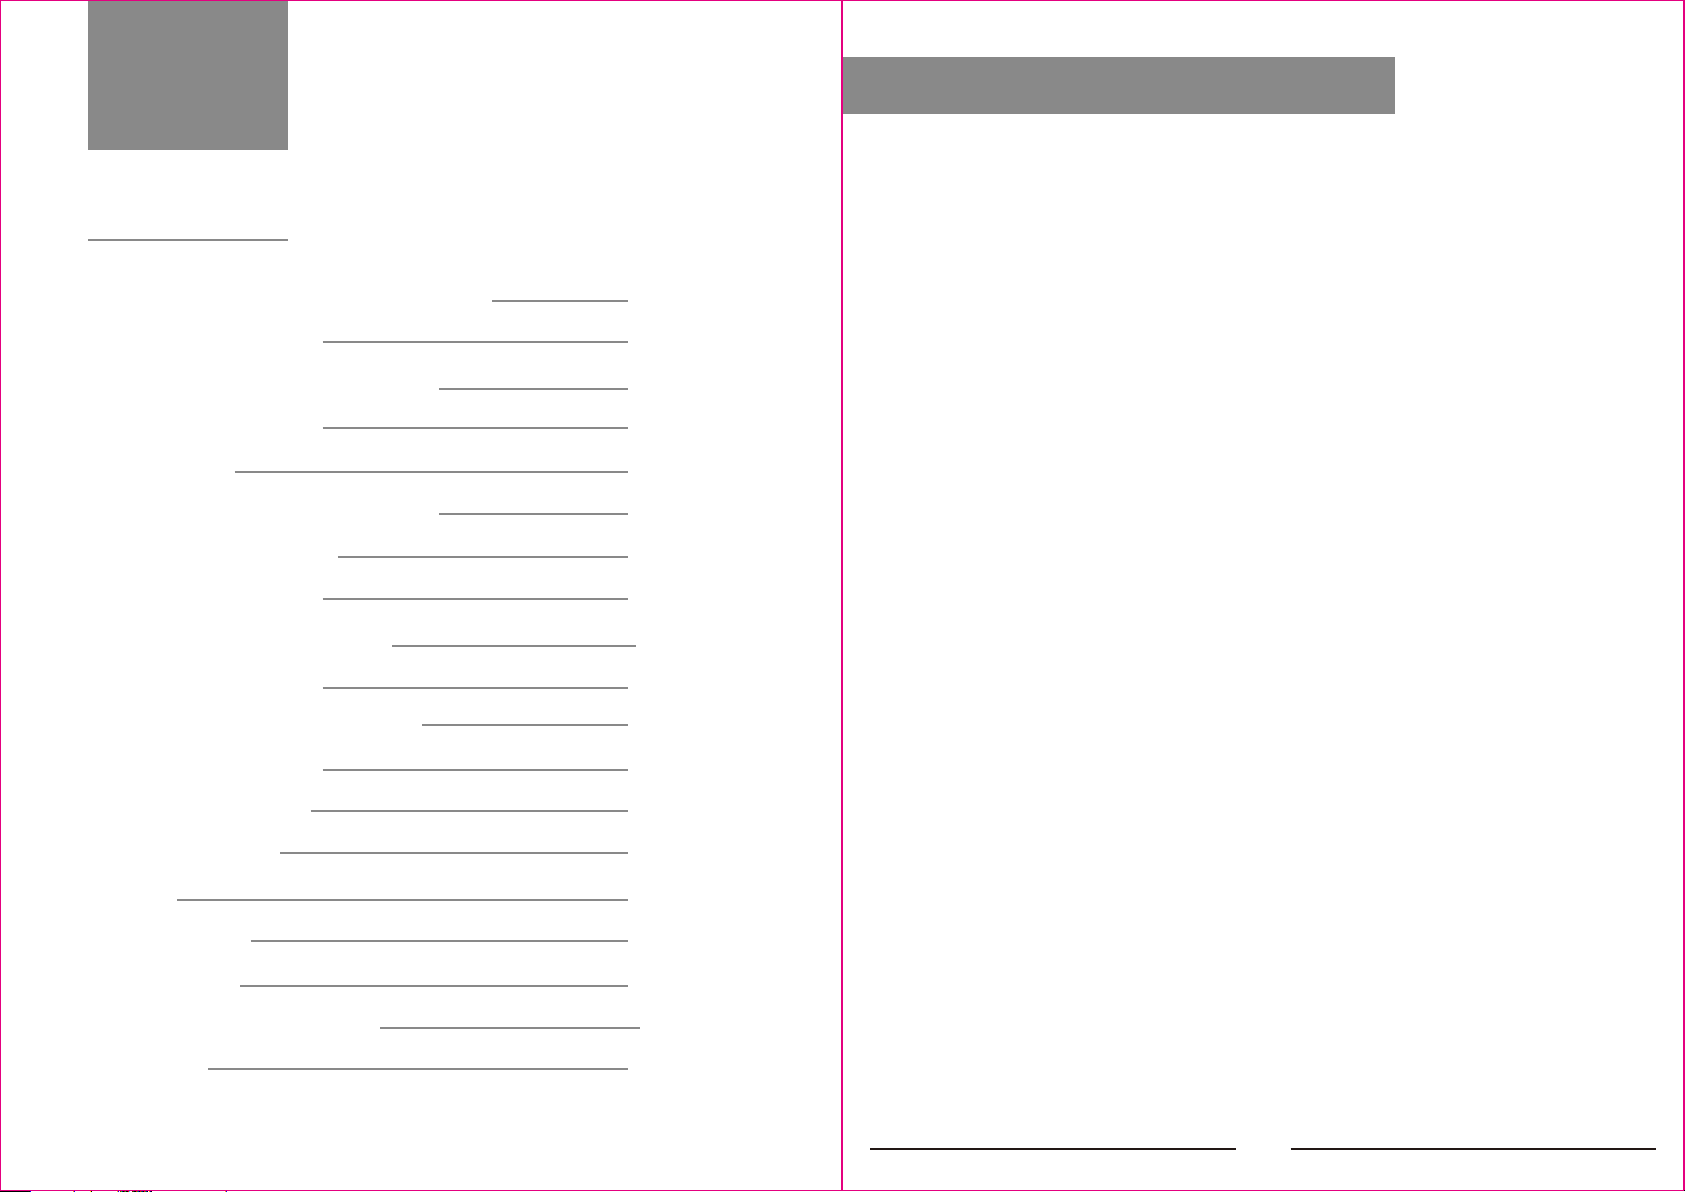
(A). Piastra
(C). Apertura di rabbocco del serbatoio dell’acqua
(E). Pulsante di spruzzatura
(G). Manopola del termostato per la temperatura
(I). Base
(K). Indicatore luminoso
(M). Cavo di alimentazione
SISTEMA ANTI-CALCARE
Uno speciale ltro in resina all'interno del serbatoio dell'acqua ammorbidisce l'acqua e impedisce l'accumulo di
calcare nella piastra. Il ltro in resina è permanente e non necessita di sostituzione.
Nota:
Utilizzare solo acqua di rubinetto. L'acqua distillata e demineralizzata rende inecace il sistema anticalcare
alterando le sue caratteristiche sico-chimiche.
Non utilizzare additivi chimici, sostanze profumate o decalcicanti. La mancata osservanza delle suddette
normative comporta la perdita della garanzia.
SISTEMA ANTI-GOCCIA
Con il sistema antigoccia, puoi stirare perfettamente anche i tessuti più delicati.
Stirare sempre questi tessuti a basse temperature. La piastra può rareddarsi no al punto in cui non esce più
vapore, ma piuttosto gocce di acqua bollente che possono lasciare segni o macchie. In questi casi, il sistema
antigoccia si attiva automaticamente per prevenire la vaporizzazione, in modo da poter stirare i tessuti più delicati
senza rischiare di rovinarli o macchiarli.
(B). Spruzzatore dell’acqua
(D). Selettore del vapore
(F). Pulsante di colpo di vapore
(H). Spia di riscaldamento
(J). Blocco della base
(L). Interruttore blocco base
(N). Pulsante di pulizia
(O). Indicatore “MAX”
E
F G H I J K L
MNO
D
C
B
A
5
4

STIRATURA A VAPORE
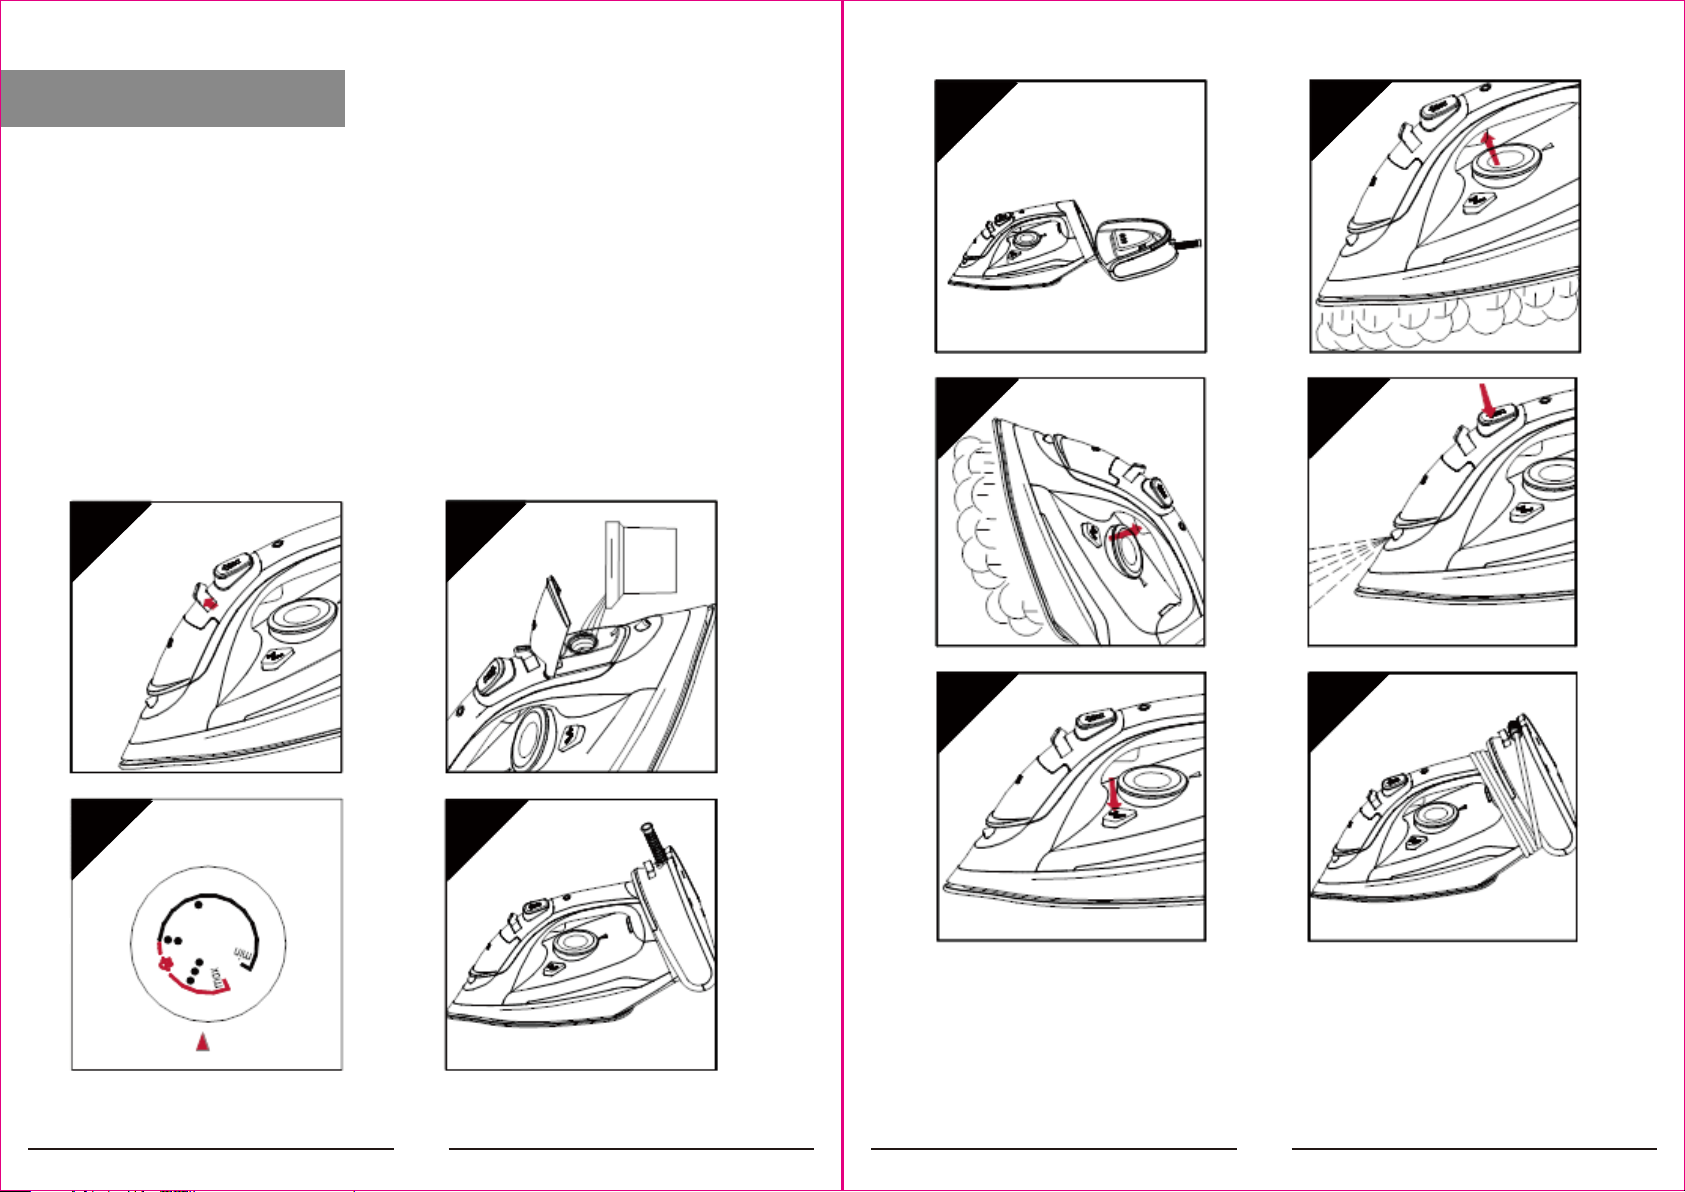
Riempire il serbatoio:
- Controllare che la spina sia scollegata alla presa di alimentazione.
- Spostare il selettore del vapore (D) su "0" [Fig. 1].
- Aprire lo sportello della porta di riempimento (C).
- Sollevare la punta del ferro per aiutare l'acqua ad entrare nell'apertura senza traboccare.
- Versare lentamente l'acqua nel serbatoio facendo attenzione a non superare il livello massimo (circa 370 ml)
indicato da "MAX" sul serbatoio [Fig. 2].
- Chiudere lo sportello della porta di riempimento (C).
Selezione del vapore:
1. Solo impostando una temperatura più alta è possibile utilizzare la funzione di stiratura a vapore. per esempio.
·· o ··· corrispondono al vapore normale, Max corrisponde al grande vapore.
2. Assicurarsi che ci sia abbastanza acqua nel serbatoio dell'acqua, mettere il ferro in posizione verticale.
3. Impostare la posizione richiesta dal selettore della temperatura, deve essere compresa tra la gamma di vapore
(·· o ···). [Figura. 3]
4. Collegare il ferro alla base e inserire la spina nella presa:
- Quando si usa il ferro collegato alla base [Fig. 4], assicurarsi di utilizzare l'interruttore di blocco della base (L),
posizionare il blocco della base (J) in posizione di blocco. Riscaldamento in posizione orizzontale o verticale.
- Quando utilizzate il ferro separatamente dalla base [Fig. 5], mettere verticalmente il ferro sulla base e attendere
il riscaldamento,
5. Quando la spia luminosa di riscaldamento (H) si spegne, è possibile iniziare a utilizzare il ferro.
-Se il ferro è stato collegato alla base, è possibile continuare a stirare.
-Se il ferro è stato utilizzato separatamente, è possibile utilizzare circa 30 secondi dopo che l'indicatore di
riscaldamento (H) si spegne (ci sarà una leggera dierenza di tempo è una condizione normale), quindi
è necessario riporre il ferro sulla base per il riscaldamento, è possibile continuare a utilizzarlo dopo che l'indicatore
di riscaldamento (H) si spegne.
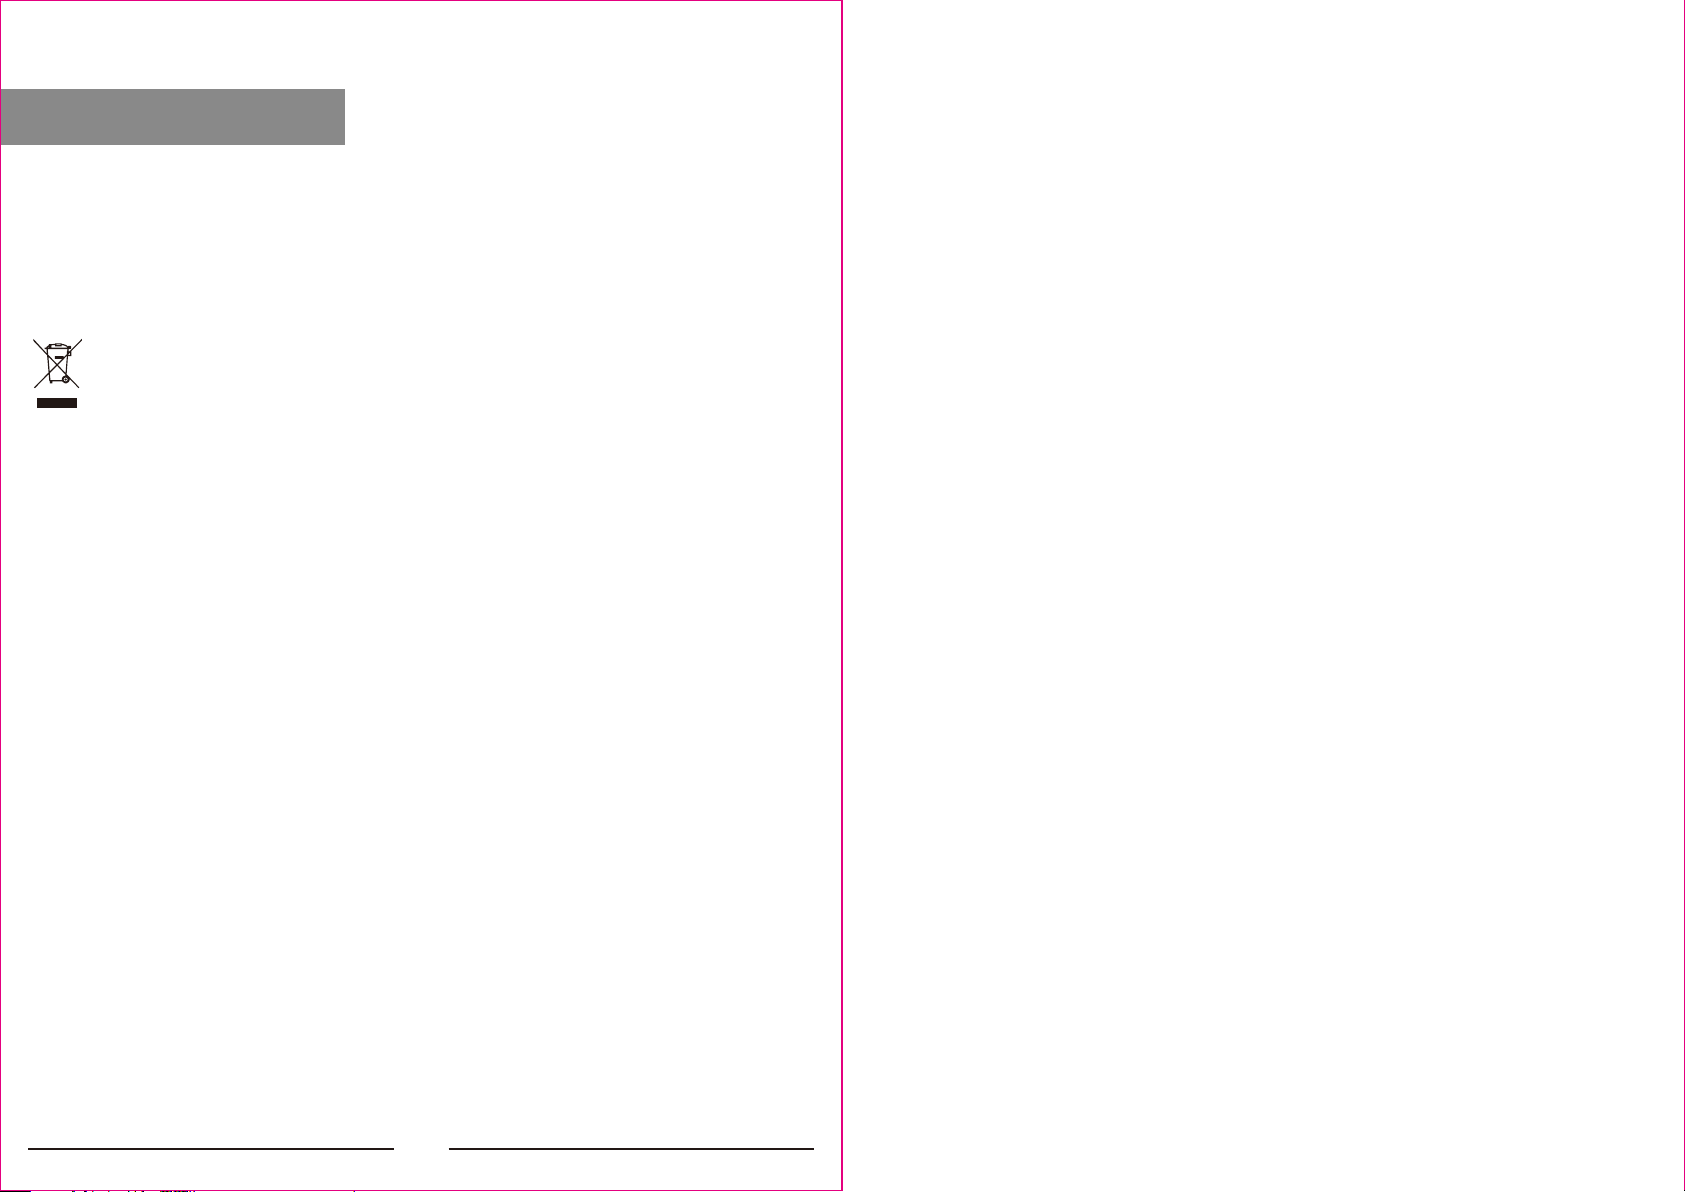
6. Impostare il selettore del vapore sulla posizione desiderata. [Figura. 1]
Premere il pulsante del getto di vapore (F) per generare un potente getto di vapore che può penetrare nei tessuti
e levigare le pieghe più dicili e resistenti.
Attendere almeno 3 secondi prima di premere nuovamente [Fig. 6].
Premendo il pulsante del getto di vapore a intervalli è possibile anche stirare verticalmente (tende, indumenti
appesi, ecc.) [Fig. 7].
Attenzione! La funzione colpo-vapore può essere utilizzata solo a temperature elevate. Arrestare l'emissione
quando la spia luminosa di riscaldamento (H) si accende, quindi iniziare a stirare di nuovo solo dopo che la luce
si è spenta.
FUNZIONE SPRAY
Assicurarsi che ci sia acqua nel serbatoio. Premere il pulsante di spruzzatura (E) lentamente (per uno spray denso) o
rapidamente (per uno spray vaporizzato) [Fig. 8].
Attenzione: per tessuti delicati, consigliamo di inumidire preventivamente il tessuto usando la funzione spray (E) o
di mettere un panno umido tra il ferro e il tessuto. Per evitare macchie, non usare lo spray su seta o tessuti sintetici.
PULIZIA
Nota: prima di pulire il ferro in qualsiasi modo, assicurarsi che la spina dell'apparecchio non sia collegata alla presa.
Eventuali depositi, residui di amido o dimensioni lasciati sulla piastra possono essere rimossi utilizzando un panno
umido o un detergente liquido non abrasivo.
Evitare di graare la piastra con lana d'acciaio o oggetti metallici.
Le parti in plastica possono essere pulite con un panno umido e poi asciugate con un panno asciutto.
AUTOPULENTE
La funzione autopulente pulisce all'interno della piastra, rimuovendo le impurità. Raccomandiamo di usarlo ogni
10-15 giorni. Indicazioni:
-Riempire il serbatoio no al livello massimo indicato e impostare il selettore del vapore (D) su "0"
-Fissare la manopola del termostato (G) alla temperatura massima e attendere che la luce (H) si spenga.
-Togliere il ferro dalla base e tenerlo in posizione orizzontale.
-Tenere premuto il pulsante di pulizia (N) nché tutta l'acqua bollente, il vapore, le impurità non escono [Fig. 9].
-Quando la piastra si è rareddata, è possibile pulirla con un panno umido.
STOCCAGGIO
- Staccare la spina del ferro dalla presa.
- Svuotare il serbatoio capovolgendo il ferro e scuotendolo delicatamente.
- Lasciare che il ferro si rareddi completamente.
- Arrotolare il cavo di alimentazione con il riavvolgitore [Fig. 10].
- Riponi sempre il ferro in posizione verticale.
STIRATURA A SECCO
Per stirare senza vapore, seguire le istruzioni nella sezione "stiratura a vapore", lasciando il selettore del vapore (D)
in posizione "0".
76
CONSIGLI PER LA STIRATURA
Raccomandiamo di utilizzare le temperature più basse con tessuti con niture insolite (paillettes, ricamo, colore, ecc.).
Se il tessuto è misto (ad esempio il 40% di cotone con il 60% di materiale sintetico), impostare il termostato
sulla temperatura della bra che richiede la temperatura più bassa.
Se non si conosce la composizione del tessuto, determinare la temperatura adatta provando su un angolo nascosto
del capo. Inizia con una bassa temperatura e aumentala gradualmente no a raggiungere la temperatura ideale.
Non stirare mai zone con tracce di sudore o altri segni: il calore del piatto ssa le macchie sul tessuto rendendole
inamovibili.
La stiratura è più ecace se si utilizza un ferro a temperatura moderata: il calore in eccesso lo brucia con il
rischio di formare un segno giallo.
Per evitare di lasciare aloni o tracce indumenti di seta, lana o sintetici lucidi, stirarli al rovescio.
Per evitare di lasciare aloni o tracce indumenti di velluto lucido, stirare in una direzione (seguendo la bra) e non
premere sul ferro. Più è pesante il carico della lavatrice, più i capi escono piegati. Questo succede anche quando i
giri di centrifuga sono molto alti.
Molti tessuti sono più facili da stirare se non sono completamente asciutti.
Ad esempio, la seta dovrebbe sempre essere stirata umida.
1 2
3 4
56
78
910
8 9
Il simbolo del cestino barrato riportato sull'apparecchio indica che il prodotto, alla ne della propria vita utile,
dovendo essere trattato separatamente dai riuti domestici, deve essere conferito in un centro di raccolta
dierenziata per apparecchiature elettriche ed elettroniche oppure riconsegnato al rivenditore al momento
dell'acquisto di una nuova apparecchiatura equivalente. L'adeguata raccolta dierenziata per l'avvio successivo
dell'apparecchio al riciclaggio, al trattamento e allo smaltimento ambientalmente compatibile contribuisce ad
evitare possibili eetti negativi sull'ambiente e sulla salute e favorisce il recupero dei materiali di cui è composto.
L'utente è responsabile del conferimento dell'apparecchio a ne vita alle appropriate strutture di raccolta.
Per informazioni più dettagliate inerenti i sistemi di raccolta disponibili, rivolgersi al servizio locale di smaltimento
riuti, o al negozio dove è stato eettuato l'acquisto.
Chiunque abbandona o cestina questo apparecchio e non lo riporta in un centro di raccolta dierenziata per riuti
elettrici-elettronici è punito con la sanzione amministrativa pecuniaria prevista dalla normativa vigente in materia
di smaltimento abusivo di riuti.
Non è garantita l’assistenza nei seguenti casi:
- Per danni provocati da oggetti posti nelle vicinanze del prodotto.
- In caso di danni meccanici all'apparecchio e per danni da trasporto.
- Nel caso di usura, per manutenzione, pulizia, controlli periodici, componenti asportabili (es. accessori).
- Se il dispositivo è stato installato in modo non conforme a quanto riportato nel manuale d’installazione a corredo
del prodotto.
- Per i danni causati da forza maggiore, inltrazione acqua o liquidi, fulmini, sovratensione.
- In caso di uso eccessivo (in particolare per uso diverso da quello per cui è stato destinato dal produttore).
- Nel caso in cui non siano state adeguatamente osservate le istruzioni perl'uso.
- Nel caso di danni provocati da surriscaldamento generato da fonti di calore esterne all’apparecchio o da uso non
conforme del prodotto alle prescrizioni del costruttore.
- Se il dispositivo non ha difetti tecnici e presenta aggiunte, modiche non concordate o siano stati posizionati
ricambi non originali.
- Nel caso di uso improprio, negligenza, o modiche eseguite senza l’autorizzazione del costruttore che causino
malfunzionamento o alterazionialla normale operatività dell’apparecchiatura.
- Tutti i casi non coperti da garanzia riferiti alle condizioni dalla stessa a corredo di ogni prodotto.
L’apparecchio è garantito per un periodo di due anni dalla data di acquisto.
Fa fede la data riportata sullo scontrino/fattura. In caso di difetto preesistente all’acquisto, viene garantita la
sostituzione. Non sono coperte da garanzie tutte le parti che dovessero risultare difettose a causa della
negligenza o dalla trascuratezza nell’uso.
La garanzia è inoltre esclusa in tutti i casi di uso improprio dell’apparecchio ed in caso di un utilizzo di tipo
professionale. Il venditore declina ogni responsabilità per eventuali danni che possano direttamente o
indirettamente derivare a persone, cose e animali domestici da conseguenza della mancata osservanza di tutte
le prescrizioni indicate nel manuale di istruzioni.
GARANZIA
10

INDEX
IMPORTANT SAFETY INSTRUCTIONS
ISTRUZIONI SPECIALI
SAVE THESE INSTRUCTIONS
INTENDED USE
TECHINCAL DATA
DESCRIPTION OF DEVICE
ANTI-CALC SYSTEM
ANTI-DRIP SYSTEM
AUTOMATIC SHUT OFF
GENERAL INSTRUCTIONS
PREPARATION TO IRON
STEAM IRONING
DRY IRONING
SPRAY FUNCTION
CLEANING
SELF-CLEANING
HOW TO PUT IT AWAY
HOW TO PUT IT AWAY
WARRANTY
pag.11-12
pag.12
pag.12-13
pag.13
pag.13
pag.14
pag.14
pag.14
pag.15
pag.15
pag.15
pag.16
pag.16
pag.17
pag.17
pag.17
pag.17
pag.18-19
pag.20
IMPORTANT SAFETY INSTRUCTIONS
When using your atiron, basic safety precautions should always be
followed, including the following:
READ ALL INSTRUCTIONS BEFORE USING
1. Use iron only for its intended use.
2. To protect against a risk of electric shock, do not immerse the iron in
water or other liquids.
3. The iron should always be turned to “ 0 ”before plugging or unplugging
from outlet. Never yank cord to disconnect from outlet; instead, grasp
plug and pull to disconnect.
4. Do not allow cord to touch hot surfaces. Let iron cool completely before
putting away. Loop cord loosely around iron when storing.
5. Always disconnect iron from electrical outlet when lling with water or
emptying and when not in use.
6. Do not operate iron with a damaged cord or if the iron has been
dropped or damaged. To avoid the risk of electric shock, do not
disassemble the iron take it to a qualied serviceman for examination
and repair. Incorrect reassembly can cause a risk of electric shock when
the iron is used.
7. Close supervision is necessary for any appliance being used by or near
children. Do not leave iron unattended while connected or on an ironing
board.
8. Burns can occur from touching hot metal parts, hot water, or steam. Use
caution when you turn a steam iron upside down – there may be hot
water in the reservoir.
9. If the malfunction indicator goes on, the atiron is not operating
normally. Disconnect from the power supply and have the atiron
serviced by qualied service personnel.
11

ISTRUZIONI SPECIALI
10. Do not put hand under steam iron.
11. Put steam iron on a at and stable surface.
12. This appliance must not be used to children with 8 years unless they
are supervised and let them know or if they have mental and physical
capacity.
1. To avoid a circuit overload, do not operate another high wattage
appliance on the same circuit.
2. If an extension cord is absolutely necessary, a 10-ampere cord should
be used. Cords rated for less amperage may overheat. Care should be
taken to arrange the cord so that it cannot be pulled or tripped over.
SAVE THESE INSTRUCTIONS
More specically:
DO NOT let children or untrained persons use the appliance without
supervision.
NEVER immerse the iron, cable or plug in any liquid.
DO NOT leave the hot iron touching fabrics or very inammable surfaces.
DO NOT leave the appliance unnecessarily plugged in. Disconnect the
plug from the mains when the appliance is not being used.
NEVER touch the appliance with wet or damp hands.
DO NOT use the power cord or the appliance in order to pull the plug out
of the socket.
DO NOT leave the appliance exposed to the weather (rain, sun, etc. ).
DO NOT leave the iron without supervision when it is connected to the
power supply.
DO NOT ll the reservoir with water before removing the plug from the
ocket.
PLEASE NOTE!
Do not use chemical additive, scented substances or decalcies. Failure to
comply with the above-mentioned regulations leads to the loss of
guarantee.
INTENDED USE
This steam iron allow to iron cloth. For private use and not commercial use.
Note! Do not put steam iron in vertical position also for short time!
TECHINCAL DATA
220-240V-50/60Hz
Power: 2000-2400W
Length of the base power cord: 1.9M
Soleplate size: 20x12 cm
1312
E
F G H I J K L
MNO
D
C
B
A
DESCRIPTION OF DEVICE AUTOMATIC SHUT OFF
- If the iron (iron connected to the base and power on) has been left for approx. 30 seconds in the horizontal
position, heating will shut o. When heating shut o, automatic shut o indicator light (K) will blink.
- If the iron (iron connected to the base and power on) has been left for approx. 8 minutes, heating will shut o.
When heating shut o, automatic shut o indicator light (K) will blink.
- When hold up the iron again, automatic shut o indicator light (K) will permanent bright. When power indicator
light (H) bright, the iron heating again.
- When power indicator light (H) goes out, the iron can be used.
GENERAL INSTRUCTIONS
When using the iron for the rst time, you may notice a slight emission of smoke and hear some sounds made by
the expanding plastics. This is quite normal and it stops after a short time. We also recommend passing the iron
over an ordinary cloth before using it for the rst time.
PREPARATION TO IRON
Before iron, check the washing lable on the product.
Start ironing the garments requiring a low temperature.
This reduces the waiting times (the iron takes less time to heat up than to cool down) and eliminates the risk of
scorching the fabric.
GARMENT LABE FABRIC TYP THERMOSTAT REGULATION
synthetic low temperature
silk - wool medium temperature
Cotton - linen high temperature
Fabric not to be ironed
(A). Soleplate
(C). Filler door
(E). Spray button
(G). Thermostat knob for temperature
(I). Base
(K). ASO indicator light
(M). Cord bushing
(O). Maximum lling level
ANTI-CALC SYSTEM
A special resin lter inside the water reservoir softens the water and prevents scale build-up in the plate. The resin
lter is permanent and does not need replacing.
Please note:
Use tap water only. Distilled and demineralized water makes the anti-calc system ineective by altering its
physicochemical characteristics.
Do not use chemical additives, scented substances or decalcies. Failure to comply with the above-mentioned
regulations leads to the loss of guarantee.
ANTI-DRIP SYSTEM
With the anti-drip system, you can perfectly iron even the most delicate fabrics.
Always iron these fabrics at low temperatures. The plate may cool down to the point where no more steam comes
out, but rather drops of boiling water that can leave marks or stains. In these cases, the Anti-drip system
automatically activates to prevent vaporization, so that you can iron the most delicate fabrics without risk of
spoiling or staining them.
(B). Spray organ
(D). Steam dial
(F). Shot-steam button
(H). Heating indicator light
(J). Base lock
(L). Base lock Switch
(N). cleaning button
15
14

STEAM IRONING
Filling the reservoir
- Check that the plug is disconnected from the socket.
- Move the steam selector (D) to “0” [Fig. 1].
- Open the Filler door (C).
- Raise the tip of the iron to help the water enter the opening without overowing.
- Slowly pour the water into the reservoir using the special measure and taking care not to go over the maximum
level (about 370ml) indicated by “MAX” on the reservoir [Fig. 2].
- Close the Filler door (C).
Selecting the steam.
1. Only setting a higher temperature can use steam ironing function. e.g. ·· or ··· match normal steam, Max match
big steam.
2. Ensure there’s enough water in the water tank, put the iron in vertical position.
3. Setting the temperature selector required position, must between steam range (·· or ···). [Fig. 3]
4. Connect the iron to the base and insert the plug into the socket:
-When use the iron connected with its base [Fig. 4], make sure to open the base lock switch (L), make the base
lock (J) in lock position. Heating in horizontal or vertical position.
-When use the iron separately with the base [Fig. 5], vertically put the iron on the base, and wait for heating,
5. When heating indicator light (H)goes out, you can start to use.
-If the iron was connected to the base, you can continue ironing.
-If the iron was used separately, you can use about 30 seconds after the heating indicator (H) goes out (there will
be slight dierence for dierent user, it is a normal condition), then you need to reput the iron on the base for
heating, you can continue to use after the heating indicator (H) goes out,
6. Setting the steam selec tor to a required position. [Fig. 1]
Selecting Shot-steam and steam when ironing vertically.
Press the shot-steam button (F) to generate a powerful burst of steam that can penetrate the fabrics and smooth
the most dicult and tough creases.
Wait for at least 3 seconds before pressing again [Fig. 6].
By pressing the shot-steam button at intervals you can also iron vertically (curtains, hung garments, etc.) [Fig. 7].
Warning: the shot-steam function can only be used at high temperatures. Stop the emission when the Heating
indicator light t (H) comes on, than start ironing again only after the light has gone o.
SPRAY FUNCTION
Make sure that there is water in the reservoir. Press the spray button (E) slowly (for a dense spray) or quickly (for a
vaporized spray) [Fig. 8].
Warning: for delicate fabrics, we recommend moistening the fabric beforehand using the spray function (E), or
putting a damp cloth between the iron and the fabric. To avoid staining, do not use the spray on silk or synthetic
fabrics.
CLEANING
Please note: before cleaning the iron in any way, make sure that the appliance plug is not connected to the socket.
Any deposits, starch residue or size left on the plate can be removed using a damp cloth or a nonabrasive liquid
detergent.
Avoid scratching the plate with steel wool or metallic objects.
The plastic parts can be cleaned with a damp cloth then wiped over with a dry cloth.
SELF-CLEANING
The self-cleaning feature cleans inside the plate, removing impurities. We recommend using it every 10-15days.
Directions:
-Fill the reservoir up to the maximum level indicated and set the steam selector (D) to “0”
-Set the thermostat knob (G) to the maximum temperature and wait for the light (H) to turn o.
-Take out the iron from the base and hold it in horizontal position.
-Hold the cleanout button (N) setting until all the boiling water, steam, impurities come out [Fig. 9].
-When the soleplate has cooled down, you can clean it with a damp cloth.
HOW TO PUT IT AWAY
- Disconnect the plug of the iron from the socket.
- Empty the reservoir by turning the iron upside down and gently shaking it.
- Leave the iron to cool down completely.
- Roll up the power cord with the rewinder [Fig. 10].
- Always put the iron away in a vertical position.
DRY IRONING
To iron without steam, follow the instructions in section “steam ironing”, leaving the steam selector (D) on
position “0”.
1716

ADVICE FOR GOOD IRONING
We recommend using the lowest temperatures with fabrics that have unusual nishes (sequins, embroidery,
ush, etc.).
If the fabric is mixed (e.g. 40% cotton 60% synthetics), set the thermostat to the temperature of the bre requiring
the lower temperature.
If you don’t know the composition of the fabric, determine the suitable temperature by testing on a hidden corner
of the garment. Start with a low temperature and increase it gradually until it reaches the ideal temperature.
Never iron areas with traces of perspiration or other marks: the heat of the plate xes the stains on the fabric,
making them irremovable.
The size is more eective if you use a dry iron at a moderate temperature: excess heat scorches it with the risk of
forming a yellow mark.
To avoid marking silk, woolen or synthetic garments shiny, iron them inside out.
To avoid marking velvet garments shiny, iron in one direction (following the bre) and do not press down on the
iron.
The heavier the washing machine is loaded, the more garments come out creased. This also happens when the
spin drying revolutions are very high.
Many fabrics are easier to iron if they are not completely dry.
1 2
3 4
56
78
910
18 19

The crossed bin symbol on the appliance indicates that the product, at the end of its useful life, having to be treated
separately from household waste, must be delivered to a separate collection center for electrical and electronic
equipment or returned to the retailer at the time of purchase of a new equivalent equipment. The adequate
separate collection for the subsequent start-up of the appliance for recycling, treatment and compatible
environmental disposal helps to avoid possible negative eects on the environment and on health and favors the
recovery of the materials it is made of.
The user is responsible for placing the appliance at the end of its life at the appropriate collection facilities. For more
detailed information regarding the collection systems available, contact the local waste disposal service, or the store
where the purchase was made. Anyone abandons or trashes this appliance and does not return it to a separate
waste collection center
electric-electronic is punished with the pecuniary administrative sanction provided for by the regulations in force
concerning the illegal disposal of waste.
Assistance is not guaranteed in the following cases:
For damages caused by objects placed near the product.
In case of mechanical damage to the appliance and for transport damage.
In case of wear, for maintenance, cleaning, periodic checks, removable components (eg accessories).
If the device has been installed in a way that does not comply with the instructions in the installation manual
supplied with the product.
For damages caused by force majeure, inltration of water or liquids, lightning, overvoltage.
In case of excessive use (in particular for use dierent from that for which it was intended by the manufacturer).
In case the instructions for use have not been adequately observed.
In the case of damage caused by overheating generated by sources of heat outside the appliance or by improper
use of the product to the manufacturer's instructions.
If the device has no technical defects and presents additions, changes not agreed or have been placed non-original
spare parts.
In the event of improper use, negligence, or modications made without the manufacturer's authorization causing
malfunction or alteration of normal operation of the equipment.
All cases not covered by warranty referring to the conditions of the same in support of each product.
The appliance is guaranteed for a period of two years from the date of purchase. The date shown on the receipt /
invoice is valid.
In case of pre-existing defect at the purchase, replacement is guaranteed.
All parts that are found to be defective due to negligence or negligence in use are not covered by warranty.
The warranty is also excluded in all cases of improper use of the appliance and in the case of a professional use.
The seller declines all responsibility for any damage that may directly or indirectly derive from persons, things and
pets as a result of failure to comply with all the instructions indicated in the instruction manual.
WARRANTY
20
This manual suits for next models
1
Table of contents
Languages:


