Lavor ETNA 4000 User manual

ETNA 4000
ETNA 4000 FOAM
-
IVP VAC 4000
IVP VAC 4000 FOAM
ATTENZIONE: leggere le istruzioni prima dell’ utilizzo.
WARNING: read the instructions carefully before use.
ATTENTION: lire attentivement les istructions avant l’usage.
ACHTUNG: die anweisungen bitte vor gebrauch sorgfältig lesen.
ADVERTENCIA: leer atentamente las advertencias antes el uso de aparado.
ATENÇÃO: ler atentamente as instruções antes da utilização.
DİKKAT: MAKİNAYI KULLANMADAN ÖNCE KULLANIM TALİMATLARINI OKUYUNUZ.
POZOR: pred uporabo preberite navodila.
ВНИМАНИЕ: Перед началом использования оборудования внимательно
ознакомьтесь с руководством по эксплуатации!
LET OP: vóór gebruik de gebruiksaanwijzing aandachtig lezen.
ISTRUZIONI PER L’USO
Attrezzatura polivalente che consente la pulizia a vapore. L’apparecchio può
essere usato anche come semplice aspirapolvere/aspiraliquidi
pag. 8
USER’S INSTRUCTIONS
Multipurpose steam cleaning equipment. The unit can be also used as a
simple vacuum cleaner that handles both dust and liquids
pag. 15
MODE D’EMPLOI
Appareil polyvalent pour le nettoyage à la vapeur, qui peut également
être utilisé comme simple aspirateur eau et poussières
page 21
BEDIENUNGSANLEITUNG
Mehrzweckgerät für die Dampfreinigung. Das Gerät kann auch als
einfachenNass- und Trockensauger verwendet werden
Seite 27
INSTRUCCIONES PARA EL USO
Aparato polivalente para la limpieza a vapor. También puede usar el
aparato como un simple aspirador de polvo y de líquidos
pág. 33
INSTRUÇÕES ANTES DA UTILIZAÇÃO
Equipamento polivalente que permite a limpeza a vapor. O aparelho
também pode ser usado como um simples aspirador de pó/de líquidos
pág. 39
KULLANMADAN TALİMATLARINI
Çokamaçlı buharlı temizleme makinası. Bu makina hem sıvı hemde toz
atıkların vakumlanması içinde kullanılmaktadır
sf. 45
NAVODILA ZA UPORABO
Pranje z ekstrakcijo pare + inijeciranje tople vode ali detergenta.
Sesanje prahu/pranje s paro
str. 51
ИНСТРУКЦИЯ ПО ЭКСПЛУАТАЦИИ
Парогенератор , введение , пылесос для влажной и сухой уборки
стр. 57
+
1-67
HANDLEIDING
Kan ook gebruikt worden als multifunctionele stoomreiniger.
Blz. 68
Technical data plate
F
F
B E
P
P
P1
R
R
H
H
E
B
CD
C
D
H2
H2
Etna 4000
Etna 4000 FOAM
2
L2
L2
L3
L1
V1
V2
V3
Etna 4000 FOAM
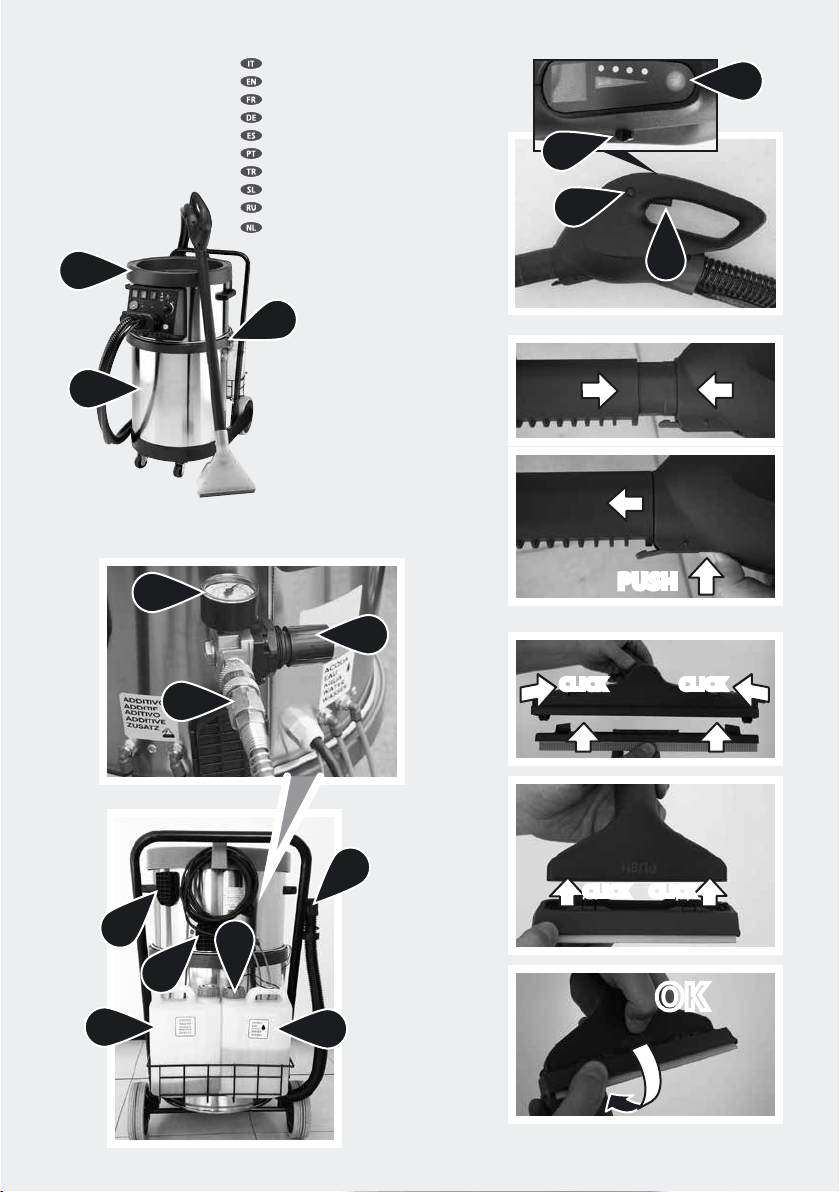
MONTAGGIO ACCESSORI
ACCESSORIES ASSEMBLING
MONTAGE DES ACCESSOIRES
MONTAGE DER ZUBEHÖRTEILE
MONTAJE ACCESORIOS
MONTAGEM DE ACESSÓRIOS
MONTAJ AKSESUARLARI
NAVODILA ZA MONTAŽO
СБОРКА ПРИНАДЛЕЖНОСТЕЙ
MONTAGE-INSTRUCTIES
OK
1
PUSH
2
CLICK CLICK
11
CLICK CLICK 22
M
M
K
J1J
Z
A
I
G
3
1 2
4
5 6
7 8
3
*
+
◊
*
+
◊
G
4

9 10 11
13 14 15
H2
12
L
L4
L4
FUNKTION GEBLÄSE BLOWER
FONCTION SOUFFLAGE
FUNZIONE SOFFIANTE
FUNCIÓN DE SOPLADOR -
FUNÇÃO SOPRADOR
HAVA ÜFLEYICI FUNKCIJA PIHANJA
Функции Oбдувка BLAZER FUNCTIE
Z1
L1
5

N
N
Y
X
U1
U1
T1
T1
S1
S1
N2
N2N1
N1
S
T2
?
UU
Q3
T4
T3
Z1
Z1
O O
Y
X
S
T2
H1H1
Q
Q2
Q1
Etna 4000 Etna 4000 FOAM
T
In base al modello si possono verificare delle differenze nella fornitura. Depending on the model, there are differences in the
scopes of delivery. Suivant le modèle, la fourniture peut varier. Je nach Modell gibt es Unterschiede im Lieferumfang. Según
el modelos, hay diferencias en el contenido suministrado. Consoante o modelo, existem diferenças no volume de fornecimento.
L4L4
L L
L2 L2
L3 L3
L1 L1
6

pag. 8
pag. 15
page 21
Seite 27
pág. 33
pág. 39
sf. 45
str. 51
стр. 57
1-67
Blz. 68
Modele bağlı olarak teslimat kapsamında farklar olabilir. В данном руководстве по эксплуатации дано описание
прибора с максимальной комплектацией. Комплектация отличается в зависимости от модели
Afhankelijk
van het model zijn er verschillen in de leveringspakketten.
7

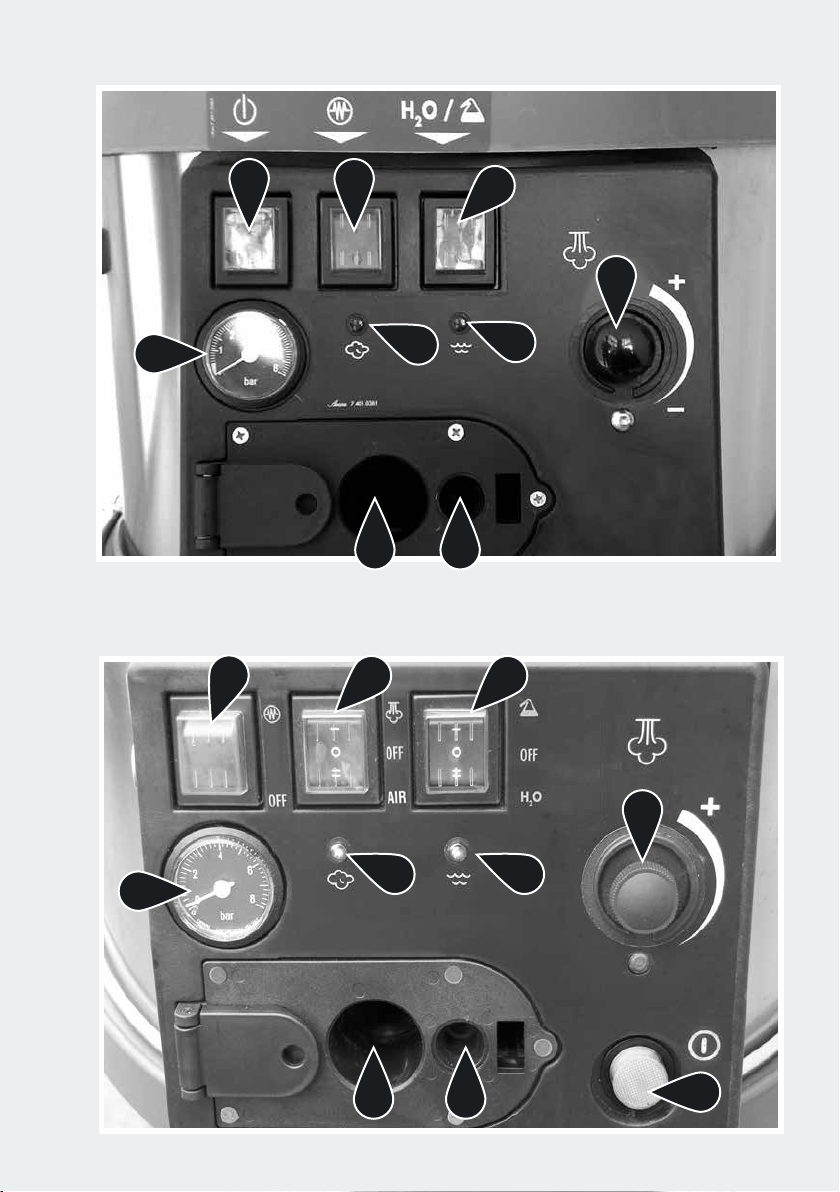
DESCRIZIONE E MONTAGGIO
ATestata motore
B
Interruttore ON/OFF generale
CSpia mancanza acqua
DSpia vapore pronto
E
Interruttore ON/OFF caldaia
FManopola regolazione vapore
GGanci per la chiusura testata/fusto
JTanica acqua
J1Tanica detergente
KSonda di pescaggio
HBocchettone d’aspirazione
H1Bocchetta tubo flex
H2Presa uscita vapore
IFusto
LTubo flex
L1Tasto aspirazione
L2Fermo sicurezza emissione vapore/aria
L3Leva vapore/aria
L4Tubo flex, funzione soffiante
MFiltri aria
NPennello plastica
N1Pennello acciaio
N2Pennello ottone
OTubo prolunga
P
Selettore pompa iniezione
I - detergente
OFF O - OFF
II - acqua calda
solo modello FOAM :
P1 Selettore modalità uso:
I - vapore
OFF O - OFF
II - aria compressa
QTelaio per polveri
(solo
ETNA
)
Q1 Telaio per liquidi
(solo
ETNA
)
Q2 Telaio per tappeti/moquette
(solo
ETNA
)
Q3
Spazzola schiumogena (solo FOAM,
NON per vapore)
UTILIZZO PREVISTO
• L’apparecchio è destinato ad un utilizzo professio-
nale.
• Può essere usato come aspiratore per liquidi e
aspiratore a secco.
• L’utilizzo dell’apparecchio in concomitanza con
polveri particolarmente fini (dimensione minore
di 0,3 µm) richiede l’adozione di specifici filtri for-
niti in opzione (Hepa).
DATI TECNICI
(vedi targhetta dati tecnici)
AVVERTENZE GENERALI
01 I componenti usati nell’imballo (es. sacchi in
plastica) possono costituire potenziali pericoli, te-
nerli fuori della portata di bambini ed animali.
02 Ogni utilizzo diverso da quelli indicati sul pre-
sente manuale può costituire pericolo, pertanto
deve essere evitato.
03 Il fabbricante declina ogni responsabilità per
danni causati a persone, animali o cose in seguito
al mancato rispetto di queste istruzioni o se l’ap-
parecchio viene usato in modo irragionevole.
04 Collegare l’apparecchio soltanto se la tensione
di rete coincide con la tensione riportata sulla tar-
ghetta delle caratteristiche e se la presa di alimen-
RManometro vapore
SPennello
S1Pennello 150
T
Bocchetta grande vapore/aspirazione
(solo ETNA)
T1Bocchetta 150
T2 Bocchetta piccola aspirazione
T3 Bocchetta grande (solo FOAM)
T4 Telaio per schiuma (solo FOAM)
UTergivetro
U1Tergivetro 150
V1 Attacco aria compressa (solo FOAM)
V2 Manometro aria compressa (solo FOAM)
V3 Manopola aria compressa (solo FOAM)
XLancia diritta
YSpruzzatore inclinato
ZTubo scarico liquidi
Z1 Fi
ltro
Istruzioni originali
IT
8

del camino e fuliggine), esplosive, tossiche o peri-
colose per la salute.
22 Non usare l’apparecchio per aspirare acqua da
recipienti, lavandini, vasche, ecc.
23 Spegnere immediatamente l’apparecchio in
caso di fuoriuscita di liquido o schiuma.
24 Non mettere l’orifizio di aspirazione vicino a
parti delicate del corpo come occhi, bocca, orec-
chie.
25 Non toccare con le mani da vicino il getto di
vapore.
26 Non impedire l’uscita del getto di vapore.
27 Non indirizzare il getto di vapore su persone
o animali.
28 Durante l’uso non coprire l’apparecchio, po-
trebbe surriscaldarsi.
29 Se l’apparecchio viene prestato ad altre perso-
ne, è necessario consegnare loro anche il libretto
di istruzioni.
30 Il prodotto non deve essere usato dai bambi-
ni o da persone con capacità fisiche, sensoriali o
mentali ridotte o mancanti di adeguata esperien-
za e conoscenza, finchè non siano state adeguata-
mente addestrate o istruite.
31 I bambini, anche se controllati, non devono
giocare con il prodotto.
32 Funzione schiuma "Foam": collegare l’apparec-
chio a un compressore d'aria (non fornito) minimo
5 bar.
33 Funzione schiuma "Foam": Per la produzione
di schiuma è indinspensabile utilizzare detergenti
specifici.
34 Eseguire sempre un test su una parte poco vi-
sibile del materiale.
tazione è dotata di messa a terra.
05 Non afferrare mai la spina del cavo elettrico
con le mani bagnate.
06 Non estrarre la spina dalla presa tirando il cavo.
07 Non trainare l’apparecchio tramite il cavo di
alimentazione.
08 Srotolare completamente il cavo di alimenta-
zione prima dell’uso.
09 È sconsigliato l’uso di prolunghe elettriche;
qualora fosse necessario l’impiego, utilizzare pro-
lunghe con il marchio di approvazione di sicurez-
za e munite di messa a terra. Sezione minima cavo
prolunga 2,5mm².
10 Togliere sempre la spina dalla presa di corrente
prima di effettuare qualsiasi intervento sull’appa-
recchio o quando rimane incostudito o alla porta-
ta di bambini o di persone non coscienti dei loro
atti.
11 Controllare scrupolosamente se cavo, spina
o parti dell’apparecchio risultano danneggiate
ed in tal caso non utilizzare assolutamente
l’apparecchio, ma rivolgersi al Servizio Assi-
stenza per la sua riparazione.
12 Non utilizzare l’apparecchio per la pulizia a
vapore di apparecchiature elettriche o prese di
corrente.
13 Non lavorare con le mani ed i piedi bagnati
quando l’apparecchio è collegato.
14 Non immergere l’apparecchio in alcun liquido.
15 Non pulire l’apparecchio con il vapore.
16 Manutenzioni e riparazioni devono essere
effettuate sempre da personale specializzato; le
parti che eventualmente si guastassero vanno so-
stituite solo con ricambi originali.
17 Prima di collegare l’apparecchio, accertarsi che
i dati di targa siano rispondenti a quelli della rete
elettrica e che la presa sia protetta con un inter-
ruttore magnetotermico differenziale“SALVAVITA”
con sensibilità di intervento inferiore a 0,03 A -
30ms.
18 Accertarsi che la presa sia conforme alla spina
dell’apparecchio.
19 Non utilizzare l’apparecchio in caso di tempe-
ratura ambiente inferiore a O° C, se esso è equi-
paggiato con cavo in PVC (HVV-F).
20 Il cavo elettrico può essere sostituito esclusiva-
mente da un centro assistenza autorizzato.
21 Non aspirare sostanze infiammabili (es. cenere
IT
9

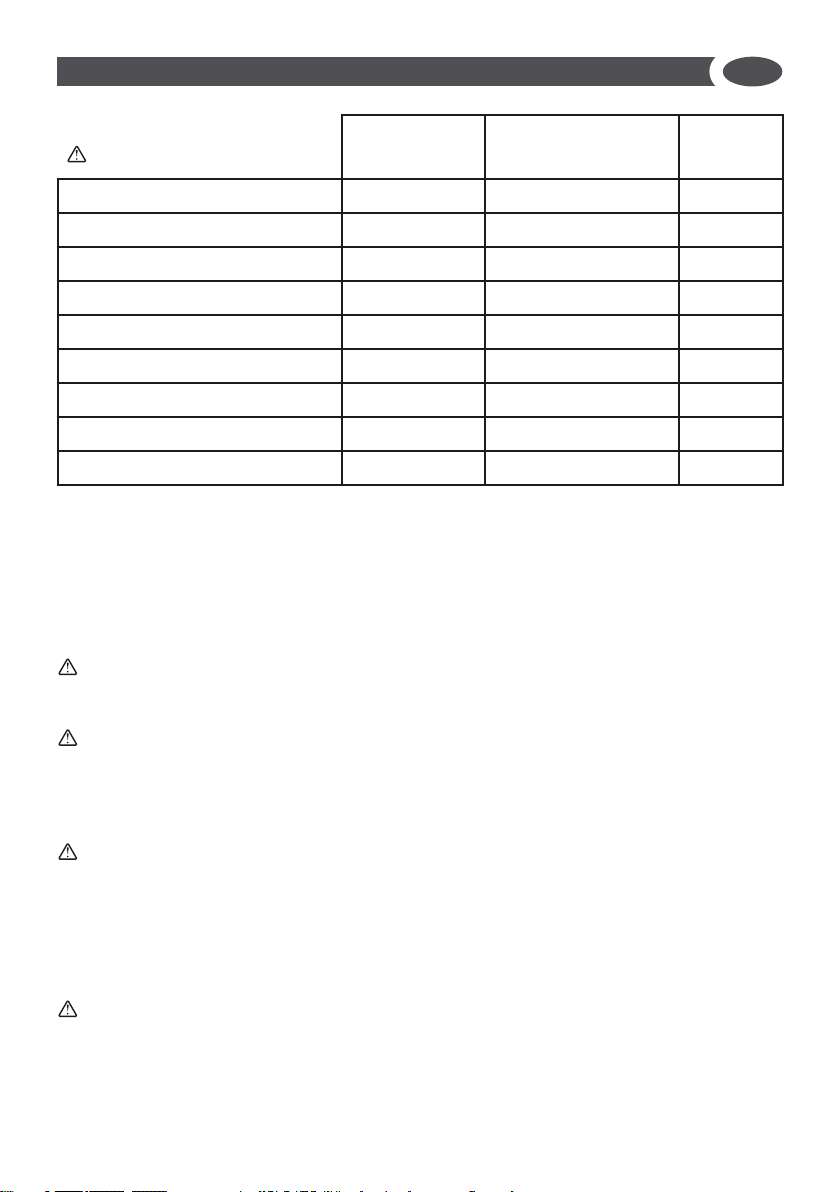
TABELLA DI UTILIZZO
34 Eseguire sempre un test su una
parte poco visibile del materiale.
Sporco normale Sporco intenso Asciugatura
Interno auto: sedili schiuma schiuma/vapore aspiratore
Interno auto: tappetini/moquette aspiratore vapore/detergente aspiratore
Interno auto: rivestimento tetto/vetri vapore vapore aspiratore
Interno auto: cruscotto aspiratore aspiratore/aria compressa panno
Cerchioni auto vapore/detergente vapore/detergente panno
Tappetti e moquette in genere schiuma schiuma/vapore aspiratore
Servizi igienici, pavimenti, rivestimenti schiuma vapore/detergente aspiratore
Parquet schiuma schiuma aspiratore
Superfici in acciaio inox schiuma vapore/detergente aspiratore
USO
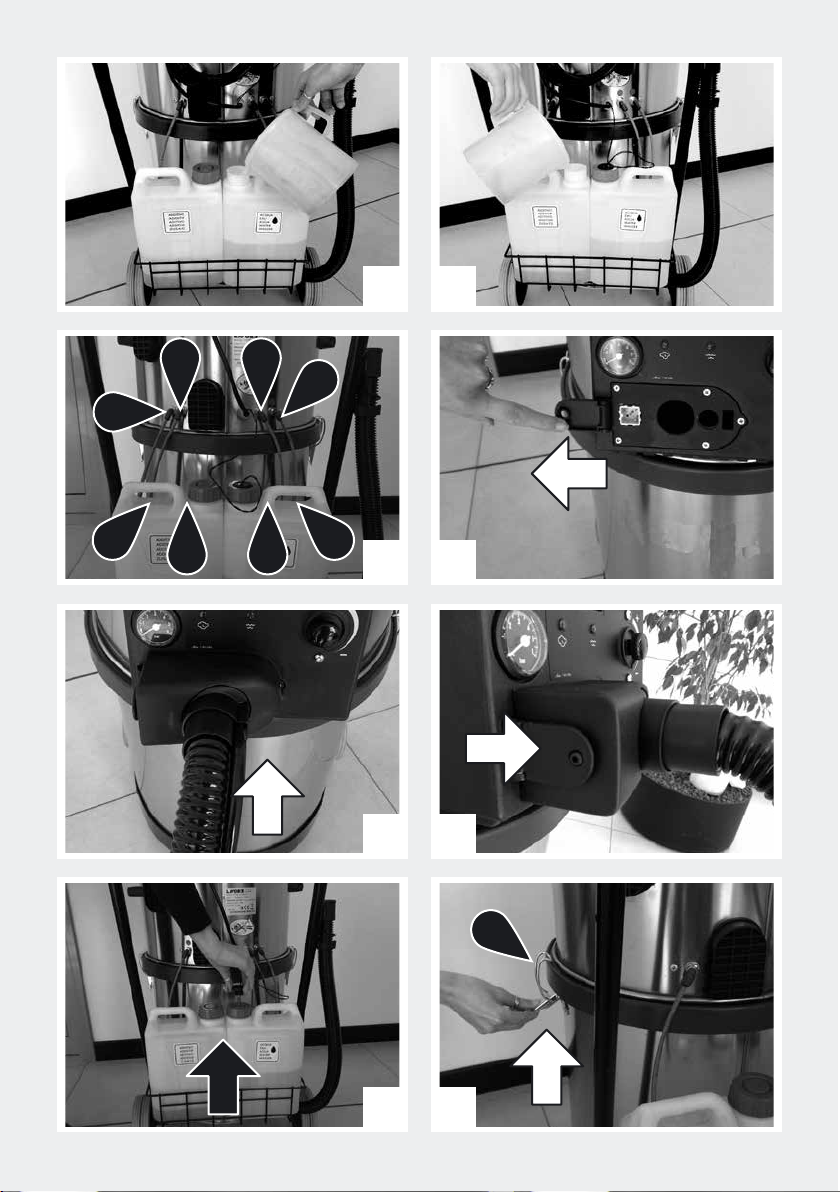
MESSA IN SERVIZIO
• Durante la preparazione spegnere l’apparec-
chio e sfilare la spina!
• Riempire la tanica Jcon acqua di rubinetto (Fig. 1)
• Non aggiungere alcun tipo di detergente o
sostanza chimica all’acqua del serbatoio!
• Riempire la tanica J1 con detergente (Fig. 2)
• Inserire i tubi (◊,+, -,*) nei fori (◊,+, -,*) sulle taniche
(Fig. 3)
• Questo apparecchio é stato progettato per es-
sere utilizzato con il detergente fornito o prescrit-
to dal costruttore. L’impiego di altri detergenti o
sostanze chimiche puo’ compromettere la sicu-
rezza dell’apparecchio!
• Inserire la bocchetta H1 del tubo flex L nel boc-
chettone di aspirazione H(Fig. 4 -5 - 6)
• Non lavorare mai senza aver montato il filtro!
ASPIRAZIONE POLVERE
• Inserire nell’impugnatura del tubo flex L l’ac-
cessorio più adatto.
• Collegare l’apparecchio ad una presa di cor-
rente idonea.
• Attivare l’interrutore generale B
• Per selezionare la potenza di aspirazione (dal
1° al 4° livello), esercitare brevi pressioni del
tasto aspirazione L1sull’impugnatura; il led
corrispondente al livello di potenza scelto
si illumina. E’ possibile variare il livello di po-
tenza sia ad aspirazione accesa che spenta.
Per accendere e spegnere l’aspiratore, tene-
re premuto il tasto aspirazione L1per circa 2
secondi.
IT
10

LAVAGGIO CON ESTRAZIONE VAPORE
• Inserire nell’impugnatura del tubo flex L l’ac-
cessorio più adatto.
• Collegare l’apparecchio ad una presa di cor-
rente idonea.
• Attivare l’interruttore generale B
• Attivare la formazione di vapore con l’inter-
ruttore Efino all’accensione della spia “vapo-
re pronto” D.
Solo Foam:
• Selezionare l'interruttore P1 in posizione
(I) vapore.
• Per la fuoriuscita di vapore, premere la leva
L3.
La prima emissione di vapore sarà accompa-
gnata da acqua di condensa; dirigere il getto
a parte o su un panno.
•
Preselezionare l’intensità del vapore tramite la
manopola Fposta sull’apparecchio. Lo strumento
Rindica il livello di pressione all’interno della cal-
daia.
•
È possibile unire le funzioni di pulizia a vapore ed
aspirazione sopra descritte, per pulire ed aspirare
contemporaneamente.
•
Per selezionare la potenza di aspirazione (dal 1° al
4° livello), esercitare brevi pressioni del tasto aspi-
razione L1sull’impugnatura; il led corrispondente
al livello di potenza scelto si illumina. E’ possibile
variare il livello di potenza sia ad aspirazione ac-
cesa che spenta. Per accendere e spegnere l’aspi-
ratore, tenere premuto il tasto aspirazione L1per
circa 2 secondi.
•
A termine operazione, rilasciare qualche istante
prima la leva vapore L3rispetto allo spegnimento
del motore aspirazione L1 per consentire il recupe-
ro dell’umidità attraverso i condotti di aspirazione.
LAVAGGIO CON ESTRAZIONE VAPORE + INIEZIO-
NE ACQUA CALDA O DETERGENTE
• Inserire nell’impugnatura del tubo flex Ll’ac-
cessorio più adatto.
• Collegare l’apparecchio ad una presa di cor-
rente idonea.
• Attivare l’interruttore generale B
• Attivare la formazione di vapore con l’inter-
ruttore Efino all’accensione della spia “vapo-
re pronto” D.
Solo Foam:
• Selezionare l'interruttore P1 in posizione
(I) vapore.
• Attivare la pompa iniezione con l’interruttore P:
H2O (II)
acqua calda oppure
(I)
detergente
Solo Etna :
• Per facilitare l’innesco della pompa iniezio-
ne, chiudere il rubinetto vapore F)
• Premere la leva L3.
• Preselezionare l’intensità del vapore tramite la
manopola Fposta sull’apparecchio. Lo strumento
Rindica il livello di pressione all’interno della cal-
daia.
• È possibile unire le funzioni di pulizia a vapore ed
aspirazione sopra descritte, per pulire ed aspirare
contemporaneamente.
• Per selezionare la potenza di aspirazione (dal
1° al 4° livello), esercitare brevi pressioni del
tasto aspirazione L1sull’impugnatura; il led
corrispondente al livello di potenza scelto
si illumina. E’ possibile variare il livello di po-
tenza sia ad aspirazione accesa che spenta.
Per accendere e spegnere l’aspiratore, tene-
re premuto il tasto aspirazione L1per circa 2
secondi.
• A termine operazione, rilasciare qualche istante
prima la leva vapore L3rispetto allo spegnimento
del motore aspirazione L1, per consentire il recu-
pero dell’umidità attraverso i condotti di aspira-
zione.
IT
11

LAVAGGIO CON ESTRAZIONE SCHIUMA
(solo FOAM)
32
Collegare l’apparecchio a un compresso-
re d'aria (non fornito) minimo 5 bar.
33
Per la produzione di schiuma è indin-
spensabile utilizzare detergenti specifici.
• Innestare il tubo di collegamento aria com-
pressa in V1 (tubo non in dotazione)
• Regolare la pressione dell'aria da 2 a 5 bar
tramite la manopola V3.
• Inserire nell’impugnatura del tubo flex L l’ac-
cessorio più adatto.
• Collegare l’apparecchio ad una presa di cor-
rente idonea.
• Attivare l’interrutore generale B
• Selezionare l'interruttore P1 in posizione
AIR (II) aria .
• Selezionare l'interruttore P in posizione
(I) detergente
• Per la fuoriuscita di schiuma, premere la leva
L3
• Distribuire la schiuma.
• Attendere 1 muinuto, in modo che il deter-
gente agisca.
• Aspirare premendo il pulsante L1
• Per selezionare la potenza di aspirazione (dal
1° al 4° livello), esercitare brevi pressioni del
tasto aspirazione L1sull’impugnatura; il led
corrispondente al livello di potenza scelto si
illumina. E’possibile variare il livello di poten-
za sia ad aspirazione accesa che spenta. Per
accendere e spegnere l’aspiratore, tenere
premuto il tasto aspirazione L1per circa 2 se-
condi.
RISCIACQUO CON ARIA E ACQUA
(solo FOAM)
32
Collegare l’apparecchio a un compresso-
re d'aria (non fornito) minimo 5 bar.
• Innestare il tubo di collegamento aria com-
pressa in V1 (tubo non in dotazione)
• Regolare la pressione dell'aria al massimo
tramite la manopola V3.
• Inserire nell’impugnatura del tubo flex L l’ac-
cessorio più adatto.
• Collegare l’apparecchio ad una presa di cor-
rente idonea.
• Attivare l’interrutore generale B
• Selezionare l'interruttore P1 in posizione
AIR (II) aria .
• Selezionare l'interruttore P in posizione
H2O (II) acqua.
• Per la fuoriuscita aria e aqua, premere la leva
L3
• Aspirare premendo il pulsante L1
• Per selezionare la potenza di aspirazione (dal
1° al 4° livello), esercitare brevi pressioni del
tasto aspirazione L1sull’impugnatura; il led
corrispondente al livello di potenza scelto si
illumina.
IT
12

RABBOCCO ACQUA CALDAIA
Il serbatoio caldaia L alimenta la caldaia con livello
elettronico; essendo un serbatoio esterno, può esse-
re rabboccato in qualsiasi momento.
Quando termina l’acqua nel serbatoio caldaia
l’apparecchio:
1. emette un segnale acustico intermittente
(bip)
2. la spia del livello dell’acqua Clampeggia
3. si arresta la fuoriuscita di vapore
Per il rabbocco, procedere come segue:
• disinserire l’interruttore per il riscalda-
mento E
• disinserire l’interruttore principale B
• estrarre il cavo dalla presa di corrente
• riempire il serbatoio acqua caldaia J
SPEGNIMENTO DELL’APPARECCHIO
• Portare gli interruttori P, P1 ,E , B,in posizio-
ne OFF.
• Estrarre la spina dalla presa.
RIMOZIONE DELLA TESTATA
• Prima di rimuovere la testata Adal fusto I,
togliere la sonda Kdal serbatoio (fig. 7)
- Liberare i ganci Ge sollevare la testata A
(fig. 8 e 9).
- Inserire il filtro lavabile sulla testata A (fig.
10 e 11).
- Montare la testata Asul fusto I, inserendo
la sonda Knell’apposito foro e serrare coi
ganci.
MANUTENZIONE
• Ugello vapore
- Pulire periodicamente, con lo spillo di puli-
zia in dotazione, l’ugello posto all’interno
della presa uscita H2.
• Filtro lavabile
- Lavare dall’interno verso l’esterno con ac-
qua corrente; lasciare asciugare prima di
riassemblare.
• Filtri aria
- Pulire i filtri aria Mposti nella parte laterale
destra della macchina tutti i giorni rimuo-
vendo lo sporco con aria compressa.
• Accessori
- Utilizzando l’apparecchio con funzioni
combinate, ad esempio il vapore e l’a-
spirazione, è possibile che dello sporco
umido ostruisca e blocchi il tubo flex, le
prolunghe e gli accessori. Questo sporco
può generare cattivi odori, impedire il
collegamento degli accessori e ridurre le
prestazioni dell’apparecchio. Per elimina-
re residui di sporcizia all’interno degli ac-
cessori (tubi, prolunga o spazzole), lavare
i condotti interni di aspirazione con acqua
corrente e rimuovere qualunque residuo.
- Attenzione! Non lavare e non immerge-
re il flex in acqua o altri liquidi. Per pulire
accuratamente il tubo flex, svuotare il ser-
batoio, collegare l’accessorio prolunga +
spruzzatore e far scorrere un litro di acqua
dolce nel tubo flex fino ad arrivare al ser-
batoio.
- Verificare periodicamente lo stato di usura
delle guarnizioni ed eventualmente sosti-
tuirle.
CONDIZIONI DI GARANZIA
Tutti i nostri apparecchi sono stati sottoposti ad
accurati collaudi e sono coperti da garanzia da
difetti di fabbricazione in conformità alla nor-
mativa vigente (minimo 12 mesi). La garanzia
decorre dalla data di acquisto. In caso di ripa-
razione dell’apparecchio o degli accessori nel
IT
13

è tassativamente vietato riporre l’apparecchio
in questi contenitori. La non ottemperanza alle
indicazioni della direttiva 2002/96/CE e ai de-
creti attuativi dei vari Stati comunitari è sanzio-
nabile amministrativamente.
periodo della garanzia, bisogna allegare una
copia della ricevuta.
Durante il periodo di garan-
zia, il nostro centro assistenza riparerà tutte quelle
disfunzioni che, nonostante un uso corretto da parte
dell’utilizzatore secondo il ns. manuale istruzioni po-
tranno essere ricondotte ad un difetto di materiali.
La garanzia avviene sostituendo o riparando quelle
parti che a ns. giudizio risultassero difettose. Le parti
sostituite rimangono di ns. proprietà. La riparazio-
ne o sostituzione di parti difettose non prolunga il
termine di garanzia dell’apparecchio; per le parti so-
stituite vale il periodo di garanzia dell’apparecchio.
Non rispondiamo per danni o difettosità all’appa-
recchio, od alle sue parti, riconducibili ad un errato
uso o manutenzione dell’apparecchio. Lo stesso vale
per la non osservanza delle norme contenute nel ns.
libretto istruzioni o per l’utilizzo di parti od accessori
non facenti parte del ns. programma. Qualsiasi inter-
vento a mezzo personale non autorizzato da noi fa
decadere tutti i diritti alla garanzia. La garanzia non
copre le parti di consumo, la cui usura è una naturale
conseguenza dell’utilizzo dell’apparecchio.
ATTENZIONE! Difetti quali ugelli otturati,
macchine bloccate per residui di formazioni
di calcare, accessori danneggiati (es. tubo
piegato) e/o macchine che non presentano
difetti NON SONO COPERTI DA GARANZIA.
TUTTI I COSTI SORGENTI NEL CASO DI RECLAMI IN
GARANZIA NON AUTORIZZATI O RICONOSCIUTI
VERRANNO ADDEBITATI.
SMALTIMENTO
Quale proprietario di un apparecchio
elettrico o elettronico, la legge (con-
formemente alla direttiva UE 2002/96/CE del
27 gennaio 2003 sui rifiuti da apparecchiature
elettriche ed elettroniche e alle legislazioni na-
zionali degli Stati membri UE che hanno messo
in atto tale direttiva) le vieta di smaltire questo
prodotto o i suoi accessori elettrici / elettronici
come rifiuto domestico solido urbano e le im-
pone invece di smaltirlo negli appositi centri di
raccolta. E’ possibile smaltire il prodotto diret-
tamente dal distributore mediante l’acquisto
di un prodotto nuovo, equivalente a quello da
smaltire. Abbandonando il prodotto nell’am-
biente si potrebbero creare gravi danni all’am-
biente stesso e alla salute umana. Il simbolo in
figura rappresenta il bidone dei rifiuti urbani ed
IT
14
INTENDED USE
• The appliance is intended for professional use.
• Multipurpose steam cleaning equipment. The
unit can be also used as a simple vacuum cleaner
that handles both dust and liquids
• If the device is used for particularly fine powders
(smaller than 0,3 µm), special filters supplied op-
tionally (Hepa) must be employed.
TECHNICAL DATA
(see technical data plate)
DESCRIPTION AND ASSEMBLY
AMotor head
BON/OFF main switch
C“No water” light
D“Steam ready” light
E
ON/OFF boiler switch
FSteam adjustment knob
GHooks for closing head/drum
JWater tank
J
1
Detergent tank
KWater level sensor
HVacuum connection
H
1
Nozzle of the flexible hose
H
2
Outlet plug for steam
IDrum
LFlexible hose
L
1
Suction motor button
L2
Steam/Air delivery safety lock
L3
Steam/Air lever
L4
Flexible hose, blower
M
Air filter
N
Small nylon brush
N1
Small brass brush
N2
Small S/S brush
O
Extension tube
P
Selector pump switch
I Selector detergent
OFF O
II Selector hot water
only FOAM model:
P1
Use mode selector:
I steam
OFF O
II compressed air
Q
Floor fitting, dry dust (only ETNA)
Q1
Floor fitting, wet liquid (only ETNA)
Q2 Carpet fitting (only ETNA)
Q3 Foaming brush (only FOAM,
do not use with steam)
R Steam pressure gauge
S Round suction brush
S1 Brush for small rectangular nozzle 150
T Big nozzle brush by steam/suction (only ETNA)
T1 Small rectangular nozzle by steam/suction 150
T
2
Armchair small nozzle brush by injection/suction
T3 Big nozzle brush (only FOAM)
T4 Foam fitting (only FOAM)
U Window wiper steam/suction
U1
Window wiper for small rectangular nozzle 150
V1 Compressed air fitting (only FOAM)
V2 Compressed air pressure gauge (only FOAM)
V3 Compressed air knob (only FOAM)
XSuction flat lance
Y
Accessory connection with steam/suction nozzle
ZDrain hose system
Z1 Filter
Translation of the original instructions
EN
15

the electrical mains and that rhe socket is protect-
ed by a differential security breaker with tripping
sensitivity below 0.03 A - 30 ms.
18 Ensure that power sockets used ore correct for
the machine.
19 Never use the appliance in ambient tempera-
tures below 0°C if it is equipped with a PVC (H VV-
F) cable.
20 The electric cable must be replaced only by an
authorised service centre.
21 Do not vacuum explosive, toxic and inflamma-
ble substances (e.g. chimney ashes and soot) or
substances that may be dangerous to your health.
22 Do not use the appliance to suck water from
containers, sinks, baths, etc.
23 If foam/liquid should come from the machine
exhaust switch off immediately.
24 Do not place the suction orifice near delicate
parts of the body such as eyes, mouth and ears.
25 Do not put your hands close to the steam jet.
26 Never obstruct the steam outlet.
27 Do not point the steam jet towards people or
animals.
28 During use the appliance could overheat if
covered.
29 If the appliance is lent to someone else, the
instruction manual should also be passed on.
30
The appliance is not to be used by chil-
dren or persons with reduced physical, sen-
sory or mental capabilities, or lack of experi-
ence and knowledge, unless they have been
given supervision or instruction.
31
Children being supervised not to play
with the appliance.
32 Foam function: connect the device to a 5 bar
minimum air compressor (not supplied).
33 Foam function: Using specific detergents is in-
dispensable for foam production.
34 Always test on a hidden area of the material.
GENERAL WARNING
SAFETY PRECAUTIONS
01 Components contained in the package (e.g.
plastic bags) could be dangerous; keep them out
of reach of children and pets.
02 The use of this machine for anything not spec-
ified in this manual may be dangerous and must
be avoided.
03 The manufacturer cannot be held responsible
for any damage/injury caused to persons, animals
or property caused by misuse of the appliance,
not in compliance with manual instructions.
04 Plug in the appliance only if the power voltage
is the same shown on the rating plate and only if
the power supply mains has a protective earthing
system.
05 Do not touch the plug of the power cable with
wet hands.
06 Do not pull the plug by its power cable.
07 Do not drag the appliance by its power cable.
08 Unwind the power cable completely before
use.
09 Avoid using electrical extension cables; if
necessary, use an extension cable with a safety
approval mark with a protective earthing system.
Minimum size of extension cable is 2.5 mm².
10 Never carry out any maintenance on the ma-
chine without first disconnecting from the mains
supply or when it is left unattended or reachable
by children or disables.
11 Periodically examine the mains cable and
machine for damage. If any damage is found,
do not use the appliance but contact your ser-
vice centre for repair.
12 Do not use the appliance for steam cleaning
electrical appliances or electric sockets.
13 Once the appliance is plugged in, do not work
with wet hands or feet.
14 Do not immerse the appliance in any liquid.
15 Do not steam-clean the appliance.
16 Service and repairs must be carried out by
qualified personnel only. Only use manufacturer
original spare parts for service repair.
17 Before connecting the appliance, make sure
that the nameplate data are the same as those of
EN
16
USAGE
STARTING UP
When preparing the appliance for use,
switch it off and unplug it!
- Fill the tank Jwith water (fig. 1)
Do not put any kind of detergent or chemi-
cal substance in the water tank!
- Fill the tank J1with detergent (fig. 2)
- Put (◊,+, -,*) hose on (◊,+, -,*) hole on the tank
(fig. 3)
This appliance is designed for use with the
detergent supplied or recommended by the
manufacturer. The use of other detergents
or chemicals may put the appliance’s safety
at risk!
- Fit the nozzle H1of the flexible hose Lin the
vacuum connection H(fig. 4-5-6)
Never use the appliance without a filter!
VACUUMING DUST
• Fit the most suitable accessory in the handle
of the flexible hose L.
- Connect the device to a suitable electrical
outlet.
- Start vacuuming by pressing main switch B.
- To select the suction power (from level 1 to
level 4), press the remote suction button L1
on the handgrip at short intervals; the se-
lected suction power level LED indicator will
light up. It is possible to change the power
level both when the suction is on and off. To
switch the vacuum on and off, hold down
the remote suction button L1for about two
seconds.
TABLE OF USE
Always test on a hidden area of the material.
Normal dirt Intense dirt Drying
Car interior: seats foam foam/steam vacuum
Car interior: floor mats/carpet vacuum steam/detergent vacuum
Car interior: roof lining/windows steam steam vacuum
Car interior: dashboard vacuum vacuum/compressed air cloth
Car rims steam/detergent vapore/detergente cloth
Rugs and carpets in general foam foam/steam vacuum
Bathrooms, floors, upholstery foam steam/detergent vacuum
Parquet foam foam vacuum
Stainless steel surfaces foam steam/detergent vacuum
EN
17

STEAM CLEANING
• Fit the most suitable accessory in the handle
of the flexible hose L.
• Connect the device to a suitable electrical
outlet.
• Start vacuuming by pressing main switch B.
Only Foam:
• Selection switch P1 to the steam position
(I).
• Press lever L3for steam outflow.
• Turn on the steam system using switch Eand
wait until “steam ready” light Dlights up.
• For the outflow of the steam, press the lever
L3. The first amount of steam will come out
with water condensation; direct the jet to
one side or onto a cloth.
•Pre-select the amount of steam using the
knob Flocated on the appliance. The gauge
Rindicates the pressure inside the boiler.
•To steam and vacuum simultaneously: it
is possible to use the above-mentioned
steamcleaning functions together.
•To select the suction power (from level 1 to
level 4), press the remote suction button L1
on the handgrip at short intervals; the se-
lected suction power level LED indicator will
light up. It is possible to change the power
level both when the suction is on and off. To
switch the vacuum on and off, hold down
the remote suction button L1for about two
seconds.
•When work is finished, release the steam le-
ver L3a few moments prior to switching off
the suction motor L1. This will allow the suc-
tion ducts to recover the humidity.
STEAM CLEANING + INJECTION HOT WATER OR
DETERGENT
• Fit the most suitable accessory in the handle
of the flexible hose L.
• Connect the device to a suitable electrical
outlet.
•Start vacuuming by pressing main switch B.
•Turn on the steam system using switch Eand
wait until “steam ready” light Dlights up.
Only Foam:
• Selection switch P1 to the steam position
(I).
• Start injection pump by selection switch P:
H2O (II) hot water or
(I)detergent.
Only Etna:
•To help the primer of the injection pump,
turn the steam tap Foff .
•Press the lever L3
•Pre-select the amount of steam using the
knob Flocated on the appliance. The gauge
Rindicates the pressure inside the boiler.
•To steam and vacuum simultaneously: it
is possible to use the above-mentioned
steamcleaning functions together.
•To select the suction power (from level 1 to
level 4), press the remote suction button L1
on the handgrip at short intervals; the se-
lected suction power level LED indicator will
light up. It is possible to change the power
level both when the suction is on and off. To
switch the vacuum on and off, hold down
the remote suction button L1 for about two
seconds.
•When work is finished, release the steam le-
ver L3a few moments prior to switching off
the suction motor L1. This will allow the suc-
tion ducts to recover the humidity.
EN
18

FOAM CLEANING
(only FOAM)
32
Connect the device to a minimum 5 bar
air compressor (not supplied).
33
Using specific detergents is indispensa-
ble for foam production.
• Insert the compressed air fitting hose in V1
(hose not supplied).
• Adjust the air pressure from 2 to 5 bar with
knob V3.
• Fit the most suitable accessory in the handle
of the flexible hose L.
• Connect the device to a suitable electrical
outlet.
• Start by pressing main switch B.
• Selection switch P1 to the air position
AIR (II)
• Selection switch P to position
(I) detergent.
• For foam outflow, press lever L3
• Distribute the foam.
• Leave the detergent on for 1 minute.
•Vacuum by pressing button L1
•To select the suction power (from level 1 to
level 4), press the remote suction button L1
on the handgrip at short intervals; the se-
lected suction power level LED indicator will
light up. It is possible to change the power
level both when the suction is on and off. To
switch the vacuum on and off, hold down
the remote suction button L1for about two
seconds.
RINSING WITH AIR AND WATER
(only FOAM)
32
Connect the device to a minimum 5 bar
air compressor (not supplied).
• Insert the compressed air fitting hose in
V1 (
hose
not supplied)
• Adjust the air pressure to the maximum with knob
V3
.
• Fit the most suitable accessory in the handle
of the flexible hose L.
• Connect the device to a suitable electrical
outlet.
• Start by pressing main switch B.
•
Selection
switch
P1
to the position
AIR
(II)
•
Selection
switch
P
to the position
H2O (II)
water
• For air and water outflow, press lever
L3
• Vacuum by pressing button
L1
.
• To select the suction power (from level 1 to
level 4), press the remote suction button L1
on the handgrip at short intervals; the se-
lected suction power level LED indicator will
light up.
TOPPING UP THE BOILER WATER TANK WITH WA-
TER
• The boiler water tank Lsupplies the boiler
through an electronic level control; since this
is an external tank, it can be topped up any
time.
• When water runs out in the boiler water
tank:
1. the appliance beeps intermittently
2. the no-water level pilot light Cflashes
3. the steam stops coming out
To top up, proceed as follows:
• Switch off the boiler switch E
• Turn off the main switch B
• Remove the cable from the socket
• Fill the boiler water tank J
AFTER USE
• Every time you finish working, put switch P,
P1, E, B in OFF position.
EN
19

• Extract the plug from the wall socket.
REMOVING THE HEAD
Before taking the head Aoff of the drum I, re-
move the prove Kfrom the tank (fig. 7)
•Release the hooks Gand raise the head A(Fig. 8
and 9).
•Put the washable filter on the head (Fig. 10 and
11).
•Put the head Aon the drum I, put the prove in the
correct hole Kand close with hooks.
MAINTENANCE
Steam nozzle
•Clean periodically, with the clean pin’s equip-
ment, the nozzle inside the outlet plug for
steam H
2
.
Washable filter
•Wash it with running water, from the inside to
the outside of the filter. Keep it dry before re-
assembling it.
Air filter
•Clean the air filter Msituated at the right side
of the machine every day, removing dirt using
compressed air.
• Accessories
•
When using the appliance with combined
functions, i.e. steam and vacuum cleaning,
wet dirt can jam and stuck inside the pipes of
flexible hose, extension tubes and accessories.
This dirt may generate bad odours, can make
the fitting of the accessories very difficult and
could reduce the performance of the appli-
ance. To eliminate dirty residues from the in-
side of the attachments (extension tubes or
brushes), wash the vacuum ducts with running
water, and remove any residues.
•Warning! Do not wash or immerge the flex
in water or any other liquid. For a thourough
cleaning of the flex empty the tank, fit the ex-
tension + sprayer attachment and suck one lit-
er of fresh water through the flex into the tank.
•Periodically check if the seals worn out and, if
necessary, replace them.
WARRANTY CONDITIONS
All our machines are subjected to strict tests and
are covered against manufacturing defects in ac-
cordance with applicable regulations (minimum 12
months). The warranty is effective from the date of
purchase. If your device or accessories are handed
in for repair, a copy of the receipt must be enclosed.
During the guarantee period our assistance centre
will repair all those malfunctions that, despite the
user has followed the instructions in our manual,
can be put down to defective materials. The parts
deemed faulty will either be replaced or repaired
under the guarantee. The replaced parts remain our
property. Replacements or repairs do not extend the
guarantee period; for the parts replaced, the appli-
ance’s period of guarantee is valid. We are not held
responsible for damages or faults to the appliance
or to any of its components if they are caused by an
improper use or maintenance of the appliance. The
same applies if the instructions given in our hand-
book are not followed or if parts or accessories are
used that are not included in our programme. The
guarantee will no longer be considered valid if peo-
ple that have not been authorised by to us tamper
with the appliance. The guarantee does not cover
wearable parts whose wear is a natural result of the
appliance’s use.
WARNING! Failures, such as clogged nozzles, valves
and mechanism blocked due to limestones, dam-
aged pressure cleaner accessories (like kinked high
pressure hose) and/or appliances normally working
without any defects ARE NOT COVERED BY THE WAR-
RANTY.
ALL COSTS INCURRED FOR UNAUTHORISED OR
UNACKNOWLEDGED COMPLAINTS WHEN THE
PRODUCT IS COVERED BY THE GUARANTEE WILL
BE CHARGED.
DISPOSAL (WEEE)
As the owner of electrical or electronic equip-
ment, the law (in accordance with the EU Di-
rective 2002/96/EC of 27 January 2003 on waste from
electrical and electronic equipment and the national
laws of the EU Member States that have implement-
ed this Directive) prohibits you from disposing of
this product or its electrical / electronic accessories
as municipal solid waste and obliges you to make
use of the appropriate waste collection facilities. The
product can be disposed of by returning it to the dis-
tributor when a new product is purchased. The new
product must be equivalent to that being disposed
of. Disposing of the product in the environment can
cause great harm to the environment itself and hu-
man health. The symbol in the figure indicates the
urban waste containers and it is strictly prohibited to
dispose of the equipment in these containers. Non-
compliance with the regulations stipulated in the
Directive 2002/96/EC and the decrees implemented
in the various EU Member States is administratively
punishable.
EN
20
This manual suits for next models
3
Table of contents
Languages:
Other Lavor Iron manuals


