Click & Grow 25 User manual

A farmers market in
your home.
Welcome to your Click & Grow 25!


Growing our own food drastically improves our connection with
nature, our mental and physical wellbeing. We believe it is the future
of food and your new Click & Grow 25 is a pioneering milestone in
it. We’re excited to welcome you on a journey that changes how we
eat and how we relate to nature. Happy growing!
Mattias Lepp
Founder and CEO of Click & Grow

Introduction 5
Recommended plants 6
Using Grow Flow™ trays 7
Continuous growing and harvesting 8
Tips for growing greens 10
Using the App 11
Our community 12
Using
Setup
Specifications
13
List of parts
14
Assembly instructions 15
Stacking Click & Grow 25 units 21
Replacing the water sensor battery
26
Warranty 27

5
Introduction
The Click & Grow 25 enables you to enjoy a continuous harvest of
fresh, nutritious leafy vegetables in your meals. Growing with us, you’ll
be taking a fruitful step towards a healthier and more sustainable diet.
The Click & Grow 25 works as simply as a capsule coffee machine,
only instead of coffee pods, you use our specially developed Smart
Soil plant pods. Coupled with the lighting and watering system they
automatically control everything plants need for accelerated growth,
superior nutrient content, and amazing taste.
Key features
Weekly harvest Automatic
watering Modular Automatic
lighting App-controlled

6
Recommended plants
Your new garden is developed as a pioneering solution for continuously
growing and harvesting leafy greens. All of these greens grow at a
similar pace - from planting to harvest in just 5 weeks. Using the Grow
Flow™ trays, you’re free to mix and match your favorite greens within
or between trays and plan your growing cycles.
Here are a few healthy recommendations from our selection of greens:
Although developed with a focus on growing leafy vegetables, the
Click & Grow 25 also works perfectly with the rest of the herbs, fruits,
and ornamentals in our wide plant pod selection.
Note that these grow slower and are not compatible with the 5 week
cycle. We recommend using the Click & Grow app with its Freestyle
mode if you want to mix different plant categories.
and 15+ more on our website
Romaine Lettuce Red Lettuce Arugula Green Sorrel Red Chard
Pak Choi Red Pak Choi Red Kale Italian Kale Leaf Mustard
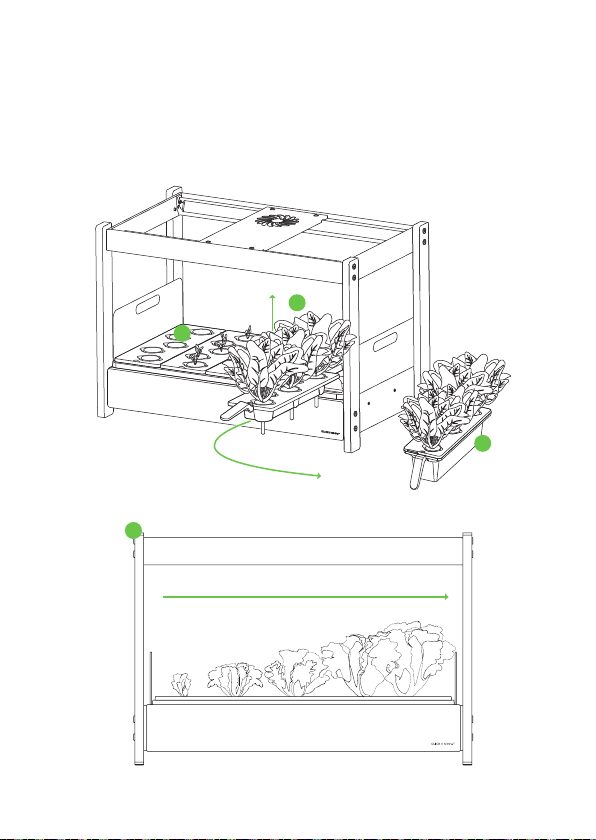
Using your Click & Grow 25
7
• Your new garden fits 5 trays, each holding 5 plant pods fig. 1
• Have all 5 trays covering the water bath at all times to keep debris
and light away
•
Move trays in and out of the garden with a detachable handle fig. 2
•
Use the germination cover on a newly planted tray for about a
week fig. 3
• Plant new pods in the 6th spare tray after you’ve moved one with
a full harvest into a special tray holder fig. 4
• We recommend the Click & Grow app to help you with your har-
vesting schedule, keep track of your plants, and manage tray refills.
The app also serves as a watering reminder
Using Grow Flow™ trays
1 2 3
3
4

8
Continuous growing and harvesting
1. Fill one tray at a time once per week
2. Remove a tray of mature greens 5 weeks after planting
3. Set them in the tray holder, consume within a week
4. Add water to the garden while making the switch
5. Slide trays sideways to make room for the next
Using Grow Flow™ tray holder & handle
Plants on the tray holder stay fresh for a week and always at hand where
you cook. They require no special conditions or grow lights but they’re
best kept in well-lit places.
1. Fill the tray holder with tap water until indicated level
2. Attach the handle to a harvest-ready tray
3. Place the harvest-ready plants on top of the tray holder
3
2
a
b
9
6. Plant a new set of plant pods, place the germination cover on top
for a week
7. Keep a gradual order with younger plants on one and older plants
on the other side to avoid overshadowing
3
2
6
7

10
Tips for growing greens
Leafy greens prefer growing at a temperature between 64°F to 72°F
(18°C to 22°C). Anything out of this range will inhibit germination. The
Click & Grow 25 does not control its temperature and humidity so mind
the conditions in your room. We recommended placing the device in
a well-ventilated room. After growing for 5 weeks a tray full of leafy
greens will have reached their best taste and nutrient levels. Remove
the tray from the garden and consume within a week.
Always remember not to run out of plant pods and try new varieties!
Head to www.clickandgrow.com to replenish your stock or set up
our plant pod subscription to have your favorite ones delivered to your
doorstep when you wish at a hefty discount.
Lighting
Watering
After plugging in the garden, two grow lights turn on automatically and
start a cycle of 16 hours on and 8 hours off. You can change the cycle
and control lighting through the app once your mobile device is paired
with the garden (see page 20).
If you follow the previously described continuous harvest cycle, you’ll
need to add up to 170 fl oz (5 L) of water per week. We suggest doing
it every time a tray is taken out and a new one planted. You can use
tap water. Keep the water bath filled between indicated marks on the
inner walls. Additionally, the garden will remind you of low water levels
with blinking lights.

11
The Click & Grow Official app connects your garden and tracks the
humidity, temperature, and water level to ensure the ultimate growing
conditions for your plants. On top of that, it serves as a powerful tool
to schedule and organize your harvest.
Key features
• Register and track your trays and plants
• Check your harvesting schedule
• Be notified when a tray of greens is fully grown
• Get personalised suggestions based on your growing history
• Receive watering reminders
• Control lights and lighting schedule
• Access Click & Grow plant information
See pairing guide on page 20.
Using the App
Get the App
clickandgrow.com/app

12
Our community
Find us on social media:
Click & Growers group
‘Ask a Gardener’ forum
@clickandgrow
Our unique Click & Growers community is the meeting place for indoor
gardeners. See what other plant lovers around the world are growing
and learn new things about indoor gardening every day.
Find Click & Growers on Facebook.
Start a conversation or ask any gardening related question - our own
Click & Grow gardeners are always there to help! Head to
gardeners.clickandgrow.com
Read our latest news, plant care tips & tricks on our blog
clickandgrow.com/blog
We would love to see how your plants are growing!
Use #clickandgrow when you are posting on social media.
13
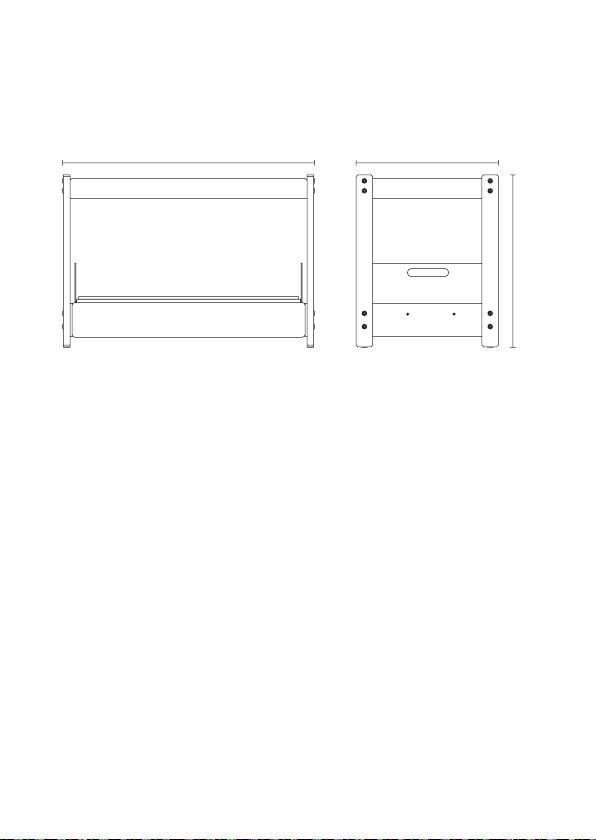
Specifications
Growing capacity
Net weight
Power
Voltage
Materials
25 plants
15 kg / 33 lb
38W total; 15,5W per lamp
220 / 110V
Steel, wood, plastic
76 cm / 29.9 in 43 cm / 16.9 in
52 cm / 20.5 in

14
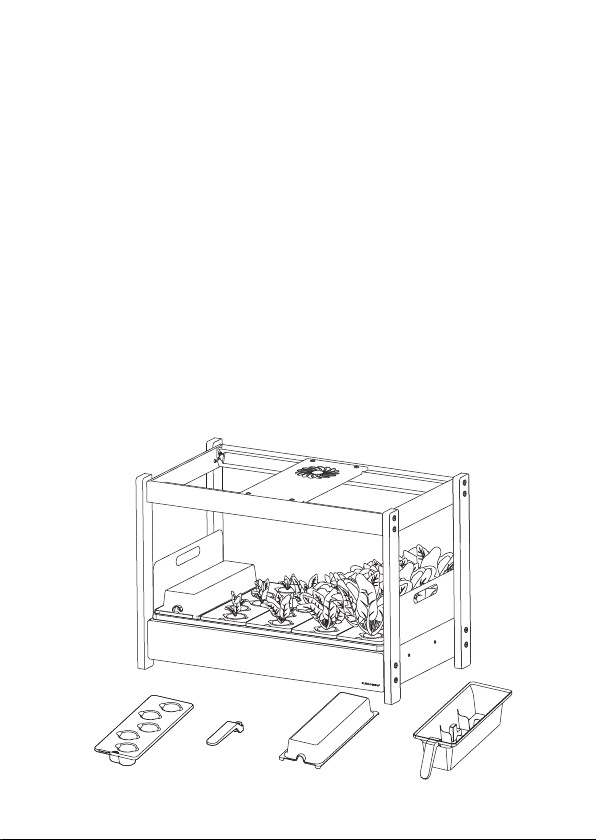
List of parts
1. Power cable clamp 2x
2. Stacking clamp 2x left & 2x right
3. Nut (for attaching legs to frame) 16x
4. L-wrench T10 1x
5. Self-adhesive pads for legs 4x
6. Wall safety fixator 1x
7. Wall safety fixator screw 1x
8. M4 screw (for stacking clamp) 9x
9. L-wrench hex 4 1x
10. Power adapter 1x
11 . Top frame set 1x
12. Water bath 1x
13. Bottom frame set 1x
14. Wooden leg 4x
15. Drawer side panel 2x
16. Germination cover 1x
17. Grow FlowTM plant tray 6x
18. Plant tray handle 1x
19. Plant tray holder 1x
1 2 3 4 5
6
16
17
18
19
1513
14
12
11
7 8 9 10
15
1
2
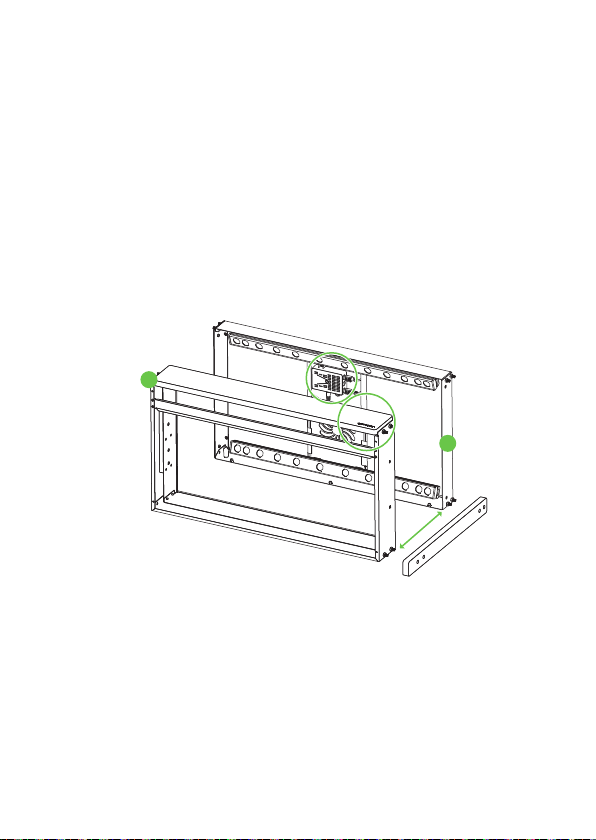
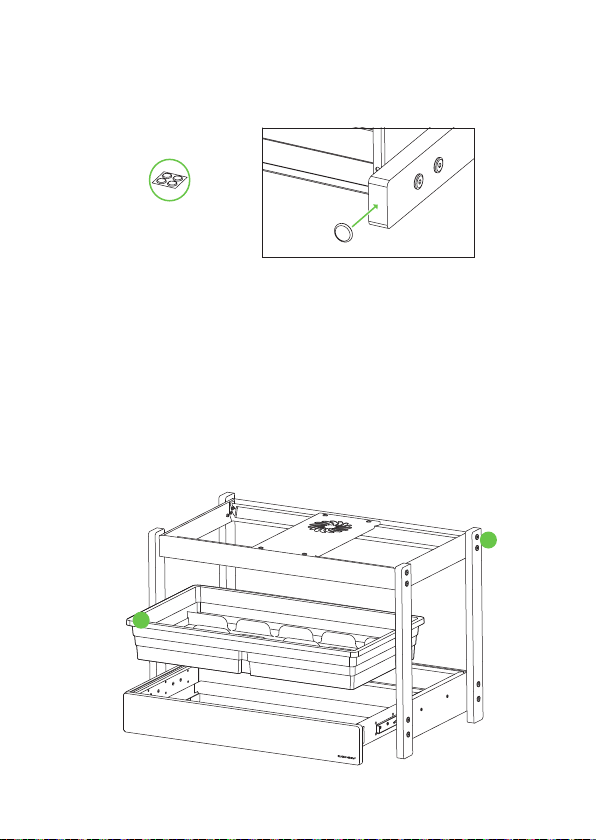
Assembly instructions
Step 1 Getting started
1.
Lay the bottom frame assembly on the floor, back side down. Handle
with care! Note the logo and the controller unit to help you orientate
2.
Lay the top frame assembly on the floor, back side down. Leave
a space between the two frames approximately the length of the
wooden legs. Handle with care!
Step 2 Installing the legs
1. First, install the rear wooden legs. Fit the rear right and rear left leg
to the frame bolts. The legs will fit only one way. Fasten the legs with
flat-head nuts, 4 nuts per leg. Tighten the nuts gently, not all the way

16
2. Install the front wooden legs. Fit the front right and front left leg to
the frame bolts. The legs will fit only one way. Fasten the legs with
flat-head nuts, 4 nuts per leg. Tighten the nuts gently, not all the way
1
1
2
2
L-wrench hex 4 1xNut 16x
17
3.
With the legs fitted to the frame, finish by applying the self-adhesive
pads under each leg (optional if stacking units)
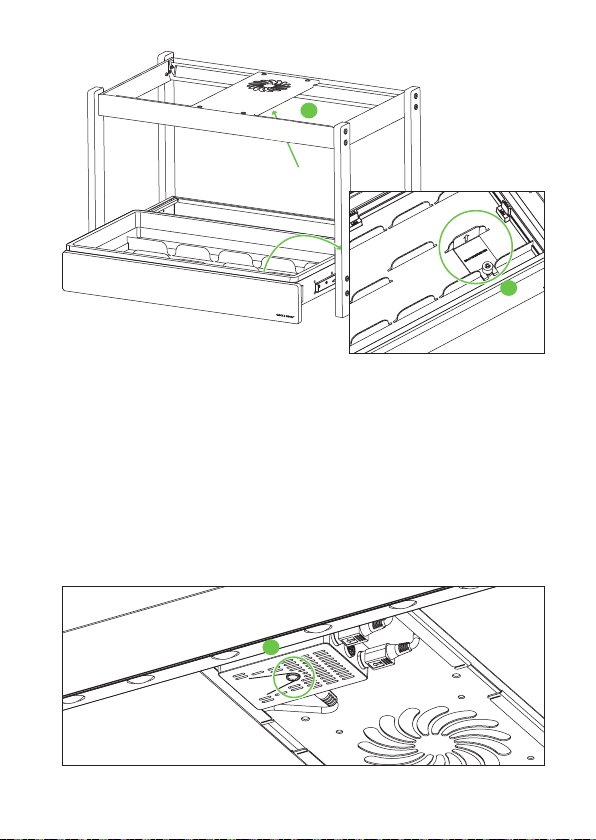
Step 3 Installing the bath & power adapter
1. Place the garden on its legs. Tighten all 16 nuts all the way, using
medium force in the end
2. Pull the drawer open and place the bath into the drawer
Do not fill the bath before pairing the water level sensor.
1
2
Pads 4x

18
Step 4 Pairing the water sensor with the garden
1. Plug in your Click & Grow 25. If you use several units, see the next
paragraph first
2. Next, remove the appropriately marked cardboard tab inside the
bath. This frees the float and triggers the Bluetooth connectivity for
the water level sensor. Wait for 10 seconds before you proceed
3. Locate the control unit for the lights under the top assembly
4
3. Attach two power cable clamps to the backside of the device
4. Connect the power adapter to the garden
5. Thread the power cable through the cable clamps
Cable clamp 2x
3
19
2
4.
Hold down the button on the controller of grow lights for 15 seconds
until both lights blink once
5.
After blinking, the pairing process will take another 10-15 seconds.
If successful, the lights will flash twice, indicating low water levels
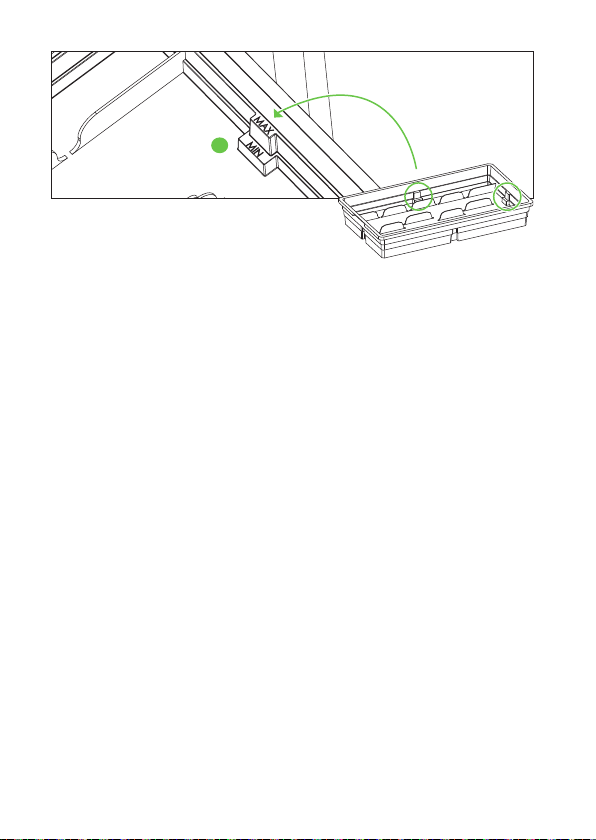
6. After a successful pairing, water can be added to the bath. Use the
guides inside the bath. This will end the blinking
4
3
20
If you have multiple gardens
If you have more than one Click & Grow 25 unit, follow the previous
steps but do the pairing one unit after another. Do not plug in units while
you are pairing a previous one. Also, make sure not to disconnect units
already paired with their water level sensors from the mains.
Connecting your garden with the app (optional)
1. Hold your mobile device near the garden with Bluetooth turned on
2. Open the Click & Grow app
3. Follow the steps in the app and choose your preferred settings
6
Step 5 Final assembly
1. Place 5 plant trays side by side on the edges of the bath
2.
Remove the protective film from the side panels. Slide the side panels
into their slots on either side of the bath
Other manuals for 25
1
This manual suits for next models
1
Table of contents
Other Click & Grow Lawn And Garden Equipment manuals


Popular Lawn And Garden Equipment manuals by other brands


Sunforce
Sunforce 80001 manual

NATURE'S INSTRUMENTS
NATURE'S INSTRUMENTS NI-PG-301-01 quick start guide

Scheppach
Scheppach MFH380-20Li Dual Translation from the original instruction manual

Sandokan
Sandokan Plug-in 5 user manual

Wiggly Wigglers
Wiggly Wigglers Urbalive Getting Started & Troubleshooting

Bush Hog
Bush Hog TOUGH PHDC Specifications