CLIMASTAR SLIM Series User manual

USER'S GUIDE
CLIMASTAR®
SLIM

INDEX
1. INTRODUCTION...................................................................................... 3
2. WALL SUPPORT..................................................................................... 4
3. SETTING UP............................................................................................ 5
3.1 Starting the Slim Towel Radiator..............................................5
3.2 Timer Mode.............................................................................. 5
4. TECHNICAL CHARACTERISTICS..........................................................6
5. FAQ's....................................................................................................... 6
6. WARRANTY TERMS AND CONDITIONS............................................... 7
2

1. INTRODUCTION
•Please, read this user guide carefully before installing your device.
•Before connecting the heater check that the supply voltage is the same as that stated on the heater.
•This device is supplied with a three core cable consisting of Live(Brown), Neutral(Blue) and
Pilot(Black) wires.
•DO NOT locate this heater immediately beneath an electrical outlet.
•IMPORTANT SAFETY ADVICE - When using electrical appliances, basic precautions should always
be followed to reduce the risk of fire, electrical shock, and injury to persons, including the following:
•If this heater is installed in a room containing a bath or shower, it should be so installed that
switches and other controls cannot be touched by a person using a bath or shower.
•The installation of this product should be carried out by an electrician or competent person and
be in strict accordance with the current IEE Wiring Regulations and relevant Building
Regulations. The heater must be installed in accordance with these instructions.
•If the supply cord is damaged, it must be replaced by the manufacturer, its after sales service agents or
any other competent qualified person.
•Not intended for use by children under the age of 3 unless duly supervised.
•Children over 3 and below the age of 8 must only turn on/off the device whenever it has been duly
placed or installed, and has been given supervision or instructions concerning use of the appliance.
Children from 3 to 8 must not regulate or clean the device, nor carry out any maintenance activity.
•Not intended for use by persons (including children over 8) with reduced, physical, sensory or mental
capabilities, or lack of experience and knowledge, unless they have been given supervision or
instruction concerning use of the appliance by a person responsible for their safety. Cleaning and
maintenance must not be carried out by children without prior supervision.
•The device can be cleaned with a damp cloth or with any conventional cleaning cloth.
•WARNING: The surfaces of this heater can become very hot. Momentary contact with any part of
the heater should not cause injury. However, aged or infirm persons or young children should not be
left unsupervised in the vicinity of the heater unless a suitable guard is fitted.
3

2. WALL SUPPORT
The device includes a mounting kit with the required hardware (rawl plugs, screws and Allen key).
The rawl plugs supplied with the mounting kit cannot be used on dry walls. For this type of wall, special rawl
plugs must be used.
This device should not be installed in Zone 1 or Zone 2 but can be installed outside these zones.
The Slim Towel Radiator can be mounted vertically or horizontally.
Once you have decided where to install the device, remove all the packaging and extract the Slim Towel
Radiator and its mounting kit.
Fixings and required tools:-
Mounting the Slim Towel Radiator:-
Check measurements and levelling before drilling. All measurements are in millimetres.
4
SLIM
POWER
250w
500w
Height (mm)
500
1000
Width (mm)
250
250
Depth (mm)
40
40
3. SETTING UP
3.1 - STARTING THE DEVICE
With a mains supply going to the radiator, click the switch on the side to the 'I' position. The switch LED flashes
and the device is working.
The device starts to heat.
To switch off the device, click the switch on the side to the off position, the switch LED turns off.
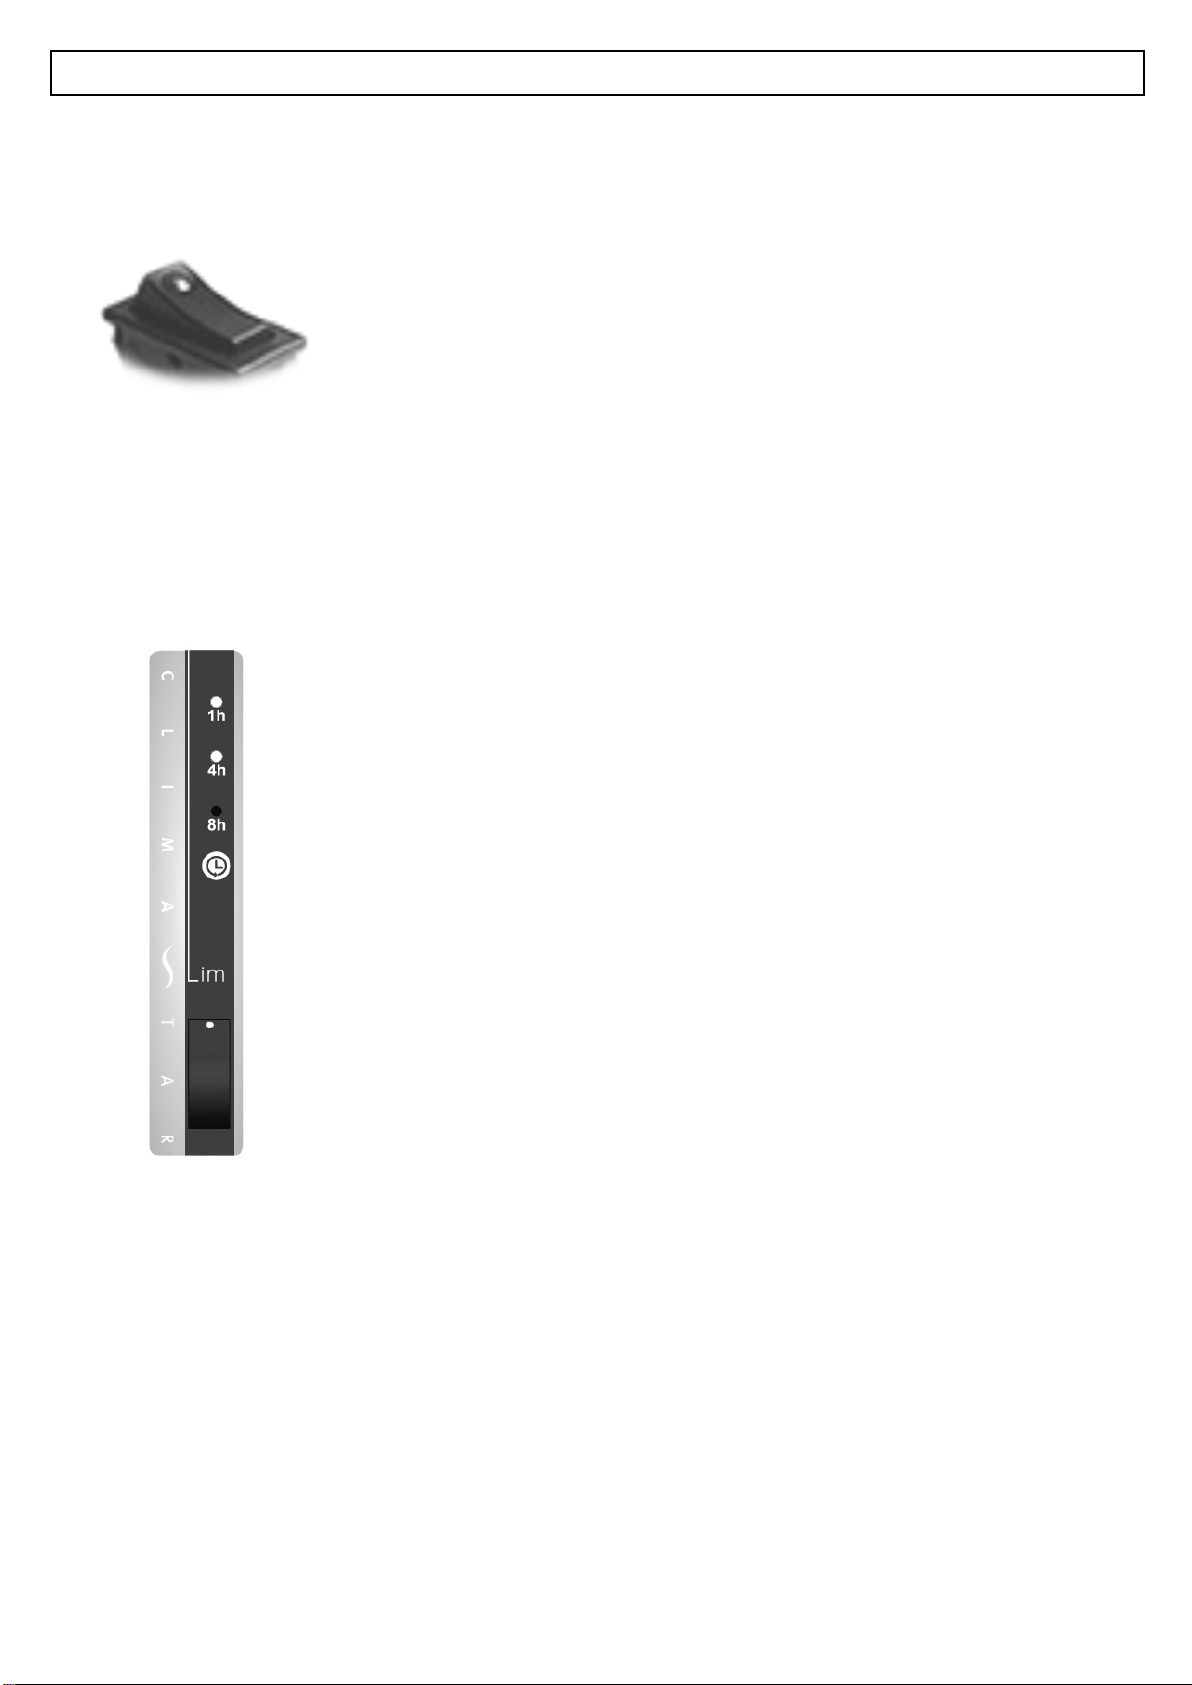
3.2 - TIMER MODE
The device works as long as the user selects one of the setback or operating times, 1h - 4h - 8h.
To select a setback time Press the button until you reach the required operating time. The options are 1h for
1 hour, 4h for 4 hours, 1h+4h for 5 hours, 8h for 8 hours, 8h+1h for 9 hours, 8h+4h for 12 hours and 8h+4h+1h
for 13 hours.
After the set operating time has finished the LED switches off indicating
that the device is now turned off.
To deactivate the timer function, click the switch on the side of the device and turn the unit off.
5
This manual suits for next models
2
Table of contents
Popular Bathroom Fixture manuals by other brands

Kohler
Kohler Mira Sport Max J03G Installation and user guide

Moen
Moen 186117 Series installation guide

Hans Grohe
Hans Grohe Raindance Showerpipe 27235000 Instructions for use/assembly instructions

Signature Hardware
Signature Hardware ROUND SWIVEL BODY SPRAY 948942 Install

fine fixtures
fine fixtures AC3TH installation manual

LIXIL
LIXIL HP50 Series quick start guide


