cliMATE KeylessGo User manual

Remote control your Mercedes
cliMATE ® KeylessGo
Installation Manual

2
KeylessGo Installation Manual
cliMATE_KeylessGo_installation_manual_20150314
Contents
3Getting Started
5Installation Instructions
8Testing the Installation
Warranty and Return Policy
Please nd more information online. The up to date warranty policy is at:
www.mbclimate.com/manuals/cliMATE_warranty.pdf

3
KeylessGo Installation Manual
cliMATE_KeylessGo_installation_manual_20150314
Getting Started
KeylessGo is an electronic drive authorization system optionally installed on many Mercedes vehi-
cles. The driver does not need to have the key in hand to unlock or start the vehicle.
The system is secure, because it requires the ignition key to be very near, whether it is in the driver’s
pocket, briefcase or purse.
To unlock the doors, the driver just touches the door handle. To lock the doors, the driver pushes the
button on the door handle.
To start the vehicle, the brake pedal must be depressed and then the Start button on the dashboard
clicked.
What is KeylessGo
It is important to install the cliMATE® Mercedes Remote Start module and to verify it functions prop-
erly before installing the cliMATE® KeylessGo cable.
Even without the KeylessGo cable, the Mercedes can be remotely started using the Mercedes Smart-
key. Just click Lock – Unlock – Lock buttons in a sequence; or just click the red Panic button if your
ignition key has one. The engine will start running.
Without the KeylessGo cable, after the remote start, the doors cannot be unlocked by touching the
door handles. They must be unlocked by pressing the Unlock button on the Mercedes Smartkey.
The cliMATE® KeylessGo cable is an optional accessory and can be ordered from your cliMATE® dealer.
Before installing the cliMATE KeylessGo cable

4
KeylessGo Installation Manual
cliMATE_KeylessGo_installation_manual_20150314
Depending on the vehicle, you might need some of the following tools:
• Medium Philips screwdriver
• T20, T25 and T30 Torx drivers
• Flashlight
• Panel removal tool
• Resistor (for example 10 kohm) or a thin wire jumper
Required tools
In short, the Mercedes KeylessGo module is disconnected from the Mercedes CAN network and re-
routed to the cliMATE® module.
The installation takes approximately 20 to 60 minutes, depending on the Mercedes model:
• Locate the Mercedes KeylessGo module
• Locate the CAN distributor block connecting the KeylessGo module to the whole CAN network
• Locate the specic CAN wire coming from the KeylessGo module and disconnect it from the
CAN distributor block, ...
• ... connect this wire to cliMATE® via cliMATE® KeylessGo cable
• Test the KeylessGo functionality
Installation concept

5
KeylessGo Installation Manual
cliMATE_KeylessGo_installation_manual_20150314
Locate the Mercedes KeylessGo module
Mercedes model KeylessGo module location
C-class W204 2008-2014 Trunk, right side, near tail light
CL-class W216 2007-2010 Trunk, right side, near tail light
CL-class W216 2011-2013 Trunk, left side, behind metal bracket
CLS-class W218 2012+ Trunk, right side, near tail light
E-class W212 2010+ Trunk, right side, near tail light
E-class W207 2010+ Trunk, right side, near tail light
GL-class X164 2006-2012 Cargo area, right side compartment
GLK-class X204 2008+ Cargo area, under carpet
ML-class W164 2006-2011 Cargo area, right side compartment
R-class W251 2006-2010 Cargo area, below spare tire
R-class W251 2011-2012 Behind driver’s seat, under false oor
S-class W221 2007-2010 Trunk, right side, near tail light
S-class W221 2011-2013 Trunk, left side, behind metal bracket
SLK-class R172 2012+ Trunk, next to fuse module
1
Installation Instructions
This generic installation manual is valid for all Mercedes models. Please visit us online at
www.mbclimate.com for latest information or additional questions. We are updating model specic
manuals regularly.
The best way to contact us is via our Help Desk at www.mbclimate.com.
6
KeylessGo Installation Manual
cliMATE_KeylessGo_installation_manual_20150314
Unplug the Mercedes KeylessGo module
Unplug the KeylessGo module and remove the connector cover.
2
Locate the KeylessGo module CAN harness
Locate the twisted brown and brown-red wire pair. It connects the KeylessGo module to
vehicle’s CAN network. Our goal is to nd the other end of this twisted pair and connect
our 2-wire harness to it.
3
Locate the CAN distribution block
Mercedes model CAN distribution block location
C-class W204 2008-2014 Passenger door jamb
CL-class W216 2007-2013 Under driver’s seat, rear area
CLS-class W218 2012+ Passenger door jamb
E-class W212 2010+ Passenger door jamb
E-class W207 2010+ Passenger door jamb
GL-class X164 2006-2012 Cargo area, right side compartment
GLK-class X204 2008+ Passenger door jamb
ML-class W164 2006-2011 Passenger kick panel
R-class W251 2006-2012 Passenger kick panel
S-class W221 2007-2013 Under driver’s seat, rear area
SLK-class R172 2012+ Passenger door jamb
4

7
KeylessGo Installation Manual
cliMATE_KeylessGo_installation_manual_20150314
Remove all connectors from the CAN distributor block
One of the blocks has many brown and brown-red wires plugged into it. From this block,
unplug all the connectors. We are seeking the one which leads to the KeylessGo module.
To help our search, plug temporarily a resistor (or wire jumper) between the brown and
brown-red wire we have disconnected from the KeylessGo module in step 3.
Using a multimeter switched to resistance measurement, measure the resistance be-
tween the two pins of each unplugged connector. One of them will show value equal to
the resistor (or short) which we placed near the KeylessGo module in the previous step.
This is the wire we do not want to plug back into the CAN distributor block.
5
Plug back all connectors into the CAN distributor block except one
Plug all the other connectors back into the CAN distributor block. Leave the one, which
we have found using the multimeter, unplugged for now.
6
Connect the cliMATE®KeylessGo cable to KeylessGo module
a) If the cliMATE® KeylessGo cable has a mating connector, just connect it to Mercedes
unplugged connector.
b) Otherwise you must solder two cables together and properly insulate the connec-
tion: Cut o the unplugged Mercedes connector. Solder the two wires of the cut harness
to the cliMATE® KeylessGo cable. Make sure that the Mercedes brown wire connects to
cliMATE® brown wire (CAN Low), and the Mercedes brown-red wire connect to cliMATE®
pink wire (CAN High).
7
Reconnect the Mercedes KeylessGo module
Remove the resistor (or wire jumper) from the KeylessGo module connector placed there
previously.
Snap on the connector cover and plug the connector back onto KeylessGo module.
8
8
KeylessGo Installation Manual
cliMATE_KeylessGo_installation_manual_20150314
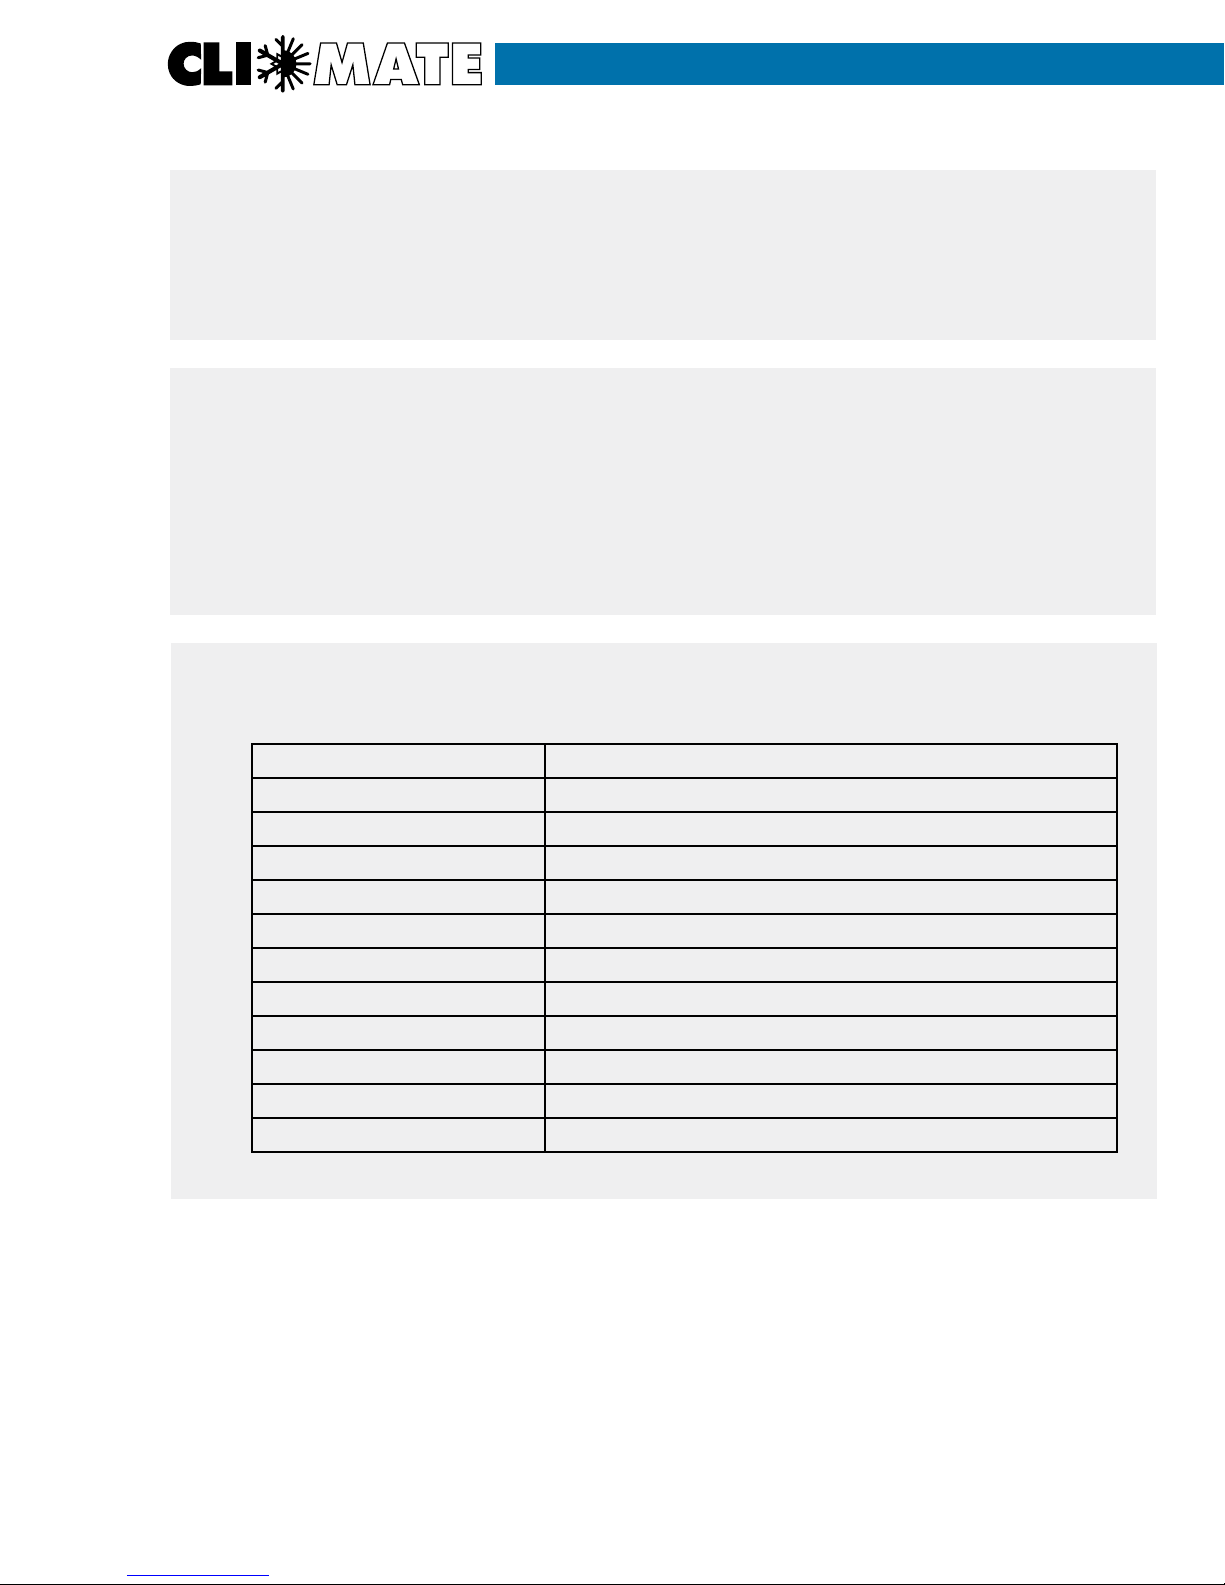
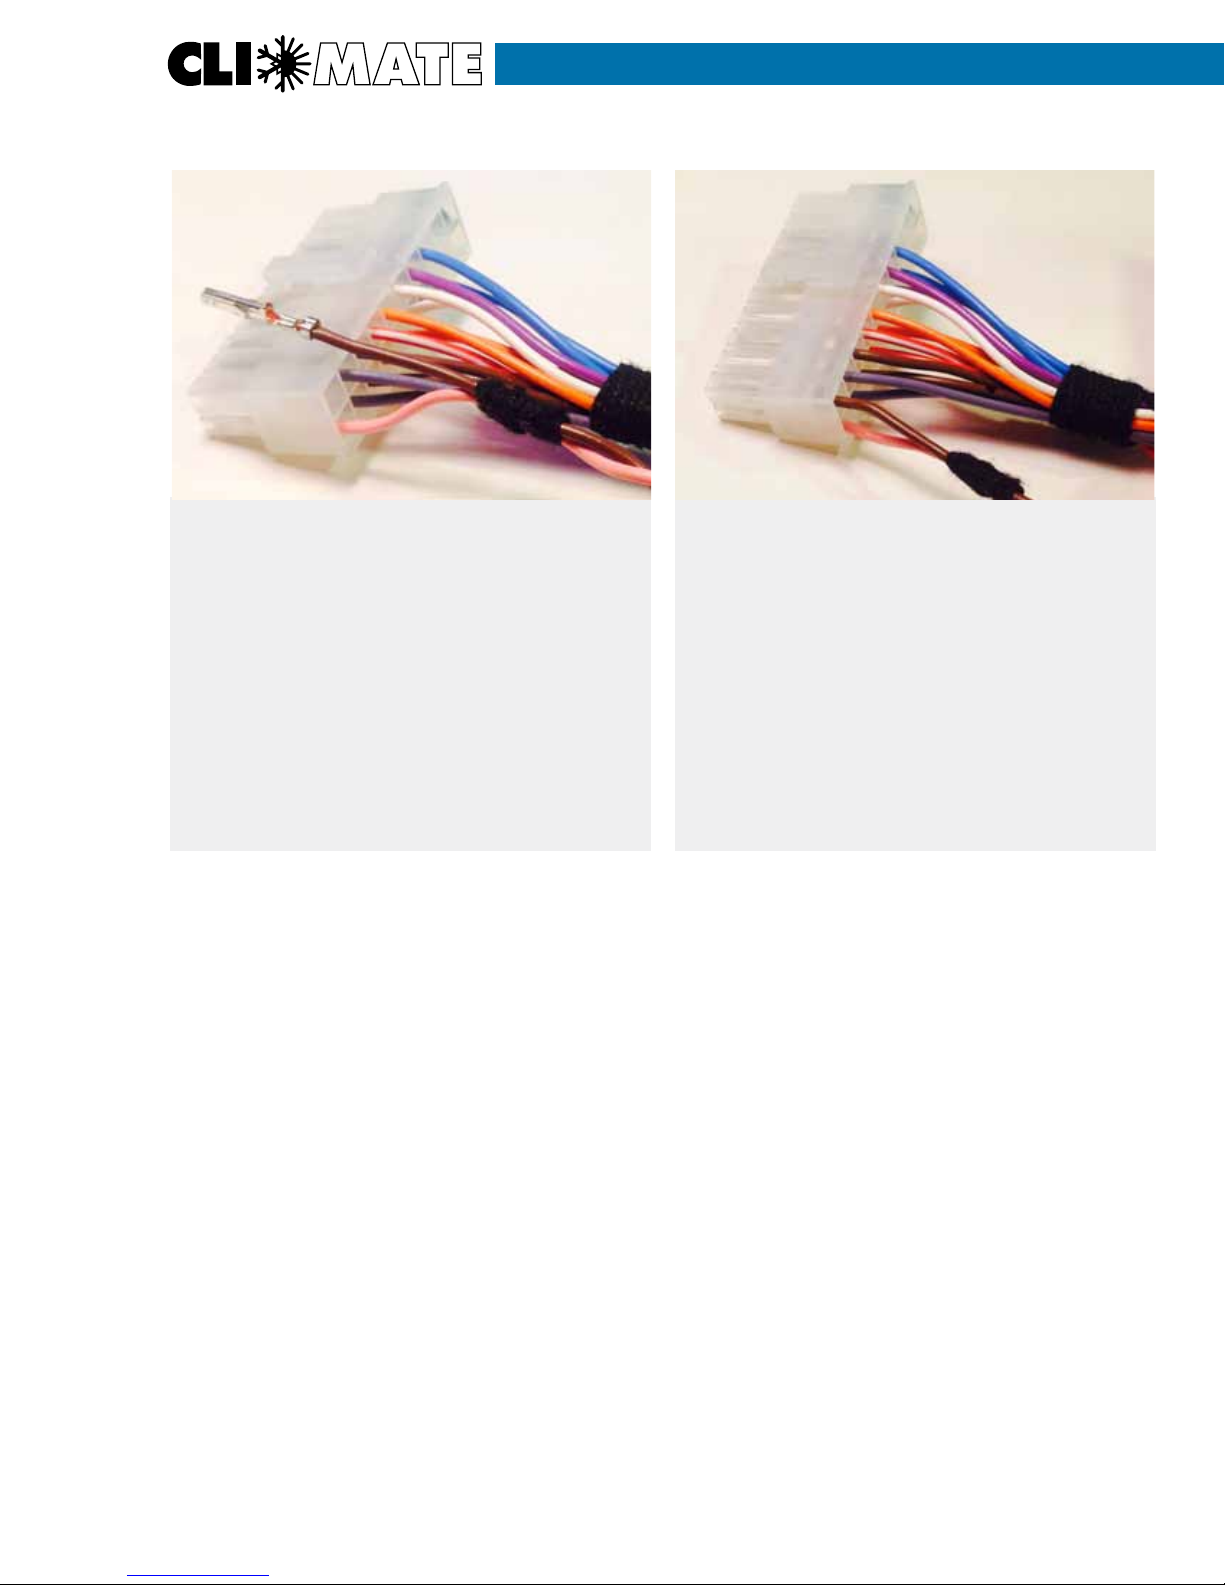
Holding the brown pin in the same orienta-
tion, plug in the brown wire into the top left
opening (number 20, CAN L).
NOTE:
Some units are shipped with the assembled
cable already.
10
Lay cliMATE® connector horizontally with
the lock upwards as pictured.
Position the KeylessGo cable wire pins as
pictured. There are two small metal guides
sticking from the pin upwards, the only way
the pin will plug into the connector .
Plug in the pink wire into the bottom left
opening (number 10, CAN H).
9Connect the cliMATE®KeylessGo
cable to cliMATE®connector
Verify the KeylessGo functionality without remote start
Verify the Mercedes KeylessGo functions as before the cliMATE® installation. Leave the vehicle, close
the doors and lock them by pushing the Lock button on the door handle.
Next, touch the door handle. Assuming you have the Mercedes Smartkey near you, it should unlock
the door.
Verify the KeylessGo functionality with cliMATE®Remote Start
Leave the vehicle and lock all the doors.
Remotely start by using the Mercedes Smartkey. Just click Lock – Unlock – Lock buttons in a se-
quence; or just click the red Panic button if your ignition key has one. The engine will start running.
Walk to the driver’s door and touch the door handle. Assuming you have the Mercedes Smartkey
near you, it should unlock the door. If yes, the KeylessGo installation was successful.
Enter the vehicle. DO NOT PRESS the brake pedal, just click the Start button TWICE on the dashboard.
This will cause the cliMATE® to release its control over the engine and indicate it by blinking the indi-
cator lights once. If your Instrument Cluster LCD is switched to LCD, the cliMATE® count-down timer
will erase the screen. Now you can drive the vehicle as usual.
Testing the Installation
Table of contents
Other cliMATE Remote Starter manuals


-UNI owner's manual")
