ClimaTemp Portables CPT-12 User manual
OPERATION MANUAL
1
OPERATION MANUAL
CPT-12
READ THIS MANUAL CAREFULLY FOR INSTRUCTIONS ON CORRECT
INSTALLATION AND USAGE, AND READ ALL SAFEGUARDS
PORTABLE SPOT AIR
CONDITIONER

OPERATION MANUAL
2
SERIAL NUMBER LOCATION AND IDENTIFICATION
The serial number and name plate can be located near the lower right side of the unit.
Nameplate Label

OPERATION MANUAL
3
FOREWARD
The first spot cooler portable air conditioner featuring Cold Plasma Needlepoint Bipolar
Ionization.
•Destroys viruses and bacteria.
•Effective on airborne and surface pathogens.
•Neutralizes odors and VOC’s
•Reduces mold spores, pollen, allergens and particulates.
•Removes smoke and smoke odors.
•Efficacy tested and Independently proven effective.
•UL2998 Certified Ozone.
Exclusive engineered features only from ClimaTemp.
•Wide operating ranges from 64°F-113°F.
•Highest evaporator airflow of any comparable 1-ton unit at 470CFM (H).
•Protected metal condenser coil decorative cover overlay with slide out filters.
•QuickMove Condenser and Evaporator filters. For quick effortless cleaning.
•Attachable rear kick plate for navigating over door jams and rough terrain.
•Metal cord wrap holder to keep the units power cord organized and out of the way.
•Stylish and functional side bump guards to protect the unit from dents and scratches.
Features:
•Cold Plasma Technology. Needlepoint Bipolar Ionization.
•Dual mode operation. Cooling with purification or fan with purification.
•Provides 12,000 Btu/h of cold air.
•ETL Listed and Certified.
•Soft touch programmable LED Controller.
•Self-diagnostic LED controller displays error codes for quick troubleshooting.
•Operates on standard 115V power at only 12 Amps.
•Auto full condensate bucket shut off and audible alarm.
•Condensate Pump Option. (Beckett Brand Plug n Play)
•Automatic Restart feature that resets to original settings if power is lost.
•No costly installation necessary. Fast setup in minutes.
•Provides cooling down to 64°F ambient.
•Built for everyday use and designed for the rental industry.
•Classic design for a great look in all commercial applications.
•High quality locking castors for effortless movement.
•LCDI protected plug
•HEPA kit ready. Unit can be equipped with HEPA filtration capabilities with the
ClimaTemp HEPA Accessory Kit.

OPERATION MANUAL
4
INVENTORY
After unpacking your ClimaTemp Portable spot air conditioner, please check to make
sure you have the following items:
1. CPT-12 Portable spot air conditioner
2. Operation Manual
3. Kick Plate/Foot Pedal. (located under the unit). Please attach to bottom rear of unit.
4. Metal Cord Wrap Holder. (located under the unit). Please attach to back of unit.
Note: If any of these items were not included in the box or appear damaged,
please contact your ClimaTemp Portable spot air conditioner reseller for
replacement.

OPERATION MANUAL
5
INSTALLATION & GENERAL SAFETY INFORMATION
•Unit Designed for indoor usage only. Do not submerge or spray water on the spot
cooler.
•Do not use the unit at conditions above 113 ℉ (45℃) or below 64 ℉ (18℃).
•Use 115v-60HZ, 1Phase power supply only. Securely plug into grounded 15amp
outlet.
•Do not use an extension cord which may cause a risk of fire or electric shock.
•Do not bend or kink power cable. Damage to power cord can cause electric shock
or injury.
•Do not place anything on the top of the machine. Do not stand or place hands or
fingers inside of the unit while in operation.
•Install unit on smooth level ground. Lock the castors breaks to minimize rolling
and movement.
•Always power off unit by the control panel, do not turn off by removing plug from
power source.
•Condenser exhaust should always be ducted to the exterior or outside the area for
maximum cooling.
•Do not pinch, minimize or constrict the duct size of the exhaust (12”) as this may
cause then unit to malfunction or damage to the unit.
When in operation, the front and back of the machine should be more than 20" from the
wall or other barrier. The cold air exhaust should be at least 12" away from any barrier
and hot air exhaust should be more than 79" from roof or barrier.
OPERATION MANUAL
6
INSTALLATION (cont.)
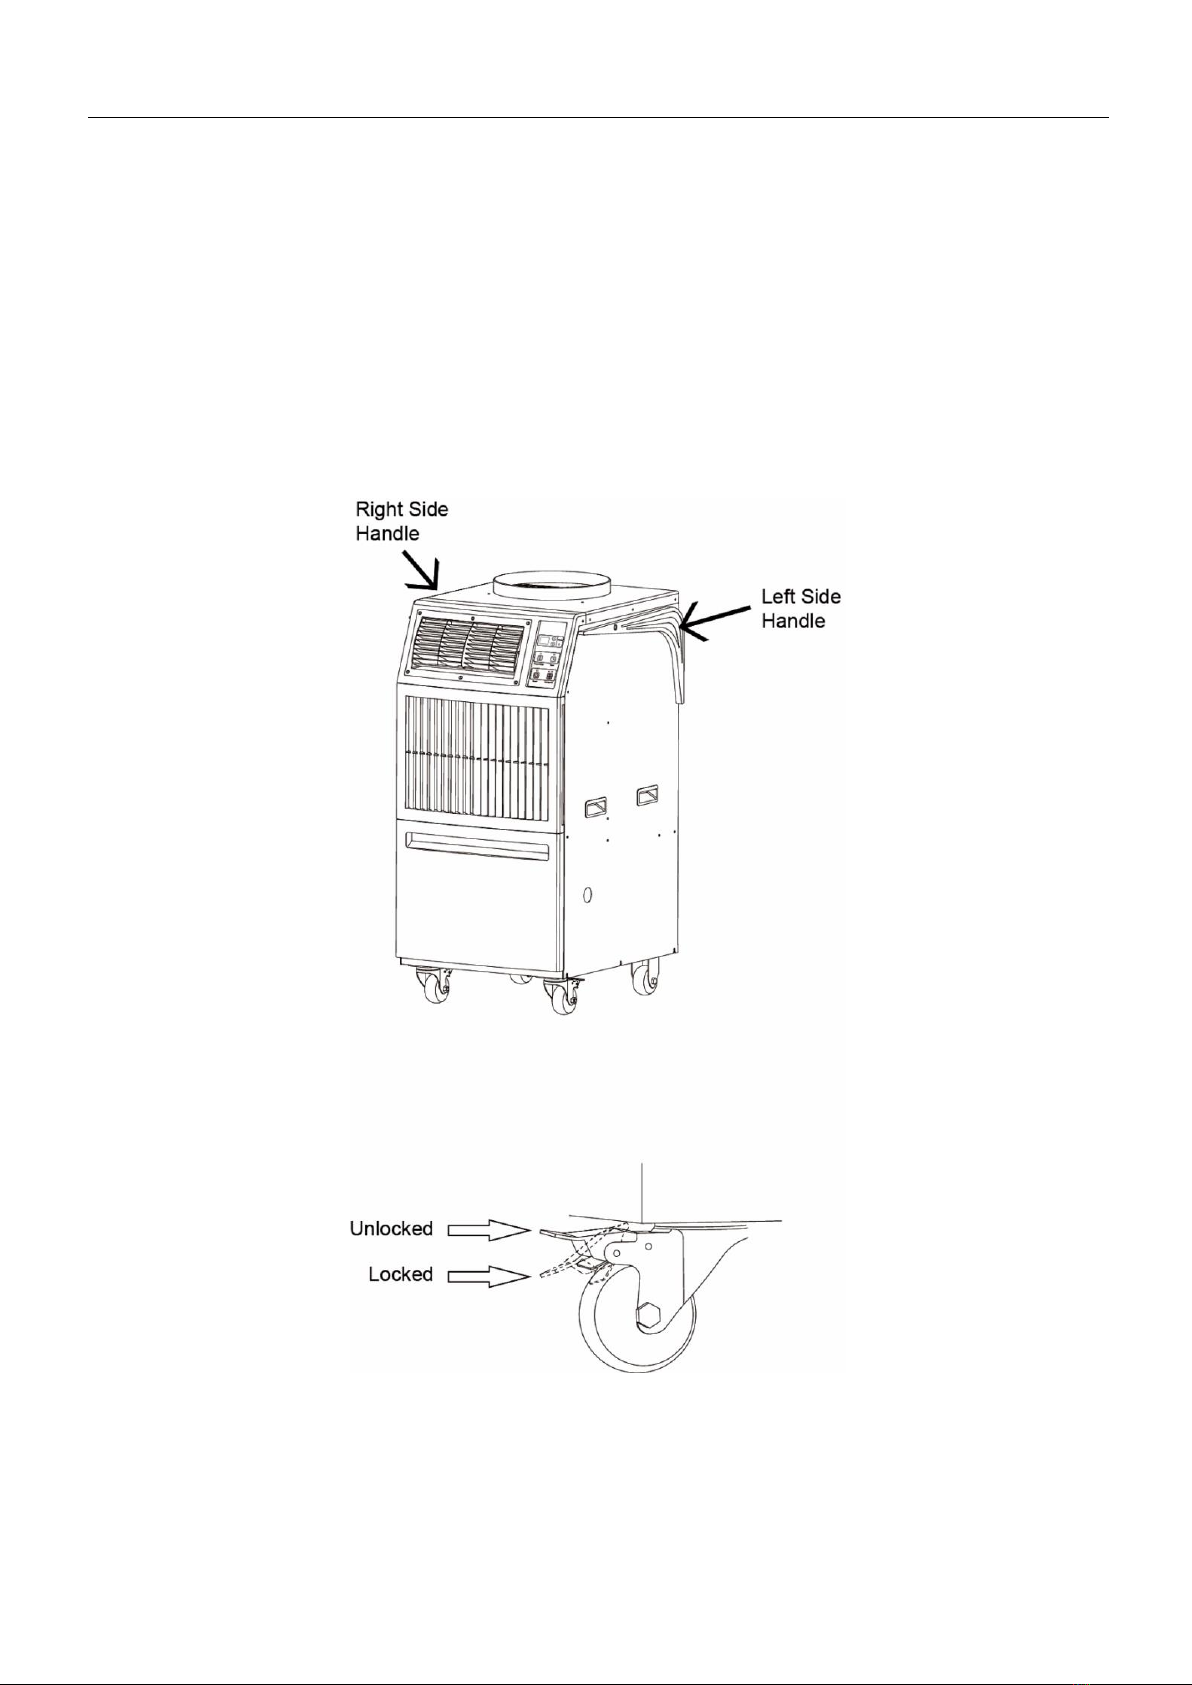
Moving the Unit
Unlock the casters and push the Portable spot air conditioner unit using the side
handles to a flat, level surface and set the casters to the LOCKED position.

OPERATION MANUAL
7
INSTALLATION (cont.)
Plugging in the Unit
1. Check the prongs and surface of the power cord plug for dust/dirt. If dust and/or dirt
are present, wipe off with a clean, dry cloth.
2. Check the power cord, plug and prongs for damage. If any damage is found, contact
ClimaTemp Portables or a qualified technician for repair.
WARNING:
1. If the power cord or plug is damaged, replacement should only be performed by
qualified electrical personnel.
2. Because of potential safety hazards under certain conditions, we strongly
recommend against the use of an extension cord.
Procedure for Testing Device
The CPT-12 is equipped with a LCDI power cord. This device is non-serviceable and
opening the device may cause electric shock or void the warranties of the product.
1. Plug into grounded appropriate 115v receptacle.
2. If unit does not operate, press the test button, followed by the reset button.
3. If test fails then do not use and contact your ClimaTemp reseller for replacement.
CAUTION: The power source should be a dedicated single outlet circuit with UL listed
short-circuit and ground fault protective breaker. Do not share the AC outlet with any
other instrument or equipment. The minimum power supply rating and the maximum
fuse size for each corresponding model are listed below.
MODEL
MINIMUM POWER SUPPLY RATING
RECOMMENDED
FUSE SIZE
CPT-12
115V, single phase,60Hz,15A
15A maximum

OPERATION MANUAL
8
OPERATION
Control Panel
Before operating the unit, it is important to familiarize yourself with the basic controls
located on the control panel.

OPERATION MANUAL
9
OPERATION (cont.)
Operating Method
1. Power Switch:
After plugging into power, the power switch LED indicator will illuminate, press the POWER
button to turn on and turn off the unit. Cold Plasma is engaged when power is on.
2. Air volume selection:
Press Fan Speed to select the high or low air volume.
3. Fahrenheit and Celsius Temperature setting:
Procedure: Press and hold the Fan Speed button while plugging the unit into the power
supply; once the digital display shows CF, release the Fan Speed button. If the current
setting is in Celsius, the indicator will display ℃. If the current setting is in Fahrenheit, the
indicator will display ℉. Press the temperature button to change to C or press the timer
button to change to F. Store the settings by pressing the Fan Speed button.
4. Temperature setting:
Press the temperature button, the temperature button will start to blink. Press the up and
down adjustment button on the display to set the temperature you desire. Once selected wait
15 seconds and your preferred temperature will be set. The display will show the temperature
of the environment (as default). The range is 18℃~35℃ (64℉~113℉). When the environment
temperature is higher than the setting temperature, the compressor will engage, producing
cold air. When the environment temperature is lower than the setting temperature, the
compressor will disengage and shut off.
5. Fan Only Mode:
To operate in fan mode, press the temperature UP button to its highest setting (95). This will
operate the unit in fan mode only. This mode can be used to operate the unit in Cold Plasma
purification mode without cooling.
6. Time setting:
Press timer button, the timer LED turns on, temperature light will turn off, the display will
show the time our unit will turn off (12 hours), press up and down button to change the time
(1-12 hours), 3 seconds later the display will show the temperature of the environment again,
the temperature light will turn on.
7. Alarm indicator/Unit error:
When the unit’s condensate bucket is full of water, or an overcurrent, overheat, or other
trouble is detected by the unit, the alarm indicator will turn on. When the unit stops working,
LED display will show the error code.

OPERATION MANUAL
10
LED Display Error Codes:
Code
Description
Reason
CO
Compressor Over-current
Protection
Surrounding Temperature too high.
Hot air exhaust is obstructed.
Input voltage is too high or too low.
Compressor problem.
Relay problem.
P
Pressure too high in cooling
system
Surrounding Temperature too high.
Hot air exhaust is obstructed.
Surrounding Temperature to low.
tc
Evaporator Frost Protection
Cold air exhaust system is
obstructed
FL
Water level warning
Water Tank Full
t1
Inlet air sensor problem
Connector problem or sensor
damaged
t3
Evaporator temperature sensor
problem
Connector problem or sensor
damaged
OPERATION MANUAL
11
OPERATION (cont.)
Empty the Drain Tank
During COOL mode, condensate water accumulates in the drain tank.
When the drain tank becomes full, an audible chirping sound can be heard and LED
displays “FL”, then the unit will cut off the power supply and stop.
Note: If you want to empty the drain tank, please wait after the unit stops.
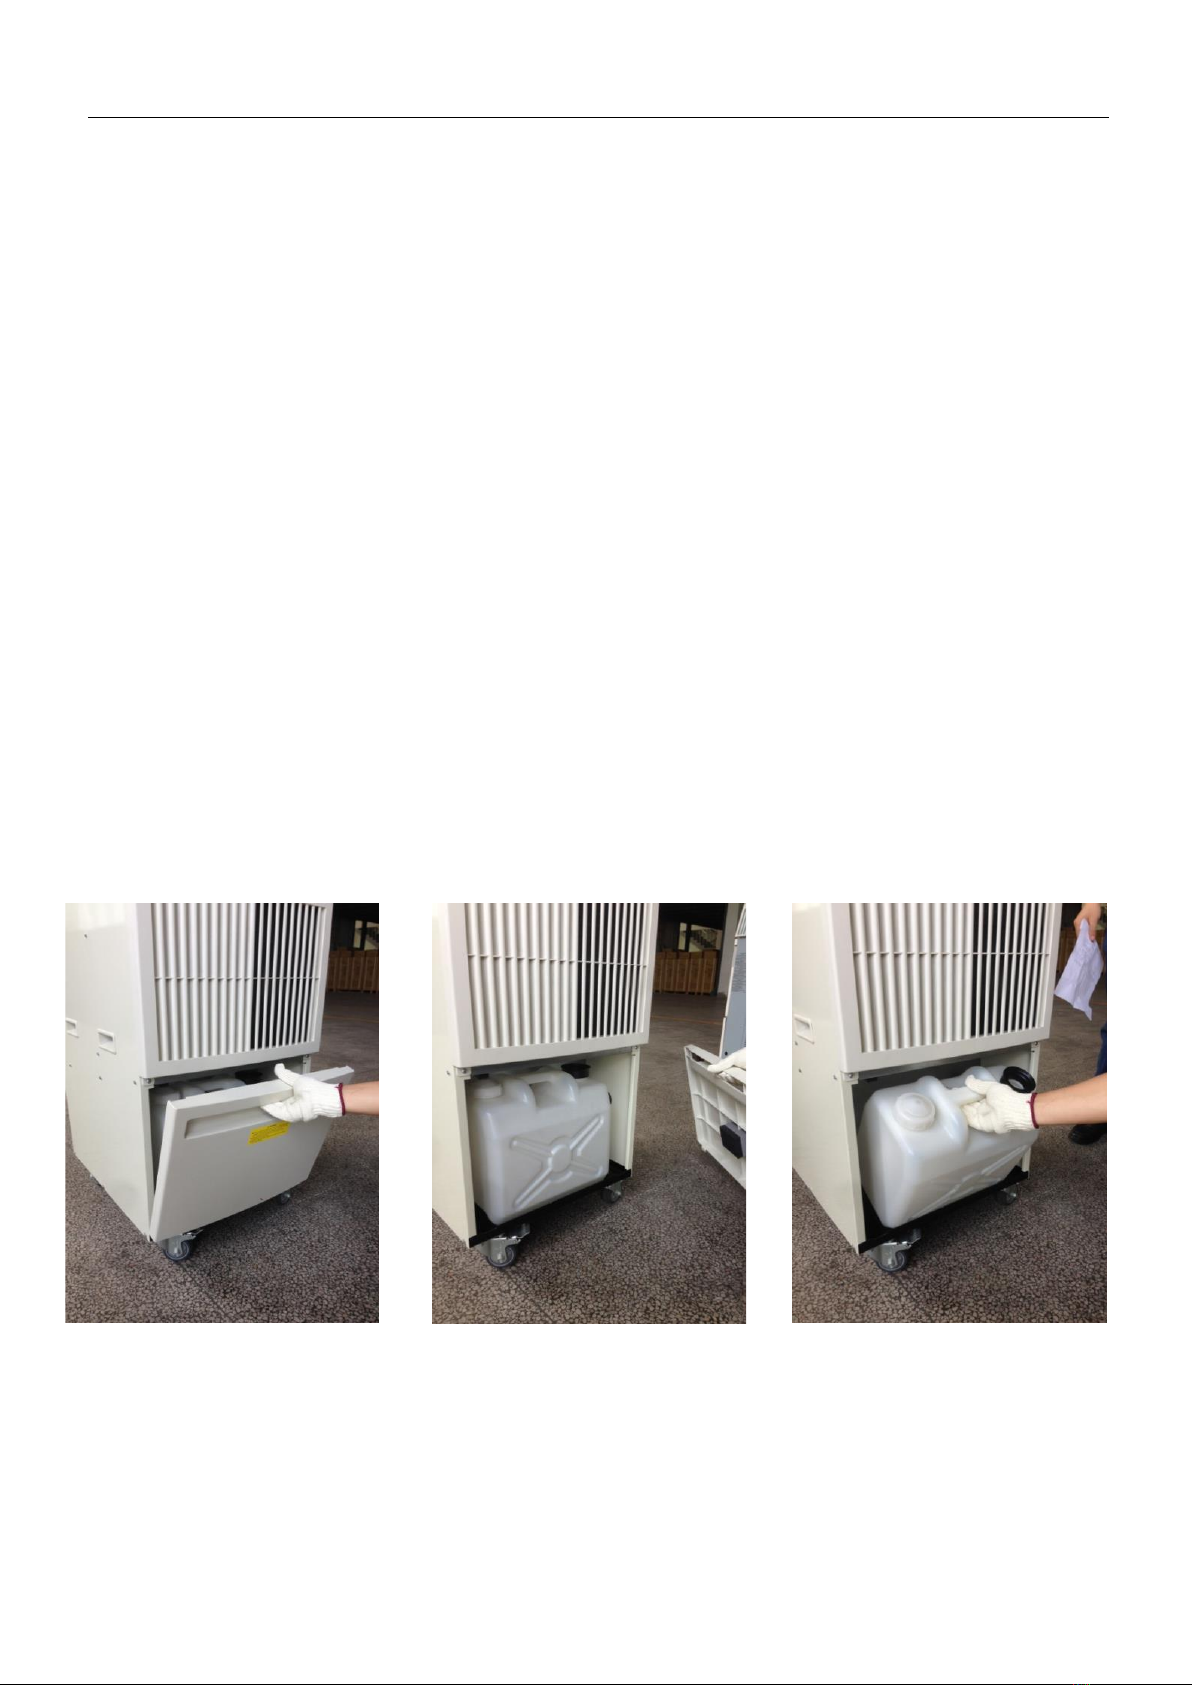
1. Open the drain tank door.
2. Pull the drain tank from the unit.
3. Remove the cap and empty the drain tank.
4. Replace the cap and return the drain tank to the unit.
5. Close the drain tank door.
6. Press the Power button to restart the unit.
OPERATION MANUAL
12
OPERATION (cont.)
•When the “Tank Full” light illuminates, and an audible chirping sound can be
heard, the unit will cut off the power supply and stop.
•Please open the drain tank door and pull out the drain
tank from the unit, remove the cap and empty
the drain tank.
• Carefully remove the water tank and do not
damage the top components on the top of water tank.
• Make sure the water tank is in correct position,
otherwise it may cause water to leak and damage
the unit and surroundings.
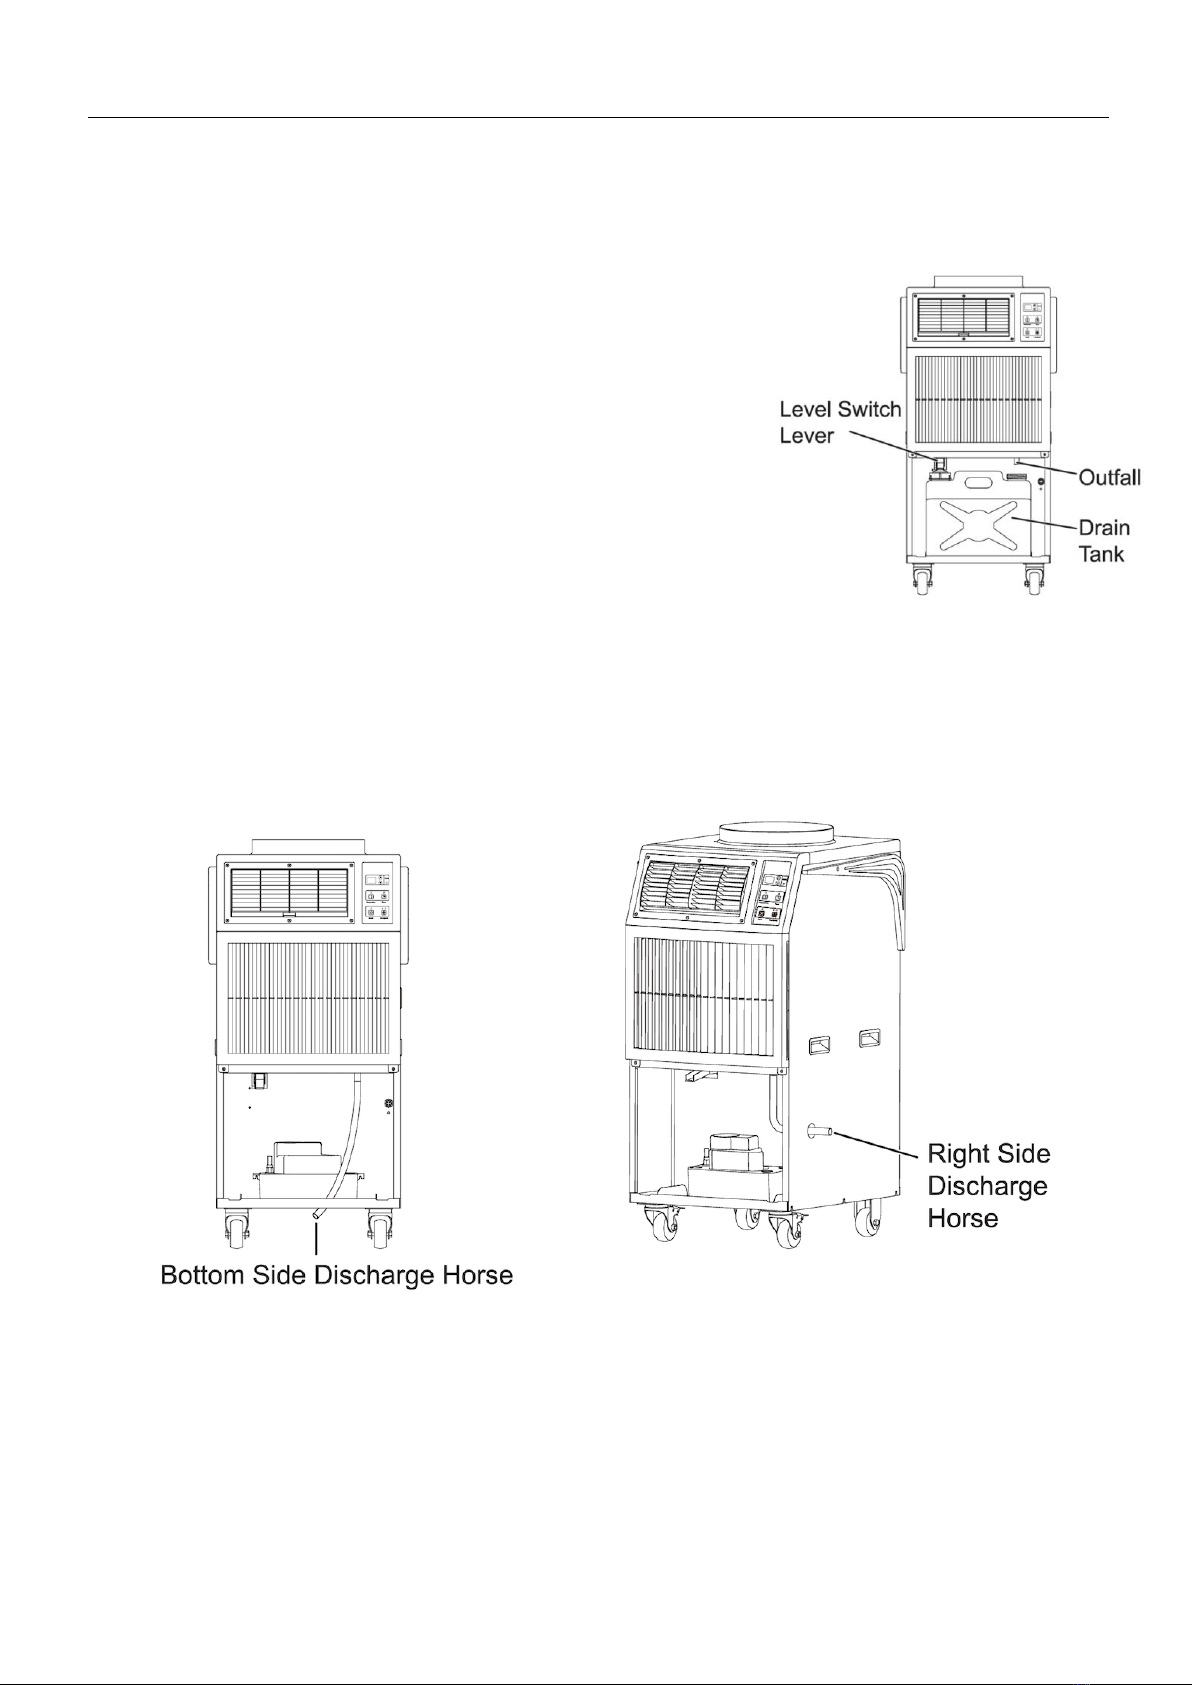
Note: The condensed water can be directly discharged through a gravity drain. Remove
the drain tank, connect the drain outlet directly to the machine through the bottom side
discharge hose or out through the right-side discharge hose outlet.
Optional Plug n Play Condensate Pumps are available for the CPT-12 spot cooler.
Please contact your ClimaTemp reseller for condensate pump options.

OPERATION MANUAL
13
DAILY INSPECTION & MAINTENANCE
Empty the Drain Tank
To empty the drain tank, refer to instructions on page 11.
Clean the Air Filters
Clean the air filters once a week. If the unit is used in a dusty environment, more
frequent cleaning may be required. A dirty filter can reduce air output resulting in a
decrease in the cooling capacity and damage to the compressor and components.
Filter Removal Method
1. Turn the unit off by pressing the Power button.
2. Remove the two air filters.
Note: To remove the front evaporator filter, slide the filter by pulling the filter out of
the machine’s front evaporator panel. To replace the filter slide filter back into
evaporator panel.
To remove the rear condenser filter, pull filter up and out of the condenser frame. To
replace filter, slide filter back into condenser frame with tab facing up.

OPERATION MANUAL
14
Filter Cleaning Method
1. Remove filters. Dust, dirt and particulate can be removed from the filter with a
vacuum cleaner, or rinse in cold or lukewarm water. If the
element is extremely dirty, wash with a neutral
detergent.
2. After the element has been cleaned, rinse with
clean running water, allow to dry, then reinstall filters into unit.
End of Season Maintenance.
1. Wrap power cord on rear cord wrap holder.
2. Remove all water from condensate bucket.
3. After cleaning the unit completely dry with scratch resistant cloth.
4. Unit should be operated in fan mode (bring unit to highest set point) to dry
for 2-3 hours.
5. Cover unit to prevent dust and humidity.

OPERATION MANUAL
15
TROUBLESHOOTING
Check the following items before calling your ClimaTemp Portable spot air conditioner
reseller or a qualified technician.
CONDITION
POSSIBLE CAUSE
REMEDY
Unit does not
operate
1. Ground fault breaker trip or
breaker trip from power source.
Reset breaker or reset LCDI power cord.
2. Drain tank is full.
Empty the drain tank.
Water leaking
1. Drain port plugged
1.Clear drain outlet.
2. Drain Tank is not in the right
place.
2. Place the drain tank in the right position,
note the relative position of the float and
lever.
3. Dust and dirt particulate are
on the front filter.
3. Clean the front filter.
4. The water lever of drain tank is
too high.
4. Pull out the drain tank and empty it.
No cooling.
1. The surface of the condenser
is dirty.
1. Clean (vacuum) the surface of the
condenser. Do not use water or coil
cleaner.
2. Exhaust fan malfunction.
2. Repair, replacement of exhaust fan
motor.
3. Temperature of the external
environment is too high
3. Use the unit only if surrounding
temperature is between 64F and 113F
4.The capacitor of the
compressor is damaged.
4.Replace the capacitor
5. Input voltage is too high or
too low.
5. Make sure voltage is correct.
6. Compressor thermal overload
protection
6. Restart the unit after it has cooled down.
7. Compressor motor is
damaged.
7. Repair, replace Compressor motor if
needed.
OPERATION MANUAL
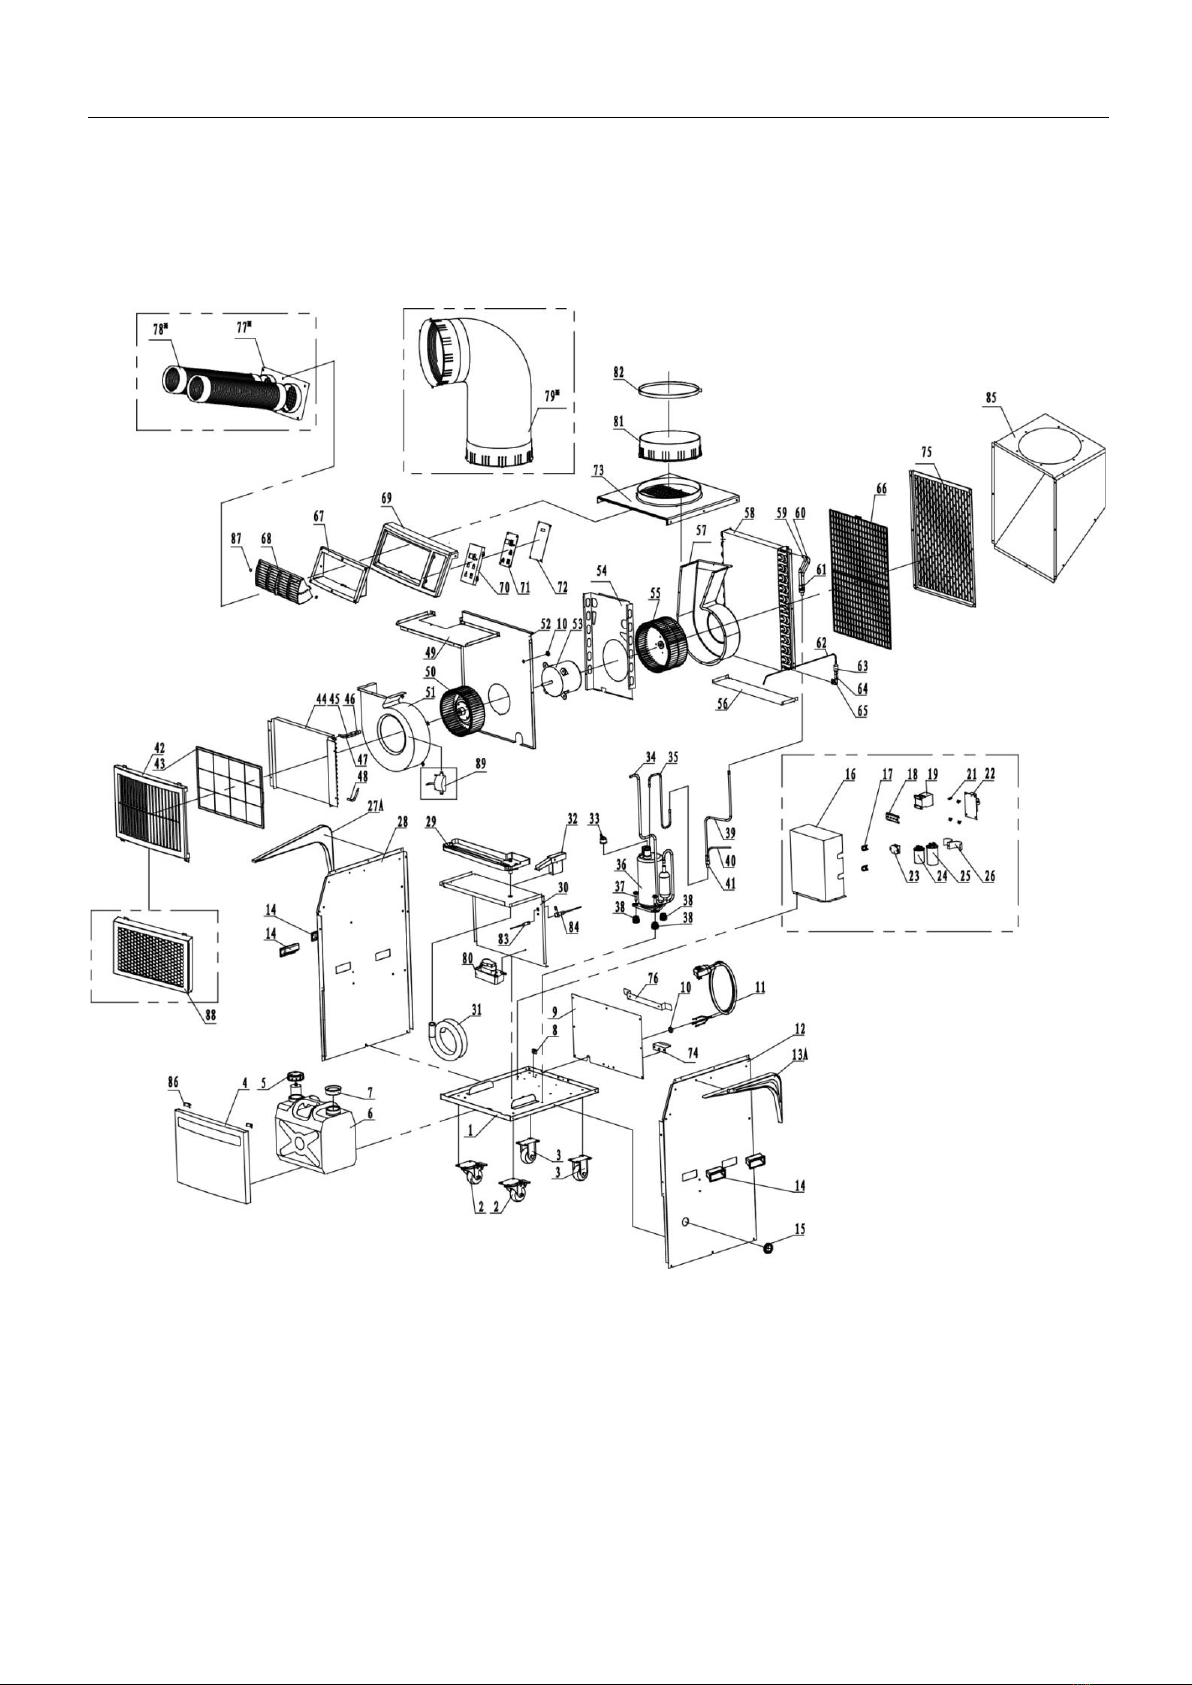
16
Parts List Breakdown
※ Optional Accessory
88.HEPA Kit
89. Bipolar lonizer

OPERATION MANUAL
17
Limited Warranty
ClimaTemp Portables Inc. warrants its portable air conditioner products and accessories against defects
in material or workmanship. Under ordinary use ClimaTemp will, at its sole discretion, repair or replace
any defective product or part covered by this warranty. Warranty coverage is (12) months for all parts on
the ClimaTemp product and (36) months on the compressor or compressor components. This warranty is
in effect from the date of purchase on any invoicing for the end user. This Limited warranty is conditional
on the return of the part or unit to the manufacturer with approval in which all goods and services are
freight prepaid from the customer or distributor. This warranty does not cover malfunctions or misuse
beyond ClimaTemp’s control including improper operation, neglect, abuse, abnormal use, incorrect
electrical connections, and failure to perform routine maintenance. Furthermore, ClimaTemp will not be
responsible for improper installation that damages unit or components. Any shipping damage or improper
transport is not covered under this warranty.
DISCLAIMER OF WARRNTY EXCEPT AS EXPRESSLY PROVIDED IN THIS STANDARD WARRANTY POLICY STATEMENT,
CLIMATEMP PORTABLES HEREBY EXPRESSLY DISCLAIMS ALL REPRESENTATIONS, CONDITIONS AND WARRANTIES, WHETHER
EXPRESS OR IMPLIED, INCLUDING BY WAY OF EXAMPLE AND NOT LIMITATION, THE IMPLIED WARRANTIES OF TITLE,
MERCHANTABILITY, NONINFRINGEMENT AND FITNESS FOR A PARTICULAR PURPOSE. LIMITATION ON LIABILITY
NOTWITHSTANDING ANYTHING HEREIN TO THE CONTRARY, IN NO EVENT WILL CLIMATEMP PORTABLES BE LIABLE FOR ANY
SPECIAL, INCIDENTAL, PUNITIVE OR CONSEQUENTIAL DAMAGES WHATSOEVER, INCLUDING LOSS OF PROFITS, WHETHER
ARISING IN CONTRACT, TORT, WARRANTY OR OTHERWISE, EVEN IF IT HAS BEEN ADVISED OF THE POSSIBILITY OF SUCH
DAMAGES. THE LIMITATIONS SET FORTH HERE WILL APPLY EVEN IF THE REMEDIES OF ERROR CORRECTION, REPAIR OR
REPLACEMENT, REPERFORMANCE OF SERVICES AND REFUND OF PAYMENTS COMPLETELY FAIL OF THEIR ESSENTIAL
PURPOSE. NOTWITHSTANDING ANYTHING HEREIN TO THE CONTRARY, THE LIMIT OF CLIMATEMP PORTABLES (WHETHER IN
CONTRACT, TORT, NEGLIGENCE, STRICT LIABILITY, BY STATUTE OR OTHERWISE) TO CUSTOMER OR TO ANY THIRD PARTY
WITH RESPECT TO WHICH SUCH CLAIM IS MADE. GOVERNING LAW AND JURISDICTION
ClimaTemp Portables Inc.
844-349-5665
www.Clima-Temp.com

OPERATION MANUAL
18
Table of contents
Other ClimaTemp Portables Air Conditioner manuals


NK6OO(LC)(LH) Service manual")


