Clipper NORTON CDM 204 User manual
CDM204 30/11/2022
11/11/2022 AL
EN12418
Comments /
Others:
Créateur / Creator / Initiator
Nom de la spécification / Specification Name / Name
der Spezifikation :
Code couleur / Colour Coding / Farbleitsystem :
NA
Date Création / Creation Date /
Datum der Initialisierung
Procédé Attachement / Attachment Process /
Herstellungsprozess
Dernière Révision / Latest Revision
/ Letzte Revision
Réviseur / Revisor / Revisor
Référence
Normative / Safety
Standard / Gültige
Normen und
Richtlinien
carotage-forage
NA
FICHE PRODUIT / PRODUCT SHEET / PRODUKT-DATENBLATT
SAINT-GOBAIN ABRASIVES
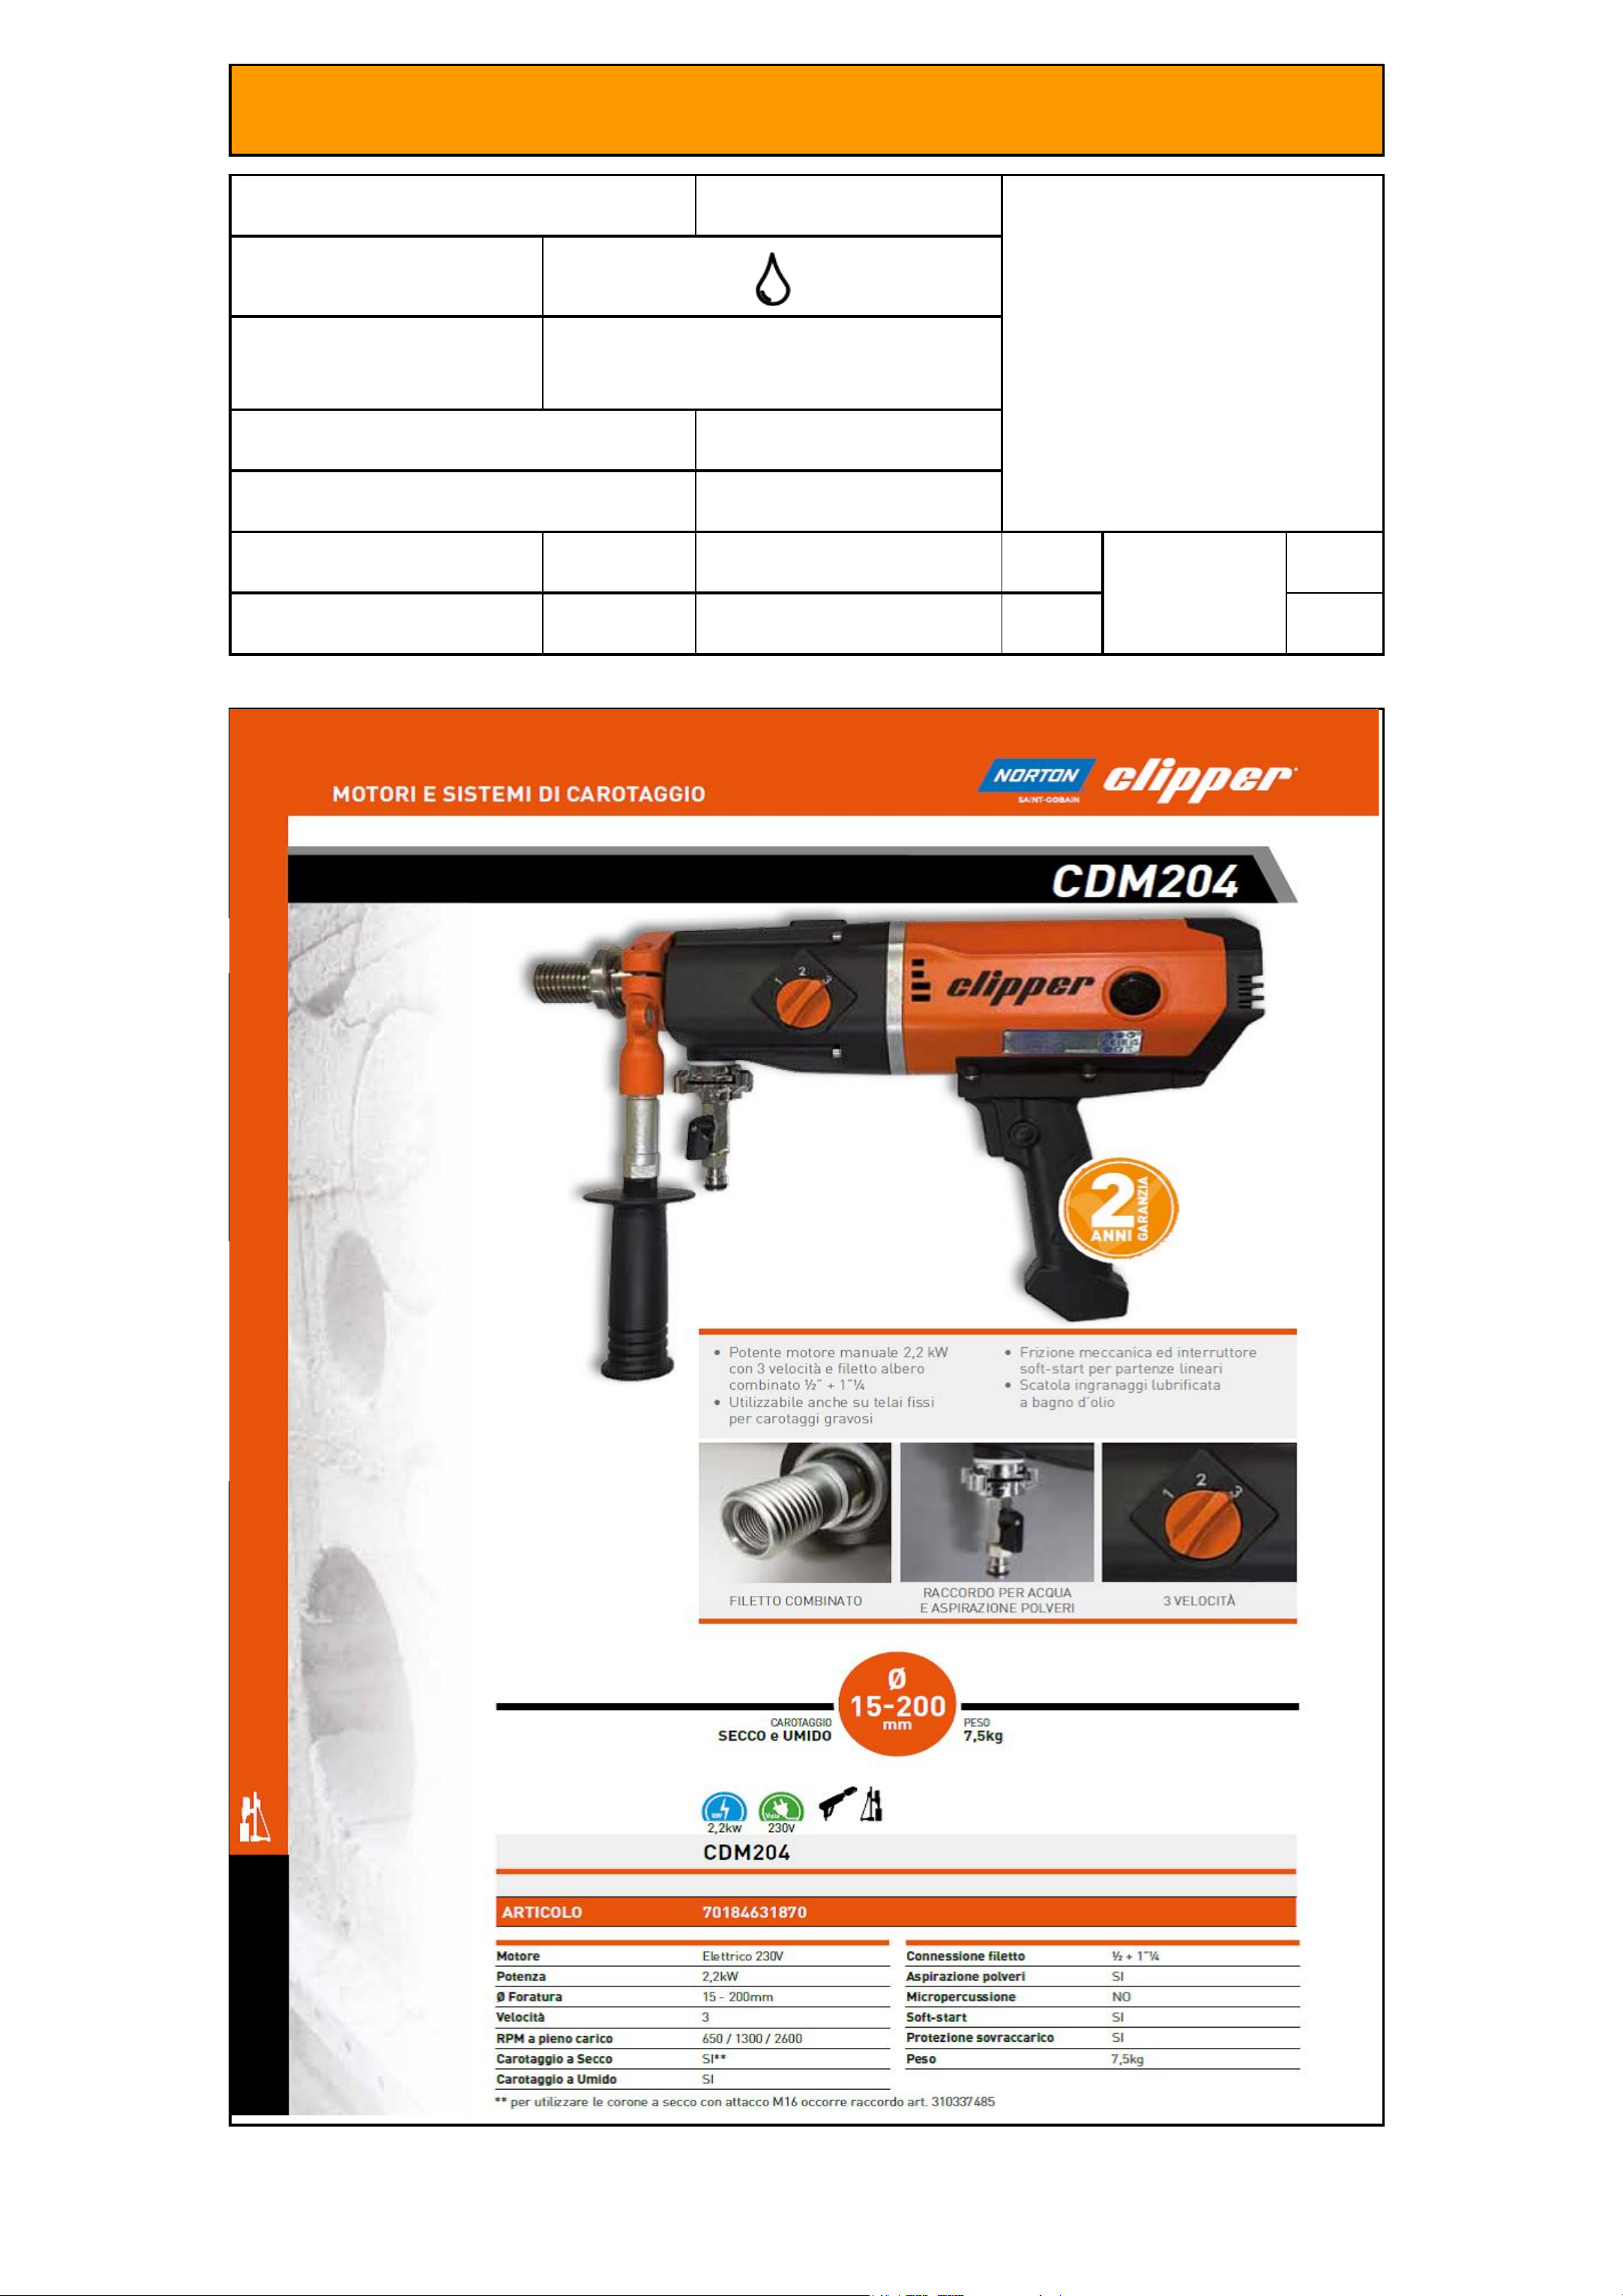
CDM204
Application machine / Machine
Application / Anwendung
(Maschine) :
Application Matériaux / Materials /
Materialien :
SAINT-GOBAIN ABRASIVES xxxxxxxxxxxxxxxxxxxxxxxxxxxxxxxxxxxxxxxxxxxxxxxxxxxxxxxxxxxxxxxxxxxxxxxxxxxxxxxxxxxxxxxxxxxxxxxxxxxxxxxxxxxxxxxxxxxxx

CDM 204
OPERATING INSTRUCTIONS
MANUALE D
’
USO

2
ENGLISH
Instructions for use
ITALIANO
Manuale d’uso
6
4

3
2000W
CDM 204
~AC
220-240V
50-60Hz
Amperage
10A
Class
I
2
1
3
650 min-1
Ø 82 - 202mm
2
1
3
1300 min-1
Ø 42 - 81 mm
2
1
3
2600 min-1
Ø 15 - 41 mm
A
B
C
AØ 60 mm
B 1/4” UNC
C G1/2”
7.5 kg
•
•
PRCD
•
technical information may be changed without priornotice.

4
MAIN PARTS
1.
Pistolgrip
2.
Switch
3.
Waterlevel
4.
Auxiliaryhandle
5.
Carbonbrushes
6.
Gear switch
7.
Drillconnection
8.
Collar
9.
Spanner
10.
Water connection (wetdrilling)
11.
Dust extraction (dry drilling)
12.
Residual-currentdevice(PRCD)
INTENDED USE
This is an insulated diamond core drilling machine
for WET use in combination with diamond core
drilling
for drilling holes in stony materials and concrete.
The
drilling machine can be used manually as well as in
combination with a drill platform. This machine is suited for
right as well as left handed personnel.
This is an insulated diamond core drill machine for
DRY use in combination with diamond coredrills for
drilling holes in brick/ block and masonry. The machine
may not be used for wet drilling and is not suitable for use
with diamond core drills which must be cooled by water.
POWER SUPPLY
The drill machine may only be connected to the voltage
which is stated on the type illustration and only works with
1-phase. The machine is insulated according to European
Guidelines and consequently may only be used via a trip
switch (PRCD) with an under voltage safety level of < 10
mAon an earthed electrical main.
SAFETY INSTRUCTIONS
•
Alwaysusetheextrasidehandleand always hold the drill
machine with bothhands
•
Always use the machine under supervision. Keephands
away from rotatingparts
•
Double-check that the diamond drill is correctly
assembled
•
Before use, check that all screws are firmly in place.
Because of vibrations caused during drilling, screws can
work loose and cause damage or injury
•
After use, do not touch metal parts of the drill machine
and the diamond drill; this could be hot and cause burns.
•
Ensure that the drill machine does not start rotating by
accident;alwaysdisengagetheswitchwhendisconnecting
from the power source, or if there is an interruption to the
powersupply
CDM 204
Attention: Because of the high torque in the lowest gear,
we strongly advise you not to drill by hand in the lowest
gear. If the diamond drill suddenly gets stuck there is a
high risk that the user will get hurt. Use lowest gear only in
combination with a drillrig.
PRCD SWITCH
The machine electrical cable is equipped with a PRCD
switch which protects the operator against electrocution.
As soon as the drilling machine is plugged in, the PRCD
should be started up by pressing on the (green) -RESET-
button. If the PRCD is switched off, the -RESET- button
must be pressedagain.
Note:
•
The PRCD and the electrical cable should never come in
contact withwater
•
Check the PRCD by pressing the -TEST button before
use.
•
Never use the diamond drilling machine without a
properly functioningPRCD
•
Neverreplace the standard plug with another typeofplug
WORKING PROCES
If drilling is done by hand, initially the drill should never be
applied perpendicular to the material (the drill may start
‘spinning’). Spinning is prevented by drilling the first
centimeter / 0,5 inch at an angle of 30 degrees. Then the
drill can be slowly brought to the desired position.
In order to center without problems, it is advised to use a
pilot drill. Once the pilot drill is removed, the drill can be
placed in the pre-drilled hole.
Tips
•
Diamond drills which are not precisely circular cause
extra burden to the bearings and the cogs.
•
Switch on the machine only if the diamond drill can turn
freely.
•
Whenchangingthediamond drill, always use2spanners.
Never use a hammer as this may damage the cogs.
Auxiliary handle
The side handle can be loosened by hand to change its
position. After position is set, twist the handle again until
firm. By removing this handle, it is possible to mount the
drilling machine in a drill rig.
Switching on/off
If the machine is provided with a switch with a lock-on
button, with which the machine can be switch on/off in 2
ways:
1
- Momentswitch
Switch on; push theswitch
Switch off; release theswitch
2
- Permanentswitch
Switchon;pushtheswitchandsecureusinglock-onbutton
Switch off; push the switch and release again
For your safety you may only use the lock-on button
when the machine is mounted in a drill rig!

5
Overloadprotection
To protect the motor, operator and diamond drill, the
machine is provided with a mechanical, electronic and
thermal overload safety system. Whenever the engine is
switched off due to overload, it must be switched on again
as soon as possible to cool the engine. Then let the drill
turn for a minimum of 1minute.
1
- Electronic /Thermal
If the machine is being overloaded, the motor electronic
switches over to the pulsating operation for showing the
operator the overload. If the force is then not reduced, the
motor switches off after a few seconds. After switching the
machine off and on again, the motor start again softly.
2
- Mechanical
If the drill bit suddenly gets stuck, the slip coupling is
activated to disconnect the main axis from the engine.
Make sure you switch off the engine immediately and
remove the drill from the hole. When the slip coupling is
activated for a longer period, the mechanical slip must be
re-tuned by a recognizedexpert.
Drilling with water cooling - Water connection
IFAPPLICABLE
The drilling machine is equipped with a water tap, which
includes a ‘Gardena’ connection. Make sure that the core
drill is sufficiently cooled and that the slurry is properly
discharged. The maximum permitted water pressure is 3
bars. Always use clean water to enlarge the life span of
the internal water seals. In case of leakage, the drilling
machine has to be checked IMMEDIATELY by a certified
mechanicalexpert.
Dry drilling - DustExtraction
IFAPPLICABLE
For dry drilling only use designated drill bits. Dry drilling is
only possible in masonry, brick/block and sandstone.
Dust released during dry drilling is dangerous to your
health. Therefore, a dust extraction system specially
intended for this purpose must be used, and if necessary,
a dust mask worn. The use of a dust extraction system is
also required to optimize the life time of the diamond drill
bit. Toprevent clogging of the dust extraction system it is
essential that the materials which are being drilled are
completely dry. Information about dust extraction systems
is available at your diamond tools supplier.
ENVIRONMENTAL PROTECTION
According to the European regulation
2002/96/EC,SAINT-GOBAINABRASIVES
is responsible to recycle old electric drill
motors. You are therefore requested
to return old SAINT-GOBAIN ABRASIVES electric drill
motors toyour local reseller.
WARRANTY
Guarantee claims must be shown by submission of
purchase invoice. The guarantee includes the repair of
defects which have occurred and can be linked by to
material or manufacturing faults.
Not covered byguarantee:
•
Defects or damages which have arisen due to incorrect
use orconnection.
•
Machineoverload.
•
When maintenance has been carried out incorrectly or
badly.
•
Informationinthemanualhasnotbeenproperlyfollowed.
•
The machine is used by unqualified persons.
•
If the machine is used for purposes for which it is
unsuitable.
•
The machine is repaired using unoriginal parts.
•
If the machine encryption is damaged or deleted.
•
If defects are caused by fire, damp and/or transport.
EMISSION
Typically, the A-weighted noise levels of the product are:
Sound pressure level 94 dB(A); Sound power level 105
dB(A). Uncertainty K = 3 dB.
WEAR HEARING PROTECTION!
The measured average vibration is less than 2,5 m/s².
Measured values determined according toEN 60745.
DECLARATION OF CONFORMITY
We declare under our sole responsibility that this product
(CDM 204) is in conformity with the following standards or
standardized documents:
EN 60745-1 ; EN 55014-1 ; EN 55014-2 ;
EN 61000-3-2 ; EN 610003-3 ; EN 62841-1 ;
EN 62841-2-1 ; 2011/65/EU ; 2014/30/EU ;
2006/42/EG ; 2014/130/EU
Machine DesignManager
Francois Chianese
03.01.2022
SAINT-GOBAINABRASIVESS.A.
190, bd. J.F.Kennedy
L-4930BASCHARAGE,LUXEMBOURG

6
A causa del continuo sviluppo e migliorie tecniche sul prodotto,
le informazioni tecniche possono essere soggette a cambiamenti
senza preavviso.
COMPONENTI PRINCIPALI
1. Impugnatura
2. Interruttore
3. Livello dell’acqua
4. Maniglia laterale
5. Spazzole di carbone
6. Interruttore di marcia
7. Innesto foretto
8. Bussola di serraggio
9. Inserto chiave
10. Innesto tipo Gardena (foratura ad acqua)
11. Estrazione della polvere (foratura a secco) *
12. PRCD
DESTINAZIONE D’USO
Carotatrice per la foratura con ACQUA di materiali
laterizi e calcestruzzo in abbinamento con corone
diamantate. La carotatrice può essere utilizzata
manualmente o su supporto fisso. utilisée en
combinaison avec une colonne de carottage.
Carotatrice per la foratura a SECCO di materiali la-
terizi e calcestruzzo in abbinamento di corone dia-
mantate.
ALIMENTAZIONE
La carotatrice può essere collegata solamente a corrente
alternata monofase come indicato nella targhetta.
La carotatrice è isolata secondo le Direttive europee e, di
conseguenza, può essere utilizzata esclusivamente con
interruttore di sicurezza (PRCD) con protezione sotto
tensione inferiore a 10mA in una circuito con fase a terra.
ISTRUZIONI DI SICUREZZA
• Utilizzate sempre la maniglia laterale in più installata e
sorreggete sempre la carotatrice con entrambe le mani.
• Utilizzate sempre la macchina sotto la supervisione di
qualcuno. Mantenere le mani a distanza dalle parti in
movimento.
• Controllate con cura che la corona diamantata sia
correttamente montata
• Prima dell’uso, controllate che tutte le viti siano salde e
nella corretta posizione. A causa delle vibrazioni durante
l’uso della carotatrice, le viti possono allentarsi e causare
danni o infortuni
• Dopo l’uso non toccare le parti metalliche della
carotatrice o la corona diamantata poiché potrebbero
essere calde e causare ustioni.
• Accertatevi che la carotatrice non si azioni per sbaglio;
disinserite sempre l’interruttore quando staccate il
collegamento all’alimentazione o se c’è un’interruzione di
corrente.
CDM 204
Attenzione: Vista l’elevata coppia della marcia più bassa,
si consiglia vivamente di non utilizzare la carotatrice a
mano in tale marcia. Qualora la corona si bloccasse
improvvisamente è probabile che l’operatore si infortuni.
È opportuno utilizzare la marcia più bassa solo in
combinazione con un supporto fisso.
INTERRUTTORE PRCD
Il cavo elettrico del motore è dotato di un interruttore
PRCD che protegge l’operatore dalle elettrocuzioni.
Non appena la carotatrice è collegata all’alimentazione, il
PRCD deve essere inserito premendo il tasto -RESET-
(verde). Se il PRCD è disinserito, il tasto -RESET- deve
essere premuto nuovamente.
NB:
• Il PRCD ed il cavo elettrico non devono mai entrare in
contatto con l’acqua
• Controllate il PRCD premendo il tasto -TEST- prima dell’uso.
• Evitate sempre di utilizzare la carotatrice la corona
diamantata senza un PRCD che funzioni adeguatamente
• Evitate di sostituire la spina standard con una di un altro
tipo
MODALITA DI UTILIZZO
Se la foratura è effettuata a mano, la carotatrice non
dovrebbe mai essere posta perpendicolarmente rispetto al
materiale (potrebbe iniziare a ‘slittare’). Si può prevenire lo
slittamento praticando un primo foro di 1 cm con un angolo
di 30 gradi. Successivamente potrà essere portata nella
posizione desiderata.
Per un centraggio privo di problemi si consiglia l’uso di una
punta pilota. Una volta rimossa la punta pilota, la punta può
essere inserita nel foro così ottenuto.
Suggerimenti
• I segmenti diamantati ovalizzati causeranno un carico
maggiore su cuscinetti e ingranaggi.
• Accendete la macchina solo se la corona in diamante è in
grado di girare liberamente.
• Quando cambiate la corona diamantata, utilizzate sempre
due chiavi. Non utilizzate mai un martello, perché potrebbe
danneggiare gli ingranaggi.
Maniglia laterale in più
La maniglia laterale può essere allentata a mano per cambiarne
la posizione. Una volta impostata la posizione, ruotate la
maniglia finché non è ben salda.
Rimuovendo la maniglia sarà possibile montare la carotatrice
su un supporto fisso.
Accensione/spegnimento
La macchina è dotata di interruttore con pulsante di blocco tramite
il quale è possibile accenderla e/o spegnerla in due modi:
1 - Utilizzo temporaneo
Interruttore acceso; premere l’interruttore
Interruttore spento; rilasciare l’interruttore
2 - Utilizzo permanente
Interruttore acceso; premere l’interruttore e bloccarlo tra- mite
pulsante
Interruttore spento; rilasciare l’interruttore due volte
Per la vostra sicurezza il pulsante di blocco deve essere
usato solo quando la carotatrice è installata su un supporto
fisso!!
Protezione contro il sovraccarico
Per proteggere il motore, l’operatore e la punta in
diamante, la macchina è dotata di un sistema di
sicurezza contro il sovraccarico meccanico, elettronico e
termico. Ogni volta che il motore viene spento a causa
del sovraccarico, deve essere riacceso il prima possibile
affinché possa raffreddarsi. Dopodiché è necessario
lasciare che la carotatrice giri senza carico per almeno
un minuto.
1 - Elettronico / Termico
Se la macchina è sovraccarica, il sistema di protezione
del motore contro il sovraccarico elettrico attiva il LED
che lampeggiando segnala il sovraccarico all’operatore.
Se la forza non viene ridotta, il motore si spegne entro
pochi secondi. Dopo aver spento e riacceso la macchina,
il motore si riavvia lentamente.
2 - Meccanico
Se la punta della carotatrice si incastra improvvisamente,
verrà attivato l’innesto di sicurezza per scollegare l’asse
principale dal motore. Accertatevi di spegnere subito il
motore e rimuovete la carotatrice dal foro. Quando
l’innesto di sicurezza rimane attivato per un periodo più
lungo, deve essere nuovamente tarato da personale
idoneo e qualificato.
Foratura con raffreddamento ad acqua.
Innesto acqua SE APPLICABILE
La carotatrice è dotata di un rubinetto dell’acqua con in-
nesto “Gardena”. Accertatevi che la carotatrice sia suffi-
centemente raffreddata e libera dallo sporco. La pressi-
one massima consentita per l’acqua è di 3 bar. Utilizzate
sempre acqua pulita per far durare più a lungo le chiusure
idrauliche interne. In caso di perdite, la carotatrice dovrà
essere IMMEDIATAMENTE controllata da un esperto
meccanico qualificato.
Foratura a secco.
Estrazione delle polveri SE APPLICABILE
Per la foratura a secco utilizzate solo punte apposite con
innesto 1/4”UNC (F). La foratura a secco è possibile solo
su mattoni, laterizi e arenaria.
La polvere prodotta nel corso della foratura a secco
costituisce un pericolo per la salute. È pertanto possibile
utilizzare un sistema di estrazione della polvere
specificamente pensato a questo scopo e se necessario,
indossare una mascherina. L’utilizzo di un sistema di
estrazione della polvere è necessario anche per
ottimizzare la durata della punta in diamante. Per
impedire che il sistema di estrazione della polvere si
intasi è fondamentale che i materiali perforati siano
completamente asciutti.
Il vostro rivenditore di fiducia potrà fornirvi informazioni sui
sistemi di estrazione della polvere.
SMALTIMENTO
Secondo la norma europea 2002/96/EC,
SAINT-GOBAIN ABRASIVES è responsa-
bile del riciclaggio di vecchi motori elettrici.
Siete pertanto invitati a restituire i vostri
vecchi motori elettrici al vostro rivenditore.
GARANZIA
La carotatrice è coperta da una garanzia di 12 mesi a
partire dalla data di acquisto. Le richieste di garanzia
saranno accettate solo su presentazione della fattura di
acquisto. La garanzia include la riparazione dei difetti
verificatisi a causa di materiali e /o difetti di fabbricazione.
Elementi non coperti dalla garanzia:
• Difetti o danni provocati da uso o collegamento scorretti.
• Sovraccarico della macchina.
• Mancata o non corretta manutenzione.
• Mancata conformità alle istruzioni contenute nel manuale
• Utilizzo della macchina da parte di personale non
qualificato.
• Utilizzo della macchina per operazioni a cui non è adatta.
• Riparazione della macchina con pezzi non originali.
• Danneggiamento o cancellazione della targa con i dati
identificativi.
• Eventuali difetti causati da incendi, umidità e/o condizioni
di trasporto.
EMISSIONI
Il livello sonoro ponderato dello strumento è tipico: livello
di pressione sonora 94 dB (A) Livello potenza sonora 105
dB (A). Incertezza K = 3 dB..
INDOSSARE AURICOLARI DI PROTEZIONE!
Il valore tipico di accelerazione ponderata non superiore a
2,5 m/s2.
Questi valori sono stati ottenuti conformemente alle EN
60745.
DICHIARAZIONE DI CONFORMITÀ
Dichiariamo sotto la nostra responsabilità che il prodotto
(CDM 204) è conforme alle normative e disposizioni di
linee guida :
EN 60745-1 ; EN 55014-1 ; EN 55014-2 ;
EN 61000-3-2 ; EN 610003-3 ; EN 62841-1 ;
EN 62841-2-1 ; 2011/65/EU ; 2014/30/EU ;
2006/42/EG ; 2014/130/EU
Machine DesignManager
Francois Chianese
03.01.2022
SAINT-GOBAINABRASIVESS.A.
190, bd. J.F.Kennedy
L-4930BASCHARAGE,LUXEMBOURG
Guarantee can be claimed and technical support obtained from your local distributor where
machines, spare parts and consumables can be ordered as well:
This manual suits for next models
1
Table of contents
Languages:
Other Clipper Drill manuals

Popular Drill manuals by other brands


Makita
Makita DA6300 instruction manual

Hitachi
Hitachi 6.2Amp - D13 1/2" Electric Drill Rev. D-Handle... Specifications

Bosch
Bosch GBH 36 V-LI Professional Original operating instructions

Makita
Makita DA3000R instruction manual

HIKOKI
HIKOKI DB 10DL Handling instructions

Fein
Fein DSc 636 operating instructions