SteelMax D2X User manual

D2X 8/2014 Operator's Manual For Drilling Machine - 1 -
SAFETY INSTRUCTIONS
AND OPERATOR’S MANUAL
FOR
DRILLING MACHINE
D2X

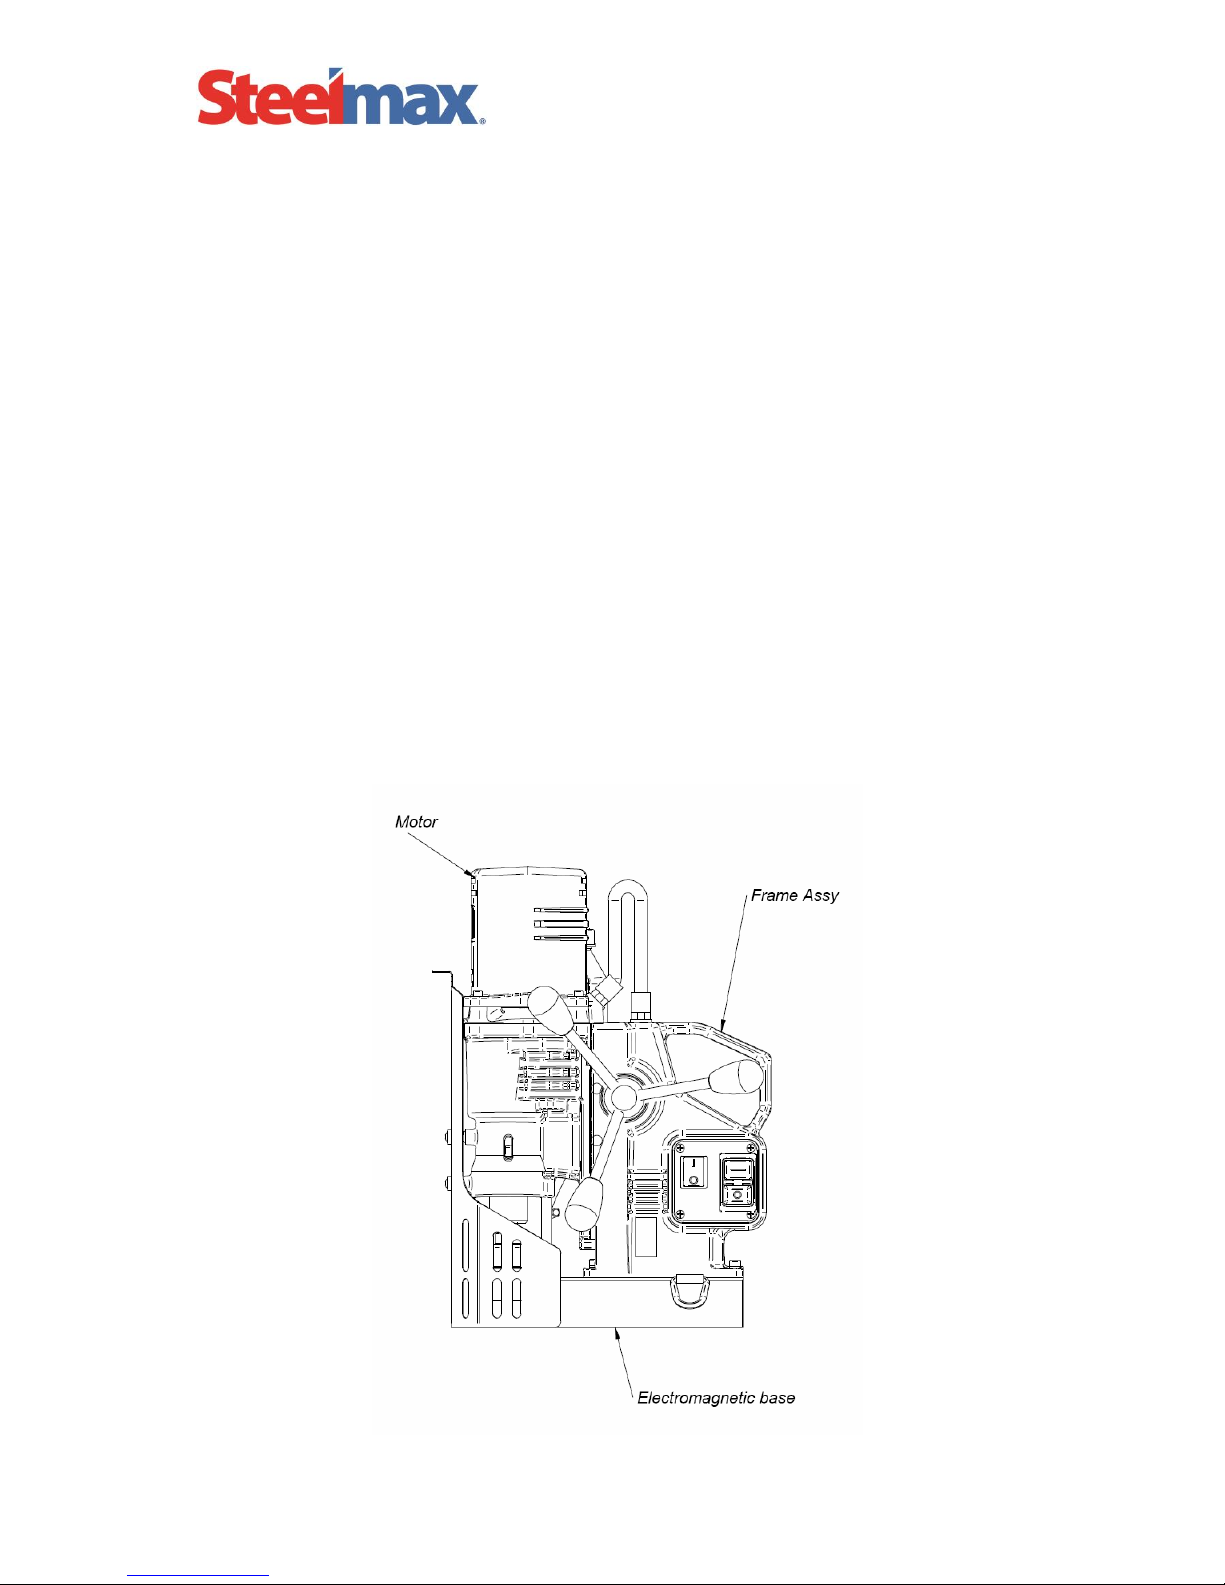
D2X
- 2 -
TABLE OF CONTENTS
I. SAFETY INSTRUCTIONS.............................................................................................................. 3
1.General information..................................................................................................................... 3
2.General safety advice.................................................................................................................. 3
II.START UP AND OPERATION...................................................................................................... .5
1.Cutters and optional equipment features.................................................................................... .5
2.Machine start up .......................................................................................................................... 6
3.Operating instructions.................................................................................................................. 9
III.ADJUSTMENT, MAINTENANCE AND SERVICE ....................................................................... 10
IV.TECHNICAL DATA....................................................................................................................... 11
V. PARTS LIST/EXPLODED DRAWINGS........................................................................................ 13
VI. ELECTRICAL DIAGRAM.............................................................................................................. 24
VII. EC DECLARATION OF CONFORMITY....................................................................................... 25
VIII. MACHINE TEST CERTIFICATE .................................................................................................. 26
IX. WARRANTY CARD...................................................................................................................... 27
X. ANNULAR CUTTERS................................................................................................................... 28

D2X
- 3 -
BEFORE YOU START WORK WITH THE MACHINE,
PLEASE READ THESE INSTRUCTIONS CAREFULLY
AND USE ALL RECOMMENDATIONS.
I. SAFETY INSTRUCTION
The magnetic drilling machine should be used only for the purpose described in this
manual. Using the machine incorrectly or not for its intended use may result in serious injury
and/or death.
1. GENERAL INFORMATION
Portable magnetic drilling machines are fast becoming universal power tools not only
at steel fabricating workshops or steel building sites but also at every factory maintenance
workshop, truck manufacturer & repair company, military equipment service, onboard ship
maintenance shop, etc.
Full advantages of electromagnetic drilling machines can only be achieved with
optimal tooling. Annular cutters are designed and manufactured specifically to offer a wide
range of advantages in one precise pass not otherwise attainable with heavy stationary
equipment. The drill is equipped with a powerful motor and automatically adjustable slides.
2. GENERAL SAFETY ADVICE
Drilling machine should not be used when:
1. The operator has not read the Operator’s Manual.
2. The work to be done is not in agreement with the recommendations in this Manual.
3. Drilling machine is not complete or has been repaired with non-standard parts.
4. Power supply parameters do not conform to those stated on the motor’s plate.
5. Machine operator has not checked the condition of the drilling machine, the condition of
the power cable, control panel, cutter and other components.
6. Power supply socket is not equipped with a protection circuit.
7. Machine is not secured with a safety chain to protect it from falling down,
especially when used at heights or in vertical or upside-down positions.
8. Bystanders are present in the immediate vicinity of machine.

D2X
- 4 -
Important rules of safe use of drilling machine
1. Before attempting to work with the machine, check condition of the electrical supply,
including power cord and plug.
2. The drilling machine should be connected to an installation equipped with protection
circuit (neutral or ground) and protected with a 15 Ampere fuse/circuit breaker for 220V
and 20 Ampere fuse/circuit breaker for 120V.
3. Machine can be used outdoors, but it is not weatherproof. Do not expose to rain, snow
or frost.
4. Machine should not be used on: rusty surfaces, steel plates covered in thick paint,
uneven surfaces, next to a welding machine. When the machine is attached to any
metal surface, that surface should not be welded. Remove the drill from the steel before
beginning welding. This can cause damage to the machine and will void the
warranty.
5. In all cases, always use a safety chain/strap (see drawing below). The safety chain
must not be loose! To avoid this situation, the safety chain should be securely attached.
Do not use the machine in explosive hazard areas. Do not start work if the machine has
excessive play on guide slides. Always wear safety goggles and ear protection. Do not
remove metal chips and strands with bare hands
Safety chain can also secure the drill through
the handle.
1. Do not touch the spindle and cutter during work.

D2X
- 5 -
2. Tools must be fastened firmly. When an annular cutter is used, check before start of
work to ensure the screws holding the cutter are tight.
3. It is not safe or productive to use blunt or damaged tools.
4. Do not use annular cutters without pilots, and arbors without ejection spring.
Do not touch or replace the annular cutter with power source on –
while electromagnetic base is being used.
5. Use tools recommended in Operator’s Manual only.
6. After use, always clean metal chips and coolant from drilling machine.
7. Always unplug the machine from the power supply during any maintenance work on the
machine.
It is not advisable to use the drill on steel less than 3/8” (10 mm) thick.
On thin steel (less than 3/8” (10 mm)) the magnet’s adhesive power would be
significantly reduced and can cause machine failure or operator injury. The
Safe Magnet technology may not allow the drill to start. Use of a thicker
backing plate under the surface to be drilled can solve this problem. The
entire surface of the electromagnetic base should be located on the work
piece! Before positioning the machine on the work surface, it is recommended
that the work surface under the electromagnetic base be sanded down with
abrasive paper to allow better adhesion!
Please follow all recommendations.
II. START UP AND OPERATION
1. Cutters and optional equipment features
The D2X uses a #2 Morse taper which makes it possible to use twist steel bits by
using our optional ½” adjustable chuck adapter. (Part # SM2MTJ)
The annular cutter (2) slides inside arbor body (1) and is fastened with screws
(3). While fastening the cutter in the socket, be aware that screws should be screwed tight
so that they do not come loose. It is important to position the cutter in relation to the socket
in such a way that the flats on the cutter shank are positioned in line with the fixing screws
(3). Both fastening screws (3) should be tightened on the cutter. The pilot (5) is located
inside the cutter. It makes it easier to position the annular cutter over the center of a
planned hole. During drilling, as the cutter goes deep into the steel, the pilot moves back
into the arbor body and tightens the discharge spring (4). This spring ejects the plug which
is a by-product of drilling a hole with an annular cutter. On occasions when there is a need
for an overlapping hole the pilot pin should not be used.

D2X
- 6 -
2. Machine start up
The machine is supplied in a metal box with complete standard equipment.
D2X comes in standard equipment set which consists of:
metal box for storage or transport
drilling machine
arbor AMT2-C-19/2-2
cooling system
chip guard
spoke handles
Allen wrenches:
- hex s=4
- hex s=5
wedge, MT2
safety chain
snap hook
operator’s manual
Drawing 3.
A few types of holes that can be done with an annular cutter
.
Drawing 2.
Principle of annular cutter’s work

D2X
- 7 -
2.1 Before first drill:
Steel elements of the drilling machine are protected for transit and storing with grease
film.
All grease should be removed before first start up of the machine
All handles should be screwed into pinion before each use.
2.2 Before you cut
Before positioning the machine on work piece always make sure that:
-Work piece is made of steel;
-Thickness of work piece is at least 3/8” (10 mm)
-Surface of the steel under the magnet is flat
-Wipe, brush or sand down clean surface where you intend to place the drilling
machine, so that you remove rust, paint, dirt etc which would reduce adhesive power of the
electromagnetic base.
Install drill bit, annular cutter or other tooling such as tap or reamer in the machine
before power is supplied to the unit. Then plug it in (see paragraph 3) and position where
you wish to use it. Place the machine so that the tool is over the center of the hole you
intend to make, and turn the magnetic base ON.
Prior to use always make sure that the machine is secured from falling with
original chain (as described in paragraph 1 no. 2 “Important rules of safe use
of drilling machine”).
2.3 Cutting
-Select the right speed for the tool you intend to use (see the speed chart in this
manual on page 12). Choose suitable cooling/lubricating fluid and fill cooling reservoir with
it. The cooling system is an integral part of the machine and should always be used.
Warning: The cooling system can only be used when drilling machine is in the
vertical position. In other positions, additional external source of cooling should be
used, for example: a pressurized coolant bottle or an alternative lubricant such as
Edge Cream which can be applied directly to edge of the cutter.
-Check proper operation of the cooling system. Open coolant reservoir’s tap and
apply pressure on the pilot by turning spokes counter clockwise. Cooling liquid should start
to run down the cutters inner wall as the pilot starts to sink into the cutter. If there is no liquid
flowing down the cutter, check if the tap is fully opened. It may take a few seconds for
cooling liquid to fill the whole system.
-Turn the motor on.
Making a hole with an annular cutter should ideally be done in one pass. Enter the
cut slowly until the cutter is ejecting a continuous thread of cuttings. Then apply steady and
continuous pressure letting the cutter do the work. Excessive pressure will cause excessive

D2X
- 8 -
heat and premature dulling of the cutter. Plug must be ejected after the hole is completed. If
you experience plugs getting stuck inside a cutter after hole is complete, try to reduce
pressure on the cutter or use a different coolant. Do not allow excessive shavings to build
up around the cutter and arbor. If a plug is stuck in the cutter after the drilling operation then
turn off the drill and the coolant flow, move the drill over a smooth metal surface and tap the
cutter lightly using the spoke handles to lower the cutter down to the flat surface. Tapping
the plug with a wooden object can also help dislodge the plug. In severe cases the plug
may need to be removed with pliers. Stuck plugs can be the result of using dull or dirty
cutters.
WARNING: When the annular cutter goes through the material the
plug can be pushed out often with considerable strength.
Pay attention to avoid injury.
-After a hole is made, the cutter should be withdrawn back and both the motor and
the electromagnet should be switched OFF.
-When work with the machine is finished, the power cord should be disconnected
from the power source, the machine should be cleaned, and the cutter should be removed
and cleaned.
2.4 How to use the special functions
There are some factors affecting the value of the clamping force. They are as follows:
thickness of the base, presence of the paint coats, rust and other contamination, non-flat
surface, excessive stock roughness, extended wear of the magnets lower surface and the
make up of the steel surface.
The Safe Magnet circuitry will not allow the motor to operate when there is
insufficient magnetic holding power which can occur under any of the conditions
cited in the previous paragraph.
To operate this machine properly you should push on the main switch in position “I”.
Then you should turn on the green button “I” to turn on the motor. To stop the motor you
should push on red button “O” (It turns the motor off, the magnet still holds). To move the
machine and drill in another place you should stop the motor and then push the main switch
in position “O”.
2.5 Working in difficult areas
While working in difficult access areas, as well as for left-handed operators, one may
change location of the pinion with the spoke handles to the other side of drilling machine.

D2X
- 9 -
2.6 Semiautomatic gib adjustment
Turn the spoke handles (1), so the screws (2) in the face plate are visible through the
openings in the slider (5).. After loosening all the screws, slide the slider up and down
several times so that the pressure strip aligns itself and automatically adjusts the gib to the
proper clearance. This is only necessary in case the drill drops to the bottom by itself (too
loose) or binds during operation (too tight or out of straight alignment).
After resetting the gib clearance, tighten screws (2) starting from the middle screw. The
slider should be located symmetrically relative to the middle screw. Next, tighten the
neighboring screws (2) moving the slider, as necessary, to make the screws accessible.
Then, tighten screws (3) until any noticeable resistance is felt. When the screw is in this
position and held with an allen key, tighten counter nut (4). The screws (3) counteract the
machining force and protect the pressure strip from shifting during operation.

D2X
- 10 -
2.7 Installing and uninstalling the cooling system
Hang the cooling system on the screws (1) and lower the chip guard (2). Insert the
cooling hose, with the spring positioned as in the figure below, between the pin and
arbor (3), and attach the tip of the cooling hose to the coupling. Then, slide the
spring to the end of the hose (4), until it touches the arbor (5). Dismount in reverse
order.
Before starting the machine:
unscrew the bottle cap,
fill the bottle with the cutting fluid,
tighten the cap.
Then, make sure the cooling system is mounted properly and the cooling hose properly
attached to the coupling. Next, unscrew the bottle cap by 1/3 rotation and open the valve,
after which the hose will be filled with the fluid. Then, start the machine (see II point 3).
Once the work is finished, tighten the cap and close the valve (to prevent fluid from
leaking during idle period) and dismount the cooling system before inserting the machine
into the tool box.
1
2
3
4
spring
valve
5

D2X
- 11 -
3. Operating instructions
The machine is supplied in a metal box. Steel elements of the drilling machine
are protected for transit and storing with grease film. Before first start up of the
machine all grease should be removed. Before each use all spoke handles should
be screwed into the pinion.
Control panel includes below elements:
(01) - Main switch MAGNET,
(02) - START-STOP button MOTOR.
a) In order to start the machine, press the main switch MAGNET (01) on “I“ button.
Now you can start the motor by pressing green button MOTOR (02) on “I”.
b) Stopping the motor is executed with red button “O” (then the motor is switched
OFF but the electromagnetic base is still ON) (02).
c) To move machine into next drilling spot, stop the motor as described above and
push the magnet switch (01) to the position “O”.
d) Use the gear box lever to change the speed. It may be necessary to slightly rotate
the arbor by hand in order to change speeds.
To move the machine into next drilling spot, stop the motor as described
above and push the main switch MAGNET to the position “O”. To change the speed,
use the gear box lever. The motor must be stopped before switching gears.
. READ THE WHOLE INSTRUCTION MANUAL BEFORE
ATTEMPTING TO START UP
Drawing 5. Control panel
D2X
- 12 -
III. ADJUSTMENT, MAINTENANCE AND SERVICE
Every 50 hours of work, or as need arises, elimination of excess play in slide
guides should be performed. The screws and the locking nuts are provided for
that reason. The slide guide should go up easily and not slide down under its
own weight.
When the drill is not in regular usage it should be stored on its side (laying
horizontally) in order to keep the gearbox grease spread adequately around the
gears. Simply return the drill to its case which prevents dust accumulation on the
drill and lay the case flat on a shelf.
The position of the gear lever (used for selection of gearbox speed) should be
changed occasionally to ensure proper gearbox lubrication. Regularly check
condition of carbon brushes. (see paragraph IV –Technical data).
Lubricate the brass slide guide inserts regularly with grease as well as the rack
and pinion.
To prevent the machine from rusting (especially when used outdoors) all steel
parts should be covered with thin layer of grease film.
All repair work should be done only by authorized service centers.

D2X
- 13 -
IV. TECHNICAL DATA
Power supply
□ 110÷120V AC / 50-60 Hz
□220÷240V AC / 50-60 Hz
Power required
1300 W
Motor power
1260 W
Tool holder
3/4" (19 mm) Weldon
Max. twist drill diameter
7/8” (23 mm)
Max. annular drilling diameter
2” (50 mm)
Max. annular drilling depth
2” (50 mm)
Insulation Class
I
Standard adhesive force of electromagnet
(for steel 7/8” (22 mm) thick and Ra< 1,25)
12 000 N
Slide stroke
6” (153 mm)
Machine speeds /under load/
Low speed –200 rpm
High speed –400 rpm
Electromagnetic base
90x180x48 mm
Length of the power cord
10’ (3 m)
Total weight
36.3lbs (16.5 kg)
Noise level
85 dB
Surrounding temperature
32°F to 104°F (0°C ÷ 40°C)

D2X
- 14 -
The D2X machine is capable of cutting 2” (50 mm) holes through 2” plate. That is
unique for an electromagnetic drill of this size and weight
Check the condition of the carbon brushes for every 100 hours of work. If the length
of the brush is less than 5 mm, they should be replaced. After replacement, new
brushes should be run without a load for about 20 minutes in order to seat properly
for efficient operation. Replacement of brushes is possible without removal of the
motor.
The transmission spine may also be replaced which can extend the life of the
D2X by a considerable amount.
.
1. Relationship between machine speed and cutter diameter –parameters
Position of gear lever (used for selection of gearbox speed) should be changed
occasionally in order to keep the gearbox fully lubricated.
Relationship between machine speed and cutter diameter
The cutter diameter
Rotary speed
[rpm]
[inch]
[mm]
1” to 1.5”
12mm to 35mm
400
1.5” to 2”
36mm to 50mm
200
Relationship between machine speed and twist drill diameter
The twist drill diameter
Rotary speed
[rpm]
[inch]
[mm]
0.04 to .5”
3.5mm to 13mm
400
9/16” to 7/8”
14mm to 22mm
200

D2X
- 15 -
V. Parts List and Exploded Drawings
ITEM
PART NUMBER
DESCRIPTION
Q-TY
1
KLN-0103-01-00-00-0
WEDGE MT2
1
2
DZW-0212-12-00-00-0
SPOKE HANDLE INCLUDING KNOB (ASSY)
3
3
UCW-0220-00-00-01-0
ARBOR SET - AMT2-C19/2-2
1
4
LNC-0223-00-01-00-0
SAFETY CHAIN
1
5
OSL-0399-17-00-00-0
SAFETY SPRING
1
6
UKL-0399-11-00-00-0
COOLING SYSTEM
1
7
SKR-0399-15-00-00-1
METAL BOX
1
8
KLC-000007
4 MM HEX WRENCH
1
9
KLC-000005
HEX. WRENCH S=2,5
1
10
KLC-000003
FLAT WRENCH S=8
1
11
KLC-000037
HEX WRENCH 5 MM
1
12
OPK-000001
PLASTIC BOX
1
14
PRT-0151-06-13-00-7
BAR L=25
1
15
SPR-000002
SPRING 2x2 MT2
1
16
WYP-0203-06-02-00-0
PLUNGER
1
17
USZ-0203-06-03-00-0
SEAL
1
18
PDK-0203-06-04-00-0
WASHER
1
19
KRP-0220-00-02-00-0
ARBOR BODY
1
20
PDK-0234-00-09-00-0
WASHER II
2
21
KNC-0257-05-03-04-1
CONNECTOR 4x11,5
1
22
TLJ-0284-00-07-00-3
COOLANT RING
1
23
PRS-000009
INTERNAL RETAINING RING 19w
1
25
3
19
18
22
15
4
23
6
17
7
16
2
5
12
26
20
21
14
24
11 10
8
1
9

D2X
- 16 -
ITEM
PART NUMBER
DESCRIPTION
Q-TY
24
PRS-000017
EXTERNAL RETAINING RING 25z
1
25
PRS-000105
SEAL O-RING 25.2x3
2
26
WKR-000032
HEX SOCKET SET SCREW WITH FLAT POINT M10x10
2
ITE
M
PART NUMBER
DESCRIPTION
Q-
TY
1
STJ-0399-01-00-00-1
FRAME ASSEMBLY
1
2
WLK-0212-00-07-00-1
PINION SHAFT
1
3
SZN-0212-10-02-00-2
POWER CORD 230V 3x1.5 WITH STRAIN RELIEF ASSY
1
3
SZN-0075-00-51-00-5
POWER CORD 120V 3x2,08 WITH STRAIN RELIEF ASSY
1
3
SZN-0212-10-02-00-5
POWER CORD 230V 3x1.5 WITH STRAIN RELIEF ASSY
(AU)
1
4
PNL-0300-04-00-06-1
CONTROL PANEL ASSY - 230V
1
4
PNL-0300-04-00-06-0
CONTROL PANEL ASSY - 120V
1
5
KRP-0399-01-01-00-1
MAIN BODY ASSY
1
6
NPD-0399-02-00-00-0
MOTOR ASSY - 230V
1
6
NPD-0399-02-00-00-1
MOTOR ASSY - 120V
1
7
OSL-0399-04-00-00-0
GUARD ASSY
1
9
TLJ-0399-06-00-00-0
BOTTOM SLEEVE
2
10
PDK-000151
NYLON WASHER
4
11
PDK-000161
EXTERNAL TOOTH LOCK WASHER 3,7
4
12
PDK-000060
EXTERNAL TOOTH LOCK WASHER 4,3
1
13
SPR-000030
PUSH SPRING
2
14
WKR-000415
CROSS RECESSED PAN HEAD SELF-TAPPING SCREW 3,5x13
4
15
WKR-000184
CROSS RECESSED PAN HEAD SCREW M4x12
1
16
WKR-000395
HEX SOCKET ROUND HEAD SCREW WITH FLANGE M5x20
2
17
PRS-000019
EXTERNAL RETAINING RING 28z
1
18
PDK-000043
SPRING WASHER 4,1
1
19
LST-0257-01-03-00-0
SLIDE INSERT - LEFT
1
20
DLW-000007
CABLE GLAND WITH STRAIN RELIEF PG11
1
26
2
1
18
5
4
11
10 13
9
16
20
3
28
12
17
29
19
30
34
31
23
26
21
33
24
27
35
10
6
7
36 32
22 25
15
14

D2X
- 17 -
ITE
M
PART NUMBER
DESCRIPTION
Q-
TY
21
LST-0399-01-01-02-1
PRESSURE PLATE
1
22
NKR-000016
NUT M5
3
23
PDK-000017
ROUND WASHER 5,3
5
24
SPR-000043
SPRING 1,6x8x14,5
4
25
WKR-000043
HEX SOCKET SET SCREW WITH FLAT POINT M5x10
3
26
TLJ-000010
SELF-LUBRICATING SLEEVE 28x32x16
2
27
SRB-000086
HEX SOCKET BOLT M5x20
5
28
PDS-0300-01-02-00-0
ELECTROMAGNETIC BASE
1
29
PAS-0212-00-23-00-0
D-RING STRAP
1
30
PDK-000046
SPRING WASHER 6,1
4
31
SRB-000115
HEX SOCKET BOLT M6x25
4
32
WLC-000007
SWITCH START-STOP - 230V
1
32
WLC-000005
SWITCH START-STOP - 115V
1
33
STR-0257-04-03-00-2
ELECTRONIC CONTROLLER SW-31M - 230V
1
33
STR-0257-04-03-00-3
ELECTRONIC CONTROLLER SW-31M - 120V
1
34
FLT-0257-04-12-00-0
INTERFERENCE ELIMINATOR
1
35
MSK-0300-04-01-00-1
PANEL PLATE ASSY
1
36
PNK-000013
MAGNET SWITCH
1

D2X
- 18 -
54
51
33
11
45
38
23
19
9
16
35
25 24
42
1
2
17
8
58
48
52
57
46
20
57
12
52
49
47
21 27
14
56
3
53
4
18
55
50
29
28
10
30
31
15
7
6
40
5
22
32
13
34
44
26
43
37
41
39
36

D2X
- 19 -
NPD-0399-02-00-00-0
MOTOR ASSY - 230V
NPD-0399-02-00-00-1
MOTOR ASSY - 120V
ITEM
PART NUMBER
DESCRIPTION
Q-TY
1
TLJ-0171-00-22-00-0
SWITCH SLEEVE
1
2
SPR-0171-00-23-00-0
SWITCH SPRING
1
3
DZW-0171-00-24-00-0
SHIFT LEVER
1
4
WLK-0202-00-16-00-1
SHIFT PIN SHORT
1
5
KOL-0211-00-10-00-0
GEAR z 52, m=1,25mm
1
6
WPS-0211-00-13-00-1
KEY 6x6x15
1
7
PDK-0211-00-15-00-0
WASHER, THRUST 10x1 (2x2)
1
8
PDK-0211-00-16-00-0
BEARING WASHER 8,1
1
9
WDL-0211-00-28-00-1
SHIFT FORK
1
10
WLK-0211-01-02-00-0
PINION SHAFT z=12 ASSY
1
11
SLN-0399-02-01-00-2
MOTOR ASSY- 230V
1
11
SLN-0399-02-01-00-3
MOTOR ASSY- 120V
1
12
KRP-0399-02-02-00-0
GEARCASE ASSY
1
13
OBD-0399-02-03-00-3
MOTOR HOUSING
1
14
PWD-0399-02-05-00-0
MOTOR WIRE ASSY
1
15
PWD-0399-02-07-00-0
GROUND CONDUCTOR
1
16
WLK-0399-02-08-00-0
PINION SHAFT z12, z20 ASSY
1
17
KLK-000005
SPRING DOWEL PIN 3x14
1
18
PDK-000060
EXTERNAL TOOTH LOCK WASHER 4,3
2
19
WKR-000184
CROSS RECESSED PAN HEAD SCREW M4x12
2
20
WKR-000450
CROSS RECESSED PAN HEAD SCREW M5x10
2
21
TBL-0202-00-30-00-0
GEAR LABEL
1
22
PRS-000017
EXTERNAL RETAINING RING 25z
1
23
PDK-000043
SPRING WASHER 4,1
2
24
PDK-000045
SPRING WASHER 5,1
1
25
WKR-000180
CROSS RECESSED PAN HEAD SCREW M3x5
2
26
SRB-000092
HEX SOCKET BOLT M5x40
4
27
SRB-000090
HEX SOCKET BOLT M5x35
1
28
WLK-0211-00-07-00-0
GEARSHAFT 2x2
1
29
WPS-0211-00-17-00-1
KEY 3x3,7
1
30
KOL-0399-02-08-01-0
HELICAL INPUT GEAR z46
1
31
LOZ-000055
BALL BEARING 8x22x7
1
32
PKR-0399-02-01-01-3
MOTOR COVER
1
33
WRN-0399-02-01-10-0
ARMATURE ASSY - 230V
1
33
WRN-0399-02-01-10-1
ARMATURE ASSY - 120V
1
34
KNC-0399-02-04-00-1
ARMATURE TOOTH END z12
1
35
KRW-0400-02-01-02-0
GUIDE FAN
1
36
OBD-000024
UPPER HOUSING
1
37
PDK-000157
SPRING WASHER
1
38
SPR-000042
BRUSH SPRING
2
39
SCZ-000022
BRUSH - 230V
2
39
SCZ-000021
BRUSH - 115V
2
40
WKR-000407
CROSS RECESSED PAN HEAD TAPPING SCREW M4x20
4
41
STN-000027
FIELD - 230V
1
41
STN-000026
FIELD - 120V
1
42
SRB-000295
HEXAGON BOLT M5x57
2
43
LOZ-000055
BALL BEARING 8x22x7
1

D2X
- 20 -
NPD-0399-02-00-00-0
MOTOR ASSY - 230V
NPD-0399-02-00-00-1
MOTOR ASSY - 120V
ITEM
PART NUMBER
DESCRIPTION
Q-TY
44
LOZ-000025
BALL BEARING 12x28x8
1
45
WRZ-0399-02-02-02-0
SPINDLE
1
46
LST-0399-02-02-03-0
GEAR RACK
1
47
KRP-0399-02-02-11-1
GEARCASE
1
48
PRS-000035
INTERNAL RETAINING RING 62w
1
49
KLK-000034
DOWEL PIN 4n6x14
1
50
PRS-000017
EXTERNAL RETAINING RING 25z
1
51
PRS-000021
EXTERNAL RETAINING RING 30z
1
52
PDK-000045
SPRING WASHER 5.1
2
53
LOZ-000028
BALL BEARING 25x47x12
1
54
LOZ-000075
BEARING 30x62x16
1
55
LOZ-000006
NEEDLE BEARING 8x12x10
1
56
LOZ-000009
NEEDLE BEARING 10x16x10
1
57
SRB-000086
HEX SOCKET BOLT M5x20
2
58
PLC-0399-05-00-00-0
STOP ROD
1
SMR-000001
GREASE LUBRIPLATE BP1
0,39 kg
Other manuals for D2X
1
Table of contents
Other SteelMax Drill manuals

SteelMax
SteelMax D1PRO User manual

SteelMax
SteelMax D200XT User manual

SteelMax
SteelMax D3X R User manual

SteelMax
SteelMax SM-D2 User manual

SteelMax
SteelMax D4X User manual

SteelMax
SteelMax D1 AUTO User manual

SteelMax
SteelMax SM-D1 User manual

SteelMax
SteelMax SM-D1 User manual

SteelMax
SteelMax SM-D1 User manual

SteelMax
SteelMax D2X User manual


Popular Drill manuals by other brands


Hilti
Hilti TE 60-ATC-AVR operating instructions

Festool
Festool PDC 18/4 Li Original operating manual

Villager
Villager VLN 1609 Original instruction manual

Milwaukee
Milwaukee BF-312 Service parts list

HERKULES
HERKULES HBH 1000 operating instructions

Wolfcraft
Wolfcraft 5027000 Translation of the original operating instructions