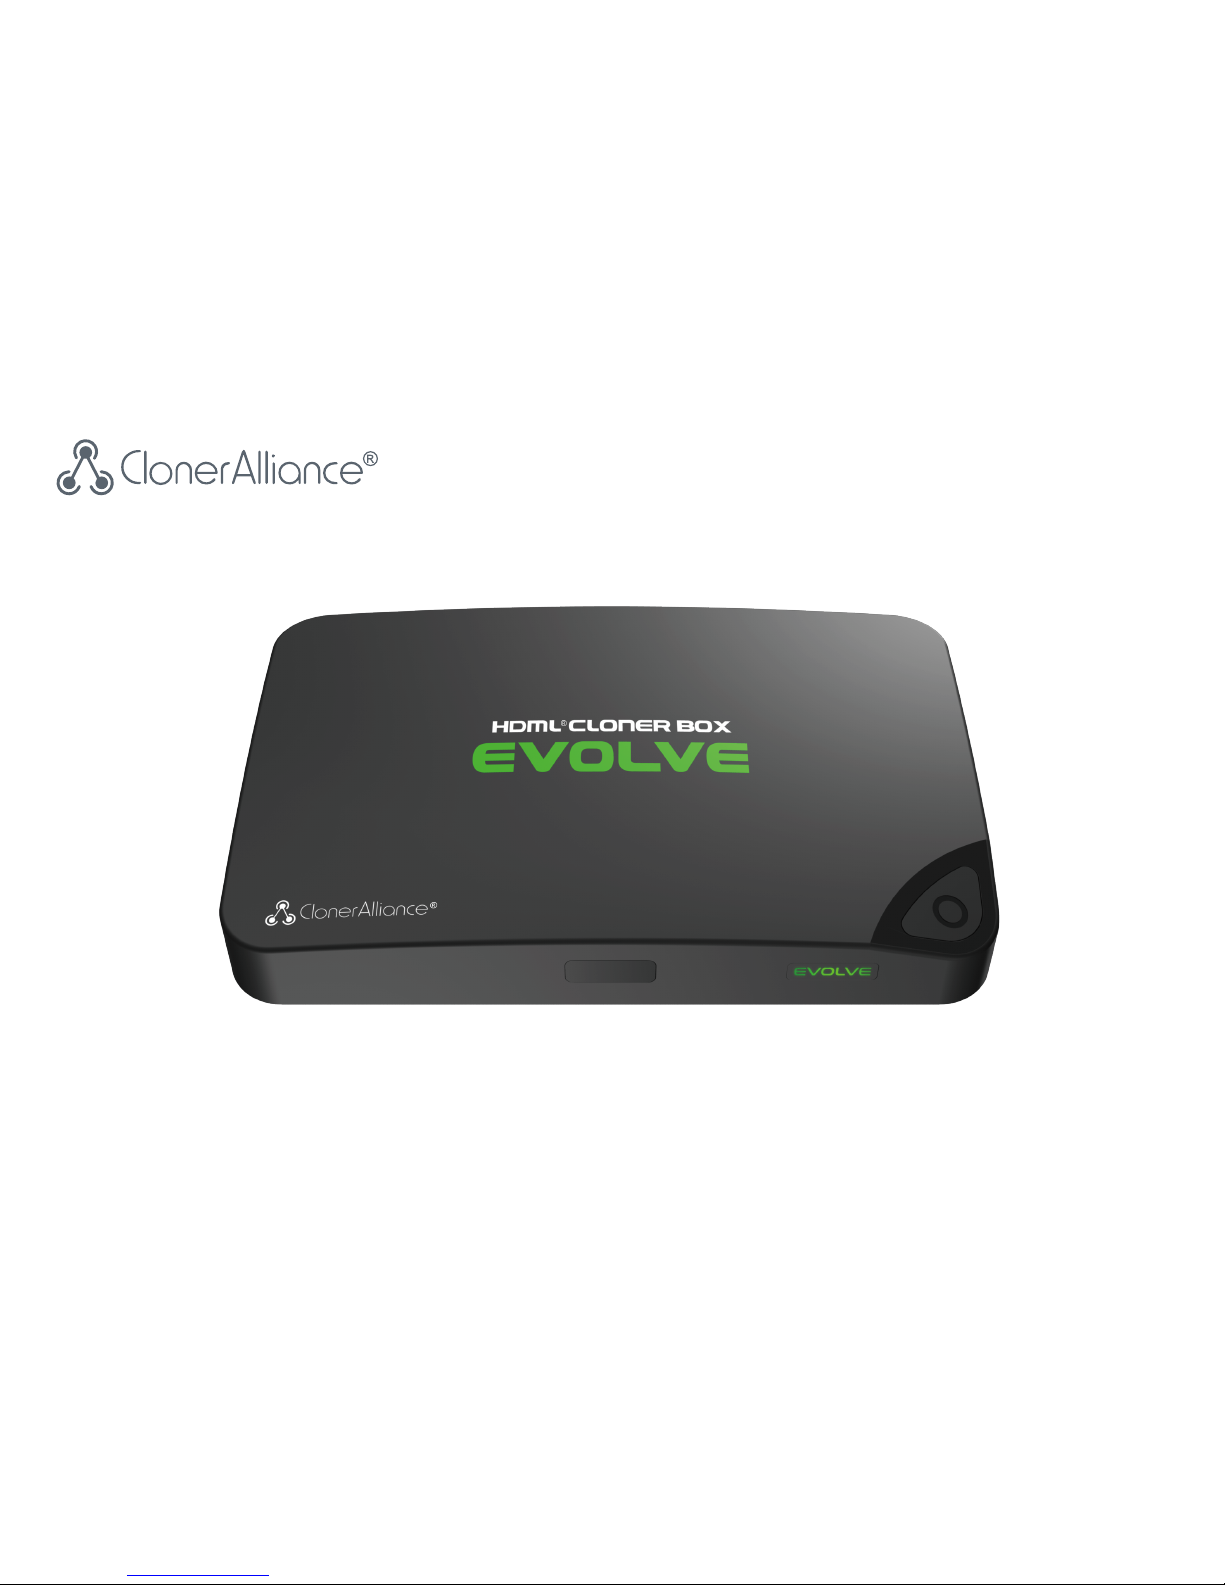
Cloner Alliance HDML-Cloner Box Evolve User manual
HDML-Cloner Box Evolve User Manual

HDML-Cloner Box Evolve User Manual
This documentation describes how to use HDML-Cloner Evolve Box (Model: CA-1180E) device.
Copyright Notice
Copyright © ClonerAlliance® Inc. All rights reserved.
Documentation Version 2.5
No part of this publication may be reproduced, transmitted, transcribed, stored in a retrieval system, or translated into any
language or computer language, in any form or by any means, electronic, mechanical, magnetic, optical, chemical, manual,
or otherwise, without the prior written permission of ClonerAlliance™ Inc.
Trademarks
HDML® is a registered trademark of ClonerAlliance® Inc.

Safety Notices
Before using HDML-Cloner Box Evolve, please ensure that you read and under-
stand the safety precautions below:
1. Do not attempt to open the case of HDML-Cloner Box Evolve or modify it in any
way, as this will void the warranty.
2. Keep HDML-Cloner Box Evolve away from water and other liquids, as this may
cause the unit to malfunction.
3. HDML-Cloner Box Evolve may become warm during use. This does not indicate
malfunction.
4. Do not place heavy objects on HDML-Cloner Box Evolve, as this may cause the
unit to overheat and malfunction.
5. If the exterior of HDML-Cloner Box Evolve requires cleaning, wipe it with a soft
dry cloth.
6. Do not dispose of the unit via conventional domestic waste.

CONTENTS
1Getting Started 1
1.1 Box Contents ...............................................................................1
1.2 Product Diagram.............................................................................2
2How to record videos to the USB flash drive/TF card 7
2.1 Connect ....................................................................................7
2.2 Record/Capture ..............................................................................8
2.3 Schedule Recording ..........................................................................10
2.4 Bitrate Setup ................................................................................12
3How to record videos to PC 13
3.1 Install HDML-Cloner Pro Helper................................................................13
3.2 Connect ....................................................................................14
3.3 Register ....................................................................................16
3.4 How to get the registration code of HDML-Cloner Pro Helper? ........................................17
3.5 Record/Capture ..............................................................................19
3.6 Setup ......................................................................................25
4Menu Navigation 30
5Frequently Asked Questions 32
6Supported Resolutions 36
7Product Specifications 37
8Contact Us 38
9Disclaimer 39
i
GETTING STARTED
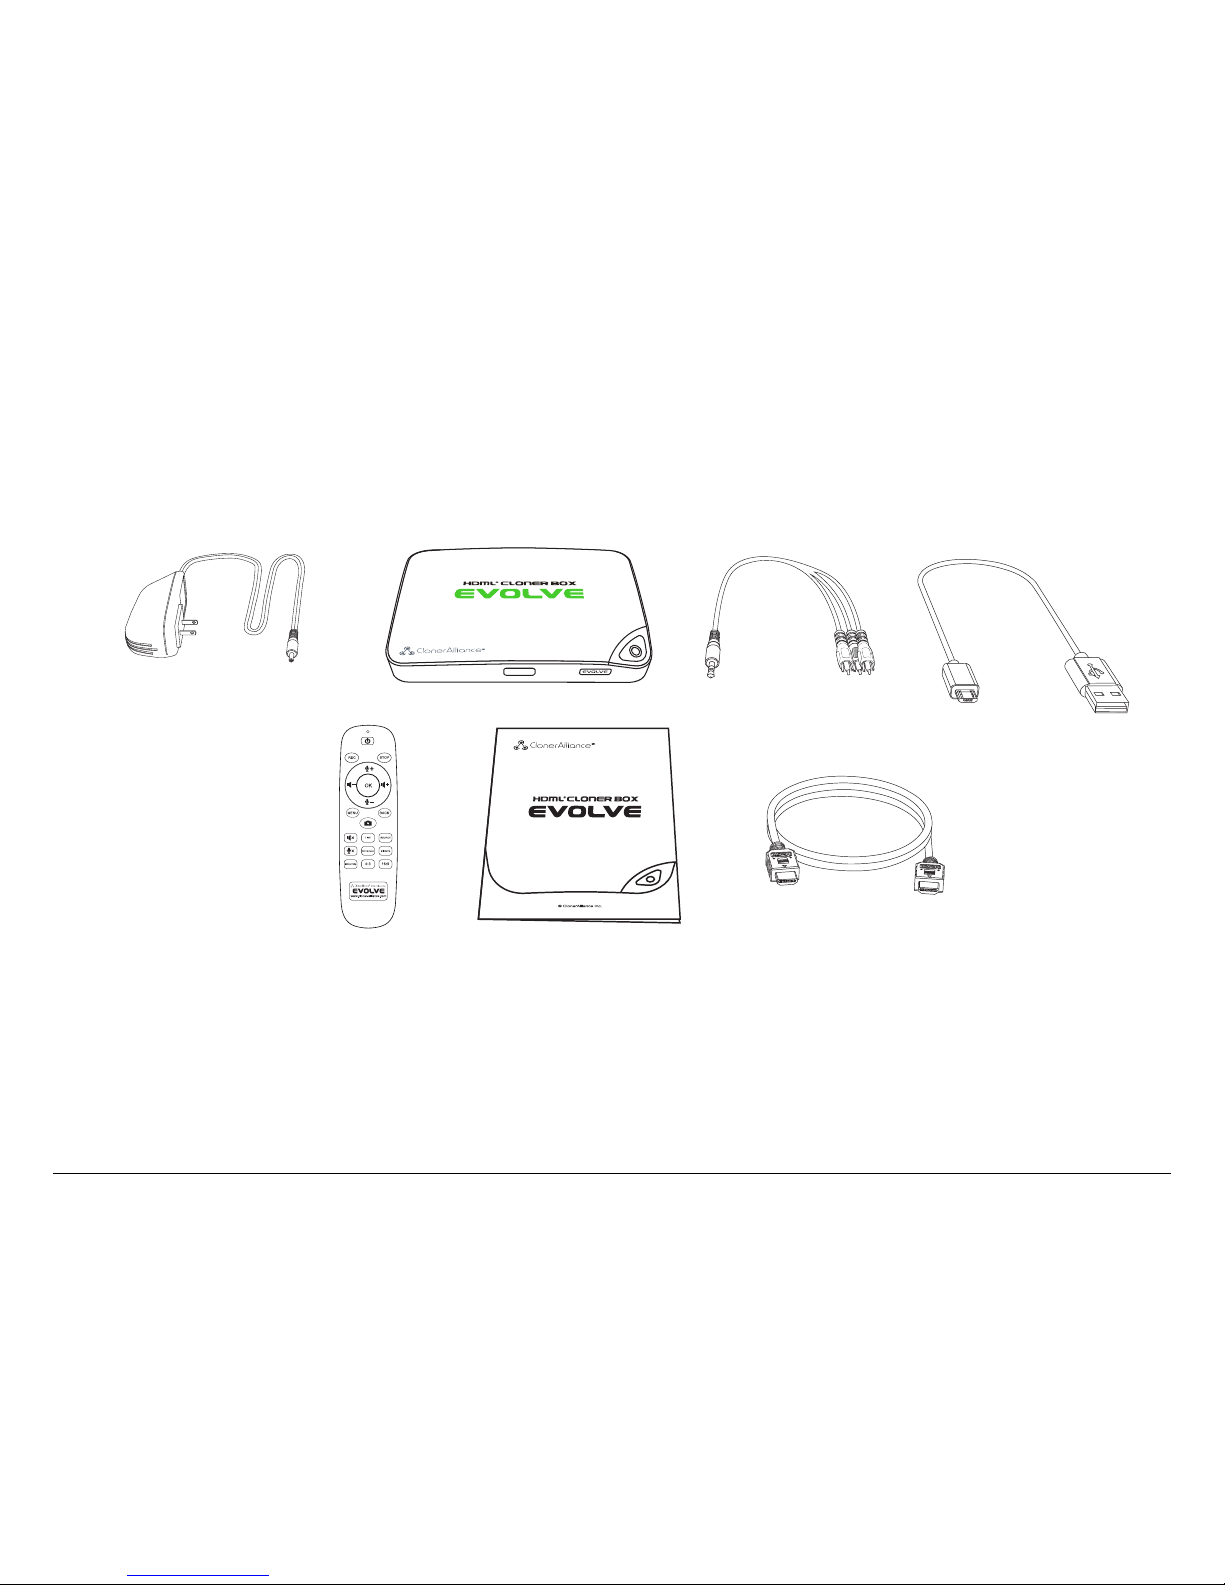
1.1 Box Contents
a b c d
ef g
• a. Power Adapter
• b. HDML-Cloner Box Evolve
• c. AV Cable
• d. Micro-USB to USB Cable
• e. Remote Control
• f. User Manual
• g. HDMI Cable
1

1.2. Product Diagram
1.2 Product Diagram
1 2 3
1. IR: Receives the IR signal from the remote control.
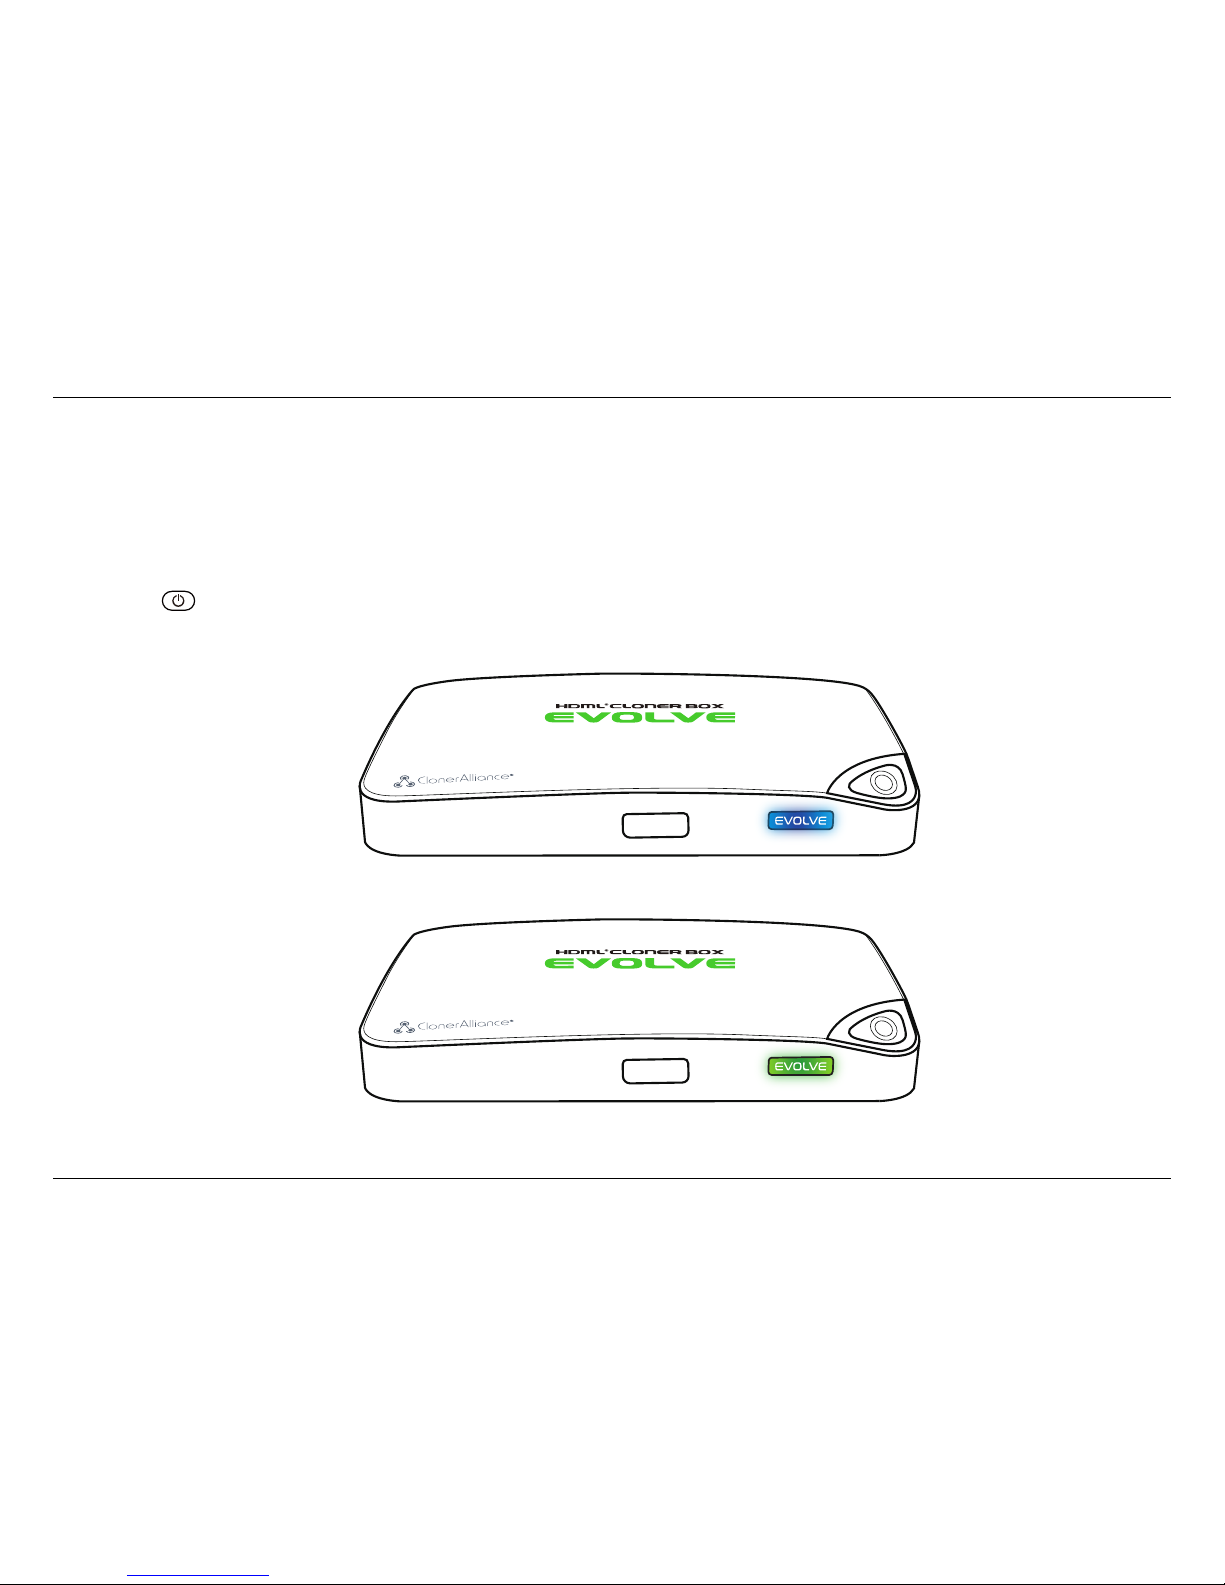
2. LED light: Three colors are available: white, blue and green. Plug in the power adapter, the LED will illuminate white
for a while, then blink blue/green alternately and finally illuminate solid blue or solid green. In the process of recording, the
LED will blink blue/white or green/white alternately. When the recording is stopped, the LED will blink blue/green
alternately, it means it’s buffering. Please don’t remove storage devices until the LED light turns solid Blue/Green.
3. Record/Stop/Wakeup: Press this button to start or stop recording.You can also press this button to wake up
HDML-Cloner Box Evolve when it is sleeping.
2

1. Getting Started
TF Card Storage
4 5
4. TF Card: Insert the TF card into this slot and record videos to this storage medium.
5. Storage: Insert the USB flash drive or mobile hard disk and record videos to this storage medium.
3

1.2. Product Diagram
6 7 8 9 10 11
6. 5V/2A: Plug the power adapter into this port and power on HDML-Cloner Box Evolve.
7. 1 IN: Connect an HDMI cable between a source video player and HDML-Cloner Box Evolve.
8. 2 IN: Connect an HDMI cable between another source video player and HDML-Cloner Box Evolve.
9. AV IN: Connect the AV adapter cable between a source video player and HDML-Cloner Box Evolve.
10. OUT: Connect an HDMI cable between HDML-Cloner Box Evolve and TV.
11. TO PC: Connect the Micro-USB to USB cable between PC and HDML-Cloner Box Evolve for recording videos to PC.
This function must be realized together with HDML-Cloner Pro Helper.
4

1. Getting Started
12 13
12. :Insert the headphone plug into this jack to output the video sound.
13. :Insert the microphone plug into this jack to input your live voice.
5

1.2. Product Diagram
Turn on/Turn off the power of HDML-Cloner Box Evolve.
Start recording.
Stop recording.
Adjust the volume of the source video.
Adjust the volume of the microphone voice.
Show the main menu.
Exit the menu.
Confirm button
Capture an image.
Mute the video.
Set the system time.
Switch the input signal.
Mute the microphone.
Set the schedule recording time, start time and frequency.
Select the recording bitrate.
Switch the resolution between 1080p and 720p.
Switch the aspect ratio to 4:3.
Switch the aspect ratio to 16:9.
Tip: The remote control is powered by two AAA batteries, which are not included in the
product box and need to be purchased independently.
6
HOW TO RECORD VIDEOS TO THE USB FLASH DRIVE/TF CARD
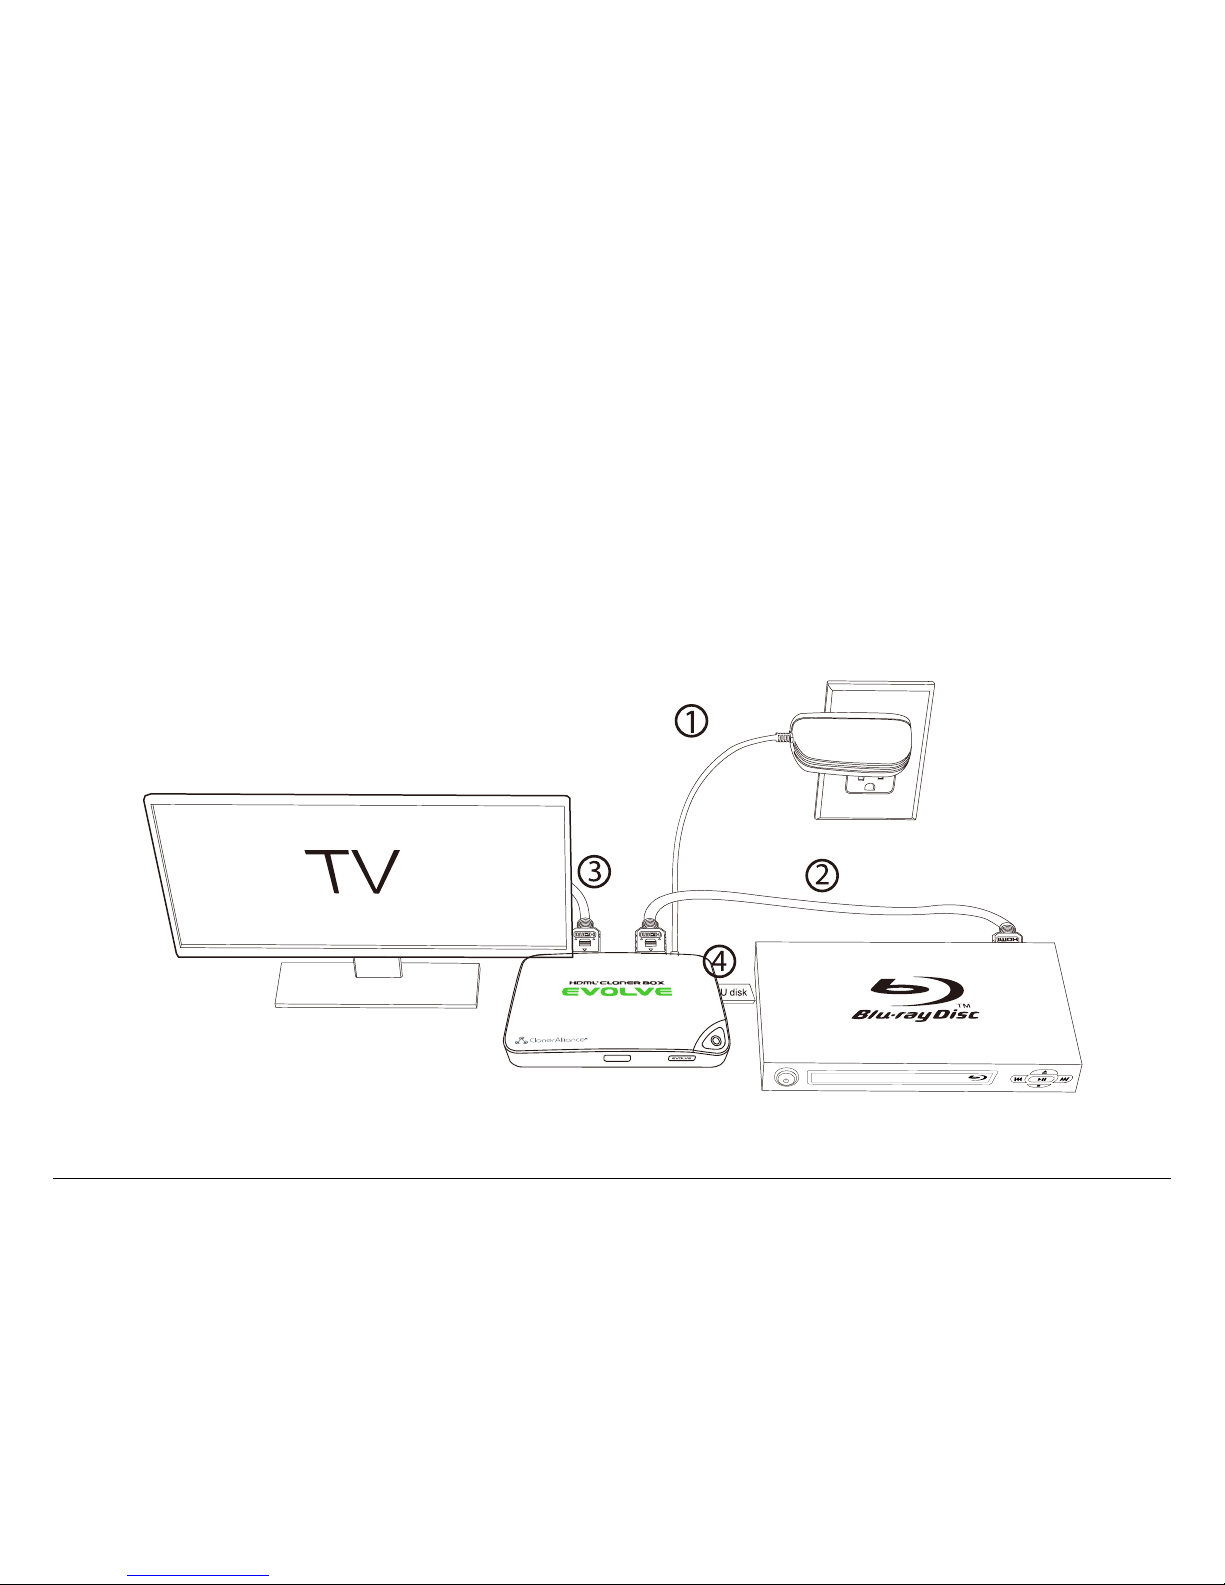
2.1 Connect
1. Plug the power adapter into the power socket and plug the other end into the 5V/2A port of HDML-Cloner Box Evolve.
2. Connect the video player to the “IN”port on HDML-Cloner Box Evolve via an HDMI cable.
3. Connect HDML-Cloner Box Evolve from the “OUT”port to TV via an HDMI cable.
4. Insert the USB flash drive/mobile hard disk or TF card into HDML-Cloner Box Evolve.
7

2.2. Record/Capture
Tips:
1. If you insert both the USB flash drive and TF card into HDML-Cloner Box Evolve, the recorded video will be saved
to the storage medium which is connected first.
2. For better user experience, please use a premium USB flash drive or mobile hard disk with high quality to avoid
problems caused by disk quality.
2.2 Record/Capture
1. After all devices are connected properly, please power on all devices, the video image from the video player will be
displayed on TV and the LED will illuminate solid blue or solid green.
2. Press the“Record/Stop”button on the capture box or press the REC button on the remote control. Then the LED will
blink blue/white or green/white alternately, which indicates the capture box is in the process of recording.
3. Press the “Record/Stop”button again on the capture box or press the STOP button on the remote control. Then the
LED will blink blue/green alternately, which indicates the recorded video is being saved.
4. When the LED turns solid blue or solid green from blinking blue/green alternately, it indicates the video has been saved
successfully. Then you can remove the USB flash drive or TF card.
Note: DO NOT remove the USB storage drive/TF card from HDML-Cloner Box Evolve in the process of recording (Flashing
Blue/Green LED indicates it’s still in the process of recording.) |
8
2. How to record videos to the USB flash drive/TF card
Tips:
1. HDML-Cloner Box Evolve will power on immediately when connected to the external power adapter. When the video
players connected to 1 IN and 2 IN ports are shut off, HDML-Cloner Box Evolve will be in standby mode automatically
after 3 minutes. If you want to use it again, please press the ”Record/Stop” button on HDML-Cloner Box Evolve or
press on the remote control.
2. If the source video is 1080p, the LED will illuminate solid blue; if the source video is 720p or others, the LED will
illuminate solid green.
3. HDML-Cloner Box Evolve supports the function of CEC wake-up. If the video player is turned on, other devices
connected to it via HDMI cables will be turned on automatically.
9
2.3. Schedule Recording
2.3 Schedule Recording
IMPORTANT: If you set the recording frequency to “Once”, please make sure to create a schedule task at least 3 minutes
in advance. If you set the recording frequency to “Every day”, please make sure to create a schedule task at least 1 minute
in advance. Then HDML-Cloner Box Evolve will start recording the video at the scheduled time properly.
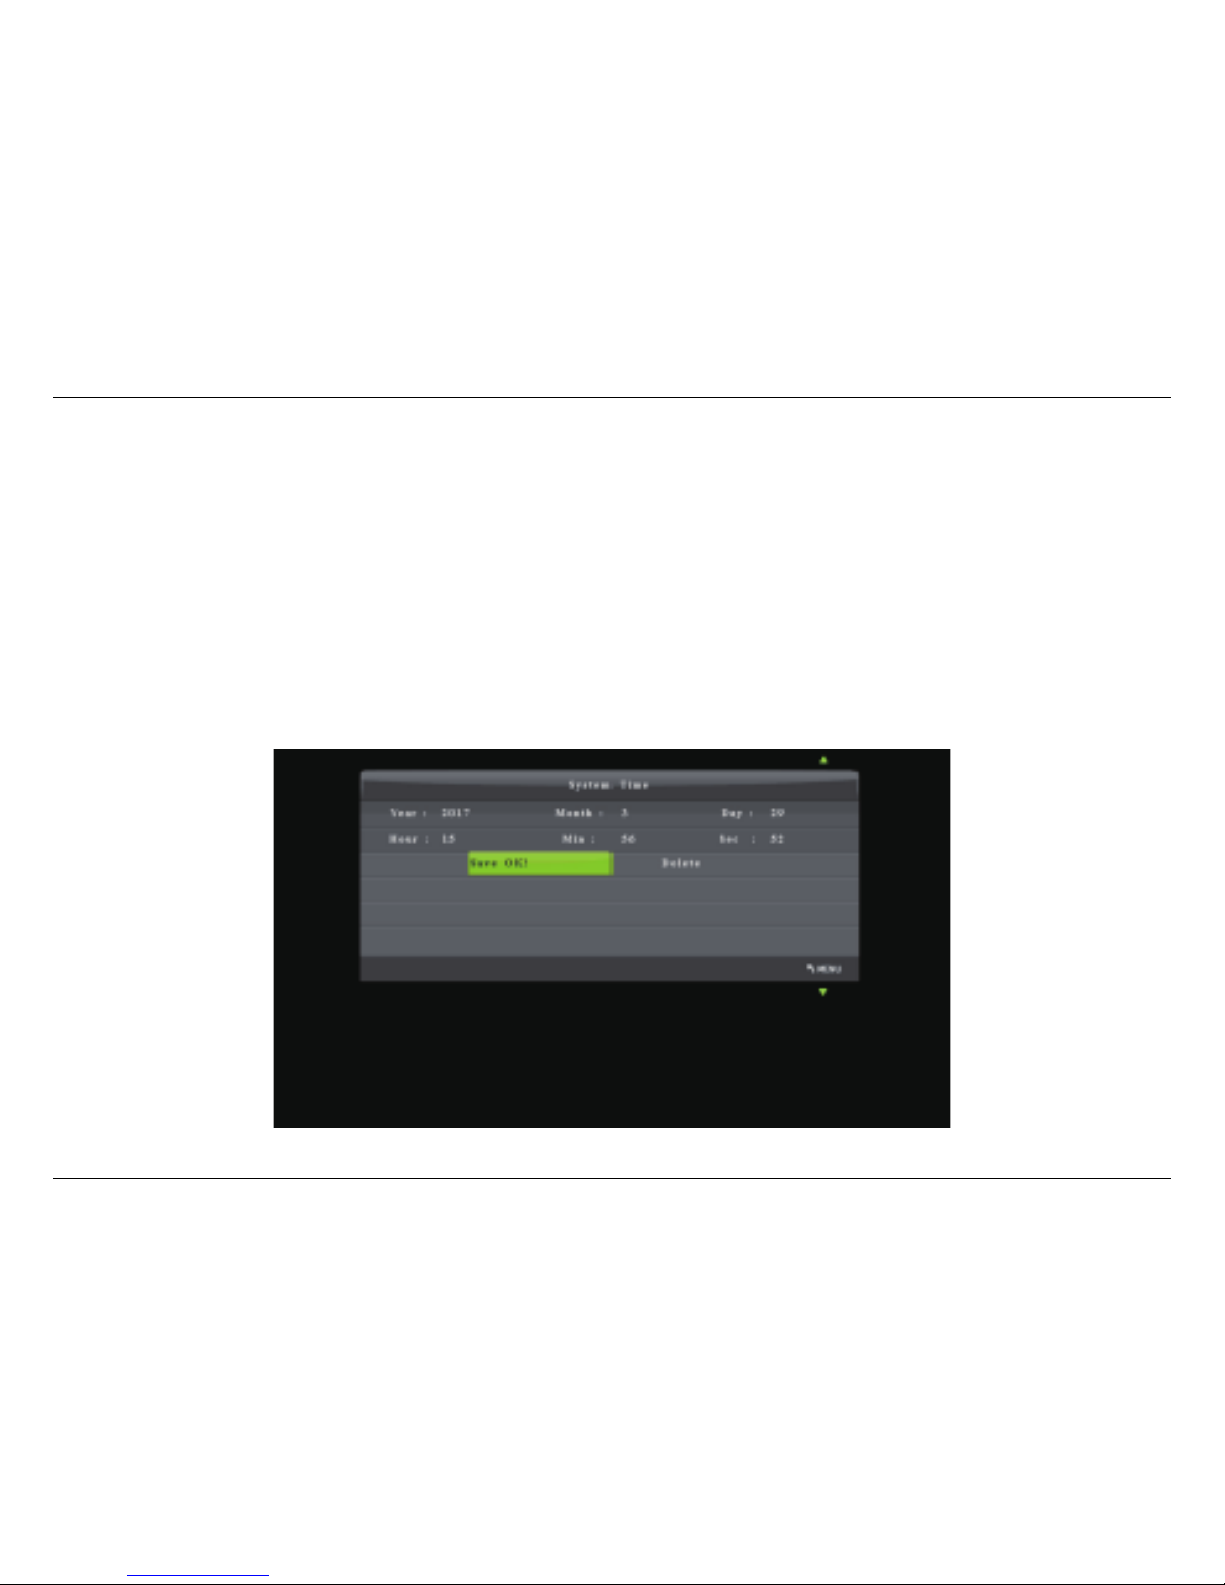
1. Press the TIME button on the remote control. Set the system time by using the four buttons of volume control on the
remote control. Then select Save to finish the setting.
10

2. How to record videos to the USB flash drive/TF card
2. Press the SCHEDULE button on the remote control. Set the recording frequency (Once/Everyday), start time and
recording time by using the four buttons of volume control on the remote control. Then select Save to finish the
setting.
3. After finishing the setup, then HDML-Cloner Box Evolve will start recording videos automatically at the scheduled
time. Note: If you want to record certain channel’s video, do select the channel first.
11

2.4. Bitrate Setup
2.4 Bitrate Setup
Press on the remote control and the bitrate selection menu will pop up.
There are six options available, which are: | LIMITED: 6M, | LIMITED: 10M, | LIMITED: 16M, | UNLIMITED: 6M, |
UNLIMITED: 10M, | UNLIMITED: 16M. If you select a bitrate prefixed with LIMITED, the recorded video saved to the
storage device in FAT32 or NTFS format will be split into several 2GB files. If you select a bitrate prefixed with UNLIMITED,
the recorded video saved to the storage device in NTFS format will be a complete video, but if the storage device is in FAT32
format, the recorded video will still be split into several 2GB files.
12

HOW TO RECORD VIDEOS TO PC
System Requirements:
Prior to installing HDML-Cloner Pro Helper, please make sure you are using Windows Vista or later versions and your PC
is equipped with USB 2.0 or USB 3.0 port.
3.1 Install HDML-Cloner Pro Helper
HDML-Cloner Pro Helper is a smart program to record video discs, game videos, homemade videos or anything from any
video source under Windows OS working together with HDML-Cloner Box Evolve.
Please download the latest version of HDML-Cloner Pro Helper from our official website: https://www.cloner-alliance.com/
hdmicloner-pro-helper.html
Note: Please don’t connect HDML-Cloner Box Evolve to PC before installing the software, or there will be a prompt
“Unknown USB Device”.
If the following window appears during the installation process, please select“Install”, otherwise HDML-Cloner Pro Helper
will not work properly.
13

3.2. Connect
3.2 Connect
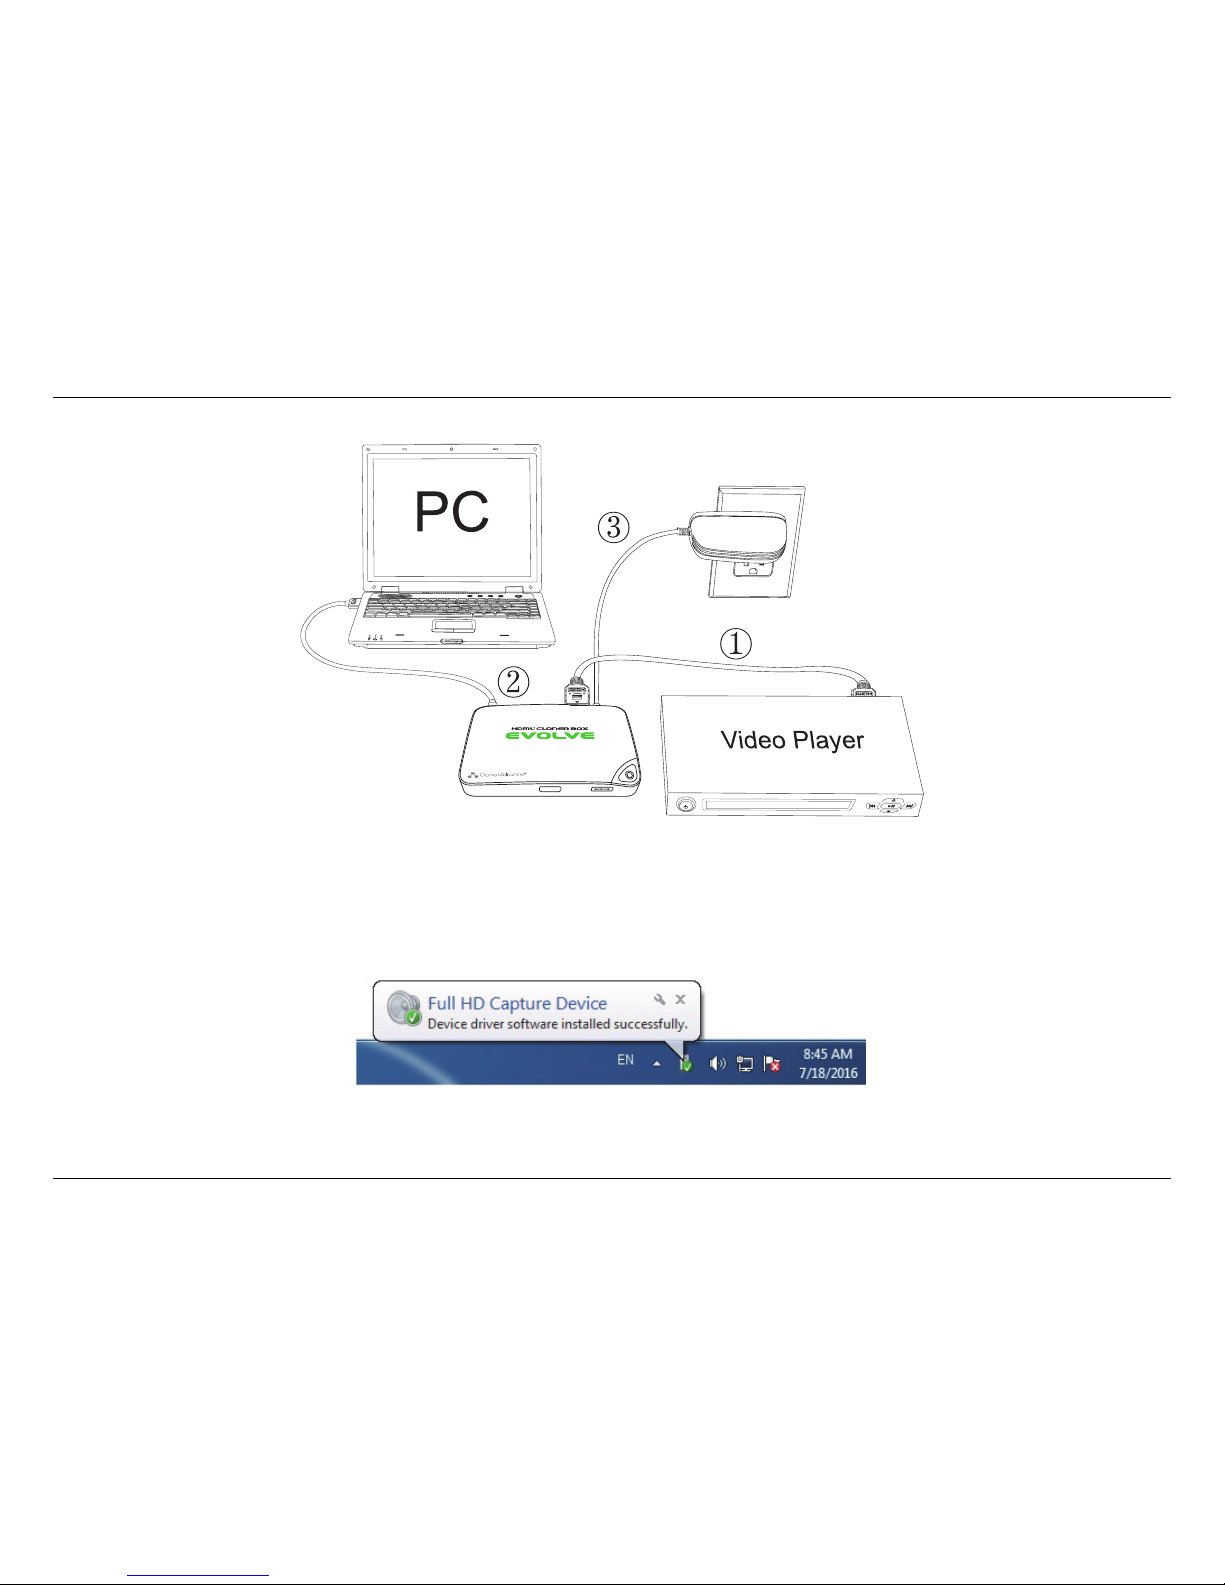
1. Connect the video player to the “IN”port on HDML-Cloner Box Evolve via an HDMI cable.
2. Connect the Micro-USB to USB cable between the “TO PC”port of HDML-Cloner Box Evolve and the USB port
of PC.
3. Plug the power adapter into the power socket and plug the other end into the 5V/2A port of HDML-Cloner Box Evolve.
Tips:
1. You can connect up to 3 video players by connecting them to 1 IN, 2 IN and AV IN ports respectively via cables and
press the “SOURCE”button on the remote control to switch the input signal.
2. When HDML-Cloner Box Evolve is connected to PC successfully, the LED light will turn white.
14
3. How to record videos to PC
After all devices are connected properly, when you power on all devices, the Windows operating system will prompt“Found
a new hardware”and install the driver automatically. Wait a while and when the prompt “Device driver software installed
successfully”pops up (as shown below), run HDML-Cloner Pro Helper on the desktop.
15

3.3. Register
3.3 Register
Please register HDML-Cloner Pro Helper first before using, otherwise it can only be used for 7 days. Run HDML-Cloner
Pro Helper. Click on the main interface to open the ”About” window. Then click on the ”Register” button to open the
”Register” window. Fill in your proper Email address, real name and code. Then click ”OK” to finish the registration.
16
This manual suits for next models
1
Table of contents


