CMA Dishmachines VINCILAB 2 User manual

VinciLab 2 is an Android mobile graphic data acquisition system, which can be used in
a variety of ways, standalone and with a computer or tablet, in the classroom and in the field.
The Home Screen is the starting point for using your VinciLab. The shortcuts to Coach 7, Settings, and
VinciLab Update apps are already present on the Home screen.
• Use Settings to connect your VinciLab 2 to internet and configure display and system settings.
• Use VinciLab Update to check if any updates releases are available and to update VinciLab 2.
• Use Coach 7 for data collection.
Drag upwards to open the Application screen. This screen contains shortcuts to all applications
that come installed with your VinciLab 2. These are Calculator, Clock, Files, Gallery, Lightning, Music,
RustDesk, Search, Video and VinciLab MCPU.
Internal
Sound Sensor
for recording
sound signals
Home Screen
starting screen
for using VinciLab 2
Power Button for turning VinciLab 2 and
its screen On or Off
Sensor inputs (A1, A2, A3, A4),
ControlBox port (D1) and HDMI port (D2)
for connecting sensors
USB C port (left) for charging and communication
USB port (right) for connecting any USB peripheral
Audio Out (left) for generating DC/AC voltage signals
Audio In (right) for connecting external microphone
At the backside of VinciLab 2, Speaker and a compartment with an internal rechargeable Battery, are located.
• To turn VinciLab 2 on press and hold the Power button until the VinciLab’s screen turns on.
The minimum battery level to start VinciLab 2 is 5 %.
• Tu turn Vincilab 2 off press and hold the Power button until the shutdown menu opens.
Tap Power off to shut down the device.
Capacitive Color
Touch Screen
for viewing
and controlling
QUICK START GUIDE VINCILAB 2

Ω
VINCILAB 2 STANDALONE: THE COACH 7 APPLICATION
Is a powerful app for data collection and control when using VinciLab 2 standalone. It offers live
sensor data displays, real-time graphing, tools for data processing. If you are familiar with working
with Coach 7 on computers or tablets you will recognise a lot of similarities in functionality.
Dashboard
with buttons for easy start
Interface Screen
to display connected and enabled sensors
Graph Screen
to display data in graphs
Value Screen
to display data as digital values
Activity Screen
with overview of all elements
Data Table Screen,
to display data in a table
Meter Screen
to display data on meters
Content Screens
to display texts, images and web pages

1. Turn VinciLab 2 on by pressing its Power button. Wait until the Home Screen appears.
2. Ensure VinciLab 2 has sufficient battery power (at least 20%) or is connected to a power
supply.
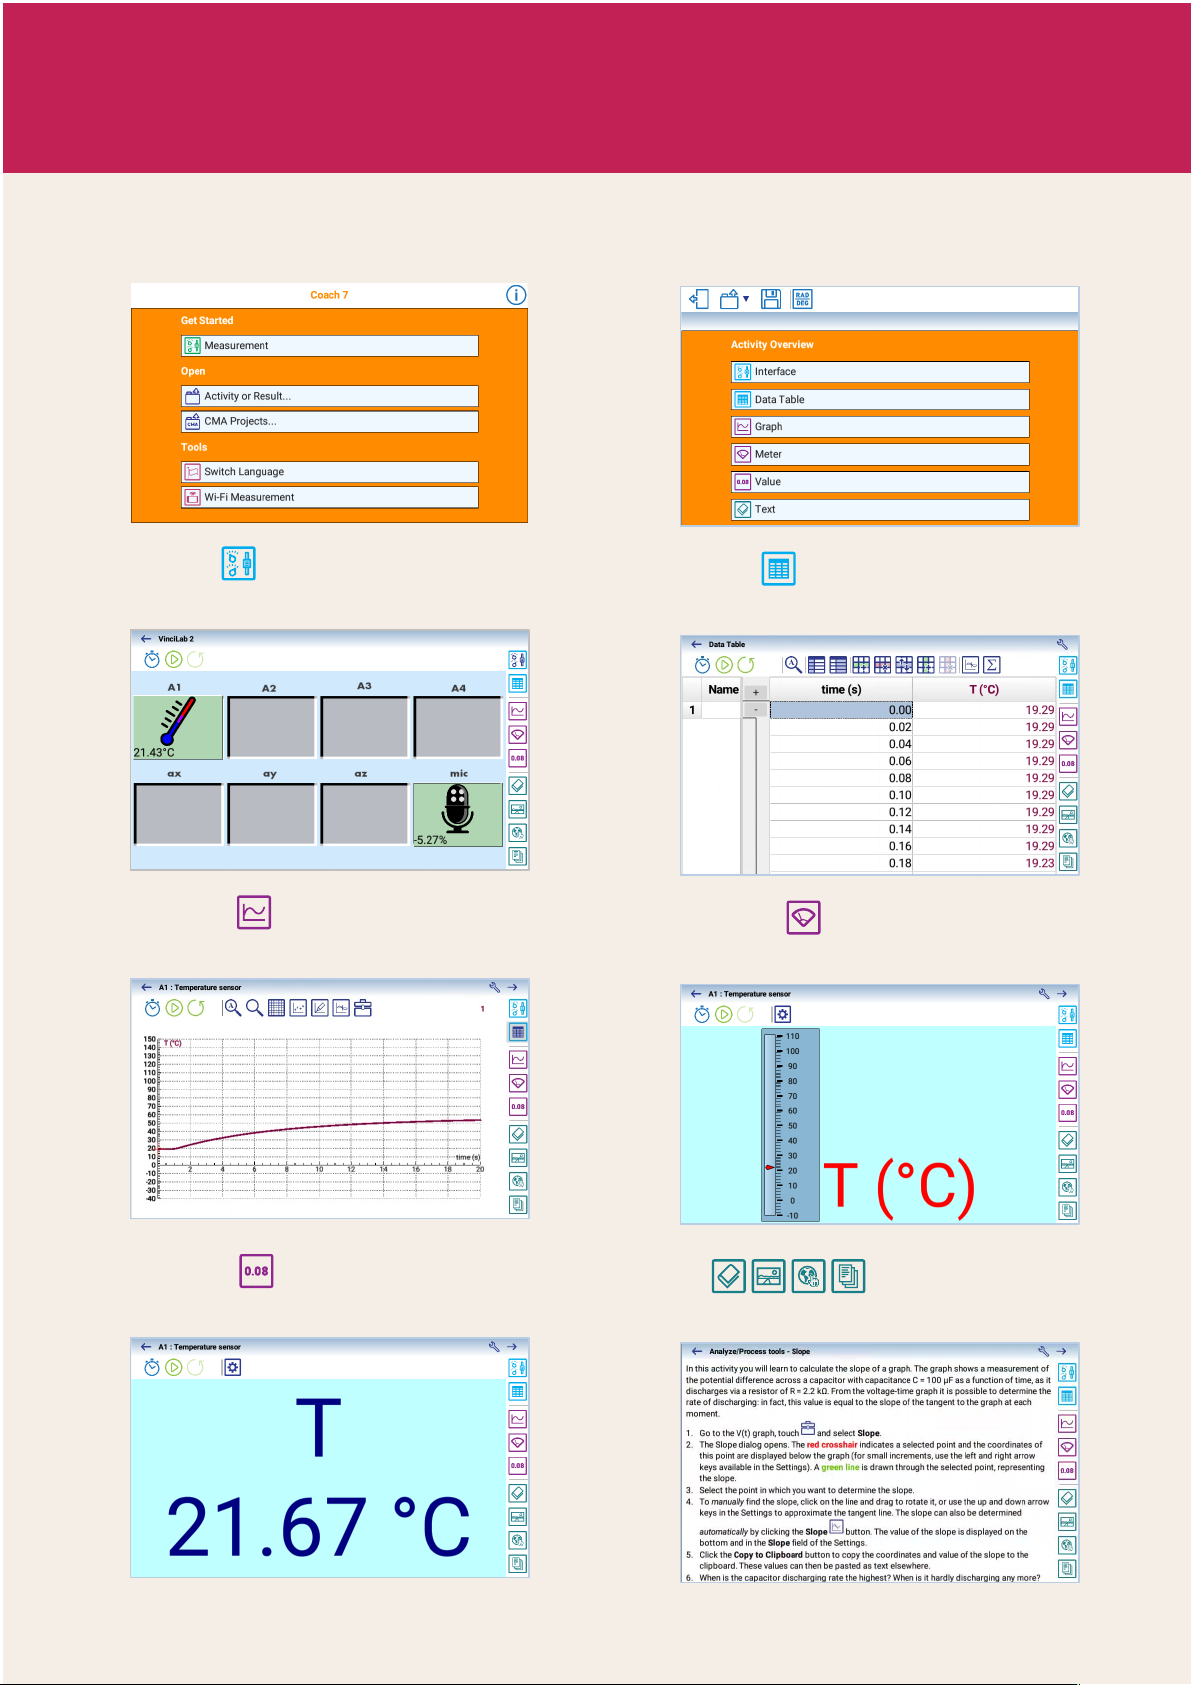
3. On the Home screen tap Coach 7.
4. Tap the dashboard button Measurement and select Time-based Measurement.
5. On the Activity screen tap Interface.
6. Connect the sensor(s) to the sensor input(s) of
VinciLab 2 or enable the internal sensors. When
a connected sensor is detected its sensor icon
appears and its live readings are displayed. In
rare situations, a sensor may be not detected.
Then tap the empty sensor input to which the
sensor is connected and select Choose a sensor
and select the correct sensor from the list.
7. The sensor icons on the Interface screen show the current values measured by the sensor.
These live displayed data are not stored in VinciLab’s 2 memory.
8. Tap the toolbar button Settings to check and modify the measurement settings.
9. Tap the sensor icon and select Display as > Graph. The graph appears on the Graph
screen.
10. Tap to start data collection. In most cases, Coach 7 directly starts the measurement.
If triggering is enabled, then the measurement is started automatically when the trigger
conditions are met.
11. The measurement is finished when the specified measurement time has been reached.
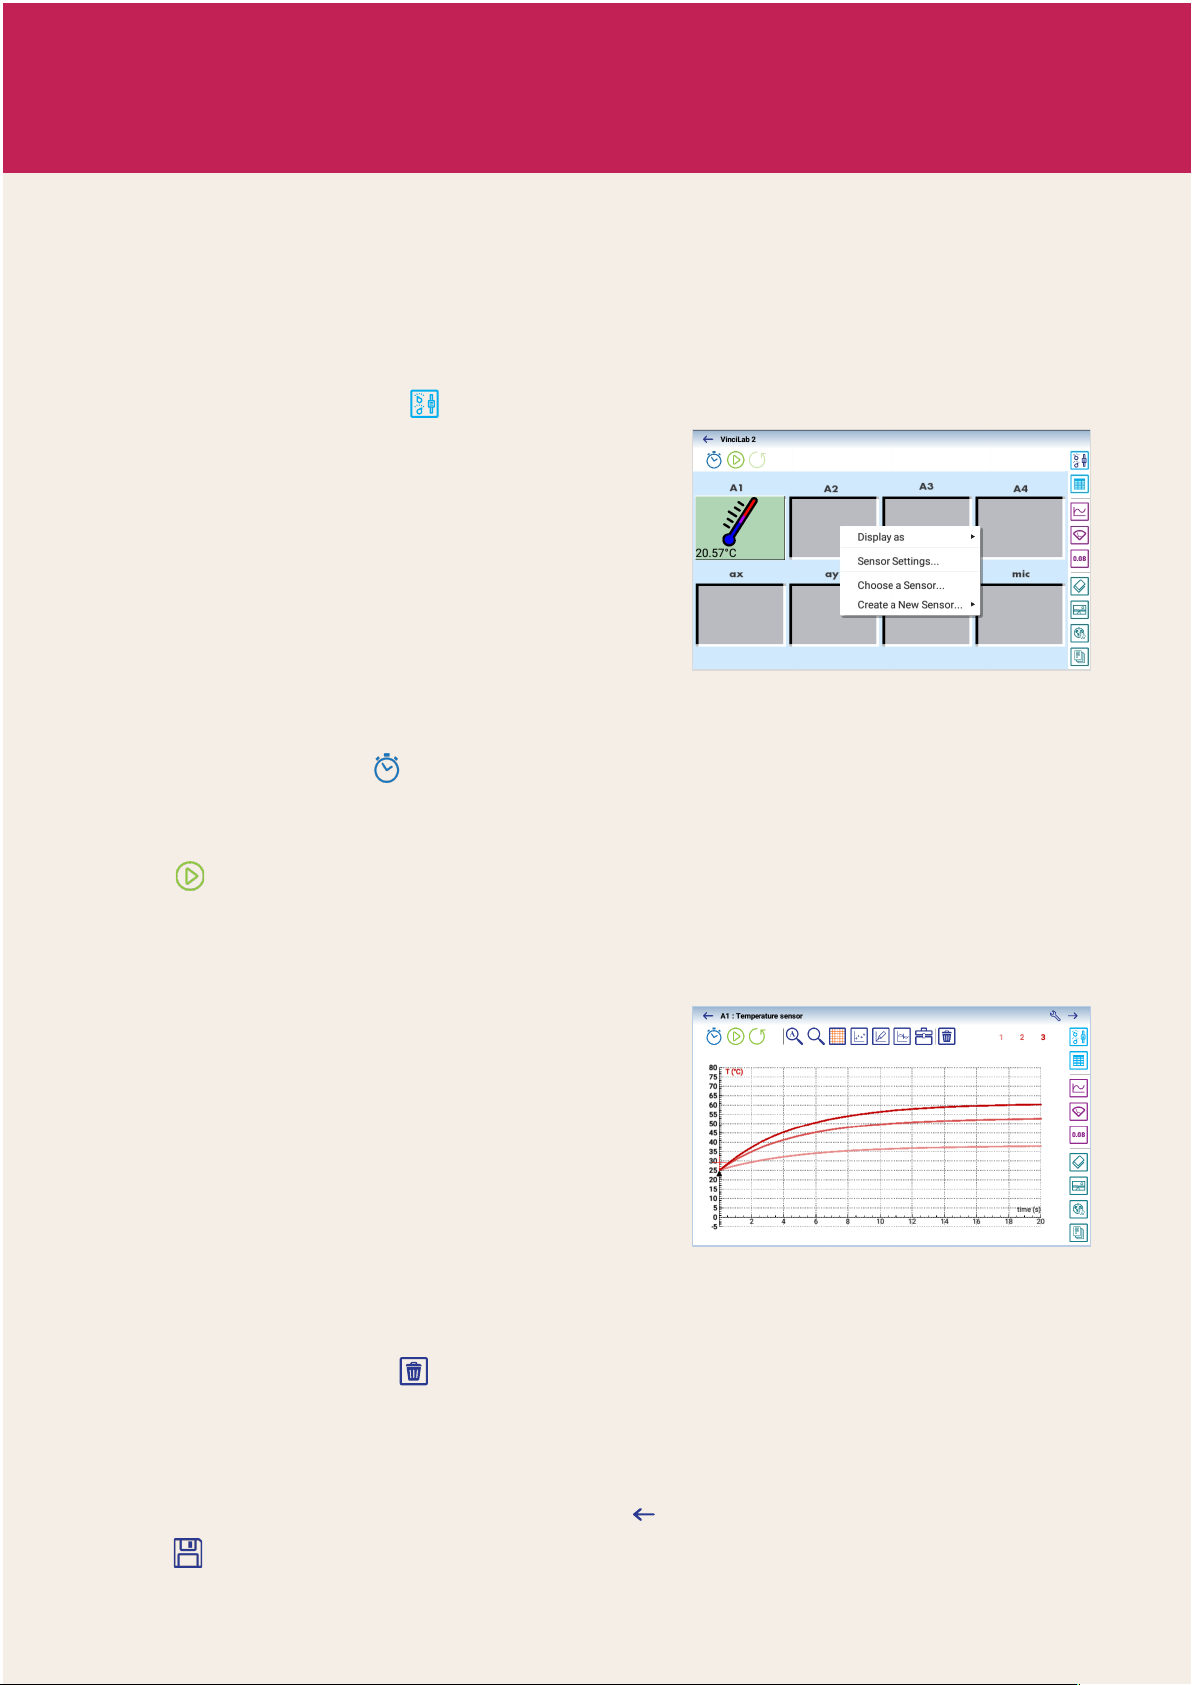
12. Graphs are automatically updated during the
data collection. For each new measurement run,
a new run is added to the graph(s). Runs are
distinguished by means of a shade of the variable
color; the latest Run gets the darkest shade. The
Run numbers, displayed on the right side of the
Graph Toolbar, indicate the number of available
Runs.
• Tap on the Run number to hide its data on the graph. Tap again to show it.
• To delete a measurement run:
In the Graph screen: Tap and select the run you would like to delete.
In the Data Table screen: Tap a run number in the table and select Delete.
The selected runs will be removed from the Data Table and graphs, and the remaining runs
will be renumbered. Note that this action cannot be undone, the deleted runs are lost.
13. To save your Result file exit the Graph screen and confirm that you want to save it or
use in the Activity screen Toolbar. Name the file and tap SAVE.
VINCILAB 2 STANDALONE: TYPICAL MEASUREMENT PROCEDURE
When working with VinciLab 2 as a standalone device VinciLab is controlled by its touch screen
and the Coach 7 app is running on VinciLab 2.

USING VINCILAB 2 WITH COMPUTERS AND MOBILE DEVICES
VinciLab can be used as a lab interface connected (via USB or Wi-Fi) to
computers (Mac and Windows) and mobile devices (iOS, Android).
Coach 7 and Coach 7 Lite programs and apps support such measurements.
1. USING VINCILAB 2 WITH COMPUTERS
VinciLab 2 can work as a lab interface with computers such as Mac and Windows computers.
During such measurement, the Coach 7 or Coach 7 Lite program on the computer is used to
control the data collection. The collected data are transferred to the computer and the
measurement can be followed and analyzed on the computer.
The device can communicate via the USB port (USB C port on VinciLab 2) or wirelessly via Wi-Fi.*
2. USING VINCILAB 2 WITH MOBILE DEVICES
VinciLab 2 can work as a lab interface with mobile devices such as Android and iOS. During such
measurement, the Coach 7 or Coach 7 Lite app on the mobile device is used to control the data
collection. The collected data are transferred to the mobile device and the measurement can be
followed and analyzed on its screen. When working with mobile devices VinciLab communicates
via Wi-Fi*.
3. TRANSFERRING FILES BETWEEN VINCILAB 2 AND THE COMPUTER
Users can store their files on VinciLab 2 in different folders. Dedicated folders like Images, Videos,
and Documents are already present on VinciLab 2.
Transferring files between VinciLab 2 and a computer is possible via:
USB
Memory Stick
Insert your USB memory stick into the USB port of VinciLab 2.
Use the Files app to move or copy files.
USB cable
Connect VinciLab to the computer via the provided USB cable. When
VinciLab 2 is detected then you can use it like any other external storage
device. On Mac computer, you must first install an app that makes possible
file transfer between a Mac computer and an Android device.
Wi-Fi
Make sure that VinciLab 2 is connected to the same network as your
computer. Use the Rust Desk app on your VinciLab 2 together with the
RustDesk program on your computer (needs to be installed beforehand) to
transfer the files between the two devices*.
4. DISPLAY THE VINCILAB 2 ON A LARGER MONITOR
HDMI: Connect VinciLab 2 and a monitor with an HDMI cable, then start up VinciLab 2.
Wi-Fi: Use the Rust Desk app on your VinciLab 2 together with the RustDesk program on your
computer (needs to be installed beforehand) to display the VinciLab’s screen on your
computer screen*.
* Read VinciLab 2 Users’ Guide for a detailed description of how to do it.
To download the guide go to https://cma-science.nl/resources/en/interfaces/007.pdf
https://cma-science.nl
Other manuals for VINCILAB 2
1
Other CMA Dishmachines Laboratory Equipment manuals
Popular Laboratory Equipment manuals by other brands

Thermo Electron
Thermo Electron IEC CL40 Series user manual

Westlab
Westlab 4500RPM Max manual

Swan Analytical Instruments
Swan Analytical Instruments AMI Turbiwell Operator's manual

NEW BRUNSWICK SCIENTIFIC
NEW BRUNSWICK SCIENTIFIC BioFlo 4500 Guide to operations

Bürkle
Bürkle StickProof 5338-0410 Directions for use

Waters
Waters 2410 Service manual