CMA Dishmachines VINCILAB 2 User manual

VINCILAB 2
USER’S GUIDE
https://cma-science.nl

2 | VinciLab 2 User’s Guide
For our international users
The latest version of this guide can be downloaded at the CMA
website: https://cma-science.nl/resources/en/interfaces/007.pdf
Aan onze Nederlandse gebruikers
VinciLab 2 wordt standaard uitgeleverd met Engelse handleiding.
U kunt de laatste versie van de Nederlandse handleiding vinden en
downloaden van de CMA-website:
https://cma-science.nl/resources/nl/interfaces/007.pdf
VinciLab 2 User’s Guide ver. 1.0, March 2023
Author: Ewa Kedzierska
© CMA, Amsterdam, 2023
CMA,
A.J. Ernststraat 169,
1083 GT Amsterdam,
Netherlands
https://cma-science.nl

VinciLab 2 User’s Guide | 3
TABLE OF CONTENTS
I. INTRODUCTION 5!
II. GETTING STARTED 6!
1.#VinciLab#2#overview# 6!
2.#Turning#VinciLab#2#on#and#off# 7!
3.#Powering#VinciLab#2# 9!
4.#Using#the#touchscreen#10!
5.#Home#Screen#10!
6.#Application#screen#11!
7.#Sensor#inputs#A1,#A2,#A3,#A4#12!
8.#Built-in#sensors#12!
9.#Output#D1#and#D2#12!
10.#The#ways#of#using#VinciLab#2# 13!
10.1$Standalone$.....................................................................................................................................................................................$13!
10.2$With$computers$...........................................................................................................................................................................$13!
10.3$With$mobile$devices$...................................................................................................................................................................$13!
III. APPLICATIONS 14!
1.#Coach#7#14!
2.#Settings#14!
2.1$Network$&$Internet$.......................................................................................................................................................................$14!
2.2$Connected$devices$.........................................................................................................................................................................$15!
2.3$Display$................................................................................................................................................................................................$15!
3.#Update#16!
4.#Other#applications#17!
4.1$Calculator$..........................................................................................................................................................................................$17!
4.2$Clock$....................................................................................................................................................................................................$17!
4.3$Files$......................................................................................................................................................................................................$17!
4.4$Gallery$.................................................................................................................................................................................................$18!
4.5$Lightning$............................................................................................................................................................................................$18!
4.6$Music$...................................................................................................................................................................................................$19!
4.7$RustDesk$............................................................................................................................................................................................$19!
4.8$Search$.................................................................................................................................................................................................$19!
4.9$Video$...................................................................................................................................................................................................$19!
4.10$VinciLab$MCPU$.............................................................................................................................................................................$19!
5.#Installing#custom#applications#on#VinciLab#2#20!
IV. VINCILAB 2 STANDALONE: WORKING WITH COACH 7 APP 20!
1.#Starting#and#stopping#Coach#7#20!
2.#Coach#7#Dashboard#21!

4 | VinciLab 2 User’s Guide
3.#Activity#screen#22!
4.#Typical#time-based#measurement#procedure#23!
5.#Working#with#sensors#on#the#Interface#screen#24!
5.1$Toolbar$and$menus$.......................................................................................................................................................................$24!
5.2$Connecting$and$detecting$sensors$..........................................................................................................................................$25!
5.3$Using$the$built-in$sensors$..........................................................................................................................................................$26!
5.4$Creating$own$sensors$...................................................................................................................................................................$27!
5.5$Sensor$Settings$...............................................................................................................................................................................$27!
5.6$Sensor$Input$Ranges$.....................................................................................................................................................................$28!
5.7$Measurement$Settings$.................................................................................................................................................................$30!
6.#Data#Table#screen#31!
6.1$Variable$Properties$.......................................................................................................................................................................$32!
6.2$Run$Properties$................................................................................................................................................................................$32!
7.#Graph#screen#33!
7.1$Graph$Properties$............................................................................................................................................................................$34!
8.#Meter#Screen#35!
9.#Value#screen#36!
10.#Data#Analysis#and#Processing#Tools#37!
10.1$Simple$Analysis$Tools$...............................................................................................................................................................$37!
10.2$Advanced$Analysis$and$Processing$Tools$.........................................................................................................................$38!
11.#Learning#Content#42!
11.1$Text$screen$.....................................................................................................................................................................................$43!
11.2$Image$screen$.................................................................................................................................................................................$43!
11.3$Web$Page$screen$.........................................................................................................................................................................$43!
11.4$Student$Text$screen$...................................................................................................................................................................$44!
V. USING VINCILAB AS A LAB INTERFACE WITH COMPUTERS AND MOBILE DEVICES 44!
1.#Setting#VinciLab#communication#45!
2.#Typical#measurement#procedure#on#computer/mobile#device#46!
VI. TRANSFERRING FILES BETWEEN VINCILAB 2 AND THE COMPUTER 48!
APPENDIX. WORKING WITH RUSTDESK 49!
TECHNICAL SPECIFICATIONS 51!
1.#Key#Features#51!
2.#Working#conditions#and#maintenance#52!
3.#Factory#reset#52!
4.#Warranty#52!
5.#Battery#precautions#53!
6.#Safety#Information#53!

VinciLab 2 User’s Guide | 5
I. INTRODUCTION
VinciLab 2 is a modern and versatile data-logging and control solution for STEM
Education. It can be used as a standalone device or as a lab interface connected, via USB
or Wi-Fi, to computers (Mac and Windows), mobile devices (iPad, Android), and
Chromebooks.
VinciLab 2 runs on Android 11 and is preloaded with several applications. The Coach 7
application is the main application for data collection and control when using VinciLab 2
standalone. Other applications, present on the device, offer many other useful
functionalities such as setting up the device and its wireless connections, managing user
files, remote desktop control, etc.
VinciLab 2 is equipped with two processors: the main processor to control the device’s
operating system and screen, and a measurement processor to control the measurement
and control processes. It has 2 GB RAM memory and 8 GB flash memory for applications
and user files. The 5” capacitive color touch screen provides an 800 x 480 pixels display
offering easy control of the device.
For connecting sensors, VinciLab 2 has four BT (right-handed) sensor inputs A1, A2, A3,
and A4, which support CMA sensors. Additionally, it has two built-in sensors: a 3-axis
accelerometer and a microphone.
An output D1 is meant for connecting the CMA ControlBox for controlling its outputs or
generating analogue signals. An output D2 is a dedicated HDMI output allowing to present
the VinciLab’s screen on a big screen.
For wireless connectivity VinciLab is equipped with Wi-Fi and Bluetooth. By using wireless
connectivity and the RustDesk application the Vinci-Lab’s screen can be remotely viewed
and controlled from any computer or mobile device connected to the same network.
VinciLab is delivered with:
• USB cable for connecting to the USB port or USB power adapter,
• USB power adapter for powering and charging,
• User’s Quick Start Guide and User’s Guide.
This guidebook is intended to provide instructions for the basic operations of VinciLab 2.

6 | VinciLab 2 User’s Guide
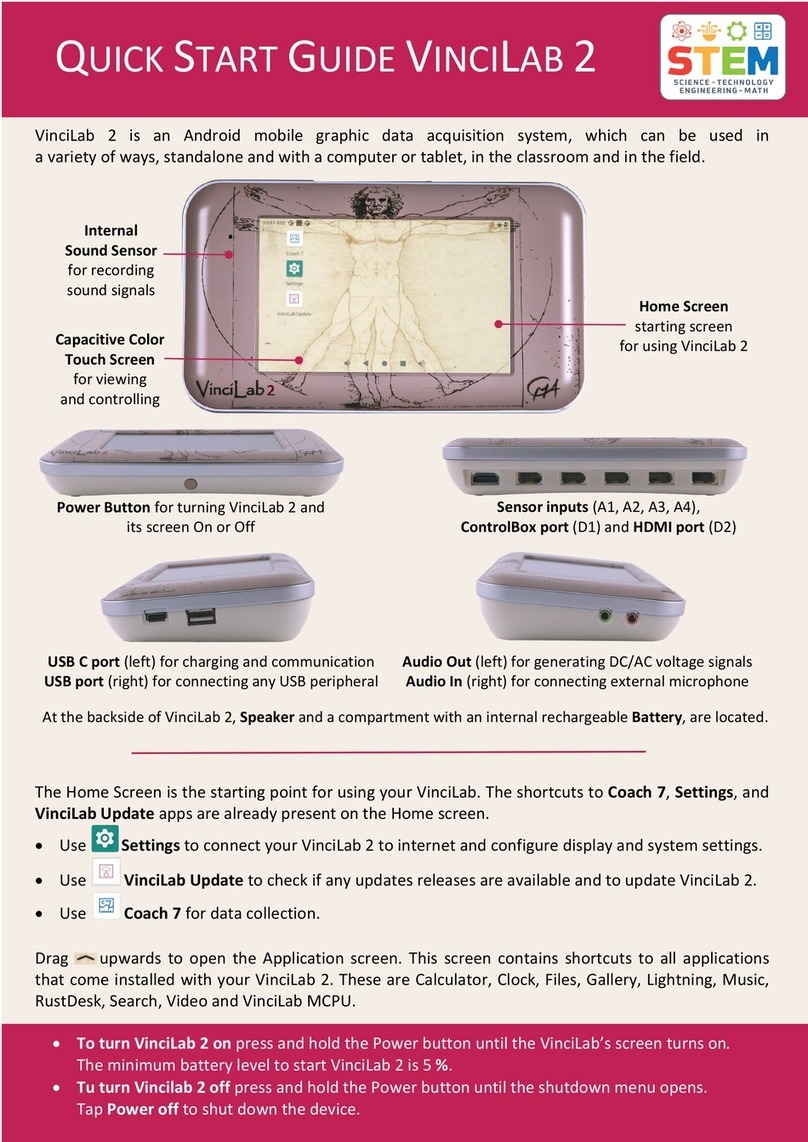
Internal Microphone
for recording sound signals
II. GETTING STARTED
1. VinciLab 2 overview
Capacitive Color Touch Screen
for viewing and controlling
Sensor Inputs A1, A2, A3, A4
for connecting sensors
D1
for ControlBox
D2
HDMI port
Power Button
for turning VinciLab on or off (long press) and for turning the screen on and off (short press)

VinciLab 2 User’s Guide | 7
Battery Compartment
for the internal, lithium-ion rechargeable
battery (supplied with VinciLab 2)
Audio Out Port
output for AC and DC voltage signals,
for connecting to a power amplifier
USB Port
for connecting any USB peripherals like a
mouse, keyboard, USB flash drive, USB hub, etc.
USB C Port
for connecting a USB cable for charging
or for communication with computer
Audio In Port
for connecting an external microphone
Speaker
for playing audio

8 | VinciLab 2 User’s Guide
2. Turning VinciLab 2 on and off
To turn on
• Press and hold the Power button until the VinciLab’s screen turns on.
• While VinciLab 2 is booting the message ‘VinciLab is starting. Please wait.’ is displayed.
• Wait until the device finishes its booting procedure and displays its Home screen as
shown in the image below.
Note:
• The minimum battery level to start VinciLab 2 is 5 %.
To turn off
• Press and hold the Power button until the shutdown menu opens.
• Tap Power off to shut down the device.
• Tap Restart to start the device again.
The table below shows all the functions of the Power button.
VINCILAB 2 IS
POWER BUTTON
ACTION
OFF
Short press
(less than 2 s)
Only when connected to power:
battery level <= 5% then it shows battery empty screen
battery level > 5% then it shows the charging status
OFF
Long press
(more than 2 s)
Turns VinciLab 2 on
ON
Short press
(less than 2 s)
Turns the screen off
To turn the screen on again briefly press the Power button
ON
Long press
(longer than 2 s)
Start the shutdown procedure

VinciLab 2 User’s Guide | 9
3. Powering VinciLab 2
An internal rechargeable battery (Li-Poly 3.7 V, 4000 mAh, located in the back
compartment), powers VinciLab 2. The battery icon on the status bar of the Home Screen
indicates the current power level.
VinciLab 2 is delivered with its battery partially charged. The device will work as long as
the battery provides enough power, or it is powered via the power adapter. Before the
battery becomes too low for operating the device a warning will appear on the screen. If
you continue working without charging, the device will shut down. A fully discharged
battery requires circa 3 hours of charge time.
To charge battery
• Connect the USB cable to the USB C port of VinciLab 2.
• Connect the other end of the USB cable to the USB power adapter.
• Plug the USB power adapter into a standard power outlet.
- or -
• Connect the USB cable to the USB C port of VinciLab 2.
• Connect the other end of the USB cable to the USB port of your computer. The
efficiency of charging via a USB port is limited by the maximal current provided by a
USB socket (500 mA for USB 2.0 and 800 mA for USB 3.0).
Battery life will depend on the screen brightness and on the sensors and features used,
but typically you can expect to use VinciLab for at least 4 hours without recharging it. To
save power in the Settings app dim the brightness of the screen (Display > Brightness
level) or set the screen timeout (Display > Screen timeout). You can also press shortly the
Power button to turn off the screen when you do not need it.
The long-time life of the battery is more than 300 full (0 to 100%) charging cycles. If the
charging cycle is not full e.g., 30% to 60%, it will last more charging cycles. Exposure to
temperatures over 35oC will significantly reduce battery life. A replacement battery can
be ordered separately (CMA art. code 007bat).
Notes:
• VinciLab can be used while the battery is being charged by the power adapter.
• VinciLab typically consumes about 700 mA. If you set the screen brightness to the maximum
level, do a lot of data transferring via Wi-Fi, or connect many then power consumption will
be much higher.
• When VinciLab discharges fully it will not turn on until a minimum charge of 5% is reached.
This minimum level will arise when your battery gets older.
• For the proper functioning of VinciLab 2 for sensor recognition and measurement, we
recommend having the battery level not lower than 20%.
• When the USB port does not provide enough power, VinciLab will not be charged, or
charging will be significantly slower.
• On most computers, USB ports do not provide enough power for the simultaneous operation
of VinciLab and charging its battery.
• VinciLab can work without a battery when connected to power.

10 | VinciLab 2 User’s Guide
4. Using the touchscreen
WARNING! The touchscreen best responds to a tap from the pad of your finger. Using
excessive force or a metallic object when pressing the touch screen may damage the glass
surface and void the warranty.
Tap
Tap the item to select or launch them. For example, tap an item to select it, tap an
application’s icon to launch the application, or tap the on-screen keyboard to enter text
or numbers.
Flick or drag
Flick or slide your finger vertically or horizontally across the screen. For example, browse
through images or scroll a long screen.
Zoom
Place two fingers on the screen at once and pinch them together (to zoom out) or spread
them apart (to zoom in).
5. Home Screen
The Home Screen is the starting point for using your VinciLab. The shortcuts to three
applications are already present on the Home screen: Coach 7, Settings, and VinciLab
Update.
The items in the bottom bar are always available for quick access.
Make the sound volume higher
Go step back
Go to the Home screen
Browse through opened applications
Make a sound volume lower
When not visible drag the bottom upwards to display the bottom bar and drag the bar
downwards to hide it.
The status bar on top of the Home screen displays additional information such as time,
connectivity status, battery level, etc.

VinciLab 2 User’s Guide | 11
You can customise your Home screen with widgets and shortcuts to additional
applications preloaded on your VinciLab.
To add a widget
Tap the Home screen, tap Widgets, and select the widget that you want to have on your
Home screen. For example, the Digital clock.
To add a shortcut to an application
Open the Application screen, touch and hold an application icon then drag it a bit until it
appears on your Home screen. Drag it further to the desired location.
To remove the shortcut touch and hold an application icon on your Home screen then
drag it out of the screen.
To change the wallpaper
Tap the Home screen, tap Wallpaper, and select the image that you want to have on your
Home screen.
6. Application screen
The Application screen, which you open from
your Home screen, contains the applications
that come installed with your VinciLab 2.
To open the Application screen
• Drag a small arrow on the Home screen
upwards.
To open an application
• From your Home screen or the Application screen, tap the application icon.
• Most applications keep running in the background until they are closed. The next time
you open the application, you can continue where you left off.
• You can view and access recently used applications by pressing in the bottom bar.
To close an application
• Press in the bottom bar. An overview of recently opened applications is given.
• Swipe through the applications and select the application you want to close.
• Drag it out of the screen.
A more detailed description of apps you can find in III. Applications.

12 | VinciLab 2 User’s Guide
7. Sensor inputs A1, A2, A3, A4
VinciLab 2 has four BT (right-handed) sensor inputs A1, A2, A3, and A4. CMA BT sensors
1
(with exception of the CMA Digital Motion Detector 0664) can be directly connected to
these sensor inputs. VinciLab 2 supports sensor recognition and automatically identifies
sensors connected to inputs.
VinciLab 2 can sample up to 4 sensors simultaneously. The sampling rate depends on the
number of channels used during the data collection. For measurement via one channel
maximum sampling frequency is 1 MHz, for measurement via two channels
simultaneously 500 kHz, and via three and four channels simultaneously 200 kHz.
All sensor inputs can be (simultaneously) used as counter inputs. Sensors such as the CMA
Photogate (art. code 0662i or BT63i) or CMA Radiation sensor (art. code 0666i or BT70i)
are by default defined as counters. Other analogue sensors can be used as counters after
defining the counter conversion settings in Coach e.g., defining a heart-beat sensor to
count heartbeats.
8. Built-in sensors
VinciLab 2 has two built-in sensors:
• A Microphone, which measures sound waveforms.
• A 3-axis Accelerometer, which
measures in 4 ranges: ± 20 m/s2, ± 40
m/s2, ± 80 m/s2, and ± 160 m/s2
acceleration, in
the x, y, and z directions. The image
shows the directions of x, y and z
axes of the accelerometer.
Both internal sensors are connected to
the measurement processor of
VinciLab 2 and can be used in
combination with sensors connected to
sensor inputs.
9. Output D1 and D2
The output D1 is a right-handed BT socket
meant for connecting the CMA
ControlBox.
The Output D2 is an HDMI port that
allows direct connection to a larger
display. Connect VinciLab 2 and a monitor
with an HDMI cable, then start up
VinciLab 2.
1
Older (4-mm) versions of CMA sensors can be connected via a 4mm to BT adapter (art. code 0519).

VinciLab 2 User’s Guide | 13
10. The ways of using VinciLab 2
VinciLab 2 can be used in the following ways:
10.1 Standalone
VinciLab 2 can be used as a standalone data collection device. By using Coach 7
application on the device measurements with connected sensors can be performed. Data
can be collected, graphed, processed, and stored in the device’s memory. This is very
useful for remote data collection e.g., outside the school or in a lab where no computers
or tablets are available.
Other applications, preloaded on the device, offer additional functionalities such as
setting up the device, watching videos and images, using the timer or stopwatch, and
browsing websites.
For a more detailed description of how to work with VinciLab standalone read IV.
VinciLab 2 standalone: working with Coach 7 app.
10.2 With computers
VinciLab 2 can work as a lab interface with computers such as Mac and Windows
computers. In such a case the Coach 7 or Coach 7 Lite program on the computer is used
to control the data collection. The collected data are transferred to the computer and the
measurement can be followed and analyzed on the computer.
The device can communicate via the USB port (USB C port on VinciLab 2) or wirelessly via
Wi-Fi. The type of communication should be set beforehand in the Coach 7 app on your
VinciLab and Coach 7 program via the Hardware Setting button present on the Coach 7
dashboard.
Additionally, VinciLab 2 can be used with the computer to:
• transfer files between VinciLab 2 and the computer (via USB).
• display the VinciLab’s screen and transfer data by using the RustDesk application (via
Wi-Fi).
10.3 With mobile devices
VinciLab 2 can work as a lab interface with mobile devices such as Android and iOS. In
such a case the Coach 7 or Coach 7 Lite app on the tablet is used to control the data
collection. The collected data are transferred to the mobile device and the measurement
can be followed and analyzed on its screen. When working with mobile devices VinciLab
communicates via Wi-Fi.
For a more detailed description of how to work with VinciLab with computers and mobile
devices read V. Using VinciLab as lab interface with Computers and Mobile devices.

14 | VinciLab 2 User’s Guide
III. APPLICATIONS
VinciLab 2 runs on Android 11 and is preloaded with several applications. The shortcuts
to three important applications are already located on the Home screen.
1. Coach 7
The Coach 7 application is used for data collection and control when using VinciLab 2
standalone. It allows you to open Activities and Results, set up experiments, collect,
display, and process the collected data, and save the Results. If you are familiar with
working with Coach 7 on computers or tablets you will recognise a lot of similarities in
functionality. However, there are some changes, especially in the user interface making
it possible to work on a small VinciLab 2 screen. Many of these changes are described in
the chapter III. VinciLab 2 standalone: working with Coach 7 app.
• Tap to start Coach 7.
2. Settings
The Settings application is used to configure your
VinciLab 2.
• Tap to open Settings.
• Scroll down to find the desired options.
• The most important settings are described
below.
2.1 Network & Internet
Here you can connect your VinciLab to a Wi-Fi network. VinciLab 2 supports the 802.11
/b/g/n Wi-Fi protocol.
To turn Wi-Fi On and Off
• In Settings select Network & internet, tap Wi-Fi and turn the Use Wi-Fi on by setting
the slider to the position On.
• VinciLab 2 automatically scans for available Wi-Fi connections and lists the available
networks.
• When the scan is completed, tap a Wi-Fi
network to connect to. Enter the password
when needed.
• When VinciLab is successfully connected it
shows that the selected network is Connected
and shows the name of the selected network
under Wi-Fi.
• To turn the Wi-Fi services off drag the Wi-Fi
slider to the position Off.

VinciLab 2 User’s Guide | 15
2.2 Connected devices
Here you can pair your Bluetooth devices. VinciLab 2 supports Bluetooth® 4.1.
Bluetooth communication can be used e.g. to connect a wireless Bluetooth keyboard or
a mouse.
To pair a Bluetooth device
• In Settings select Connected devices and tap Pair new device.
• VinciLab automatically searches for Bluetooth devices nearby.
• From the list of scanned devices, tap the target device, then follow the prompts to
complete the pairing.
• If the target device requires a PIN, enter a PIN for the target device and confirm.
• After successful pairing, the device is listed below Other devices.
To use USB for file transfer
2
• Connect the USB cable to the USB C port of VinciLab 2.
• Connect the other end of the USB cable to the USB port of your computer.
WINDOWS
MAC
When VinciLab 2 is automatically
recognized then you can use it like any
other external storage device.
You can transfer files between your
computer and VinciLab 2 by using
Windows Explorer.
An Android device is not automatically
recognized on Mac. You need to install first
a special app such as Android App Transfer
(https://www.android.com/filetransfer).
After installation and connecting VinciLab 2
to your Mac computer, you will be able to
transfer the files between the two devices.
2.3 Display
Here you can set the settings of the screen display.
To save power
• In Settings select Display and tap Brightness. Lower the brightness of the screen by
dragging the slider.
• In Settings select Display and tap Screen timeout. Select a screen timeout - the length
of time delay between the last screen touch and the automatic screen timeout.
Note:
• To reactivate the screen after it has been turned off press briefly the Power button.
2
This is only possible when VinciLab 2 is working standalone.

16 | VinciLab 2 User’s Guide
2.4 System
Here you can configure the Language, Date and Time.
To set the VinciLab’s language
• In Settings select System and tap Language & input.
• Tap Languages. The English language is installed as default.
• To add another language tap Add language
and select the desired language from the list.
• The selected language appears in the list of
languages after English. To make this language
your default language, tap, hold it and move
to the first position of the list. The system
language changes now to the selected
language.
Note:
This language setting is only valid for standard Android Applications, not for the Coach 7
app. The language of Coach 7 must be set via the dashboard button Switch Language.
To set date and time
• In Settings select System and tap Date & time.
• Tap Date to select the date.
• Tap Time to select the time.
3. Update
The VinciLab Update application is used to update your VinciLab 2, its operating system,
measurement firmware, and pre-loaded applications. The update does not delete the
user-installed applications and the user data.
• Plug your VinciLab 2 into power and connect to the internet via Wi-Fi.
• Tap VinciLab Update.
• The Update screen shows the installed system, firmware, and Coach 7 versions.
• Tap the UPDATE button to start the update.
• The app checks and informs you if there is a new update available. If this is the case
confirm to proceed with the update.
• The update file will be first downloaded.
During this process, a message is displayed
and the green bar below the message shows
the progress of downloading.
• Depending on your internet connection the
download may take up to 15 minutes.
• Once the download process is finished the
VinciLab 2 is restarted, and the update

VinciLab 2 User’s Guide | 17
process starts.
• The progress of the update is displayed on
the screen.
• Wait until the update is completed. It takes a
few minutes.
• When the update is finished VinciLab 2 is
restarted again. Then it is ready to use.
• In case something goes wrong during the
system update and VinciLab 2 does not work
anymore contact CMA to get information on how to perform the USB Recovery
Update.
4. Other applications
All applications pre-loaded on VinciLab 2 can be accessed via the Application screen.
4.1 Calculator
The Calculator application is used to perform
simple mathematical calculations.
• Tap to start Calculator.
4.2 Clock
The Clock application is used to set the time, and
alarm, use the timer and stopwatch.
• Tap to start Clock.
• You can use this app to set an alarm, clock,
timer, and stopwatch.
4.3 Files
The Files application is used to manage files on
your VinciLab 2. It allows browsing through the
internal memory of the device and USB flash
memory when connected.
• Tap to start Files.
• Press to find links to the selected
locations like Images, Videos, Audios,
Documents, Downloads etc.
• Tap VinciLab_2 to open the VinciLab’s 2 memory.
• Browse through it by tapping a folder to open it and by using to return to the
previous location.

18 | VinciLab 2 User’s Guide
To copy/move a file
• Go to the location of your file.
• Long-tap a file to select it.
• Use and select Copy to/Move to.
• Browse to the location you want to
copy/move your file and tap COPY/MOVE.
To delete a file
• Go to the location of your file.
• Long-tap a file to select it.
• Press to delete the file and confirm with OK.
To transfer files between VinciLab 2 and a USB memory stick
• Insert your USB memory stick into the USB
port of VinciLab 2. When detected its name
(here on the right image FLASHDEVICEFAT32)
appears below the VinciLab_2 name.
• Tap the device name to see the folders and
files on the memory stick.
• Now you can copy or move files between the
two devices.
• To remove the USB memory stick first tap
next to its name. When the name will disappear, you can safely disconnect it.
4.4 Gallery
The Gallery application is used to display the
images located in the Images folder on your
VinciLab 2.
• Tap to start Gallery.
• Tap an album to open it.
• Tap an image to enlarge it.
• Pinch in/out to zoom in/out the image.
4.5 Lightning
The Lightning application is a simple Internet
browser that lets you view web pages on your
VinciLab 2.
• Tap to start Lightning.
• Use the browser in a similar way as any other
browser.

VinciLab 2 User’s Guide | 19
4.6 Music
The Music application is used to play mp3 applications.
• Tap to start Music.
• Use the app as any other music player.
4.7 RustDesk
The RustDesk app is an open-source remote desktop software that can be used to show
the VinciLab 2 screen on a computer or a mobile device and transfer files between the
VinciLab 2 and other devices via a Wi-Fi connection.
• Tap to start RustDesk.
• More information on the use of RustDesk can be found at
https://rustdesk.com/docs/en/manual/.
For a more detailed description of the RustDesk app see also Appendix I.
4.8 Search
The Search application is used to perform an internet search with the Internet browser.
• Tap to start Search.
• Type in the term you are searching for and confirm with Go.
4.9 Video
The Video application is used to display the videos located in the Videos folder on your
VinciLab 2.
• Tap to start Video.
• Use the app as any other video player.
4.10 VinciLab MCPU
The VinciLab MCPU application is used to
manually set the communication to the VinciLab 2
Measurement processor (called also MCPU).
• Tap to start VinciLab MCPU.
• By default, the communication to the
Measurement processor is set to VinciLab 2.
• Set the slider to PC if you want to use
VinciLab 2 as a lab interface with a computer
or a mobile device.
• Note, that each time you start the Coach 7 app on VinciLab 2 the communication to
MCPU is automatically set to VinciLab 2.

20 | VinciLab 2 User’s Guide
5. Installing custom applications on VinciLab 2
VinciLab 2 does not offer access to the Google Play store, but users may install a custom
application manually
3
. This can be done by using a USB memory stick.
To install your own application
1. Copy the .apk file of the application you want to install to a USB memory stick.
2. Plug the USB memory stick into the VinciLab’s USB-A port.
3. Open the Files app. The USB memory should be now displayed below VinciLab2.
4. Tap on it. Browse through the files to locate your .apk file.
5. Tap the .apk file and select Package installer.
6. When a warning popups tap Continue.
7. Confirm that you want to install the application.
8. The application will be installed. When ready tap Open to start the installed
application or Done to return to Files.
9. The new application should be present on the Application screen.
IV. VINCILAB 2 STANDALONE: WORKING WITH COACH 7 APP
When using VinciLab 2 standalone the Coach 7 app preloaded on VinciLab 2 is used for
data collection and control.
1. Starting and stopping Coach 7
To start Coach 7
• Tap to start Coach 7.
To stop Coach 7
Warning:
There is no Quit button present in the Coach 7 app. You must close Coach 7 in the way described
below.
• Display the bottom bar by dragging it upwards.
• Tap .
• Swipe through the opened apps and select Coach 7.
• Drag it out of the screen.
3
CMA does not take any responsibility of the proper functionality of installed custom
applications.
Other manuals for VINCILAB 2
1
Table of contents
Other CMA Dishmachines Laboratory Equipment manuals
Popular Laboratory Equipment manuals by other brands

Thermo Electron
Thermo Electron IEC CL40 Series user manual

Westlab
Westlab 4500RPM Max manual

Swan Analytical Instruments
Swan Analytical Instruments AMI Turbiwell Operator's manual

NEW BRUNSWICK SCIENTIFIC
NEW BRUNSWICK SCIENTIFIC BioFlo 4500 Guide to operations

Bürkle
Bürkle StickProof 5338-0410 Directions for use

Waters
Waters 2410 Service manual