manuals.online logo
Brands
  1. Home
  2. •
  3. Brands
  4. •
  5. CMD
  6. •
  7. Accessories
  8. •
  9. CMD PortHole User manual

CMD PortHole User manual

Popular Accessories manuals by other brands

Quincy lab 140AE-1 operating manual

Quincy lab

Quincy lab 140AE-1 operating manual

HomePro ZIR000 user manual

HomePro

HomePro ZIR000 user manual

DOL 20SCR Technical user guide

DOL

DOL 20SCR Technical user guide

RAB Smart Task installation manual

RAB

RAB Smart Task installation manual

Kemppi KMS 300 quick guide

Kemppi

Kemppi KMS 300 quick guide

Stearns 57,500 Series Installation and service instructions

Stearns

Stearns 57,500 Series Installation and service instructions

iGuzzini TWILIGHT COPENAGHEN manual

iGuzzini

iGuzzini TWILIGHT COPENAGHEN manual

Adelaide Annexe & Canvas Avan Deluxe installation guide

Adelaide Annexe & Canvas

Adelaide Annexe & Canvas Avan Deluxe installation guide

OHAUS 5000 instruction manual

OHAUS

OHAUS 5000 instruction manual

HOME8 WLS1300 quick start guide

HOME8

HOME8 WLS1300 quick start guide

MAXBOTIX MaxSonar quick start guide

MAXBOTIX

MAXBOTIX MaxSonar quick start guide

ioSmart iSmart56 Installation and user guide

ioSmart

ioSmart iSmart56 Installation and user guide

Focusrite Scarlett 18i8 user guide

Focusrite

Focusrite Scarlett 18i8 user guide

Velleman ED38105 user manual

Velleman

Velleman ED38105 user manual

JumpSport SkyBounce user manual

JumpSport

JumpSport SkyBounce user manual

Prima-Temp PRIYA Instructions for use

Prima-Temp

Prima-Temp PRIYA Instructions for use

Tefcold BC85I-BC85I W user manual

Tefcold

Tefcold BC85I-BC85I W user manual

Vaisala WMS302 user guide

Vaisala

Vaisala WMS302 user guide

manuals.online logo
manuals.online logoBrands
  • About & Mission
  • Contact us
  • Privacy Policy
  • Terms and Conditions

Copyright 2025 Manuals.Online. All Rights Reserved.

Information and Installation Guide
PortHole Power and Data Module
CMD Ltd, Sycamore Road, Eastwood Trading Estate, Rotherham, S65 1EN
T: 01709 829 511 | F: 01709 378 380 | E: [email protected] | W: www.cmd-ltd.com
Part No:133500 Issue No: 003
Easy Fixing
The PortHole through desk power and data module has
been designed to t any desk that has been pre-cut
with a standard 80mm grommet hole.
Power and Data
The module can be supplied with a choice of power,
data and AV congurations.
Replacable Keystones
Replacement Data, USB and AV keystone units can be
supplied so the functionality of each PortHole can be
changed at any time.
Quick and Easy to Install
1. Remove the xing nut.
2. Place the module through the grommet hole
(see g.02).
3. Replace the xing nut to secure. (see g. 03)
4. Connect the power and data cables
g. 01
g. 02 g. 03
The desk should
be pre-cut with a
standard 80mm
grommet hole
Information and Installation Guide
PortHole Power and Data Module
CMD Ltd, Sycamore Road, Eastwood Trading Estate, Rotherham, S65 1EN
T: 01709 829 511 | F: 01709 378 380 | E: [email protected] | W: www.cmd-ltd.com
Part No:133500 Issue No: 003
g. 05
Quality Assurance and Compliance
Statement of Sustainability
CMD endeavours to produce items that are
manufactured using high quality materials that are
sustainable, recycled or recyclable where possible
and, which do not represent a threat to our common
environment. Wherever possible we design with
consideration for the environment and adopt recognised
best practice to encourage the recycling of our products.
Product Materials
External Metal Parts 100% Recyclable
External Plastic Parts 100% Recyclable
Internal Metal Parts 100% Recyclable
Internal Plastic Parts 100% Recyclable
Packaging Materials
100% Recyclable Cardboard Outer Box
100% Recyclable Cardboard inner xing box
Manufacturing
Designed and Manufacture in Shefeld, UK.
98% of material used to make this product is recyclable.
Certications
Tested to BS5733.
Life-span/Safety
All our power and data modules are put through a range
of in-house tests. Due to the design approach of sharing
components and fastening methods, a number of these
tests are generic for the entire product range.
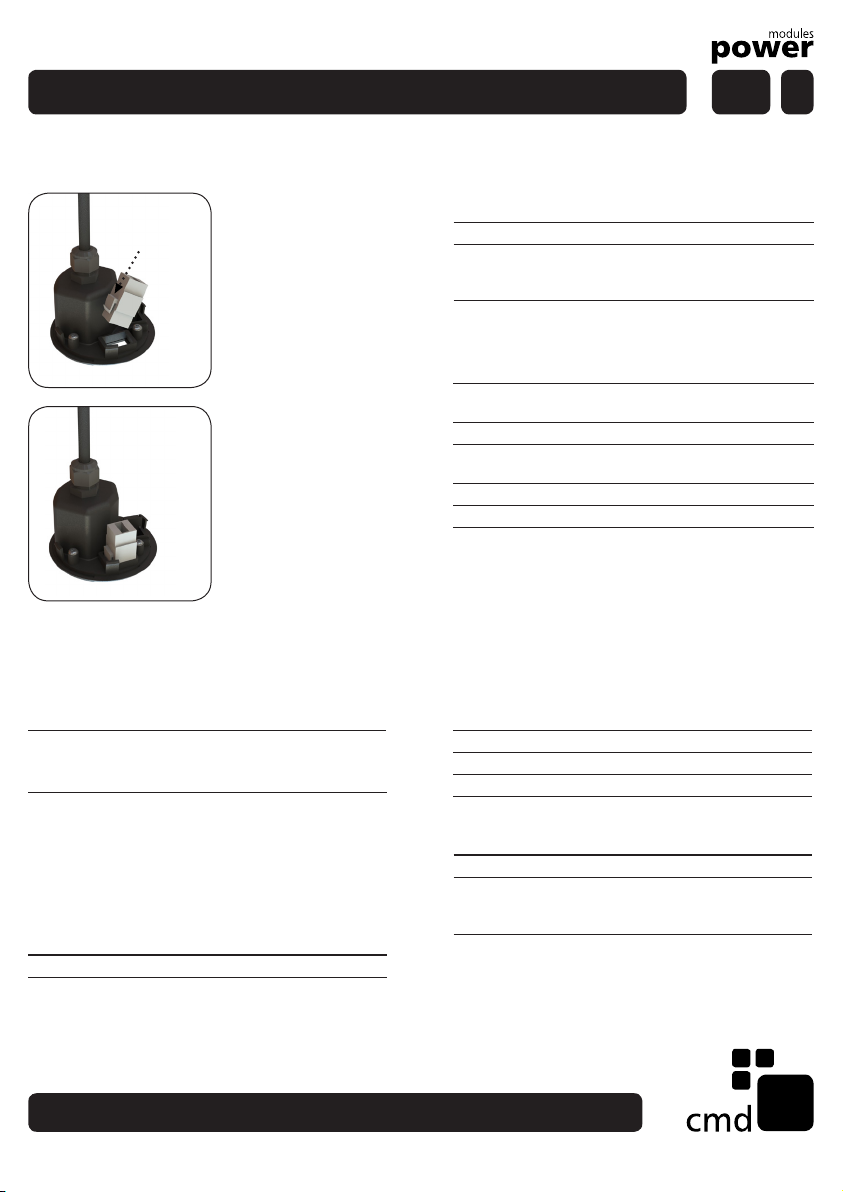
The Data, USB and
AV keystones can be
replaced at any time.
For safety, we
recommend that you
unplug the power and
the data cables before
removing the inside
section of the module.
To remove the
unwanted keystone
unit simply depress
the holding clips (see
g. 04).
To t the new keystone
unit simply follow this
process in reverse.
(see g. 05), before
replacing the inside
section and the data
and power cables.
Cleaning & Maintenance
Service Components Available to order.
Cleaning &
Maintenance
Dry cloth, no abrasives or
solvents to be used on the
module surface.
Handling & Storage Do not drop or expose to
moisture.
Warning
Do not use this product for any purpose other than which
it was designed for.
Do not over tighten the xing nut.
All electrical cables should be tted by a qualied
electrician.
Do not attach power and/or data cables before tting.
Do not dismantle or remodel the power module.
NB: CMD cannot accept any responsibility or liability
for providing category 5e performance in products
supplied. We will however, t category 5e specication
components where specied.
g. 04
g. 05
holding clips
Keystone Couplers Important Information