CMT DAF-001 User manual
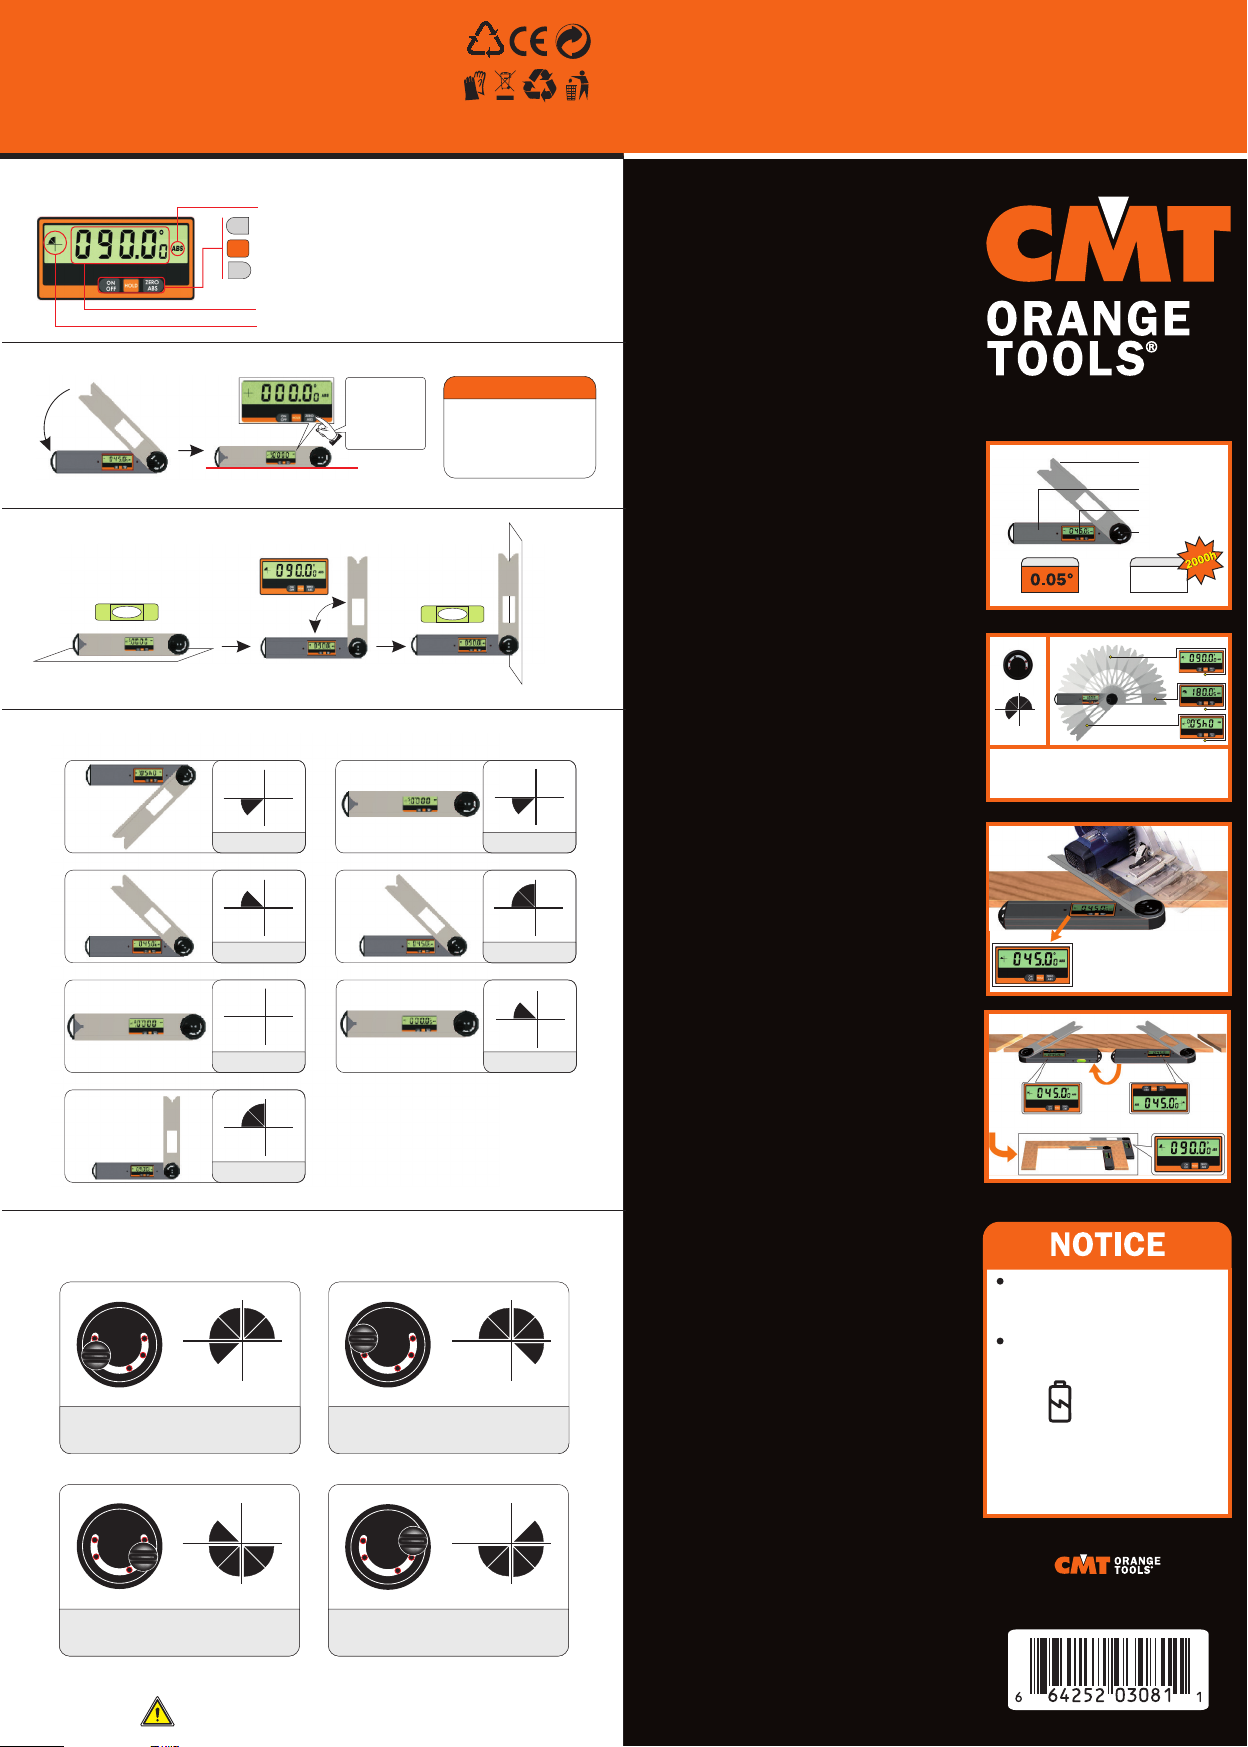
1. BUTTONS AND LCD DISPLAY
2. MEASURING IN ABSOLUTE (ABS) MODE
3. USING A HIGH QUALITY LEVEL VIAL
4. ANALOGUE QUADRANT FOR MOVING BLADE
5. LOCKING YOUR DIGITAL ANGLE FINDER FOR MEASURING
ON
OFF
HOLD
ZERO
ABS
A. ABS mode.
B. Press longer than eight seconds to turn your device off;
short press to turn LCD off.
C. Records the last measured value.
D. Switch between absolute and relative measuring mode
by short pressing the button.
E. High resolution: 0.05°
F. Analogue quadrant showing.
Under ABS mode,
press ZERO/ABS
for five seconds
to set the moving
blade to zero.
Place the moving blade in the same
position of the fixing blade.
Standard level surface.
Make different measuring by locking at four different locking holes.
Notice: measuring range can reach 360° after screwing off the locking knob.
Measuring range: -45° ~180° Measuring range: 0° ~225°
Measuring range: -180° ~45° Measuring range: -225° ~0°
Plumb surface
for measuring.
(1) Device automatically
resets to the original zero
position after shutting off.
(2) Device even makes
upright measurements.
Under ABS mode
- Position in the quadrant: 45°.
- Display range of quadrant is 360°.
-45°
45°
0°
-0.05°
45.05°
0.05°
90°
DIGITAL
ANGLE
FINDER DAF-001
DIGITAL
ANGLE
FINDER
www.cmtorangetools.com
Clean digital angle finder with mild
liquid soap and a damp cloth.
Never dip into water.
Don’t mark bar with any electric
engraver or scratch it.
DAF-001
1. Metal moving blade
on the front.
2. Aluminium fixing blade.
3. LCD display.
4. Locking knob.
Four holes for locking when measuring
specific angles. Measuring range can reach 360°
after screwing off the locking knob.
Lock the moving blade
at any angle, make precise
drawings and cut directly.
Holes for locking.
Analogue quadrant
showing.
PowerHigh Resolution
3V CR2032
lithiun battery
BCD
03.55.0135 VERS-2022-06
Imported by
WARNING: Cancer and Reproductive Harm - www.P65Warnings.ca.gov
21
PAP
BATTERY
INCLUDED
(CR2032-3V)
INSTRUCTION
EN ES FR IT DE PL RU

1. BUTTONS AND LCD DISPLAY
2. MEASURING IN ABSOLUTE (ABS) MODE
ON
OFF
HOLD
ZERO
ABS
A. ABS mode.
B. Press longer than eight seconds to turn your device off;
short press to turn LCD off.
C. Records the last measured value.
D. Switch between absolute and relative measuring mode
by short pressing the button.
E. High resolution: 0.05°
F. Analogue quadrant showing.
Under ABS mode,
press ZERO/ABS
for five seconds
to set the moving
blade to zero.
Place moving blade in the same
position of the fixing blade.
(1) Device automatically
resets to the original zero
position after shutting off.
(2) Device even makes
upright measurements.
Under ABS mode
COPIADOR
DE ÁNGULO DIGITAL
A
1. Barra metálica móvil delantera.
2. Barra de fijación en aluminio.
3. Pantalla LCD.
4. Botón de fijación.
- Máxima precisión: 0,05°.
- Batería de litio CR2032 de 3V.
B
- Posiciones de fijación.
- Vista de los cuadrantes.
- Cuatro posiciones de fijación.
Destornillar el botón de fijación para llegar a 360°.
C
Fije la barra próxima al ángulo deseado.
Dibuje o corte sobre el objeto.
NOTA
• Limpie el copiador con jabón líquido suave
y con un paño húmedo. Nunca sumerja en agua.
• Siempre utilice una batería de litio CR2032 de 3V.
• No raye o marque la barra con un grabador eléctrico.
1. BOTONES Y PANTALLA LCD
A. Medición absoluta ABS.
B. Presione el botón más de ocho segundos para
apagar el copiador. Presione brevemente para
apagar la pantalla LCD.
C. Guarda el último valor registrado.
D. Presione el botón para pasar de la medición absoluta
a la medición relativa.
E. Máxima precisión: 0,05°.
F. Vista de los cuadrantes.
2. MEDICIÓN ABSOLUTA
- Ponga la barra metálica móvil en la misma posición
que la barra de fijación.
- En medición absoluta presione el botón ZERO/ABS
durante cinco segundos para poner la barra móvil en cero.
En medición absoluta ABS
(1) Después haber apagado el copiador, este
se restablece y mide desde la posición cero inicial.
(2) El copiador mide también en posición vertical.
3. UTILIZAR UN NIVEL
- Para medir en una superficie estándar.
- Para medir en una superficie vertical.
4. CUADRANTE PARA LA BARRA MÓVIL
- Posición en el cuadrante: 45°.
- El cuadrante en la pantalla muestra 360°.
5. FIJE LA POSICIÓN DE LA BARRA MÓVIL
Efectúe mediciones diferentes fijando la barra
móvil en cualquier ángulo deseado (cuatro posiciones).
Nota: destornillar el botón de fijación para llegar a 360°.
Batería INCLUIDA (CR2032-3V)
RAPPORTEUR DIGITAL
A
1. Bras pivotant frontal en métal.
2. Bras de fixation en aluminium.
3. Affichage LCD.
4. Bouton de fixation.
- Haute précision : 0,05°.
- Batterie lithium CR2032 3V.
B
- Positions de blocage.
- Vue des cadrans
Quatre positions de blocage.
Dévisser le bouton pour atteindre 360°.
C
Bloquez le bras à l’angle désiré.
Dessinez ou coupez sur l’objet.
REMARQUE
• Nettoyez le rapporteur en utilisant
du savon liquide doux et un chiffon humide.
Ne jamais le plonger dans l’eau.
• Utilisez toujours une batterie lithium CR2032 3V.
• Évitez de rayer ou de marquer le bras avec
des graveurs électriques.
1. BOUTONS ET AFFICHAGE LCD
A. Mode de mesure absolu ABS.
B. Appuyez sur le bouton environ huit secondes
pour éteindre votre rapporteur. Appuyez
brièvement pour étendre l’affichage LCD.
C. Garde la dernière valeur enregistrée.
D. Appuyez brièvement sur le bouton pour passer
du mode de mesure absolu à relatif.
E. Haute précision : 0,05°.
F. Vue des quadrants.
2. MESURE ABSOLUE (ABS)
- Placez le bras pivotant dans la même position
du bras de fixation.
- Dans le mode ABS appuyez sur ZERO/ABS
cinq secondes pour établir le bras pivotant à zéro.
Dans le mode ABS
(1) Après l’avoir éteint, le rapporteur se réinitialise
et mesure à partir de la position initiale zéro.
(2) Le rapporteur mesure aussi lorsqu'il est
positionné verticalement.
3. UTILISER UN NIVEAU
- Pour mesurer sur une surface standard.
- Pour mesurer sur une surface verticale.
4. CADRAN POUR LE BRAS PIVOTANT
- Position dans le cadran : 45°.
- Le cadran dans le display montre 360°.
5. BLOQUER LE BRAS PIVOTANT
Mesurez en bloquant le bras pivotant à l’angle désiré
(4 au total).
Remarque : dévisser le bouton pour atteindre 360°.
Batterie INCLUSE (CR2032-3V)
ES FR
CYFROWY WSKAŹNIK NACHYLENIA
A
1. Jedno ruchome ramię wykonane z metalu
2. Drugie ramię wykonane z aluminium
3. Wyświetlacz LCD
4. Śruba blokująca
- Wysoka rozdzielczość wyświetlania: 0,05°
- Zasilanie: 3V CR2032 bateria litowa, wystarcza na 2000 godzin
B
- Otwory na śrubę blokującą
- Wskaźnik ćwiartek koła
W zależności od zakresu kąta stosujemy jeden z czterech
otworów służących do blokowania. Wykręcając śrubę blokującą, z
akres pomiaru może wynosić 360°
C
Możliwość blokady ruchomego ramienia, pozwala
na dokonywanie dokładnych zaznaczeń oraz precyzyjnego
cięcia z dokładnym zachowaniem zmierzonych kątów
UWAGI:
• Czyść kątomierz za pomocą wilgotnej szmatki.
Nie dopuszczaj do zamoczenia kątomierza.
• Zawsze używaj baterii 3V Lithium.
• Do znakowania nie używaj elektronicznych znaczników
ani ostrych elementów ( używaj raczej ołówka lub markera)
1. PRZYCISKI I WYŚWIETLACZ
A. ABS
B. Włącz/wyłącz; przytrzymaj 8 sekund aby wyłączyć urządzenie.
C. Zatrzymaj
D. Przełączać się między trybem pomiaru bezwzględnego
lub względnego przez krótkie naciśnięcie
E. Wysoka rozdzielczość: 0.05°
F. Wskaźnik ćwiartek koła
2. USTAWIENIE ZERA/ABS
- Umieść oba ostrza w tej samej pozycji.
- W systemie ABS, długie przytrzymanie przycisku ABS ZERO
powoduje ustawienie I zapamiętanie pozycji zerowej ruchomego
ramienia
W trybie ABS
(1) Automatycznie zapamiętuje pozycję zero po wyłączeniu urządzenia
(2) Urządzenie może pracować zarówno w pozycji poziomej jak i pionowej
3. ZASTOSOWANIE WBUDOWANEJ POZIOMICY
- Poziomica może pracować zarówno w pionie jak i w poziomie.
4. ILUSTRACJA WSKAŹNIKA KOŁA W ZALEŻNOŚCI
OD POŁOŻENIA RUCHOMEGO RAMIENIA
- Zmiana wskaźnika następuje co 45°
- Zakres wskaźnika = 360°
5. UŻYWANIE OTWORÓW BLOKUJĄCYCH
Na kątomierzu znajdują się 4 otwory blokujące w zależności
od mierzonego kąta.
Wskazówka: Po usunięciu śruby blokującej zakres
pomiaru wynosi 360°.
ZAWIERA baterii (CR2032-3V)
ЦИФРОВОЙ ИЗМЕРИТЕЛЬ УГЛОВ
A
1. Металлическая поворотная планка с фиксатором.
2. Алюминиевая несущая планка-основание
3. LЖидкокристаллический дисплей.
4. Фиксатор
- точность: 0,05°
- Питание: литиевая батарея 3V CR2032
B
- Отверстия для фиксации
- Фиксированные положения для стандартных углов
Четыре отверстия для фиксации при замерах стандартных углов;
открутите резьбовой фиксатор для измерений в пределах 360°
C
Зафиксируйте поворотную планку под любым нужным углом и
сделайте точную разметку или рез на заготовке
Обратите внимание:
• Чистите цифровой угломер влажной т
ряпкой с мягким жидким мылом. Никогда не погружайте в воду.
• Используйте только литиевую батарею 3V CR2032
• Не маркируйте каким-либо гравёром планку и не царапайте её
1. КНОПКИ И ЖИДКОКРИСТАЛЛИЧЕСКИЙ ДИСПЛЕЙ
A. Режим ABS
B. Нажмите и удерживайте-более 8 секунд, чтобы выключить
ваше устройство; кратковременное нажатие, чтобы выключить
жидкокристаллический монитор
C. Удерживайте
D. Переключение между абсолютным и относительным
режимами измерения коротким нажатием
E. Высокая точность: 0,05°
F. Фиксированные положения для стандартных углов
2. АБСОЛЮТНЫЙ РЕЖИМ ИЗМЕРЕНИЯ
- Установите поворотную планку в тоже положение, что и
несущая планка-основание
- В режиме ABS нажмите клавишу ZERO/ABS и удерживайте
в течение 5 секунд, чтобы установить нулевое положение“0”
поворотной планки.
В режиме ABS
(1) Устройство автоматически запоминает исходное положение“0”
после выключения.
(2) Устройство считывает даже находясь в вертикальном положении.
3. ИСПОЛЬЗУЙТЕ КАЧЕСТВЕННЫЙ
- Определение базового уровня поверхности
- Определение вертикали для измерений
4. ФИКСИРОВАННЫЕ ПОЛОЖЕНИЯ ПОВОРОТНОЙ ПЛАНКИ
- Шаг фиксированных положений: 45°
- Диапазон положений поворотной планки: 360°
5. ФИКСАЦИЯ ЦИФРОВОГО УГЛОМЕРА ДЛЯ ИЗМЕРЕНИЙ
Делайте измерения, фиксируя поворотную планку в различных
положениях с помощью 4 резьбовых отверстий.
Обратите внимание: диапазон измерений может достигать
360° после отвинчивания резьбового фиксатора.
Батареи ВКЛЮЧЕНЫ (CR2032-3V)
PL RU
GONIOMETRO DIGITALE
A
1. Asta metallica mobile frontale.
2. Asta di fissaggio in alluminio.
3. Display a cristalli liquidi.
4. Manopola di serraggio.
- Massima precisione: 0,05°.
- Batteria al litio CR2032 da 3V.
B
- Posizioni di bloccaggio.
- Vista dei quadranti.
4 posizioni di bloccaggio. Svitate la manopola
per raggiungere 360°.
C
Bloccate l’asta in prossimità dell’angolo desiderato.
Disegnate o tagliate direttamente sull’oggetto.
AVVISI
• Pulite il goniometro utilizzando sapone liquido
e un panno umido. Non immergetelo in acqua.
• Utilizzate sempre una batteria al litio CR2032 da 3V.
• Evitate di graffiare o marcare l’asta con incisori elettrici.
1. BOTTONI E DISPLAY A CRISTALLI LIQUIDI
A. Modalità di misurazione assoluta ABS.
B. Premete il pulsante per circa 8 secondi per spegnere
il goniometro. Premete brevemente per spegnere il display.
C. Memorizza l’ultimo valore registrato.
D. Premete brevemente il pulsante per passare
dalla modalità di misurazione assoluta a relativa.
E. Massima precisione: 0,05°.
F. Vista dei quadranti.
2. MISURAZIONE ASSOLUTA (ABS)
- Collocate l’asta metallica mobile
nella stessa posizione dell’asta di fissaggio.
- In modalità ABS premete ZERO/ABS per 5 secondi
per impostare l’asta mobile a 0.
In modalità ABS
(1) Dopo lo spegnimento l’apparecchio si resetta
e rimisura dalla posizione 0 iniziale.
(2) L’apparecchio effettua misurazioni anche
se collocato verticalmente.
3. UTILIZZARE UNA LIVELLA
- Per misurare su una superficie standard.
- Per misurare su una superficie verticale.
4. QUADRANTE PER L’ASTA MOBILE
- Posizione nel quadrante: 45°.
- Il quadrante sul display mostra 360°.
5. FISSATE l’ASTA MOBILE
Effettuate le vostre misurazioni bloccando l’asta in
corrispondenza dell’angolo desiderato (4 posizioni in totale).
Avviso: svitate la manopola per raggiungere 360°.
Batteria INCLUSA (CR2032-3V)
DIGITALES
WINKELMESSGERÄT
A
1. Metallmessarm.
2. Aluminiumfixierarm.
3. LCD-Anzeige.
4. Feststellschraube.
- Hohe Genauigkeit: 0,05°.
- 3V-CR2032-Lithiumbatterie.
B
- Feststellpositionen.
- Quadrantenanzeige.
Vier Feststellpositionen. Schrauben Sie den Knopf ab,
um einen 360°-Messbereich zu erreichen.
C
Stellen Sie den Messarm an jedem beliebigen
Winkel fest, setzen Sie genaue Markierungen
und schneiden Sie gleichzeitig.
BEMERKUNG
• Reinigen Sie das Winkelmessgerät mit milder
Seifenlauge und einem feuchten Tuch.
Niemals ins Wasser tauchen.
• Verwenden Sie immer eine 3V-CR2032-Lithiumbatterie.
• Vermeiden Sie den Metallmessarm zu zerkratzen
oder mit einem Elektrostecher zu markieren.
1. TASTEN UND LCD-ANZEIGE
A. Absoluter Messmodus
B. Drücken Sie die Taste länger, als acht Sekunden,
um das Winkelmessgerät auszuschalten. Drücken
Sie diese kurz, um die LCD-Anzeige abzuschalten.
C. Speichert den letzten aufgenommenen Winkel.
D. Drücken Sie diese Taste kurz, um von absolutem
zu relativem Modus zu wechseln.
E. Hohe Genauigkeit: 0,05°.
F. Quadrantenanzeige.
2. ABSOLUTER MESSMODUS (ABS)
- Stellen Sie den Metallmessarm in die gleiche Position,
wie den Aluminiumfixierarm.
- Im absolutem Modus drücken Sie ZERO/ABS für fünf
Sekunden, um den Metallmessarm auf Null einzustellen.
Im absoluten Modus
(1) Das Winkelmessgerät stellt sich nach dem Abschalten
automatisch auf die Anfangsposition Null zurück.
(2) Das Winkelmessgerät misst auch, wenn es aufrecht
gestellt wird.
3. BENUTZUNG EINES NIVEAUS
- Auf einer Standardoberfläche messen.
- Auf einer aufrechten Oberfläche messen.
4. QUADRANT DES METALLMESSARMES
- Position im Quadrant: 45°.
- Der Quadrant auf der LCD-Anzeige zeigt 360° an.
5. BEFESTIGUNG DES METALLMESSARMES
Stellen Sie den Metallmessarm an jedem gewünschten Winkel
fest (Vier totale).
Bemerkung: Schrauben Sie den Knopf ab, um einen
360°-Messbereich zu erreichen.
Batterien ENTHALTEN (CR2032-3V)
IT DE 1. Metal moving blade
on the front.
2. Aluminium fixing blade.
3. LCD display.
4. Locking knob.
Four holes for locking when measuring
specific angles. Measuring range can reach 360°
after screwing off the locking knob.
Lock the moving blade
at any angle, make precise
drawings and cut directly.
Holes for locking.
Analogue quadrant
showing.
PowerHigh Resolution
3V CR2032
lithiun battery
AB
CD
BCD


