CO/Tech E0336WST4H4PR User manual
ENGLISHSVENSKANORSKSUOMIDEUTSCH
Svenska | Norsk
Soumi | Deutsch
Art.no Model
XX-XXXX XXXXXXXX
XX-XXXX XXXXXXXX
English
Important:
Read the entire instruction
manual carefully and make sure
that you fully understand it
before you use the equipment.
Keep the manual for future
reference.
Viktig information:
Läs hela bruksanvisningen
noggrant och försäkra dig om
att du har förstått den innan du
använder utrustningen. Spara
bruksanvisningen för framtida
bruk.
Viktig informasjon:
Les disse anvisningene nøye og
forsikre deg om at du forstår dem,
før du tar produktet i bruk.
Ta vare på anvisningene for
seinere bruk.
Tärkeää tietoa:
Lue nämä ohjeet huolellisesti ja
varmista että olet ymmärtänyt
ne, ennen kuin alat käyttää
laitetta. Säilytä ohjeet
myöhempää tarvetta varten.
Wichtiger Hinweis:
Vor Inbetriebnahme die
komplette Bedienungsanleitung
durchlesen und aufbewahren.
Ver. 20191107
Original instructions
Bruksanvisning i original
Originalbruksanvisning
Alkuperäinen käyttöohje
Original Bedienungsanleitung
Important:
Read the entire instruction
manual carefully and make sure
that you fully understand it
before you use the equipment.
Keep the manual for future
reference.
Viktig information:
Läs hela bruksanvisningen
noggrant och försäkra dig om
att du har förstått den innan du
använder utrustningen. Spara
bruksanvisningen för framtida
bruk.
Viktig informasjon:
Les disse anvisningene nøye og
forsikre deg om at du forstår dem,
før du tar produktet i bruk.
Ta vare på anvisningene for
seinere bruk.
Tärkeää tietoa:
Lue nämä ohjeet huolellisesti ja
varmista että olet ymmärtänyt
ne, ennen kuin alat käyttää
laitetta. Säilytä ohjeet
myöhempää tarvetta varten.
Wichtiger Hinweis:
Vor Inbetriebnahme die
komplette Bedienungsanleitung
durchlesen und aufbewahren.
ENGLISHSVENSKANORSKSUOMIDEUTSCH
Väderstation med färgskärm | Værstasjon med fargeskjerm
Sääasema, jossa värinäyttö | Wetterstation mit Farbdisplay
Art.no Model
36-7904 E0336WST4H4PR
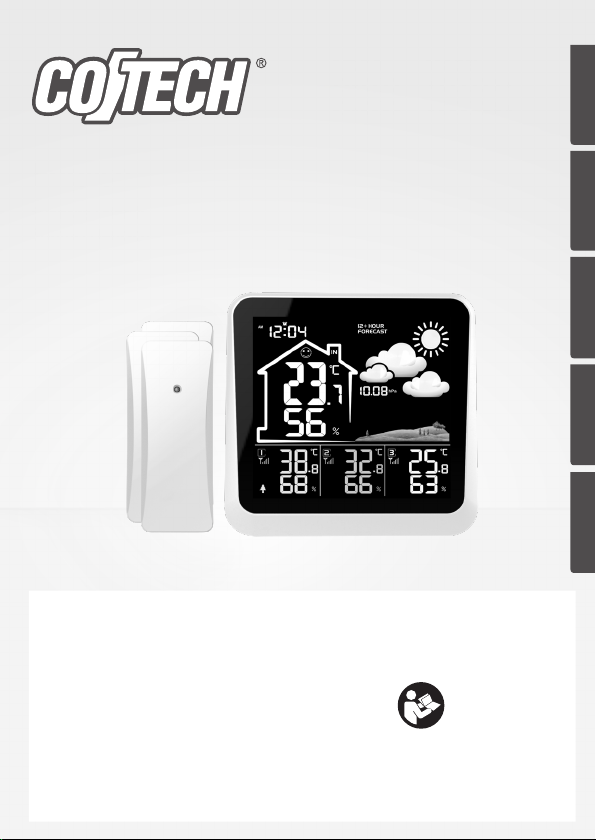
Weather Station with Colour Screen
Ver. 20191127
Original instructions
Bruksanvisning i original
Originalbruksanvisning
Alkuperäinen käyttöohje
Original Bedienungsanleitung


ENGLISH
3
Weather Station with Colour Screen
Art.no: 36-7904 Model: E0336WST4H4PR
Please read theentire instruction manual before using theproduct and
then save it for future reference. We reserve theright for any errors in
text or images and any necessary changes made to technicaldata.
In theevent of technical problems or other queries, please contact
our Customer Services (see address details on theback).
Things to consider:
• Other wireless equipment using thesame frequency band can
reduce thetransmissionrange.
• Therange of all wireless equipment depends on thetype of
obstacles located between thetransmitter and thereceiver
(e.g. aconcrete wall will interfere with thesignal much more
than aplasterboard wall).
If you experience problems, try thefollowing:
• Turn off any other existing wireless equipment to check whether
this is thecause of theproblem.
• Move any other existing wireless equipment. Shorten thedistance
between thesending and receiving devices and reduce thenumber
of obstacles (walls, furniture,etc.) betweenthem.
Safety
• The product must not be dismantled or modified in anyway.
• The main unit is only intended for indoor use and must not be
exposed to rain or moisture.
• The product is not intended to be used as areference instrument
and Clas Ohlson will not be held liable for any damage which may
result from inaccurate readings.
• The batteries should be removed if theproduct is not to be used
for anextended period, otherwise they might leak and damage
theproduct. Neverleave discharged batteries in thebattery
compartment.
• Changing thebatteries of themain unit will erase any saved
min and max readings.
• The product must not be subjected to impacts.
• Remember to unplug themains adapter from thewall socket
during heavy thunder storms to protect theproduct.

ENGLISH
4
1
2
3
45
6
7
8
9
10
11 12
13
14
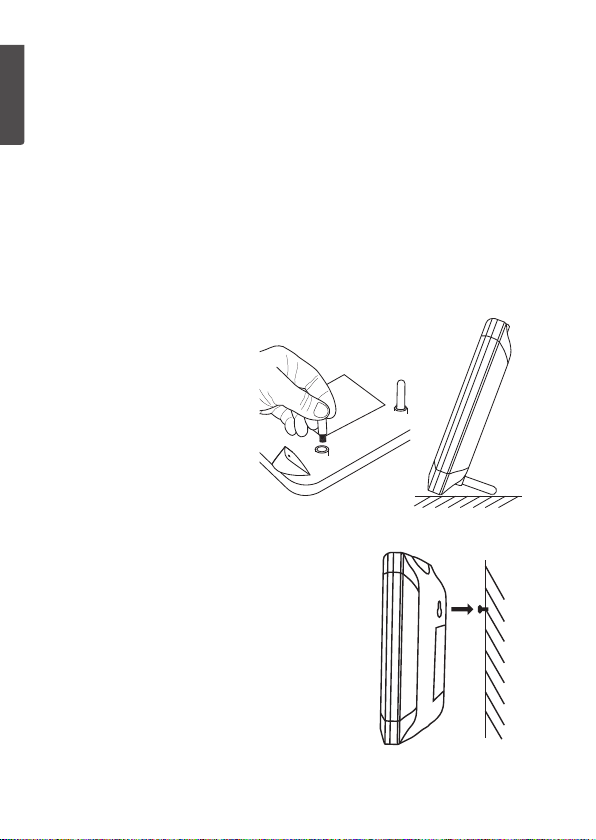
Buttons and functions
Main unit
1. Relative humidity from sensor 1
2. Outdoor symbol for sensor 1.
We recommend that sensor 1
be located outdoors in order
for theweather station to
provide as correct aweather
forecast as possible.
3. Low battery indicator for
sensor 1
4. Temperature from sensor 1
5. Signal strength from sensor1.
Illuminates when measurement
data is received and when
scanning for asensor.
6. Indoor relative humidity
7. Indoor temperature
8. Indoor comfort indicator
9. Snooze indicator.
Flashes when thesnooze
function is active.
10.Time/set alarm time
11.Alarm indicator.
Lights when thealarm function
is activated and flashes when
thealarm sounds.
12. Low battery indicator, main unit
13.Weather forecast
14.Atmospheric pressure

ENGLISH
5
15
16
17
18
19
20
21
22
24
25
23
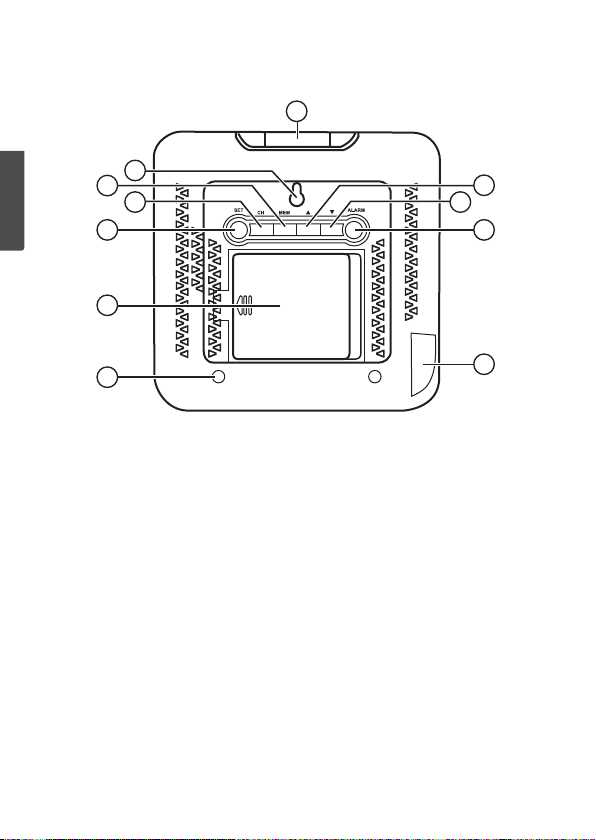
15.Table stand hole
16.Battery cover
17.[SET] Press to display
thedate. Holdin to set
thedate andtime.
18.[CH] Press and hold in to
clear settings and scan for
asensor.
19.[MEM] Press to display
themax/min readings.
Holdin to clear thesaved
max/min values.
20.Hanging hole
21.[SNOOZE/LIGHT]
Snooze/display light
22.[▲] Increase. Pressto select
temperature display in ºC orºF.
23.[▼] Decrease. Pressto select
either a12- or 24-hour clock
display.
24.[ALARM] Press to display
theset alarm time, additional
presses activate/deactivate
thesetalarm. Holdin to set
thealarmtime.
25.DC 5 V power input socket

ENGLISH
6
26
27
28
29
Sensors
26.LED indicator (flashes when
data is being sent to
themain unit)
27.Hanging hole
28.Channel selector
29.Battery compartment
Installation
Sensors
• Before thesensors can be paired with themain unit they must be
set to work on different channels.
• We recommend that thesensor that is to be located outdoors be
set to work on channel 1 in order for theweather station to provide
as correct aweather forecast as possible.
1. Slide thebattery cover of thesensor in thedirection of thearrow.
2. Set thechannel selector of thefirst sensor to position 1,
theselector of thesecond sensor to position 2 and thethird to
position3.
3. Insert 2×AAA/LR03 batteries, observing themarkings on
thebottom of thebattery compartment.
4. Slide thebattery cover back on until it clicks intoplace.
Main unit
The main unit of theweather station can operate off batteries or
themains using theincluded mains adapter.
Battery operation
1. Remove thebattery cover (16) from theback of themainunit.
2. Observe themarkings on thebottom of thebattery compartment
and insert 3×AAA/LR03 batteries.
3. Refit thebatterycover.
ENGLISH
7
Mains operation
Connect theincluded mains adapter to theDC 5 V power input
socket (25) and to a230V wall socket.
Information
• When themain unit is switched on for thefirst time, it will enter
acalibration mode in which it requires you to enter avalue for
theatmospheric pressure. Theatmospheric pressure varies from
one geographic location to another and in order to be able to
calibrate theweather station you will need to find out thecurrent
atmospheric pressure at your location from anInternet weather
service or other reliable source to use as areferencevalue.
- The value for theatmospheric pressure (14) willflash. Pressor
hold in [▲] or [▼] to change thevalue. Confirm by pressing
[SET] or wait for 20 seconds.
• After theset reference pressure has been confirmed themain unit
will begin anautomatic scan for nearby sensors. Thescan will
be indicated by the symbol lighting up on thesensor. Ifduring
thescan themain unit can’t find, or loses contact with asensor,
“—.-” will appear on thedisplay. Holdin [ CH ] for 3 seconds to
manually scan for and re-register thesensors.
Placement/mounting
Note:
Things to consider before choosing where to place theunits:
• Avoid radiant heat from surrounding buildings, roofs, etc. Asarule,
thetemperature sensor should be installed about 5 ft (1.5 m) above
theground and shaded from direct sunlight.
• Test theoperation of thesensor in theintended location before
installingit. Therange can also be affected by thetype of obstacles
located between thetransmitter and thereceiver (e.g. aconcrete
wall will interfere with thesignal more than aplasterboard wall).
• Other wireless equipment using thesame frequency band
(433 MHz) can reduce thetransmissionrange.
• Make sure that thewall has no concealed electrical wiring,
gas or water pipes before drilling/screwing.
ENGLISH
8
If you experience range problems, try thefollowing:
• Turn off any other existing wireless equipment to check whether
this is thecause of theproblem.
• Shorten thedistance between themain unit and thesensors and
reduce thenumber of obstacles (walls, furniture, etc.) betweenthem.
Main unit
• The main unit has built-in temperature, humidity and atmospheric
pressure sensors. Theunit should therefore not be positioned
where it might be affected by heat from heaters, fireplaces or
other sources ofheat.
• Avoid placing theunit next to metal objects such as metal window
frames as this may cause interference with reception.
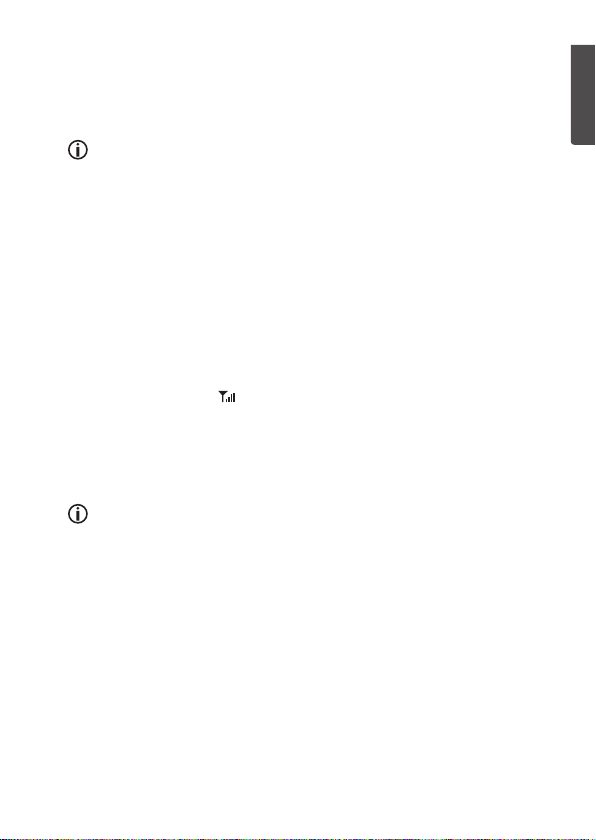
Using thetable stand:
Screw theincluded
table stand supports into
thethreaded holes (15).
Screw ascrew nearly all theway into
thewall, leaving thehead sticking out
alittle and hang themain unit using
thehanging hole (20).
Wall mounting:

ENGLISH
9
Sensor unit
• Place thesensor in alocation that is
protected from direct sunlight andrain.
• Mount thesensor at least1.5 m (5 ft)
above ground, if possible.
• Screw ascrew nearly all theway into thewall,
leaving thehead sticking out alittle and hang
thesensor using thehanging hole (27).
Instructions for use
Settings
1. In normal mode, hold in [SET] for 3 seconds to enter
thesettingsmode.
2. Press or hold in [▲] or [▼] to change thevalue.
Confirm each stage with [SET].
If none of thebuttons is pressed within 20 seconds, thesettings are
saved and theweather station reverts to normal displaymode.
Set thefollowing in sequential order:
- Hour: Hour setting
- Minute: Minute setting
- Year: Year setting
- MD/DM: Set theorder of how theday and month are displayed.
- Month: Month setting
- Day: Day setting
- Pressure unit: Set which units of measurement theatmospheric
press is displayed in (hPa/mb, mmHg or inHg)
Selecting the units of temperature
Press [▲] to toggle between units of temperature measurement in
degrees Celsius (ºC) and degrees Fahrenheit (ºF).

ENGLISH
10
Display lighting
Battery operation
Press [SNOOZE/LIGHT] (21) to illuminate thedigits and symbols on
thedisplay. The lighting will automatically go off after 8 seconds.
Mains operation
Press [SNOOZE/LIGHT] repeatedly to choose thebrightness mode
High, Low orOff.
Weather forecast
The weather station will measure theatmospheric pressure and generate
aweather forecast for thecoming 12hours. Oneof thefollowing symbols
will appear depending on thecurrent atmospheric pressure trend:
Things to consider:
• We recommend that Sensor 1 be located outdoors in order
for theweather station to provide as correct aweather forecast
as possible.
• If theweather station is moved to another location, it will take
12–24 hours for it to adjust and recalculate in order to give
reliable forecasts.
• One should never expect 100 % forecast accuracy.
Forecasts have about a75 % accuracylevel.
Max and min readings
1. Press [MEM] to display themax readings for thetemperature
and humidity.
2. Press thebutton again to display themin readings.
3. Press thebutton once more to return to current readings.
Zeroing the saved max and min readings:
The max and min readings of theweather station are automatically
reset to zero everynight. The readings can also be zeroed manually by
holding in [MEM].
Sunny Sunny spells Cloudy Rain Snow

ENGLISH
11
Comfort indicator
The comfort indicator (8) shows thecomfort level, i.e. howthebody
perceives thecurrent combination of temperature and humidity.
Formost people anindoor environment feels most comfortable when
therelative humidity (RH) is at alevel of 40–70 %. The comfort level
is however merely aguide as therelationship between humidity and
comfort varies from person to person.
0–40 % RH
The humidity is
low
40–70 % RH
The humidity is
optimal
70–100 % RH
The humidity is
high
Alarm
Setting the alarm
1. In normal mode, hold in [ALARM] for 3 seconds to
enter thealarm settingmode.
2. Press or hold in [▲] or [▼] to change thevalue.
Confirm each stage with [ALARM].
3. Set thehours and minutes. Thealarm time will be saved and
thedisplay will return to displaying thecurrenttime.
Activating/Deactivating a programmed alarm
1. Press [ALARM] once to display theset alarmtime.
2. Press [ALARM] therequired number of times to activate/deactivate
thealarm. The symbol (11) will light up when thealarm is activated.
Activating the snooze function
When thealarm sounds: Press [SNOOZE/LIGHT] (21) to activate
thesnooze function. Thealarm will turn off, thesnooze symbol (9) will
begin to flash and thealarm will sound again after 5 minutes.
Turning off the alarm
When thealarm sounds: Press [ALARM] on theback of themainunit.
Thealarm is turned off and will sound at theset time on thenextday.

ENGLISH
12
Care and maintenance
Clean theproduct by wiping it with adampcloth. Useonly mild
cleaning agents, never solvents or corrosive chemicals.
Troubleshooting guide
The display
is unclear or
shows nothing.
Replace thebatteries in themainunit.
The wireless
sensors send
no data to
themainunit.
“—.-” is
displayed.
• If themain unit receives no signal from
asensor within 3 minutes, anautomatic scan
is initiated. Afterthemain unit has scanned
for 1 hour without finding asensor, —.- is
displayed.
• Remove thebatteries from thesensor,
wait for awhile and then reinsertthem.
• Insert new batteries into thesensor.
Onlyuse high quality alkaline batteries.
• Try scanning for thesensor manually: Hold in
[CH] for 3 seconds. Notethat any saved
max/min readings will be deleted.
• Check thedistance between thesensor and
themainunit. Thedistance should be1.5–30m.
• Make sure that thewireless signal is not
disrupted by nearby metal structures.
• Move themain unit away from other electronic
devices such as routers, computers and TVsets.
The display
shows “LL.L”
or “HH.H”.
The sensor is outside themeasuringrange.
The displayed
temperature or
precipitation is
incorrect.
• Remove thebatteries, wait for awhile and then
reinsertthem. Beginanew scan for thesensor
(Hold in [CH] for 3 seconds).
• Make sure theunits are free from interference from
heat sources, air-conditioning units, or similar.

ENGLISH
13
Responsible disposal
This symbol indicates that theproduct should not be
disposed of with general householdwaste. Thisapplies
throughout theentireEU. Inorder to prevent any harm
to theenvironment or health hazards caused by incorrect
waste disposal, theproduct must be handed in for
recycling so that thematerial can be disposed of in a
responsible manner. Whenrecycling your product, take it to your local
collection facility or contact theplace of purchase. Theywill ensure that
theproduct is disposed of in anenvironmentally sound manner.
Specifications
Main unit
Temperature range
indoor 0 to +50 °C
outdoor -30 to +60 °C
Humidity
indoor 20 % RH to 90 % RH
outdoor 20 % RH to 90 % RH
Atmospheric pressure 800 to 1100 hPa
Frequency 433 MHz
Range, open area 30 m
Batteries 3×LR03/AAA (sold separately)
Sizeexcl. tablestand 144×26×140 mm (L×W×H)
Weightexcl. batteries 273 g
Sensor unit
Frequency 433.94 MHz
Batteries 2×LR03/AAA (sold separately)
Size 38×19×100 mm

14
SVENSKA
Väderstation med färgskärm
Art.nr 36-7904 Modell E0336WST4H4PR
Läs igenom hela bruksanvisningen före användning och spara den
sedan för framtidabruk. Vi reserverar oss förev. text- och bildfel samt
ändringar av tekniskadata. Vid tekniska problem eller andra frågor,
kontakta vår kundtjänst (se adressuppgifter på baksidan).
Tänk påatt:
• Annan befintlig trådlös utrustning på samma frekvensband kan
påverka räckvidden negativt.
• Räckvidden på all trådlös utrustning påverkas av vilka hinder
som finns mellan sändaren och mottagaren (t.ex. enbetongvägg
dämpar signalen avsevärt mer än engipsvägg).
Vid funktionsproblem, prova följande lösningar:
• Stäng av övriga befintliga trådlösa utrustningar för att kontrollera om
de kan vara orsaken till problemet.
• Flytta den trådlösa utrustningen och/eller förkorta avståndet,
samt minska antalet hinder (väggar, möbleretc.) mellan sändaren
och mottagaren.
Säkerhet
• Produkten får inte demonteras eller modifieras på någotsätt.
• Huvudenheten är avsedd för inomhusbruk och får inte
utsättas för regn ellerfukt.
• Produkten är inte avsedd för att användas som referens på något
sätt och Clas Ohlson tar inte ansvar för skador som
kan uppkomma på grund av felaktig visning eller avläsning.
• Ta ur batterierna om inte produkten ska användas under enlängre
tid, de kan börja läcka och skada produkten. Låtaldrig förbrukade
batterier sitta kvar ibatterifacket.
• Vid batteribyte ihuvudenheten raderas lagrade
max- ochmin.värden.
• Produkten får inte utsättas för stötar.
• Kom ihåg att dra ut stickproppen ur vägguttaget vid
kraftiga åskväder för att skydda produkten.

15
SVENSKA
1
2
3
45
6
7
8
9
10
11 12
13
14
Knappar och funktioner
Huvudenhet
1. Relativ luftfuktighet, givare 1
2. Utomhussymbol, givare1.
Virekommenderar att givare
1 placeras utomhus för att
väderstationen ska ge enså
korrekt väderprognos som
möjligt.
3. Låg batterinivå, givare 1
4. Temperatur, givare 1
5. Signalindikator, givare1.
Tändsnär mätdata tas emot
samt vid sökning efter givare.
6. Relativ luftfuktighet inomhus
7. Inomhustemperatur
8. Komfortindikator inomhus
9. Snoozeindikator. Blinkar när
snoozefunktionen äraktiv.
10.Tid/inställt alarm
11.Alarmindikator. Lysernär
alarmfunktionen är aktiverad
och blinkar vidalarm.
12.Låg batterinivå, huvudenhet
13.Väderprognos
14.Lufttryck
16
SVENSKA
15
16
17
18
19
20
21
22
24
25
23
15.Fäste för bordsstöd
16.Batterilucka
17.[SET] Tryck för att
visadatum. Hållin för att
ställa in datum ochtid.
18.[CH] Tryck och håll in för
att nollställa och söka
efter givare.
19.[MEM] Tryck för att visa
max/min-värden. Hållin för
att nollställa max/min-värden.
20.Väggfäste
21.[SNOOZE/LIGHT]
Snooze/displaybelysning
22.[▲] Stegauppåt. Tryckför
att välja temperaturvisning
iºC ellerºF.
23.[▼] Steganedåt.
Tryckför att växla mellan
12 eller 24 timmars tidvisning.
24.[ALARM] Tryck för att visa
inställd alarmtid, ytterligare
tryck aktiverar/avaktiverar
inställtalarm. Hållin för att
ställa in alarmtiden.
25.DC 5 V

17
SVENSKA
26
27
28
29
Givare
26.LED-indikator
(blinkar när data skickas
till huvudenheten)
27.Väggfäste
28.Kanalväljare
29.Batterihållare
Installation
Givare
• Innan givarna kan anslutas till huvudenheten måste de ställas in
så att de sänder på olika kanaler.
• Vi rekommenderar att den givare som ska monteras utomhus,
ställs in på kanal 1 för att väderstationen ska ge så korrekt
väderprognos som möjligt.
1. Skjut givarens batterilucka nedåt ipilens riktning.
2. Ställ in första givarens kanalväljare iläge 1,
den andra iläge 2 och den tredje iläge3.
3. Se märkningen ibotten på batterihållaren och
sätt i2×AAA/LR03-batterier.
4. Skjut tillbaka batteriluckan tills den klickar påplats.
Huvudenhet
Väderstationen kan drivas med batteri och/eller från elnätet via
medföljande nätadapter.
Batteridrift
1. Ta bort batteriluckan (16) på väderstationens baksida.
2. Se märkningen ibotten på batterihållaren och sätt i
3×AAA/LR03-batterier.
3. Sätt tillbaka batteriluckan.

18
SVENSKA
Nätdrift
Anslut den medföljande nätadaptern till DC 5V (25) och
till ett230 V vägguttag.
Information
• När huvudenheten slås på första gången hamnar den
ikalibreringsläge för lufttryck. Lufttrycket varierar beroende på det
geografiska läget och för att kunna kalibrera värdet måste du ha
referensvärden från enmätare/givare som du vet visar rätt, t.ex.
frånenvädertjänst på internet.
- Värdet för lufttryck (14) blinkar. Tryckeller håll in [ ▲] eller [ ▼] för
att ändravärde. Bekräfta med [SET] eller vänta i20sek.
• Efter att du bekräftat det inställda värdet påbörjas enautomatisk
sökning av närliggande givare. Sökningen indikeras med
vid respektive givare. Omväderstationen under sökningen inte
hittar, eller om den tappar kontakten med engivare, visas ”—.-”
idisplayen. Hållin [CH] i3 sek för att manuellt söka och registrera
om givarna.
Placering/montering
Obs!
Innan du monterar enheterna, tänk på följande:
• Undvik strålningsvärme från kringliggande byggnader, taketc.
Generellt bör temperaturgivare monteras på skuggsida minst
1,5 m frånmark.
• Prova givarna på deras tilltänkta platser innan de monterasupp.
Räckvidden påverkas beroende av vilka hinder som finns mellan
sändaren och mottagaren (t.ex. enbetongvägg dämpar signalen
avsevärt mer än engipsvägg).
• Annan befintlig trådlös utrustning på samma frekvensband
(433 MHz) kan påverka räckvidden negativt.
• Försäkra dig om att väggen är fri från el- och vattenledningar
där du avser att skruva/borra.

19
SVENSKA
Vid räckviddsproblem, prova följande:
• Stäng av övriga befintliga trådlösa utrustningar för att kontrollera om
de kan vara orsaken till problemet.
• Flytta givarna eller huvudenheten och förkorta avståndet, samt
minska antalet hinder (väggar, möbleretc.) mellan enheterna.
Huvudenhet
• Huvudenheten har inbyggda detektorer för temperatur, luftfuktighet
och lufttryck. Placera därför enheten på sådant sätt att den inte
utsätts för värme från element, spisar eller andra värmekällor.
• Undvik att placera enheten intillt.ex. fönsterkarmar av metall
eftersom det kan störa radiomottagningen.
Placering ståendes med bordsstöd:
Skruva ide medföljande
stöden ifästena (15).
Fäst enskruv iväggen och häng upp
huvudenheten på väggfästet (20).
Väggmontage:

20
SVENSKA
Givare
• Placera givaren på enplats som är
skyddad från direkt solljus ochregn.
• Montera utomhusgivaren på enhöjd av
minst 1,5 m över mark om möjligt.
• Fäst enskruv och häng upp givaren på
väggfästet (27).
Användning
Inställningar
1. I normalläge, håll in [SET] i3 sek för att komma till inställningsläge.
2. Tryck eller håll in [ ▲ ] eller [ ▼] för att ändravärde. Bekräfta varje
steg med [SET].
Om ingen knapptryckning sker inom 20 sek så sparas inställningarna
och väderstationen återgår till normalt visningsläge.
Ställ itur och ordning in följande:
- Hour: Inställning av timmar
- Minute: Inställning av minuter
- Year: Inställning av år
- MD/DM: Ställ in ivilken ordning månad och dag ska visas
- Month: Inställning av månad
- Day: Inställning av dag
- Pressure unit: Ställ in ivilken enhet lufttrycket ska visas
(hPa/mb, mmHg eller inHg)
Val av temperaturenhet
Tryck [ ▲] för att välja mellan visning av temperatur igrader Celsius (ºC)
eller grader Fahrenheit (ºF).
This manual suits for next models
1
Table of contents
Languages:
Other CO/Tech Weather Station manuals


