Nasaco WS100 User manual

WEATHER STATION
WS100
Manuel d’utilisation
User manual
Bedienungsanleitung
Manual de usuario disponible en:
Manuale utente disponibile su:
Manual do usuário disponível em:
Gebruikershandleiding beschikbaar op:
Instrukcja obsługi dostępna na stronie:
Felhasználói kézikönyv elérhető a:
Uživatelská příručka k dispozici na:
Руководство пользователя доступно по адресу:
www.gtcompany.fr/en/customer-support/

EDITION : FR
STATION MÉTÉO
REF : WS100
CONSIGNES DE SÉCURITÉ
- Maintenir les enfants éloignés des matériaux d’emballage
(sacs plastiques, bandes en caoutchouc, etc.)
- Cet appareil peut être utilisé par des enfants à partir de 8 ans et
plus ainsi que par des personnes ayant des capacités physiques,
sensorielles ou mentales réduites ou un manque d’expérience
et de connaissances, à condition qu’elles aient reçu une supervision
ou des instructions concernant l’utilisation de l’appareil en
toute sécurité et qu’elles comprennent les dangers encourus.
- Ne jamais laisser les enfants manipuler l’appareil sans
surveillance.
- Le nettoyage et l’entretien par l’usager ne doivent pas être
eectués par des enfants, sauf s’ils ont plus de 8 ans et qu’ils
sont surveillés.
- Ne pas utiliser l’appareil à l’extérieur.
- Ne pas démonter l’appareil.
- Ne pas immerger l‘appareil dans l‘eau.
LIRE ATTENTIVEMENT TOUTES LES INSTRUCTIONS DE LA PRESENTE NOTICE,
EN RESPECTANT LES CONSIGNES D’UTILISATION ET DE SECURITE. CONSERVER
CETTE NOTICE POUR CONSULTATION ULTERIEURE ET EN AVISER LES UTILISATEURS
POTENTIELS.

- Ne pas exposer pas l‘appareil à des chocs, des vibrations, de la
poussière ou une humidité extrême. Cela pourrait entraîner des
dysfonctionnements, des courts-circuits voir des dommages
aux batteries et aux composants.
- Ne pas exposer l’appareil aux rayons du soleil, à des ammes
ou à des températures élevées.
- Ne pas exposer l’appareil à des égouttements d’eau ou des
éclaboussures.
- Ne pas utiliser l’appareil s’il ne fonctionne pas normalement.
- Ne pas réparer l’appareil soi-même. Ne coner les réparations
qu’à une personne qualiée.
- Cet appareil a été conçu pour un usage domestique uniquement,
toute utilisation professionnelle non appropriée ou non conforme à
la notice, n’engage ni la responsabilité, ni la garantie du fabricant.
- L’utilisation de l’appareil doit se faire exclusivement comme
décrit dans ce manuel.
INFORMATIONS CONCERNANT LES PILES
- Pour fonctionner correctement, l’appareil doit être équipé des piles prévues
à cet eet.
- Seules les piles du type recommandé doivent être utilisées.
- Les piles doivent être mises en place en respectant le sens de polarité.
- Les bornes des piles ne doivent pas être mises en court-circuit.
- Ne pas mélanger des piles neuves et des piles usagées.
- Ne pas mélanger des piles alcalines, des piles standard (carbone-zinc) et
des batteries rechargeables (nickel-cadmium).
- Ne pas recharger les piles ni tenter de les ouvrir.
- Ne pas jeter les piles au feu.
- Retirez les piles de l’appareil en cas de non-utilisation prolongée.
- Remplacez toutes les piles en même temps par des piles neuves identiques
entre elles.
- Si le liquide qui sort de la pile entre en contact avec les yeux ou la peau,
lavez la zone atteinte immédiatement et minutieusement à l’eau claire et
consulter un médecin.
- Ne pas exposer les piles à une chaleur excessive telle que rayon solaire,
feu ou assimilé.

DESCRIPTION
ALIMENTATION
FONCTIONS
1. Station météo
2. Écran LCD
3. Bouton LIGHT
4. Bouton SNOOZE
5. Bouton MAX/MIN
6. Bouton UP(+)/DOWN(-)
7. Bouton MODE
8. Compartiment à piles pour le réveil
9. Horloge
10. Jour de la semaine
11. Température
12. Humidité
13. Situation météorologique actuelle
14. Niveau de confort
15. Tendance de température
- Ouvrez avec précaution le couvercle du logement
des piles.
- Placez 3 piles de type AAA 1,5V (non incluses) en
respectant la polarité indiquée.
- Refermez le logement des piles.
- Date, heure et jours de la semaine
- Météo actuelle
- Fonction d’alarme et de répétition
- Température intérieure (0°C ~ 60°C)
- Humidité intérieure (20% ~ 95%)
- Sauvegarde des températures et des
taux d’humidité min. et max.
- Achage de l’heure : 12/24 heures
- Achage de la température : C / F
- Rétroéclairage
143
2
567
10
11
8
9
12
14
13
15
INSTALLATION / UTILISATION
1 - INSTALLATION
- Posez la station météo sur une surface plane horizontale.
2 - UTILISATION DE LA STATION MÉTÉO
INDICATEUR MÉTÉO
À la mise en marche de l’appareil, la station météo indique les conditions de l’environnement sous
forme d’icônes : ensoleillé, nuageux, pluvieux.
TEMPERATURE ET HUMIDITÉ
La station météo ache les informations suivantes :
- Température intérieure (11)
- Taux d’humidité intérieure (12)
CHOIX DE L’UNITÉ DE TEMPÉRATURE
- Appuyez sur le bouton (DOWN) pour sélectionner l’unité de température : °C (Celsius) ou °F (Fahrenheit).
VALEURS MAX/MIN POUR LA TEMPÉRATURE ET L’HUMIDITÉ
- Appuyez sur le bouton (MAX/MIN) pour que l’achage change entre les valeurs actuelles de
température et l’humidité et les valeurs MIN/MAX.
- Les valeurs MIN/MAX pour la température et l’humidité sont sauvegardées automatiquement et
sont réinitialisées tous les jours automatiquement à 0 h 00.

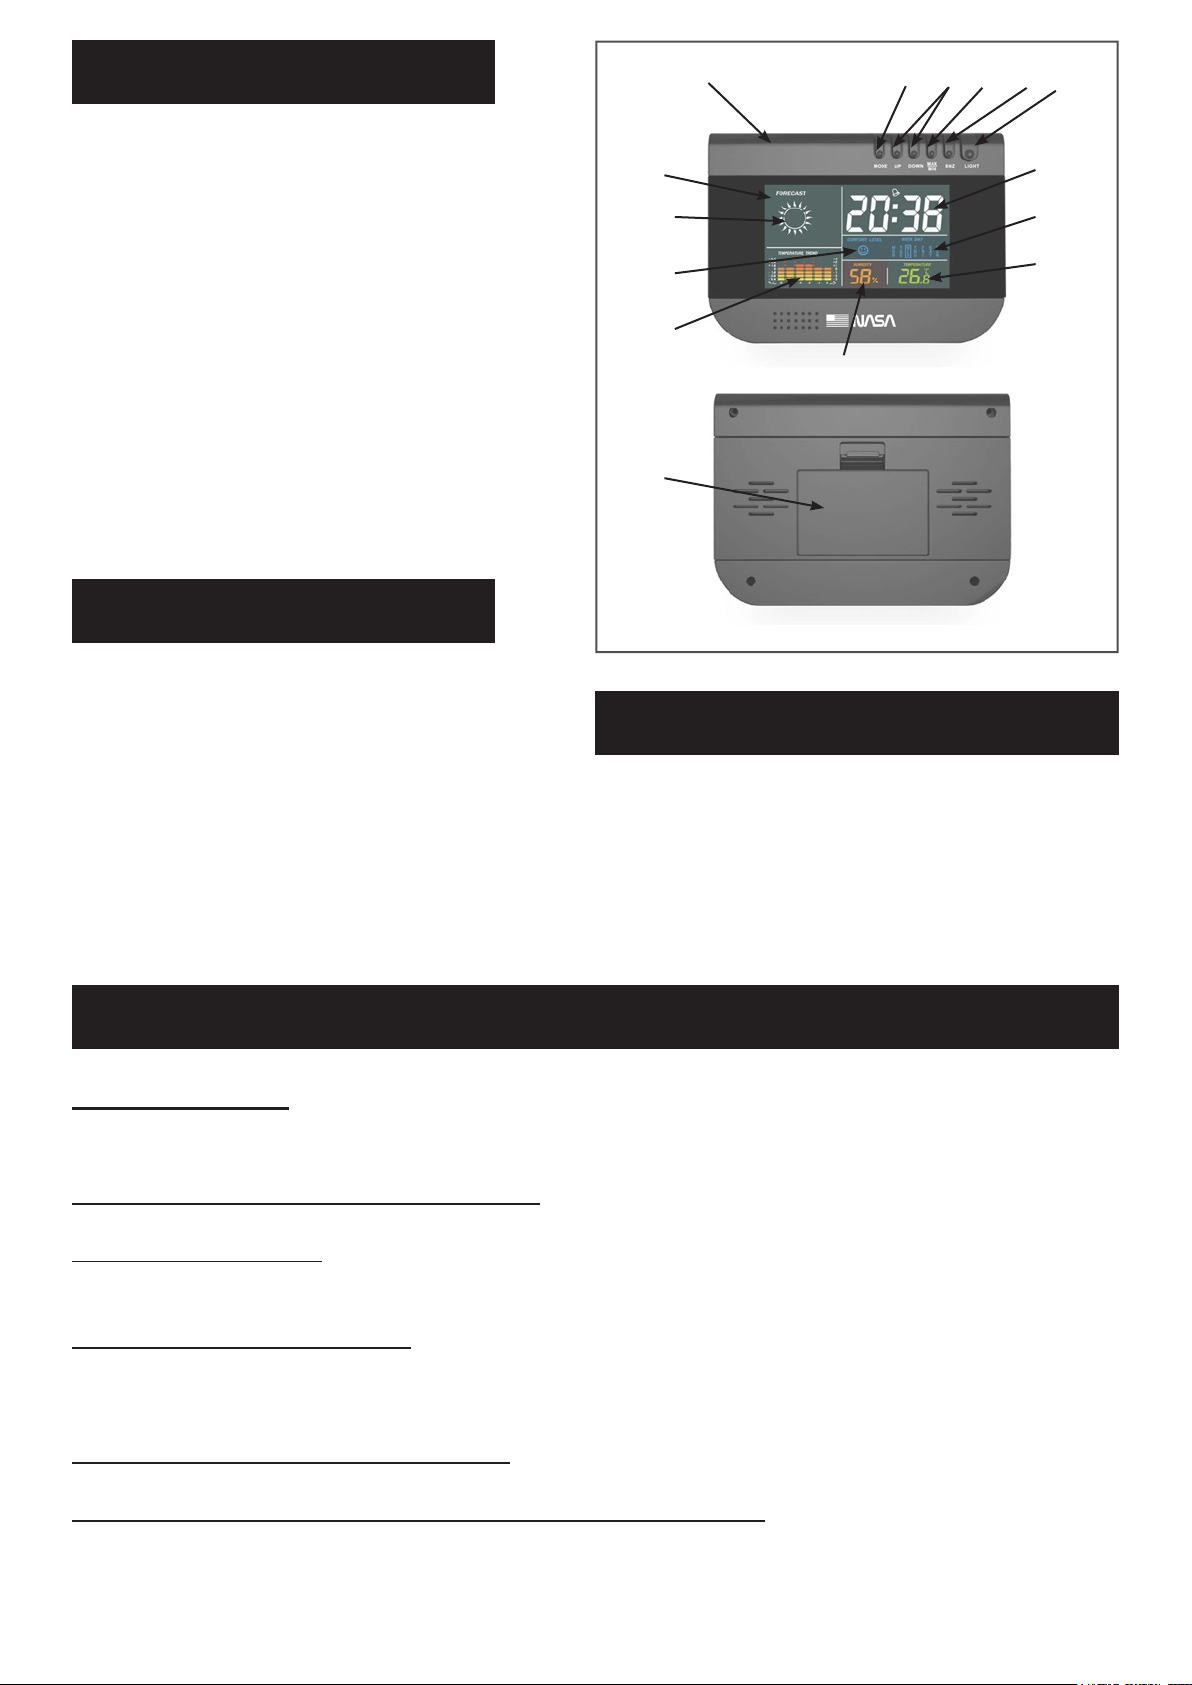
3 - RÉGLAGE DE L’HEURE
- Pressez le bouton (MODE) durant 3 secondes pour entrer dans le mode de réglage heure.
- Utilisez les boutons (UP) et (DOWN) pour ajuster les valeurs. Maintenez les boutons appuyés pour
accélérer le délement des valeurs.
- Pressez le bouton (MODE) pour valider.
- Sans action sur les boutons pendant le réglage, l’appareil revient à l’achage normal au bout de 10 secondes.
4 - RÉGLAGE DE LA DATE
- Pressez 2 fois successivement le bouton (MODE) pour sélectionner la fonction Date.
- Pressez le bouton (MODE) durant 3 secondes pour entrer dans le mode de réglage.
- Utilisez les boutons (UP) et (DOWN) pour ajuster les valeurs. Maintenez les boutons appuyés pour
accélérer le délement des valeurs.
- Pressez le bouton (MODE) pour valider.
- Sans action sur les boutons pendant le réglage, l’appareil revient à l’achage normal au bout de 10 secondes.
5 - RÉGLAGE DE L’ALARME
- Pressez 3 fois successivement le bouton (MODE) pour sélectionner la fonction Alarme.
- Pressez le bouton (MODE) durant 3 secondes pour entrer dans le mode de réglage.
- Utilisez les boutons (UP) et (DOWN) pour ajuster les valeurs. Maintenez les boutons appuyés
pour accélérer le délement des valeurs.
- Pressez le bouton (MODE) pour valider.
- Sans action sur les boutons pendant le réglage, l’appareil revient à l’achage normal au bout de 10 secondes.
ACTIVATION / DÉSACTIVATION DE L’ALARME
- Pressez le bouton (UP) pour activer ( ) ou désactiver l’alarme (aucun symbole ne s’ache).
ARRÊT DE L’ALARME
- L’alarme se déclenche à l’heure programmée. Pour arrêter l’alarme, pressez le bouton (UP),
celle-ci retentira à nouveau le lendemain à la même heure.
RÉPÉTITION DE L’ALARME (SNOOZE)
- Lorsque la sonnerie retentit, pressez le bouton (SNZ) : le symbole clignote et l’alarme s’interrompt.
La sonnerie retentira à nouveau après 8 minutes.
- Pressez ensuite le bouton (UP) pour désactiver la répétition de l’alarme.
6 - MODIFICATION DU FORMAT D’AFFICHAGE DE L’HEURE (12 > 24)
- Entrez en mode Alarme, maintenez le bouton (UP) jusqu’à ce que l’achage revienne au mode Heure.
- Le format d’achage de l’heure doit changer.
9 - NETTOYAGE ET MAINTENANCE
- Avant de nettoyer l’appareil, veuillez le couper de son alimentation électrique (enlevez les piles).
- Ne nettoyez l’appareil que de l’extérieur en utilisant un chion sec. N’utilisez pas de liquides de
nettoyage an d’éviter d’endommager les parties électroniques.
8 - RÉTROÉCLAIRAGE
- Par défaut, le rétroéclairage est éteint (pour économiser l’énergie).
- Appuyez sur le bouton (LIGHT) pour activer le rétroéclairage pendant 7 secondes.
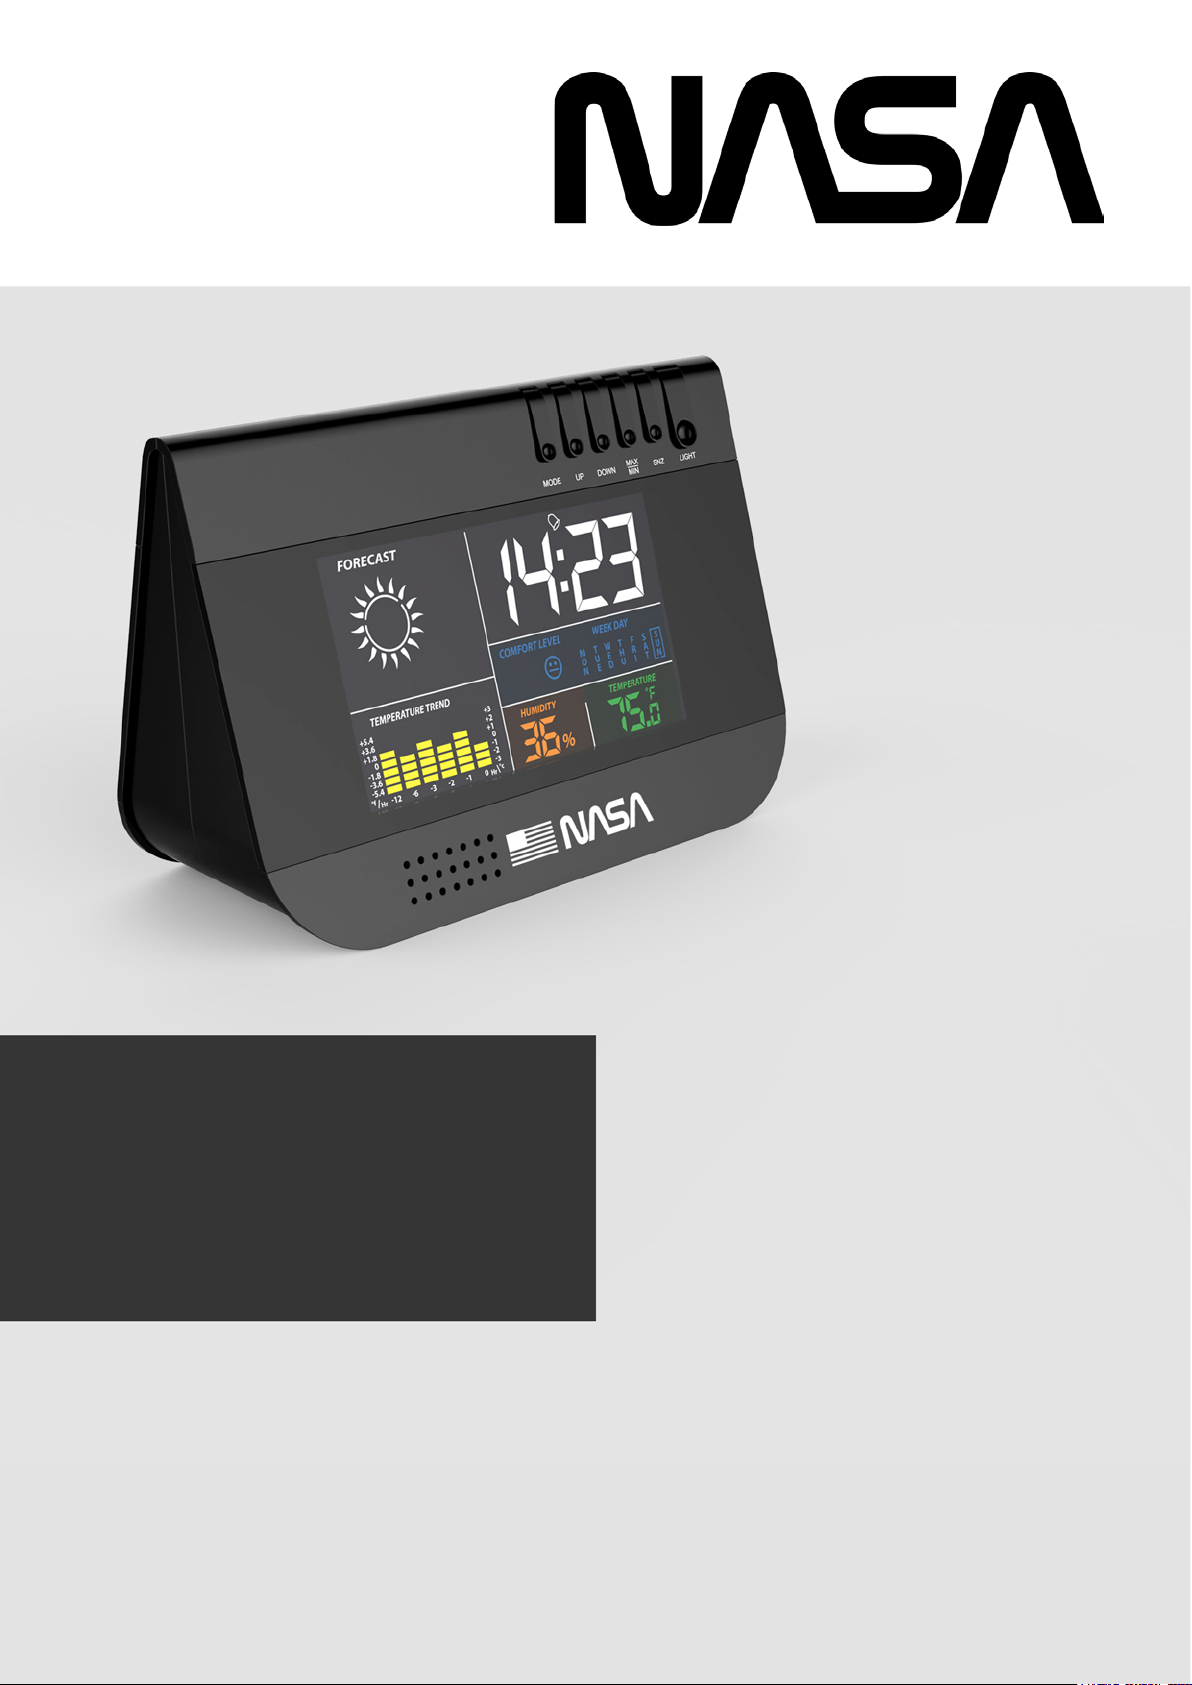
Humidité de 40 % ou moins
Humidité comprise entre 40 %
et 70 % ; et température
comprise entre 20°C (68°F) et
25°C (77°F)
Humidité de 70 % ou plus
7 - NIVEAU DE CONFORT : ICÔNES

VERSION : EN
PLEASE READ ALL THE DIRECTIONS IN THIS MANUAL CAREFULLY AND FOLLOW
THE OPERATING AND SAFETY INSTRUCTIONS. KEEP THIS MANUAL FOR FUTURE
REFERENCE AND SHOW IT TO POTENTIAL USERS.
WEATHER STATION
REF : WS100
SAFETY INSTRUCTIONS
- Keep children away from packaging materials (plastic bags,
rubber bands, etc.)
- This unit may be used by children aged 8 years and over and by
anyone with reduced physical, sensory or mental capabilities
or a lack of experience and knowledge, provided that they
have been given supervision or instructions about how to use
the unit safely and that they understand the hazards involved.
- Never allow children to handle the unit without supervision.
- Cleaning and maintenance must not be carried out by children
unless they are over 8 years of age and supervised.
- Do not use the unit outdoors.
- Do not disassemble the unit.
- Do not immerse the unit in water.
- Do not expose the unit to bumps, vibration, dust, or extreme
humidity. This could lead to malfunctions, short circuits or
damage to batteries and components.

- Do not expose the unit to direct sunlight, ames or high
temperatures.
- Do not expose the unit to dripping water or splashes
- Do not use the unit if it does not operate normally.
- Do not repair the unit yourself. Only allow repairs to be carried
out by a qualied person.
- This unit has been designed for domestic use only. The
manufacturer cannot be held responsible, and the guarantee
will not apply, for any professional use that is not appropriate
or does not comply with the instructions.
- The unit may only be used as described in this manual.
BATTERY INFORMATION
- To function properly, the unit must have the appropriate batteries inserted.
- Only the recommended type of batteries should be used.
- The batteries must be inserted the right way round.
- The battery terminals must not be short-circuited.
- Do not mix new and used batteries.
- Do not mix alkaline, standard (carbon-zinc) and rechargeable (nickel -
cadmium) batteries.
- Do not recharge the batteries or attempt to open them.
- Do not dispose of batteries in re.
- Remove the batteries from the unit when not in use for a long time.
- Replace all batteries at the same time with new, identical batteries.
- If the liquid from a battery comes into contact with your eyes or skin, wash
the aected area immediately and thoroughly with clean water and seek
medical attention.
- Do not expose batteries to excessive heat such as sunlight, re or similar.

DESCRIPTION
POWER SUPPLY
FUNCTIONS
1. Weather station
2. LCD screen
3. LIGHT button
4. SNOOZE button
5. MAX/MIN button
6. UP(+)/DOWN(-) button
7. MODE button
8. Battery compartment for the alarm
9. Clock
10. Day of the week
11. Temperature
12. Humidity
13. Current weather
14. Comfort level
15. Temperature trend
- Carefully open the battery compartment cover.
- Insert 3 x AAA 1,5V batteries (not included),
respecting the polarity indicated.
- Close the battery compartment.
- Date, time and days of the week
- Current weather
- Alarm and snooze function
- Indoor temperature (0°C ~ 60°C)
- Indoor humidity (20% ~ 95%)
- Storage of min. and max. temperatures
and humidity levels
- Time display: 12/24 hours
- Temperature display: C/F
- Backlighting
143
2
567
10
11
8
9
12
14
13
15
INSTALLATION / USE
1 - INSTALLATION
- Place the weather station on a at horizontal surface.
2 - USE OF THE WHEATHER STATION
WEATHER INDICATOR
When the unit is turned on, the weather station will show the weather conditions in the form of
icons: sunny, cloudy, rainy.
TEMPERATURE ET HUMIDITY
The weather station displays the following information:
- Indoor temperature (11)
- Indoor humidity rate (12)
CHOOSING THE TEMPERATURE UNIT
- Press the (DOWN) button to select the temperature unit: °C (Celsius) and °F (Fahrenheit).
MAX/MIN VALUES FOR TEMPERATURE AND HUMIDITY
- Press the (MAX/MIN) button to toggle the display between the current temperature and humidity
values and the MIN/MAX values.
- The MIN/MAX values for temperature and humidity are saved automatically and automatically
reset every day at 00:00.

5 - SETTING THE ALARM
- Press the (MODE) button 3 times to select the Alarm function.
- Press the (MODE) button for 3 seconds to enter the setting mode.
- Use the (UP) and (DOWN) buttons to adjust the values. Hold the buttons down to speed up scrolling.
- Press the (MODE) button to conrm.
- If the buttons are not pressed, the unit returns to the normal display after 10 seconds.
ACTIVATING/DEACTIVATING THE ALARM
- Press the (UP) button to activate ( ) or deactivate the alarm (no symbol is displayed).
STOPPING THE ALARM
- The alarm will go o at the programmed time. To stop the alarm, press the (UP) button; it will
sound again the next day at the same time.
SNOOZING THE ALARM (SNOOZE)
- When the alarm sounds, press the (SNZ) button: the symbol will ash and the alarm will stop.
The alarm will sound again after 8 minutes.
- Then press the (UP) button to deactivate the snooze function.
6 - CHANGING THE TIME DISPLAY FORMAT (12 > 24)
- Enter the Alarm mode and hold the UP button until the display returns to the Time mode.
- The time display format will change.
9 - CLEANING AND MAINTENANCE
- Before cleaning the unit, disconnect the power supply (remove the batteries).
- Only clean the outside of the unit and use a dry cloth. Do not use cleaning uids to avoid damaging
the electronics.
8 - BACKLIGHTING
- By default, the backlight is o (to save energy).
- Press the (LIGHT) button to activate the backlight for 7 seconds.
Humidity of 40% or
less
Humidity between 40% and
70% and temperature between
20°C (68°F) and 25°C (77°F)
Humidity of 70% or
more
7 - COMFORT LEVEL : ICONS
3 - SETTING THE TIME
- Press and hold the (MODE) button for 3 seconds to enter the time setting mode.
- Use the (UP) and (DOWN) buttons to adjust the values. Hold the buttons down to speed up scrolling.
- Press the (MODE) button to conrm.
- If the buttons are not pressed, the unit returns to the normal display after 10 seconds.
4 - SETTING THE DATE
- Press the (MODE) button twice to select the Date function.
- Press the (MODE) button for 3 seconds to enter the setting mode.
- Use the (UP) and (DOWN) buttons to adjust the values. Hold the buttons down to speed up
scrolling.
- Press the (MODE) button to conrm.
- If the buttons are not pressed, the unit returns to the normal display after 10 seconds.

VERSION : DE
LESEN SIE ALLE ANWEISUNGEN IN DIESER BEDIENUNGSANLEITUNG SORGFÄLTIG
DURCH UND BEACHTEN SIE DIE ANWENDUNGS- UND SICHERHEITSHINWEISE.
BEWAHREN SIE DIESE BEDIENUNGSANLEITUNG FÜR ZUKÜNFTIGE ZWECKE AUF
UND INFORMIEREN SIE POTENZIELLE BENUTZER.
WETTERSTATION
REF : WS100
SICHERHEITSHINWEISE
- Halten Sie Verpackungsmaterialien (Plastiktüten, Gummibänder
usw.) von Kinder fern.
- Dieses Gerät kann von Kindern ab 8 Jahren sowie von
Personen mit eingeschränkten körperlichen, sensorischen
oder mentalen Fähigkeiten oder mangelnder Erfahrung bzw.
fehlendem Wissen benutzt werden, sofern sie beaufsichtigt
werden oder bezüglich des sicheren Gebrauchs des Geräts
unterwiesen wurden und über die Gefahren informiert sind.
- Erlauben Sie Kindern niemals, das Gerät ohne Aufsicht zu
bedienen.
- Die Reinigung und Wartung darf nicht von Kindern
durchgeführt werden, es sei denn, sie sind älter als 8 Jahre
und unter Aufsicht.
- Verwenden Sie das Gerät nicht im Freien.
- Demontieren Sie das Gerät nicht.
- Tauchen Sie das Gerät nicht in Wasser ein.

- Setzen Sie das Gerät keinen Stößen, Vibrationen, Staub
oder extremer Feuchtigkeit aus. Dies kann zu Fehlfunktionen,
Kurzschlüssen oder zur Beschädigung von Batterien und
Komponenten führen.
- Setzen Sie das Gerät nicht direkter Sonneneinstrahlung,
Flammen oder hohen Temperaturen aus.
- Setzen Sie das Gerät Wassertropfen und -spritzern aus.
-Nehmen Siedas Gerätnicht inBetrieb, wennes nichteinwandfrei
funktioniert.
- Reparieren Sie das Gerät nicht selbst. Lassen Sie Reparaturen
nur von einer qualizierten Person durchführen.
- Dieses Gerät wurde nur für den Hausgebrauch entwickelt. Für
eine professionelle Nutzung, die ungeeignet ist oder nicht der
Bedienungsanleitung entspricht, übernimmt der Hersteller weder
Haftung noch Garantie.
- Das Gerät darf nur gemäß der Beschreibung in dieser
Bedienungsanleitung verwendet werden.
INFORMATIONEN BEZÜGLICH DER BATTERIEN
- Um ordnungsgemäß zu funktionieren, muss das Gerät mit den entsprechenden
Batterien ausgestattet sein.
- Es sollten nur die empfohlenen Batterietypen verwendet werden.
- Die Batterien müssen mit der richtigen Polarität eingelegt werden.
- Die Batterieklemmen dürfen nicht kurzgeschlossen werden.
- Mischen Sie keine neuen und gebrauchten Batterien.
- Mischen Sie keine Alkali-, Standard- (Kohle-Zink) und wiederauadbaren
(Nickel-Cadmium) Batterien.
- Laden Sie die Batterien nicht auf und versuchen Sie nicht, sie zu önen.
- Werfen Sie die Batterien nicht ins Feuer.
- Nehmen Sie die Batterien aus dem Gerät, wenn Sie es längere Zeit nicht
benutzen.
- Ersetzen Sie alle Batterien gleichzeitig durch neue, identische Batterien.
- Wenn die Batterieüssigkeit mit Ihren Augen oder Ihrer Haut in Berührung
kommt, waschen Sie den betroenen Bereich sofort und gründlich mit
sauberem Wasser und suchen Sie einen Arzt auf.
- Setzen Sie die Batterien nicht übermäßiger Hitze wie Sonnenlicht, Feuer
oder Ähnlichem aus.

BESCHREIBUNG
STROMVERSORGUNG
FUNKTIONEN
1. Wetterstation
2. LCD-Bildschirm
3. LIGHT-Taste
4. SNOOZE-Taste
5. MAX/MIN-Taste
6. UP(+)/DOWN(-)-Taste
7. MODE-Taste
8. Batteriefach für den Wecker
9. Uhr
10. Wochentag
11. Temperatur
12. Luftfeuchtigkeit
13. Aktuelles Wetter
14. Komfortstufe
15. Temperatur-Trend
- Önen Sie vorsichtig den Batteriefachdeckel.
- Legen Sie 3 x AAA 1,5V Batterien (nicht
enthalten) ein und beachten Sie dabei die
angegebene Polarität.
- Schließen Sie das Batteriefach.
- Datum, Uhrzeit und Wochentage
- Aktuelles Wetter
- Alarm- und Schlummerfunktion
- Innentemperatur (0 °C ~ 60 °C)
- Luftfeuchgkeit (20% ~ 95%)
- Speicherung von minimalen und maximalen
Temperaturen und Luftfeuchtigkeitswerten
- Zeitanzeige: 12/24 Stunden
- Temperaturanzeige: C / F
- Hintergrundbeleuchtung
143
2
567
10
11
8
9
12
14
13
15
INSTALLATION / VERWENDUNG
1 - INSTALLATION
- Stellen Sie die Wetterstation auf eine ebene, horizontale Fläche.
2 - VERWENDUNG DER WETTERSTATION
WETTERANZEIGE
Nach dem Einschalten des Geräts zeigt die Wetterstation die Bedingungen in der Umgebung in
Form von Symbolen an: sonnig, bewölkt, regnerish.
TEMPERATUR UND LUFTFEUCHTIGKEIT
Die Wetterstation zeigt die folgenden Informationen an:
- Innentemperatur (11)
- Innenluftfeuchtigkeitgehalt (12)
WAHL DER TEMPERATUREINHEITE
- Drücken Sie die Taste (DOWN), um die Temperatureinheit auszuwählen: °C (Celsius) or °F (Fahrenheit).
MAX/MIN-WERTE FÜR TEMPERATUR UND LUFTFEUCHTIGKEIT
- Drücken Sie die Taste (MAX/MIN), um die Anzeige zwischen den aktuellen Temperatur- und
Feuchtigkeitswerten und den MIN/MAX-Werten umzuschalten.
- Die MIN/MAX-Werte für Temperatur und Luftfeuchtigkeit werden automatisch gespeichert und
jeden Tag um 00:00 Uhr automatisch zurückgesetzt.

5 - EINSTELLUNG DES ALARMS
- Drücken Sie dreimal hintereinander die Taste (MODE), um die Alarmfunktion zu wählen.
- Drücken Sie die Taste (MODE) 3 Sekunden lang, um in den Einstellmodus zu gelangen.
- Verwenden Sie die Tasten (UP) und (DOWN), um die Werte einzustellen. Halten Sie die Tasten
gedrückt, um das Scrollen der Werte zu beschleunigen.
- Drücken Sie zur Bestätigung die Taste (MODE).
- Wenn die Tasten während der Einstellung nicht gedrückt werden, kehrt das Gerät nach 10 Sekunden
zur normalen Anzeige zurück.
AKTIVIEREN / DEAKTIVIEREN DES ALARMS
- Drücken Sie die Taste (UP), um den Alarm zu aktivieren ( ) oder zu deaktivieren (es wird kein Symbol angezeigt).
DEN ALARM BEENDEN
- Der Alarm wird zur programmierten Zeit ausgelöst. Um den Alarm zu beenden, drücken Sie die
Taste (UP), er ertönt am nächsten Tag zur gleichen Zeit erneut.
SCHLUMMERFUNKTION (SNOOZE)
- Wenn der Alarm ertönt, drücken Sie die Taste (SNZ): Das Symbol blinkt und der Alarm wird unterbrochen.
Nach 8 Minuten ertönt der Alarm erneut.
- Drücken Sie dann die Taste (UP), um die Schlummerfunktion zu deaktivieren.
6 - ÄNDERN DES ZEITANZEIGEFORMATS (12 > 24)
- Rufen Sie den Alarmmodus auf, halten Sie die Taste (UP) gedrückt, bis die Anzeige in den
Uhrzeitmodus zurückkehrt.
- Das Format der Zeitanzeige muss sich ändern.
9 - REINIGUNG UND WARTUNG
- Bevor Sie das Gerät reinigen, schalten Sie bitte die Stromversorgung ab (entfernen Sie die Batterien).
- Reinigen Sie das Gerät nur von außen mit einem trockenen Tuch. Verwenden Sie keine
Reinigungsüssigkeiten, um Schäden an den elektronischen Bauteilen zu vermeiden.
8 - HINTERGRUNDBELEUCHTUNG
- Standardmäßig ist die Hintergrundbeleuchtung ausgeschaltet (um Energie zu sparen).
- Drücken Sie die Taste (LIGHT), um die Hintergrundbeleuchtung für 7 Sekunden zu aktivieren.
Luftfeuchtigkeit 40 % oder
weniger
Luftfeuchtigkeit zwischen 40 % und
70 % und Temperatur zwischen 20 °C
(68 °F) und 25°C (77°F)
Luftfeuchtigkeit 70 % oder
mehr
7 - KOMFORTSTUFE: SYMBOLE
3 - EINSTELLUNG DER UHRZEIT
- Drücken Sie die Taste (MODE) 3 Sekunden lang, um in den Zeiteinstellungsmodus zu gelangen.
- Verwenden Sie die Tasten (UP) und (DOWN), um die Werte einzustellen. Halten Sie die Tasten
gedrückt, um das Scrollen der Werte zu beschleunigen.
- Drücken Sie zur Bestätigung die Taste (MODE).
- Wenn die Tasten während der Einstellung nicht gedrückt werden, kehrt das Gerät nach 10
Sekunden zur normalen Anzeige zurück.
4 - EINSTELLUNG DES DATUMS
- Drücken Sie zweimal hintereinander die Taste (MODE), um die Funktion Datum auszuwählen.
- Drücken Sie die Taste (MODE) 3 Sekunden lang, um in den Einstellmodus zu gelangen.
- Verwenden Sie die Tasten (UP) und (DOWN), um die Werte einzustellen. Halten Sie die Tasten
gedrückt, um das Scrollen der Werte zu beschleunigen.
- Drücken Sie zur Bestätigung die Taste (MODE).
- Wenn die Tasten während der Einstellung nicht gedrückt werden, kehrt das Gerät nach 10
Sekunden zur normalen Anzeige zurück.

Notice of compliance for the European Union : products bearing the CE
mark comply with the applicable European directives and associated
harmonised European standards.
The “Triman” logo indicates that the product or packaging should not be
thrown in the household waste bin; instead they should be separated for
recycling or taken to a collection point (bins in stores, recycling centre,
etc.) to be recycled.
Disposal of waste equipment by users in the European Union : this
symbol means that according to local laws and regulations, it is
prohibited to dispose of this product with household waste. Instead,
it is your responsibility to protect the environment and human health
by handing over your used device to a designated collection point for
the recycling of waste electrical and electronic equipment. For more
information about where you can drop o your waste equipment for
recycling, please contact your local city oce, your household waste
disposal service or the shop where you purchased the product.
After sales service / service après vente / Kundendienst /
servicio postventa / servizio post vendita / serviço pós venda /
dienst na verkoop / serwis posprzedażowy /
értékesítés utáni szolgáltatás / poprodejní servis /
послепродажное обслуживание :
@ : aftersaleservice@gtcompany.fr - Tél. : + 33 (0) 1.85.49.10.26
Product manufactured for and distributed by :
GT COMPANY - 5 rue de la Galmy - 77700 Chessy - France
+33 (0) 1.61.10.09.25 - www.gtcompany.fr
1 year limited warranty / Garantie limitée un an / 1 Jahr eingeschränkte Garantie /
Garantía limitada de 1 año / Garanzia limitada di 1 anno /
Garantia limitada de 1 ano / 1 jaar beperkte garantie /
Roczna ograniczona gwarancja / 1 év korlátozott garancia /
Omezená záruka 1 rok / 1 год ограниченной гарантии
Made in China
NASA space program imagery: Source - International Space Archives LLC. NASA
does not design, manufacture, distribute or endorse GT Company weather stations
nor provide warranty support of GT Company weather stations. For service, support
and warranty information on this product, contact the distributor or GT Company.
Table of contents
Languages:
Other Nasaco Weather Station manuals
Popular Weather Station manuals by other brands

METER Group, Inc.
METER Group, Inc. ATMOS 22 manual

Bresser
Bresser 7003500 instruction manual

Bresser
Bresser ClimaTemp TB instruction manual

Oregon Scientific
Oregon Scientific RMS600A user manual

Unit Connection Technology
Unit Connection Technology WS0300 user manual

Ambient Weather
Ambient Weather OBSERVER WS-1550-IP user manual