Coast to Coast Winegard ConnecT 2.0 User manual
1
1
Thank you for trusting Winegard to bring connectivity
solutions to you while on the go!
The Winegard®ConnecT™2.0 will provide you more freedom when
choosing where to adventure, all while bringing the comforts of the
internet securely to you and your devices. This product will connect
all of your WiFi enabled devices to either an available WiFi hotspot or
a 3G/4G/LTE cellular connectionat much greater distances.
Introduction
WARNINGS:
• Do not paint any portion of the Winegard ConnecT. Painting the system could
damage the system and will void the warranty.
• When first setting up the Winegard ConnecT 2.0 it is recommended to check for
software updates the first time the system is connected to an Internet signal. It is
also recommended to check for updates every couple months for fixes and added
features.
• Please register your product at http://www.winegard.com/myantenna. We will be
able to pass along relevant information, as well as, inform you when software
updates are available.
Follow these instructions to search and connect to a local wireless
access point.
1) Turn on the power to the ConnecT. Turn on the WiFi enabled
device(s) that you want to connect and scan for wireless networks.
It may take a few minutes for the Winegard ConnecT network
(Winegard2ghzXXXXXX) to appear.
2) The label located on the front of this manual lists the unique default
SSID and password. Select this WiFi signal from the list of wireless
networks and connect. Once the correct SSID has been selected, enter
the password. It is recommended to set your device(s) to automatically
connect with the Winegard ConnecT 2.0.
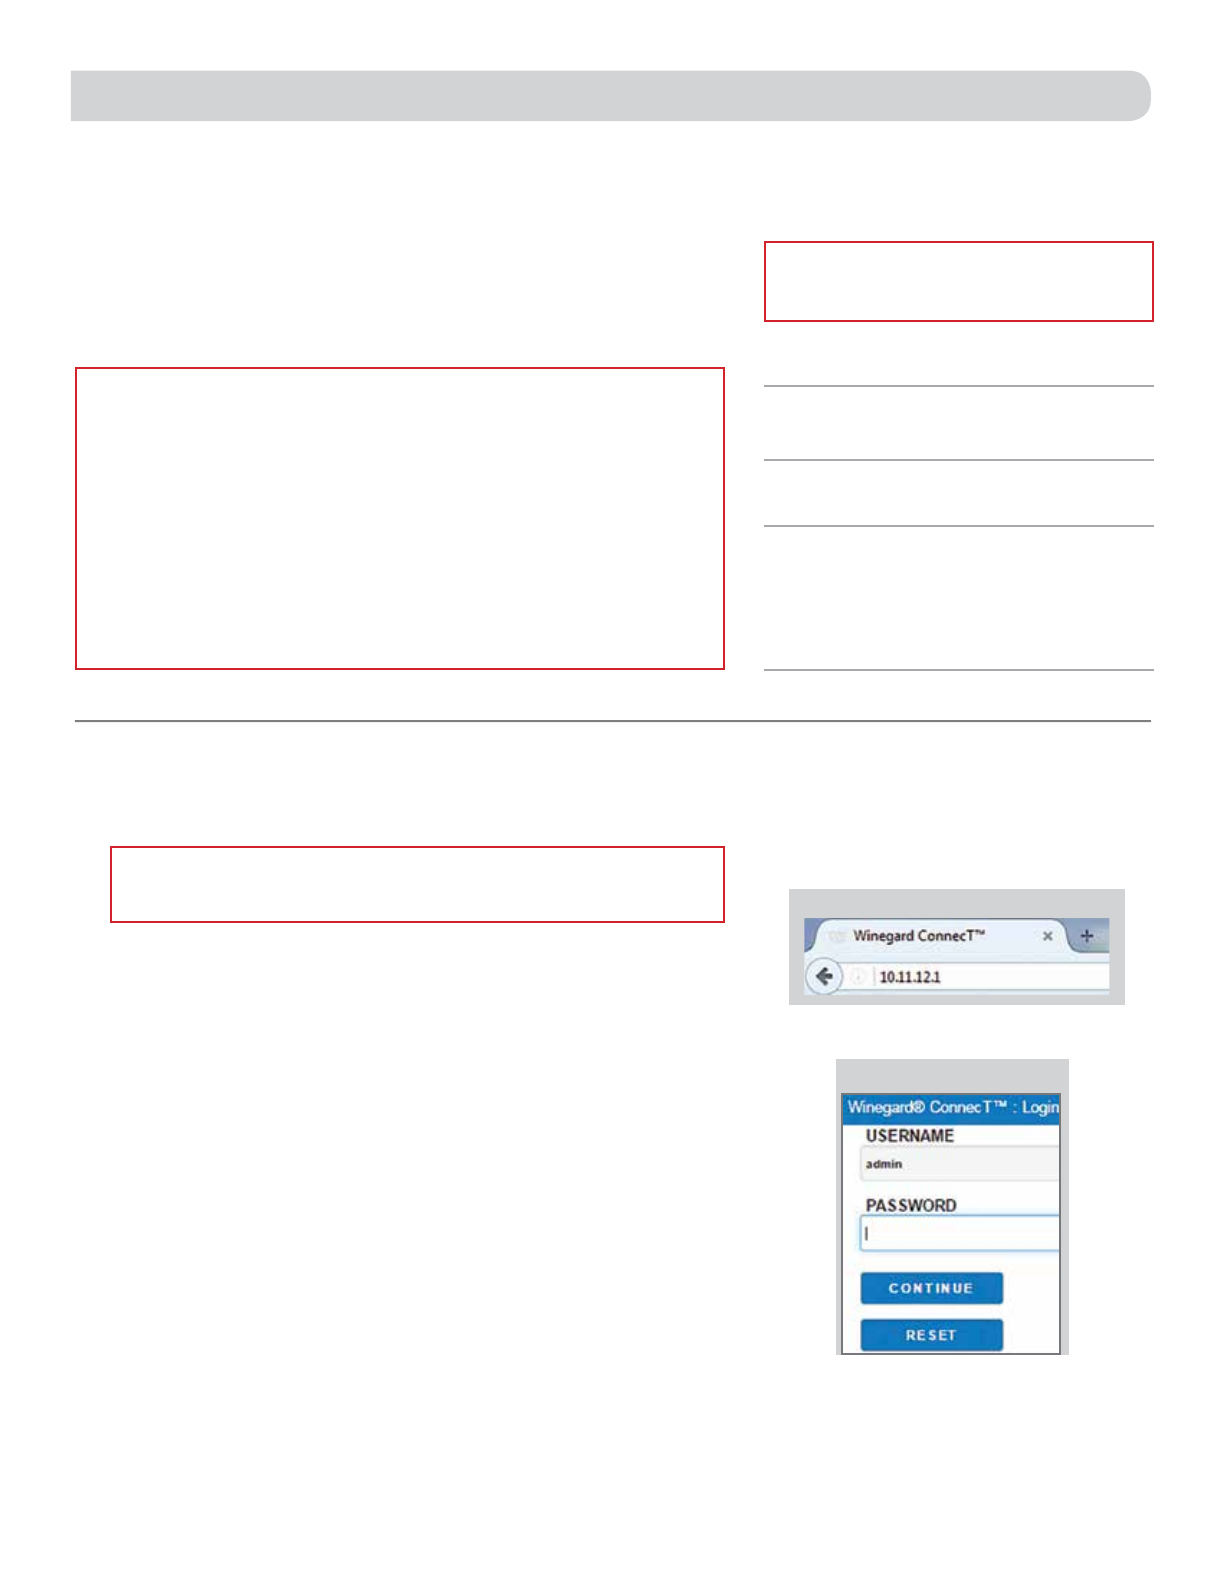
3) Once connected, open an Internet browser and type 10.11.12.1 into
the address bar and press Enter. See figure 1. This will take you to the
Admin Login Screen. Figure 2. Login using:
Username: admin Password: admin
The Winegard ConnecT can access the internet two different ways: from
a local WiFi network or a cellular network (4G/LTE).
4) To connect to a cellular network please see the Operation section
following the Installing the SIM Card section of this manual.
Figure 1
NOTE: Winegard recommends web browsers Microsoft
Edge, Firefox®, and Google Chrome™Browser.
WARNING: DO NOT CLICK THE BACK BUTTON on your web browser when navigating
through this software.
IMPORTANT: DO NOT LOSE THIS MANUAL. It contains
your unique factory default SSID and password.
NOTE: Some networks will display a “splash
page” when connecting instead of using a network
password. When connecting to a network requiring
a splash screen for multiple days, it may be
necessary to clear your browser cache.
Figure 2

2
Figure 3
Figure 4
OPERATION (WiFi)
5) To connect to a WiFi network, select WiFi ONLY and then click on SCAN
FOR WiFi. See figure 3.This will bring up a list of all WiFi signals in
range (this could take a few minutes). The Winegard ConnecT 2.0 will
display available networks by signal strength. Select the desired network
and click CONTINUE. See figure 4.
6) Enter the network password, if prompted. Once the Winegard ConnecT
connects to the internet the INTERNET STATUS will show connected (this
could take as long as two minutes). You are now ready to use the WiFi.
INSTALLING THE SIM CARD FOR 4G USE
The Winegard ConnecT 2.0 works with most Australian cellular providers.
Once you have selected the cellular provider of your choice, you will
need to insert an approved SIM card (Mini-SIM/Standard SIM – 25mm
x 15mm x 0.76mm). You will also need the correct APN (Access Point
Name) linked to the SIM card.
Once you have the SIM card from your cellular provider, you are ready to
install the SIM. In order to do this, follow these instructions:
1) Start with the ConnecT 2.0 powered off.
2) Remove the 2 Phillips head screws that attach to the SIM card cover
plate.
3) Remove the SIM card cover plate.
4) Take your newly acquired SIM card and insert it into the empty SIM
card holder, with the metal electronic chip facing downward. You should
hear a clicking sound once the card inserts into the correct position. DO
NOT force the SIM card in to the SIM holder. The card must be properly
positioned to function. If you do not hear a clicking sound, make sure that
the SIM card is inserted correctly. If it is inserted backwards it will not
insert completely and you will not hear a clicking sound.
5) Replace the SIM card cover plate and 2 screws.
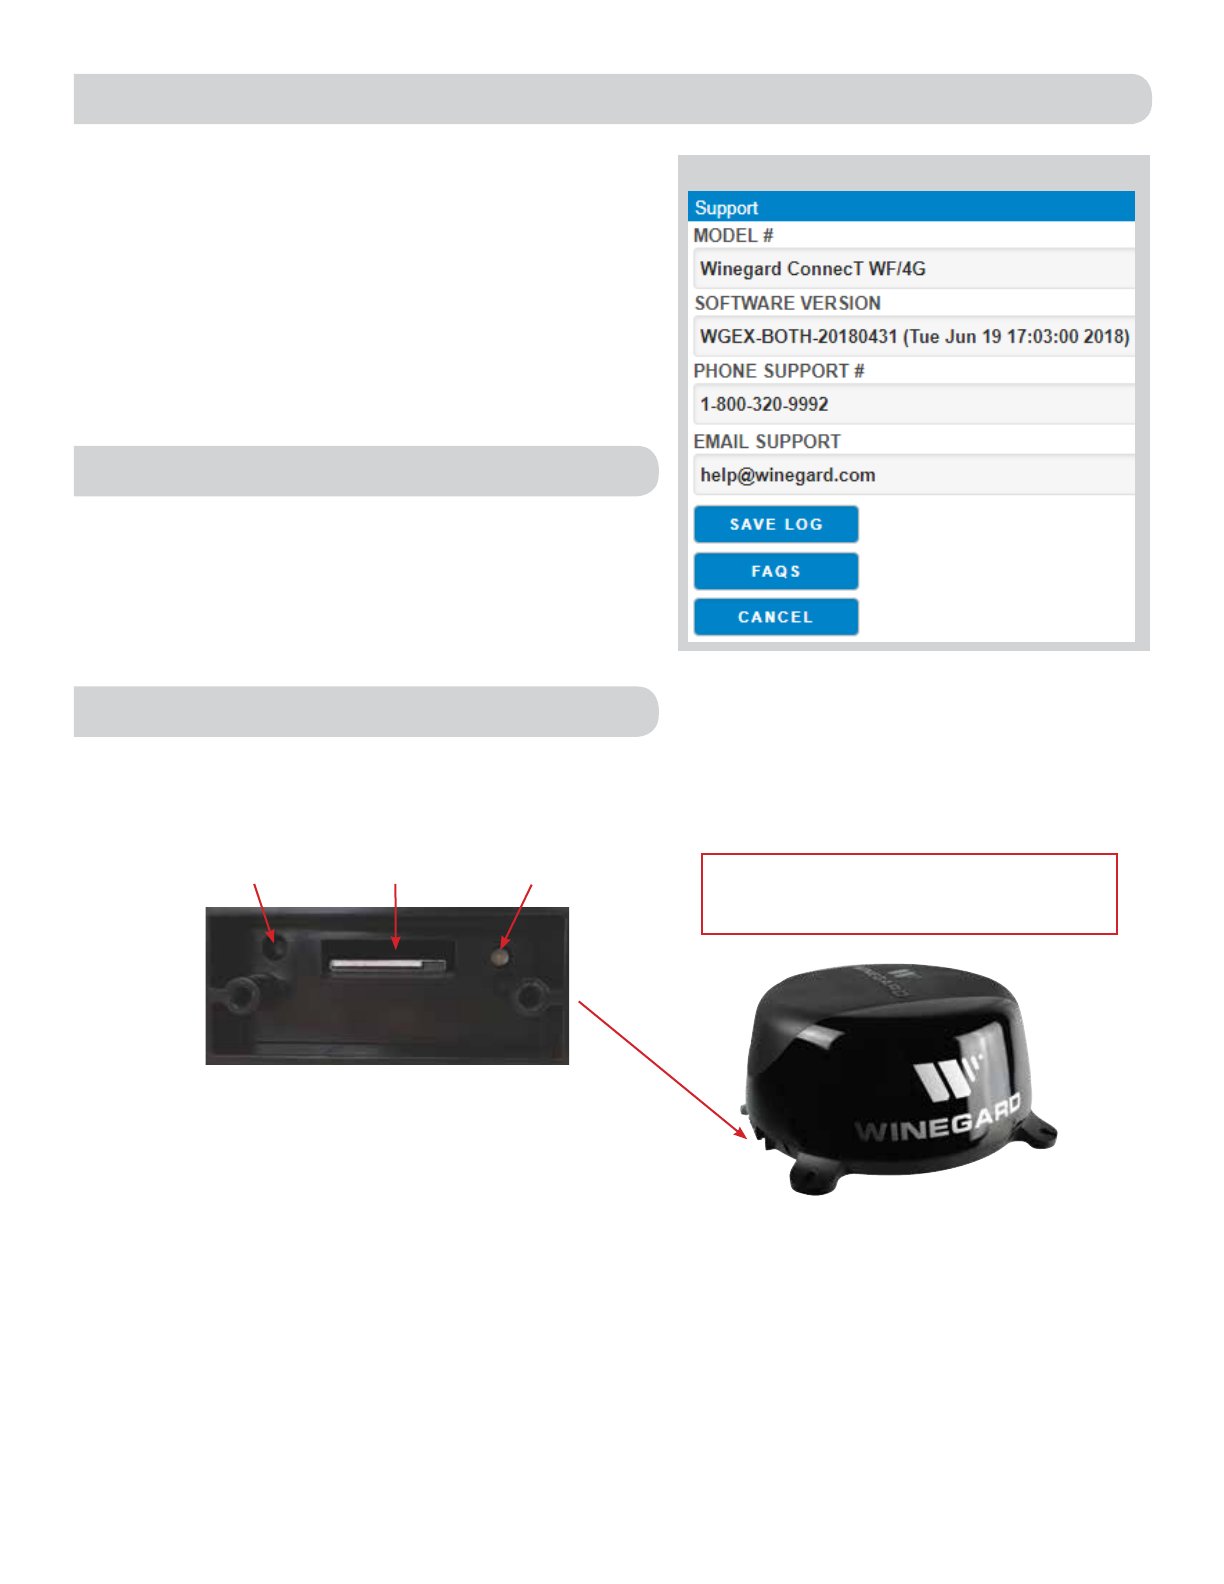
Reset Button SIM Card LED
NOTE: After you have successfully swapped your
SIM card, you will need to update the software of the
ConnecT to recognize the SIM that is now installed.
NOTE: When using your own private data plan
some features will be unavailable, such as the
Data Plan page. For information about data usage,
contact your cellular provider.
NOTE: In order to update the ConnecT 2.0’s firmware with the correct Carriers Network
Settings you will need an internet connection. Please make sure that you have a usable
WiFi connection.
3
INSTALLING THE SIM CARD cont.
Operation: First Time Setup (Cellular Service)
1) Turn the ConnecT 2.0 on.
2) Turn on the WiFi enabled device(s) that you want to connect and scan
for wireless networks. It may take a few minutes for the network
(Winegard2ghzXXXXXX) to appear.
3) The label located on the front of this manual lists the unique default
SSID and password. Select this WiFi signal from the list of wireless
networks and connect. Once the correct SSID has been selected,
enter the password. It is recommended to set your device(s) to
automatically connect with the Winegard ConnecT 2.0.
4) Once connected, open an Internet browser and type 10.11.12.1 into
the address bar and press Enter. This will take you to the Admin
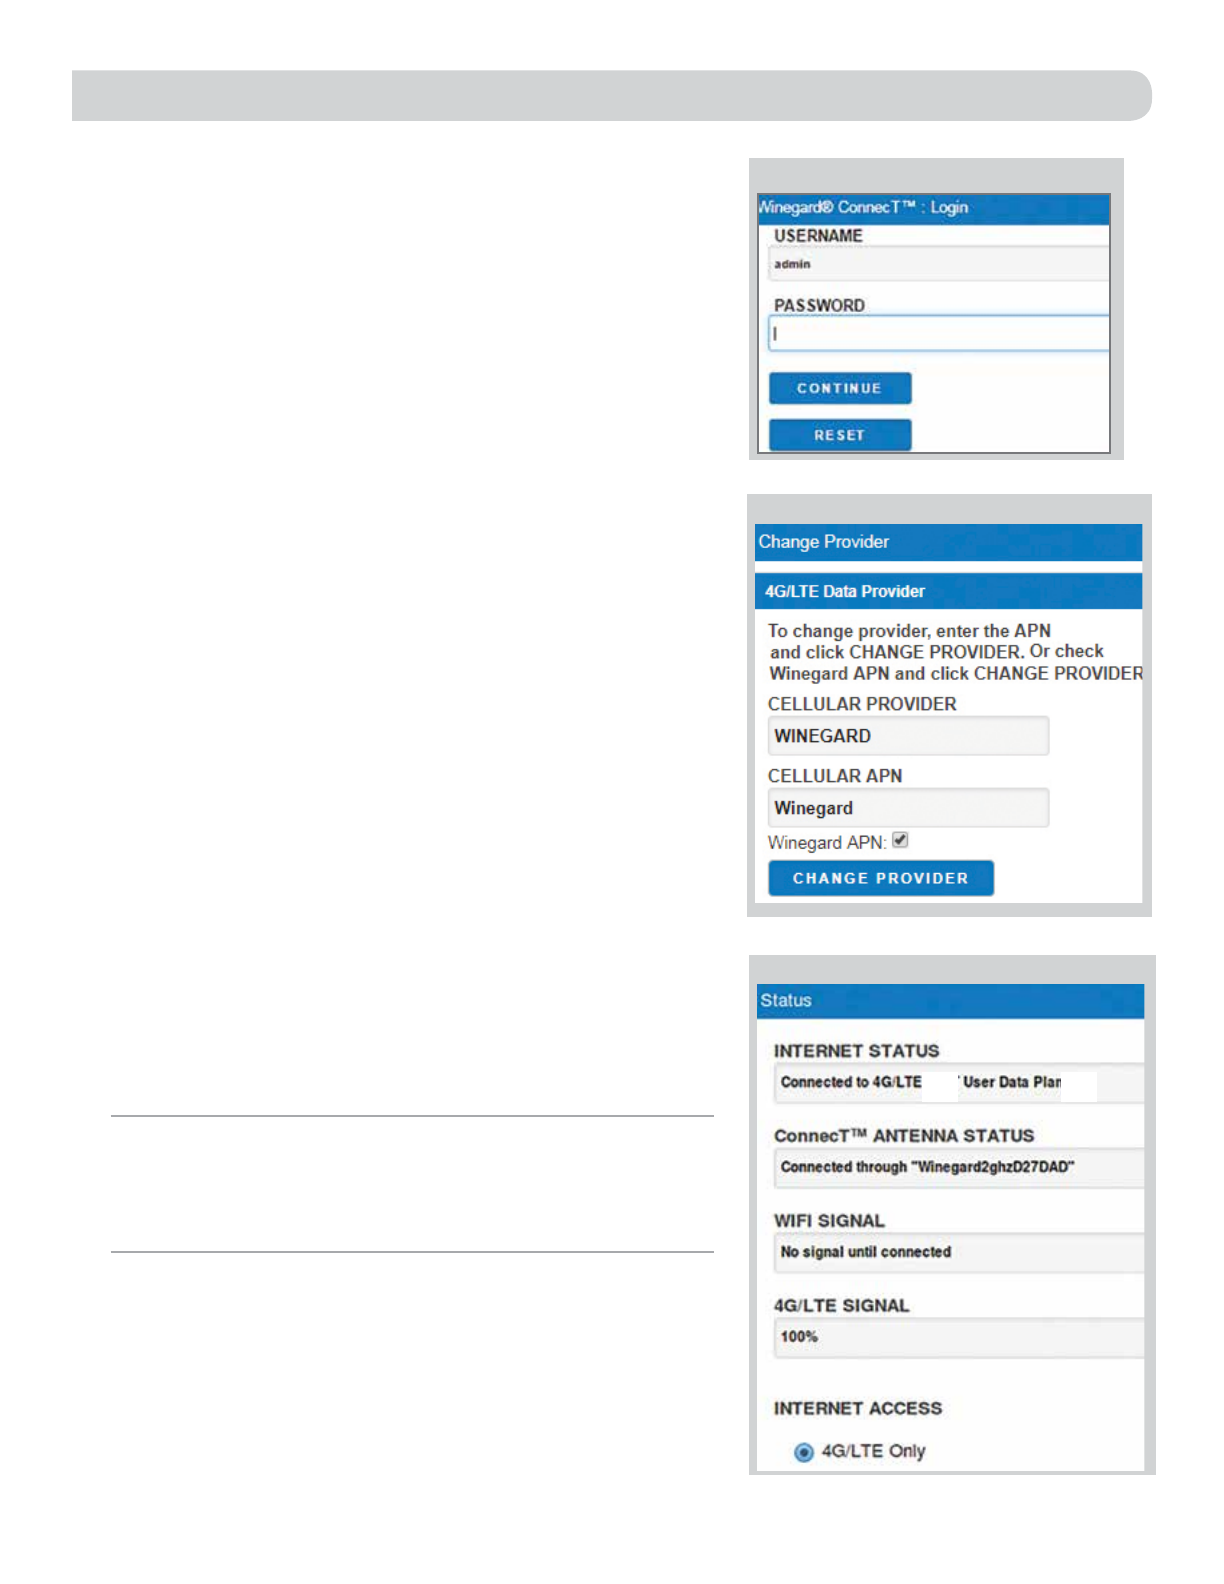
Login Screen.Login using:
Username: admin Password: admin
See figure 5.
5) Next, you will need to connect to the internet in order to download
the correct cellular provider’s firmware. Select WiFi Only and click
the SELECT button.
6) Click the SCAN FOR WIFI button and select one of the usable WiFi
networks.
7) Once connected to the internet, under the NAVIGATE TO PAGE field,
click on the drop-down menu and select CHANGE PROVIDER on the
main status screen. See figure 6.
8) Enter the correct cellular provider in the CELLULAR PROVIDER field
and then enter the correct APN for the SIM card in the CELLULAR
APN field.
9) Click on the CHANGE PROVIDER button.
10) The unit will start to download the necessary firmware. Once the
download is completed, click on the PROCEED button (if available)
to start the flash procedure. Next, click on the 4G /LTE ONLY Internet
Access option on the main Status screen. Your internet status should
change to Connected to “Your Provider”. See figure 7.
Figure 6
Figure 7
Figure 5
NOTE: On the main Status screen, after the first time setup of your cellular
SIM card, you are able to choose from connecting to a useable WiFi connection
or 4G/LET signal. Each time you change the SIM card/cellular provider you will
need to repeat steps 1-10 of the First Time Setup (Cellular Service).
4
It is recommended that you change the network name of
your Winegard ConnecT. This will improve the security of
your network and make it easier to find with your WiFi
enabled devices.
Change Network Password
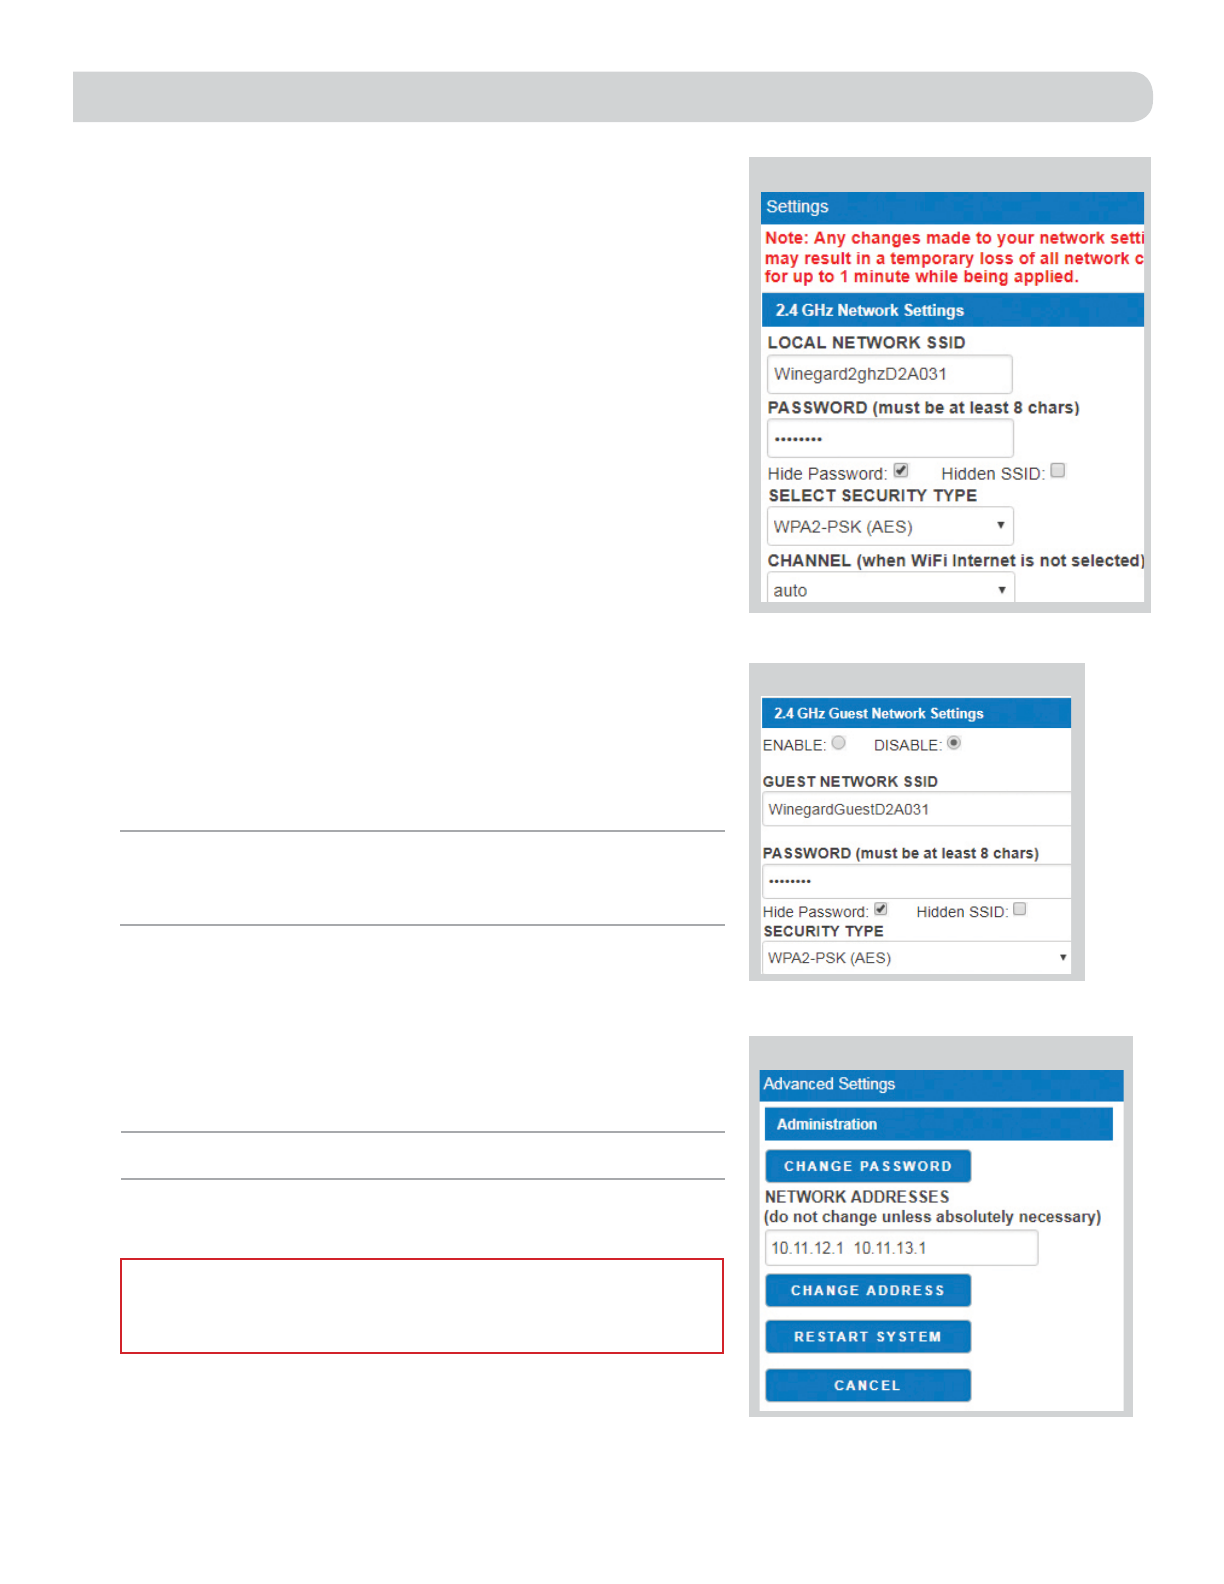
To secure your network, it is suggested that you change the
network password to something you can remember. The new
password must be at least eight characters long. You will
need to log in using the new user name and password.
Security Type
The Winegard ConnecT Security Type has been defaulted
to WPA2-PSK (AES). Other options are available on this
screen.
Guest Network
The Winegard ConnecT 2.0 provides a simple way to set up an
extra network that doesn’t have access to the Status Screen. This
allows you to provide guests with an easy login process to use when
accessing your network while you still maintain a secure system.
To set up a Guest Network:
1) Click on ENABLE. See figure 9.
2) Give the guest network an easily recognizable name. See figure 8.
3) Enter a password. If you use a simple password, it is recommended
that the guest network be disabled when not in use. See figure 8.
Change Administration Password
It is not necessary to change the administration password, however,
to change the password click on CHANGE PASSWORD to bring up
the new password screen. See figure 10. Enter the new password
into the area for both PASSWORD and RE-ENTER PASSWORD. The
password in each of these boxes must match.
Change Network Address
Restart System
Press the restart button only if needing to reboot the Winegard
ConnecT system.
LOCAL NETWORK SETTINGS
NOTE: Any changes made to your network settings will result in a loss of all
network connections. You will need to reconnect all devices to the Winegard
ConnecT 2.0 with the changed network name and/or password.
Figure 8
Figure 9
Figure 10
WARNING: DO NOT CHANGE THE NETWORK ADDRESS UNLESS
INSTRUCTED BY WINEGARD TECH SUPPORT. DOING SO MAY CAUSE
YOUR SYSTEM TO NOT FUNCTION PROPERLY.
NOTE: Do not use the existing WiFi password for the ADMINISTRATION PASSWORD.

5
In the Network Activity option, the name of each device that
is connected wirelessly to the Winegard ConnecT product will
be displayed.
UPDATING THE SOFTWARE
NETWORK ACTIVITY
Figure 13
Figure 14
NOTE: To retain all passwords and name changes during updates, click
Keep Settings. See figure 11.
NOTE: Updating the system software from the network will require the
Winegard ConnecT to be connected to an internet source.
Forget and Saved Networks
If you want to forget the WiFi network that you are currently
on click the FORGET WIFI button. Figure 13.
To view the list of saved networks. Click the SAVED WIFI
button. On this page you will be able to prioritize your
list of saved networks, delete any or all saved networks,
and edit any saved network. Figure 14.
Figure 12
Figure 11
When first setting up the Winegard ConnecT 2.0 it is recommended
to check for software updates the first time the system is connected
to an Internet signal. It is also recommended to check for updates
every couple months for fixes and added features.
1) From the Status Screen, choose UPDATE SOFTWARE from the
drop down menu.
2) Once on the update software screen, click CHECK FOR LATEST
VERSION. See figure 11.
3) There will be a slight delay while the Winegard ConnecT compares
the current software version to the latest available version. If you
have the latest version there is no need to update the software,
click CANCEL. If the check finds that you have older software,
click PROCEED to update to the latest version. See figure 12.
4) If you clicked PROCEED, the system will unavailable for several
minutes while the outdoor antenna resets. After it reboots, the
system will function normally.
NOTE: During this reset, your device may switch to a local remembered
WiFi network. This will not allow you to return to the ConnecT setup
screens. If this happens, simply reconnect manually to the ConnecT’s SSID
again from your device.
6
RESET / RETURN TO FACTORY DEFAULTS
To return to factory default, press the reset button located
inside the SIM card/LED cover plate on the left-hand side
for 30 seconds.
If you are unable to gain access to the outside antenna, you
may perform a power cycle from the power switch. In order
to do this, start with the power switch in the off position.
You will need to turn the switch on, wait 90 seconds and
then turn off. Repeat 3 consecutive times. On the next
power on, the system will begin a reset.
Under the support you will find some useful information
on how to contact the Winegard support team. If you are
experiencing issues you may be asked to save a log file. To do
this you will click on the SAVE LOG button and a download
from the Winegard ConnecT’s software to your device will
begin. After the file is downloaded you will be able to email
technical service for review. See figure 15.
Before contacting the Winegard support team click on the
FAQ button and see if the issue/question you are experiencing
is already listed.
The about page has information about your ConnecT product,
such as, current software version, 4G Carrier, SIM Card
Number, and much more.
Figure 15
ABOUT
SUPPORT
Reset Button SIM Card LED WARNING: ALL CHANGES WILL BE LOST AND
THE UNIT WILL RETURN TO FACTORY DEFAULT
SSID AND PASSWORD.
7
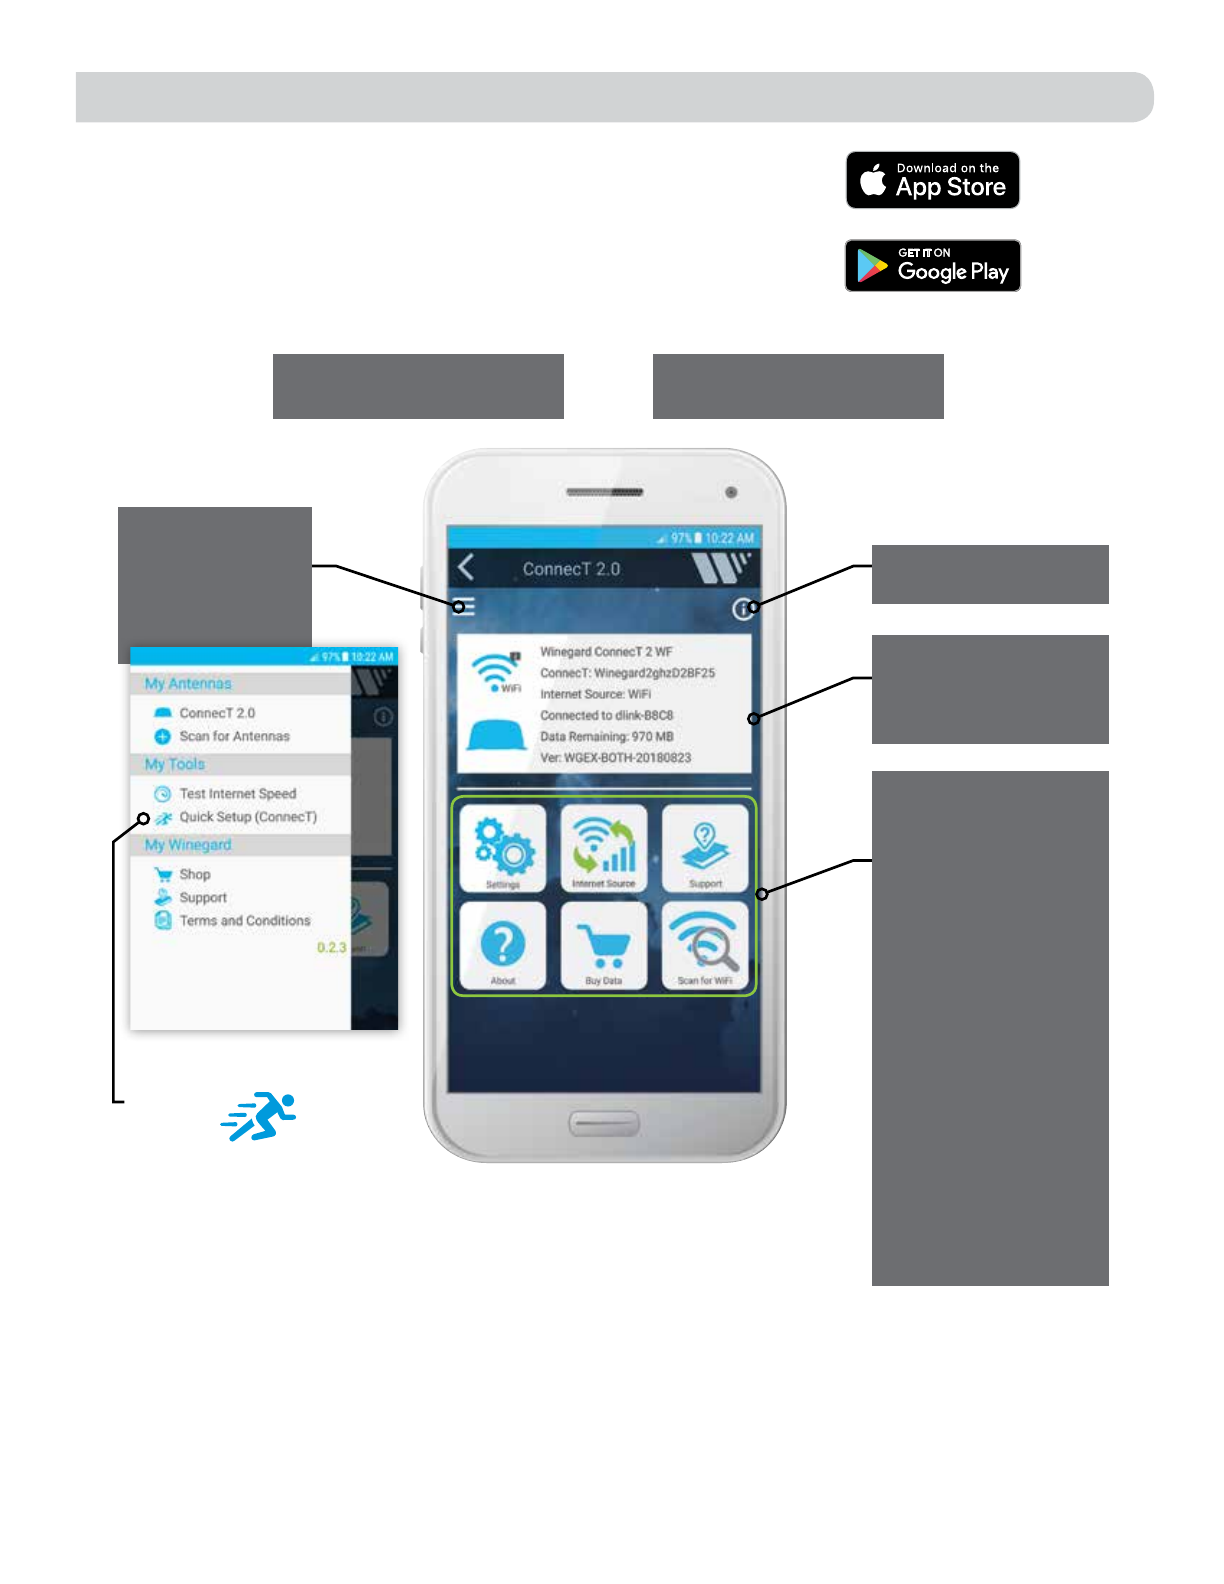
WINEGARD APP - CONNECTED
Winegard recommends downloading the Winegard Connected app now
for free in the Apple App Store and Android Google Play store. The app
was developed to make the overall use of our ConnecT products easier.
Many of the features found within the web user interface are found
within the app on a unified screen.
Quick App
Overview
No 2-Year
Contract
Pay-as-You-Go
30 Days at a Time
Fastest Speeds
Available
No Waiting for the
Next Billing Cycle
No Data
Overages
No Throttling
Based on Usage
Compatible with Winegard
ConnecT models
No PC required to set up
your ConnecT system
Settings Change
network info
Internet Source Switch
between WiFi, 4G, and
no Internet
Support Contact
Winegard, access logs
and manuals
About Update software,
view system info
Buy data
*Purchase
Winegard LTE data
(pay 30 days at a time
with no throttling)
Scan for WiFi Scan
and switch to available
WiFi networks
Slideout Menu
Internet download
speed test, quick
start setup, shop
Winegard.com
Info Helpful hints,
troubleshooting
Overview Connection
status, tap to see signal
strength, software
version
This app requires the use of the camera,
GPS, sensors and compass in your
smartphone. Compass accuracy is based on
calibration and distance from large objects
that may cause magnetic interference.
*U.S.A ONLY

8
QUESTION ANSWER
Am I able to paint the Winegard ConnecT
2.0?
Do not paint any portion of the ConnecT system. Painting the system could impact the performance
and possibly cause damage, which would void the warranty.
I am not seeing the SSID (NETWORK
NAME) for my ConnecT system.
Check that the LED, located under the SIM Card/LED cover entry plate, is powered on. If not, with
a voltage meter, verify that 12V is getting from the vehicle power to the dome. If it is powered on
and you do not see the SSID, reset the unit by pressing and holding the reset button under the
SIM Card/LED cover plate for 30 seconds.
The system software shows I’m connected
to a WiFi source but why aren’t the web
pages loading?
Some WiFi sources do not require a password to connect but do require something before they will
let you use their network. In these cases, they will often have a “SPLASH” page that requires you
to either agree to their rules or enter a password before they will allow you to use their network.
These pages will not always load on the web browser that you select but instead open on your
devices default browser. Sometimes browsing to a web page will also bring up this splash page.
After updating the software and logging
into the system, the CONNECT ANTENNA
status field on the main Status screen
shows "Installing Software" for an
indefinite period.
Return to the Update Software screen and click on the RESTORE button. This will complete the
update on the Winegard ConnecT system.
What if I lost my manual and/or cannot
find my SSID or password?
If you haven’t changed your factory preset SSID or password you have some options to recover these:
1. Located on the side of the dome is a SIM card /LED cover plate. Inside this plate there will
be a white label with your factory preset SSID and password.
If you have changed your password you have 2 options:
1. Inside the SIM Card/LED cover plate there is a reset button on the left hand side. Press and
hold the reset button for 30 seconds. This will restore the unit to the original factory settings.
Then you may log in using the factory SSID and password located on the front of this manual or
inside the cover plate.
2. If you are unable to gain access to the outside antenna you can also do a power cycle to get
the unit back to the factory defaults. (See the Reset/Return to Factory Defaults section of this
manual on page 5).
What do I do if 10.11.12.1 does not bring
up the login screen?
One of several things has happened. The first thing to check is the WiFi signal that your device is
connected to. If this is not the Winegard ConnecT SSID, this address isn’t valid. If you are indeed
connected to the correct network, the address may have been changed. To resolve this, perform a
factory reset. See the Reset/Return to Factory Defaults section of this manual on page 5.
My device shows the SSID but when I
enter the correct password it will not
connect.
Try resetting the ConnecT 2.0 to see if your device will then connect. See the Reset/Return to
Factory Defaults section of this manual on page 6.
After switching from WiFi to 4G or vice
versa my Internet Status field will not
connect.
Verify that your device is still connected to the ConnecT. When switching between 4G and WiFi
your device may have stopped the connection. In order to avoid this, it is recommended to have
your device set to auto connect to the ConnecT when in proximity.
What is the No Internet button on the
main screen used for?
The No Internet button allows the user to turn off auto connect if there is no WiFi around. When
auto connect feature searches for nearby saved WiFi networks, the local AP turns off causing the
user's device(s) to disconnect and reconnect continuously.
What happens if my firmware update
failed?
First connect to a WiFi source. Navigate to the Update Software drop-down and click select.
Finally click on the Recover Modem button. This will reconfigure your modem.
Troubleshooting
LED DEFINITION (LOCATED UNDER THE SIM CARD/LED COVER) :
LED OFF System is powered down.
SOLID RED System is booting up.
FAST BLINKING GREEN System is initializing.
FAST BLINKING ORANGE System is up and waiting for an Internet connection.
SOLID GREEN System is connected to the Internet.
ALTERNATING GREEN/ORANGE System is being updated with new software
WINEGARD®CONNECT™2.0 SUPPORT

9
STATUS SCREEN MESSAGES:
Connected to WiFi XXXX The Winegard ConnecT 2.0 unit is communicating with the source WiFi signal and working. If you
are unable to connect to the internet, the source signal may have a problem.
Scanning The Winegard ConnecT 2.0 unit is looking for WiFi signals in range. This can take a few minutes.
Once the unit is able to identify all of the signals, they will be listed and you will be able to
choose one.
Trying to Connect to WiFi XXXX You have selected a source signal and the Winegard ConnecT 2.0 unit is attempting to connect to
this source. Once connected, the message should change to “Connect to…”
Logging into WiFi XXXX The source signal is password protected. This message will be displayed after you have entered
the correct password and the two systems work out the security protocols.
Bad Password The source signal is password protected. This message will be displayed after you have entered an
incorrect password and the source system has rejected the connection. Generally this screen will
only be seen if the source signal is distant or weak. Normally, the password will be rejected on the
network password screen.
Not Connected The Winegard ConnecT 2.0 system is not connected to a network.
Connecting to WiFi XXXX The Winegard ConnecT 2.0 system is communicating to the selected source signal and a
connection is being made. This will generally only take a minute or two.
WINEGARD®CONNECT™2.0 SUPPORT cont.

10
FCC STATEMENT
This device complies with Part 15 of the FCC Rules. Operation is subject
to the following two conditions: (1) This device may not cause harmful
interference, and (2) this device must accept any interference received,
including interference that may cause undesired operation.
This equipment has been tested and found to comply with the limits for a
Class B digital device, pursuant to Part 15 of the FCC Rules. These limits are
designed to provide reasonable protection against harmful interference in a
residential installation. This equipment uses and can radiate radio frequency
energy and, if not installed and used in accordance with the instructions,
may cause harmful interference to radio communications. However, there
is no guarantee that interference will not occur in a particular installation.
If this equipment does cause harmful interference to radio or television
reception, which can be determined by turning the equipment off and on,
the user is encouraged to try to correct the interference by one or more of
the following methods:
• Reorient or relocate the receiving antenna.
• Increase the separation between the equipment and devices.
• Connect the equipment into an electrical outlet on a circuit different
from that which the radio receiver is connected.
• Consult the dealer or an experienced radio/TV technician for help.
FCC Caution
Any changes or modifications not expressly approved by the party
responsible for compliance could void the user’s authority to operate this
equipment.
Only channels 1–11 can be operated. Selection of other channels is not
possible.
This device and its antenna(s) must not be co-located or operating in
conjunction with any other antenna or transmitter.
FCC Radiation Exposure Statement
This equipment complies with FCC radiation exposure limits set forth for an
uncontrolled environment. This equipment should be installed and operated
with a minimum distance of 25 cm between the radiator and your body.
This device and its antenna(s) must not be co-located or operating in
conjunction with any other antenna or transmitter except in accordance
with FCC multi-transmitter product procedures.
This device complies with FCC and Industry Canada license-exempt RSS
standard(s). Operation is subject to the following two conditions: (1) this
device may not cause interference, and (2) this device must accept any
interference, including interference that may cause undesired operation
of the device.
Le présent appareil est conforme à FCC et CNR d’Industrie Canada
applicables aux appareils radio exempts de licence. L’exploitation est
autorisée aux deux conditions suivantes : (1) l’appareil ne doit pas
produire de brouillage, et (2) l’utilisateur de l’appareil doit accepter tout
brouillage radioélectrique subi, même si le brouillage est susceptible d’en
compromettre le fonctionnement.
WINEGARD MOBILE PRODUCTS LIMITED WARRANTY
(1YEARS PARTS; 1 YEAR LABOR)
Winegard Company warrants this product against defects in materials or workmanship for a period of one (1) years
from the date of original purchase. During year one (1) of such warranty, Winegard Company will also pay authorized
labor costs to an authorized Winegard dealer to repair or replace defective products. No warranty claim will be
honored unless at the time the claim is made, Customer presents proof of purchase to an authorized Winegard dealer
(to locate the nearest authorized Winegard dealer, contact Winegard Company, 3000 Kirkwood Street, Burlington,
Iowa 52601, Telephone 800-288-8094 or visit www.winegard.com). Customer must provide proof of purchase with a
dated sales receipt for the Winegard product to verify the product is under warranty. If the date of purchase cannot be
verified, the warranty period shall be considered to begin thirty (30) days after the date of manufacture.
If a defect in material or workmanship is discovered, Customer may take the product to an authorized Winegard
dealer for service. Customer must provide proof of purchase to verify the product is under warranty. If the product
is brought to an authorized Winegard dealer for service prior to expiration of year one (1) of the warranty period and
a defect in material or workmanship is verified by Winegard Technical Services, Winegard Company will cover the
Winegard dealer’s labor charges for warranty service. The Winegard dealer must contact Winegard Technical Services
in advance for pre-approval of the service. Approval of the service is at the sole discretion of Winegard Company.
Alternatively, Customer may ship the product prepaid to Winegard Technical Services (located at 2736 Mt.
Pleasant Street, Burlington, Iowa 52601, Telephone 800-788-4417). Customer must return the product along with
a brief description of the problem and provide Winegard Technical Services with Customer’s name, address, and
phone number. Customer must also provide proof of purchase to verify the product is under warranty. If the product
is returned before the expiration of the warranty period, Winegard Company will (at its option) either repair or replace
the product.
This Limited Warranty does not apply if the product has been damaged, deteriorates, malfunctions or fails
from: improper installation, misuse, abuse, neglect, accident, tampering, modification of the product as originally
manufactured by Winegard in any manner whatsoever, removing or defacing any serial number, usage not in
accordance with product instructions or acts of nature such as damage caused by wind, lightning, ice or corrosive
environments such as salt spray and acid rain. This Limited Warranty also does not apply if the product becomes
unable to perform its' intended function in any way as a result of the television signal provider making any changes in
technology or service.
RETURN AUTHORIZATION POLICY
A Return Material Authorization (RMA) is required prior to returning any product to Winegard Company or Winegard
Warranty Services under this warranty policy. Please call our Technical Services Department at 800-788-4417 or send
an email to [email protected] to obtain the RMA number. Please furnish the date of purchase when requesting
an RMA number. Enclose the product in a prepaid package and write the RMA number in large, clear letters on the
outside of the package. To avoid confusion or misunderstanding, a shipment(s) without an RMA number(s) or an
unauthorized return(s) will be refused and returned to Customer freight collect.
WINEGARD COMPANY DOES NOT ASSUME ANY LIABILITIES FOR ANY OTHER WARRANTIES, EXPRESS OR
IMPLIED, MADE BY ANY OTHER PERSON.
ALL OTHER WARRANTIES WHETHER EXPRESS, IMPLIED OR STATUTORY INCLUDING WARRANTIES OF FITNESS
FOR A PARTICULAR PURPOSE AND MERCHANTABILITY ARE LIMITED TO THE TWO YEAR PERIOD OF THIS
WARRANTY.
In states that do not allow limitations on implied warranties, or the exclusion of limitation of incidental or
consequential damages, the above limitations or exclusions do not apply.
Some states do not allow limitations on how long an implied warranty lasts, or the exclusion of limitation of
incidental or consequential damages, so the above limitations or exclusions may not apply to you.
This warranty gives Customer specific legal rights. Customer may also have other rights that may vary from state
to state. WS-MOBWARREV3
Rev. 10/14

Page 1 of 3
Coast RV Pty Ltd
trading as Coast to Coast RV Services
ABN 49 097 104 492 - ACN 101 461 330
PO Box 415, Regents Park NSW 2143
Ph (02) 9645 7600 - Fax (02) 9645 7699
Email: warranty@coastrv.com.au
Web: www.coastrv.com.au
Warranty Against Defects
1 WHAT THIS WARRANTY RELATES TO
1.1 This warranty covers goods supplied by Coast RV Pty Ltd T/A Coast to Coast RV Services ("Supplier") to the
Client ("Goods") and relates to any defects in materials and workmanship under normal use and
maintenance (“Defect”).
2 WHAT THE SUPPLIER WILL DO TO HONOUR THE WARRANTY
2.1 The Supplier will:
(i) replace or repair the Goods or the defective part of the Goods free of charge;
(ii) arrange for the Goods or the defective part of the Goods to be repaired or replaced by a qualified
repairer free of charge.
2.2 The Supplier reserves the right to replace defective parts of the Goods with parts and components of similar
quality, grade or composition where an identical part or component is not available.
2.3 Goods presented for repair may be replaced by refurbished goods of the same type rather than being
repaired. Refurbished parts may be used to repair the goods.
3 WHAT THE CLIENT MUST DO TO CLAIM THE WARRANTY
3.1 To claim the benefit of the warranty, the Client will need to (sequentially):
(i) first contact the Supplier; and
(ii) present the defective Goods to the Supplier for inspection, including inspection for defective
workmanship, or otherwise provide evidence of the claimed Defect, accompanied by evidence of proof
of purchase and date of delivery, and if applicable, evidence of maintenance performed in accordance
with the relevant maintenance schedules.
3.2 The claim listed in clause 3.1 may be made in person, or the claim may be sent to the address listed on this
form, including the particulars required under clauses 3.1(i) and 3.1(ii).
3.3 The appropriate form for making a claim for warranty is as attached.
4 DURATION OF WARRANTY
4.1 This warranty will cease:
(i) where the Goods are purchased already fitted in or as a component of a vehicle or RV: from the date
that is twelve (12) months after the Client takes delivery of the vehicle or RV; and
(ii) where the Goods are purchased separately or as an after-market item: from the date that is twelve
(12) months from the date of purchase..
4.2 If a Defect does not materialise in the Goods prior to the date provided in clause 4.1, the Supplier will have
no liability to the Client under this warranty.
5 RESPONSIBILITY FOR COSTS OF CLAIM UNDER THIS WARRANTY
5.1 The Supplier is responsible for the costs directly associated with repairing or replacing the Goods in
accordance with clause 2.1 only.
5.2 Any works required to be completed in addition to fixing the Defect are the responsibility of the Client.
Additional works includes any costs associated with any testing or repair of the Goods or any goods to which
they are fitted, undertaken by a third party in relation to any defect without prior authorisation from the
Supplier.
5.3 Where it is determined that the Goods do not have a Defect, the Client will be charged a GST exclusive
inspection fee of forty-five dollars ($45.00) plus freight costs for the return of the Goods, this is subject to
change without notice.
5.4 The cost of delivery and insurance of the Goods to and from the Supplier, travel costs to and from the
Supplier, and the cost of inspecting and testing the Goods are the sole responsibility of the Client.

Page 2 of 3
6 WARRANTY LIMITATIONS
6.1 The Supplier makes no warranties or representations other than those set out in this warranty document
except as is required by law.
6.2 The Supplier will not be liable under this warranty:-
(i) to the Client or any other person for any consequential, direct or indirect loss, damage or costs
incurred or suffered by the Client or any other person, including but not limited to damage to persons,
other property, loss of turnover, loss of profits, loss of business or goodwill;
(ii) to the Client for transportation or travel costs which are the Client's responsibility;
(iii) for damage or defects in any Goods caused by improper transportation, storage or any other misuse,
neglect or accident.
(iv) for the installation of the Goods. Any fault or defect due to installation should be referred to the
installer. The Goods must be installed in accordance with the Manufacturer’s instructions and any
relevant legislation or code.
6.3 This warranty covers the Client only and it is not transferrable if the Goods are sold by the Client during the
warranty period.
7 WARRANTY EXCLUSIONS
7.1 This warranty will not apply where:
(i) the Goods have been improperly modified or repaired or the Good's defect has arisen due to the
Client's failure to properly install, fit, maintain, service or use the Goods in accordance with the
specifications and instructions provided by the Manufacturer, including a failure to comply with the
relevant maintenance schedule (where applicable);
(ii) the Supplier cannot establish any Defect in the Goods after testing;
(iii) the Goods have been used other than for the purpose for which they were designed;
(iv) the Goods have been subject to abnormal conditions, including but not limited to temperature,
pressure, stress, load or similar;
(v) the Client or installer have used or fitted non-genuine or non-approved parts and accessories to the
Goods or have failed to use recommended parts and accessories;
(vi) the Good's defect has arisen due to abuse, misuse, neglect or accident;
(vii) the Goods have not been installed in accordance with the relevant instructions;
(viii) the Good’s defect is caused by use or fair wear and tear of the Goods (or expendable parts).
8 RIGHTS AT LAW
8.1 The benefits given to the Client under this warranty are in addition to other rights and remedies of the Client
at law in relation to the Goods.
8.2 Our Goods come with guarantees that cannot be excluded under the Australian Consumer Law. You are
entitled to a replacement or refund for a major failure and for compensation for any other reasonably
foreseeable loss or damage. You are also entitled to have the Goods repaired or replaced if the Goods fail to
be of acceptable quality and the failure does not amount to a major failure.

Page 3 of 3
WARRANTY CLAIM FORM
Warranty Providers Name:
Coast RV Pty Ltd trading as Coast to Coast RV Services
ABN 49 097 104 492 - ACN 101 461 330
Warranty Providers Address:
PO Box 415 Regents Park NSW 2143
Client:
Contact No.
Description of Goods provided:
Receipt enclosed: (tick box)
Yes No
Receipt No:
Description of defects (Give as
much detail as possible. Use a
separate page if required):
Date of purchase/services
provided:
I hereby declare that the information provided above is true and correct and to the best of my knowledge and belief
and I have complied with all the conditions of the warranty.
Signed:.....................................................................
Name:......................................................................
(please print)
Dated:......................................................................
[Please note, the issue or completion of this form by the Client does not constitute an admission of liability by the Supplier]

11
11
Apple and the Apple logo are trademarks of Apple Inc., registered in the U.S. and other countries. App Store is a service mark of Apple Inc., registered in the U.S. and other countries. Google
Play and the Google Play logo are trademarks of Google LLC. Winegard is a registered trademark of Winegard Company. Disclaimer: Although every effort has been made to ensure that the
information in this manual is correct and complete, no company shall be held liable for any errors or omissions in this manual. Changes and technological advances are continuously being made
in the wireless market. Information provided in this manual was accurate at time of printing. If the antenna does not function as expected, please contact Winegard Co. Winegard Company
2736 Mt. Pleasant Street • Burlington, IA 52601 • 1-800-288-8094 • Fax 319-754-0787 • www.winegard.com
Printed in U.S.A. ©2018 Winegard Company Rev0 10-18 2452418
This manual suits for next models
1
Table of contents
Popular Extender manuals by other brands

Winegard
Winegard Extreme RW2035W Installation & operation manual

Gembird
Gembird DEX-HDMI-01 User manual all efforts have been made to offer a

Extron electronics
Extron electronics VGAUXGA Line Drivers With Audio Extender... user manual

Wilson Electronics
Wilson Electronics SLEEK 2B5225 installation guide

dedalo
dedalo kam6 quick start guide

Covid
Covid S2MBW-120 user manual


