Winegard Extreme RW2035W User manual

Place label here
Please register your product at
http://www.winegard.com/myantenna.
We will be able to pass along relevant
information, as well as inform you when
software updates are available.
FREE
WINEGARD
®
Extreme™
OUTDOOR WIFI EXTENDER
RW-2035 / RW2035W
Installation / Operation Manual
or call 1-800-320-9992
2452414 Rev5 3-21
www.winegard.com/extreme
Manuel disponible en français au www.winegard.com/extreme
Manual disponible en español en www.winegard.com/extreme
Winegard App
CONNECTED
Quickly set up
your Winegard
Extreme system

OUTDOOR INSTALLATION (Mast Sold Separately)
1
PARTS LIST
WARNINGS:
• Read this manual carefully and completely before
attempting to assemble, install or operate this product.
Winegard®recommends the installation of this
equipment be done by a professional technician.
• Save these instructions.
• Do not paint any portion of the Winegard®Extreme™
.
Painting the system could damage the system and will
void the warranty.
• When first setting up the Winegard Extreme it is
recommended to check for software updates the first
time the system is connected to an internet signal. It is
also recommended to check for updates every couple
months for fixes and added features.
• PoE must be installed indoors.
The RW-2035 antenna may be installed inside or
outside on any mast or pole.
DO NOT MOUNT UPSIDE DOWN OR OVER
CHIMNEY OPENINGS
1) Remove each antenna from the protective bag and
screw it into the correct open port on the outdoor
unit (ODU). Figure 1.
2) Firmly tighten each antenna by hand. If using a
wrench, do not overtighten as the antennas or
housing may become damaged. The antennas
should be tightened to 20–25 inch pounds of
torque.
3) Slide the cable from the antenna through the
mounting bracket and nylon bolt. Screw the
nylon bolt into the hole on the bottom of the
antenna until the mounting bracket is firm
against the bottom of the antenna. Figure 1.
4) Insert “U” bolt through mast clamp and
mounting bracket and start hex nuts onto “U” bolt.
See Figure 1. Slide mast thru “U” bolt and tighten
hex nuts with 7/16” wrench.
SPECS
• Dimensions: 10.3”diameter, 12.4”
tall, 3.75 lbs.
• Wireless Standard: 802.11a/b/g/n
• Frequency Band: 2.4GHz
• Amplifiers: (3) 2.4GHZ Amplifiers
• Antennas: (3) detachable high gain
5dBi antennas
• Wireless Security: WEP, WPA, WPA2,
WPA mixed
• Ports: (1) RJ45 10/100
• Power Rating: Switching, AC Input
100-240v, 1.5A
Outdoor 2.4ghz
Antennas (3)
Extreme™Outdoor Unit (ODU)
Figure 1
Power Supply
Power Inserter
(PoE)
Outdoor Ethernet
Connector Kit :
Barrel
Nut (2)
Crimp (2)
Seal (2)
Mast
Clamp
Nylon Bolt
Mounting Bracket
U-Bolt Hex
Nut
Mast or pipe
(not provided)
ODU
Antennas
Hardware Bag:
Mast
Clamp
Nylon
Bolt
Mounting
Bracket
U-Bolt
Hex Nut (2)
Mast Diameter Range:
¾” – 1.25” O.D.
Ethernet Cable required, not included (85 ft. maximum)

2
1) Determine the location for the PoE and
connect the ethernet cable (not provided)
from the outdoor antenna to the “To
Antenna” connection on the PoE. Ensure
the cable is adequately secured to this
port. Figure 3.
2) Connect the power supply into the “Power
IN” port on the PoE. Again, ensure the
cable is tightly secured to this port.
3) Lastly, there are 8 mounting eyelets on the
PoE. We recommend using the remaining
mounting screws (4), from the hardware
pack, to mount the PoE to the desired
location. To ensure eyelets don’t break, do
not overtighten screw.
4) Turn the power switch to the on position.
The LED should light up.
1) Take each outdoor ethernet connector apart.
2) Using a screw driver or similar tool, push through the crimp to force out the rubber seal, set
the seal aside for later.
3) Slide the end of the ethernet cable from the Extreme™unit (ODU) through the nut before
sliding the cable through the crimp portion of the nut. Use the slit on the side of the rubber
seal to slip the seal onto the cable coming from the Extreme unit. Figure 2. Push the rubber
seal back into the crimp.
4) Plug the connector into the barrel and make sure that you hear it click. Slide the crimp until
you can thread it snugly onto the barrel and screw the nut back onto the crimp and tighten
until snug.
5) Repeat this process with the ethernet cable (not provided) that runs into the building. This
cable should not exceed 85 feet. Figure 2.
OUTDOOR INSTALLATION (Mast sold separately) cont.
INTERIOR INSTALLATION
Figure 3
Reset
Button LAN (not used)
To
Antenna
Power In
Power/Status
LED Indicator
On/O
Switch
LED DEFINITIONS:
LED O System is powered down.
Solid Red The Winegard Extreme is booting up.
Slow Orange
Blink
The Winegard PoE is searching for
an ODU.
Fast Orange
Blink
The Winegard PoE reset button was
pressed for 10 seconds.
Slow Red Blink
The Winegard PoE is connected to
something other than the ODU in the
“To Antenna” port.
Fast Red Blink The Winegard PoE reset button was
pressed for more than 30 seconds.
Solid Green The Winegard PoE has found the ODU
and it is powered up.
Fast Green
Blink
The Winegard PoE reset button was
pressed for less than 10 seconds.
Alternating
Green &
Orange Blink
Power may have been removed
during an update and the Winegard
ODU is in rescue mode. Please
contact Winegard at 1-800-320-
9992.
Barrel
Connector
Seal Crimp
Nut
Cable from
Extreme
Cable from
building
Figure 2

OPERATION
3
IMPORTANT: DO NOT LOSE THIS MANUAL.
It contains your unique factory default SSID
and password.
NOTE: Winegard®recommends web browsers
Microsoft®Edge, Firefox®, and Google
Chrome™Browser.
WiFi Extender
1) Confirm the ON button is pressed in on the PoE power
supply. The LED should be on and green. Turn on the
WiFi enabled device(s) that you want to connect and
scan for wireless networks. It may take a few minutes
for the network to appear.
2) The label located on the front of this manual lists the
unique default SSID and password. Select this WiFi
signal from the list of wireless networks and connect.
Once the correct SSID has been selected, enter the
password.
It is recommended to set your device(s) to
automatically connect with the Winegard®Extreme™.
3) Once connected, open an internet browser and type
10.11.12.1 into the address bar and press Enter. Figure 5.
This will take you to the Admin Login screen. Figure 6.
Login using: Username: admin Password: admin.
To connect to a WiFi network, go to Step 4.
4) To connect to a WiFi network, select WiFi and then click
on SCAN FOR WiFi. Figure 7. This will bring up a list of all
WiFi signals in range (this should take about one minute).
The Winegard Extreme will display available networks
by signal strength. Select the desired network and click
CONTINUE.
5) Enter the network password, if prompted. Once the
Winegard Extreme connects to the internet, the
INTERNET STATUS will show connected (this could
take as long as two minutes). You are now ready to use
the WiFi.
Figure 5
Figure 6
Figure 8
Figure 4
Reset
Button LAN (not used)
To
Antenna
Power In
Power/Status
LED Indicator
On/O
Switch
NOTE: The steps below can also be done on the
WINEGARD CONNECTED App. (Extender Mode)
Figure 7
(Extender Mode)

Change (SSID) Network Name
It is recommended that you change the name of
your Extreme. This will improve the security of your
network and make it easier to find with your WiFi
enabled devices.
Change Network Password
To secure your network, it is suggested that you
change the network password to something you can
remember. The new password must be at least eight
characters long. You will need to log in using the new
user name and password.
Forget and Saved Networks
If you want to forget the WiFi network that you are
currently on click the FORGET WIFI button. Figure 9.
To view the list of saved networks. Click the SAVED WIFI
button. On this page you will be able to prioritize your
list of saved networks, delete any or all saved networks,
and edit any saved network. Figure 10.
Most functions on the Winegard Extreme are controlled
from the Local Network Settings screen. From the
Status Screen, select LOCAL NETWORK SETTINGS from the
drop down menu and click SELECT. From here (Figure
11), it is possible to do any of the following:
Security Type
The Winegard Extreme Security Type has been
defaulted to WPA2-PSK (AES). Other options are
available on this screen.
Guest Network
The Winegard Extreme provides a simple way to set up
an extra network that doesn’t have access to the Status
Screen. This allows you to provide guests with an easier
password to use when accessing your network while still
maintaining a secure system.
To set up a Guest Network (Figure 12):
1) Click on ENABLE.
2) Give guest network an easily recognizable name.
3) Enter a password. If you use a simple password,
it is recommended that the guest network be
disabled when not in use.
OPERATING FEATURES
Figure 12
NOTE: Any changes made to your network
settings may result in a temporary loss of all
network connections . You will need to reconnect
all devices to the Winegard Extreme with the
changed network name and/or password.
Figure 11
Figure 9
Figure 10
4

UPDATING THE SOFTWARE
ADVANCED SETTINGS
5
When first setting up the Winegard Extreme it is
recommended to check for software updates the first
time the system is connected to an Internet signal. It is
also recommended to check for updates every couple
months for fixes and added features.
1) From the Status Screen, choose UPDATE SOFTWARE from
the drop down menu and click SELECT.
2) Once on the update software screen, click CHECK FOR
LATEST VERSION. See Figure 14.
3) There will be a slight delay while the Winegard Extreme
compares the current software version to the latest
available version. If you have the latest version there
is no need to update the software, click CANCEL. If the
check finds that you have older software, click PROCEED
to update to the latest version. See Figure 15.
4) If you clicked PROCEED, the system will unavailable for
several minutes while the outdoor antenna resets. As it
powers back on, the system will function normally.
Figure 14
NOTE: During this reset, your device may switch to a local remembered WiFi network. This will not
allow you to return to the Extreme setup screens. If this happens, simply reconnect manually tothe
Extreme’s SSID again from your device.
Connected Devices
This displays the name of each device currently
connected wirelessly to the Winegard®Extreme™.
Change Network Address
Change Admin Password
It is not necessary to change the administration
password, however, to change the password click on
CHANGE PASSWORD to bring up the new password screen.
See Figure 13. Enter the new password into the area
for both PASSWORD and RE-ENTER PASSWORD. The
password in each of these boxes must match.
Figure 13
NOTE: To retain all passwords and name changes during
updates, click “Keep Settings”. See Figure 14. Updating
the system software from the network will require the
Winegard Extreme to be connected to an internet
source.
Figure 15
NOTE: Do not use the existing WiFi password for the
ADMIN PASSWORD.
WARNING: Do not change the Network Address unless
instructed by Winegard Tech Support. Doing so may
cause your system to not function properly.

6
QUESTION ANSWER
Am I able to paint the
Winegard®Extreme™?
Do not paint any portion of the WiFi extender. Painting the system could damage the system and
will void the warranty.
I have wired the PoE and
turned the power button on,
but I see no LED and I cannot
access the Extreme software.
Confirm that you are supplying 24VDC to the PoE “Power In” port. The unit will not power on
and no LED will be present if the voltage is too low. Confirm you are using the supplied power
adapter, the label will read 24vdc 1.5amp output. If the proper power adapter is being used
and the light still does not come on, confirm the power adapter is providing the required
24vdc output.
The system says that it is
connected, why won’t web
pages load?
Some WiFi sources do not require a password to connect but do require something before
they will let you use their network. In these cases, they will often have a “SPLASH” page that
requires you to either agree to their rules or enter a password before they will allow you to use
their network. These pages will not always load on the web browser that you select but instead
open on your devices default browser. Sometimes browsing to a web page will also bring up
this splash page.
The system keeps making
me log in every time I try to
change screens.
Check to see if you have a second window open on the Winegard Extreme status screen. Close
this window and the problem should go away.
I changed my password and
nothing happened.
The Winegard Extreme will reject any password that is not long enough. Try entering a
password of at least eight characters. This will improve the security of your devices.
What if I cannot find my SSID
or password?
If you haven’t changed your factory preset SSID or password you have 3 options to recover these:
1. Connect a laptop to the LAN connection on your PoE power inserter. Figure 4. This will allow
you into the software. Once logged in, you will be able to recover your SSID and password
on the Local Networks Settings tab.
2. On the bottom of the ODU is a white label with your factory preset SSID and password.
3. Remove the 3 nuts from the 3 plastic feet. Lift the outdoor antenna from the 3 metal posts and
the label containing this information will be on the bottom side.
If you have changed your password you have 2 options:
1. Connect a laptop to the LAN connection on your PoE power inserter. Figure 4. This will allow
you into the software. Once logged in, you will be able to recover your SSID and password
on the Local Networks Settings tab.
2. Press and hold the reset button for 30 seconds located on the PoE (Figure 4). This will
restore the unit to the original factory settings. Then you may log in using the factory SSID
and password located on the front of this manual or on the ODU.
What do I do if 10.11.12.1
does not bring up the login
screen?
One of several things has happened. The first thing to check is the WiFi signal that your model
is connected to. If this is not the Winegard Extreme SSID, this address isn’t valid. If you are
indeed connected to the correct network, the address may have been changed. To resolve this,
press the reset button on the side of your PoE for 30 seconds. This will return the unit to its
factory settings.
My default SSID does not
appear on my device when I
search for it.
When the Winegard Extreme first powers on or has reset for any reason, it stops broadcasting
the SSID. It may take between four and five minutes from the time it regained power to start
broadcasting again.
I changed my Winegard
Extreme SSID and was
disconnected.
This is normal. The old SSID that you were connected to is no longer valid, simply open your
device’s WiFi screen and search for the name you chose for your network. Select this and
enter the password.
I am connected to a network
but the speed isn’t very good.
The Winegard Extreme can only extend the signal range for what is available. Try moving closer
to the source of the signal and logging on with your device directly. If the speed is still slow, try
searching for another available network.
STATUS SCREEN MESSAGES:
Connected to WiFi XXXX The Winegard Extreme unit is communicating with the source WiFi signal and working. If you
are unable to connect to the internet, the source signal may have a problem.
Scanning
The Winegard Extreme unit is looking for WiFi signals in range. This can take a few minutes.
Once the unit is able to identify all of the signals, they will be listed and you will be able to
choose one.
Trying to Connect to WiFi
XXXX
You have selected a source signal and the Winegard Extreme unit is attempting to connect to
this source. Once connected, the message should change to “Connect to…”
Logging into WiFi XXXX The source signal is password protected. This message will be displayed after you have
entered the correct password and the two systems work out the security protocols.
Bad Password
The source signal is password protected. This message will be displayed after you have
entered an incorrect password and the source system has rejected the connection. Generally
this screen will only be seen if the source signal is distant or weak. Normally, the password will
be rejected on the network password screen.
Not Connected The Winegard Extreme system is not connected to a network.
Connecting to WiFi XXXX The Winegard Extreme system is talking to the selected source signal and a connection is
being made. This will generally only take a minute or two.

WINEGARD PRODUCTS LIMITED WARRANTY (2 YEARS PARTS; 1 YEAR LABOR)
Winegard Company warrants this product against defects in materials or workmanship for a period of two (2) years from the date of original purchase.
During year one (1) of such warranty, Winegard Company will also pay authorized labor costs to an authorized Winegard dealer to repair or replace
defective products. No warranty claim will be honored unless at the time the claim is made, Customer presents proof of purchase to an authorized
Winegard dealer (to locate the nearest authorized Winegard dealer, contact Winegard Company, 3000 Kirkwood Street, Burlington, Iowa 52601,
Telephone 800-288-8094 or visit www.winegard.com). Customer must provide proof of purchase with a dated sales receipt for the Winegard product to
verify the product is under warranty. If the date of purchase cannot be verified, the warranty period shall be considered to begin thirty (30) days after the
date of manufacture.
If a defect in material or workmanship is discovered, Customer may take the product to an authorized Winegard dealer for service. Customer must
provide proof of purchase to verify the product is under warranty. If the product is brought to an authorized Winegard dealer for service prior to expiration
of year one (1) of the warranty period and a defect in material or workmanship is verified by Winegard Technical Services, Winegard Company will cover
the Winegard dealer’s labor charges for warranty service. The Winegard dealer must contact Winegard Technical Services in advance for pre-approval of
the service. Approval of the service is at the sole discretion of Winegard Company.
Alternatively, Customer may ship the product prepaid to Winegard Technical Services (located at 2736 Mt. Pleasant Street, Burlington, Iowa 52601,
Telephone 800-788-4417). Customer must return the product along with a brief description of the problem and provide Winegard Technical Services
with Customer’s name, address, and phone number.Customer must also provide proof of purchase to verify the product is under warranty. If the product
is returned before the expiration of the warranty period, Winegard Company will (at its option) either repair or replace the product.
This Limited Warranty does not apply if the product has been damaged, deteriorates, malfunctions or fails from: improper installation, misuse, abuse,
neglect, accident, tampering, modification of the product as originally manufactured by Winegard in any manner whatsoever, removing or defacing
any serial number, usage not in accordance with product instructions or acts of nature such as damage caused by wind, lightning, ice or corrosive
environments such as salt spray and acid rain. This Limited Warranty also does not apply if the product becomes unable to perform its' intended function
in any way as a result of the television signal provider making any changes in technology or service.
RETURN AUTHORIZATION POLICY
A Return Material Authorization (RMA) is required prior to returning any product to Winegard Company or Winegard Warranty Services under this
warranty policy. Please call our Technical Services Department at 800-788-4417 or send an email to [email protected] to obtain the RMA
number.Please furnish the date of purchase when requesting an RMA number. Enclose the product in a prepaid package and write the RMA number in
large, clear letters on the outside of the package. To avoid confusion or misunderstanding, a shipment(s) without an RMA number(s) or an unauthorized
return(s) will be refused and returned to Customer freight collect.
WINEGARD COMPANY DOES NOT ASSUME ANY LIABILITIES FOR ANY OTHER WARRANTIES, EXPRESS OR IMPLIED, MADE BY ANY OTHER PERSON.
ALL OTHER WARRANTIES WHETHER EXPRESS, IMPLIED OR STATUTORY INCLUDING WARRANTIES OF FITNESS FOR A PARTICULAR PURPOSE AND
MERCHANTABILITY ARE LIMITED TO THE TWO YEAR PERIOD OF THIS WARRANTY.
In states that do not allow limitations on implied warranties, or the exclusion of limitation of incidental or consequential damages, the above limitations
or exclusions do not apply.
Some states do not allow limitations on how long an implied warranty lasts, or the exclusion of limitation of incidental or consequential damages, so the
above limitations or exclusions may not apply to you.
This warranty gives Customer specific legal rights. Customer may also have other rights that may vary from state to state. WS-MOBWARREV3
Rev. 10/14
FCC STATEMENT
This device complies with Part 15 of the FCC Rules.Operation is subject to the following two conditions: (1) This
device may not cause harmful interference, and (2) this device must accept any interference received, including
interference that may cause undesired operation.
This equipment has been tested and found to comply with the limits for a Class B digital device, pursuant to Part 15 of
the FCC Rules.These limits are designed to provide reasonable protection against harmful interference in a residential
installation. This equipment uses and can radiate radio frequency energy and, if not installed and used in accordance
with the instructions, may cause harmful interference to radio communications. However, there is no guarantee that
interference will not occur in a particular installation.If this equipment does cause harmful interference to radio or
television reception, which can be determined by turning the equipment o and on, the user is encouraged to try to
correct the interference by one or more of the following methods:
• Reorient or relocate the receiving antenna.
• Increase the separation between the equipment and devices.
• Connect the equipment into an electrical outlet on a circuit dierent from that which the radio receiver is
connected.
• Consult the dealer or an experienced radio/TV technician for help.
FCC Caution
Any changes or modifications not expressly approved by the party responsible for compliance could void the user’s
authority to operate this equipment.
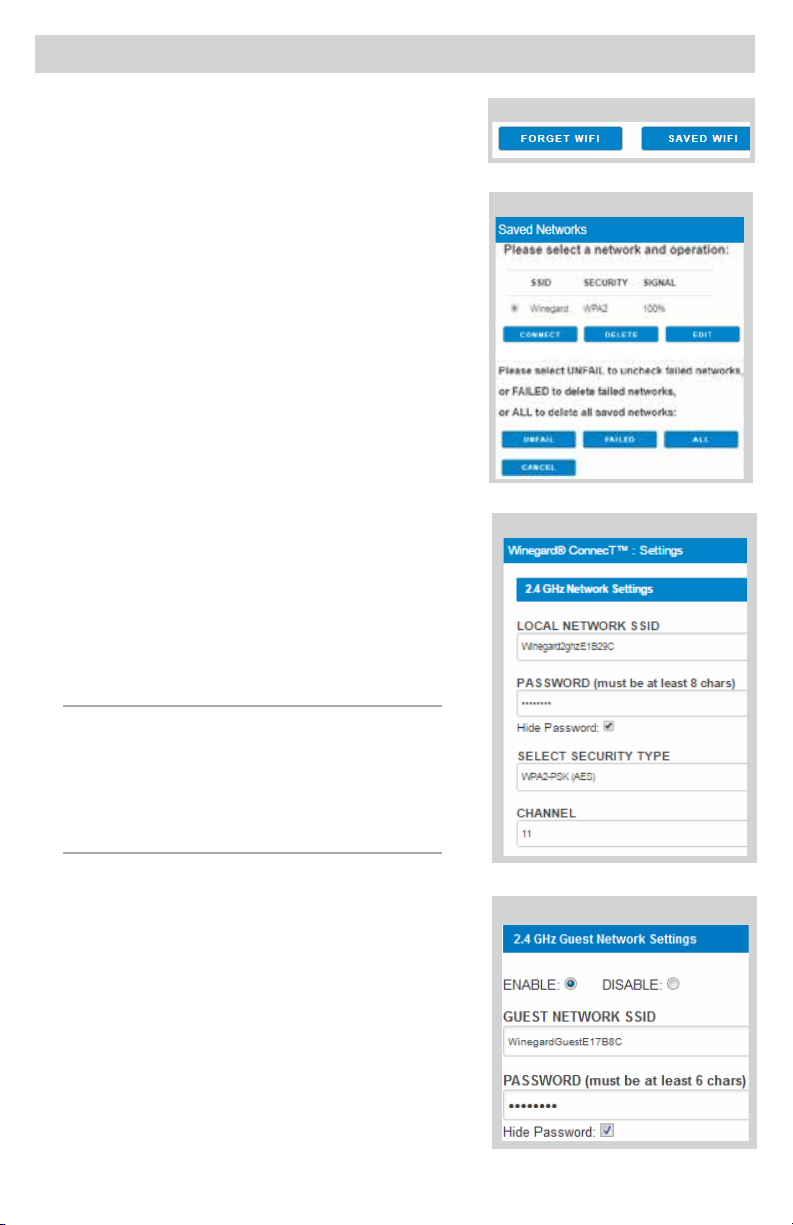
Only channels 1–11 can be operated. Selection of other channels is not possible.
This device and its antenna(s) must not be co-located or operating in conjunction with any other antenna or
transmitter.
FCC Radiation Exposure Statement
This equipment complies with FCC radiation exposure limits set forth for an uncontrolled environment. This equipment
should be installed and operated with a minimum distance of 25 cm between the radiator and your body.
This device and its antenna(s) must not be co-located or operating in conjunction with any other antenna or
transmitter except in accordance with FCC multi-transmitter product procedures.
This device complies with FCC
and Industry Canada license-
exempt RSS standard(s).
Operation is subject to the
following two conditions:
(1) this device may not
cause interference, and
(2) this device must accept
any interference, including
interference that may cause
undesired operation of the
device.
Le présent appareil
est conforme à FCC et
CNR d’Industrie Canada
applicables aux appareils
radio exempts de licence.
L’exploitation est autorisée
aux deux conditions suivantes
: (1) l’appareil ne doit pas
produire de brouillage, et
(2) l’utilisateur de l’appareil
doit accepter tout brouillage
radioélectrique subi, même si
le brouillage est susceptible
d’en compromettre le
fonctionnement.
Disclaimer: Although every eort has been made to ensure that the information in this manual is correct and complete, no company shall be held
liable for any errors or omissions in this manual. Information provided in this manual was accurate at time of printing. If the antenna does not
function as expected, please contact Winegard Co. Winegard is a registered trademark of Winegard Company. LLC. Apple & the Apple logo are
trademarks of Apple Inc., registered in the U.S. and other countries. App Store is a service mark of Apple Inc., registered in the U.S. and other
countries. Google Play & the Google Play logo are trademarks of Google LLC. All trademarks, registered trademarks and logos are the property
of their respective owners and are not aliated with Winegard Company.
Winegard Company • 2736 Mt. Pleasant Street • Burlington, IA 52601 • 1-800-288-8094 • Fax 319-754-0787
www.winegard.com • Printed in U.S.A. ©2018 Winegard Company Rev5 3-21 2452414
This manual suits for next models
1
Table of contents
Other Winegard Extender manuals

Winegard
Winegard ConnecT 2.0+ User manual

Winegard
Winegard ConnecT 2.0 User manual

Winegard
Winegard ConnecT WF1xT Series User manual

Winegard
Winegard WF2-35B User manual

Winegard
Winegard Extreme RW-2035 User manual

Winegard
Winegard ConnecT WF1 User manual

Winegard
Winegard Togo Roadlink C2 User manual

Winegard
Winegard ConnecT WF1 User manual

Winegard
Winegard WF-4000 User manual

Winegard
Winegard ConnecT 4G1 User manual