COEF Master Disco 96 User manual

•OPERATING INSTRUCTIONS
•MANUALE ISTRUZIONI
Rev. 1
Programmable Console
Master Disco 96
®
•Code 02D007
•Codice 02D007

Pag. 2
®
E-mail: [email protected] - http://www.coef.it
Tuttiidirittidiriproduzione,diffusionedelpresentemanuale
sono riservati a COEF srl.
Le descrizioni ed illustrazioni fornite nella presente pubbli-
cazione non sono impegnative.
COEF srl. si riserva il diritto di apportare in qualsiasi mo-
mento tutte le modifiche che riterrà opportune.
Ilpresentemanualenonpuòesserecedutoinvisioneaterzi
senza specifica autorizzazione scritta da COEF srl.
All rights for reproduction of this catalogue are reserved for
COEF srl.
Descriptions and illustrations are not binding.
COEFsrl.reservestherighttomakeallnecessarymodifica-
tions at any time.
Thismanualcannotbeinspectedbythirdparty,withoutwrit-
ten autorization by COEF srl.
Lesdroitsdereproductiondececataloguesontentiérement
réservés à la Société COEF srl.
Lesdescriptionsetles illustrations fournies dans ce manuel
n’engagent acunement notre Société.
COEF srl. se réserve le droit d’apporter, à tout moment, les
modifications qu’elle jugera utiles.
Ce manuel ne peut être remis à des tiers sans l’autorisation
préalable de la Société COEF srl.
Alle Rechte vorbehalten. Nachdruck verboten.
Die in diesem Handbuch enthaltenen Beschreibungen und
Abbildungen sind nicht verbindilich.
Die Firma COEF srl. behält sich das Recht auf Änderungen
zu jedem Zeitpunkt vor.
Diese Bedienungsanleitung darf ohne schriftliche Geneh-
migung der Firma COEF srl. dritten Personen nicht zugänglich
gemacht werden.

Pag.3
INDICE INDEX
5-PROGRAMMAZIONE................................................................................................................................
5 - PROGRAMMING .......................................................................................................................................
6 - PROGRAMMAZIONE SEQUENCER ........................................................................................................
6 - SEQUENCER PROGRAMMING ...............................................................................................................
7 - ESECUZIONE PROGRAMMI ...................................................................................................................
7 - RUNNING PROGRAMS ..........................................................................................................................
8
•Passo 1 Setup 1......................................................................................................................................................
•Step 1 Setup 1 .....................................................................................................................................................
•Passo 2 - JOYSTICK - Settaggio Joystick ........................................................................................................
•Step 2 - JOYSTICK - Setting Joystick ............................................................................................................
•Passo 3 - ASSIGN - Assegnazione proiettori ............ ..........................................................................................
•Step 3 - ASSIGN - Projectors’ assignment ............. .........................................................................................
•Passo 4 - TYPE - Tipi di proiettore ....................................................................................................................
•Step 4 - TYPE - Projectors type setting ..........................................................................................................
•Passo 5 - AUDIO - Configurazione audio IN ....... ...............................................................................................
•Step 5 - AUDIO - Audio IN setting ...................................................................................................................
•Passo 6 - RS232 - Configurazione porta RS232 ........... ....................................................................................
•Step 6 - RS232 - RS232 port’s configuration .................................................................................................
•Passo 7 - BEEPER - Configurazione cicalino .....................................................................................................
•Step 7 - BEEPER - Beeper configuration .......................................................................................................
•Passo 8 - PASSWR - Configurazione PASSWORD ...........................................................................................
•Step 8 - PASSWR - Password setting .............................................................................................................
•Passo 9 - FORMAT - Formattazione dell’unità .....................................................................................................
•Step 9 - FORMAT - Resetting unit ......................................................................................................................
pag. 16
pag. 18
pag. 17
pag. 19
pag. 20
pag. 21
pag. 22
pag. 8
pag. 8
pag. 8
pag. 8
pag. 9
pag. 10
pag. 11
pag. 12
pag. 13
pag. 13
pag. 13
pag. 13
pag. 14
pag. 14
pag. 14
pag. 14
pag. 15
pag. 15
CONCETTO GENERALE - GENERAL CONCEPT ....................................................................................
1-DIMENSIONIEPANNELLI - DIMENSIONSandPANELS......................................................................
2-COLLEGAMENTI-CONNECTIONS.........................................................................................................
3-ACCENSIONECONSOLE-SWITCHTOPOWERON..............................................................................
4- SETUP ........................................................................................................................................................
pag. 4
pag. 5
pag. 6
pag. 7
pag. 8

Pag. 4
CONCETTO GENERALE GENERAL CONCEPT
Master Disco 96
Il Master Disco 96 è una console programmabile studiata per controllare apparecchiature che dispongono di ingressi
DMX: (scanners, fari cambiacolore, inseguipersone ecc.).
ConilMasterDisco96èpossibilecontrollarefinoa96canaliDMX(es:16proiettorida6canalicadaunooppure12proiet-
torida8canali).nelMasterDisco96sonomemorizzatididefaulttuttiiproiettoriprodottidaCOEF,conassegnazioneautoma-
tica dei canali.
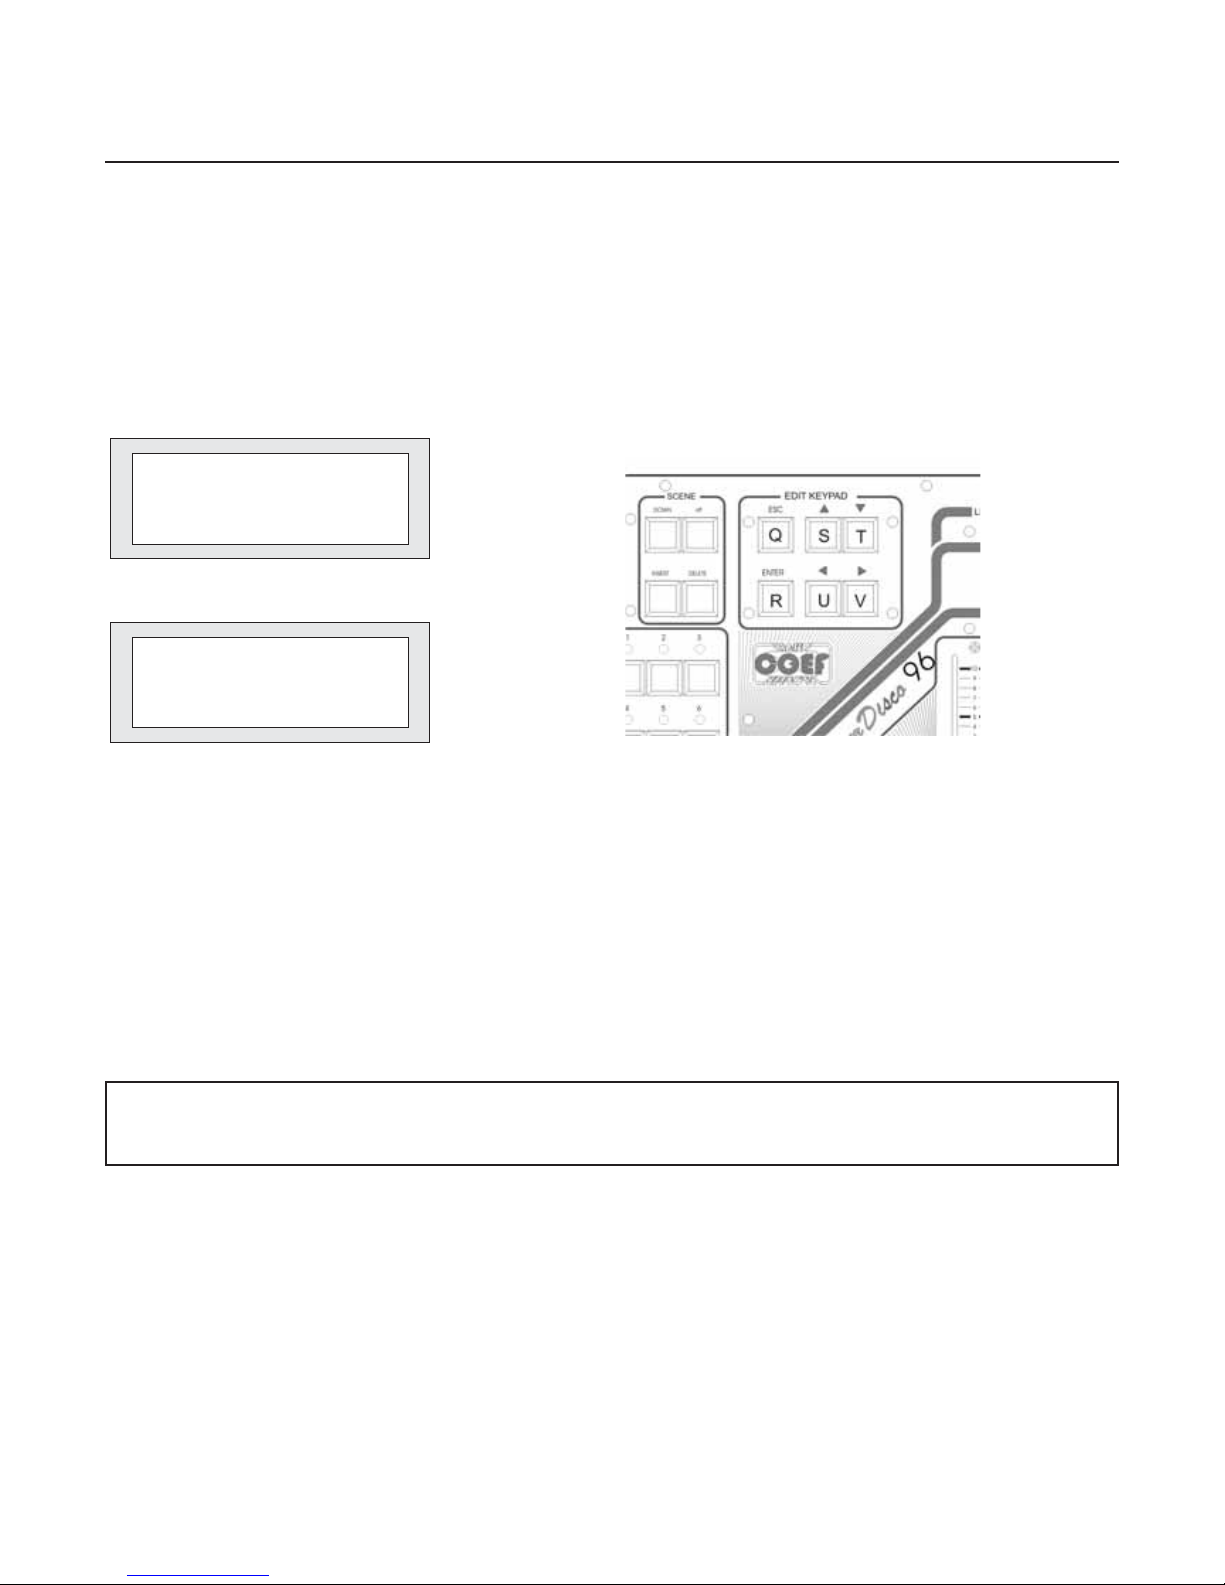
Tutta la console viene gestita e configurata attraverso un display a matrice retroilluminato che permette una interfaccia
utentechiaraesemplicissimadacomprendere.Ivaloridaattribuireaivaricanalideiproiettorisonoimpostabiliconrapiditàat-
traverso comodi sliders molto sensibili; una migliore precisione si ottiene per mezzo di appositi pulsanti che incrementano o
decrementano il valore digitale, con passo di una unità su 255.
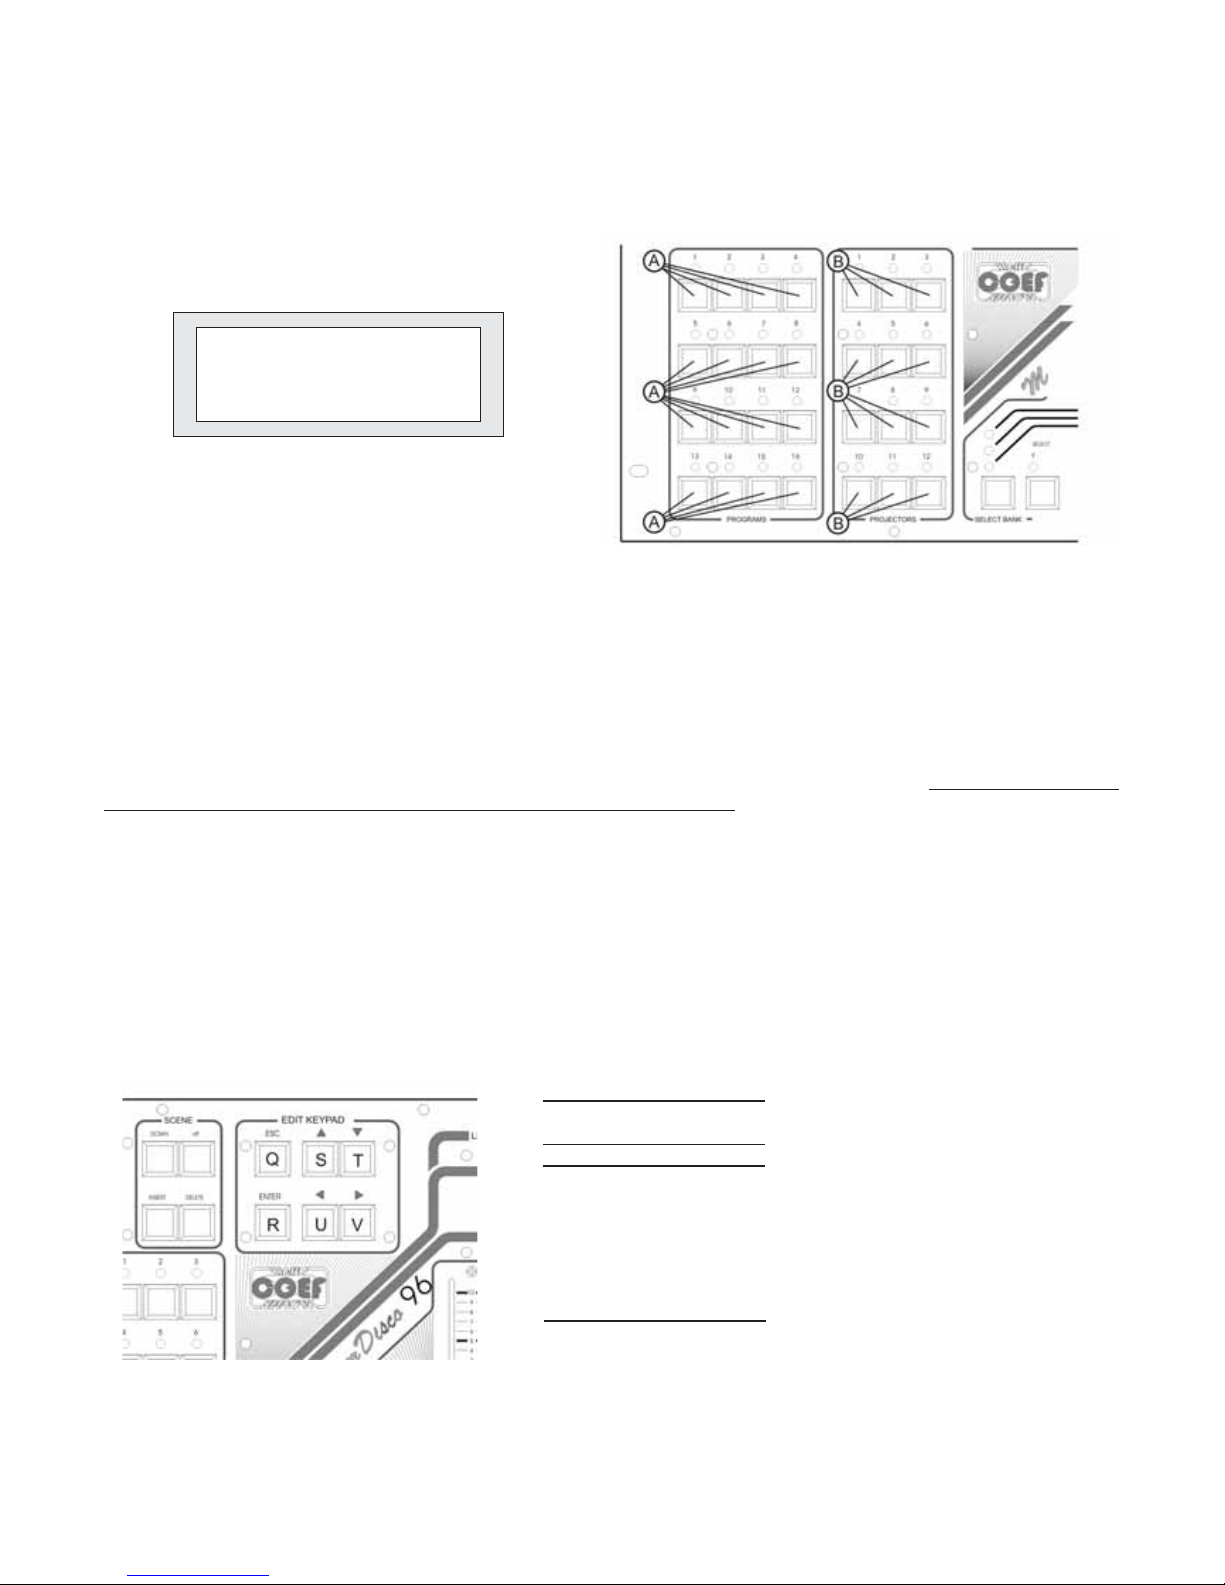
Sonomemorizzabili16programmichepossonoimpegnaretuttiiproiettorisupportatidalMasterDisco96,conunnumero
di scene per programma varabile e non condizionante, grazie alla memoria dinamica che non viene sprecata se un program-
ma contiene un numero ridotto di scene.
IprogrammimemorizzatinelMasterDisco96 possonoessereeseguitisincronizzandoilcambio scenaconmicrofonoin-
terno o audio esterno.
Laprotezione deidatièsalvaguardatadall'obbligodiunaPassword perle operazionicheporterebberoalla perditatotale
o parziale dei dati memorizzati.
E’possibile, tramite collegamento con PC, il salvataggio dei programmi, della configurazione di lavoro e l’aggiornamento
della versione software.
Master Disco 96 is a programmable console studied to control units provided with DMX inputs: scanners, color-chan-
gers, follow-spots etc.
BytheMasterDisco96it’spossible to control up to 96 DMX channels(for ex: 16 projectors each of 6 channels or12 proj-
ectors each of 8 channels). In the Master Disco 96 are stored to default all the COEF projectors of the Performance line and
all the other Coef light effects, with automatic assignment of the channels.
Thewholeconsole is managed andconfiguratedthroughamatrixdisplay that permitsanuserinterface clear and easyto
understand.
The values to assign to the various projectors channels are rapidly setted by means of useful precise sliders; a greater
precisionof the value, foreachchannel, can be obtainedby means ofproperpush-buttons which allow thedigitalvalueto in-
crease and decrease, at one digit step on 255.
It’spossibletoinsert 16programsusing alltheprojectorscontrolled bytheMaster Disco 96,with anumberofscenes va-
riable thanks to the dynamic memory which is not wasted when a program contains a smaller number of scenes.
Master Disco 96 can be synchronized to internal microphone and external audio systems.
The protection of the datais guaranteed by PASSWORD, for those operationswhichcan cause the total or partial loss of
data.
BymeansoftheRS232 portconnectingtoapersonalcomputer,youcanbothupgradetheMasterDisco96 softwareand
to save the settings and programs inserted.

Pag.5
1 - DIMENSIONI E PANNELLI DIMENSIONS and PANELS
Figure 2
Figure 3

Pag. 6
2 - COLLEGAMENTI CONNECTIONS
POWER SUPPLY
12 VDC 20% 1A
+
-
From DC adapter
POWER
IN
Figure 4
PIN 1=GND
PIN 2=SIGNAL -
PIN 3=SIGNAL +
DMX OUT 1 DMX OUT 2
DMX 512
DMX Out
Figure 5
MIC RS 2
3
AUDIO IN
RL
S/N C
H
r
Audio IN
Figure 6
InserirenellapresapredispostanelpannelloposterioredelMasterDisco96lo
spinottoprovenientedall’alimentatoreacorredodell’apparecchiatura(vediFig.4).
ATTENZIONE! La tensione fornita deve essere di 12 Volts DC e 1A.
Take out the provided DC adapter and plug it into the relevant socket in the
Master Disco 96 back panel (see fig.4).
ATTENTION! The voltage furnished must be 12 Volts DC and 1A.
CollegareallepreseindicateinFig.5leapparecchiaturedacontrollare,facen-
doattenzionecheicaviediconnettorinonpresentinocorto-circuitichepotrebbe-
ro danneggiare le uscite DMX del Master Disco 96
Connectthe unitstobe checkedtotheoutletsindicatedin Fig.5.Payattention
that the cables and the connectors don’t present short-circuits that could damage
the DMX outputs of the Master Disco 96.
Questi ingressi permettono il collegamento di segnali audio provenienti da va-
rie sorgenti musicali; cd audio, mixer, registratori a nastro ecc.
These inputs allow the connection to audio signals coming from various music
sources: cd-audio, mixer, tape-player, etc.

Pag.7
3 - ACCENSIONE DELLA CONSOLE SWITCH TO POWER ON
InserirenellarelativapresaBNClalampadaflessibile(l’accessorioèunoptional,nonèfondamentaleperilfunzionamento
della console, e deve essere acquistato a parte). Accendere il Master Disco 96 tramite l’interruttore presente sul pannello
frontale sopra il display a matrice. L’apparecchiatura provvederà ad effettuare un check funzionale e sul display sarà indicata
per qualche secondo la versione del software attualmente installato.
Plug theflexiblelamp in therelevantBNCsocket( this lamp is an optional, notessentialto the console working: it’s
not provided with the console). Switch the Master Disco 96 on by means of the switch on the front panel above the matrix
display. The unit will make a functional check and the actually installed software version will appear for some seconds on the
display.
Ceck...
Revision x.xx
Figure 7
COEF
Master Disco 96
[PROGRAM] SETUP SEQ.
Figure 8
Le indicazioni che il display mostrerà saranno:
[PROGRAM] = Programmazione di uno dei 16 programmi disponibili
SETUP = Settaggio dei parametri di funzionamento della console
SEQ. = Programmazione del SEQUENCER per l’esecuzione automatica dei programmi.
Tutte le impostazioni e le scelte si effettueranno attraverso i pulsanti della sezione EDIT KEYPAD (vedi fig.9).
Il tasto ENTER confermerà la scelta o la selezione, il tasto ESC annullerà ogni selezione e riporterà le indicazioni del Di-
splaynellostatoprecedente.Laprimafaseall’accensionedelMasterDisco96saràquelladelsettaggiodeiproiettoricollega-
ti alla console e della impostazione dei parametri di funzionamento; con il tasto freccia destra (part. Vfig.9) porteremo la
selezione(ledueparentesiquadrelampeggianti)sullaparolaSETUP;premereENTER(part.Rfig.9)edentriamonellasezio-
nediSETUP.SealMasterDisco 96(dopo laprimaaccensione)èstataassegnataunaPASSWORD diingresso allefunzioni
di programmazione, inserire la PASSWORD alla richiesta.
Figure 9
The display will show the following indications:
[PROGRAM] = the programming of one of the 16 available programs
SETUP = setting of the operating parameters of the console
SEQ. = the SEQUENCER programming for the automatic execution of programs.
AllthesettingswillbemadebymeansoftheEDITKEYPAD sectionpush-buttons(seefig.9).TheENTERpush-buttonwill
confirm the selection or the choice, the ESC push-button will cancel each selection and will restore the Display indications as
before. The first stage, after switching on the Master Disco 96, will be the setting of the projectors connected to the console
andthefunctioningparameterssetting;bymeansoftheright-arrowpush-button(part.V,fig9),youwillselect(movingthetwo
flashingsquarebrackets)thewordSETUP;pressENTER(part.R,fig.9)andentertheSETUPsection.Ifatthetimeofthefirst
switching you have assigned a PASSWORD to the Master Disco 96 to entry the programming functions, you must enter the
PASSWORD as requested.
LaPASSWORDimpostatainfabbricaè:1-2-3-4dadigitareconipulsantidellasezionePROGRAMS(fig.13pag.9)
ThedefaultPASSWORDis:1-2-3-4; youcaninsertitusingthePROGRAMSsectionpush-buttons(fig.13pag.9)

Pag. 8
4 - SETUP SETUP
* SETUP/1 *
SETUP2 ----- -----
[JOY] ASSIGN TYPE
Figure 10
By “V” push-button (fig.9 pag.7) select [SETUP] section and confirm by EN-
TER (push-button R).
This stage is extremely important so that the functioning of the projectors
group connected to the console flew correctly, allowing fast and accurate set-
tings. The display will show a new menu (see fig. 10); let’s see it in details:
JOY:
ASSIGN:
TYPE:
SETUP2:
JOYSTICK setting
Assignment of the type of the projector to each push-button of the PROJECTORS section
Projectors and their channels configuration.
Go to [SETUP2] section
Selezioniamo con il tasto “V” (fig. 9 pag.7) la sezione [SETUP] e confermiamo con ENTER (tasto R).
Questafase è diestrema importanza, affinchè il funzionamento del parcoproiettori collegato alla console, funzioni in ma-
niera corretta, permettendo impostazioni veloci e sicure.
Il display mostrerà un nuovo menu (vedi Fig. 10); analizziamolo in dettaglio:
JOY:
ASSIGN:
TYPE:
SETUP2:
Assegnazione della modalità di funzionamento del JOYSTICK
Assegnazione del tipo di proiettore ad ogni pulsante della sezione PROJECTORS.
Configurazione di proiettori aggiuntivi.
Passaggio alla sezione [SETUP2]
***** JOYSTICK *****
Status:SPEED HIGH
SPEED LOW
Figure 11
PremendoENTER (part.Rfig.9)conla parola[JOY] evidenziatatraicursori
lampeggianti, il diplay (fig. 11) ci fornirà altre indicazioni.
Selezioniamo per mezzo dei pulsanti SeTla velocità del Joystick (range 0-
255 digitale veloce o lento).
Uscire dalla funzione e memorizzare per mezzo del pulsante ESC.
PushingENTER (part.R, fig. 9) with theword [JOY] between flashing brackets, the display (see fig. 11) will give you other
indications and requests.
By means of the Sand Tbuttons you will select the type of velocity for the JOYSTICK (range digital value 0-255 fast or
slow).
Pressing ESC you will exit from “JOY” (part. Q, fig.9).
•Passo 2 - Settaggio JOYSTICK
•Step 2 - Setting JOYSTICK

Pag.9
•Passo 3 - ASSIGN - Assegnazione proiettori
Lafasediassegnazionedeiproiettoriè assolutamente necessaria peril funzionamento del Master Disco 96. Non sarà
possibilecostruirealcunprogramma,senonavremoassociatoaipulsantiPROJECTORS(part.Bfig.13)untipodiproiettore.
Si accede atale funzione selezionando la parola [ASSIGN] e premendo ENTER (part. R fig.14).
Appena entrati in questa fase, lampeggerà il led luminoso della sezione PROJECTORS (fig.13) riferito al numero 1 dei
proiettori disponibili. Con i pulsanti SeT(vedi fig.14) sceglieremo il tipo di proiettore da abbinare al numero selezionato; la
scelta,senonabbiamocreatoaltritipidiproiettoreconlafunzione[TYPE](vediPasso4),èlimitataatuttalaseriedeiproiettori
COEF e sarà mostrata sul display che riporterà anche informazioni relative a:
- canale di partenza DMX del proiettore “DMX St”
- numero di canali occupati dal proiettore “DMX Len”
- numero di canali totali usati nel Master Disco 96 “Channels Used:”
Continuare l’assegnazione dei proiettori installati, premendo il pulsante relativo al proiettore stesso (part. B fig.13) e ripe-
tendo ciò che è stato esposto poche righe prima.
Usciamo dalla funzione ASSIGN premendo il tasto ESC (part.Qfig.13).
*PROJECTORS ASSIGN.*
Projector DMX:StÈ Len
Empty ---È ---
Channel Used:0
Figure 12
Figure 13
Figure 14
PROIETTORICOEFDIVISIPERNUMERODICANALI
CDisco SC
CDisco AL
Color Fr
Col Show
PERF I
PERF II
PERF III
PERF IV
PERF 200
200Disco
250RG
250Show
1k2 Disco
MP 250
MP 250 Fr
= Color Disco Scarica
= Color Disco Alogeno
= Color Fresnel
= Color Show
= Performance 1
= Performance 2
= Performance 3
= Performance 4
= Performance 200
= Performance 200 Disco
= Performance 250 RG
= Performance 250 Show
= Performance 1200 Disco
= MP-250 Optic
= MP-250 Fresnel
CH
2
3
5
6
8

Pag. 10
•Step 3 - ASSIGN - Projectors’ assignment
After pushing ENTER (part. R, fig. 17) with the word [ASSIGN] between flashing brackets, the display will give you other
indications and requests.
This stage is absolutely necessary to the Master Disco 96 functioning because it will be impossible to ‘edit’any program
till one projectors set will be at disposal.
As soon as you enter this stage, the led of the PROJECTORS section, relevant to the n1 of the available projectors, will
flash (fig. 16).
BymeansoftheSandTbuttonsyouwillselectthetypeofprojectortolinktotheselectednumber; ifyouhavenotyetdone
thestep4[TYPE]thechoice,is limited to the whole series of COEF projectors, that will appear on the display together with in-
formations about:
- DMX starting channel of the projector “DMX St”
- number of channels occuped by the projector “DMX Len”
- total number of the channels used in Master Disco 96 “Channels Used:”
Continueto assign the installed projectors by pushingthebuttonrelevant to each projector (part.B, fig. 16)andrepeating
the operations explained above.
Pressing ESC you will exit from “ASSIGN” (part. Q, fig. 17).
*PROJECTORS ASSIGN.*
Projector DMX:StÈ Len
Empty ---È ---
Channel Used:0
Figure 15
Figure 16
Figure 17
PROJECTORS COEF by NUMBER OF CHANNELS
CDisco SC
CDisco AL
Color Fr
Col Show
PERF I
PERF II
PERF III
PERF IV
PERF 200
200Disco
250RG
250Show
1k2 Disco
MP 250
MP 250 Fr
= Color Disco Scarica
= Color Disco Alogeno
= Color Fresnel
= Color Show
= Performance 1
= Performance 2
= Performance 3
= Performance 4
= Performance 200
= Performance 200 Disco
= Performance 250 RG
= Performance 250 Show
= Performance 1200 Disco
= MP-250 Optic
= MP-250 Fresnel
CH
2
3
5
6
8

Pag.11
•Passo 4 - TYPE - Tipi di proiettore
* SETUP/1 *
SETUP2 ----- -----
JOY ASSIGN [TYPE]
Figure 18
[N:1 ]Name:Type 01
ChPrj:1 ChMS96:--
Shutter Value:---
Interpolation:---
Figure 19
Selezionando[TYPE]unnuovomenu(Fig.19)ciindicheràiltipodiproiettorecheciapprestiamoaconfigurare.Possiamo
configurare sino a 10 tipi di proiettore differenti; tale scelta si effettua tramite i pulsanti SeT.
Determinato il numero del proiettore da configurare, per mezzo dei pulsanti UeVsceglieremo cosa variare della confi-
gurazione:
[Name:Type xx]
[ChPrj:x]
[ChMS96]
[Interpolation:XX]
[Shutter Value:---]
“Name:Typexxx”:8caratteriadisposizioneperattribuireunnomeunivocoalproiettore.Selezionarelaletteradamodifi-
care tramite i pulsanti SeTe modificarla per mezzo dei pulsanti YeZ.
”ChPrj: (valore)”: viene impostato il numero del canale del proiettore selezionato. Sono controllabili proiettori fino a 20
canali. Selezionare tramite i pulsanti SeTil numero del canale.
”ChMS96: (--- / valore)”: viene impostato il numero del canale (cursore / joystick) della consolle con cui controlleremo il
canale X del proiettore selezionato. Selezionare tramite i pulsanti SeTil numero del canale.
“Interpolation:(YES/ NO)”:siriferisceallapossibilitàdiimpostarequeldeterminatocanaleinmododiretto(cambiorapi-
do dei valori digitali da una scena all’altra) o in modo interpolato (possibilità di eseguire il range dei valori da una scena ad
un’altra in modo regolato dal tempo di CROSS).
“Shutter Value : (---/valore)”: Valore digitale 0-255 corrispondente all’otturatore chiuso o allo spegnimento della lampa-
da. Selezionare tramite i pulsanti SeTil valore digitale da attribuire.
Proseguire fino alla configurazione totale di tutti i canali di quel tipo di proiettore.
Premereilpulsante(ESC)dopoaverterminatolaconfigurazionedeitipidiproiettoriinpossesso.Siritornaalmenuprece-
dente.
= Nome da attribuire al proiettore
= Canale fisico del proiettore in edit
= Canale assegnato al Master Disco 96
= Interpolazione o meno del canale
= Valore digitale dell’otturatore chiuso attribuito al canale selezionato

Pag. 12
•Step 4 - TYPE - Projectors type setting
* SETUP/1 *
SETUP2 ----- -----
JOY ASSIGN [TYPE]
Figure 20
[N:1 ]Name:Type 01
ChPrj:1 ChMS96:--
Shutter Value:---
Interpolation:---
Figure 21
Selecting [TYPE] a new menu (Fig. 21) will show you the type of projector to be configurated. You can configure up to 10
types of different projectors; this choice is possible by means of SeTbutton.
Once selected the number of the configutating projector, by means of the Uand Vpush-buttons you choose what is to
change in the configuration:
[Name:Type xx]
[ChPrj:x]
[ChMS96]
[Interpolation:XX]
[ShutterValue:---]
“Name:Type xxx” : you have 8 letters available to name the projector. Select the letter to be modified by means of SeT
buttons and modify it by means of YeZ(Down & UP digital channels section).
”ChPrj:(value)”: you setthechannelnumber oftheselectedprojector.Youcan controlprojectorsupto 20 channels.Se-
lect the number of the channel by means of the SeTpush-buttons.
”ChMS96:(---/ value)”:yousetthenumberofthechannel(slider/joystick)oftheconsolecontrollingtheXchannelofthe
selected projector.Select the number of the channel by means of the SeTpush-buttons.
“Interpolation: (YES/ NO)”: it means that each channel can be setted either Direct (quick change of the digital values
fromone scene totheother)or Intepolated (thevaluesrange between onesceneandthe otherwillbeexecuted regulated by
the CROSS time).
“Shutter Value : (---/value)”: 0-255 digital value. Corresponding to the closed shutter or to the lamp switching off. Select
the digital value by means of the SeTpush-buttons.
Continueuptothetotalconfigurationofallchannelsforeachtypeofprojector.Pressthepush-buttonESCwhentheconfi-
guration of all type of projector is done.Then return to the previous menu.
= Name for the projector
= Channel of the projector in edit
= Channel assigned to Master Disco 96
= Channel interpolation or not
= Digital value of the closed shutter for the selected channel

Pag.13
•Passo 6 - RS232 - Configurazione porta RS232
•Step 6 - RS232 - RS232 port configuration
*SETUP/2*
BEEPER PASSW FORM.
[AUDIO] RS232 -----
Figure 22
Passare alla sezione SETUP2 come precedentemente indicato.
Selezionare con i pulsanti UeV(fig.23) la parola [AUDIO] e premere ENTER .
Inquestomodoavremo la possibilità di determinare il tipodi sorgente AUDIOche piloterà ilcambio scena automaticodel
programmainesecuzione.Sceglieretral’ingressomicrofonicoel’ingressoPINRCAconitastiSeTnellasezioneEDITKEY-
PAD (fig.23).
Premere ESC per uscire dalla funzione.
Figure 23
****** AUDIO ******
Input:MIC
Input:LINEA
Figure 24
Go to SETUP2 function.
Select by means of the Uand Vpush-buttons (fig. 23) the word [AUDIO] and press ENTER.
Inthisway you willhavethepossibilityto select thekindofAUDIOsource that will pilottheautomaticchangingof the sce-
ne of the program in execution. Choose between the microphone input and the PIN RCAone by means of the Sand Tpush-
buttons in the EDIT KEYPAD section (fig. 23). Push ESC to exit the function.
•Passo 5 - AUDIO - Configurazione Audio IN
•Step 5 - AUDIO - Audio IN Setting
****** RS232 ******
Status:DISABLED
Status:ENABLED
Figure 25
Selezionare con i pulsanti UeV(fig.23) la parola [RS232] e premere EN-
TER .
In questo modo avremo la possibilità di stabilire se rendere attiva o disatti-
vare la porta RS232 con i tasti SeT(fig.23). Il nuovo software permette ora il
salvataggio ed il recupero dei programmi attraverso il collegamento al Perso-
nal Computer per mezzo della porta RS232.
Premere ESC per uscire dalla funzione.
Select by means of the Uand Vpush-buttons (fig. 23) the word [RS232]
andpushENTER.Inthiswayyouwillhavethepossibilitytodecidetoenableor
disabletheRS232portbymeansoftheSandTpush-buttons(fig.23).Withthe
new software release, you can save and load the MasterDisco96 programs
and configuration by means of the RS232 port and the Personal Computer.
Press ESC to exit from the function.

Pag. 14
Selezionare con i pulsanti UeV(fig.23) la parola [BEEPER] e premere EN-
TER .
Inquestomodoavremolapossibilitàdideterminareserendereattivoodisat-
tivareilBEEPalla pressione di ogni pulsante.Effettuare la scelta con i tasti SeT
nella sezione EDIT KEYPAD (fig.23).
Premere ESC per uscire dalla funzione.
****** BEEPER ******
Status:ON
Status:OFF
Figure 26
•Passo 7 - BEEPER - Configurazione cicalino interno
•Step 7 - BEEPER - BEEPER setting
Select by means of the Uand Vpush-buttons(fig. 23) the word [BEEPER]
andpressENTER.Inthiswayyouwillhavethepossibilitytoenableordisablethe
BEEPpressingany push-button.ChoosebymeansoftheSandTbuttonsonthe
EDIT KEYPAD section (fig. 23). Press ESC to exit from the function.
•Passo 8 - PASSWR - Impostazione PASSWORD
•Step 8 - PASSWR - PASSWORD setting
* PASSWORD MODIFY *
New Password:
Figure 27
Selezionarecon ipulsantiUeV(fig.18) laparola[PASSW] epremere ENTER.Come mostratodallafig.27 ildisplaychie-
deràdi immettere4numeri conipulsanti dellasezionePROGRAMS(part.Afig.29).Automaticamente ilsistemachiederà poi
laripetizionedellaPASSWORDinseritaperverificarnelacorrettezza;undoppioBEEPconfermeràl’avvenutamemorizzazio-
ne.ATTENZIONE! E’importantenon generarepasswordcasuali chenonsaràpossibilericordare, perchèdifficilmentesbloc-
cherete il sistema.
Select by means of the Uand Vpush-buttons the word [PASSW] and press ENTER. As shown in fig. 27, the display will
ask you to set 4 numbers by means of the PROGRAMS section push-buttons (part. A, fig. 29). Automatically the system will
askyoutorepeat theinsertedPASSWORD toverify itscorrectness;adouble BEEPwill confirmit’smemorized. ATTENTION!
It’s important: don’t generate casual passwords because you could forget them, so you could hardly be able to unlock the sy-
stem!
* PASSWORD VERIFY *
Repeat Password:
Figure 28 Figure 29

Pag.15
•Passo 9 - FORMAT - Formattazione e reset console
•Step 9 - FORMAT - Format and reset console
!!!!!! FORMAT !!!!!!
Attention, all data
will be delete!
Press DEL. to start
Figure 30
ATTENZIONE! Con questa funzione verranno azzerate tutte le impostazioni effettuate sulla console e saranno anche
cancellati tutti programmi memorizzati. E’dunque una funzione da utilizzare solo in caso di estrema necessità e con estrema
attenzione.
ATTENTION! This function will clear all the settings of the console and all the memorized programs. It’s a function to be
used only when strictly necessary and very carefully.

Pag. 16
5 - PROGRAMMAZIONE
COEF
Master Disco 96
[PROGRAM] SETUP SEQ.
Figure 31
PROGRAMMING
Select Program
to Edit
Figure 32
Scene: 1/1 TS:1.0
MemUsed: 0% TC:1.0
[START] END
COPYprg DELETEprg
Figure 33
Figure 34 Figure 35
Premere ENTER per entrare nella fase di preparazione di un programma.
ImmetterelaPASSWORD personale se questaèstataconfigurata(vedicapi-
tolo SETUP paragrafo relativo).
Come richiede il display (fig.32) selezionare uno dei 16 programmi (pulsanti
part. Afig. 34) ed osserviamo le indicazioni presentate dal display (fig. 33).
Scene: 1/1-ilprimonumeroindicalascenaincuicitroviamo;ilsecondoindi-
ca il totale delle scene già programmate.
TS: 1.0 - Valoreespressoin secondirelativoal tempodiSTAND(tempodi
permanenza della scena prima di un cambio scena) Valore minimo 0.1 Valore
MAX 9.9.
TC:1.0 - Valore espresso insecondirelativoaltempo di CROSS(tempodi
spostamento degli assi dello specchio; canali X e Y del proiettore).
[START] - Permette di raggiungere rapidamente la prima scena del pro-
gramma.
[END] - Permettediraggiungererapidamentel’ultimascenadelprogram-
ma.[COPYprg] - Copiailcontenutodelprogramma inEDITinun’altroprogram-
ma (Destination?).
[DELETEprg] - Cancella il programma in EDIT
Quando si entra nella programmazione di un programma è indispensabile,
come prima azione, selezionare il o i proiettori che vogliamo inserire nella scena,
permezzodeipulsantiB(fig.34);illampeggiodeirelativiLEDS ci indicherà quelli
selezionati. Controllare il o i proiettori per mezzo dei cursori Je del Joystick (per
controllareproiettoriconpiùdi6canalicambiareilbancodeicanaliconiltastoW);
impostare i tempi di STAND ediCROSS con i relativi pulsanti della sezione TI-
MES (part.G-H-I-L fig. 40) equindipremereINSERT (part.Ofig.40) per passare
allascena successiva. E’possibile ritornare sullascenavolutapermezzodei pul-
santi Med Nper poter correggere il valore dei canali dei proiettori impiegati nella
scena;ilproiettoredovràessereselezionato(lampeggiodelLEDrelativo)ecorre-
zionedeivaloriconglisliderediljoystick.E’possibilenotarecheogniminimospo-
stamento dei cursori attiva il canale, evidenziando sul display, il valore digitale
inserito nelle due parentesi quadre []lampeggianti. Per una regolazione fine del
valore, una volta attivato il canale di interesse, usare i pulsanti YeZpredisposti
perlaregolazioneconincrementio decrementidiundigitperpressione.Il pulsan-
te Xprovvede ad attivare rapidamente i canaliXeYdelJoystick evitando di toc-
carlo fisicamente, rischiando lo spostamento di posizione anche se minimo.

Pag.17
** Out of Memory! **
Remove Projectors or
Scene and try again
ESC to continue
Figure 36
LamemoriadelMasterDisco96 èditipodinamicoesiadattaquindiautoma-
ticamenteadogninuovoinserimentodiscenanelprogrammaasecondadelnu-
mero di proiettori (e dunque dei canali impiegati) che vengono inseriti in ogni
scena del programma in EDIT.
L’indicatore della percentuale di memoria in uso è sempre presente nel di-
splaymentrevienepreparatounprogramma(MemUsed:%fig.33);quandoque-
sta percentuale raggiunge il 99%, un nuovo messaggio (fig.36) chiederà di
rimuovere alcuni proiettori dalla scena o la scena stessa affinchè il programma
possa essere memorizzato senza alcun problema.
Quandovogliamoutilizzareunprogrammagiàdefinitoapportandomodifiche
nellescene,possiamocopiarneilcontenutoinun’altroprogrammachesuccessi-
vamente modificheremo a nostro piacimento; selezioniamo con i tasti freccia la
parola [COPYprg] e premiamo ENTER; il display (fig.37) ci chiederà di fornire il
numero del programma destinazione; tale scelta deve essere effettuata tramite i
pulsantiS eT(fig.39) econfermataconENTER.Premere ESCperannullare l’o-
perazione.
Quando vogliamo azzerare completamente un programma per comodità di
EDIToperrecuperarespazionellamemoria,possiamousarelafunzione[DELE-
TEprg] (fig. 38) che sarà confermata dalla pressione del tasto DELETE (part. P
fig. 40) oppure annullata da ESC.
*** COPY PROGRAM ***
Destination?:1
Press ENTER to start
or ESC to abort
Figure 37
* DELETED PROGRAM *
Press DEL. to start
or ESC to abort
Figure 38
Figure 39 Figure 40
6 - PROGRAMMAZIONE SEQUENCER
[--] -- -- -- -- --
-- -- -- -- -- --
-- -- -- -- -- --
Sequencer Prog.ing
Figure 41
Entrando nella funzione [SEQ.] potremo inserire fino a 18 programmi che il
Master Disco 96 eseguirà in modo automatico e consequenziale. E’ sufficiente
selezionare i programmi dalla sezione PROGRAMS per inserirli oppure preme-
re DELETE per cancellare l’inserimento. Si può inserire ripetitivamente anche il
solito programma. Per correggere eventuali errori di impostazione o di sequen-
za, usare i tasti freccia S-T-U-V (fig. 34) ed immettere il nuovo numero del pro-
gramma oppure premere DELETE per eliminare quello non voluto.
Premere ESC per uscire e memorizzare.

Pag. 18
5-PROGRAMMING
COEF
Master Disco 96
[PROGRAM] SETUP SEQ.
Figure 42
PROGRAMMING
Select Program
to Edit
Figure 43
Scene: 1/1 TS:1.0
MemUsed: 0% TC:1.0
[START] END
COPYprg DELETEprg
Figure 44
Figure 45 Figure 46
Push ENTER in order to enter the stage of program preparation.
Insert the personal PASSWORD in case you have saved your own one (
see chapter SET-UP ).
Thedisplay will ask you to selectone ofthe16 programs(see fig. 45 part
A) and after that it will show the following instructions (see fig. 44) :
Scene1/1 - thefirstnumberindicatesthe scene youareinat the moment
and the second number indicates the total scenes already programmed.
TS : 1.0 - indicates the STAND time value expressed in seconds (stan-
dingtimeof a scene before the scenechange).Minimumvalue0.1Maximum
value 9.9.
TC : 1.0 - indicates the CROSS time value expressed in seconds (mo-
ving time of the mirror axis; X and Y channels)
[START] -allowsyoutogoimmediatelytothefirstsceneoftheprogram
[END] -allowsyoutogoimmediatelytothelastsceneoftheprogram
[COPYprg]-copy the program youareeditingintoanotherprogram (De-
stination?)
[DELETE prg] - cancel the program you are editing
The first step to take when you enter in the programming stage of a pro-
gram is to select the projector or projectors (push-buttons Bfig 45) that you
want to insert in the scene; the selected projectors leds will be flashing. You
can control the selected projectors by means of sliders Jand Joystick (to
control theprojector which have morechannels, press thepush-button Wto
changechannelbank);settheSTANDandCROSStimesbymeansofthere-
levantpush-buttonsinthe TIMES section (part.G-H-I-L fig51)thanpressIN-
SERT (part. Ofig 51) to skip to the next scene. It is possible to go back to the
requested scene by means of push-buttons Mand Nand to change the proj-
ectors channels values; the projector must be selected (the relevant led flas-
hing) and to proceed to the values changing using the sliders and joystick.
You will notice that any small movement of the slider will activate the channel
and you will see on the display the digital value inserted. In order to make a
fineadjustmentofthevalue,onceyouhaveactivatedtherequestedchannel,
you can use the push-buttons Yand Zthat will make adjustments of one digit
by one digit. The Xpush-button will quickly activate the X and Y channels of
the joystick without having to touch it and this will avoid any possible move-
ment from the setted position.

Pag.19
** Out of Memory! **
Remove Projectors or
Scene and try again
ESC to continue
Figure 47
MASTERDISCO 96 memory is dynamic and it is automatically adapting to
eachnewsceneinsertionintheprogram,followingthenumberofprojectors(the-
refore following the number of channels used) that are inserted in each scene of
the program you are editing.
On the display you constantly have the indicator of the memory used while
youarepreparinga program (MemUsed: % seefig.44);whenthismemoryrea-
ches99%youwillhaveamessageonthedisplaysayingthatyouhavetoremove
some projectors from the scene or the scene itself in order to properly save the
program.
Whenyouwanttouse an already existing program just making some modifi-
cationsto thescenes,youcan recallthisprogramand copyitscontent inanother
program, to be then modified as you like. Select from the display the word [CO-
PYprg] by means of the arrow-push-buttons and push ENTER; the display (fig.
32)willaskyoutogivethedestinationprogramnumber;theprogramnumbercan
beinsertedbymeansofpush-buttonsSandT(fig.50)andconfirmedbypressing
ENTER. Press ESC in order to delete the operation.
Ifyouwishtodeleteacompleteprograminordertorecovermemorycapacity
orforyourownconvenience,youcanusethefunction[DELETEprg](fig.49)that
has to be confirmed by pressing the push-button DELETE (fig. 51 part. P) or that
can be cancelled with ESC.
*** COPY PROGRAM ***
Destination?:1
Press ENTER to start
or ESC to abort
Figure 48
* DELETED PROGRAM *
Press DEL. to start
or ESC to abort
Figure 49
Figure 50 Figure 51
6-SEQUENCER PROGRAMMING
[--] -- -- -- -- --
-- -- -- -- -- --
-- -- -- -- -- --
Sequencer Prog.ing
Figure 52
Enteringinfunction [SEQ.]youwillhavethepossibilitytoinsertupto18pro-
grams number and Master Disco 96 will automatically execute them following
thesequenceyouhavegiven.Theprogramsnumbersareinsertedbysimplyse-
lecting them and they are cancelled by pressing DELETE. You can also insert
the same program repeatedly. In order to modify the sequence settings you can
use the arrow-push-buttons S-T-U-V (fig. 50) and insert the new number or to
press DELETE in order to cancel the undesired ones.
Press ESC to exit.

Pag. 20
7 - ESECUZIONE PROGRAMMI
Unavoltamemorizzati tuttii programmi eduscendo dalla fasedi programmazione,basterà selezionare unodei program-
mi (1-16) per portarlo in esecuzione.
In questa modalità sono disponibili alcune funzioni:
a) - Cambio della scena con tempo di STAND impostato o con impulso musicale (MIC interno o LINE (vedi SETUP)).
b) - Black-OUT temporaneo del programma (chiusura degli otturatori di tutti proiettori).
c) - STOP temporaneo del programma (proiettori fermi nelle funzioni ma con otturatore aperto).
d) - Impiego manuale di alcuni proiettori anche se usati nel programma.
FUNZIONE a)
E’possibileregolareconuncoefficientegenerale KTS(tempodiSTAND) oKTC(tempodiCROSS)l’esecuzionedelpro-
grammapermezzo dei pulsanti inseriti nella sezioneTIMES (part.G-H-I-L fig. 53) oppure stabilire il cambio scena attraverso
impulsimusicaliabilitandoilpulsanteMUSIC (part.Efig.53).La sceltadellasorgente musicale (MIC - LINE) deveessere im-
postata in fase di SETUP. Ripremere il pulsante per riportare il controllo delle scene alla funzione “tempo”.
FUNZIONE b)
Premereil pulsanteBLACK-OUT(part.Cfig.53) perbloccarela scenainesecuzioneinterrompendoancheilfasciolumi-
noso dei proiettori. Ripremere il solito pulsante per riavviare il programma.
FUNZIONE c)
Premere il pulsante PAUSA (part. Dfig. 53) per fermare temporaneamente l’esecuzione del programma mantenendo
aperti gli otturatori dei proiettori.
FUNZIONE d)
Mentre un programma è in esecuzione, è possibile selezionare uno o più proiettori per ottenerne un controllo manuale
completo. I proiettori che risultano inseriti nel programma (veloce lampeggio dei relativi LEDS) saranno sganciati dal pro-
grammastesso(lentolampeggiodeirelativiLEDS)epotrannoesserecontrolati manualmentenellelorofunzioni.Ripremen-
do il pulsante relativo al proiettore, questo ritornerà al controllo assoluto del programma.
Figure 53
Progr. 1 KTS:1.0
Program Running
Sc: 1/1 KTC:1.0
Figure 54
Progr. 1 KTS:1.0
Sc: 1/1 KTC:1.0
[087] 105 000 X:000
000 --- --- Y:124
Figure 55
Per mandare in esecuzione i programmi pre-ordinati con la funzione SEQUENCER, premere il pulsante SEQ. PROG.
(part.Ffig. 53). I programmi verranno eseguiti nell’ordine stabilito al momento della programmazione del SEQUENCER. Per
interrompere l’esecuzione è sufficiente ripremere lo stesso pulsante.
Table of contents