Cognisys Scout PIR User manual

1
Owner’s Manual
Revision 1.0
Copyright 2018 Cognisys, Inc.

2
Table of Contents
1. SAFETY INSTRUCTIONS .................................................................................................................................. 5
2. GETTING STARTED ......................................................................................................................................... 5
2.1 WHAT IS THE SCOUT PIR? ..................................................................................................................................6
2.2 WHY PIR? (AND ITS LIMITATIONS) .......................................................................................................................6
2.3 WHAT IS INCLUDED ...........................................................................................................................................7
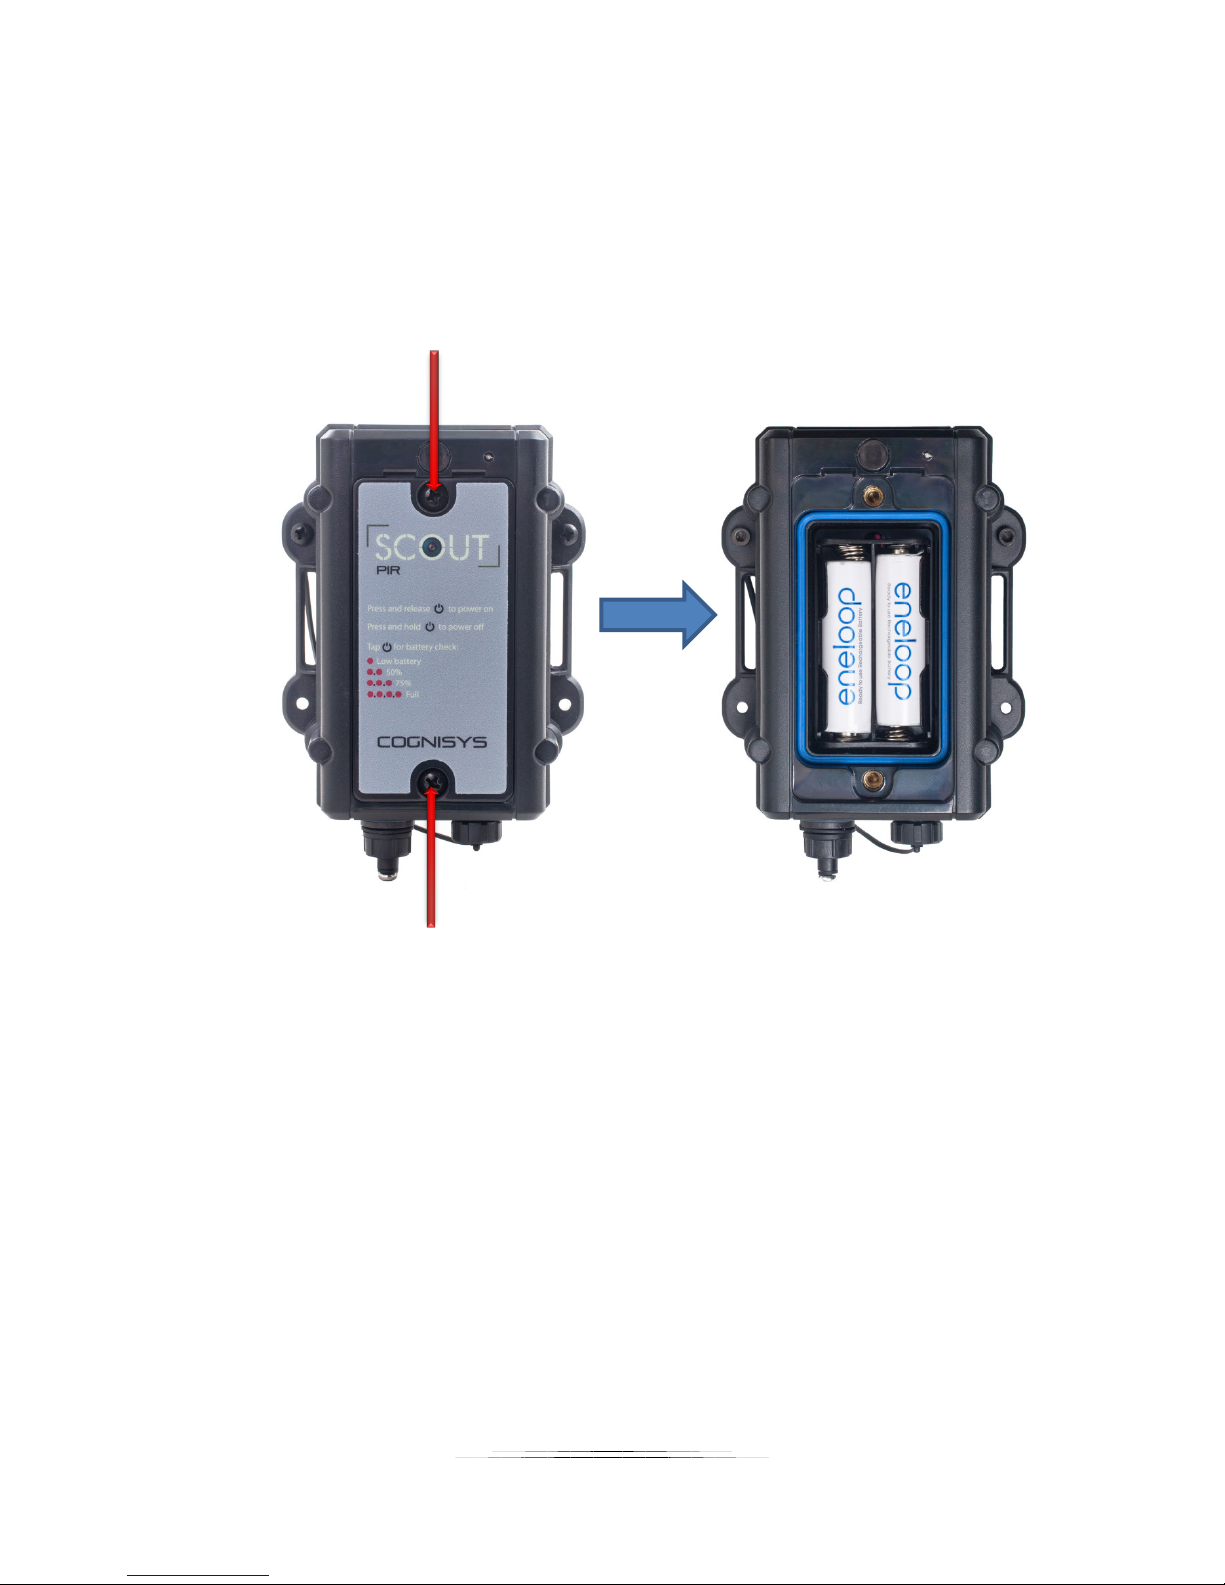
2.4 BATTERY INSTALLATION ......................................................................................................................................8
2.5 QUICK START GUIDE ..........................................................................................................................................9
2.6 CLEANING AND CARE .......................................................................................................................................10
2.6.1 Cleaning .................................................................................................................................................10
2.6.2 Care and storage....................................................................................................................................10
2.6.3 Maintaining Weatherproof Design ........................................................................................................11
2.7 THE SCOUT PIR ..............................................................................................................................................12
3. ACCESSORIES ............................................................................................................................................... 13
3.2 SCOUT RECEIVER ....................................................................................................................................................14
4. INSTALLING THE SOFTWARE........................................................................................................................ 15
5. BASIC NAVIGATION ..................................................................................................................................... 15
5.1 POWER BUTTON .............................................................................................................................................15
5.2 LED INDICATORS.............................................................................................................................................16
6. NAVIGATING THE APP ................................................................................................................................. 17
6.1 CONNECTION STATUS ......................................................................................................................................17
6.2 GLOBAL BUTTONS ...........................................................................................................................................17
6.2.1 Read Config............................................................................................................................................18
6.2.2 Save Config ............................................................................................................................................18
6.2.3 Shutter ...................................................................................................................................................18
6.2.4 Outputs Off ............................................................................................................................................18
6.3 ADJUSTING SETTINGS.......................................................................................................................................19
7. SETTINGS..................................................................................................................................................... 20
7.1 SETTINGS NAVIGATION MAP .............................................................................................................................20
7.2 SETTING DESCRIPTIONS ....................................................................................................................................21
7.2.1 # pics (elapsed) ......................................................................................................................................21
7.2.2 Sensitivity ...............................................................................................................................................21
7.2.3 LED On....................................................................................................................................................21
7.2.4 Camera Settings.....................................................................................................................................21
7.2.4.1 # pics ............................................................................................................................................................. 22
7.2.4.2 Delay ............................................................................................................................................................. 22
7.2.4.3 On time ......................................................................................................................................................... 22
7.2.4.4 Off time......................................................................................................................................................... 22
7.2.4.5 Final Off......................................................................................................................................................... 22

3
7.2.4.6 Extend On Time............................................................................................................................................. 23
7.2.4.7 Extend Off Time ............................................................................................................................................ 23
7.2.4.8 Periodic Half-Press (PHP) .............................................................................................................................. 23
7.2.5 Wireless Settings....................................................................................................................................24
7.2.5.1 Enabled ......................................................................................................................................................... 24
7.2.5.2 Channel ......................................................................................................................................................... 24
7.2.5.3 ID................................................................................................................................................................... 24
7.2.5.4 Wake Up Speed............................................................................................................................................. 24
7.2.6 Time Settings .........................................................................................................................................25
7.2.6.1 On Time......................................................................................................................................................... 25
7.2.6.2 Off Time ........................................................................................................................................................ 25
7.2.7 Shot Limit ...............................................................................................................................................26
7.2.7.1 Limit Window................................................................................................................................................ 26
7.2.7.2 Limit Timeout................................................................................................................................................ 26
7.2.8 Software ID ............................................................................................................................................27
7.2.9 Voltage...................................................................................................................................................27
7.2.10 Load PIR Defaults...............................................................................................................................27
8. EXAMPLES ................................................................................................................................................... 28
8.1 CAMERA SETTINGS ..........................................................................................................................................28
8.2 WIRED CAMERA (CAMERA CONTROLS FLASHES) ....................................................................................................30
8.3 FULL WIRELESS (USING THE SCOUT CAMERA BOX) ................................................................................................31
8.3.1 Scout PIR in the Camera Box App...........................................................................................................32
8.4 VIDEO RECORDING (WIRED OR WIRELESS) ............................................................................................................33
8.5 MAXIMUM BATTERY LIFE..................................................................................................................................35
8.6 SCOUT PIR PLACEMENT ...................................................................................................................................36
9. INSTALLING THE REFLASH SOFTWARE (OPTIONAL)...................................................................................... 39
9.1 WINDOWS INSTALLATION .................................................................................................................................39
9.2 OS XINSTALLATION.........................................................................................................................................39
10. TROUBLESHOOTING ................................................................................................................................ 40
11. SPECIFICATIONS ...................................................................................................................................... 42
12. WARRANTY ............................................................................................................................................. 43
13. REVISION HISTORY .................................................................................................................................. 44

4
Table of Figures
Figure 1 – Scout PIR Connections ...............................................................................................................12
Figure 2 - Mac/PC Global Buttons (at top).................................................................................................. 17
Figure 3 - Basic Connection Diagram .......................................................................................................... 30

5
1. Safety Instructions
WARNING indicates a potentially hazardous situation which, if not avoided, could result in death
or serious injury.
Follow all CAUTION notices to reduce the risk of personal injury, prevent damage to the Scout
equipment, accessories, and devices (computers, cameras, flashes, etc). Failure to follow all
CAUTION notices may void your warranty. CAUTION may also indicate a potentially hazardous
situation which, if not avoided, may result in personal injury.
The safety alert symbol precedes a general CAUTION or WARNING statement.
The electrical hazard symbol precedes an electric shock hazard CAUTION or WARNING
statement.
CAUTION: Only use approved power sources for Scout equipment. Use of other power
adapters or batteries may damage the sensor and/or attached equipment.
CAUTION: Misuse of Scout equipment could potentially damage your equipment. Cognisys, Inc.
will not be held liable for damage to your equipment. If you have questions about safety please
contact us!
2. Getting Started
The latest version of this manual is available on our website at:
http://www.cognisys-inc.com/store/scout-pir.html
The graphics/menus included in this manual may not be identical to the software that you are
running. Improvements and adjustments to the software may happen prior to an updated
version of the manual.
Not big on reading manuals? (What? No thumbs-up? We worked hard on this you know!) We
have a few real world setups in the “8 - Examples” section. You can always come back to the
technical details if you get stuck. You really should finish reading this section though – it goes
through battery replacement and the basic care of the sensor.

6
2.1 What is the Scout PIR?
The Scout PIR is an ideal solution for short-term or long-term trail photography. It uses Passive
Infrared (PIR) to detect motion. This means it is looking for a heat signature to move.
The Scout PIR has several features not available with many trail photography devices:
•Ultra-compact
•USB controlled
•Customizable camera control
•Adjustable sensitivity to prevent false activations
•Time windows of operation to only go after the subjects you’re interested in
•Can limit the number of shots to reduce nuisance triggers (curious squirrels)
•Wired or wireless operation with other Scout equipment
•Quad-element differential PIR sensor for superior noise filtering
•Fast response time (up to 100ms)
•Weatherproof design
•Removable ¼-20 tripod mount
•Operates off of 2 AA batteries
•> 90 days of battery life
•Wide operating temperature range: -20C – 60C (-4F – 140F)
2.2 Why PIR? (and its limitations)
Advantages of PIR:
•Reduced cost.
•Single-ended sensor. You don’t need a transmitter since you’re just looking for a
change in the scenes heat signature. Less camera framing concerns.
•Excellent battery life with just two AA’s.
•Wider field of view than a beam sensor (great for video work)
•Can detect slight motion (a beam-break system only activates when the subject crosses
the beam – PIR will continue to activate when it sees motion)
Disadvantages of PIR:
•Wider field of view makes tack-sharp pictures more difficult. You may be counting
more on your camera’s depth of field.
•Potential false triggers from sunlight (warm leaves blowing in the wind)
•Slower response time
•There is a short 2-3 second “recovery” time after a subject is detected
•Decreased detection range compared to Scout RX
•Decreased operating temperature range compared to Scout RX

7
There definitely is a place for PIR-based sensors in the trail photography / camera trap world. If
the disadvantages of the Scout PIR make you a little nervous – no worries! We have an
incredible beam-break style system that is fully compatible with other Scout equipment:
https://www.cognisys-inc.com/store/scout-standard.html
Still not sure? You can always send us an e-mail at support@cognisys-inc.com. We’d be happy
to answer your questions!
2.3 What is Included
The Scout PIR includes:
•Scout PIR sensor
•Camera cable of choice (for stills)
•4m/13ft weatherproof cable (Scout PIR to camera)
•Removable ¼-20 tripod mount
•Quick-start guide insert
If you purchased the Scout PIR as a kit it may include additional accessories.

8
2.4 Battery Installation
Battery installation is a simple process and because the Scout PIR has excellent battery life –
you won’t have to do it often!
The Scout PIR requires two AA (LR6) batteries. You can use either alkaline, lithium, or
rechargeable varieties. For details about maximizing battery life see section “8.5 - Maximum
Battery Life”.
1. Be sure the sensor is clean prior to replacing the batteries otherwise dirt may compromise
the weatherproof seal.
2. Remove the two front screws (by the front label shown above with the red arrows) using a
Philips screwdriver.
3. Remove the battery door.
4. Install the two batteries.
5. Align and push the battery cover onto the sensor housing.
6. Install screws being careful not to cross-thread them – do not overtighten!

9
2.5 Quick Start Guide
Want to be up and running in two minutes or less? Here’s the quick-start guide in case you
misplaced it:

10
2.6 Cleaning and Care
We want your Scout equipment to last – so here are some brief steps to keep it happy!
2.6.1 Cleaning
For cleaning we recommend a slightly dampened (not wet) micro-fiber cloth. Do not spray
water directly into the inside of the equipment. Any liquid that goes into the sensor may
cause an electrical failure of the device. Do not use a flammable liquid/solvents or cleaning
agents on the sensor – just a micro-fiber cloth (dampened if needed).
2.6.2 Care and storage
Scout equipment is designed to handle normal wear and tear but there are some things to
avoid:
Do not get the unit wet internally.
If not using the external connectors be sure to attach the protective cover or
water may leak into the sensor causing damage.
Do not drop the unit (there is some fancy technology inside – if you wouldn’t
drop your camera, why would you drop this sensor?!?)
Protect the unit’s sensor opening when packing up your gear. If a tripod fights
the PIR sensor – the tripod will win.
Do not allow dirt to get into the blue weatherproof seal around the battery
compartment. This could cause seal failure and damage to the sensor and/or
batteries.
Do NOT remove the four screws on the back of the sensor (opposite of the
battery door). This may cause water to leak into the electronics.
Remove all batteries prior to long term storage.
Failure to properly care for the Scout PIR could result in a leak that may damage the unit.
The product warranty does not cover water damage resulting from user error.

11
2.6.3 Maintaining Weatherproof Design
Scout equipment is designed to meet the most challenging environmental conditions. It
does, however, require some care to maintain its weatherproof sealing.
Prior to opening the equipment rinse it under gently running water if it is dirty.
It’s very important to keep the housing’s silicone seal clean. A single hair or grain of sand
could potentially cause the housing to leak and damage the equipment. The seal is bright
blue in color. If the seal is dirty use a water dampened cotton swab to remove any debris
and thoroughly air dry the seal prior to returning the sensor into the field.
Below is an image indicating the seal location. It is recessed in a groove in the battery
compartment.

12
2.7 The Scout PIR
Figure 1 – Scout PIR Connections
There are two connectors on the Scout PIR (left to right):
1. Camera Connector (5-pin)
Camera half/full press: 3.5mm connector on end of cable.
2. USB
Change sensor settings (you can also do this wirelessly via the Scout Camera Box).
Update firmware.
The Scout PIR uses weather-resistant connectors and cables. If the sensor will be used outside
during the rain, snow, or condensing humidity be sure to have the connectors locked in place
(including the connector caps if a port is unused). The 3.5mm jack on the end of the supplied
cable must be kept dry.

13
3. Accessories
The Scout PIR works great all on its own but there are some key accessories that could turn this
sensor into a full-blown camera trapping system.
3.1 Scout Camera Box
Most camera trapping systems are intended for long term deployments under harsh
conditions. Keeping your camera dry and secure is usually a requirement! Thankfully we’ve
developed a camera box that is ideal for holding your camera. It also has the added benefit of
wirelessly communicating with the Scout PIR sensor. This means no more hungry red squirrels
or insects eating cables. Bear will have less “play toys” when there aren’t any cables laying
around. The setup is easy and has been used around the world in the most challenging
conditions.
For more information please look at our website:
https://www.cognisys-inc.com/store/scout-camera-box.html

14
3.2 Scout Receiver
Why would you want a Scout Receiver if you are using a Scout PIR? For additional
flexibility. The Camera Box lets you combine several Scout PIR and RX/TX combinations for a
variety of applications. One Scout PIR could turn on auxiliary lighting, another PIR could start
video recording, while the Receiver could have a burst of tack-sharp still images taken. When
used in conjunction with the Camera Box the only limit is your creativity (and the cooperation of
whatever you’re shooting!).
For more information please look at our website:
https://www.cognisys-inc.com/store/scout-standard.html

15
4. Installing the software
The Scout PIR sensor can be controlled one of two ways. You can plug a USB cable into it and
adjust the settings using a program for your Mac or PC. You can optionally control it wirelessly
via the Scout Camera Box app (this requires a Scout Camera Box). See section “8.3 - Full
Wireless (Using the Scout Camera Box)” for details on wirelessly controlling it.
Wait – I need an app? Maybe. Out of the box the Scout PIR will function for most applications.
There are times, however, where you may want to use some of the advanced features of the
sensor. For this you’ll need the free application to change the parameters. You likely have a
laptop with you in the field for reviewing images and potentially making setup changes anyways,
right? This is just another small program to make your camera trapping experience a success!
You can download the free PC/Mac version of the app here:
https://www.cognisys-inc.com/products/scout/scoutpir_tech_specs.php
5. Basic Navigation
In this section we’ll go into the basics of using the Scout PIR. If you find your eyes glossing over
with all the technical discussion you can always skip to the “8 - Examples” section to start using
your Scout PIR.Adjusting the settings is the same regardless if you’re using USB or wirelessly
communicating with it through the Scout Camera Box.
5.1 Power Button
The power button is located on the side of the sensor. Press this button to turn on the Scout
PIR. The PIR sensor takes some time to warm up and calibrate. During this time the red power
LED will fade in and out. Once the Scout PIR is ready the light will turn out (you don’t want a
beacon of red light, right?).
To turn off the Scout PIR simply press and hold this button for approximately two seconds.

16
Note: Once the Scout PIR is on you can give the power button a quick press to check the
remaining battery life. The power LED will flash at you to indicate how the batteries are doing:
If you are using the Scout Camera Box you can wake it (so that it can be connected to over Wifi)
by pressing this power button on the Scout PIR. This way you don’t have to open up the back
cover of the Camera Box in order to connect to it.
The Scout PIR should be turned on prior to plugging in a USB cable. Otherwise it will enter
reprogramming mode and not respond to the app.
5.2 LED Indicators
There are two LED indicators on the Scout PIR. The power LED was discussed above.
Additionally there is a front-facing LED. When a subject is detected both the power LED (side-
mounted) and the front-facing LED will light up for the duration the camera is active.
In some applications you may not want any visible light when the sensor detects something. You
can optionally disable the LED. See section “7.2.3 - LED On” for details.

17
6. Navigating the app
In this section we’ll briefly give an overview for how to use the app to adjust settings. If you find
your eyes glossing over with all the technical discussion you can always skip to the “8-
Examples” section to start using your Scout PIR.
The Scout PIR should be turned on prior to plugging in a USB cable. Otherwise it will enter
reprogramming mode and not respond to the app.
6.1 Connection Status
You can verify you have a connection to the sensor.
In the upper-right corner of the application there will be a green or a red indicator. Green
indicates that the computer is communicating with the Scout PIR. Red means either the sensor
was not turned on prior to plugging in USB, it has no batteries installed, or drivers did not install
properly (contact us at support@cognisys-inc.com if you have any problems!).
Connected
Disconnected
6.2 Global buttons
There are four global buttons at the top of the app that immediately take effect. “Read Config”,
“Save Config”, “Shutter”, and “Outputs Off”.
Figure 2 - Mac/PC Global Buttons (at top)

18
6.2.1 Read Config
Pressing this button will read the current settings for the sensor. This happens
automatically when the app first detects a device is present.
6.2.2 Save Config
This will take any app changes and permanently save them to the sensor. Any time you
make a change to a setting it will be sent down to the sensor but it will not be permanently
retained (after a power-cycle) unless you press this “Save Config” button.
6.2.3 Shutter
This will activate the shutter outputs (and follow its programming) for the sensor.
6.2.4 Outputs Off
“Outputs Off” will stop any shutter/camera output. This can be useful if you’ve started a
long shutter activation (like a 30 second video recording) but want it to stop immediately so
you can adjust camera settings. Cameras will generally not let you adjust their settings
while the half-press or full-press is active.

19
6.3 Adjusting Settings
The very first item listed in the app is the number of pictures that have been taken since power-
on (or since they were last cleared). This is followed by the sensitivity, and whether or not the
LED’s should light when the sensor detects something. Beneath that all the rest of the settings
are grouped into categories. Simply expand the category and choose what settings you would
like to adjust. They’re discussed in the section below.

20
7. Settings
7.1 Settings Navigation Map
Below is the navigation map for all the settings. The links are “clickable” to get you to the
specific details about the setting.
# pics
Sensitivity
LED On
Camera Settings
# pics (elapsed)
Sensitivity
On time
Off time
Final Off
Extend On Time
Extend Off Time
Periodic Half-Press
Enable
Half-Press
Half-Press Interval
Wireless Settings
ID
Channel
Wake Up
Time Settings
On Time
Off Time
Shot Limit
Enabled (Yes/No)
Shot Limit
Limit Window
Limit Timeout
Software ID
Voltage
Load PIR Defaults
Other manuals for Scout PIR
1
Table of contents