Electra e2.3 User manual

e2.3
Instruções
Manual do utilizador para o detetor e2.3 !
O e2.3 é um detetor de movimento de 160º encastrável, que utiliza um sensor passivo de
infravermelhos para detetar variações de temperatura emitida por pessoas ou objetos que
atravessem a sua área deteção. Tem um sensor incorporado que lhe permite detetar
automaticamente a luminosidade. É fácil de instalar e amplamente utilizado.
Especificações:
Tensão de alimentação: 220-240V/AC Angulo de deteção: 160°
Regulação do tempo: Min.10seg±3seg Frequência:: 50/60Hz
Max.7min±2min Distancia de deteção: 9m max (<24)
Cargas : Luz ambiente: <3-2000LUX (ajustável)
Duas linhas : Max.500W Temperatura de funcionamento:-20~+40
200W eLED Humidade:<93%RH
Três linhas: Max.500W Consumo: aprox 0.5W
200W eLED Alturademontagem:1-1.8m
Velocidade de deteção: 0.6-1.5m/s
FUNÇÕES:
Écapazdeidentificardia/noite.Sendopossíveloutilizadorajustaroseufuncionamento
para níveis de luz ambiente diferentes.
Podefuncionarduranteodiaeanoitequandoajustadonaposição“Sol”no(max.).Pode
funcionar com luz ambiente inferior a 3LUX quando ajustado na posição “3” no (min)
Oajustedotempoéadicionadocontinuamente:quandorecebeaindicaçãodemovimento
apos a primeira atuação, esta ira reiniciar o tempo a partir desse momento
Interruptor:“ON”“OFF”“PIR”.
Boa sensibilidade Fraca sensibilidade
Conselhos de Instalação:
O detetor responde a alterações de temperatura, evite as seguintes situações:
Eviteapontarodetetornosentidodeobjetoscomsuperfíciesaltamentesrefletoras,tais
como espelhos, etc.
Evitemontarodetetorpertodefontesdecalor,taiscomoaquecedores,ar-condicionado,
etc.
Eviteapontarodetetorparaobjetosquesepossammovercomovento,comocortinase,
plantas altas.

LIGAÇÃO:
Perigo de morte. Risco de choque elétrico!
Ainstalaçãodeveserrealizadaportécnicosqualificados.
Desligueaenergia.
Cobrirouisolarpeçasadjacentessobtensão
Protegercontrareativação
Verifiqueaausênciadeenergia.
RetireopainelfrontaldosensoreajusteotempoeosLUX(consulteafigura1).
Efetuealigação,nosterminaisdosensordeacordocomodiagramadeligações.(de
acordo com sua situação (três ou dois fios)
Coloqueodetetornacaixadeaparelhagemeaperteosparafusosemambososlados.
Volte a colocar o painel frontal, ligue a alimentação e teste.
Figura1
ESQUEMA DE LIGAÇÕES: (possibilidade de 2 tipos de ligação)
Ligação 2 fios Ligação 3 fios
TESTE:
Ajustepotenciómetrodotempoparaomínimo(10”).AjusteopotenciómetrodosLUX
para a posição (SOL).
Ligueaalimentação,alâmpadadeveestarligada.
Ajusteointerruptordefunçãopara"OFF",alâmpadadeveserdesligadaimediatamente.
Ajusteafunçãopara“PIR”,odetetorealâmpadaligadanãoterãosinalnoinício.Após
30 segundos, o detetor inicia o trabalho. Se o detetor receber o sinal de indução, a carga
liga. Enquanto não houver mais nenhum sinal de indução, a carga deve parar de
funcionar dentro de 10 seg. ± 3 seg. e a carga será desligada.
Ajusteos“LUX”sentidoanti-horárioparaomínimo,sealuzambienteforsuperiora3LUX,
a carga não voltara a ligar. Se a luz ambiente for inferior a 3LUX (escuro), o detetor
devera funcionar sem que seja acionado, a carga devera se desligar em
aproximadamente 10” ±3”.
Quando efetuar o teste durante o dia coloque o potenciómetro na posição, pois a
carga poderá não ligar
PROBLEMAS DE LIGAÇÂO:
Acarganãoliga:
a. Verifique as ligações.
b. Verifique se a carga esta boa.
c. Verifique se as configurações de luz correspondem a do ambiente.
Sensibilidadefraca:
a. Verifique se não existe nenhum objeto que impeça a deteção.
b. Verifique se a temperatura ambiente não é demasiadamente elevada.
c. Verifique se esta dentro do raio de deteção do detetor.
d. Verifique se o detetor esta montado dentro da altura estipulada.
e. Verifique se a orientação do movimento é a correta.
.
Acarganãodesliga:
a. Verifique se não existe um movimento continuo dentro do raio de atuação do
detetor.
b. Verifique se “TIME” não esta regulado para o tempo máximo
c. Verifique se a alimentação corresponde ao indicado.
www.electra.pt

e2.3
Instruction
Welcome to use e2.3 infrared motion sensor!
The product adopts good sensitivity detector, integrated circuit. It gathers automatism,
convenient safe, saving-energy and practical functions. It utilizes the infrared energy from
human as control-signal source, it can start the load at once when one enters detection field. It
can identify day and night automatically. It is easy to install and used widely.
SPECIFICATION:
Power Source: 220-240V/AC Detection Range: 160°
Time Delay : Min.10sec±3sec Power Frequency: 50/60Hz
Max.7min±2min Detection Distance: 9m max (<24)
Rated Load: Ambient Light: <3-2000LUX (adjustable)
Two wire line: Max.500W Working Temperature:-20~+40
200W and LED Working Humidity :< 93%RH
Three wire line: Max.500W Power Consumption: approx 0.5W
200W and LED Installation Height: 1-1.8m
Detection Moving Speed: 0.6-1.5m/s
FUNCTIONS:
Can identify day and night: The consumer can adjust working state in different ambient light.
It can work in the daytime and at night when it is adjusted on the “sun” position (max). It can
work in the ambient light less than 3LUX when it is adjusted on the “moon” position (min).
As for the adjustment pattern, please refer to the testing pattern.
Time-Delayisaddedcontinually:Whenitreceivesthesecondinductionsignalswithinthe
first induction, it will restart to time from the moment.
Theswitch:“ON“OFF”“PIR”.
Good sensitivity Poor sensitivity
INSTALLATION ADVICE:
As the detector responds to changes in temperature, avoid the following situations:
Avoidpointingthedetectortowardsobjectswithhighlyreflectivesurfaces,suchasmirrors
etc.
Avoidmountingthedetectornearheatsources,suchasheatingvents,airconditioning
units, light etc.
Avoidpointingthedetectortowardsobjectsthatmaymoveinthewind,suchascurtains,
tall plants etc.

CONNECTION:
Warning. Danger of death through electric shock!
Mustbeinstalledbyprofessionalelectrician.
Disconnectpowersource.
Coverorshiedanyadjacentlivecomponents.
Ensuredevicecannotbeswitchedon.
Checkpowersupplyisdisconnected.
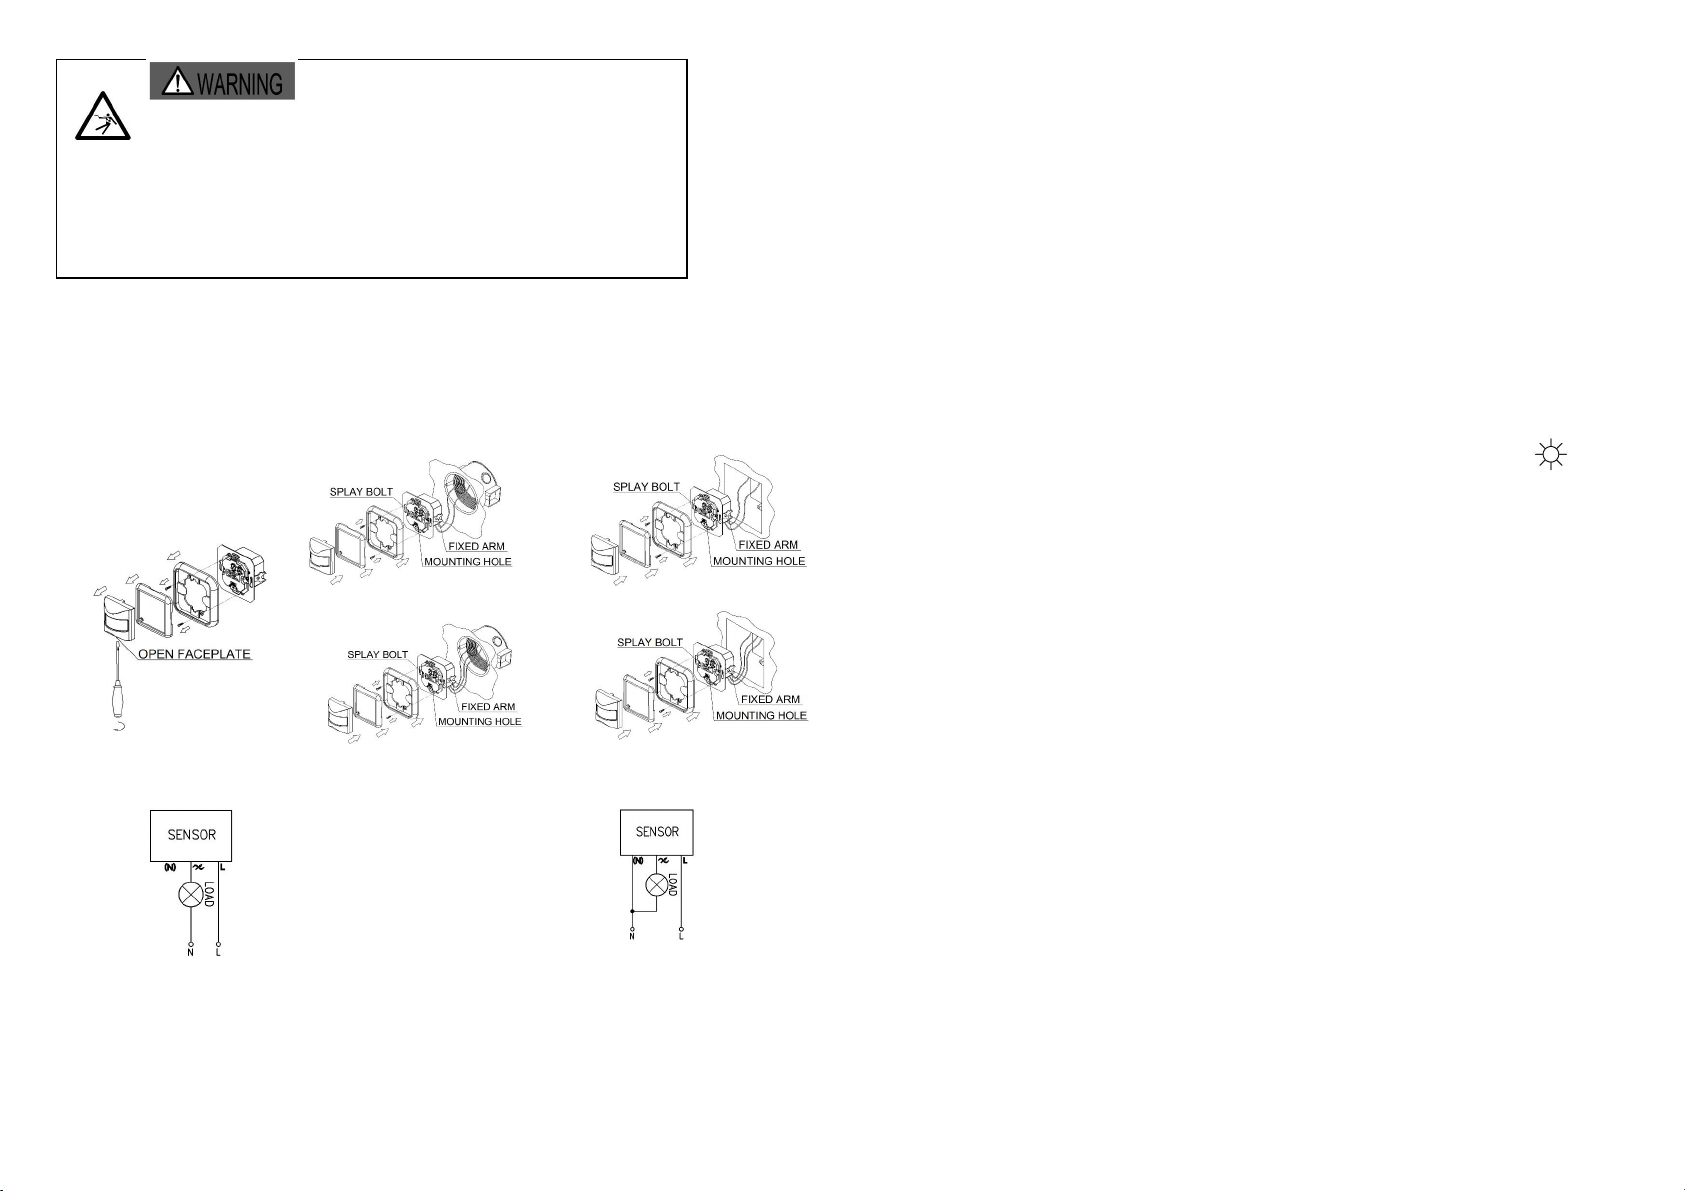
UnloadthefaceplateofsensorandadjustthetimeandLUXknob.(refertofigure1)
Loosethescrewsintheconnectionterminal,andthenconnectthepowertoconnection
terminal of sensor according to connection-wire diagram. (according to your actual situation,
here you can connect three wire or two wire)
Ifyouwanttoinstallitincircularhole,putthesensorintotheholeandtightenthesplaybolt
on both sides. If you want to install in quadrate hole, put the sensor into the hole, fix the
screw through the mounting hole .
Installbackthefaceplate,switchonthepowerandthentestit.
Two wire line Two wire line
Figure1 Three wire line Three wire line
CONNECTION-WIRE DIAGRAM: (there are two ways .see the following)
DO NOT PUT THE SENSOR
INTOPOWERDIRECTLY!!!
Twowireline Threewireline
TEST:
Setthefunctionswitchto“ON”,set“TIME”
anti-clockwise to minimum, “LUX” clockwise to
maximum.
Switchonthepower,thelampshouldbeon.
Setthefunctionswitchto“OFF”,thelampshouldbeoffimmediately.
Setthefunctionswitchto“PIR”,thesensoranditsconnectedlampwillhavenosignalatthe
beginning. After Warm-up 30sec, the sensor can start work .If the sensor receives the
induction signal, the lamp will turn on. While there is no another induction signal any more,
the load should stop working within 10sec±3sec and the lamp would turn off.
TurnLUXknobanti-clockwiseontheminimum(moon).Iftheambientlightismorethan
3LUX, the sensor would not work and the lamp stop working too. If the ambient light is less
than 3LUX (darkness), the sensor would work. Under no induction signal condition, the
sensor should stop working within 10sec±3sec.
Note: when testing in daylight, please turn LUX knob to (SUN) position, otherwise
the sensor lamp could not work! If the lamp is more than 60W, the distance between lamp
and sensor should be 60cm at least.
SOME PROBLEM AND SOLVED WAY:
Theloaddoesnotwork:
a. Please check if the connection of power source and load is correct.
b. Please check if the load is good.
c. Please check if the settings of working light correspond to ambient light.
Thesensitivityispoor:
a. Please check if there is any hindrance in front of the detector to affect it to receive
the signals.
b. Please check if the ambient temperature is too high.
c. Please check if the induction signal source is in the detection field.
d. Please check if the installation height corresponds to the height required in the
instruction.
e. Please check if the moving orientation is correct.
Thesensorcannotshutofftheloadautomatically:
a. Please check if there is continual signal in the detection field.
b. Please check if the time delay is set to the maximum position
c. Please check if the power corresponds to the instruction. www.electra.pt
Table of contents
Languages:
Other Electra Accessories manuals