manuals.online logo
Brands
  1. Home
  2. •
  3. Brands
  4. •
  5. HPM
  6. •
  7. Accessories
  8. •
  9. HPM D641/BFL User manual

HPM D641/BFL User manual

• Operating range up to 70m
• 2 melodies for selection
• Weather resistant bell press
• Flashing Light
• Volume control
• Visitor alert
• Panic button
• Pager
1 2Features Typical Applications
LE07955AAA
Specifications
Bell press supply voltage: 12V d.c
Transmission frequency: 433.92 MHz
Range: Up to 70m
Receiver battery voltage: 4.5V d.c
Sound level: 70dB
Battery requirement:
Door chime receiver: 3 x ‘C’ batteries (not supplied)
Bell press transmitter: 1 x 12V A23 battery (supplied)
Note: This door chime is not compatible with units from
D642 series or with D641/B, D641/BLR and D641/BLRCC.
Box contents
• Bell Press
• Door Chime receiver
• 1 x 12V battery
• Mounting screws and wall plugs
• Double-sided tape
Deluxe Wireless Door Chime
with Flashing Light
Battery Operated
Cat. D641/BFL
Instruction Manual
Maintenance
The HPM Wireless Door Chime is an example of superior design and craftsmanship. The following
suggestions will help you care for the Door Chime so you can enjoy it for years:
1. Keep the Door Chime dry. If the Door Chime gets wet, wipe it dry immediately. Liquids might
contain minerals that can corrode the electronic circuits.
2. Use and store the Door Chime only in normal temperature environments. Temperature extremes
can shorten the life of electronic devices, damage batteries, and distort or melt plastic parts.
3. Handle the Door Chime gently and carefully. Dropping it can damage the circuit boards and can
cause the door chime to work improperly.
4. Keep the Door Chime away from dust and dirt, which can cause premature wear of parts.
5. Wipe the Door Chime with a damp cloth occasionally to keep it looking new. Do not use harsh
chemicals, cleaning solvents, or strong detergents to clean the chime.
6. Use only fresh batteries of the recommended size and type. Always remove old or weak batteries.
They can leak chemicals that can destroy electronic circuits.
7. Modifying or tampering with the Door Chime’s internal components can cause a malfunction and
might invalidate its warranty.
8. Care should be taken when replacing Receiver batteries. Open casing carefully so as not to
damage the internal wiring.
9Troubleshooting continued
PROBLEM POSSIBLE CAUSE SUGGESTED SOLUTION
Your Door Chime has
stopped sounding.
Your Door Chime Receiver batteries
may be flat (3C batteries). Replace the batteries in your Door
Chime Receiver (3C batteries).
If the red indicator light on the
Bell Press Transmitter no longer
illuminates when pressed then your
transmitter battery is flat.
Replace your Bell Press Transmitter
battery (A23 12V).
If you have checked
your batteries and your
Door Chime is still not
operating.
Check the distance between your Door
Chime and Bell Press, they may be
located too far away from each other.
Relocate the Door Chime Receiver
closer to the Bell Press.
Your Bell Press may be located too
close to a metal structure or too
close to the ground.
Relocate your Bell Press away from
the metal structure or further away
from the ground.
The volume control may be in off
position Move the volume control to either
low or high
Channel used on Bell Press
Transmitter and Door Chime Receiver
may be different
Modify channel on either Bell Press
Transmitter or Door Chime Receiver.
Refer to Channel Selection – Section 5.
10
Warranty
HPM Legrand warrants this product for a period of 3 years
from the date of purchase.
These goods come with guarantees that cannot be
excluded under the Australian and New Zealand Consumer
Laws. You are entitled to a replacement or a refund
for a major failure and for compensation for any other
reasonably foreseeable loss or damage. You are also
entitled to have the goods repaired if the goods fail to be
of acceptable quality and the failure does not amount to a
major failure.
See the Warranty card enclosed with this product for
further details.
Customer Service
For all Customer Service and Technical Support
please call Monday to Friday during business hours.
HPM Legrand Australia
1300 369 777
www.hpm.com.au
HPM Legrand New Zealand
0800 476 009
www.hpm.co.nz
ABN: 31 000 102 661
Please read all instructions carefully before installation and use.
No wiring is required.
Door Chime Receiver
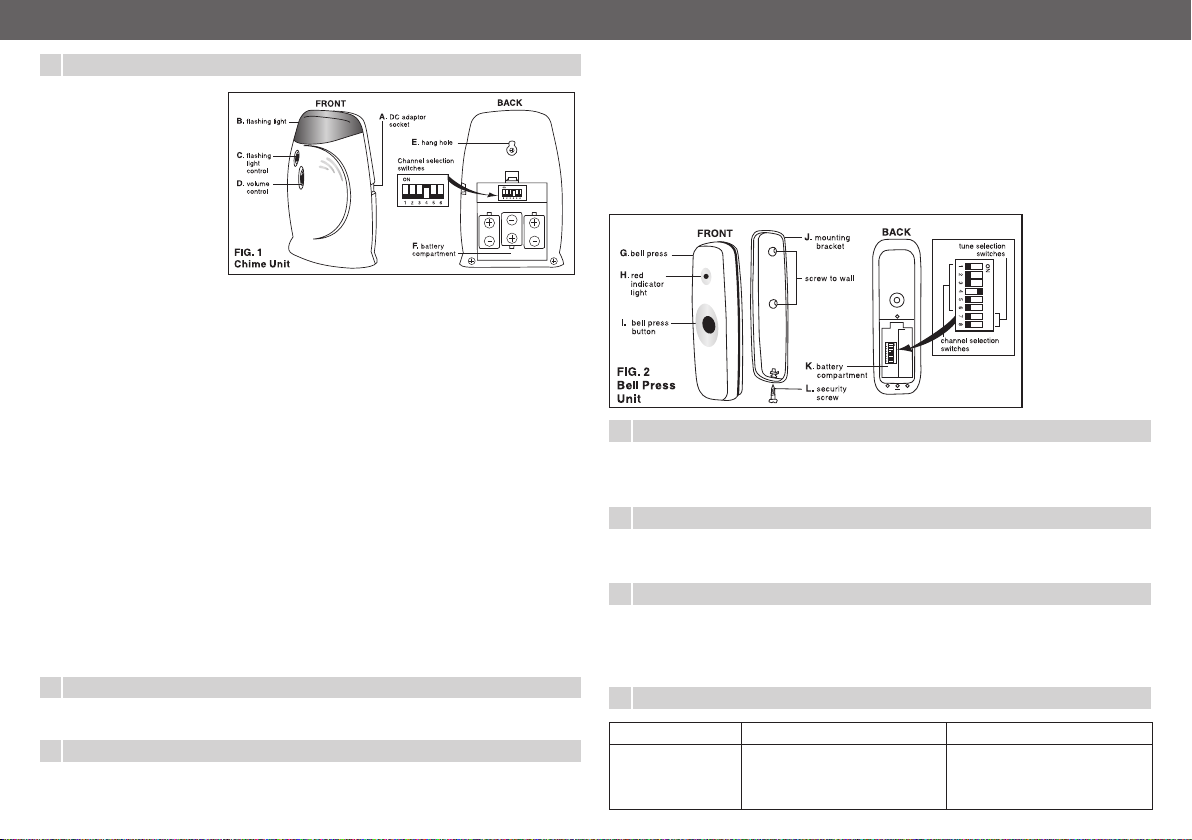
The Chime Unit (Fig. 1) can be
powered by 3 x ‘C’ size batteries
(not included) or can be plugged in
to a powerpoint using the external
DC adaptor socket (Fig. 1 A)
(adaptor not included).
IF USING DC ADAPTOR: Simply
plug a 9V DC adaptor into the DC
adaptor socket (Fig. 1 A), plug the
other end of the adaptor into any
standard 240V power point and
switch the power point ON.
IF USING BATTERIES: Alkaline batteries are recommended for longer life. For best performance do not use
rechargeable batteries, do not mix old and new batteries or batteries of different types.
Step 1: Remove the cover of the Battery Compartment (Fig. 1 F)
Step 2: Insert 3 x ‘C’ size alkaline batteries into the Battery Compartment (Fig. 1 F) ensuring the (+) end of
the batteries are at the (+) in the Battery Compartment.
Step 3: Replace Battery Compartment cover. The Chime Unit is fully portable. It is free-standing and can be
placed anywhere in the home. It can also be fixed to a wall by using the slotted hang hole (Fig. 1 E)
on the back. The Chime Unit is not weatherproof. Do not expose to rain or immerse in water.
Bell Press Transmitter
Step 1: Remove the security screw at the bottom of the Bell Press Unit. - (Fig. 2 L)
Step 2: Remove the Bell Press (Fig. 2 G) from the Mounting Bracket (Fig. 2 J). Open the Battery
Compartment cover on the back of the Bell Press. Insert 12V battery provided into the Battery
Compartment (Fig.2 K) ensuring that the (+) end of the battery is at the (+) in the Battery
Compartment. Replace Battery Compartment cover.
Step 3: Ensure the channel selected is the same as the channel selected on the Chime Unit
(refer Channel Selection section).
Step 4: Select tune you wish to hear (refer Tune Selection section).
Step 5: Press the Bell Press Button (Fig.2 I) to ensure that the red indicator light (Fig. 2 H) illuminates,
indicating that the battery is correctly installed, and to test satisfactory operation. The Bell Press is
suitable for outdoor use, however for best performance and a longer life the Bell Press should not
be exposed to direct sunlight or rain.
Step 6: Secure the Mounting Bracket (Fig. 2 J) using the 2 x screws/ wall plugs or double sided tape
provided. To ensure that the weatherproofing is maintained, mount the Bell Press in upright
position. The Bell Press (Fig. 2 G) can then be inserted into the Mounting Bracket (Fig. 2 J) and
securely fastened at the bottom using the security screw supplied (Fig. 2 L).
3Installation Press Unit being used it is likely that another unit operating nearby, using the same frequency channel, is
the cause. You will need to select a different channel:
Step 1: On the Bell Press Unit -The Channel Selection Switches are the first 6 switches located inside the
Bell Press Battery Compartment (Fig. 2 K). Remove the Bell Press (Fig. 2 G) from the Mounting
Bracket (Fig.2 J). Open the Battery Compartment cover on the back of the Bell Press. Select a
different channel by moving one or more of the 6 Channel Selection Switches to the ON position.
Step 2: On the Chime Unit - The Channel Selection Switches are located inside the Battery
Compartment (Fig. 1 F). Move the Channel Selection Switches so that they correspond exactly
to the Channel Selection Switch positions you have set on the Bell Press Unit. Test to ensure
correct operation.
6Tune Selection
Inside the Battery Compartment of the Bell Press Unit (Fig. 2 K) there is a row of 8 switches. The last
2 switches are for Tune Selection and represent the 2 tunes available - Ding Dong or Westminster. To
change the tune, simply select the other Tune Selection Switch.
7Volume Selection
The Volume Control (Fig. 1 D) enables you to adjust the volume of your HPM Door Chime (HIGH or LOW)
or turn it OFF completely.
8Flashing Light Selection
The Flashing Light Control (Fig. 1 C) enables you to have a light (Fig. 1 B) flash when the Door Chime Unit
is activated . This can be in addition to or instead of the tune sounding. Simply position the Flashing Light
Control (Fig. 1 C) in either the ON or OFF position. Perfect for hearing impaired, families with children,
shift workers not wanting to be woken or if there is loud background noise eg. when vacuuming.
Press the Bell Press Button (Fig. 2 I) to sound the Chime Unit. Press again to repeat the chime. The operation
and range of your HPM Door Chime will depend on location, temperature and battery condition.
4Door Chime Operation
Inside the Battery Compartment of both the Bell Press (Fig. 2 K) and the Chime Unit (Fig.1 F) there are 6
Channel Selection Switches. It is essential that the Channel Selection Switches be in the same position on
both units for them to recognise each other. In the event that your Door Chime Unit sounds without your Bell
5Channel Selection
9Troubleshooting
PROBLEM POSSIBLE CAUSE SUGGESTED SOLUTION
The Door Chime is
intermittent when it
is activated or sounds
when not activated.
A similar door chime with the same
frequency is operated nearby.
Change the channel of your Door
Chime and Bell Press (refer to
Changing Operating Channels).

Other HPM Accessories manuals

HPM D641/B User manual

HPM

HPM D641/B User manual

HPM 630S02WE User manual

HPM

HPM 630S02WE User manual

HPM XLP912WEWE User manual

HPM

HPM XLP912WEWE User manual

HPM 630R02WE User manual

HPM

HPM 630R02WE User manual

HPM D641/PILR User manual

HPM

HPM D641/PILR User manual

HPM 630/3 User manual

HPM

HPM 630/3 User manual

Popular Accessories manuals by other brands

Proxim Antenna Tsunami MP.11 Installation and management guide

Proxim

Proxim Antenna Tsunami MP.11 Installation and management guide

Vernier WDSS manual

Vernier

Vernier WDSS manual

ProMinent DULCOLEVEL Original operating instructions

ProMinent

ProMinent DULCOLEVEL Original operating instructions

UNINEX Nakatomi Koolzone SAC-6500 Quick user guide

UNINEX

UNINEX Nakatomi Koolzone SAC-6500 Quick user guide

VOLTCRAFT 1313703 operating instructions

VOLTCRAFT

VOLTCRAFT 1313703 operating instructions

Philips GC920 user manual

Philips

Philips GC920 user manual

Pioneer CNDV-80MT Operation manual addendum

Pioneer

Pioneer CNDV-80MT Operation manual addendum

Sandberg ACTIVE Survivor quick guide

Sandberg

Sandberg ACTIVE Survivor quick guide

Celestron C10-NGT Communication protocol

Celestron

Celestron C10-NGT Communication protocol

KUSSMAUL 091-22F installation instructions

KUSSMAUL

KUSSMAUL 091-22F installation instructions

Kayoba 779-014 User instructions

Kayoba

Kayoba 779-014 User instructions

Dreiha CoolingBox 35 manual

Dreiha

Dreiha CoolingBox 35 manual

INNOBIZ Nomalia Instructions for use

INNOBIZ

INNOBIZ Nomalia Instructions for use

Rockler Chrome Summit Pen Kit instructions

Rockler

Rockler Chrome Summit Pen Kit instructions

Apogee Instruments SU-100 owner's manual

Apogee Instruments

Apogee Instruments SU-100 owner's manual

Palram CANOPIA VITORIA 5000 Assembly instruction

Palram

Palram CANOPIA VITORIA 5000 Assembly instruction

Palram Applications SIERRA 2.3x2.3m/7'5" instructions

Palram Applications

Palram Applications SIERRA 2.3x2.3m/7'5" instructions

Omron E3S-G datasheet

Omron

Omron E3S-G datasheet

manuals.online logo
manuals.online logoBrands
  • About & Mission
  • Contact us
  • Privacy Policy
  • Terms and Conditions

Copyright 2025 Manuals.Online. All Rights Reserved.