coldture 220631MiV1 User manual

Coldture Instruction Manual for the Ice Mini Systems & Tubs
(Ver.:220631MiV1)
Performance Favors the Cold
coldture.com

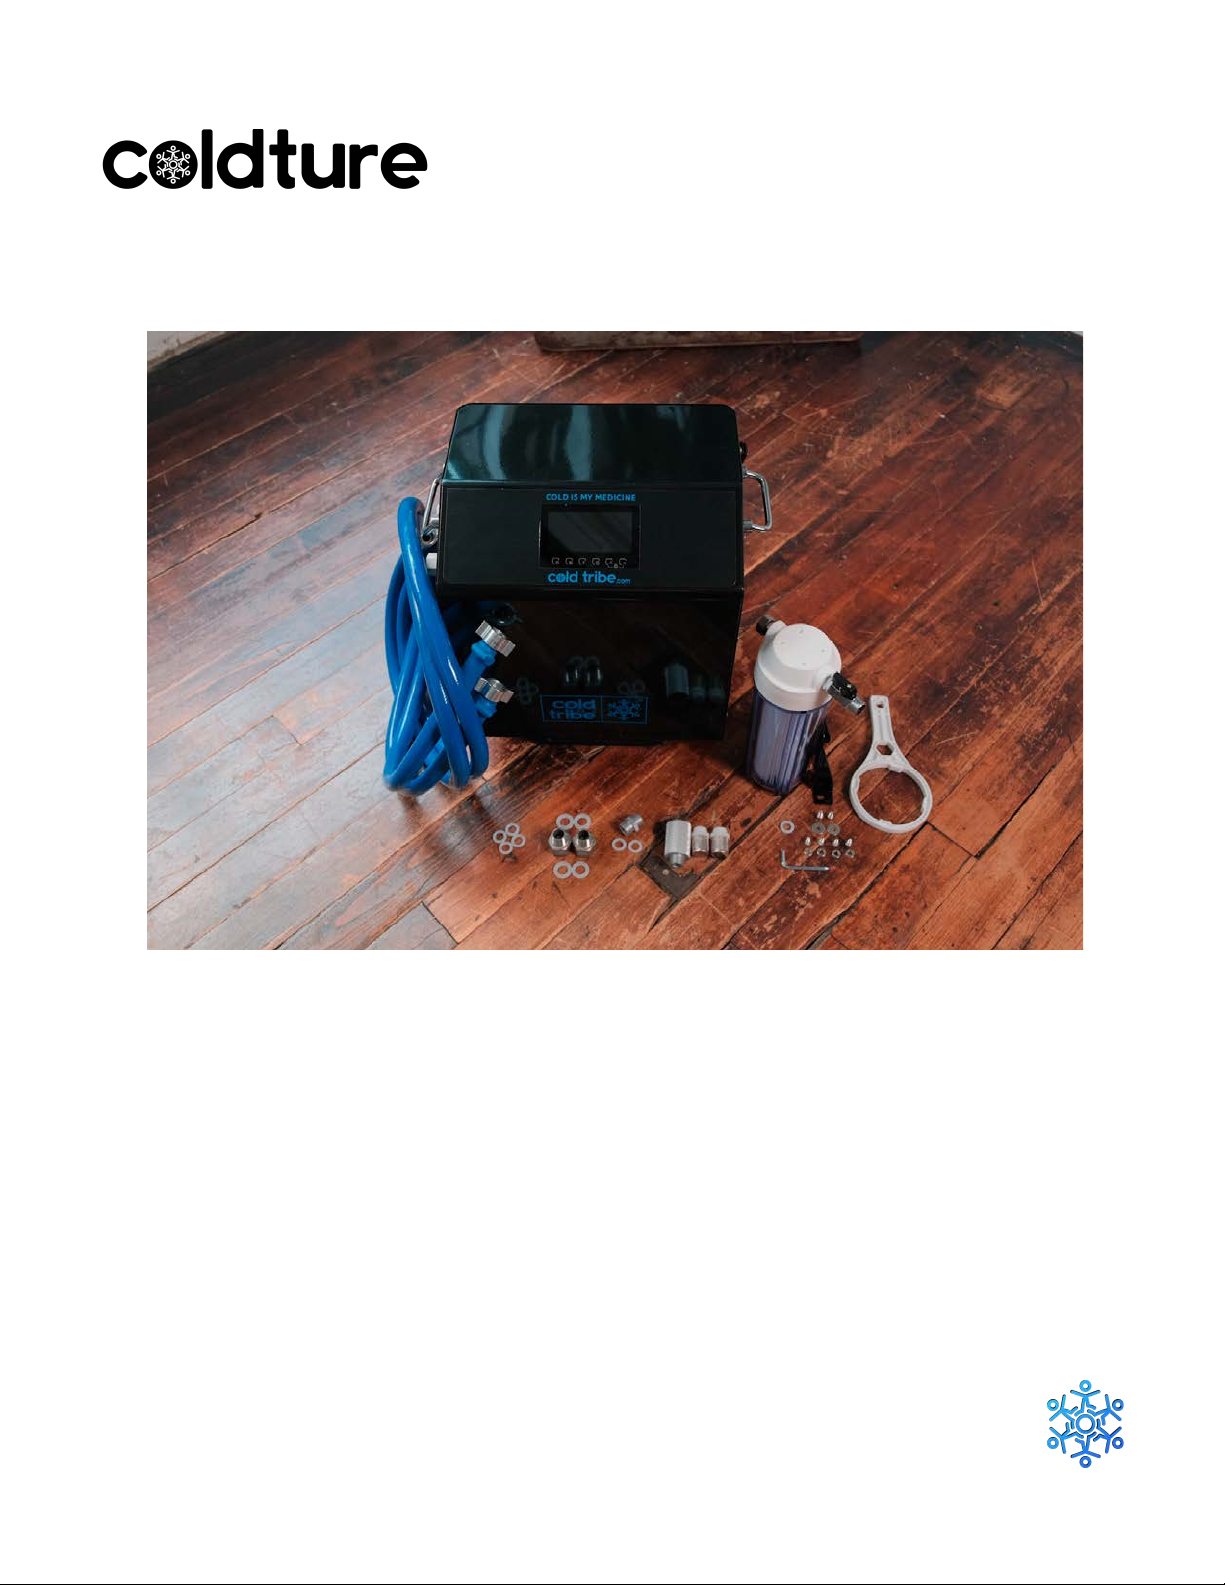
Welcome to the family and thank you for your purchase! We are excited to get you on your cold
immersion journey as soon as possible. Please carefully review the following manual to ensure
proper installation, operation and maintenance of your new unit.
Warnings
ELECTRICITY IS VERY DANGEROUS, IN ORDER TO PREVENT ACCIDENTS, PLEASE PAY ATTENTION
TO SAFETY.
1. PLEASE MAKE SURE THE LOCAL ELECTRICITY IS SUITABLE FOR THE CHILLER BEFORE USING.
2. PLEASE MAKE SURE THIS CHILLER IS OPERATED IN A GOUNDED/EARTHED SOCKET.
3. PLEASE DON’T FORGET TO TEST THE RESIDUAL CURRENT CIRCUIT BREAKER (RCD) ONCE A
WEEK AT LEAST. DON’T USE THE MACHINE ANY MORE IF IT HAS ANY PROBLEMS WITH RCD.
4. PLEASE NEVER PUT THIS MACHINE INTO THE WATER, AND DON’T’ SPRAY HIGH PRESSURE
WATER ON CHILLER.
5. PLEASE COOL THE BATH WATER IN ADVANCE BEFORE TAKING A BATH, AND DON’T FORGET TO
TAKE THE PLUG OUT OR TURN OFF THE MAIN SWITCH WHEN TAKING A BATH, ALTHOUGH THIS
MACHINE HAS PASSED MANY SAFETY TESTS, WE NEVER RECOMMEND KEEPING THE MACHINE
ON WHILE TAKING A BATH IN THE CHANCE THAT IT SOCKET IS NOT GROUNDED OR OTHER
ISSUES.
6. KEEP THE CHILDREN AWAY FROM THE CHILLER.
7. DON’T COVER OR BLOCK THE AIR INLET OR/AND OUTLET WHEN USING THE MACHINE.
8. PLEASE KEEPING ENOUGH SPACE MORE THAT 30CM AROUND THE MACHINE.
9. PLEASE EMPTY THE WATER FROM DRAINAGE IN ADVANCE FOR LONG TERM STORAGE.
10. PLEASE EMPTY THE WATER FROM DRAINAGE IN ADVANCE IF THE AMBIENT TEMP LESS THAN 2C,
ESPECIALLY IN THE WINTER, OTHERWISE, THE WATER WILL EASILY BECOME TO THE ICE AND
BLAST THE MACHINE.
11. PLEASE KEEP THE ENVIRONMENT VENTILATED, THE MAX ALLOWABLE TEMPERATURE OF
AMBIENT IS NOT MORE THAN 45 DEGREES CELSIUS.
12. KEEP YOUR HAIR, FINGERS, TOWEL AND SO ON AWAY FROM THE FAN OF CHILLER.
13. KEEP SHARP OBJECTS AWAY FROM THE TUB.
14. DO NOT LEAVE CHILDREN UNATTENDED AROUND THE TUB - TO PREVENT DROWNING.
coldture.com

Chiller & Tub Overview
1. Hose *2
2. Chiller *1
3. Rubber washer (RW1) *7
4. Rubber washer (RW2) *4
5. Metal washer (MW1) *4
6. Metal washer (MW2) *2
7. 3/4 Fitting *2
8. Screen Housing *1
9. Screen *2
10. Double male fitting (DMF) *1
11. Screw 1 (SW1) *4
12. Screw 2 (SW2) *2
13. Filter casing cover
14. Filter casing body
15. Filter cartridge
16. Valve
17. Filter holder
18. Filter wrench
19. Allen key
coldture.com

1.Tub and bag
2. Cover
3. Dual Action Pump & Hose
4. Repair patch
5. Air valve*
* when pushed in - valve is open
When pushed out - valve is closed
Inflate tub in pushed out position.
coldture.com

Tub Assembly
1. Clean area where tub will be placed *
ensure there are not sharp nails or objects
underneath that may puncture the tub.
2. Remove tub from bag and unroll to have
access to the air valve
3. Open air valve cover and press the valve
to ensure it is in the up position - if the
valve is in the down position then air will not
be contained inside the tub please double
check its position.
4. Attach the hose to the pump inflate side
5. Connect the hose to the tub by locking
the hose in with a clockwise motion.
6. Pump the tub until it is 8-10 PSI.
7. Remove the hose and screw back the
valve cover
* If air is coming out once you remove the
hose then the valve is in the wrong position.
8. Enjoy the tub with water and ice.
9. If you have a full system proceed to the
next page for chiller assembly.
coldture.com

Chiller Assembly
1. Remove and store chiller inlet/outlet
covers.
You have two options for setting up the filter
system. 1. Screen only for fast on the go
set up where you dont need fine filtering. 2.
Cartridge filter (20 micron) installation for
more permanent at home/gym setups.
2. SCREEN ONLY FAST SETUP
1. Screw in screen into Red Inlet
2. Screw over top of screen; the screen
housing.
OR
2. CARTRIDGE FILTER FINE FILTRATION
1. Take small rubber washer and put it
between the double male fitting and
the chiller
2. Center the cartridge filter in the clear
housing and use the cover to close
the filter housing tightly. * make sure
rubber seals are in place
3. Add rubber washer before attaching
filter to chiller
4. Hand tighten the connection
5. Take the metal filter holder and use
appropriate screws to attach to
chiller and filter
coldture.com

3. Remove the tub caps and store for future
use.
4. Take the ¾ fitting and add the large
rubber washer
5. Center the fitting on the connection and
screw on all the way until 2-3 threads
remain. Do for both Water IN & Water OUT.
6. Add a small washer to the hose and
attach to ¾ fitting - do not over tighten as
the washer may become pinched and
displaced.
MATCH HOSE CONNECTION RED TO
RED AND GREEN TO GREEN
7. Add small rubber washers to the opposite
end of the hose and connect water out with
inlet on the chiller A: Screen housing or B.
Filter. * Do not over tighten
8. Add small rubber washers to the opposite
end of the hose and connect water in with
outlet on the chiller * Do not over tighten
coldture.com

Filling the Tub
* Ensure your tub is in the ideal location
before starting to fill as you will not be able
to move it once water is inside
1.Use garden hose to fill the water if
accessible OR use garden hose faucet
adaptor to connect to bathroom sink.
2. Begin filling tub while monitoring for any
leaking
3. Once water fills above the min mark you
may begin the next steps of turning on the
chiller.
Chiller Start Sequence and Testing
1. Start by testing the safety shut off plug by
plugging it into a power outlet. A red light
should turn on.
a. Press Test on the plug to test the
shut off - light should turn off
b. Press Reset on the plug to reboot
the power back.
c. Test Weekly
2. Turn on the the power bottom and
monitor the following:
a. Leaks
b. Filter is filling up with water
c. E3 may flash for less than 30
sec.then water should start flowing.
coldture.com

Troubleshooting Chiller Start
Most common issue with the first start is air
leak shown by error code E3 - if E3
continues to flash for more than 30 seconds
than you will need to troubleshoot the red
line by doing the following:
1. Ensure washers have been used
between every connection.
2. Ensure clear filter housing is tightly
screwed on
3. Disconnect hoses; connect to check if
washers are in place - Over tightening
causes washer to be misplaced resulting in
air leaks.
4. Maybe sight tightening is required -
approach with caution.
5. Make sure water valve is in open
position ->
6. Reinstall filter making sure that two
rubber seals are in place on filter housing.
7. If issue persists please book a video
support call and we will troubleshoot the
issue live with you.
coldture.com

Operating Chiller & Controls
1. Power - Hold for 3 secs to turn on/off
2. Mode - Keep on Ice Bath
3. “F” - Temperature setting - press
once then press arrows up or down
to adjust temperature.
4. Clock - press to adjust for clock time
its on 24hr setting
5. Arrows - set temperature and lock
screen by pressing both up and
down arrows.
6. Wifi activation - Hold the clock for 10
secs until the wifi icon appears.
Wifi Connection
Step 1: Install TUYA SMART App at your
app store or use the QR code.
Step 2: Make sure your smartphone is
connected to WIFI-2.4G, only 2.4G, chiller
doesn’t work under WIFI-5G.
Make sure your smartphone and chiller are the
WIFI-2.4. network
coldture.com

Step 3
1. Run APP TUYA
2. Add Deviceliances
4. Select Thermostat (WIFI)
3. Choose Small Home App5. Turn power on
Chiller
6. Hold the Clock for 10 seconds until the Wifi is
blinking
7. Setup wifi connection on the app by selecting
a 2.4GHz network and providing a password.
8. Select EZ Mode and following instructions on
app
9. Device should be added and APP Control
Maintenance
Removing water from tub using submersive
pump *Prefered Method*:
1. Acquire a submersive water pump 1/3HP
or stronger.
2. Attach garden hose to water pump.
3. Direct to nearest drain
4. Plug pump into power outlet.
coldture.com

Removing water from tub with chiller:
1. Turn chiller off
2. Remove the Water in hose and ¾ fitting
3. Attach hose end to the chiller hose ¾
fitting
4. Direct the hose to the nearest drain
5. Turn on chiller
6. Monitor so water does not go below water
out level. Turn off the chiller.
7. Once water is below water out level
remove hose that is connected to inlet from
the tub and put it inside the tub to pump the
remaining water out.
8. When the hose is inside under the water,
turn the chiller on and monitor so that the
pump is not running dry.
** Do not use hose longer than 30 ft or
elevate more than 5ft - strain on pump may
cause damage! **
coldture.com

Filter Maintenance:
1. Once every 2-3 weeks or as needed
clean the filter.
2. Start by closing the water valve that is
before the filter or at the base of the tub.
3. Open the filter cartridge housing and
remove the filter along with the dirty water.
4. Take the filter to a space where you can
rinse the filter with a higher pressure nosal
in a up and down motion clearing the pleats
of any debris.
5. Put the filter back in the housing and
screw tightly back in place. Ensure all
rubber seals are in place.
6. Ensure you open the valve again once
everything is done. * Important! *
Replace filter element every 2-3 months
or as per use and water quality.
Water quality maintenance: use granular
chlorine and chlorine puck to ensure
appropriate free chlorine levels are
maintained in the tub - test water weekly
* Low water flow and/or flashing filter
signal on chiller requires filter cleaning.*
coldture.com

Tub Disassembly
1. Once all water is out - open the air
valve cap and press the valve down to
ensure it is in down position. Keep air
valve in down position * Caution high
pressure air may be loud *
2. Fold the logo side in so the tub edge
lines up with the bottom inside edge.
3. Next fold the opposite side over top
ensuring edge lines up with the bottom of
the other side.
4. Use your body weight to push out the air
while folding sides down.
5. Push the air valve once again to lock in
the up position.
6. Take Pump and connect the hose to the
deflate side. Then connect to tub and
deflate the remaining air from the tub.
7. Begin to roll the tub from the short side
ensuring that the connections are
protected inside the fold.
8. Use the straps to tighten the rolled up tub
9. Place in bag and you're ready to go.
Email Us If You Need Help!
coldture.com
Table of contents