OPERATING INSTRUCTIONS
CHARGING YOUR RADAR 360˚LIGHTS
FOR THE FIRST TIME
1. Find a location where your light is exposed to full sunlight for at least 8
hours. This will typically require a full day so start charging in the morning.
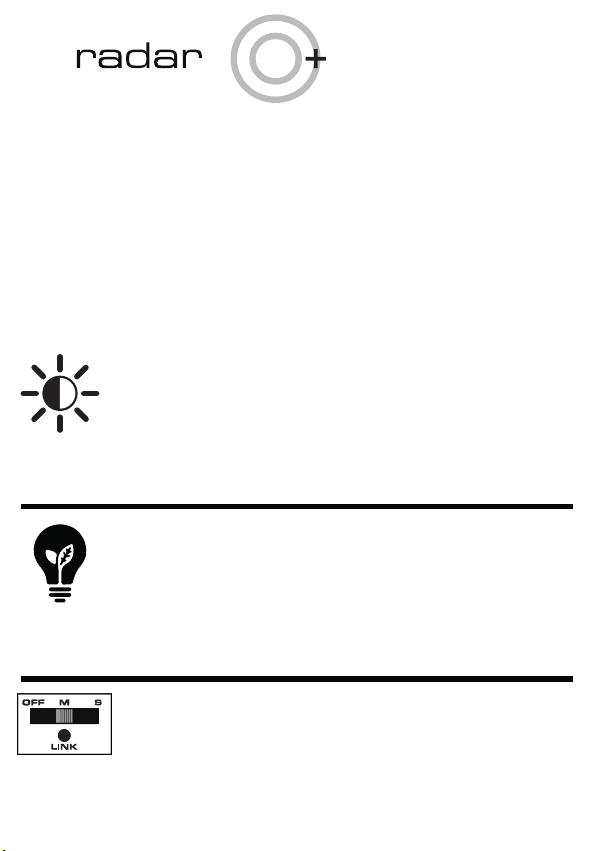
2. Turn your light switch to the “M”
position for charging to commence.
3. After charging is complete or it is getting
dark, turn your switch to OFF until you are
ready to start the LINK process. This
prevents the battery from running down
again, if there is a delay between charging,
LINKING and installation.
The switch located on the front of the solar light panel housing in between
the lights is to turn on the product and also to link your Radar 360˚linkable
lights together (if you are creating a linked network)
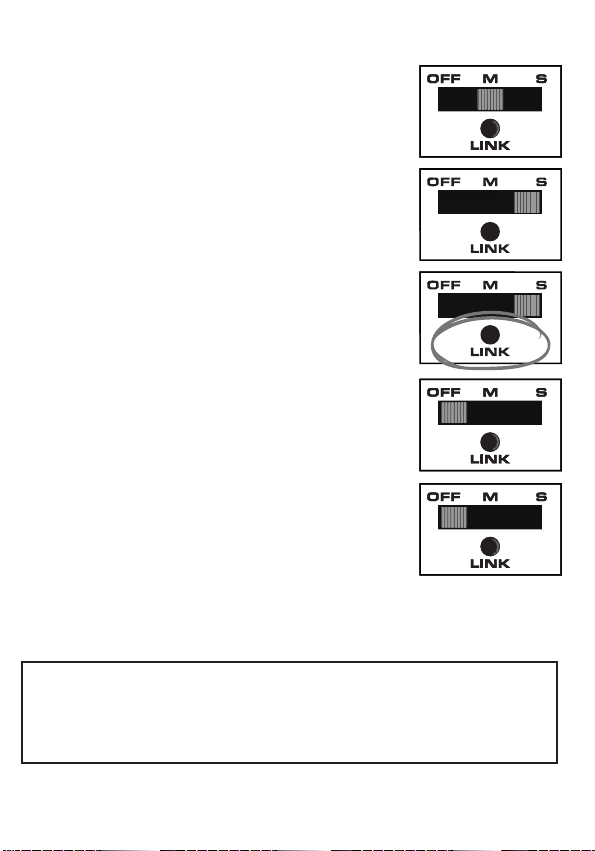
LINKING YOUR RADAR 360˚+ LIGHTS FOR THE FIRST TIME
Only TWO (2) Lights (for linking 3 or more lights, please see website)
1. Make sure your lights are fully charged before you commence
the Link procedure.
2. Take the 2 lights you wish to pair and place
the lights upwards on a level flat surface.
3. Choose one light to be a Master light.
The other light(s) will then be
Secondary light. MASTER SECONDARY
TOOLS REQUIRED TO INSTALL (not included)
Electric
Power Drill
Phillips
Screwdriver
Pencil Ladder Eye
Protection
Level
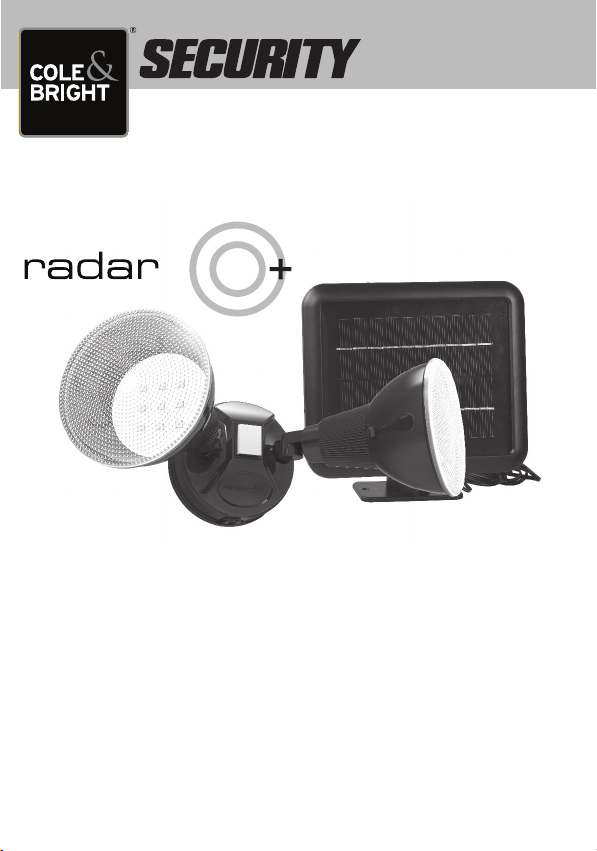
PARTS LIST
4
wall inserts
4
phillips screws
1
solar panel
1
light unit
GENERAL PRECAUTIONS
Keep out of reach of children.
PRE-INSTALLATION
•
Carefully remove the fixture from carton and check that all parts are included.
Carefully remove the fixture from carton and check that all parts are included.
Be careful not to misplace any of the parts needed for installation.
Be careful not to misplace any of the parts needed for installation.
•
For best results, determine light placement location before assembly. Charge
For best results, determine light placement location before assembly. Charge
the light in full sunlight for 24 hours prior to using.
the light in full sunlight for 24 hours prior to using.
INSTALLATION
Choose an ideal location.
Choose an outdoor location with full, direct sunlight
Choose an outdoor location with full, direct sunlight
so that the solar panel can receive at least 6-8 hours
so that the solar panel can receive at least 6-8 hours
of sunlight each day. Shady locations will result
of sunlight each day. Shady locations will result
in the battery receiving less energy and shorten
in the battery receiving less energy and shorten
the duration of illumination at night. The selected
the duration of illumination at night. The selected
location should not be near strong lighting sources
location should not be near strong lighting sources
such as street lights. This may cause the light to turn
such as street lights. This may cause the light to turn
off automatically as the built-in sensor detects the
off automatically as the built-in sensor detects the
nearby lighting source.
The Eclipse+ Security Light uses a highly sensitive
The Eclipse+ Security Light uses a highly sensitive
motion sensor. Therefore placement position of the
motion sensor. Therefore placement position of the
light is important. For best results we recommend
light is important. For best results we recommend
you place the Eclipse+ 7m away from areas where
you place the Eclipse+ 7m away from areas where
it is likely to be triggered by unintended movement.
it is likely to be triggered by unintended movement.
For example, windows where there is regular
For example, windows where there is regular
movement in the house. NOTE:
The Radar360˚linkable
signal can penetrate most
obstacles. The signal CANNOT
penetrate metal objects.
36
63728P CB Eclipse+Solar Radar 360 Security Light Instruction Sheet.indd 363728P CB Eclipse+Solar Radar 360 Security Light Instruction Sheet.indd 3 21/08/2023 11:05:11 AM21/08/2023 11:05:11 AM