Comfomatic RISE AND RECLINE CHAIR User manual

The Art of Relaxation
Comfomatic High Leg Lift & Comfomatic Deluxe
Rise & Recline Chairs
RISE AND RECLINE CHAIR
OWNERS MANUAL

2
Introduction
Congratulations on your investment in, what we believe is, one of the most advanced rise and recline
chairs available today. With this investment we hope that you have taken a major step towards a new
level of relaxation and comfort.
We have taken great care in the design, the engineering and the materials that have gone into your
new rise and recline chair. We are therefore confident that your rise and recline chair will provide you
with many years of trouble free service.
How To Use This Manual
We at Comfomatic want you to get the maximum benefit from using your new chair. This manual will
describe the features and functions of your new chair. It also contains important safety information as
well as instructions on how to adjust the chair. By fully understanding the method of operation you will
be able to gain maximum benefit from your chair. We therefore recommend that you read this manual
carefully before using your new chair.
Important: Safety
Please note that unlike any other standard chairs this product contains moving parts. It is, therefore,
important that you pay particular attention to the Safety Instructions (see pages 12 - 14) to ensure that
you use the product in the safest way possible.
Introduction & Contents .......................................................................................................... Page 2
Using your remote control ................................................................................................... Page 3-4
Help Getting In & Out Of Your Chair......................................................................................... Page 5
The Comfomatic Massage & Heat System .......................................................................... Page 6 - 8
Getting Used To Your New Chair.............................................................................................. Page 9
Caring For Your New Chair ............................................................................................... Page 9 - 11
Safety ............................................................................................................................ Page 12 - 14
Guarantee & Contacting Customer Services .......................................................................... Page 15
Technology That Works
The Art Of Relaxation

Your Rise & Recline Handset Explained
Handset
Please take a few minutes to fully acquaint yourself with the workings of the chair by carrying out at
least one complete operational cycle of the chair.
Technology That Works
3
Just Press The Buttons Until You Feel Comfortable!
For the Rest of Your Life
High Leg Lift - Tilt in Space
Power (Button 1). Press this button to turn on the power, the remote will
illuminate.
Recline (Button 2).By pressing and holding button 2, your chair will recline and
the leg-rest will rise. Simply release the button once you
have reached the desired position.
Return & Rise By pressing and holding button 3, your chair will return from
(Button 3). the reclined position and then slowly stand you to your feet.
Simply release the button once you have reached the desired
position. Always return the chair to the fully closed position
(by pressing and holding button 2 or 3) once you have left
the chair.
Deluxe
Reset (Button 1). By pressing and holding button 1 the chair will return to it’s
fully closed position.
Recline (Button 2).By pressing and holding button 2, the back of your chair will
recline. Simply release the button once you have reached the
desired position.
Return (Button 3). By pressing and holding button 3, the back of your chair
will return from the reclined position. Simply release the
button once you have reached the desired position
Leg Elevation By pressing and holding button 4 the leg of your chair will
(Button 4). be elevated. Simply release the button once you have
reached the desired position
Lift (Button 5) By pressing and holding button 5, the chair will return to
the seated position and then slowly stand you to your feet.
Simply release the button once you have reached the desired
position. Always return the chair to the fully closed position
(By pressing and holding button 1) once you have left the
chair.

4
How to Operate Your New Rise & Recline Chair
There are three main positions your recliner can be used in:
Technology that Works
The Art Of Relaxation
Closed
The standard sitting position.
Relax
Leg-rest extended, back upright - ideal
for watching TV, reading newspapers etc.
Recline
Leg-rest extended, back reclined - for
complete relaxation.
As with all powered furniture, it is important to ensure
that there are no obstructions surrounding or under the
chair prior to its operation. It is also important to ensure
that small children or pets are clear of the chair prior to its
operation.
Relax & Recline*
To move to the relax or recline position, sit as far back
as possible in the chair so that your body weight is
behind the midpoint of the chair. Using the guidance
on page 3 of the manual adjust yourself into the
desired position. Please note that once the leg-rest is
raised it is normal for your feet to hang over the end of
the leg-rest.
*Please note that due to the technology used within
our High Leg Lift chair it is designed to recline and
raise the legs in one smooth and supportive action
once the leg rest has been engaged.

Technology that Works
5
For the Rest of Your Life
The Secret Is To Press The Buttons Until You Feel Comfortable!
Lift
To use the chair’s lift feature, ensure that you are sat facing forward, with at least one hand on the
arms of the chair and your feet placed firmly on the floor. Press and hold the lift button. This will slowly
bring the chair into the closed position and then lift the chair into a standing position. Release the
lift button once you have reached the desired position. To sit back into the chair, simply back yourself
into the lifted chair, making sure you are holding onto at least one arm, then press and hold the return
button, the chair will slowly lower you into the closed position.

6
Technology that Works
The Art Of Relaxation
The Comfomatic Massage System
Your new Comfomatic Rise & Recline Chair offers you the latest in massage technology – all at the
touch of a button. Now you can experience the benefits of a vibrating massage or a soothing heat in
the comfort of your new chair.
Important
The massage and heat system within your Comfomatic Rise & Recline Chair is designed to aid your
relaxation and comfort, it is not a substitute for medical care. Should you have a medical device fitted
(eg Pacemaker etc) you must consult a qualified medical practitioner before using the Comfomatic
Massage system.
The variable speed massage system within Comfomatic chairs is provided via motors that vibrate. In
common with all systems that operate in this way, the motors will create noise. The noise experienced
is a normal part of its operation and is affected by several factors including the floor surface, the
intensity of the massage, the speed and the type of massage selected. The massage system has a timer
that will automatically turn it off after a pre-determined period.
Massage Zones Explained

Technology that Works
7
For the Rest of Your Life
Just Press The Buttons Until You Feel Comfortable!
Massage Handset Explained
For best results from your massage system please take a little time to fully acquaint yourself
with the functions of the handset, then adjust the speed and intensity of the massage to suit
your own requirements.
1. Power
This button switches the massage system on or off.
Depress the button to switch on. Please note that
the handset buttons will illuminate and the display
will confirm that the massage system is active.
The massage system is programmed to allow 15
minutes continual use, the massage system then is
automatically switched off.
Please note that whilst the function buttons will remain
illuminated until the massage system is switched off, either by
the timer or by you, the LCD automatically switches off after
30 seconds.
When the massage system is switched off the handset retains
the current settings in its memory. Therefore when switched
back on the massage will automatically start with the last used
settings.
2. Zone Selection Control
Next choose the zones that you wish to operate. To operate the zone
selection function, simply press the appropriate zone buttons from 1-5.
Each button offers individual control of the selected zone from top of the back
(1) to the calves (5). As each zone is selected the zone button will glow green. Active zones are also
depicted in blue on the LCD display. To turn a zone or a combination of zones off simply press the zone
button (numbered 1 – 5) the handset will confirm your selection on the display and the green light will
be dimmed.
3. Intensity
Next select the intensity of the massage. The system offers varying levels of intensity from a gentle
massage at the lowest level to a more vigorous effect at maximum intensity. Press the Intensity +
button to increase intensity and the Intensity – button to reduce intensity. The LCD display will confirm
the intensity level selected. All that you need to do now is relax and enjoy your massage.

8
Technology that Works
The Art Of Relaxation
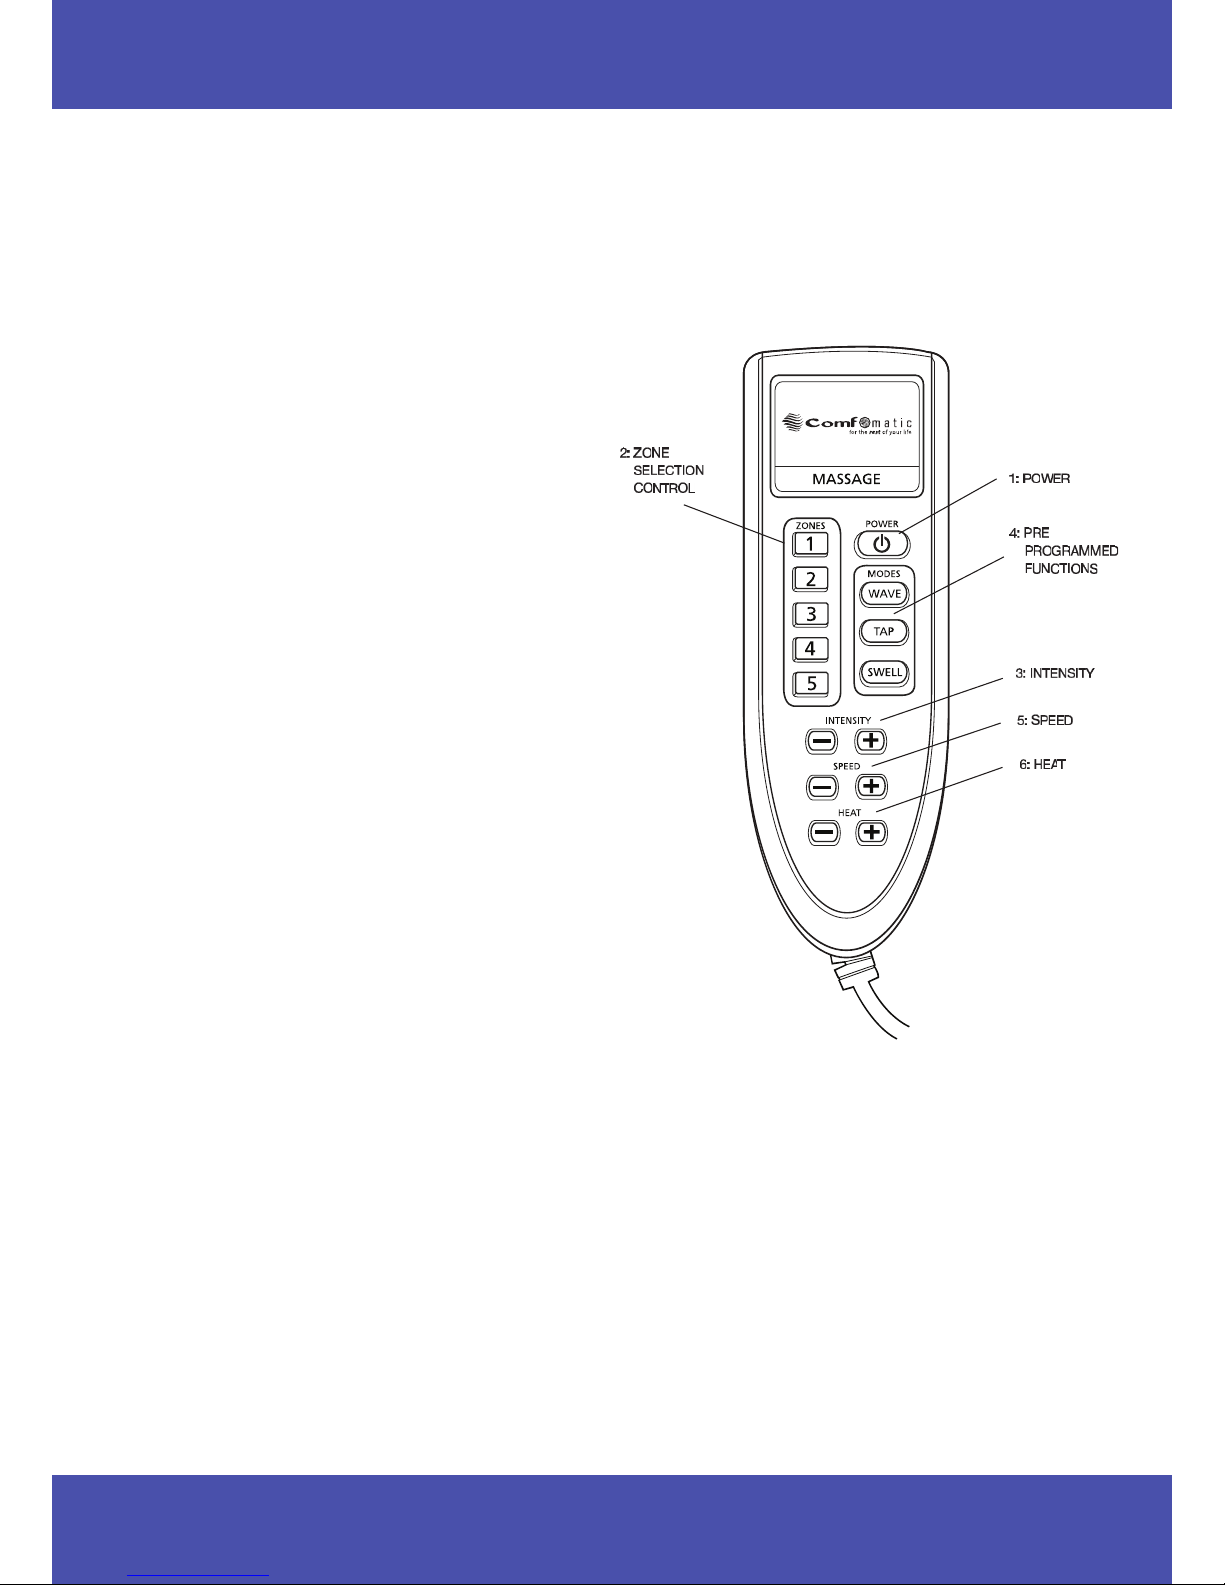
4. Pre-Programmed Functions
Your massage system is equipped with 3 pre-programmed functions for your enjoyment:
Wave:
Offers complete head to toe massage by operating each selected zones in turn starting at the top back
(zone 1) and working through to the calves (zone 5) and then back to zone 1. This programme can be
operated at any level at any speed (See Section 5). You can also de-select any zone by pressing the
zone button (see 2 above) that zone will then be omitted from the wave cycle. To re-select an omitted
zone just press the zone button again.
Pressing the Wave button again will return you to the manual zone select option (see 2 above).
Tap:
On activation all selected zones are operated together in short bursts of massage. Tap can be used
on any combination of zones or all 5 zones at once. This programme can also be adjusted to operate
at any level of intensity and at any speed (See Sections 3 & 5). You can also de-select any zone by
pressing the zone button (see 2 above) that zone will then be omitted from the Tap cycle. To re-select
an omitted zone just press the zone button again.
Pressing the Tap button again will return you to the manual zone select option (see 2 above).
Swell:
Offers a rolling massage, each zone sequentially vibrating from minimum to maximum selected
intensity. Swell can be used on any combination of zones or all 5 zones at once. Swell can also be
adjusted to operate at any level of intensity and at any speed (See Sections 3 & 5). You de-select a
zone by pressing the zone button (see 2 above) that zone will then be omitted from the Swell cycle. To
re-select an omitted zone just press the zone button again.
Pressing the Swell button again will return you to the manual zone select option (see 2 above).
5. Speed
The speed selector only works when the Wave, Tap or Swell pre-programmed functions are selected.
The speed selection offers varying speeds from slow to fast. Press the Speed + button to increase
speed and the Speed – button to reduce speed. The LCD display will confirm the speed level selected.
6. Heat - & +
These buttons control the heat pad which offers heat to the lumbar region.
Press the Heat + button to activate the heat pad, the LCD display will change to confirm that the heat
has been switched on. Press the Heat – button to turn the heat pad off. The LCD display will change
to confirm that the heat pad is turned off.
The heat pad is fitted with a pre-set thermostat which, once the pad attains its operating temperature,
cycles on and off to maintain the pre-set level of heat. The pad automatically switches off after 15
minutes use.

Technology that Works
9
1. Dressed 2. Leg-rest Extended 3. No Dressing
For the Rest of Your Life
Just Press The Buttons Until You Feel Comfortable!
Getting Used To Your New Rise & Recline Chair
Your new Comfomatic Rise & Recline Chair may seem a bit strange at first, after all how many years
did you spend sitting on a chair with just one position? Much like getting used to a new pair of shoes
it always takes time to settle into a new chair. So please allow your new chair the opportunity to get
used to you and more importantly for you to get used to it. Remember that the best advice we can give
you, is simply to press the buttons until you feel comfortable.
Care Of Your Recliner
To ensure safe and efficient operation, all of our reclining products have seats and backs that are either
zipped or sewn into place. This anchoring of the seat and back prevents the movement and allows
for the easy operation of the reclining action. Loose seats and backs could interfere with the reclining
mechanism. Being anchored into place means the seat and back cannot be reversed as you can do
with some non-reclining chairs. Consequently your new recliner needs a little bit of TLC to ensure that
it looks good for longer. Regular ‘dressing’ of the seat and back as described below will help maintain
the original look and form of the recliner.
Knee Roll / Seat Quilts
All recliner quilts need to have what appears to be additional or extra fabric around the knee roll area
when closed. This is because when extended the leg-rest elongates by up to 2”. Extending in this
manner allows the leg-rest to offer as much leg support as possible. This is illustrated below where
in the closed position the seat height (represented by the dimension A in Picture 1) moves forward
and extends by approx 2” (Picture 2). One effect of this feature is that the quilt may appear to stick
out slightly when viewed from the side of the chair. If left undressed this overhang will become more
pronounced and appear to deepen the depth of the seat.
WE THEREFORE RECOMMEND THAT THE SEAT BACKS AND SEATS ARE
DRESSED DAILY TO REDUCE THIS EFFECT.

10
Technology that Works
The Art Of Relaxation
Dressing
Can be simply done by using your hands, pushing the seat quilt
towards the back of the chair and smoothing the fabric to the side
of the seat as indicated in the diagram . This will return the quilt to
its original position. After use always ‘plump’ up the seat back by
pushing the fibres back into place. To do this gently beat the back to
re-distribute the fibres in the cushion.
Clean Regularly
Small dust and dirt particles can increase wear and tear of the fabric
and dull the surface appearance. We recommend that you clean the fabric monthly by using a soft
brush or by gently vacuuming. We do not recommend the use of water or fabric cleaners on our fabric
chairs. Never use a stiff fibre or metal brush as this can score and damage the pile of the fabric or the
leather.
Leather chairs should be dusted regularly with a soft lint free cloth. We recommend regular vacuuming
of the furniture using a soft brush, as the accumulation of dust and crumbs can cause premature wear
on the leather. Use a damp clean cloth with a solution of mild soap and water to remove light staining
on leather chairs. To avoid leaving water marks moisten the entire surface of your leather chair evenly
and lightly.
Soiling
Wet cleaning of fabric chairs is not recommended as it can cause the colours to run and may also leave
a permanent stain mark. For stubborn stain removal we recommend that a professional upholstery
cleaning specialist is used. The effectiveness of specialist cleaning treatment will depend upon the
degree of soiling. It is advisable to have your product cleaned before the dirt becomes too ingrained
in the fabric.
PLEASE NOTE THAT WE CANNOT BE HELD RESPONSIBLE
FOR ANY DAMAGE CAUSED BY CLEANING.
Sunlight
Sunlight can cause fading so please position your product away from direct sunlight or protect it by
drawing your curtains or blinds.

11
For the Rest of Your Life
Just Press The Buttons Until You Feel Comfortable!
Fabric Appearance
Please note that many fabrics, may appear darker or shaded in certain areas (this can be most noticeable
on the arms and seat/back of the chair).This is due to the way the direction of the pile in the fabric
reflects daylight and is a natural characteristic of this type of cover. Lightly brushing the pile in a
different direction will help minimise (but not eliminate) this apparent ‘shading’ of the cover. Due to the
makeup of Dralon and Chenille fabrics, the material has a tendency to crease and show crush marks
during normal use. This can create changes in the shading of the material. This is caused by the pile
of the fabric being moved in different directions and is an inherent characteristic of the material. Light
brushing, by moving the pile in one direction will help reduce the above.
Leather Appearance
Please note that leather is a natural product that may have shading or texture variations across its
surface. We will always use quality full leather hides for the manufacture of any chair, this helps to
minimise texture and colour differences. However these differences are an inherent characteristic of the
material and therefore cannot be considered to be a fault
General
Whenever possible, ensure that your furniture does not come into contact with sharp objects, eg.
buckles, which may snag the fabric. If snagging does occur, carefully cut off the threads with scissors;
do not try to pull the threads off. Do not allow animals on your upholstery as they can easily damage
the fabric with their claws etc.
Avoid sitting on the arms as this can cause structural damage to the product. Sitting on the edge of
the seat cushion can cause the fillings to move and give a creased appearance to the seat. Should this
occur, gently push the fabric backwards to move the fillings back to their original position.
The arms of your new chair are subject to most wear and tear and additional protection can be
obtained by using arm protectors.
CO-ORDINATING PROTECTORS ARE AVAILABLE
PLEASE SEE THE RANGE OF ACCESSORIES IN OUR CATALOGUE.

12
Technology that Works
The Art Of Relaxation
Safety
Your safety is our number one concern. Your reclining chair contains moving parts. It is necessary
to exercise due care and attention when using your rise and recline chair.
The following points highlight areas which must be followed to help ensure the safety of
yourself and others.
Do not allow children or babies to play with or on the chair, or leave children/babies unsupervised
in the same room as a reclining/rising chair.
To prevent accidental or unauthorised use, each electrically powered
chair incorporates a quick-release handset. Always detach the handset
and store in a safe position out of the reach of children to prevent
unauthorised or unsupervised use of the chair.
To prevent accidental damage or trapping when the leg-rest closes,
each chair incorporates a sprung-loaded leg-rest. Should the leg-rest hit
an obstruction on closing, it will pivot as shown to minimise pressure.
The motor will only automatically cut off when the action cycle is
finished. The motor may continue to function but reduced pressure will
be applied to the trapped object.
As all the actions contain moving parts, never attempt to repair or adjust
the action mechanism yourself. Contact our customer service team for
any service issues. Always ensure all electrical supply wires are free
from obstruction and not twisted or trapped in any way. If any wires are
damaged, always have them replaced by our customer service team.
Do not sit on the arms of the product or on the leg-rest when it is in the
‘open’ position. Do not attempt to stretch or reach over the side or the
front of the chair. Do not sit or reach forward when the foot leg-rest is
elevated. Any of these activities could cause the chair to tip.
Do not place the remote controls down the side of the seat or out of
reach for the chair user, if you are operating the chair for the user do not
leave them unattended. Any of these activities could cause the chair to
tip with the potential to cause injury.

Never attempt to reach for anything around the chair as excessive leaning
could cause the chair to tilt.
In particular a recliner chair can tip forward if you reach too far forward
when in the sitting position and a chair in the lift position will be more
susceptible to tipping because of its raised centre of gravity. Always get
out of the chair to retrieve any articles around the chair
Always ensure that no objects are left under the chair. As with any piece
of adjustable furniture there is always the possibility that any loose
item can interfere with the moving parts of the chair.
Always handle your new chair with care. Only move the chair when it
is in the ‘rest’ or ‘closed’ position. Never attempt to move the chair when
it is in any of the open positions. Always use the arms to move the chair
– do not use the back or wings. When moving your chair, always unplug
the mains lead. This will help avoid accidental trapping of the electrical
leads.
After use always return the product to the ‘rest’ or ‘closed’ position.
Never position your product close to a fire or source of heat. Do not
leave a lit cigarette resting on the arm or any part of the product.
Do not place the chair too close to the wall as this can seriously damage
the motor should the chair be restricted in its operation. Never leave the
chair in the ‘standing’ position, always return to the ‘rest’ position after
exiting the chair.
Please note that this product should never be used other than as a
reclining chair – it is not a bed and should not be used as a substitute
for a bed.
Technology that Works
13
For the Rest of Your Life
Just Press The Buttons Until You Feel Comfortable!

14 The Art Of Relaxation
Technology that Works
Trouble Shooting Guide
Should you experience any operational problems with your chair please:
• Check that the chair is plugged in at the wall socket
• Check the wall socket works by plugging in another working appliance, i.e. table lamp
• Check that the green LED on the transformer is lit.
Should your chair still not be working please contact our customer service team on 0151 559 1140
Battery Backup
In the event of a local power failure your new chair is fitted with an emergency lowering system. For
this system to function correctly, two (2) 9v (PP3) alkaline batteries are required. These batteries should
be connected to the transformer using the connectors provided. The emergency lowering system is
designed to return your chair to the sitting position in the event of a local power failure – it is not
designed to lift any section of the chair or to operate the massage system. After the emergency lowering
has been completed the batteries should be replaced with two (2) new 9v (PP3) alkaline batteries. To
replace the batteries you need to
(1) Locate the transformer box shown below,
(2) Remove the battery compartment lid,
(3) Slide the two (2) batteries out of the battery compartment (you cannot detach
the batteries from their terminals without removing the batteries from the battery
compartment),
(4) Replace both of the batteries with new batteries of the same type. Replace the battery
compartment cover.
(5) Recycle your batteries via an approved recycler.
NEVER OPERATE YOUR CHAIR IF IT HAS A DAMAGED CORD OR PLUG.
CONTACT OUR CUSTOMER SERVICE TEAM FOR ADVICE.
YOUR CHAIR HAS NO USER SERVICEABLE PARTS. DO NOT INTERFERE
WITH ANY PART OF THE CHAIR OR THE MASSAGE SYSTEM.
INTERFERING WITH THE CHAIR OR THE MASSAGE SYSTEM WILL
INVALIDATE YOUR WARRANTY AND COULD CAUSE HARM TO YOU
OR TO OTHERS. WE ARE HERE TO HELP SO IF YOU NEED ASSISTANCE
PLEASE CONTACT OUR DEDICATED CUSTOMER SERVICE TEAM.

Technology that Works
15
For the Rest of Your Life
Just Press The Buttons Until You Feel Comfortable!
Guarantee
“Peace of Mind” is a standard feature delivered with every Comfomatic product. Your Comfomatic rise
and recline chair is protected by our three-year guarantee. The guarantee covers product failure due
to faulty workmanship and materials. Like all guarantees our guarantee is subject to terms, conditions
and exclusions, please read your guarantee booklet. Our guarantee is in addition to your rights as a
consumer.
Once you get used to your new Comfomatic rise and recline chair, we are confident that you will soon
begin to wonder how you got on without it. Because your rise and recline chair is one of our premium
range of products, it comes complete with a three-year manufacturer’s guarantee. This guarantee is
in addition to your statutory rights and covers operational failure due to defective workmanship or
materials. The guarantee does not cover damage or failure resulting from improper use, a failure to
follow operational instructions or from accidental or malicious damage.
We are so confident that our premium range of products are designed to last, there is no need for you
to take out expensive extended warranties. Providing you are the original customer and Comfomatic
service your product on an annual basis, for which a fee will be charged, we will continue to repair or
replace any mechanical or electronic parts that become defective free of charge for so long as those
parts are commercially available. This extension to your guarantee does not cover damage or failure
resulting from improper use, a failure to follow operational instructions or from accidental or malicious
damage.
If you are entitled to this extended guarantee and we are unable to repair or replace any electronic or
mechanical part because of unavailability, Comfomatic will even provide you with significant discounts
against its current model ranges, please see your guarantee booklet for details.
If you need service or help with your Comfomatic rise and recline chair, please call our customer service
team on 0151 559 1140 .
If we need to repair or replace your Comfomatic rise and recline chair under this guarantee, provided
you live within the United Kingdom, we will visit your home and repair the rise and recline chair free
of charge. Where your rise and recline chair is to be replaced under this guarantee, provided you
live within the United Kingdom, we will deliver the new rise and recline chair to you free of charge.
Whether your rise and recline chair is repaired or replaced will be at our sole discretion. Before agreeing
to replace or repair your rise and recline chair under this guarantee, we reserve the right, in certain
circumstances, to require that it is returned to us at our cost. In the event that we need to replace your
rise and recline chair we will replace it with the current equivalent model. Where a product or part of a
product is replaced under the guarantee, the new product or part has a guarantee period of 12 months
or the remaining period of the original product guarantee whichever is the greater.
We reserve the right to refuse to replace or repair your rise and recline chair:-
• if the defect is due to causes other than faulty materials or workmanship such as fair wear and
tear, wilful damage, accident, negligence by you or a third party, use other than recommended by
us, failure to follow any instructions given by us or any alteration or repair carried out without our
approval; or
• if it is soiled or in an unsanitary condition.
In the event that we respond to a call out and either there is no fault or the work and/or parts required
are not covered by this guarantee, we reserve the right to charge for the call out, any time spent
delivering the services and all parts supplied.

Comfomatic Limited
Unit 15 Turnstone Business Park, Mulberry Avenue, Widnes, Cheshire, WA8 0WN
Tel: 0151 559 1140 www.comfomatic.com
Chair Owner’s Guide ©September 2017
COM-FM011 Rev0 9/11
Table of contents
Other Comfomatic Indoor Furnishing manuals
Popular Indoor Furnishing manuals by other brands

DHP
DHP 4151119N manual

Axor
Axor Starck 10129XX1 Specification sheet

Signature Design by Ashley
Signature Design by Ashley W275-48 Assembly instructions

Vari
Vari 400664 quick start guide

Richelieu
Richelieu 701DH2R10324900 quick start guide

Wyndham Collection
Wyndham Collection WC-R4100-30-VESSEL installation instructions

Serta
Serta Dream Convertibles Breckenridge Assembly instructions

OVE
OVE ZAYDEN 40 installation manual

EXPEDO
EXPEDO DITA SNOC 214352 Assembly instruction

rst brands
rst brands Vaughn OP-AWSOF74-VGHN Assembly instructions

LDI Spaces
LDI Spaces SAFCO MWC36 Mounting instructions

Cuckooland
Cuckooland Bailey Cabin Bed Assembly instructions