Comfort Zone RX35 Operating manual

User and
Installation Manual
RX35 - RX50 - RX65
2020-10-30
From SW 2.0 CZ06525 Ver J

Contents
1Panel and control unit ..........................................................................................6
2
Settings during operation
........................................................................... 7
2.1 Display................................................................................................................... 7
2.2 Extra Hot Water ...................................................................................................... 7
2.3 Temperature/Time .................................................................................................. 7
2.4 Setting temperature control..................................................................................... 6
2.5 Control method OUT & IN (Factory Setting)............................................................ 7
2.6 Control method OUT............................................................................................... 8
2.7 Control method IN................................................................................................... 8
2.8 Indoor Temperature with double heat curves.......................................................... 9
2.9 Restriction of electrical elements............................................................................. 9
2.10 Hot water temperature .......................................................................................... 10
2.11 Restriction of hot water temperature ..................................................................... 10
2.12 Hot water priority................................................................................................... 10
2.13 Min return temperature / Min inlet temperature ..................................................... 11
2.14 Holiday settings..................................................................................................... 11
2.15 Diode list............................................................................................................... 11
2.16 Fan control and timer............................................................................................ 12
2.17 Smart control ........................................................................................................ 13
2.18 Summer mode...................................................................................................... 13
2.19 Synchronization with solar panels......................................................................... 13
3Maintenance ...................................................................................................... 14
3.1 Main fuse.............................................................................................................. 14
3.2 Replacement of air filter........................................................................................ 14
3.3 Filter alarm reset................................................................................................... 15
3.4 Checking the system pressure.............................................................................. 16
3.5 Expansion vessel.................................................................................................. 17
3.6 Electronic galvanic anode..................................................................................... 17
4Component List..................................................................................................18
5
Installation
......................................................................................................19
5.1 Transport and handling......................................................................................... 19
5.2 Placement............................................................................................................. 19
5.3 Dimensions and outlet of ventilation connection.................................................... 20
5.4 Dimensions and position of pipe connection RX35 / 50/65 High model................. 21
5.5 Dimensions and position of pipe connection RX35 / 50/65 - Low model................ 22
5.6 Pipe connections................................................................................................... 23
5.7 Radiator system.................................................................................................... 23
5.8 Floor Heating System............................................................................................ 23
5.9 Radiator and floor heating system......................................................................... 23
5.10 Connection without supply air unit (standard connection)...................................... 24
5.11 Connection with supply air units............................................................................ 24
5.12 Minimum circulation flow....................................................................................... 24
5.13 Connection of extra hot water tank - High model................................................... 25
5.14 Connection of hot water tank - Low model ............................................................ 26
6Ventilation connection........................................................................................ 27
6.1 Silencing............................................................................................................... 27
6.2 Adjustment of ventilation....................................................................................... 27
7
Electrical connection
..................................................................................28
7.1 Power supply 1x230V ........................................................................................... 28
7.2 Connection option 3x400V.................................................................................... 28
8
Accessories / Additional equipment
..................................................... 29
8.1 Indoor temperature sensor / external room sensor................................................ 29
8.2 Connection of outdoor sensor............................................................................... 29
8.3 Connection of accessories.................................................................................... 30
8.4 External alarm output (relay)................................................................................. 31
8.5 Accessories / Spare Parts..................................................................................... 32
9Commissioning................................................................................................... 33
9.1 Re-filling the system.............................................................................................. 33

9.2 Venting the system ............................................................................................... 33
9.3 Venting of hot water tank ...................................................................................... 33
9.4 Draining / emptying the system............................................................................. 34
9.5 Emptying the heating circuit.................................................................................. 34
10
Adjusting the system
.................................................................................. 35
10.1 Adjustment of shunt groups .................................................................................. 35
10.2 Adjustment of floor loops....................................................................................... 35
10.3 Adjustment of radiators......................................................................................... 35
11
Settings during installation
....................................................................... 36
11.1 Basic Settings....................................................................................................... 36
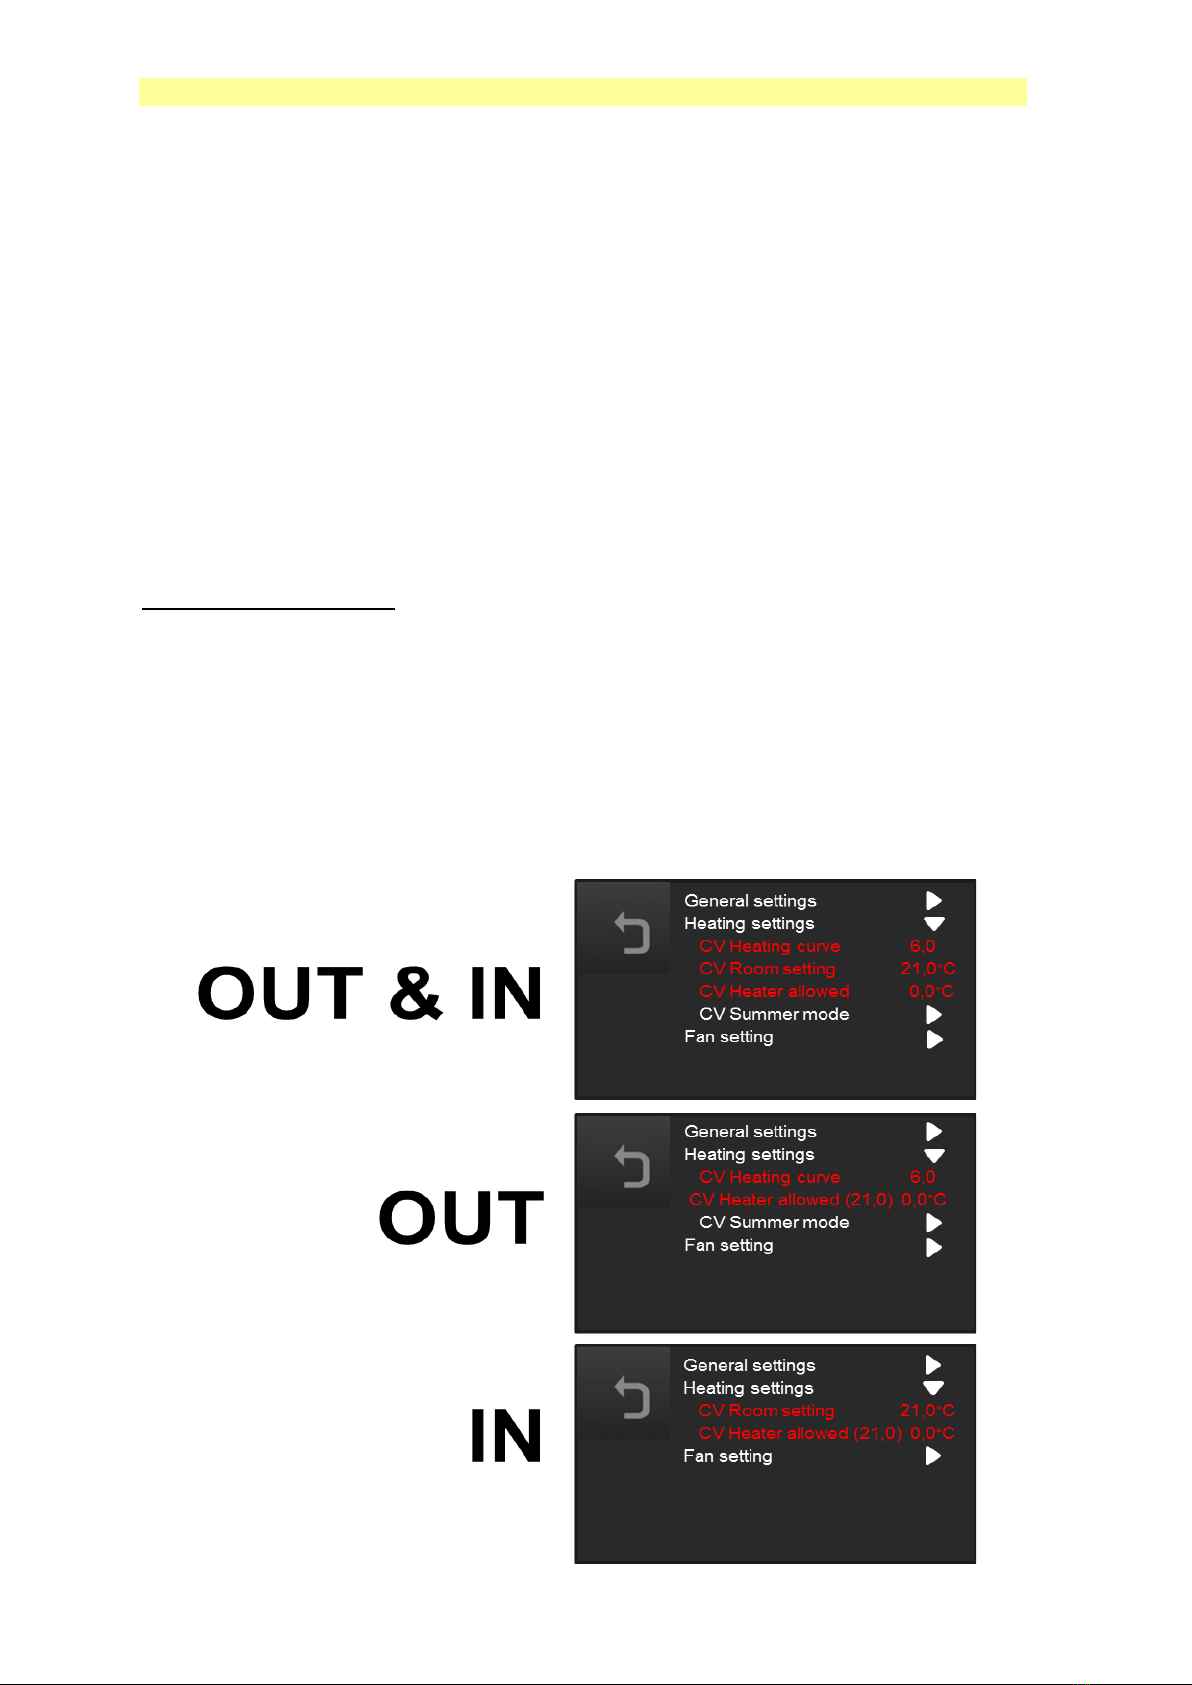
11.2 Choice of regulation.............................................................................................. 37
11.3 Blocking of interfering resonances. ....................................................................... 40
11.4 Maximum frequency of the compressor ................................................................ 40
11.5 Legionella elimination ........................................................................................... 41
11.6 Operation with heat elements only........................................................................ 41
11.7 Operation with fan off............................................................................................ 41
11.8 Start-up and installation control............................................................................. 41
11.9 Adjustable HW overheating limit ........................................................................... 41
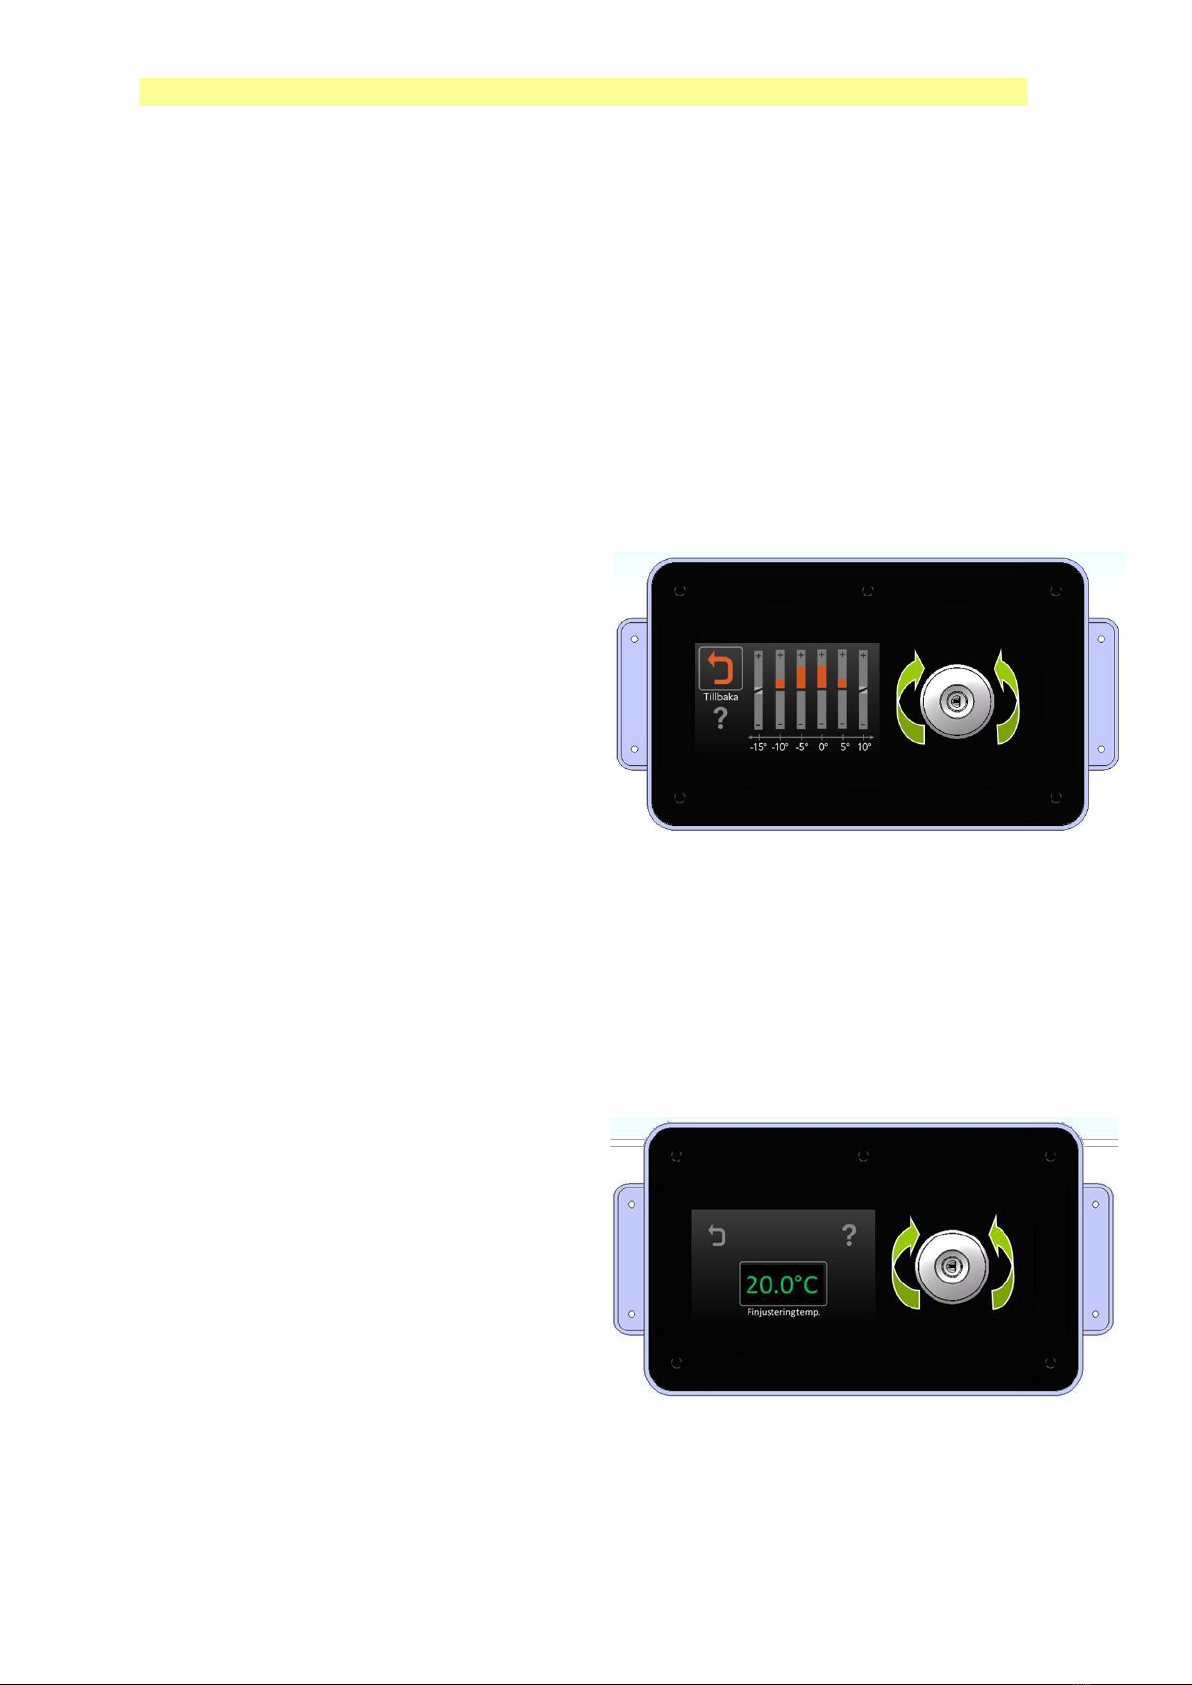
11.10 Double Heat Curves.............................................................................................. 42
11.11 External mixing valve control................................................................................. 44
11.12 Synchronization with solar panels......................................................................... 44
12
Troubleshooting
........................................................................................... 45
12.1 No heat to the elements (circulation water) although the compressor is running... 45
12.2 The heat pump heats up the HW tank and then stops........................................... 45
12.3 Overheated auxiliary heater –smell of burnt rubber.............................................. 45
12.4 Poor hot water capacity......................................................................................... 45
12.5 The heat pump completely shuts down and does not start.................................... 46
12.6 Overheating protection cannot be restored. .......................................................... 46
13 Alarms................................................................................................................47
13.1 Filter Change Alarm.............................................................................................. 47
13.2 High Gas Pressure Alarm ..................................................................................... 47
13.3 Low pressure alarm 1............................................................................................ 47
13.4 Low pressure alarm 2............................................................................................ 47
13.5 Inverter alarm (0) .................................................................................................. 48
13.6 Heater overheat alarm .......................................................................................... 48
13.7 Hot water overheat alarm...................................................................................... 49
13.8 Sensor fault TE0-TE2............................................................................................ 49
13.9 Defrost alarm........................................................................................................ 50
13.10 Unknown HP box alarm ........................................................................................ 50
13.11 Heating overheat alarm......................................................................................... 50
13.12 Heating limitation alarm......................................................................................... 50
13.13 Heating return max alarm...................................................................................... 50
13.14 SD memory card error........................................................................................... 51
13.15 Inverter connection failure..................................................................................... 51
13.16 Pressure ratio alarm.............................................................................................. 51
13.17 Hot gas temperature alarm ................................................................................... 51
13.18 Alarm - Multiple alarms simultaneously................................................................. 51
13.19 EEV min pos time out alarm.................................................................................. 52
13.20 EEV Max pos timeout alarm.................................................................................. 52
13.21 Clock not set alarm............................................................................................... 52
13.22 Condenser temperature alarm .............................................................................. 52
13.23 Room under heat alarm ........................................................................................ 52
13.24 Room overheat alarm............................................................................................ 52
13.25 Defrost error alarm................................................................................................ 53
13.26 Heating minimum alarm........................................................................................ 53
13.27 Heating freez.danger alarm................................................................................... 53
13.28 Invalid controller type/version................................................................................ 53
13.29 PL1 input alarm..................................................................................................... 53
13.30 Sensor mismatch error TE1-TE2, TE2-TE5, TE1-TE5.......................................... 53
13.31 No compressor function error................................................................................ 53
14 Pump
Diagram
................................................................................................ 54
15 Fan Chart........................................................................................................... 55

16 System overview RX35 / RX50 / RX65.............................................................. 56
17
Wiring RX35/RX50/RX65
......................................................................... 57
18 Connection terminals and fuses.........................................................................58
18.1 Connection to auxiliary heater X9 ......................................................................... 58
19 Components....................................................................................................... 59
20
CE declaration
.............................................................................................. 61
21 Energy declaration............................................................................................. 62
22 Technical data.................................................................................................... 63
23 Installation protocol............................................................................................ 64

ComfortZone RX35/RX50/RX65 Operating Instruction
Preface
Thank you for choosing a ComfortZone heat pump. By reading this manual again,
you will get the most out of your heat pump.
Keep the manual in the immediate vicinity of the heat pump as it is an important
action in case of malfunction or alarm.
ComfortZone's heat pump is designed to maintain a long service life and achieve
low outdoor temperatures. Comfort Zone heat pumps have been commercially
available since 2003 and has given us a long and solid operating experience.
The warm indoor air is sucked from the wet rooms to the ComfortZone heat pump,
where the heat is extracted and returned to the house as water-based heat. Extract
air cooled to -15° C is sent out, new fresh indoor air is taken into the house via wall
valves alternatively via a pre-heating air supply unit. The heat pump senses the
heat demand and works with a computer in a favorable manner so that the right
amount of heat is sent to the house heating system.
The extract air heat pump also warms up hot water to a water tank, from which tap
water is collected.
The effective ventilation gives you a very fresh indoor air. Moisture and contamination
are vented and mould problems disappear.
Your installer sets the outdoor air heat pump for outdoor regulation, outdoor - &
indoor regulation or indoor control only. You can fine tune the indoor temperature
via the menu on the display.
Note:
In case of malfunction, first contact your supplier /
installer for technical advice and action
3

1
Panel and control unit
The heat pump control unit is located on the front panel. From there,
compressor, condenser, fan and other parts of the heat pump are controlled.
Use the push-button knob to set the desired room temperature, hot water
temperature, hot water priority and other functions.

ComfortZone RX35/RX50/RX65
Operating instructions
[Skriv text] 7 [Skriv text]
2
Settings during operation
2.1
Display
When the display is inactive, the background
and icons are dimmed (invisible) and the indoor
temperature is the only thing lit up.
Press or turn the dial, and the other icons will
be activated. The icons are then lit, and a
cursor frame with text shows the selected icon.
2.2
Extra Hot Water
The function is used for temporarily increased
need for hot water.
Extra hot water is activated by pressing
on the knob marked OK.
Icon changes appearance (begins to fill up a
container).
Turn off by pressing the icon again. The function
shuts off automatically after 3 hours.
2.3
Temperature/Time
Under the Temperature/Time icon you find:
¤ Fine adjustment of indoor temperature
¤ Hot water temp
¤ Hot water priority, Low –Normal –High
¤ Min return temp
¤Holiday reduction

ComfortZone RX35/RX50/RX65
Operating instructions
6
2.3.1 Indoor temperature
Note: The adjustment of the heat control must always be carried out by
the responsible and authorized installer.
This means that all of the housing surfaces and floors must have an indoor
temperature corresponding to about 21° C when the heat pump is operating without
regulation with the house's own thermostats.
If the residents want a higher or lower temperature, it is possible to adjust this
according to their own wishes, see the next paragraph.
2.3.2
Uneven heat in the rooms
If uneven heat between floors, alternatively between different rooms occurs even
though thermostats are fully open everywhere.
Uneven heat is due to the fact that the water flow in the heating system is not
balanced, or that air is present in the system.
The problem is installation-technical.
Contact your installer.
2.4
Setting temperature control
.
The ComfortZone RX35-50-65 can regulate the indoor temperature with
various control methods, OUT & IN, OUT or IN.
Factory setting is OUT & IN.
Go to "Advanced settings" / Heating settings "and read which control method
you are operating:

ComfortZone RX35/RX50/RX65
Operating instructions
7
2.5
Control method OUT & IN (Factory Setting).
This option means that the outdoor temperature controls how hot circulation water
is to be distributed in the house.
In this case, the indoor sensor acts to correct the temperature.
If the outdoor sensor fails to reach the desired indoor temperature, the indoor
sensor will compensate by adjusting the heat, or reducing the heat.
Adjustment of heat with control method OUT or OUT & IN.
The issuer senses the outdoor temperature and sends hot circulating water into the housing
at a temperature determined by a heating curve.
Heat curve 1.0 gives the lowest temperature and heating curve 10.0 maximum temperature.
The value can be selected to one decimal.
For mixed heating systems, i.e. underfloor heating and radiator heating the setting curve
5.0-6.0 is recommended. See section 14.1 "Choice of regulation".
Variations occur in different houses.
Before making a big adjustment, all thermostats in the housing must be set up to the
maximum position, i.e. be fully open.
Problem:
Always too cold in the house: Increase the heating curve one step.
Always too hot in the house: Reduce the heating curve one step.
Never change more than one step in one day.
Allow the heat to adjust, preferably for 24 hours. When you experience a suitable
temperature in your rooms, the curve has been adjusted and the adjustment is complete.
Reset thermostats in bedrooms to the desired position.
Always leave thermostats in rooms in maximum position i.e. be fully open.
Fine adjustment of heat with control method OUT or OUT & IN.
Although the heating curve is set
correctly, it can feel cold indoors at
certain outdoor temperatures.
To correct this problem, go to
Temperature / Time and select Fine
tuning temperature.
A menu as shown above appears. The bars represents different
outdoor temperatures. Select the bar which is the
temperature range you are most interested in adjusting and press the knob.
Turn the knob up for increased indoor temperature and down for reduced
temperature. First change is preferably done by turning up / down

ComfortZone RX35/RX50/RX65
Operating instructions
8
the bar to half its length from the center line.
Save the set value by pressing the knob.
Now you have instructed the heat pump to increase / decrease the heating
curve according to your preference based on the current outdoor temperature.
The pump remembers the setting and adjusts the heating curve each time the
current outdoor temperature is reached.
Fine-tune further if you are not satisfied.
Repeat the procedure at other outdoor temperatures / menu bars if necessary.
Note: If the heat pump's fine tuning is set so that all the bars are close to the
max or min position, this means that the heat curve is incorrectly set. Increase
or decrease the heat curve selection by one unit.
2.6
Control method OUT.
Means that the heating is
controlled by the outdoor
temperature only.
The function is the same as
with OUT & IN control but
without indoor temperature
compensation.
2.7
Control method IN.
Means that the heat pump is controlled by your indoor temperature only.
You set your desired indoor temperature and the heat pump ensures
that this temperature is reached.
With IN control method, the
indoor temperature is
controlled exclusively by the
indoor temperature.
Since the air comes from
different places in the house,
you have an average
temperature from all of your
exhaust air devices, or if the
external indoor sensor is
used, the temperature at
where it is mounted.
The heat pump in this case is the entire house's thermostat. All room
thermostats in accommodation rooms, i.e. living room, TV room,
kitchen etc. shall have the thermostats set to maximum position, i.e. be
fully open.

ComfortZone RX35/RX50/RX65
Operating instructions
9
Thermostats for room temperature control should only be used in
bedrooms.
Note! The function of the heat pump can be seriously disturbed if the
indoor temperature is regulated by room thermostats in all rooms.
2.7.1 Problems that may arise.
Problems can arise with control method IN if the internal exhaust air
sensor is disturbed by hot air coming through your ventilation system
from heat sources such as a dryer, fireplace or sauna.
The heat pump becomes "tricked" and believes that the house is warmer
than it really is.
If this is a problem, we recommend an external indoor sensor that is
placed in a suitable place where it does not detect the hot air from the
external heat sources, see section 2.11 below.
2.8
Indoor Temperature with double heat curves.
There is a possibility of two different heating zones being controlled via the heat
pump. A function that is useful when heating the house with radiators and underfloor
heating.
If double heat curves are used there is settings for CW Heating curve 2, CW Room
setting 2 and CW Room factor 2 in the /Heating settings/ menu.
Zone 1 and zone 2 are adjustable individually.
Fine tuning of the temperature is common for zone 1 and zone 2.
For installation of double heat curves, see section 11.10.
2.9
Restriction of electrical elements.
The control board's automatic control of the indoor temperature can sometimes cause
the electrical elements to be switched on even though the indoor temperature
exceeds the set value. Allowing this provides the best temperature control, but can
also cause some increase in power consumption.
To avoid this, the parameter "CW Heater allowed" is set to 0.0° C as the factory
setting (default value).
The electrical elements are blocked if the indoor temperature exceeds the set value +
0.0° C, i.e. set value.
If " CW Heater allowed”is set " at -1.0° C, electrical elements are blocked if the indoor
temperature exceeds set value -1.0° C.
The display shows also the absolute value, i.e. (Set indoor temp –CW Heater
allowed.). In menu (If CW Room setting is 21°C):
“CW Heater allowed (20,0) -1.0°C “
If " CW Heater allowed " = IN is selected, the value is recommended to be -0.5° C.
Parameter " CW Heater allowed" can be found under "Advanced settings" /
"Heating settings" / " CW Heater allowed ".

ComfortZone RX35/RX50/RX65
Operating instructions
10
2.10
Hot water temperature
Set the desired temperature in the hot water
tank. Higher temperature in the tank gives
higher hot water capacity but increases heat
losses.
2.11
Restriction of hot water temperature
The models that have a built-in tank also have a mixing
valve for limiting outgoing hot water temperature.
At delivery, the valve is at max, about 60° C, and the
outgoing hot water temperature is the same as the tank
temperature, i.e. set VV temp.
If you want to reduce the hot water temperature, without
reducing the hot water capacity, turn the mixing valve, which
is marked with an arrow, clockwise for lower temperature
and counter-clockwise for higher temperature. Check the set
water temperature at the tapping point closest to the valve.
The hot water capacity is not affected by this limitation
2.12
Hot water priority
Low priority - the compressor normally
produces all hot water. Exceptions are made if the house is heated with the full
power of the compressor, at the same time as the control unit indicates that hot
water is to be produced.
Then the electricity supply is used to quickly reach the right hot water
temperature.
Normal priority - hot water is primarily produced by the compressor, but if the hot
water temperature drops too low, the electrical heater goes in to speed up the
heating.
High priority - Same as normal priority, but the electrical heater is used sooner.

ComfortZone RX35/RX50/RX65
Operating instructions
11
2.13
Min return temperature / Min inlet temperature
With this function one can keep a basic heat
level in the circulation system even if there is
no heating requirement in the house as a whole.
Used when you want to have some heat even
though the room temperature is above the set value.
2.14
Holiday settings
The holiday function lowers the house's indoor
temperature by about 10 degrees during the number
of days entered. One day before the end of the
holiday period, the house starts to warm up.
If there is a heating requirement, the compressor
starts up and runs for 12 hours.
If the indoor temperature has not reached the desired
value, the additional heat is used so that the house
has the desired room temperature.
2.15
Diode list
The green diode list can be adjusted in brightness or turned off completely.
Go to "Advanced settings" / "General settings" / "LED list function" 0 = LED
list off, 1-6 LED list brightness.

ComfortZone RX35/RX50/RX65
Operating instructions
12
2.16
Fan control and timer.
The fan speed can be set to Low, Normal, High and
Timer mode.
In the timer function you can choose to reduce the fan
speed for weekdays or weekends.
Meaning that the fan speed is reduced to LOW during
set time.
Timer setting for weekdays is shown with the first
5 bars in red indicating Monday to Friday.
Timer setting for weekends is shown with
the 2 last bars in red indicating Saturday and
Sunday.
For both of these functions, you will enter
the start and stop time.

ComfortZone RX35/RX50/RX65
Operating instructions
13
2.17
Smart control
To reduce the energy used for HW production the smart control function may be used.
Go to "Advanced settings" / "General settings" / "Hot water settings" / "Smart
control"/ "Smart control"/ Set to On.
The temperature in the HW tank will be reduced during periods when HW
consumption usually is low in your household. During peak hours the
temperature will still be the set HW temp value.
2.18
Summer mode
Summer mode is used when you want to avoid unnecessary heating at night
during periods of hot days and cool nights.
The function requires selecting the "OUT" or "OUT & IN" control method. The
function is not possible in the control method "IN".
Function "UV Summer Mode" = Off:
The control unit is in normal mode and the heating is controlled in the usual way.
2.18.1 Setting "UV Summer Mode".
Go to "Advanced settings" / "Heating settings" / "UV Summer mode": Change
OFF to Auto.
2.18.2 Function "UV Summer Mode" =
Auto:
When the outdoor temperature is higher than
"Outdoor temp. limit " (18.0° C) for longer time
than what is stated on parameter "UV Min heat”
(8.0h), the controller automatically controls the
minimum heating.
When the outdoor temperature is lower than
"Outdoor temp. limit”(18° C) for a longer time
than what is stated on parameter “UV Norm”
(12.0h), the control unit automatically controls the
normal mode.
At minimum heating, the flow temperature is controlled according to parameter "UV
Min inlet temp" (18° C), which is shown under the menu "UV Other" / "UV Min inlet
flow".
2.19
Synchronization with solar panels
If the “Synchronization with solar panels” option is installed, a value is
added under "Operating information" in the display, Solar power.

ComfortZone RX35/RX50/RX65
Operating instructions
14
3
Maintenance
3.1
Main fuse
The automatic circuit breaker functions as the
main switch. The automatic fuse is located
behind the front panel to the right.
Normally, the circuit breaker should not be
switched off. When the exhaust air heat pump
is in operation and main
power is on, the green diode list lights up
on the front panel in strength 1-6, function set
in 0 mode does not illuminate the LED list.
3.2
Replacement of air filter
The air filter must be changed / cleaned
regularly.
When it is time to check/clean (every 3/6/9
months) or change (every 12 months) the filter,
a symbol for the filter and the text “filter
change”appears on the display.
New air filters can be purchased from your
dealer.
Changing of the air filter is easiest
done by: Removing the front panel.
Then turn off the main switch.
Unscrew the filter cover screws.
Remove the filter cover.
Pull out the filter and clean or change
to a new filter.
Replace the filter cover and tighten
the screws.
Turn on the main power switch.
Replace the large front cover.
The filter is most easily cleaned with a vacuum cleaner.
We recommend that you change to a brand-new filter at least once
a year.
In connection with the replacement / cleaning of the air filter,
control the system pressure according to section 3.4.

ComfortZone RX35/RX50/RX65
Operating instructions
15
3.3
Filter alarm reset
The bar for the filter symbol is located in the
upper left corner.
Press the OK button.
The text "Exhaust air filter needs to be
replaced" appears on the display.
Turn the marker to the gray check mark, the
check mark changes color to green symbol.
The text "Filter changed" + "The exhaust air
filter needs to be replaced" appears on the
display.
If the filter is changed, press the OK button.
The text "Is the filter really filter changed?"
Appears on the display.
If the filter is changed, press the OK button.
The filter alarm is now reset.
.

ComfortZone RX35/RX50/RX65
Operating instructions
16
3.4
Checking the system pressure
The system pressure needs to be checked and the water system needs to be
replenished from time to time, because the air pockets that were initially in the
system are transported around and gradually emptied out. The first few days after
installation, the pressure should be checked daily.
•
Adapt to the habit of always checking the pressure at least every time
the air filter is changed or cleaned and each time the radiators or floor
heating coils are aerated.
3.4.1 High model:
•
Remove the large front cover.
•
Check the pressure, the black indicator on the manometer (1)
should show 1.0-1.5 bar.
•
If necessary, open the filling valves (2 and 3).
•
Close both filling valves when the pressure gauge shows
desired value.
•
Put the front cover in place.
3.4.2 Low model:
•
Remove the front cover.
•
Check the pressure, the black indicator on the manometer
should show 1,0-1,5 bar.
•
If necessary, open the filling valve (which is mounted by
your installer, and is normally located at at the hot water tank)
•
Close both filling valves when the pressure gauge shows
desired value.
•
Put the front cover in place.

ComfortZone RX35/RX50/RX65
Operating instructions
17
3.5
Expansion vessel
In the circulation system there is an expansion vessel which must be air-
filled (so-called pre-pressure). RX35 / 50 / 65H, HIGH model should have
a prepress of 1.0 Bar. RX35 / 50 / 65L, LOW model should have a
prepress of 1.0 bar.
3.6
Electronic galvanic anode
An electronic galvanic anode is mounted in
the tank.
Function control can be performed by
loosening the control panel front panel and
checking that the green lamp inside the plate
is lit green. (see the black arrow)
If the green light is not lit, contact your
service representative.

ComfortZone RX35/RX50/RX65
Operating instructions
18
4
Component List
These images show the important components in the heat pump.
1. Waste water funnel, shall be
connected to floor drain.
2. Connection hot water tank.
3. Safety valve (10 Bar) for incoming
water.
4. Mixing valve, temperature limiter of
domestic hot water
5. Filling valve / drain
6. Connection supply line for supply
air units.
7. Connection of return water from
circulation water and possibly air
supply units, low model also
returns from hot water tank.
8. Pressure gauge for system.
9. Safety valve (2.5 Bar) for tank and
circulation water (system
pressure).
10. Filling / drain valve.
11. Connection supply line for
circulation water to the house.
12. Shut-off valve
13. Filler / drain hose
This manual suits for next models
2
Table of contents