Compaq iPAQ PA-2 User manual

Notice © 2001 Compaq Computer Corporation
COMPAQ and the Compaq logo registered in U.S. Patent
and Trademark Office.
iPAQ is a trademark of Compaq Information
Technologies Group, L.P.
Microsoft and Windows are trademarks of Microsoft
Corporation.
All other product names mentioned herein may be
trademarks or registered trademarks of their respective
companies.
Compaq shall not be liable for technical or editorial errors
or omissions contained herein. The information in this
document is subject to change without notice.
The information in this publication is subject to change
without notice and is provided “AS IS” WITHOUT
WARRANTY OF ANY KIND. THE ENTIRE RISK
ARISING OUT OF THE USE OF THIS
INFORMATION REMAINS WITH RECIPIENT. IN NO
EVENT SHALL COMPAQ BE LIABLE FOR ANY
DIRECT, CONSEQUENTIAL, INCIDENTAL,
SPECIAL, PUNITIVE, OR OTHER DAMAGES
WHATSOEVER (INCLUDING WITHOUT
LIMITATION, DAMAGES FOR LOSS OF BUSINESS
PROFITS, BUSINESS INTERRUPTION, OR LOSS OF
BUSINESS INFORMATION), EVEN IF COMPAQ HAS
BEEN ADVISED OF THE POSSIBILITY OF SUCH
DAMAGES. THE FOREGOING SHALL APPLY
REGARDLESS OF THE NEGLIGENCE OR OTHER
FAULT OF EITHER PARTY AND REGARDLESS OF
WHETHER SUCH LIABILITY SOUNDS IN
CONTRACT, NEGLIGENCE, TORT, OR ANY OTHER
THEORY OF LEGAL LIABILITY, AND
NOTWITHSTANDING ANY FAILURE OF
ESSENTIAL PURPOSE OF ANY LIMITED REMEDY.
The limited warranties for Compaq products are
exclusively set forth in the documentation accompanying
such products. Nothing herein should be construed as
constituting a further or additional warranty.
Compaq iPAQ Personal Audio Player PA-2
First Edition (March 2001)
Part Number 237411-001


PERSONAL AUDIO PLAYER PA-2 WELCOME 1-1
1
Welcome
Thanks for buying an iPAQ Personal Audio
Player PA-2, and welcome to the world of digital
audio.
Digital audio is a way of compressing recorded
sound so that it takes up much less storage space.
A song is reduced to about 1/10 its size, enabling
fast downloads from the Internet to your Player.
There are many types of digital audio formats,
but MP3 and WMA are two of the most popular.
Digital audio players provide many benefits:
➜Solid state (no skipping)
➜CD quality sound
➜Portability (small and lightweight)
➜Compatibility with the Internet
➜The ability to take your favorite music with
you anywhere!
What is
Digital
Audio?
Why
Digital
Audio?

1-2 WELCOME PERSONAL AUDIO PLAYER PA-2
If you have a multimedia PC with a sound card
and speakers, you are probably ready for digital
audio. However, to get optimal performance, we
recommend the requirements shown here. You
may be able to download audio files with a less
sophisticated PC, but you will be happier if your
PC meets or exceeds these requirements:
➜233 MHz Processor
➜Microsoft Windows 98, Windows ME or
Windows 2000
➜100 MB free hard drive space
➜1 available USB port
➜24x CD-ROM drive (32x preferred)
➜64 MB RAM
If you have any trouble setting up your Player or
would just like more information, visit Compaq’s
web site:
http://www.compaq.com/products/iPAQ
Please register your Player to receive a more
personalized support experience. You may
register at Compaq’s web site:
http://www.compaq.com/go/register
Your Player has a One-Year Limited Warranty.
Please see the enclosed Warranty Card for
further details.
Is Your PC
Ready for
Digital
Audio?
How to
Get Help
Register
Your PA-2
Warranty

PERSONAL AUDIO PLAYER PA-2 WELCOME 1-3
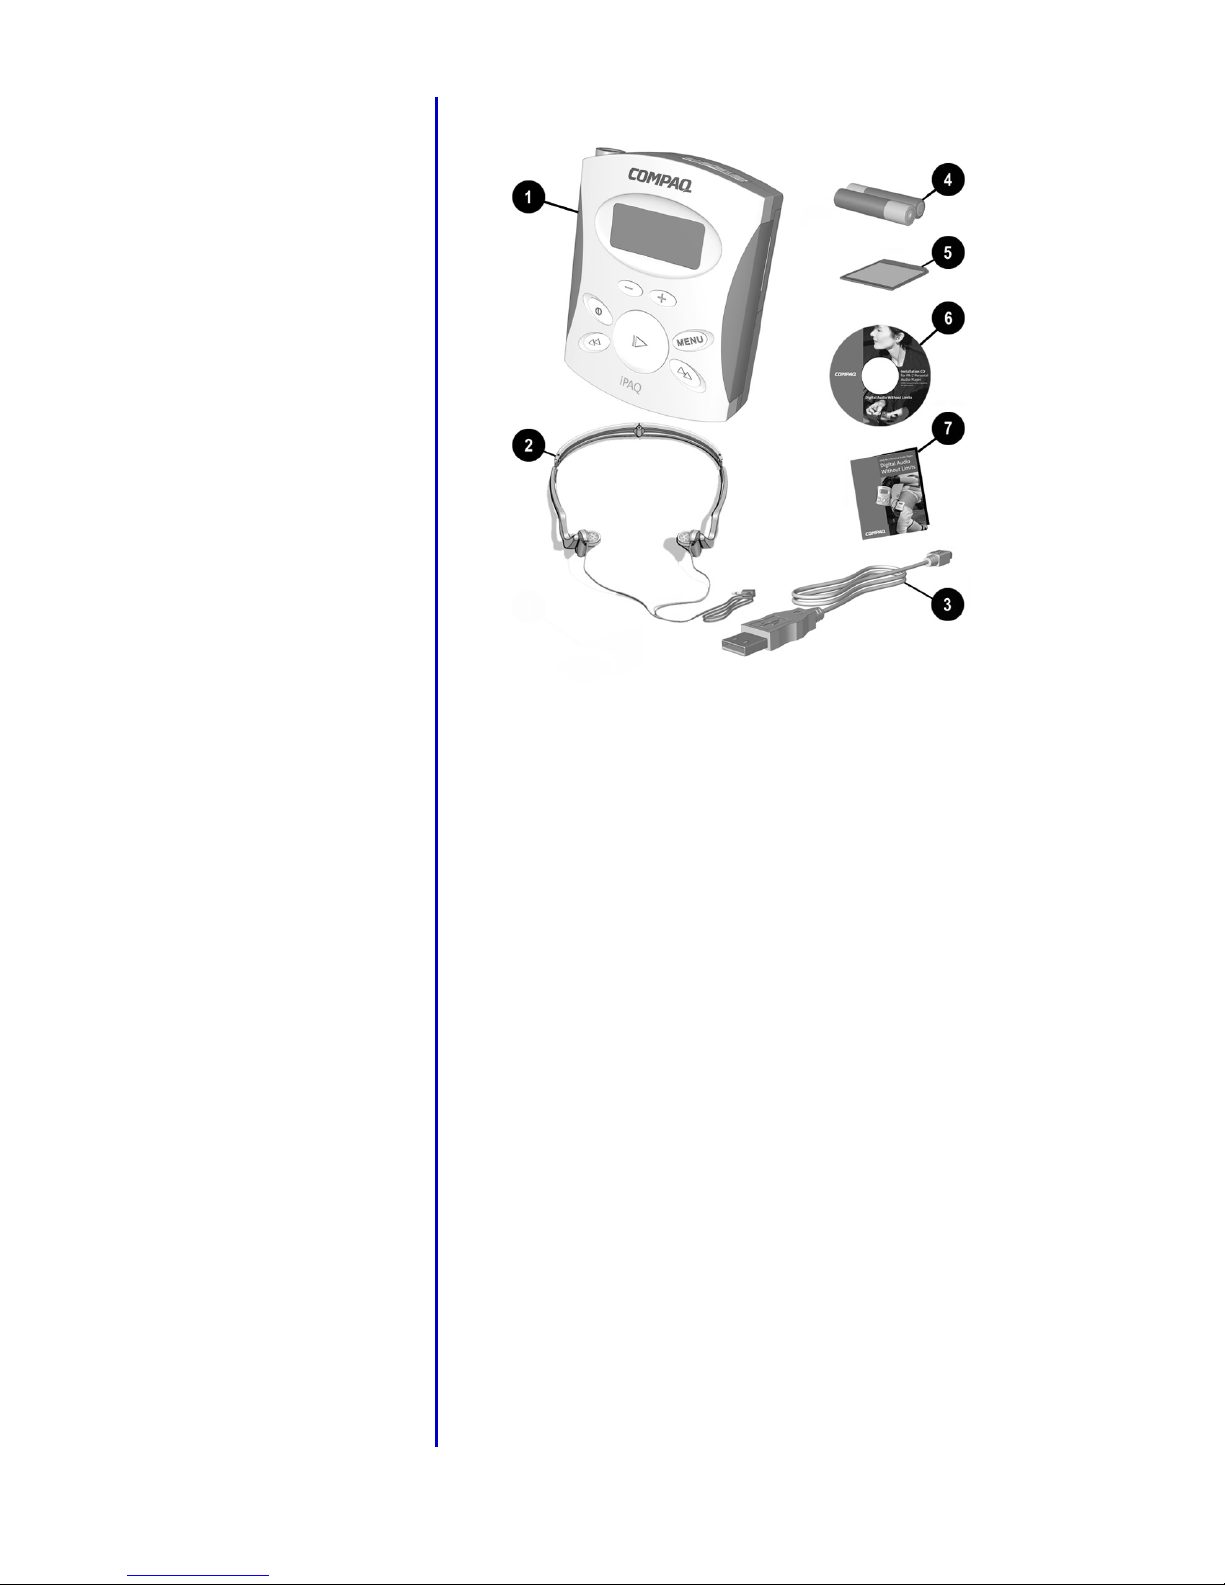
What’s in
the Box?
1Personal Audio
Player
4Two AAA batteries
2Earphones 564 MB of MMC
flash memory
3USB data cable 6CD
7This guide

1-4 WELCOME P
ERSONAL AUDIO PLAYER PA-2

PERSONAL AUDIO PLAYER PA-2 SETTING UPYOUR PLAYER 2-1
2
Setting Up Your
Player
You will soon be listening to your favorite music
on your Player. Just follow these simple steps:
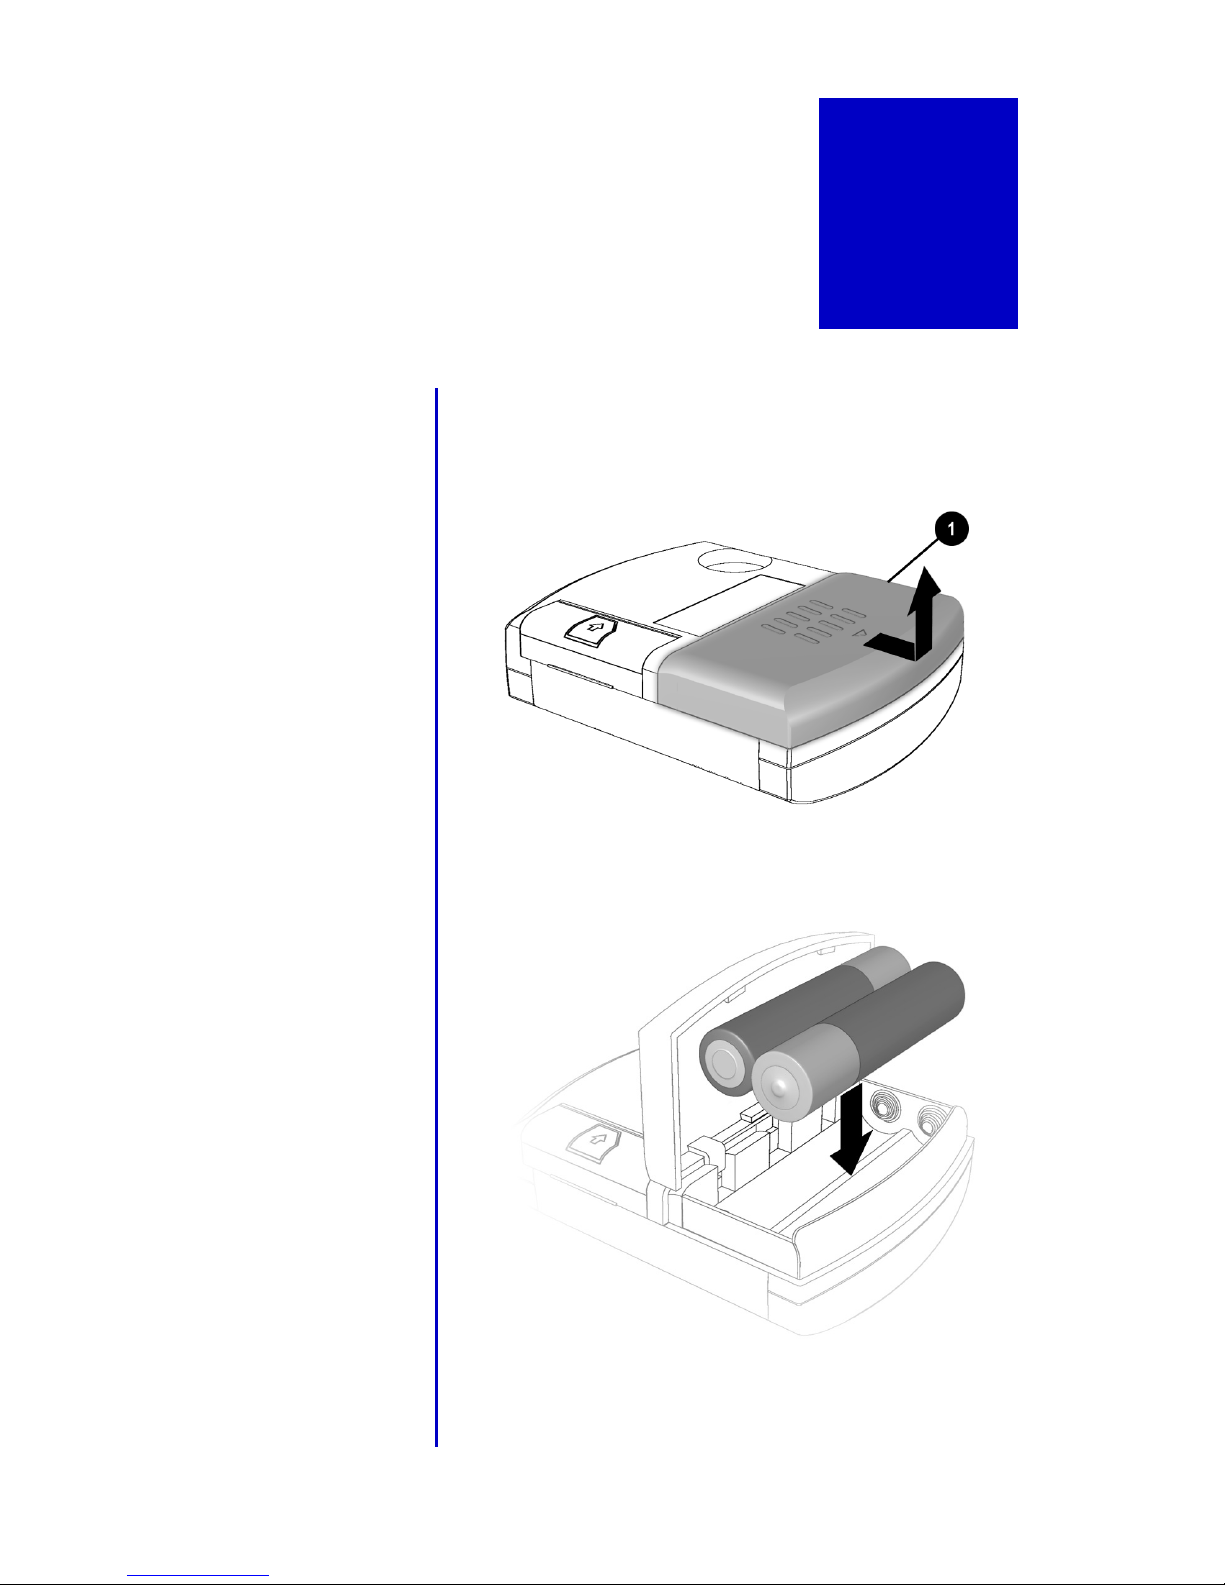
1. Pull out and lift the battery door.
2. Place the batteries that came with your Player
into the battery compartment as shown.
Installing
the
Batteries

2-2 SETTING UPYOUR PLAYER PERSONAL AUDIO PLAYER PA-2
3. Lift the flash memory door located on the
left side of the back of your Player.
4. Insert the flash memory card that came with
your Player into the bottom slot (Slot 1). See
the figure below for orientation.
5. The second slot may be used for additional
MMC flash memory (purchased separately).
Installing
the
Memory
Tip ...
Fo r m a t y o u r M M C
cards before using
them for the first time.

PERSONAL AUDIO PLAYER PA-2 SETTING UPYOUR PLAYER 2-3
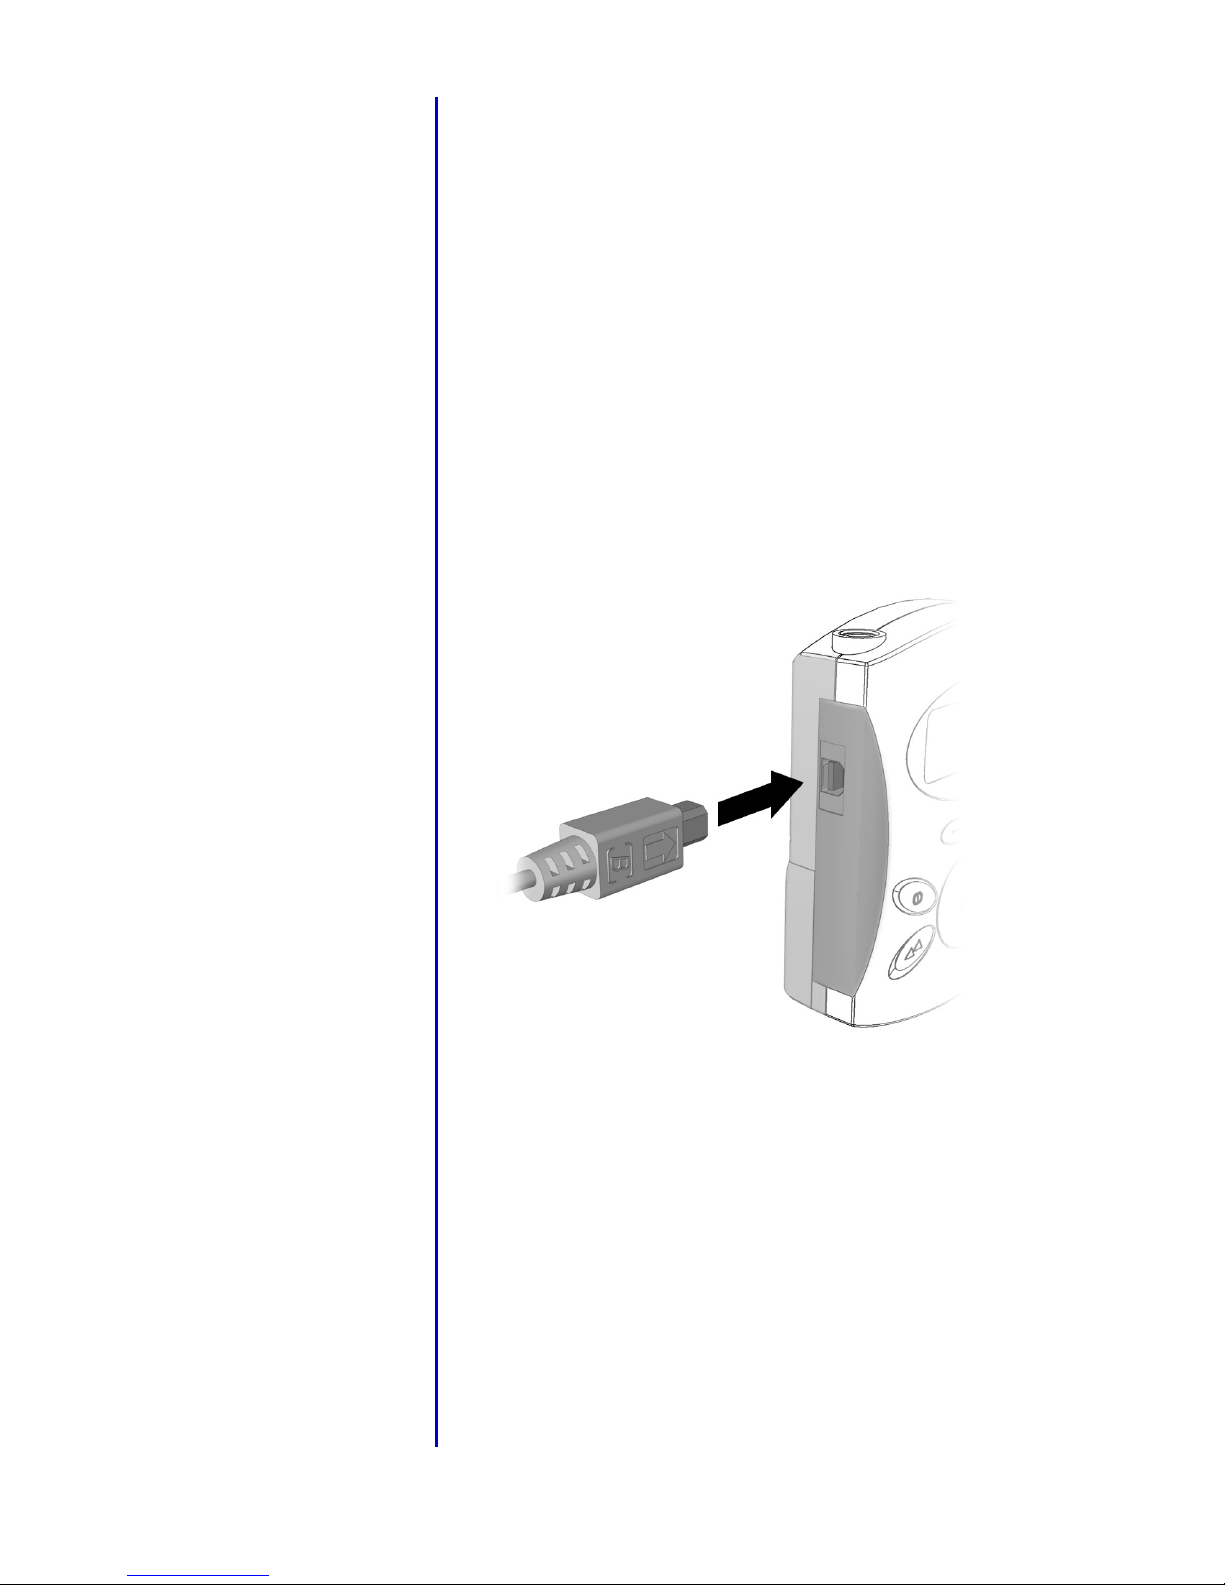
The following steps and associated diagram
show you how to connect the USB cable and
earphones.
1. Connect the USB cable to your computer.
The location of USB ports varies on different
computers. See your computer’s feature guide
if you are unable to locate your computer’s
USB port.
2. Press the Power button to turn on the Player.
3. Remove the rubber plug from the USB port
on the Player.
4. Connect the small square USB cable end to
your Player.
The USB symbol wdisplays on the LCD.
Connecting
the USB
Cable

2-4 SETTING UPYOUR PLAYER PERSONAL AUDIO PLAYER PA-2
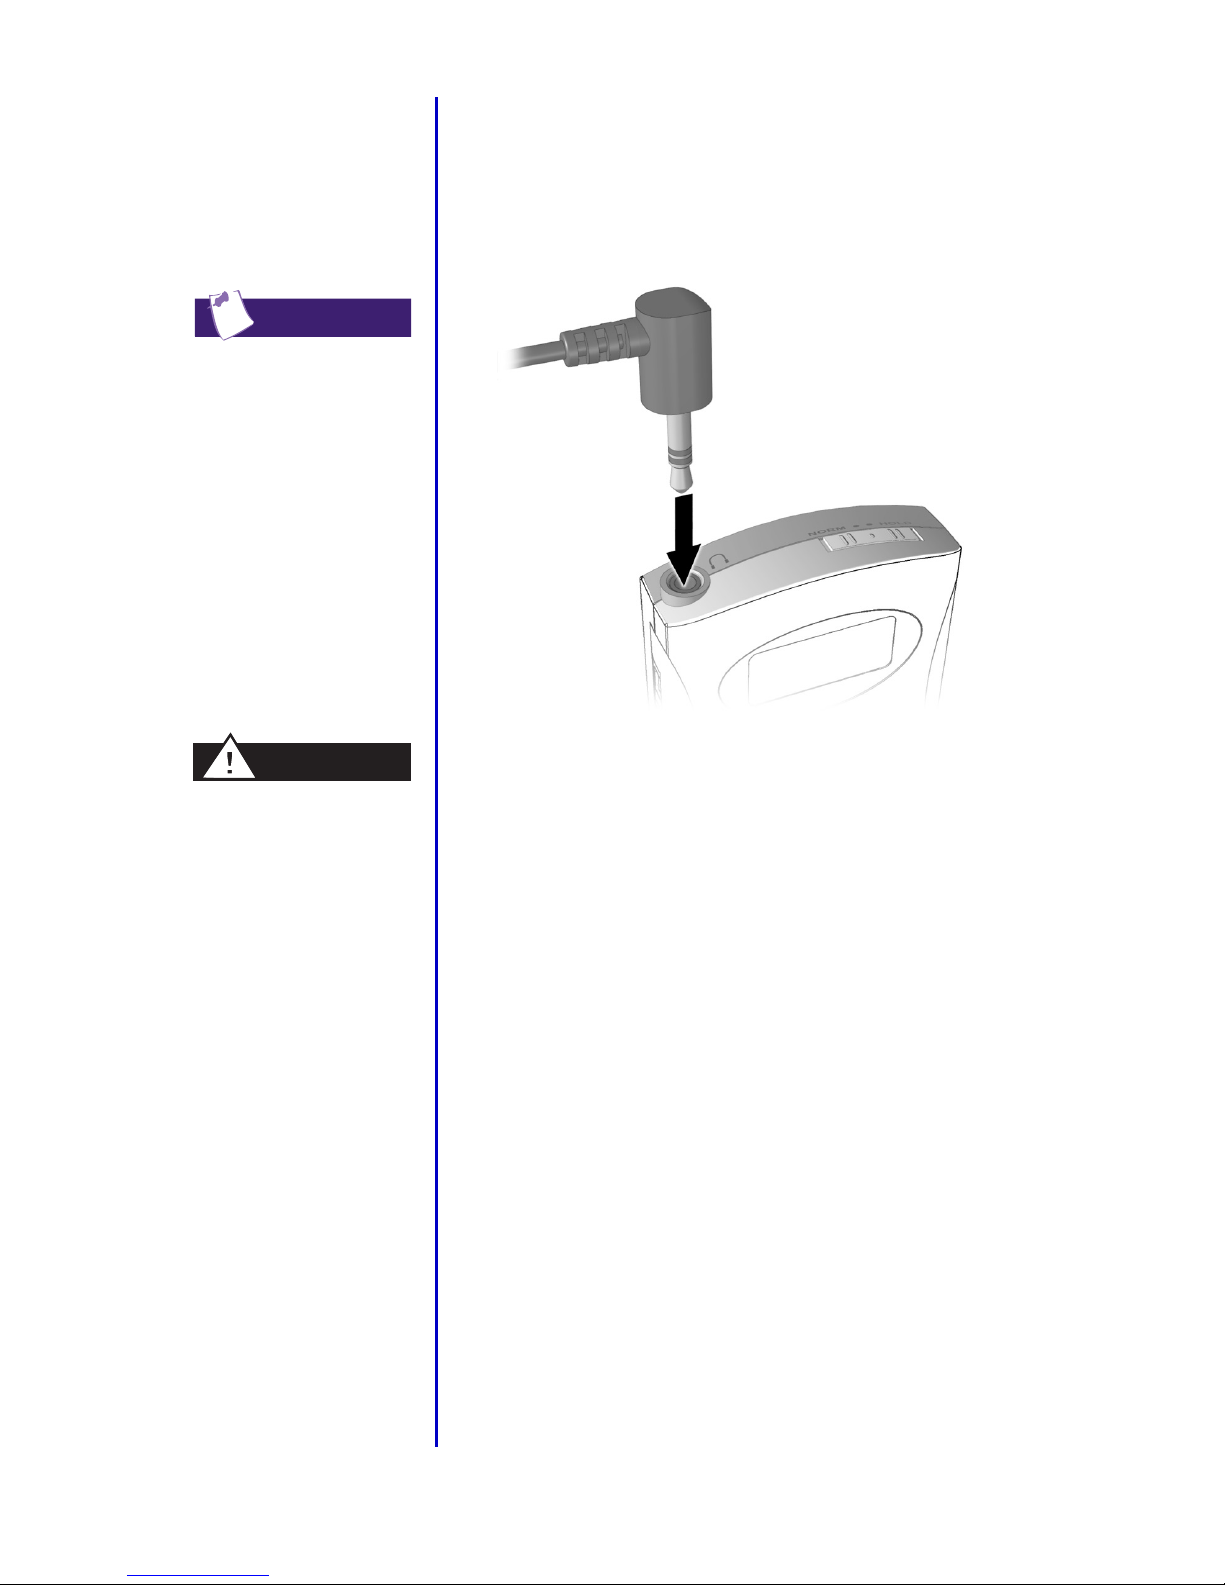
Connect the plug on the end of the earphones to
the earphone jack on top of the Player.
Note: Your Player must be connected to a USB port on
your computer or a self-powered hub. A
bus-powered hub will prevent the computer from
recognizing your Player.
Connecting
the
Earphones
Tip ...
You may use your
favorite earphones or
headphones.
Warning
Permanent hearing
loss may occur if
earphones or
headphones are used
at high volume.

PERSONAL AUDIO PLAYER PA-2 SETTING UPYOUR PLAYER 2-5
To turn on your Player:
1. Press the Power button.
When you turn on your Player, the LCD screen
briefly displays all icons, then Compaq iPAQ,
and then the following:
1:64M
This indicates that the 64 MB memory card is
installed correctly.
You will then see a No songs message, since the
memory card does not contain any songs yet.
2. Press and hold the Power button for 2 seconds
to turn off the Player. The display will show
OFF (HOLD).
Turning On
Your Player
for the First
Time

2-6 SETTING UPYOUR PLAYER PERSONAL AUDIO PLAYER PA-2
Your Player comes with an optional Belt Clip.
1. Place the belt clip into the hole in the back of
the Player.
2. Tighten the screw.
Installing
the Belt
Clip
Tip ...
When installing new
batteries, loosen the
screw and rotate the
belt clip clockwise, or
remove the belt clip
completely.

PERSONAL AUDIO PLAYER PA-2 SETTING UPYOUR PLAYER 2-7
Your Player has many outstanding features:
Features of
Your Player
Front
Features
1Display Screen -
Area where song
and playback
information
is displayed.
5Volume Increase -
Press to raise
volume level.
2Volume Decrease -
Press to lower
volume.
6Play/Pause - Press
to play a song. Press
again to pause play.
3Power - Press to
turn the Player on.
Hold for
2 seconds to turn
the Player off. The
display will show
OFF (HOLD).
7Menu - Press to see
menu options.
4Rewind/Previous
Track -Press and
hold to rewind
within a song. Press
once to skip back to
the previous track.
8Fast Forward/Next
Track - Press and
hold to fast forward
within a song. Press
once to skip ahead
to the next song.

2-8 SETTING UPYOUR PLAYER PERSONAL AUDIO PLAYER PA-2
Volume level indicator - Each )represents
2 steps in volume with a maximum volume
of 5 )s.
Music indicator - Flashes when the Player is in
PAUSE mode. The indicator is solid when
songs are playing.
Top
Features
Tip ...
You must set the
Norm/Hold switch to
the Normal position
to turn on the Player.
Hold Mode is
displayed on the
screen if the switch is
in the Hold position
when you press the
Power button.
Display
Screen
1Earphone Connection
2Norm/Hold Switch - The Norm/Hold switch
should be in the Norm position for typical usage.
When the switch is in the Hold position, the
front panel buttons are disabled. You can
carry your Player in a pocket or purse and not
worry about accidentally pushing the buttons.

PERSONAL AUDIO PLAYER PA-2 SETTING UPYOUR PLAYER 2-9
Battery charge indicator - The number of bars
visible indicates the amount of charge
remaining in your Player’s batteries. Replace
batteries when the three bars have
disappeared.
DISPLAY AREA - Displays track number,
track length, artist, and song name. The song
title format is set using the software included
with your Player.
wUSB indicator - Displays only when the
USB cable is connected to the computer and
to the Player.
HOLD - Displays when the Norm/Hold switch
is in the Hold position.
NRepeat indicator - Ndisplays when the
current song is set to repeat. NALL displays
when all songs are set to repeat.
SHUFFLE - Indicates that songs will be played
in a non-sequential order.
Your Player has many features available through
Menu options. To access the Menu options:
1. Press the Menu button to see the first option.
2. Press the Menu button repeatedly to move
through the options.
3. Press the Play/Pause button to make a
selection.
To exit the Menu, scroll through the options until
you are returned to your songs, OR, if no buttons
are pressed for 5 seconds, you are returned to
your songs.
Menu
Options

2-10 SETTING UPYOUR PLAYER PERSONAL AUDIO PLAYER PA-2
The following options are available through the
Menu:
Shuffle
Off - Songs play in the order of your playlist.
On - Songs do not play in the order of your
playlist.
Repeat
Repeat All - Continuously plays all the songs in
your playlist.
Repeat One - The current song plays again and
again.
Repeat Off - All songs in your playlist play
once, then the Player will automatically shut off
if no buttons are pressed for 10 minutes.
Equalizer
Rock - Choose this setting to hear rock music at
its best.
Jazz - Choose this setting to hear Jazz music at
its best.
Classical - Choose this setting to hear Classical
music at its best.
Custom - (Default) Use this setting to manually
adjust the Bass and Treble. With this mode, you
can boost the amount of bass and treble.
Self Test
Self Test tests the display, memory cards, and the
audio to each of the earphones. It also displays
the Player’s software version.
Menu
Options
(continued)
Tip ...
In REPEAT ALL or
REPEAT ONE mode,
songs will play
continuously until
you stop play or the
batteries run out of
power.

PERSONAL AUDIO PLAYER PA-2 INSTALLING THE SOFTWARE 3-1
Installing the
Software 3
Your iPAQ Personal Audio Player PA-2 comes with
a CD that contains two of the leading software
packages for managing your digital audio.
➜Microsoft Windows Media Player 7
➜MusicMatch Jukebox 6.0
To install the software, close all other programs
and follow these steps:
1. Insert the CD that came with your PA-2 into
your CD-ROM or DVD drive. Installation
begins and the PA-2 Software Installation
window displays. Click Next.
2. Select the language that you want to install
first.
3. Follow the Setup Wizard through installation
and setup.
4. Repeat the steps to install the other software
package (recommended).
Tip ...
If the installation
does not begin
automatically, click
on the Start menu,
select Run, and type
X:setup (where X is
the letter of your
CD-ROM or DVD
drive).

3-2 INSTALLING THE SOFTWARE PERSONAL AUDIO PLAYER PA-2
Note: If you have CD-Burning software from Roxio
(Adaptec) or Just!Burn installed, it is recommended
that you uninstall that software prior to installing
Windows Media Player 7. After you install Windows
Media Player 7 you will have CD-burning support,
but it only supports burning within the Windows
Media Player. If you want to use your previous
CD-burning software, deselect the Roxio
(Adaptec) CD-Burning Plug-in option during the
Windows Media Player 7 installation process. When
the software installation process is complete,
check the manufacturer’s home page for updates.
You can then reinstall your previous software.

PERSONAL AUDIO PLAYER PA-2 USING THE SOFTWARE PACKAGES 4-1
4
Using the Software
Packages
The MusicMatch Jukebox allows you to use a
single application to:
➜Manage audio content on your PC.
➜Encode audio files from a CD.
➜Manage audio content on your Player.
➜Create your own CD-ROM.
➜Find music to download from the Internet.
Follow these simple steps to activate
MusicMatch Jukebox 6.0.
1. Double-click the MusicMatch Jukebox
icon on your desktop to activate the software.
2. The MusicMatch Jukebox window displays
the following:
MusicMatch
Jukebox 6.0
Opening
the
software

4-2 USING THE SOFTWARE PACKAGES PERSONAL AUDIO PLAYER PA-2
3. Click on Help at the top of the window.
Select Getting Started from the drop-down
menu.
4. Follow the easy instructions that guide you
through finding music on the Internet. You
will also learn how to copy and create CDs
and playlists.
5. To download your music to your PA-2
Personal Audio Player, click File/Download
to device.
Opening
the
software
(continued)
Other manuals for iPAQ PA-2
3
Table of contents
Other Compaq MP3 Player manuals