Complete Aquatics EnhanceAir PRO 1 User manual

1
EnhanceAir™ PRO Kit
Instructions
Contents:
Warnings & Safety
......................................
...........................2
EnhanceAir™ Parts.................
...............
.............
........
....
.....3
EnhanceAir™ Assembly...................................
..
............
.......
3
EnhanceAir™ Installation....................
..........
............
...........
.4
Winter Operation Considerations...........................................5
Regular Maintenance.............................................................6
Warranty Information..........................
.........................
..........7
Accessories...................................................
..................
......7
EnhanceAir™ PRO 1 & 2
Owner’s Manual
Congratulations and thank you for your purchase of the Complete
Aquatics EnhanceAir™ PRO Pond & Water Garden Aeration
Kit. By installing an aeration system into your pond, you will
increase the dissolved oxygen levels and other gas exchange in
your water. This will make your sh happier & healthier and also
increase the biological activity that helps keep your water clear.
Please read this entire manual before installing!

2EnhanceAir™PRO Kit
Instructions
WARNING
IMPORTANT SAFEGUARDS. READ AND
FOLLOW ALL SAFETY INSTRUCTIONS.
To avoid possible equipment electric shock, special care should be taken when the
pump is used as water garden equipment. For each of the follwing situations, do not
attempt to repair yourself, return the air pump to an authorized service facility for
servicing, or discard the pump.
I) If the pump falls into the water, DO NOT REACH FOR IT: rst unplug the pump
from electricity supply, and then retrieve it.
II) Carefully examine the air pump after installation. It should not he plugged in if
there is water on parts that are not intended to be wet.
III) Do not operate if the cord or plug is damaged, or if the pump is malfunctioning,
dropped, or damaged in any way.
IV) To prevent the plug or the electrical outlet getting wet, create a drip loop near
where the cord meets the outlet. This should avoid water dripping onto the plug
or outlet. A drip loop is shown in the gure below.
If the plug of outlet does get wet, DO NOT UNPLUG THE CORD: Disconnect
the fuse or circuit breaker supplying power to the pump. Then unplug and
examine for the presence of water in the outlet.
V) Do not use the pump near volatile liquids such as gasoline, thinners, etc, as
this creates the possihility of an explosion.
CAUTIONS FOR USE
I)
This pump is air-operated. Do not, under any circumstances, attempt operation
with water or other liquids, otherwise pump may be damaged.
II) If operating pump as a winter de-icer or otherwise freezing conditions, see the
section labeled “Winter Operation Considerations” on Page 5.
III) Do not block the air being discharged. The pump must have sufcient room to
allow for heat dissipation. Under the extreme operating temperature conditions
which may be caused by failure to observe cautions II) or III), pump will
automatically switch off until cool.
IV) Always unplug pump prior to servicing. Grasp plug to remove cord from outlet.
Do not remove by pulling on power cord.
V) Do not use the air pump for any other purpose which different from its original
use. Use of unauthorized replacement parts may jeoparidize safety.
VI) When not in use, store pump in a dry, frost-free area.
VII)Never use an extension cord, this may result in equipment failure.
IIX)Always connect to an outlet protected by a Ground Fault Circuit
Interupter (GFCI or GFI)
DO NOT REMOVE PUMP CASING UNTILUNIT IS DISCONNECTED FROM ELECTRICALSUPPLY.

3
EnhanceAir™ PRO Kit
Instructions
EnhanceAir™ PRO Kit Parts
Your EnhanceAir™ PRO Kit includes one or more of the following, depending on
whether you purchased the EnhanceAir™ PRO 1 or EnhanceAir™ PRO 2 kit.
EnhanceAir™ PRO 1 Kit:
1x..EnhanceAir™ PRO 30 lpmAir pump (A)
1x...............12” Air Diffuser & Baseplate (B)
1x..
...
....20’ of 3/8” Self-weighted Airline (C)
1x.........
............
.Brass 3/8” Insert Fitting (D)
1x............2” Length of 3/8” Vinyl Tubing (E)
EnhanceAir™ 2 Kit:
1x
..
EnhanceAir™ PRO 60 lpm Air pump
(G)
2x...............12” Air Diffuser & Baseplate (B)
2x..
...
....20’ of 3/8” Self-weighted Airline (C)
1x.........
............
.Brass 3/8” Insert Fitting (D)
1x............2” Length of 3/8” Vinyl Tubing (E)
1x....
........
Manifold and Valve Assembly (F)
A.
B. C.
G.
F.
EnhanceAir™ PRO 1 Kit Assembly
Below are step-by-step instructions for assembling your EnhanceAir™ PRO 1 Kit:
(EnhanceAir™ PRO 2 on next page)
EnhanceAir™ PRO 1 Kit:
Step 1: Thread the Brass Connector (D)
onto the pump’s air discharge port. Lightly
tighten with a wrench. Do Not over-tighten.
Step 2:
Un-roll the Self-weighted Airline and
push one end onto the Brass Connector.
Step 3: Push the other end of the Self-
weighted Airline onto the barbed connector
on the Air Diffuser (B).
Step 4: Place the Pump at the edge of the
pond and the DiffuserAssembly into the pond
at desired location. See page 4 for placement
guidelines.
Step 1
Step 3
Step 2
to diffuser
to diffuser
to pump
D.
E.

4EnhanceAir™PRO Kit
Instructions
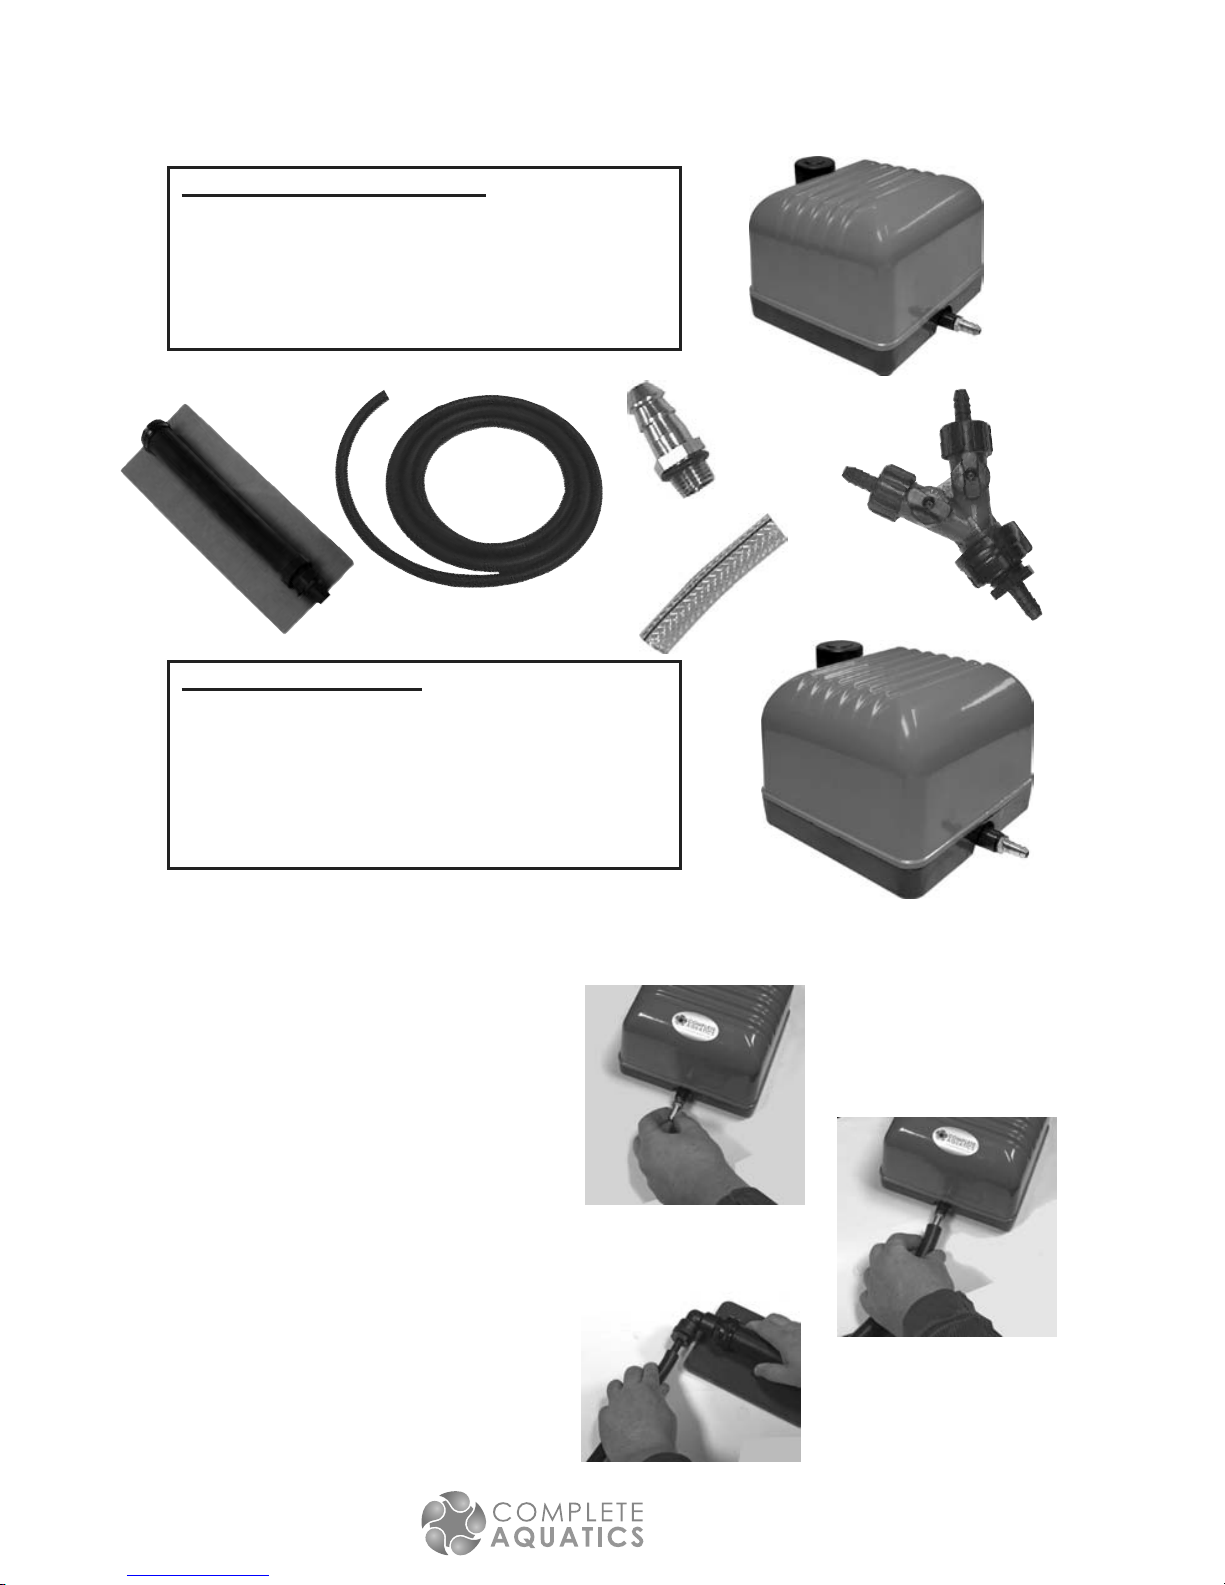
EnhanceAir™ PRO 2 Kit Assembly
EnhanceAir™ PRO 2 Kit:
Step 1: Thread the Brass Tubing Connector
(D) onto the Air Pump. Lightly tighten with a
wrench. Do Not over-tighten.
Step 2: Slip one end of the short piece of
Vinyl Tubing (E) over the Brass Connector.
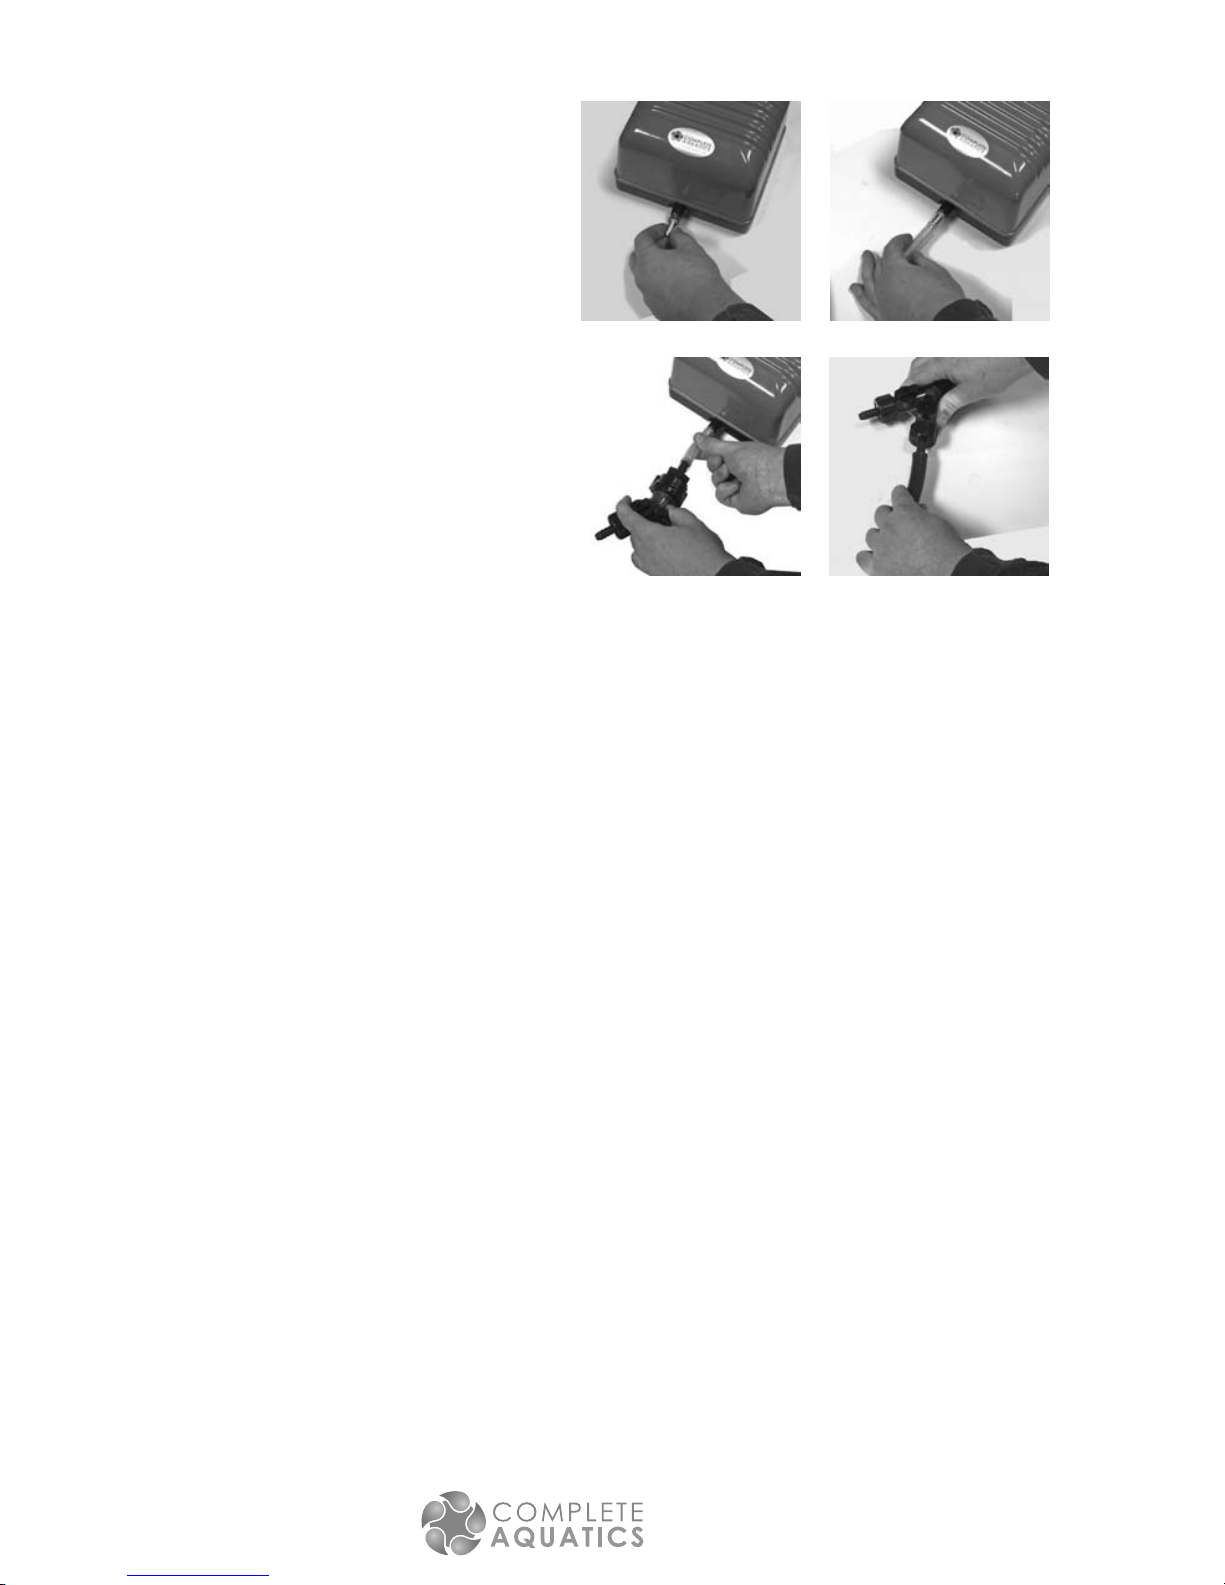
Step 3: Slip the other end of the Vinyl Tubing
(E) over the bottom end of the Manifold As-
sembly (F) (see image on page 3).
Step 4: Un-roll both Self-weightedAirlines
and push one end of each onto the open ends
of the Manifold Assembly (F).
Step 5: Push the other ends of the Self-
weighted Airline onto the barbed connector on
the Air Diffusers (B).
Step 6: Place the Pump at the edge of the
pond and the DiffuserAssemblies into the
pond at desired locations. See page 4 for
placement guidelines.
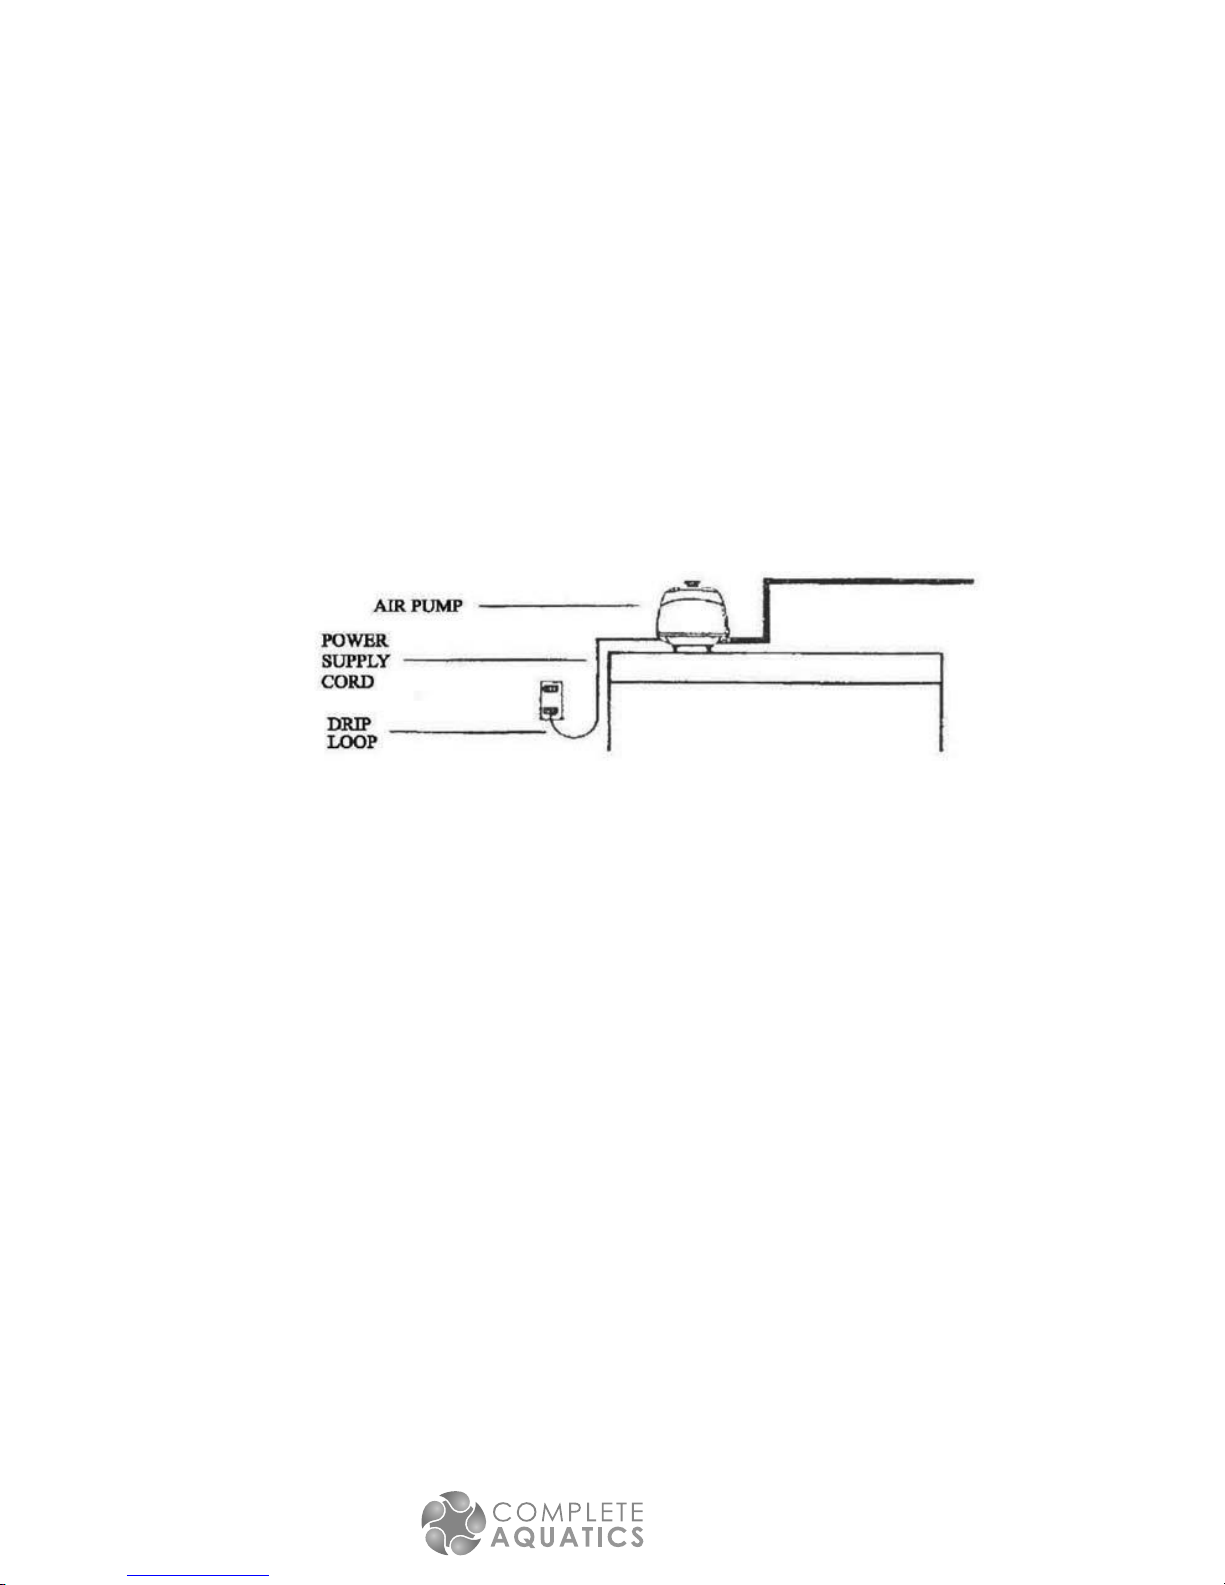
EnhanceAir™ PRO Aeration Kit Installation
To install the EnhanceAir™ PRO Aeration Kit into your pond or water garden, rst nd
a suitable place outside of the pond for the air pump. Such a place should be level, at
and above the water level in the pond to avoid water siphoning back into the pump in a
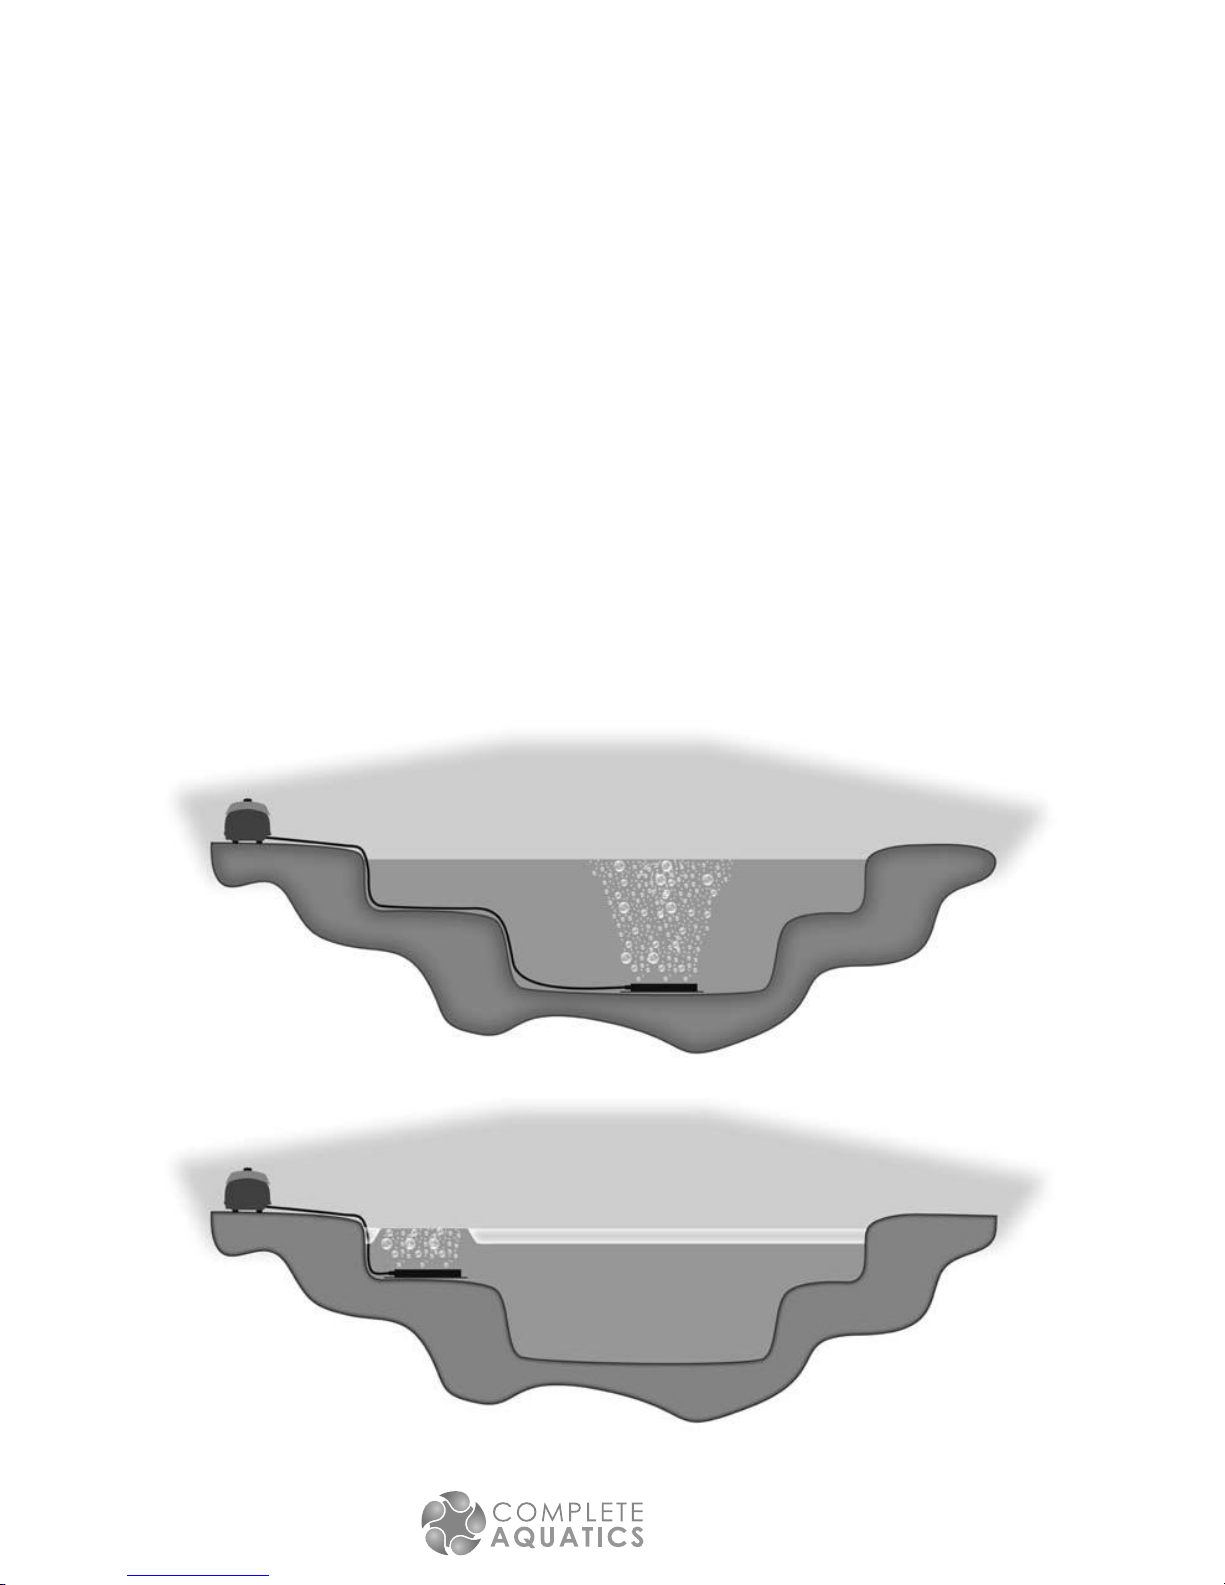
power failure. Next nd a suitable place in the water garden for the diffuser. For warm
weather operation, this will be near the center of the pond. For winter operation or using
the aeration kit as a de-icer, read the section labeled “Winter Operation Consider-
ations.” Do not place the diffuser at depths greater than 4 feet as this will greatly reduce
air ow and reduce the life expectancy of the air pump. After the diffuser and air pump
are in place, take actions to conceal the self-weighted tubing, like snaking it through
rocks or burying it under mulch. Do not place the tubing anywhere it can be stepped on,
run over or otherwise damaged. Do not kink or pinch tubing.
Notes on Installation
·Pump must be above water level in the pond and on a horizontal surface.
·Elevate air pump a few inches off the ground to keep moisture from coming in contact
w/ the pump.
·Do not allow pump to be exposed to the elements. It is highly recommended to use a
vented cover, such as an articial rock or irrigation valve box, to protect the pump.
·If using multiple diffusers (EnhanceAir™ PRO 2), ensure diffusers are evenly distrib-
uted throughout the pond. Also, make sure air ow to each diffuser is regulated by a
valve. Adjust these valves to balance the air ow to each diffuser. Ensure that valves
balance air ow between diffusers and avoid restricting overall air ow from the pump.
·The pump will automatically operate when plugged in. Pump must be plugged into an
oulet with a proper ground. If your outlet has no ground, contact an electrician to prop-
erly ground the unit. Also, pump must be plugged into an outlet protected by a Ground
Fault Circuit Interupter (GFCI or GFI).
Step 1
Step 3 Step 4
Step 5- See page 3
Step 2

5
EnhanceAir™ PRO Kit
Instructions
Figure 1: Diffuser placement in warm months.
Figure 2: Diffuser placement in freezing conditions
Winter Operation Considerations
During any season, the EnhanceAir™ PRO Kit will provide the necessary oxygen to
your pond to promote happy and healthy sh as well as greatly enhance the biological
ecosystem that keeps it clean and clear. In the winter months, though, an aerator not
only provides oxygen but is 80% more energy efcient than typical oating heaters and
equally effective in keeping an area of the pond from freezing, allowing the necessary
transfer of harmful and benecial gasses.
Following are precautions and recommendations when using your pond aeration
system in the winter months:
Diffuser Placement:
In warmer months, the best place for the diffuser is in the middle of the pond near the
deepest point to circulate highly oxygenated surface water down into the depths of the
pond (Figure 1). However, in winter the pond’s surface water is super-chilled from the
cold air and should not transfer to the bottom of the pond where the sh are. For this
reason, it is extremely important to move the aeration diffuser to an upper shelf level
near the pond surface in colder weather (Figure 2). Place the diffuser so that it is 6” to
8” below the water surface. This will keep the super-chilled water from circulating to the
bottom of the pond as well as create greater turbulence at the water surface to keep an
area from freezing. Note that the ice all around the opening is thinned and will not sup-
port weight, so never walk or step on the ice. When the pond is used for recreation in the
winter, clearly post signs at or mark the location of the diffuser and thin ice at the surface
to warn any individuals on the ice.

6EnhanceAir™PRO Kit
Instructions
Regular Maintenance
Safety Notice:
·Always use parts that are supplied or approved by Complete Aquatics. Use of other
parts may result in poor performance and could create a hazardous situation. Contact
your dealer for information on how to get parts.
·Always unplug the air pump from the outlet to perform any maintenance on the unit.
The air lter (located under the black cap on the top of the pump) on the pump ensures no
dust or debris makes it into the tubing or diffuser, which could clog the system and restrict
air ow. The air lter must be periodically cleaned (dust lightly, then use mild soapy water;
let lter dry thoroughly) or replaced. After cleaning, place the lter back into the air pump.
DO NOT OPERATE THE PUMP WITHOUT THE FILTER INSTALLED.
The air pump will need a diaphragm replacement every 12-36 months depending on:
operating depth, air quality & operating tempurature. If the air pump is operating but
there is no air coming out of the unit or diffusers, then it is possible the diaphragm will
need replaced. Ask your dealer for information about replacing the diaphragm when
acquiring a new one.
Inspect the air tubing and diffusers periodically for any damage such as cuts, cracks,
kinks or creases. Replace any damaged parts before continuing operation.
Winter Operation Considerations, cont’d
Air Pump Winter Care:
The air pump should sit on a at, horizontal surface elevated slightly off the ground
and above the pond’s water surface. Ensure there is good air circulation around the
pump and no water or snow can come in contact with the pump. Protect the pump
with a cover that will allow proper ventilation and block precipitation or melt-runoff.
Use a cover that is large enough to house the pump and does not have much extra
space. The pump will generate heat during normal operation and a proper cover will
ensure that the pump will keep warm function properly during extreme freezing condi-
tions. The CompleteAquatics Faux Rock with ventilation is an ideal cover. If one is not
available an inverted ower pot without drain holes can be used (NOTE: When using
an inverted ower pot, drill a few 3/8” holes through the side of the pot to allow ventila-
tion or elevate base of pot 1/4” from the surface of the ground. Make sure the bottom
of the pump is above the base of the upturned pot).
Winter Trouble Shooting:
As with any de-icing device, it is important to visually inspect it frequently to ensure
that it is functioning properly and a hole is maintained in the ice over the pond.
If the air pump stops pumping air:
1. Check the electrical outlet to make sure the pump is getting power.
2. Inspect the ventilation on the pump cover. Remove any abstructions such as ice or
snow.
3. Check intake lter; it may need cleaned. Check intake before and after lter for
obstructions.
4. Check all the tubing connections.
5.
Check the air transfer tubing for proper air ow. If condensation has frozen in the tubing
and preventing air ow, use a hair dryer to thaw it out. You can also disconnect the tubing
and bring inside to a warm environment. Replace the tubing immediately after clearing.
Aeration Manifold Assembly when used with Small Faux Rock Cover

7
EnhanceAir™ PRO Kit
Instructions
Product Warranty
The EnhanceAir™ warranty is broken down by components:
Component Warranty Period
EnhanceAir™ PRO Air Pump 2-year (limited)*
Diffuser 1-year (limited)
Self-weighted Rubber Tuing 1-year (limited)
Warranty Limitations: The warranty covers the parts from the purchase date
against product defects and/or poor workmanship. Proof of purchase is required
for any warranty claims.
*Warranty does not cover the pump diaphragm.
Accessories
Below are accessories you can purchase to upgrade your EnhanceAir™ PRO
system. Contact your Complete Aquatics Dealer to order or get more information
about these products and other ways to enhance your pond and its biology.
Vented Faux Rock Cover
These are not your ordinary Faux Rocks, these
imposters look incredibly like the real thing. Sitting
side-by-side with natural stone, one can barely tell
the difference. Each is nished by hand and so has a
unique look and character. Also, these covers are pre-
vented, making them perfect for blending your aeration kit
into the landscape.
Complete Aquatics catalog #: DE40056
Seasonal Diverter Valve
Quit wading through your pond just when the water turns
cold to relocate your diffusers to an upper-shelf. With an
extra set of diffusers and self-weighted air tubing (below)
you can hook up a system that only requires the turning of
two valves outside of the pond come winter. You can also
add a diverter and set of diffusers and tubing to increase
effectiveness of your aeration system in circulating and
aerating the entire pond by increasing its aera of effect.
Complete Aquatics catalog #: AE40050
12” Rubber Air Diffuser
Self-cleaning, requires little-to-no maintenance
compared to air-stones. Can handle up to 2 cfm of
air.
CompleteAquatics Catalog #:AE40005
3/8” Self-weighted Rubber
Tubing
20’ or 100’ lengths
Complete Aquatics Catalog #: AE40055 (20’) & AE40030 (100’)
Aeration Manifold Assembly when used with Small Faux Rock Cover

8EnhanceAir™PRO Kit
Instructions
This manual suits for next models
1
Table of contents
Popular Lawn And Garden Equipment manuals by other brands

Pioneer
Pioneer Brite Striper 2000 Instruction manual & parts list

Craftsman
Craftsman CMXGZBF71242131 instruction manual

Homelite
Homelite HOMHT01 Operator's manual

Parkside
Parkside 331856 1907 instruction manual

Alpine
Alpine HEH208 owner's manual

Intelligent Appliances
Intelligent Appliances Urban Cultivator XL user guide