Compur Statox 501 Administrator Guide

Statox 501 PID Sensor Head

Statox 501 PID Sensor Head
Operation Instructions
1SAFETY ADVICE 3
2INTRODUCTION 4
2.1 Measuring principle 4
2.2 Operation mode 4
2.3 Different models 4
3DRILLING PLAN, DIMENSIONS, CONSTRUCTION, SCOPE OF DELIVERY 5
4INSTALLATION AND ELECTRICAL CONNECTION 6
4.1 Caution 6
4.2 Installation 6
4.3 Electrical connection 6
5START UP AND MEASURING MODE 7
6CALIBRATION WITH GAS 8
7TROUBLESHOOTING 9
8MAINTENANCE / REPLACEMENT OF CONSUMABLES 9
8.1 Lamp cleaning / replacement of consumables 10
8.1.1 Removing the sensor 10
8.1.2 Polishing the lamp 11
8.1.3 Elektrode stack and lamp replacement 11
8.1.4 Assembly and installation of the sensor 11
8.2 Sensor replacement 12
8.3 Replacing the filter membrane inside the sensor protection cap 12
8.4 Maintenance and cleaning of the sensor head housing 12
9SPARE PARTS AND ACCESSORIES 13
10 TECHNICAL DATA 14
11 DECLARATION OF CONFORMITY 15
2

1 Safety advice
The interface is an explosion-proof device certified for group II category 2. Its intended use is to operate a
Photo - Ionisation - Sensor (PID) for the detection of volatile organic compounds (VOC).
Designed to provide increased safety it is applicable in zone 1 and zone 2.
The following safety guidelines must be followed in particular:
• Observe the safety guidelines applicable for electronic components sensitive to electrostatic voltage.
• The retaining nut must be tightened at all time. It may only be removed for sensor replacement or
maintenance. Do not operate the sensor head without sensor or retaining nut.
• The interface has been designed to operate exclusively certified MiniPID sensors (Baseefa
07ATEX0060U) with unfilled solder well. For details see chapter 10:Technical Data.
• The interface may only be installed by trained and authorised personnel. The protection class
Ex e [ib] mb IIC T4 Gb must not be compromised.
• When connecting cables in the junction box of the sensor head housing, the power supply must be
disconnected.
• The interface may be connected to housings rated increased safety “Ex e“. Installation must comply
with EN 60079-7. Cable and its termination must be protected from mechanical damage and must
stay within the temperature specifications (80°C) of the cable.
• The interface and the sensor must be operated within ambient conditions as specified in the
technical data. Operating the sensor head outside the specified ambient conditions might damage
the sensor or interface, lead to malfunction and compromise safety.
Avoid:
- Temperatures > + 60°C
- Temperatures < - 30°C
- Wetness and dust. Maintain ingress protection IP54.
In case the interface is integrated into any housing, rated to provide increased safety “Ex e“,
observe the following:
• Interface and housing must be protected from mechanical damage and environmental conditions out
of specifications.
• During installation the power supply must be disconnected.
• Protect cables from mechanical damage, corrosion and heat. Wherever such impact cannot be
avoided, extra protection as specified in DIN EN 60079-14 must be provided, or install conduits.
• Ingress protection rating IP54 must be maintained in any case. To achieve sufficient sealing, use a
washer, for instance a Viton- O-ring 20x2,5 mm between interface and housing. Fasten the interface
to flush with the housing.
3

2 Introduction
The intended use is the measurement of VOC (Volatile Organic Compounds).
2.1 Measuring principle
The target gas passes a membrane and enters the measuring chamber, where it is ionised by a high –
energy UV lamp. This produces ions, which are discharged at the electrodes. The discharge current
produced depends on the number of molecules entering, i. e. the concentration.
A PID will detect all substances with an ionisation potential smaller than < 10.6 eV. Non detectable, and
also not interfering are O2, N2, CO, CO2and CH4. Very high humidity will quench the signal.
For calibration use Isobutene as reference gas (see chapter 6).
2.2 Operation mode
The Statox 501 PID sensor head operates in the diffusion mode.
If you want to operate the Statox 501 PID in the flow mode, please contact your Compur Monitors expert.
2.3 Different models
The parameters of the Statox 501 PID interface are set ex works to the requirements of your application.
Target gas, sensor type and measuring range are hardware programmed.
The sensor type is labeled on the sensor:
PID-A1 or MP3SM6FC = ppm Sensor,
PID-AH or MP3SB6FC = ppb Sensor.
It is important to know which sensor is in use, in case you need to order spare parts or consumables
(see chapter 9).
4

3 Drilling plan, dimensions, construction, scope of delivery
12
11
10
2
8
9
7
6
5
4
3
1
1 Grounding contact
2 Mounting drill holes for Ф4 mm bolts
3 Aluminum housing
4 Cable gland for cable Ф6-11 mm
5 Magnetic pin
6 Blind plug
7 Plastic tool to open sensor
8 Sensor protection cap with gas access through filter membrane
9 Nut holding the protection cap
10 Hall sensor, contact area for the magnetic pin
11 LED
12 Interface
Function of the blind plug:
• The thinner end is a magnetic pin, triggering the internal hall sensor. Hold it close to the contact area
on the interface housing to enter the calibration routine.
• The bigger end can be used to seal the sensor head, once the sensor has been removed for service.
5

4 Installation and electrical connection
4.1 Caution
The sensor head must be protected from mechanical damage and from ambient conditions outside its
specifications. Mount it to the wall at a location where it is easily accessible for service. Use a shielded
cable to transmit the signal to the Statox 501 control module. The sensor head housing must be
grounded.
Observe local regulations for electrical installations.
Position: gas access downwards (+ / - 15° ).
Place the sensor head close to potential gas leaks considering the specific gravity of the target gas, when
selecting the installation level.
4.2 Installation
The housing has two pocket holes for wall installation. You need two screws Ø 4mm.
4.3 Electrical connection
Recommended cable: 3 x or. 5 x ≥0,75 mm², with dense- mashed shield. Outer diameter 6 mm
(e.g. Type Oelflex 415 CP3 X 0,75).
The Statox 501 PID sensor head can be operated in the 3 – wire or 5 – wire mode.
Select 3 wire mode if the electrical resistance of the cable loop is < 5 Ω.
Select 5 wire mode if the electrical resistance of the cable loop is ≥5 Ω. In this mode the two additional
„sense“ leads measure the voltage directly on the sensor head and the control module compensates for
the voltage drop in the cable.
The Statox 501 PID needs a Statox 501 Control Module (software index 2.1 and higher) for
operation. Select the appropriate program prior to connecting the sensor head. (Progams 80 - 83).
Selecting the wrong program might destroy the sensor or cause malfunction!
If there are high potential differences in your plant, ground the shield only on the Control Module side.
After start up, allow 30 min warm up time. Then perform a calibration. The calibration can be neglected if
you have purchased an ex works calibration sensor head plus Control Module. In this case do not change
the program of the control module. Otherwise the calibration parameters will be lost! Ex - works -
calibrated components have labels with all relevant information on them.
After any change of program a calibration is mandatory.
If you want to form group alarms, you can use the optional common alarm module (Art. No. 557 387).
Connecting the interface:
Terminal Wire Contact
4 or 5 blue Power supply negative
3 black Signal
1 or 2 red Power supply positive
6

PEN
L
-
+
Netzteil
1
2
1 2 3 4 5
1 oder 2
3
4 oder 5
Controller Modul
interner Bus
918 817 716 12 11
+-
+
-
A1
A2
SF
+24V
5
Controller Modul
interner Bus
+-
A1
A2
SF
+24V
56 13 14 15 613 14 15
1 2 4 5
(optional)
Sammelalarm
Modul
918 817 716 12 11 17 18 9 7 8 16 14 15 613 5 4
501 PID 501 PID
5-wire mode 3-wire mode
Electrical connections for Statox 501 PID sensor heads. Faulty connection may destroy the
interface!
5 Start up and measuring mode
• When connected to power, the LED is flashing green / red alternatingly.
• Steady green light indicates the sensor head is in the measuring mode.
• To enter or exit the calibration mode hold the magnetic pin on to the contact area on the type plate.
Different modes of operation:
LED mode Control Module display activity
LED flashing green /
red alternatingly initial phase first ----, then 0 ---
green measuring mode actual concentration ---
flashing green calibration mode see Control Module
display
Calibrate or return to
measuring mode
short red flash, then off Error: sensor
defective or missing Er 5 see chapter 7
off Error: power supply
voltage too low Er 5 see chapter 7
red Error: wrong program 0 select appropriate program
7

6 Calibration with gas
A calibration is due after installation, sensor replacement or in time intervals as required by local
regulations. Allow 30 min warm up time.
Calibration to liquid substances in the field is labor intensive and prone to error. Use Isobutene as
reference gas and apply the response factors provided by Compur Monitors.
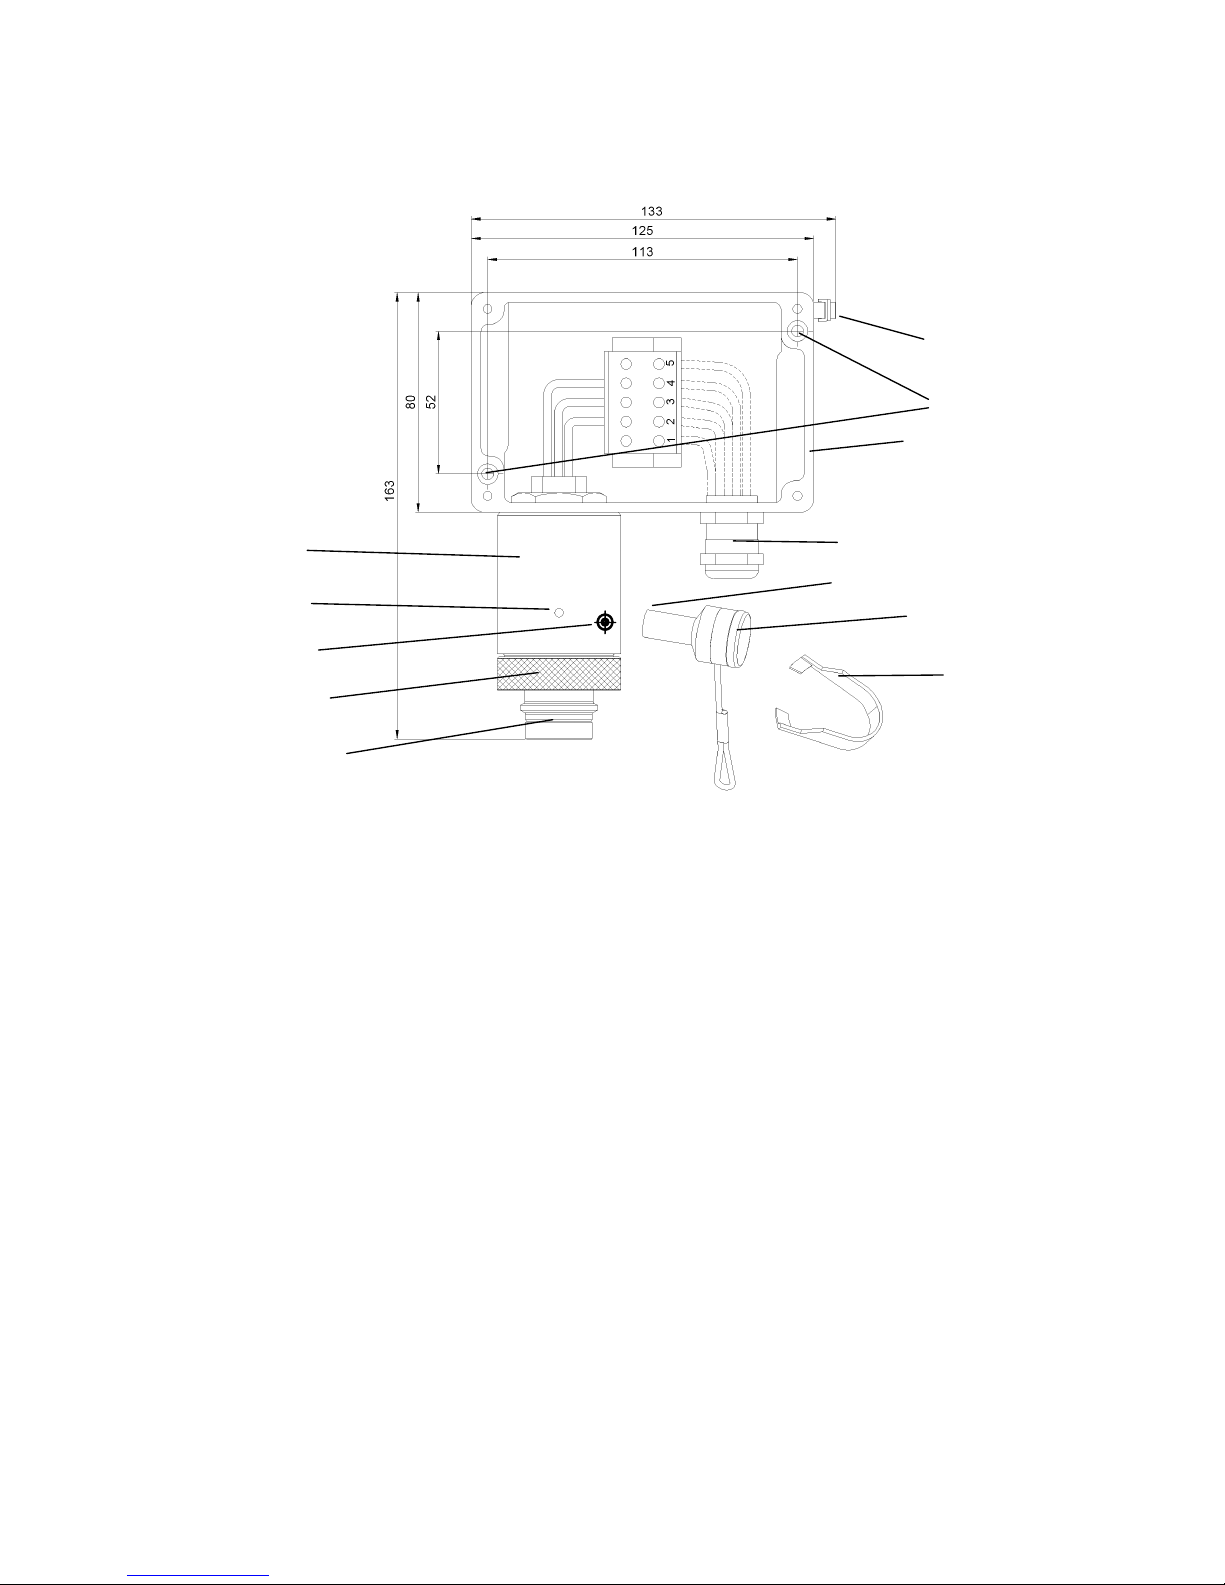
The tools required for calibration are: Span gas in appropriate concentration, a regulator and a gas
adapter.
The interface will accept set points between 10 and 100 % of the end of scale value.
To achieve best accuracy Compur Monitors recommends to calibrate at the desired alarm threshold
value. Calculate the most suitable span gas concentration with this formula:
Alarm threshold
c Isobutene =
Response factor
Example: Measuring range 0 - 1000 ppm Methylmethacrylate, Response factor = 1,6
minimal Isobutene concentration: 100 ppm / 1,6 = 62,5 ppm Isobutene
maximum Isobutene concentration : 1000 ppm / 1,6 = 625 ppm Isobutene
Procedure:
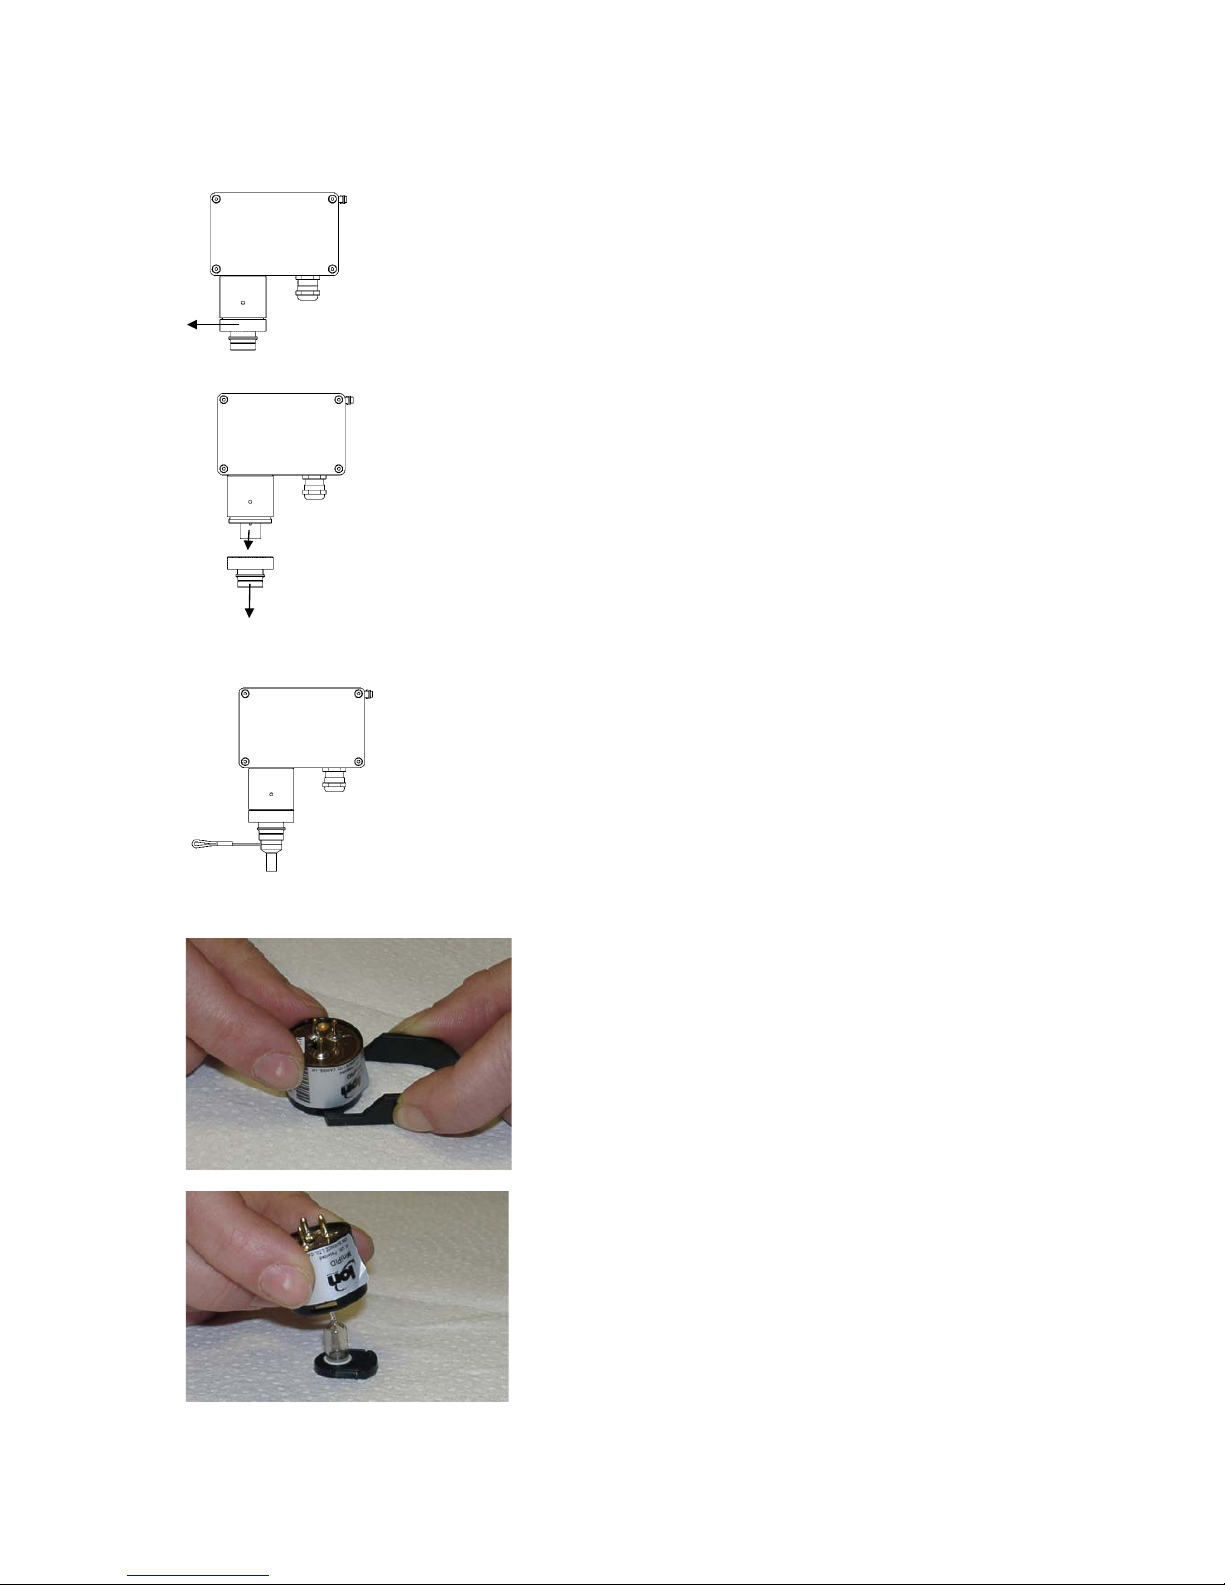
• Hold the magnetic pin on to the contact area to start the calibration routine. The green LED will start
flashing. If there is no further activity, the sensor head will automatically return to the measuring mode
after 30 minutes.
• Enter the calibration menu on the Control Module. Adjust zero.
• Connect the gas tube to one of the fittings of the gas adapter. If you want to avoid gas emissions, you
may connect an active carbon filter to the outlet. (Art.No. 806 488) Do not bend or twist the tube to
avoid overpressure in the gas adapter.
• As soon as the Control Module displays „GAS“, connect the gas adapter to the sensor and open the
valve. Press „Enter“ . The recommend flow is 20 l/h (300 ml/min). As soon as „CAL“ is flashing, press
„Enter“ again.
• Now enter the product of span gas concentration multiplied by the response factor.
Example: Calibration to methyl methacrylate with 100 ppm Isobutene.
You have to enter 100 ppm * 1,6 = 160 (The reponse factor of methyl metacrylate is 1,6)
In case the sensor signal is too low, you will get the message „SenS“ on the Control Module. Proceed
as described in the next chapter.
• Remove the gas adapter and switch the gas off.
• Push the „Reset“ button on the Control Module to leave the calibration menu.
• Touch the contact area on the PID with the magnetic pin to enter the measuring mode. The LED
should be green then.
8

7 Troubleshooting
The LED going off and the Control Module displaying Err 5, may have the following reasons:
• Sensor missing
• Incorrect wiring
• The voltage at the terminals 1/2 and 4/5 is < 4,6 V. Check the program.
• Sensor defective
• Interface defective.
If calibration is not possible (Control Module displays „SenS“ after entering the gas concentration), follow
this procedure:
• Check if there is enough gas in the cylinder? Is the regulator open? Is the tube free?
• Check the filter membrane for proper gas access.
• Polish the sensor lamp (see 8.1).
• Replace the lamp (see 8.1).
• Replace the electrode pack (see 8.1).
• Check the voltage at the terminals 1/2 and 4/5. It must be > 4,6 V.
• Replace the sensor (see 8.2).
If all this does not help, call Compur Monitors technical service.
8 Maintenance / Replacement of consumables
A PID sensor will gradually loose sensitivity over time. This process depends on the ambient conditions
and the target gas. Therefore regular calibration, lamp cleaning and replacement of consumables is
necessary to guaranty accurate measurement. Compur Monitors recommends to hold stock of
consumables.
Terms of warranty
PID sensor electronics: 12 months after delivery date. The delivery date is declared as “QC week/year”
on the sensor label.
No warranty on consumables such as sensor lamps and electrodes.
Observe the general precautions for handling electrostatic voltage sensitive electronic
components and breakable glass.
It is safe to install and remove the sensor while the sensor head is connected to the control module.
9

8.1 Lamp cleaning / replacement of consumables
8.1.1 Removing the sensor
Protect the sensor slot by re - installing the retaining nut
(see chapter 8.1.4) and closing it with the blind plug.
Open the retaining nut counter clockwise until you can
remove it, by pulling it downwards.
Unplug the sensor pulling it downwards. Work on the sensor
should be performed in a clean environment.
Place the sensor on clean soft cloth, pins upward.
Insert the plastic pliers into the two ports on the
sensor and press until you hear a click.
Carefully lift the sensor. If the electrode stack and
lamp do not come loose easily, apply the pliers
again.
10

8.1.2 Polishing the lamp
Pull the lamp carefully out of the electrode stack.
Never touch its polished front side.
Polish the front side with a cotton swap and the
polishing powder. Apply tender pressure until you
hear a silent squeak. Remove loose polish
particles with a fresh swap until the lamp front is
absolutely clean.
8.1.3 Elektrode stack and lamp replacement
• Make sure to select the correct spare parts (ppm- or ppb-version)!
The ppb - elektrode stack is white, the ppm - elektrode stack is black.
• Do not touch the front side of the lamp or the metallic parts of the electrodes.
8.1.4 Assembly and installation of the sensor
Push the lamp slightly rotating into the O - ring up
to the stop.
The lamp must flush with the electrode.
Place the electrode stack with the lamps front
side downwards on the table. Now place the
sensor on it. Make sure the two parts match in
correct position.
Push the sensor downwards until the springs
snap in.
Check for tight and flushing assembly.
The sensor is now ready to be connected to the
interface.
11

Installation of the sensor protection cap: The O-Rings
(1+2) must be properly positioned in their seats on the
sensor protection cap.
Take the sensor protection cap in one hand, make the
positioning pin of the interface match its rest in the cap,
press it upwards and tighten the nut hand tight.
Incorrect positioning may affect the sensors protection
from dirt and humidity!
2
1
• To restart the sensor head push the „Enter“ - button on the Control Module.
• After any opening of the sensor, a calibration is mandatory.
8.2 Sensor replacement
• Observe the general precautions for handling electrostatic voltage sensitive electronic
components.
• Make sure to select the correct spare parts. The sensor article codes are marked on its type plate:
PID-A1 or MP3SM6FC = ppm sensor, PID-AH or MP3SB6FC = ppb sensor.
8.3 Replacing the filter membrane inside the sensor protection cap
• The gas access opening is protected from dust and humidity intrusion by a Teflon membrane.
Whenever the membrane has been damaged or polluted, it must be replaced. (Art. No. 511206).
• Remove the clamping ring using a small screw driver. Install a new membrane and clamp ring by
pressing both in their position.
8.4 Maintenance and cleaning of the sensor head housing
• Clean the sensor head with a damp cloth. Do not use detergents or solvents. No high pressure
cleaning!
• Perform visual inspections on a regular basis. Check the gas access for pollution and damage.
12

9 Spare parts and accessories
Description Article number
STATOX 501 Sensor head PID flow adapter 511101
STATOX 501 Spare sensor PID ppm 511214
STATOX 501 Spare sensor PID ppb 511215
STATOX 501 Sensor head PID interface (Atex) 511201
STATOX 501 Sensor head PID sensor blind plug 511205
STATOX 501 Sensor head PID filter set 511206
STATOX 501 Sensor PID spare lamp ppm 511218
STATOX 501 Sensor PID spare lamp ppb 511219
STATOX 501 Sensor PID spare electrodes ppm 511223
STATOX 501 Sensor PID spare electrodes ppb 511224
STATOX 501 Sensor PID polishing set 511207
Statox 501 Control Module 556959
Statox 501 Common Alarm Module 557387
Span gas 58l Isobutene 10 ppm in air 556508
Span gas 58l Isobutene 100 ppm in air 569406
Kalgas 58l regulator 715 flow = 300 ml/min 556637
Gas tube 1 m 556710
Active carbon filter 806488
13

10 Technical data
• Instrument: Statox 501 PID Sensor head
• Type: 5366
• Manufacturer: COMPUR Monitors, München
• Operation temperature: -30° - +60°C
• Protection class: min. IP54
• Humidity: 0-95 %, non condensing
• Accuracy at the calibration concentration: ± 10 % at constant temperature and humidity
Explosion protection Parameters
• ATEX: Ex e [ib] mb IIC T4 Gb
• Application: II 2 G
• EC type examination certificate: BVS 12 ATEX E 014
• Un: 5,2 VDC
• In: 50 mA
• Um: 29 Vp
Use exclusively certified MiniPID sensors (Baseefa 07 ATEX0060U / 3) as follows:
• MiniPID Reg. MP3SM6FC
• MiniPID Reg. MP3SB6FC
• MiniPID-A1
• MiniPID-AH
This solder well must be free from solder !
Signal interferences
• Pressure: Ambient pressure variations are neglectible. In the flow mode calibration under flow
conditions is recommended.
• Temperature: Variations within specifications are neglectible.
• Absolute humidity: Humidity itself is not detected, but it may quench the signal.
• Gas concentration: Very high concentrations may partly absorb ionistaion energy and thus also
quench the signal. Calibration at the alarm threshold will guaranty maximum accuracy.
14

11 Declaration of Conformity
15

Specifications are subject to change without notice, and are provided only for comparison of products. The conditions under which
our products are used, are beyond our control. Therefore, the user must fully test our products and / or information to determine
suitability for any intended use, application, condition or situation. All information is given without warranty or guarantee. Compur
Monitors disclaims any liability, negligence or otherwise, incurred in connection with the use of the products and information. Any
statement or recommendation not contained herein is unauthorized and shall not bind Compur Monitors. Nothing herein shall be
construed as a recommendation to use any product in conflict with patents covering any material or device or its use. No licence is
implied or in fact granted under the claims of any patent. Instruments are manufactured by Compur Monitors GmbH & Co. KG,
Munich.
The General Conditions of Supply and Service of Compur Monitors GmbH & Co. KG, Munich, are applicable.
Compur Monitors GmbH & Co. KG
Weißenseestraße 101
D-81539 München
Tel.: ++49/89/ 6 20 38 268
Fax : ++49/89/ 6 20 38 184
http://www.compur.com
5366 160 998 07 01 / 08.12 511043
16
Table of contents
Other Compur Accessories manuals
Popular Accessories manuals by other brands

Krell Industries
Krell Industries Link Controller Instructions for use

Omega Engineering
Omega Engineering OSXL-101 user guide

Swisher
Swisher KVF009 installation instructions

Honeywell
Honeywell E3Point user manual

Balluff
Balluff BOS R254K-UUI-LH10-S4 manual

NOKIAN TYRES
NOKIAN TYRES INTUITU quick start guide