Concert CDP2400USB User manual

ENGLISH
www.behringer.com
A50-A8230-08001
User Manual
CONCERT
CDP2400USB
Enjoy the Sound of a Concert
Grand - Play Straight Away
with Included Piano Learning
Software and USB Interface
Thank you
Thank you for choosing the CONCERT digital piano from
BEHRINGER.This versatile instrument combines the sound and
feel of an authentic acoustic piano with the flexibility of modern
technology such as RSM tone generation, digital effects and
2 track sequencing. 88 full-size, weighted, hammer-action keys,
elegant finish and foot pedals give a professional look and feel for
the home or stage. The addition of USB audio/MIDI connectivity
opens up a whole new world of recording, performing and
podcasting options. The keyboard also comes with a bench, power
cable, USB cable and DVD that contains a bundle of software
such as eMedia Starter Piano and Keyboard Lessons, energyXT2.5
Compact BEHRINGER Edition and numerous podcasting programs.
The CDP2400USB is the ideal piano for home or stage use.
Table of Contents
Thank you..................................................................... 1
Important Safety Instructions ................................... 2
1. Before you get started ........................................... 3
2. Quick Start............................................................... 3
3. Control elements and connections ...................... 5
4. Basic operation ....................................................... 7
5. Advanced operation............................................. 10
6. Connection to external equipment.................... 20
7. Troubleshooting ................................................... 26
8. Specifications ........................................................ 27
9. Appendix ............................................................... 28
Limited Warranty....................................................... 33
Legal Disclaimer ........................................................ 35

ENGLISH
CONCERT CDP2400USB User Manual
2
Important Safety Instructions
Caution*
This symbol, wherever it appears, alerts you to the presence
of uninsulated dangerous voltage inside the enclosure -
voltage that may be sufficient to constitute a risk of shock.
Caution*
This symbol, wherever it appears, alerts you to important
operating and maintenance instructions in the
accompanying literature. Please read the manual.
Caution!
To reduce the risk of electric shock, do not remove the top
◊
cover (or the rear section). No user serviceable parts inside.
Refer servicing to qualified personnel.
To reduce the risk of fire or electric shock, do not expose
◊
this appliance to rain and moisture. The apparatus shall not
be exposed to dripping or splashing liquids and no objects
filled with liquids, such as vases, shall be placed on the
apparatus.
These service instructions are for use by qualified service
◊
personnel only. To reduce the risk of electric shock do not
perform any servicing other than that contained in the
operation instructions. Repairs have to be performed by
qualified service personnel.
Caution!
The sound quality may diminish within the range of
◊
powerful broadcasting stations and high-frequency
sources. Increase the distance between the transmitter and
the device and use shielded cables for all connections.
Caution!
Read these instructions.{1}.
Keep these instructions.{2}.
Heed all warnings.{3}.
Follow all instructions.{4}.
Do not use this apparatus near water.{5}.
Clean only with dry cloth.{6}.
Do not block any ventilation openings. Install in accordance with the{7}.
manufacturer’s instructions.
Do not install near any heat sources such as radiators, heat registers, stoves,{8}.
or other apparatus (including amplifiers) that produce heat.
Do not defeat the safety purpose of the polarized or grounding-type plug. A{9}.
polarized plug has two blades with one wider than the other. A grounding-
type plug has two blades and a third grounding prong. The wide blade or the
third prong are provided for your safety. If the provided plug does not fit into
your outlet, consult an electrician for replacement of the obsolete outlet.
Place the power cord so that it is protected from being walked on and[10].
sharp edges. Be sure that the power cord is protected particularly at plugs,
convenience receptacles and the point where it exits from the apparatus.
The apparatus shall be connected to a MAINS socket outlet with a protective[11].
earthing connection.
Where the MAINS plug or an appliance coupler is used as the disconnect[12].
device, the disconnect device shall remain readily operable.
Only use attachments/accessories specified by the manufacturer.[13].
Use only with the cart, stand, tripod, bracket, or[14].
table specified by the manufacturer, or sold with
the apparatus. When a cart is used, use caution
when moving the cart/apparatus combination to
avoid injury from tip-over.
Unplug this apparatus during lightning storms or when unused for long[15].
periods of time.
Refer all servicing to qualified service personnel. Servicing is required when[16].
the apparatus has been damaged in any way, such as power supply cord
or plug is damaged, liquid has been spilled or objects have fallen into the
apparatus, the apparatus has been exposed to rain or moisture, does not
operate normally, or has been dropped.

ENGLISH
CONCERT CDP2400USB User Manual 3
Before you get started1.
Shipment1.1
Your CDP2400USB was carefully packed at the factory, and the
packaging was designed to protect the unit from rough handling.
Nevertheless, we recommend that you carefully examine the
packaging and its contents for any signs of physical damage that
may have occurred during transit.
If the unit is damaged, please do NOT return it to
◊
BEHRINGER. Instead, notify your dealer and the shipping
company immediately. Otherwise, claims for damage or
replacement may not be honored.
Always use the original packing carton to prevent damage
◊
during storage or transport.
Make sure that no children are left unsupervised with the
◊
CDP2400USB or its packaging.
Please ensure proper disposal of all packing materials.
◊
Initial operation1.2
Be sure that there is enough space around the unit for cooling and
please do not place the CDP2400USB on high temperature devices
such as radiators etc. to avoid overheating.
Blown fuses must be replaced by fuses of the same type and
◊
rating! Please refer to the“SPECIFICATIONS”for details.
The mains connection of the CDP2400USB is made by using the
enclosed mains cable and a standard IEC receptacle. It meets all of
the international safety certification requirements.
Please make sure that all units have a proper ground
◊
connection. For your own safety, never remove or disable
the ground conductor from the unit or of the AC power
cord.
The CDP2400USB is an electronic piano. Unlike an acoustic
◊
piano, this instrument does not need to be tuned.
The sound quality may diminish within the range of
◊
powerful broadcasting stations and high-frequency
sources. Increase the distance between the transmitter and
the device and use shielded cables for all connections.
Online registration1.3
Please do remember to register your new BEHRINGER equipment
right after your purchase by visiting http://www.behringer.com
(alternatively www.behringer.de) and kindly read the terms and
conditions of our warranty carefully.
Should your BEHRINGER dealer not be located in your vicinity, you
may contact the BEHRINGER distributor for your country listed
under“Support”at www.behringer.com. Should your country
not be listed, please check if your problem can be dealt with by
our“Online Support” which may also be found under“Support”
at www.behringer.com. Alternatively, please submit an online
warranty claim at www.behringer.com BEFORE returning the
product.
Registering your purchase and equipment with us helps us process
your repair claims quicker and more efficiently.
Thank you for your cooperation!
Quick Start2.
Power on/off2.1
The CDP2400USB is a digital, i.e. electronic, piano. Therefore,
mains power is required to operate the instrument and it has to be
switched on or off. The following section describes how to connect
the unit to the mains.
The POWER switch to the left of the keyboard must be in the
◊
“off” position when you connect the unit to the mains.
FUSE HOLDER / IEC RECEPTACLE
The CDP2400USB is connected to the mains using a standard IEC
receptacle. All required safety regulations have been adhered to. A
matching power cable is included with the unit. Blown fuses must
be replaced with a fuse of the same type and rating.
Connect the power cable supplied with the unit to the1)
connector provided on the underside of the instrument and
to a wall socket
Press the POWER switch to the left of the keyboard to switch2)
the instrument on or off. The LED on the front panel lights up
when the CDP2400USB is ready for operation.
After playing, switch off the unit with the POWER switch.
◊
The POWER LED on the front panel will go out. Please note:
Merely switching the unit off does not mean that it is fully
disconnected from the mains. If you do not plan to use your
piano for a prolonged period of time, please disconnect it
from the mains by unplugging the power cable from the
wall outlet.

ENGLISH
CONCERT CDP2400USB User Manual
4
Adjusting the volume2.2
The volume of the built-in loudspeakers and headphones can be
adjusted as follows:
Set the VOLUME control to mid-travel position, between MIN1)
and MAX.
Adjust the volume as desired by moving the control to the2)
right (up) or left (down).
Caution!
The CDP2400USB is capable of producing extreme volumes.
◊
Please bear in mind that high sound pressures not only
temporarily affect your sense of hearing, but can also
cause permanent damage. Be careful to select a suitable
volume at all times, particularly when you are playing
with headphones.
Demo playback2.3
The CDP2400USB offers you 14 sound and 15 piano music demos.
These music pieces give you an impression of the instrument’s
versatility and range of sounds.
Playing back the sound demos2.3.1
This section describes how to play back the 14 sound demos.
These demos are specially designed to highlight the various
sounds and their features and show you what can be done with
your instrument.
Press the DEMO button.1)
Press one of the 14 buttons in the TONE section to play back2)
an audio demo of the selected sound color.
Press the DEMO button again to quit DEMO mode.
◊
During demo playback, the CDP2400USB does not receive
◊
or send MIDI data.
The music sequencer (see chapter 5.5) must not be set
◊
to playback or record-ready mode when you switch to
DEMO mode.
Playing back the piano music demos2.3.2
The following section describes how to play back the 15 piano
music demos. These demos show you the versatility of the GRAND
PIANO sounds.
Press the DEMO button.1)
Use the -/NO and +/YES buttons in the VALUE/SONG section2)
to select the music piece of your choice.
The display reads:
1 . . . 15: Number of the selected music piece.
All: Playback of all music pieces. The pieces are played
in chronological order.
SHF: Playback of all music pieces. The pieces are played
in random order.
Press the3) button in the SEQUENCER section to start
playback.
Press the4) button again to stop playback.
Repeat steps 2 to 4 to play back other pieces.5)
Press the DEMO button again to quit DEMO mode.
◊
A list of all the music pieces can be found in chapter 9.3.
◊

ENGLISH
CONCERT CDP2400USB User Manual 5
The music sequencer (see chapter 5.5) must not be set
◊
to playback or record-ready mode when you switch to
DEMO mode.
You can adjust the playback tempo of the piano music
◊
demos (see chapter 5.4).
Select any sound you like to accompany the piano music
◊
demos; you can also add the room, modulation and
brilliance effects (see chapter 4.2). Select and set the sound
colour before you enter DEMO mode.
Selecting and playing sounds2.4
The CDP2400USB comes with 14 different sound colours covering
a wide spectrum of sounds. You can select a sound in theTONE
section.
Press one of the 14 buttons in the TONE section to select the1)
sound of your choice.
The LED above the sound button lights up to show that the
corresponding sound has been selected. The selected sound can
be played over the entire keyboard.
The volume of the sound depends on how heavily you play
◊
the keys (not applicable to CEMBALO 1 and 2, CHURCH 1
and 2, and CLICK ORGAN).
TIP: You can also select two sounds at the same time.
◊
Control elements and3.
connections
Control panel3.1
Fig. 3.1: Control elements of the CDP2400USB
The control elements of the CDP2400USB are described below. To
give you a clear overview of the control panel, its elements have
been grouped in separate sections.
VOLUME:
{ 1 } Is used to adjust the volume of the built-in
loudspeakers, headphone outputs and LINE OUT jacks.
COLOR:
{ 2 } Varies the sound character from soft (left) to bright
(right).
SPEAKERS OFF:
{ 3 } Switches the built-in loudspeakers on
and off. The MUTE LED lights up only when the built-in
loudspeakers are switched off. When you insert your
headphones this will automatically switch off the built-in
loudspeakers.
DEMO:
{ 4 } Enables/disables DEMO mode.
CLICK:
{ 5 } Is used to start/stop the metronome click.
TRACK 1:
{ 6 } Selects track 1 for playback or recording. The
REC LED lights up when the track has been activated for
recording. The PLAY LED lights up when the track has been
set for playback and already contains musical data.
TRACK 2:
{ 7 } Selects track 2 for playback or recording. The
REC LED lights up when the track has been activated for
recording. The PLAY LED lights up when the track has been
set for playback and already contains musical data.
{ 8 } Is used to start/stop playback or recording of the music
sequencer.
REC:
{ 9 } Activates record mode.
1 2
2 4
5 6 78 9

ENGLISH
CONCERT CDP2400USB User Manual
6
MODE:
[ 10 ] Selects the TEMPO parameter and menu pages for
EDIT mode. The EDIT MODE LED shows in EDIT mode, the
TEMPO LED in TEMPO mode.
Down/Up:
[ 11 ] Depending on which mode you have selected
with the MODE button, these two buttons can be used to
enter the tempo or to scroll through the EDIT mode menu
pages.
Display:
[ 12 ] Depending on the function used, the display reads
the tempo, menu numbers or parameter values.
-/NO, +/YES:
[ 13 ] Is used to raise/lower the parameter values
shown in the display. Additionally, the +/YES button
executes certain EDIT functions.
TONE:
[ 14 ] These 14 buttons are used for sound selection. In
DEMO mode they are used to select individual sound
color demos.
REVERB:
[ 15 ] Selects one of four room effects (CHAMBER,
CONCERT, CHURCH, THEATER) for the selected sound. An
LED shows which effect is currently active. If no LED lights
up, no room effect is active.
SPECIAL:
[ 16 ] Is used to select one of four modulation effects
(CHORUS, FLANGER, TREMOLO, DELAY) for the selected
sound. An LED shows which effect is currently active. If no
LED lights up, no modulation effect is active.
KEYS:
[ 17 ] Is used to set the key velocity to SOFT, MEDIUM or
HARD. An LED shows which setting is currently active. If no
LED lights up, no key velocity has been selected and playing
a key always triggers a fixed volume level, irrespective of
how hard you play the key.
TRANSPOSE:
[ 18 ] Is used for setting keyboard/pitch
transposition.
Connectors3.2
The connectors of the CDP2400USB are located on the back panel
of the keyboard.
Fig. 3.2: Connectors of the CDP2400USB
MIC IN:
[ 19 ] Connect a dynamic or condenser microphone to
this input using a standard XLR cable. The jack automatically
supplies 15V of phantom power. Adjust the input sensitivity
with the adjacent GAIN control.
NOTE: If the microphone signal begins to distort, turn the GAIN
knob counter-clockwise.
AUX IN:
[ 20 ] Connect external sound sources such as a CD or
MP3 player using a ⁄" plug.
LINE IN:
[ 21 ] Connect external sound sources such as CD players,
mixers or drum machines using RCA cables.
LINE OUT:
[ 22 ] Connect the CDP2400USB to an external sound
system or recording device using RCA cables.
PEDALS:
[ 23 ] Connect the foot pedals of the CDP2400USB to this
jack using the included 5-pin cable.
13
11
10 12
14
15 16 17 18
19 20 21 22
23 24 25

ENGLISH
CONCERT CDP2400USB User Manual 7
MIDI
[ 24 ] : Connect external devices such as synthesizers,
sequencers, etc. to the CDP2400USB's using 5-pin DIN cables
(MIDI cables).
MIDI IN receives data that controls the CDP2400USB's
•
internal sound generator.
MIDI OUT sends controlling data from the CDP2400USB's
•
keys and pedals to other MIDI devices.
MIDI THRU transmits data from the MIDI IN jack to other
•
MIDI devices without altering the data.
USB:
[ 25 ] Connect the CDP2400USB to a computer using a type B
USB connector. This connection will transmit both the audio
from the internal sound generator as well as MIDI data. You
may use this to record performances or control software on
your computer via MIDI.
Foot pedals3.3
The CDP2400USB has three pedals similar to those found on
acoustic grand pianos.
Soft/Piano pedal:
[ 26 ] Use this to reduce the volume of a
particular passage.
Sostenuto pedal:
[ 27 ] This pedal sustains notes that allow
distinct advantages:
Play a note or chord on the keys
•
While holding the note(s), press the sostenuto pedal
•
Notes played before the pedal was pressed will continue
•
to sustain, while those played after the pedal was pressed
decay normally
Damper/Forte pedal:
[ 28 ] All notes sustain when the damper/
forte pedal is pressed, even if you release the key(s).
Power:
[ 29 ] Press this button to turn the CDP2400USB on and off.
Phones jacks:
[ 30 ] Connect headphones to these jacks using ¼"
and/or ⁄" plugs. The jacks may be used simultaneously, but
the volume cannot be controlled separately.
Basic operation4.
The following chapters describe some further basic functions which
you can use in addition to those already explained.
Using two sounds (layer mode)4.1
Instead of a single sound you can also play two sounds
simultaneously on the CDP2400USB. These sounds are layered and
can be played together over the entire keyboard.
In the TONE section, simultaneously press the buttons of the1)
sounds to be layered.
The LEDs above the buttons light up to show that the associated
sounds have been selected.
In our example the sounds “GRAND 1”and“STRINGS” are layered.
To quit layer mode, press any button in the TONE section.
◊
This will also select one single sound again.
Changing the sound character4.2
You can change the sound character by using a room and a
modulation effect as well as a brightness equalizer.
26 27 28
29
30

ENGLISH
CONCERT CDP2400USB User Manual
8
Color equalizer4.2.1
Use the Color equalizer to change the sound character and make it
softer or more brilliant.
Change the sound character with the COLOR control as1)
follows:
Move the control to the left (
•
) for a softer sound that is
darker in tone.
Move the control to the right (
•
) for a more brilliant
sound.
Room effects4.2.2
The CDP2400USB provides room effects simulating four reverb
rooms of different sizes. When you select a sound, the CDP2400USB
also selects an appropriate effect. If required, however, you
can always select any other effect. The following reverb room
simulations are available:
CHAMBER: Simulates a small room.
CONCERT: Simulates a small concert hall.
CHURCH: Simulates a large concert hall.
THEATER: Simulates a typical stage ambience.
Keep pressing the REVERB button until the effect of your1)
choice has been selected.
The active effect is shown by an LED lighting up next to the effect
name.
If none of the four LEDs lights up, the room effect is
◊
disabled.
Keep the REVERB button pressed while adjusting the original2)
vs. effect signal ratio in the VALUE/SONG section using the
-/NO and +/YES buttons.
The display reads:
0 . . . 20: Effect intensity
(0= no effect, 20 = maximum effect)
If you want to restore the default settings, keep the REVERB3)
button pressed, then press -/NO and +/YES simultaneously.
Modulation effects
The CDP2400USB provides a modulation effect featuring four
different types of effect. When you select a sound, the CDP2400USB
automatically adds an appropriate effect for some of the sounds.
If required, however, you can always select any other effect. The
following modulation effects are available:
CHORUS: Chorus effect. ”widens”the sound.
FLANGER: Time-shifted layering of sounds. Produces a
“floating”sound.
TREMOLO: Rapid, constantly repeated changes in the volume
of the sound.
DELAY: Echo effect. Produces time-shifted repetitions of
the sound that decay over time.
Keep pressing the SPECIAL button until the effect of your1)
choice has been selected.
The selected effect is shown by an LED lighting up next to the
effect name.
If none of the four LEDs lights up, the modulation effect is
◊
disabled.
Keep the SPECIAL button pressed while adjusting the original2)
vs. effect signal ratio in the VALUE/SONG section using the
-/NO and +/YES buttons.
The display reads:
0 . . . 20: Effect intensity
(0= no effect, 20 = maximum effect)
If you want to restore the default settings, keep the SPECIAL3)
button pressed, then press -/NO and +/YES simultaneously
+
+

ENGLISH
CONCERT CDP2400USB User Manual 9
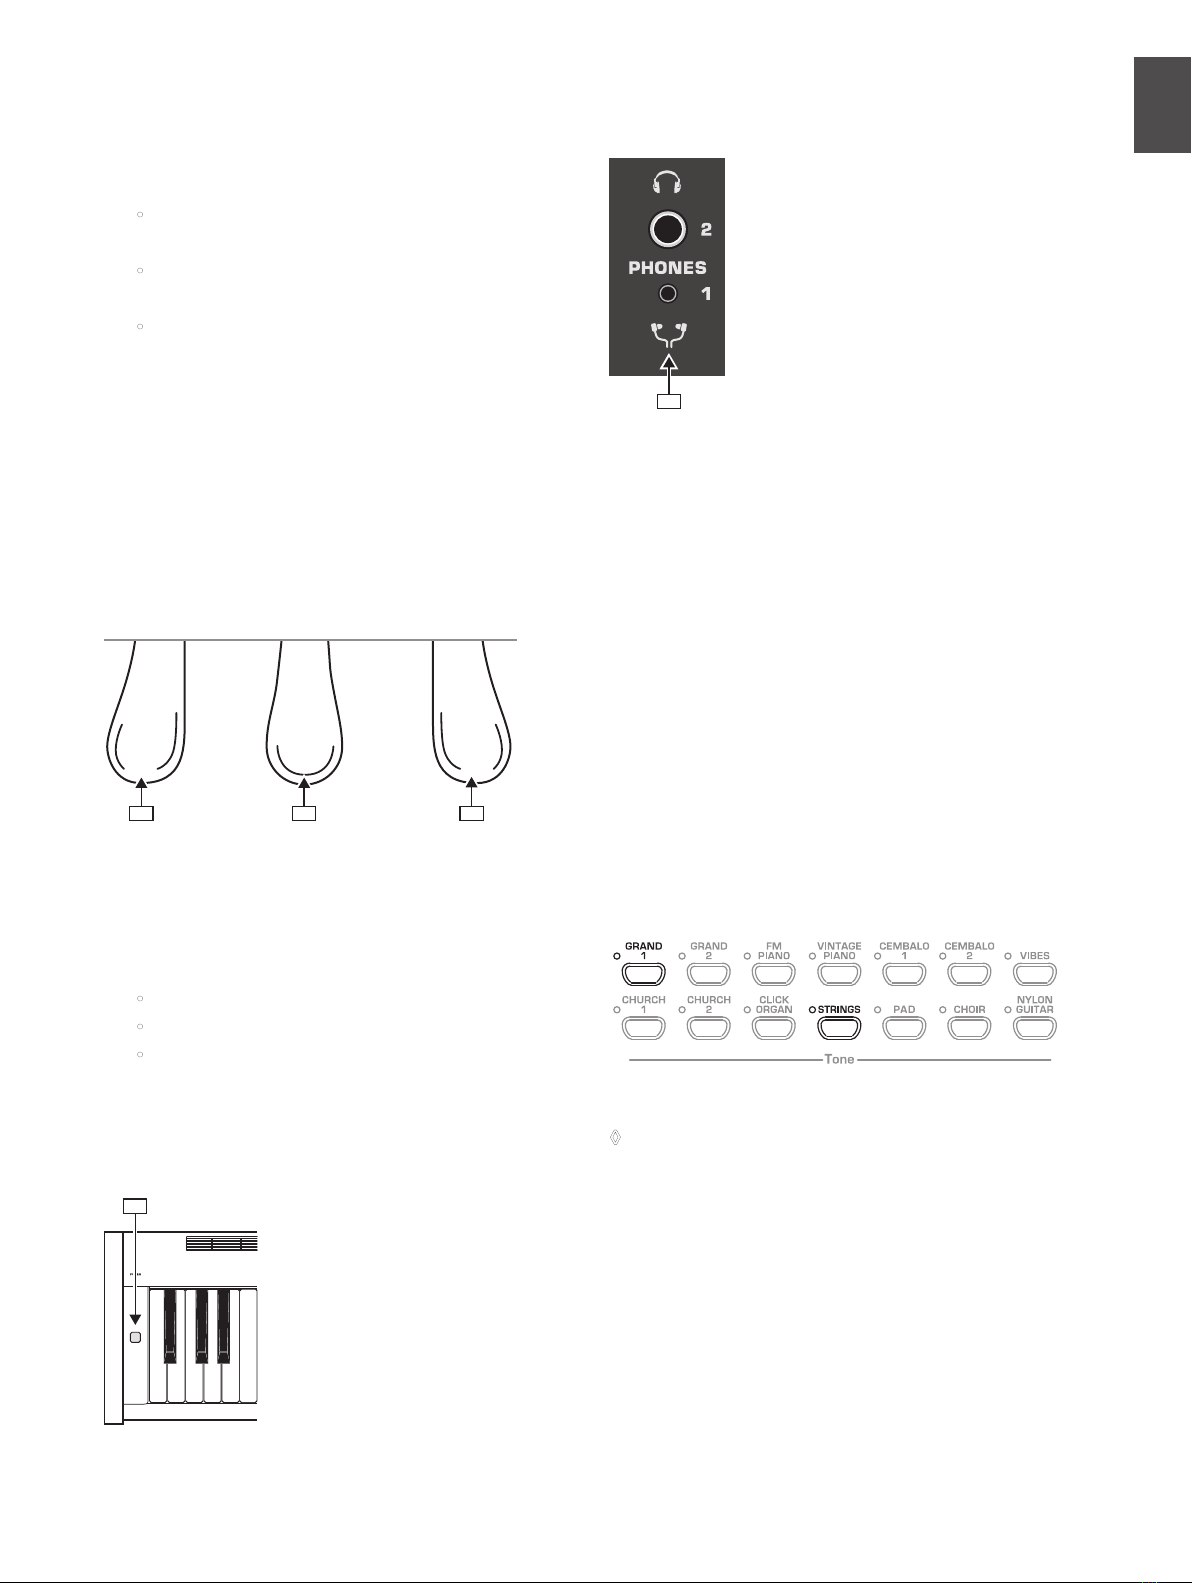
Using the pedals4.3
The CDP2400USB is equipped with three foot pedals performing
the same functions as the pedals on an acoustic grand piano.
Normally, the pedals are used in accordance with the instructions
given in the music, where they are marked by special symbols. It
is useful to know how sound is produced on an acoustic piano to
better understand how the pedals work.
When you strike a key, a hammer hits several strings for each note;
the strings produce a tone with a defined pitch. When you let go
of the key, a damper felt falls down on the strings to stop them
from vibrating any longer. As a result, the tone decays quickly.
However, if the key is held down, the tone is sustained for a while
before it decays completely. In this case, the tone decays only after
a certain time.
This decay characteristic can be influenced using the three
foot pedals.
Soft/piano pedal (left):
•
The soft pedal produces a soft and
intimate sound. Use this pedal for particularly soft musical
passages (pianissimo).
On an acoustic piano this soft sound results from a smaller
distance between hammer and strings. On a grand piano,
however, the position of the hammer changes, so that the
hammer does not hit all strings.
Press the pedal to dampen all tones played afterwards with1)
the pedal down.
Let go of the pedal for normal playing.2)
You can adjust the effect of the damper pedal
◊
(see chapter 5.6.2).
Sostenuto pedal (middle):
•
Use the sostenuto pedal to
sustain individual tones. The notes already played – as
long as they have not yet decayed – will be sustained
as soon as you press the pedal. All notes played
subsequently will be dampened as described above.
This allows you to play and sustain a certain note using
the pedal, while all subsequent tones will be played in a
staccato (detached) manner.
When you sustain single notes on an acoustic piano using
the sostenuto pedal, the damper felts of the notes already
played do not dampen the strings when you release the
keys, but are held in their position.
Play the notes to be sustained.1)
Press the pedal to sustain the tones you just played.2)
Play the next notes. These are played with normal decay.3)
Release the pedal for normal playing.4)
Damper/Forte pedal (right): The damper pedal allows
•
you to sustain the notes already played (and held) plus all
subsequent notes, without having to hold the keys down.
The damper pedal is often used to achieve a richer sound.
This is the pedal that is used most often. You can also
use it very subtly, for example, by holding it down only
half-way.
On the acoustic piano notes are sustained by keeping
all the damper felts in their raised position even after
releasing the keys.This allows the notes played to decay
quite naturally.
Play the notes to be sustained.1)
Press the pedal to sustain the notes you just played plus all2)
subsequent notes.
Release the pedal for normal playing.3)
Using headphones4.4
The CDP2400USB is equipped with two headphone jacks located
on the underside of the playing console (front left). Headphones
are ideal for practicing without disturbing others. The second
headphone jack allows another person, for example a music
teacher, to listen as well so that piano lessons can also be held using
headphones. Both ¼" and /" inputs are available.
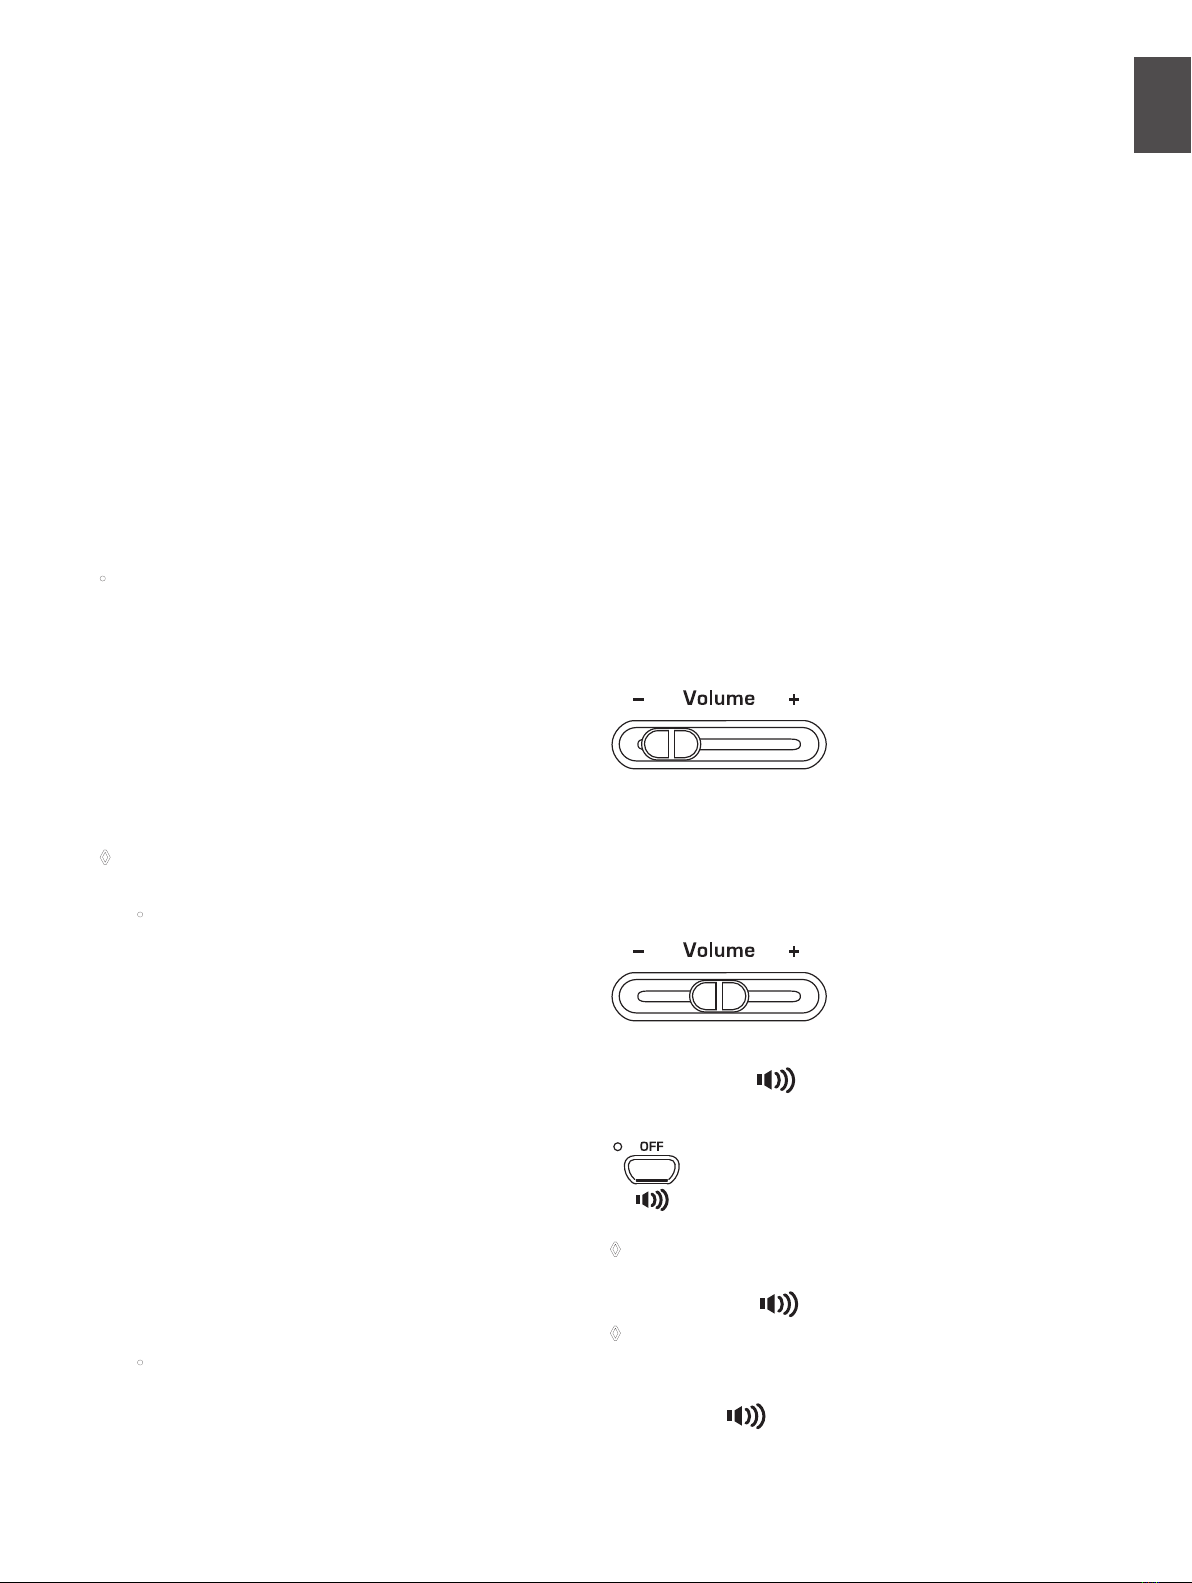
Use the VOLUME control to turn the volume down (move the1)
slide control to the left half of its control range).
Connect your headphones to a free headphone jack on the2)
underside of the playing console.
While playing, adjust the volume as desired using the3)
VOLUME control.
If required, the4) button allows you to switch the built-in
loudspeakers of the CDP2400USB on or off.
The built-in loudspeakers of the CDP2400USB are switched
◊
off as soon as you connect a pair of headphones; the MUTE
LED above the button lights up.
When you disconnect your headphone from the
◊
headphones jack, the built-in loudspeakers of the
CDP2400USB are switched on again and the MUTE LED
above the button goes out.

ENGLISH
CONCERT CDP2400USB User Manual
10
Advanced operation5.
The following chapters provide information on advanced operating
functions of the CDP2400USB.
Using EDIT mode5.1
Many advanced operating functions of the CDP2400USB are
available in EDIT mode. The following sections describe how to
adjust these functions in EDIT mode.
Whenever you are prompted to enter EDIT mode, please
◊
follow the step-by-step instructions given below to select a
function and adjust its parameters.
Keep pressing the MODE button in the TEMPO/EDIT MODE1)
section until the EDIT MODE LED lights up.
Scroll through the functions using the Down/Up buttons, until2)
the appropriate function (e.g. E1) has been selected.
Use the -/NO- and +/YES buttons in theVALUE/SONG section3)
to adjust the value of your choice.
Quick access to layer mode functions5.1.1
Use the following operating procedure for direct access to the layer
mode menu pages.
Press and hold down the two sound buttons selected for layer1)
mode (e.g. GRAND 1 and STRINGS) and press the MODE
button in the TEMPO/EDIT MODE section.
The EDIT LED lights up and the EDIT page E3.1 is displayed.
Transposition5.2
The sounds produced by the CDP2400USB can be transposed up
or down by half-tones (key by key). This is useful, for example if you
want to play a piece in a key that is easier to play because it has few
or no accidentals at all (e.g. C major), but intend the piece to sound
in a difficult key with lots of accidentals (e.g. D flat major).
Example: D flat major has five flats (accidentals). In this key you
would have to play a lot of black keys. However, if you transpose
the sounds up by one half-tone, you can easily play the piece on
the white keys (C major). It can be helpful to transpose the
keyboard by an octave (12 halftones), for example to play low notes
in the middle register where they can be played more comfortably.
Press and hold the TRANSPOSE button and use the -/NO and1)
+/YES buttons in the VALUE/SONG section to adjust the
transposition value of your choice in half-tone steps.
The display reads:
0: No transposition (default setting)
1 ... 12: Keyboard is transposed up by the number of half-
tones selected.
-1 ... -12: Keyboard is transposed down by the number of
half-tones selected.
Release the TRANSPOSE button when the desired value has2)
been selected.
+
+

ENGLISH
CONCERT CDP2400USB User Manual 11
The LED above the TRANSPOSE button lights up when the
◊
transposition feature is active, i.e. when a value other than
zero has been set.
If a transposition interval has already been set, you can
◊
enable/disable the transposition function using the
TRANSPOSE button.
Layer mode settings5.3
In layer mode you can effect additional settings for advanced
playing with two sounds at the same time.
All sounds are numbered internally from 1 through 14. This order of
sounds determines which sound is addressed internally as voice #1,
voice #2, etc., which in turn is important for making changes to the
sounds selected.
In our example the two sounds GRAND 1 and STRINGS are being
used in layer mode. Internally, GRAND 1 is #1, STRINGS is #11. The
sound with the lower number is addressed internally as voice #1
(here: GRAND 1), the sound with the higher number as voice #2
(here: STRINGS).
Please note the order of voices used in the sound
◊
combination selected, in order to understand which
settings apply to which voice in the examples below.
A layer combination consisting of two sounds must be set
◊
up before you can adjust the following functions
(see chapter 4.1).
Volume ratio5.3.1
Use this function to adjust the volume ratio of the selected sounds.
Please enter EDIT mode (see chapter 5.1) and select the
◊
following function.
Function: E3.1
Value: 0 . . . 20
Description:
10: Same volume for voice #1 and voice #2
<10: Voice #2 louder than voice #1
>10: Voice #1 louder than voice #2
Detune5.3.2
This function allows you to detune the selected sounds slightly
against each other.
Please enter EDIT mode (see chapter 5.1) and select the
◊
following function.
Function: E3.2
Value: -10 . . . 10
Description:
0: Same pitch for voice #1 and voice #2
<0: Voice #2 higher than voice #1
>0: Voice #1 higher than voice #2
Transposition5.3.3
Use this function to transpose the selected sounds up or down
by one octave. Depending on which sounds are used in a
combination, the tranpose function can help make the sounds
more homogeneous.
Example:
In a combination of GRAND 1 and STRINGS, the STRINGS sound
too low. In this case, it helps to transpose the STRINGS up by one
octave.
Please enter EDIT mode (see chapter 5.1) and select the
◊
following function.
Function: E3.3 (voice #1 transposed by an octave)
E3.4 (voice #2 transposed by an octave)
Value: -1 . . . 1
Description:
0: No transposition
-1: Transposition down by one octave
1: Transposition up by one octave
Effect intensity5.3.4
This function allows you to edit the effect intensity of the
modulation effect for the selected sounds.
Please enter EDIT mode (see chapter 5.1) and select the
◊
following function.
Function: E3.5 (effect intensity voice #1)
E3.6 (effect intensity voice #2)
Value: 0 . . . 20
Description:
1 . . . 20: Effect intensity (default setting)
0: No effect
1 2 3 4 5 6 7
8 9 10 11 12 13 14

ENGLISH
CONCERT CDP2400USB User Manual
12
Reset5.3.5
Use this function to reset all settings in layer mode.
Please enter EDIT mode (see chapter 5.1) and select the
◊
following function.
Function: E3.7
Value: -
Description:
Press the +/YES button to execute this function.
Using the metronome
The CDP2400USB features a built-in metronome which can be
used for practising or to make recordings with the internal music
sequencer.
To use the metronome, please proceed as follows :
Press the CLICK button to start or stop the metronome.1.
The metronome beats are shown by flashing dots on the display.
At the beginning of a measure all dots light up simultaneously.
Keep pressing the MODE button in the TEMPO/EDIT MODE2)
section until the TEMPO LED lights up.
Use the two Down/Up buttons to adjust a tempo of your3)
choice.
Press and hold the CLICK button while adjusting the number4)
of beats per measure using the -/NO and +/YES button in the
VALUE/SONG section.
The display reads:
04: No stressed beats (default setting)
24, 34, 44, 54, 64, 74: Quarter meter (e. g. 2/4)
38, 68, 78, 98, 128: Eighth-note meter (e. g. 3/8)
Metronome volume5.3.6
Use this function to adjust the metronome volume.
Please enter EDIT mode (see chapter 5.1) and select the
◊
following function.
Function: E5
Value: 1 . . . 20
Description:
1 . . . 20: Metronome volume (1 = low, 20 = high)
Proceed as follows for direct access to the metronome volume
menu page.
Press and hold the CLICK button, then hit the MODE button in1)
the TEMPO/EDIT MODE section.
The EDIT MODE LED lights up and the EDIT page E5 is displayed.
Music sequencer5.4
The CDP2400USB provides a built-in 2-track sequencer which
allows you to record and play back a piece of music . For each of
the two tracks you can select one or two sounds for recording. This
means that the music sequencer can play back up to four sounds at
the same time. While playing back a music piece you can also play
on the keyboard to produce complex performances with up to six
different sounds.
What is more, you can use the music sequencer for practicing. For
example, you could record the left and right-hand parts of a piece
+
+

ENGLISH
CONCERT CDP2400USB User Manual 13
separately on the two tracks. During playback, switch off one track
(=hand) and play the muted part yourself. Thus, you can practice
each part individually within its musical context.
Recording pieces of music5.4.1
This section describes how to record music pieces with the built-in
music sequencer.
Press the REC button. The REC LED above the TRACK-1 or1)
TRACK-2 button lights up. The dots in the display start flashing
in the adjusted metronome tempo, thus indicating the beat.
Now, the CDP2400USB is set to record mode.
The memory of the music sequencer can store up to 10,000
◊
notes. However, this number can decrease depending on
how much pedaling information is stored.
You can quit record mode by pressing the REC button again.
◊
If necessary, adjust the metronome tempo and meter as2)
described in chapter 5.4.
Keep pressing the TRACK-1 button until the REC LED above3)
the corresponding button lights up red. Now, track 1 is
selected for recording. If you did a recording take before, the
last track selected will be used for recording. Depending on
which track is currently used, you will have to select the other
track for recording.
TIP: If the PLAY LED for one of the tracks lights up, this warns
◊
you that notes have already been recorded on this track. If
you select this track again for recording (REC LED lights up
red), the previous recording will be lost.
Select a sound in the TONE section. You can also use a sound4)
combination (see chapter 4.1) for recording.
Switch on the acoustic CLICK signal by pressing the CLICK5)
button, if you want to make a metronome backed recording.
Start recording by pressing the6) button or simply start
playing on the keyboard. The current meter is counted in the
display.
If the display starts flashing during recording and reads the
◊
message FUL, this is to warn you that the recording memory
has been used up. All data recorded up to this point will be
stored, but the recording process will be terminated.
Once your recording is finished stop the sequencer by7)
pressing the button again.
Recording mode will thus be canceled automatically.
◊
Repeat the whole procedure to record a second track. This8)
time, however, select TRACK 2 instead of TRACK 1 in step #3.
TIP: If the right-hand part of a music piece you want to
◊
practice has been recorded on track 2 and the left-hand
part on track 1 (for example, by your piano teacher), you can
mute one of the two tracks during playback to practice the
corresponding part.
TIP: Press the CLICK button again to stop the
◊
metronome click.
Editing pieces of music5.4.2
This section describes how to edit a recording by replacing a
recorded track with a new recording. What is more, you can see
how to record a track without playing back the second track, which
can be useful when you record two different pieces of music.
You must have recorded at least one track before you can
◊
carry out the steps described below.

ENGLISH
CONCERT CDP2400USB User Manual
14
If you are not sure whether a track has been recorded or not,
◊
check this by pressing the TRACK 1 and TRACK 2 button,
BEFORE you enter record mode. If one of the PLAY LEDs
above the TRACK buttons light up, this shows you that
something has been recorded on this track.
If you do not want to hear the previously recorded track while1)
you record the second one, press the TRACK button of the
track until its green PLAY LED goes out. Do this BEFORE you
enter record mode. If you want to hear the previously
recorded track, continue with step #2.
Press the REC button. The REC LED above the TRACK 1 or2)
TRACK 2 button lights up. The dots on the display start
flashing in the metronome tempo that has been set, thus
indicating the beat. Now, the CDP2400USB is set to record
mode.
The memory of the music sequencer can store up to 10,000
◊
notes. However, this number can decrease depending on
how much pedaling information is stored.
You can quit record mode by pressing the REC button again.
◊
Press the TRACK button of the track you want to record until3)
the REC LED above the button lights up red. Now the selected
track is record-ready. If you did a recording take before, the last
track selected will be used for recording. Depending on which
track is currently used, you will have to select the other track
for recording.
Tip: If you select a track for recording, which already
◊
contains note information, all previously recorded notes on
this track will be erased!
Select a sound in the TONE section. You can also use a sound4)
combination (see chapter 4.1) for recording.
Switch on the acoustic metronome signal by pressing the5)
CLICK button, if you want to make a metronome-backed
recording.
Start recording by pressing the6) button or simply start
playing on the keyboard. The current meter is constantly
shown in the display.
If the display starts flashing during recording and reads the
◊
message FUL, this is to warn you that the recording memory
has been used up. All data recorded up to this point will be
stored, however, but recording process will be terminated.
Once your recording is finished stop the sequencer by7)
pressing the button again.
Recording mode will thus be canceled automatically.
◊

ENGLISH
CONCERT CDP2400USB User Manual 15
Playing back pieces of music5.4.3
This section describes how to play back the music piece you have
just recorded.
Press the TRACK 1 and TRACK 2 buttons until the green PLAY1)
LED above the buttons lights up. This is to activate the tracks
for playback.
You can only activate those tracks for playback which
◊
actually contain note information.
If you want to have a metronome-backed playback, press the2)
CLICK button to switch on the metronome.
Press the MODE button in the TEMPO/EDIT MODE section3)
until theTEMPO LED lights up, then use the two Down/Up
buttons to adjust the playback tempo.
You can play back a recording at its original tempo by
◊
pressing the two Down/Up buttons at the same time.
Press the4) button to play back the recording. The
current meter is constantly shown in the display.
During playback the two tracks can be switched on/off at
◊
any time.
You can accompany the music sequencer playback with the
◊
currently selected sound.
TIP: If the right-hand part has been recorded on track 2 and
◊
the left-hand part on track 1, you can switch off either of the
tracks and practice its part live during playback. The volume
of the muted track is adjustable. If necessary you can play it
back in the background at low volume for support
(see chapter 5.5.5).
To stop the playback, press the5) button
Repeating musical passages for5.4.4
practicing
The following section describes how to play back a specific
passage of a recorded music piece repeatedly. This function is
ideal for practicing a specific difficult passage recorded by your
piano teacher.
To make the best use of this function, the left and righthand
◊
parts should be recorded separately on tracks 1 and 2. In
this case, you can play back one part only with the music
sequencer, while you practice the other part.
Select the track to be played back, so that the PLAY LED above1)
the corresponding TRACK button lights up.
The volume of a muted track is adjustable (see chapter
◊
5.5.5).
Press the2) button to play back the selected track.

ENGLISH
CONCERT CDP2400USB User Manual
16
Press the MODE button in the TEMPO/EDIT MODE section3)
when the playback has reached the point from which you
want to start repeating a passage.
The display reads:
A-: Starting point of the loop is set.
Press the MODE button again when the playback reaches the4)
point where you want to end the repetition of a passage.
The display reads:
A-b: Ending point of the loop is set.
The musical passage is now repeated continuously, so that you can
practice it to perfection
When you want to stop practicing, press the5) button
again to stop the playback.
Press the MODE button again to quit repetition mode.
◊
The passage marked as a loop for repetition is automatically
◊
erased when you quit music sequencer mode.
Setting the volume of muted tracks5.4.5
This function allows you to set the volume of muted tracks.1)
Please enter EDIT mode (see chapter 5.1) and select the
◊
following function.
Function: E6
Value: 0 . . . 20
Description:
1 . . . 20: Volume of muted track
0: Muted tracks are not audible
Editing the music sequencer settings5.4.6
The following paragraphs explain how to edit the playback settings
of recordings made with the music sequencer.
The following settings can be edited separately for each of the
two tracks:
Sound (see chapter 2.4)
•
Room effect intensity (see chapter 4.2.2)
•
Modulation effect intensity (see chapter 4.2.3)
•
Layered sounds (see chapters 4.1 and 5.3)
•
The following global settings can be made for the whole music
piece:
Tempo (see chapter 5.4)
•
Meter (see chapter 5.4)
•
Type of room effect (see chapter 4.2.2)
•
Type of modulation effect (see chapter 4.2.3)
•
Press the REC button in the SEQUENCER section to enter1)
record mode. The REC LED above the TRACK 1 orTRACK 2
buttons lights up and the dots in the display start flashing in
the rhythm of the selected metronome tempo, thus indicating
the beat.
Be sure not to press the
◊
button during the following
steps. Otherwise, a new recording would be made on the
selected track erasing all the data recorded before.
Use theTRACK button to select the track whose settings you2)
wish to edit. If you want to edit global settings (e.g. tempo,
measure, etc.) you can select either one of the two tracks.

ENGLISH
CONCERT CDP2400USB User Manual 17
Edit the settings as described in the chapters mentioned3)
above.
If necessary, repeat step 2 for the second track.4)
Press the REC button to quit record mode.5)
The changes made have now been stored in the music sequencer.
When you play back the music piece, the new settings will be
effective. All previous settings are deleted.
Sync start5.4.7
You can set the music sequencer playback-ready, so that it will start
playback as soon as you play a key on the keyboard. This function
can be very helpful when the music sequencer is used as an
“accompanist”. The function is also available in DEMO mode.
Make sure that the playback tracks are active (PLAY LED above1)
the corresponding TRACK button lights up green). If necessary,
activate the tracks by pressing their TRACK buttons in the
SEQUENCER section.
Press and hold one of the active TRACK buttons, then press2)
the button in the SEQUENCER section.
A dot in the lower right-hand corner of the display starts flashing in
the tempo of the metronome, thus signaling that the instrument
is set to sync start mode.The sequencer starts playback as soon as
you play a key on the keyboard.
If you want to quit sync start mode, simply repeat step 2.
◊
Start the music sequencer with foot pedal5.4.8
This function allows you to reprogram the left soft pedal, so that it
can be used to start/stop the music sequencer. This is useful when
you are playing a music piece live and want to start a sequencer
accompaniment at a later point during the piece. When the pedal
has been set accordingly, you can also use it to start/stop playback
in DEMO mode.
Please enter EDIT mode (see chapter 5.1) and select the
◊
following function.
Function: E4.1
Value: 1, 2
Description:
1: Soft pedal function (default setting)
2: Music sequencer
System settings5.5
The CDP2400USB provides several setting options to control
the global functions of the instrument. Please read below which
options are available and how you can edit their settings.
Key velocity5.5.1
This parameter determines the volume of the sounds with
reference to the key velocity applied, i.e. you can set here how hard
you have to strike a key to achieve maximum volume.
The following section describes how to change the key velocity.
Press the KEYS button to select one of the following settings:1)
HARD: The keys must be played very hard to achieve
maximum volume.
MEDIUM: The keys must be played with medium velocity to
achieve maximum volume (default setting).
SOFT: The keys must be played only lightly to achieve
maximum volume.
OFF: If none of the LEDs lights up, each key stroke will
produce a defined volume, irrespective of how hard
you play the keys.
+

ENGLISH
CONCERT CDP2400USB User Manual
18
An LED above the button lights up to show the current setting. If all
LEDs are out, key velocity is switched off. In this case you can adjust
a fixed volume level as follows:
Press and hold the KEYS button, then use the -/NO and +/YES2)
buttons to set the volume level to be produced when you play
a key on the keyboard, irrespective of the key velocity applied.
The display reads:
1 . . . 127: Fixed volume level produced when you play a key
on the keyboard (default setting: 64)
Keep the KEYS button pressed, then press the -/NO and +/YES3)
buttons simultaneously to recall the standard setting.
The key velocity setting has no effect on the following
◊
sounds: CEMBALO 1 and 2, CHURCH 1 and 2, and CLICK
ORGAN.
TIP: young pianists might find it easier to use a SOFT key
◊
velocity setting.
Soft pedal intensity5.5.2
Use this function to adjust the intensity of the soft pedal effect.
Please enter EDIT mode (see chapter 5.1) and select the
◊
following function.
Function: E4.2
Value: 1 . . . 5
Description:
3: Normal soft pedal intensity (default setting)
1: Low soft pedal intensity
5: High soft pedal intensity
The function will be effective only if the left pedal is used as
◊
a soft pedal, but NOT to start/stop the music sequencer (see
chapter 5.5.8).
Fine tuning5.5.3
The CDP2400USB can be detuned slightly to adapt it to other
instruments or tunings. The setting made here affects the pitch
of all keys.
The following section describes how to adjust the fine tuning of
the CDP2400USB. The tuning shown in the display is referenced
to the concert pitch“A” in Hertz (Hz).
Please enter EDIT mode (see chapter 5.1) and select the
◊
following function.
Function: E1
Value: 427 . . . 453
Description:
440: Western European equal tuning (default setting)
453: Maximum detuning upwards
427: Maximum detuning downwards
1/5-Hz steps are shown as follows (figures separated by one or
two dots):
440: 440 Hz
4.40: 440,2 Hz
44.0: 440,4 Hz
440.: 440,6 Hz
4.40.: 440,8 Hz
Tunings5.5.4
The CDP2400USB provides different tunings developed during
the past few centuries. The tuning used most often today is called
equal tuning and has been a characteristic element of the music
composed from the 19th century up to the present. However, for
some baroque pieces (e.g. by J. S. Bach) it can be interesting to use
an older tuning system.
In the history of music, the development of the individual tunings
can be traced back to the development of scales and polyphony
and the resulting adaptation of instruments and their tuning.
Apart from these historical reasons, the limited tuning aids
available in former times played an important role for the practical
implementation of tunings.
The CDP2400USB provides the following tunings:
Equal tuning (default setting)
•
Equal tuning divides one octave into twelve intervals of equal size
or spacing. Thus, each half-tone is detuned slightly to the same
extent, with the octave being the only perfect interval. This has
been the most common tuning since the 19th century, as it makes
it possible to play all twelve major/minor keys.
+

ENGLISH
CONCERT CDP2400USB User Manual 19
Pure major/minor intonation
•
This tuning is based on the perfect tuning of the seven notes of one
scale (e.g. C major). Triads played one fifth above or below are also
perfect, since they use the notes of the basic key. However, all other
keys are not playable, since their frequency relationships change
depending on the basic note.
This tuning can only be used for music that strictly follows a
classical cadence comprising tonic, dominant and subdominant.
Pythagorean tuning
•
The Pythagorean tuning is based on perfect fifths. As a
consequence, all thirds are impure.
This tuning was used for early music up to the late Middle Ages. The
homophonic or two-part polyphonic music of the time did not use
any thirds, but only perfect unison, fourth, fifth and octave intervals.
Meantone tuning
•
Meantone tuning resulted from the change in the perception of
dissonant intervals during the Renaissance period and from the
beginnings of chromaticism and polyphony. Polyphony made the
third the most important interval in music.Therefore, meantone
tuning is based on perfect thirds rather than perfect fifths to tune
the twelve notes of a scale. However, this also means that some
scales are unplayable.
Today, the meantone tuning can still be used for works from the
early 16th and 17th centuries (e.g. G. F. Handel).
Werckmeister/Kirnberger tuning
•
The Werkmeister and Kirnberger tunings result from first attempts
to realize a well-tempered tuning which – unlike the Pythagorean
and meantone tunings – allows for playing in all twelve keys. The
advantages of the Pythagorean and meantone tunings, i.e. the
slight detuning of some fifth intervals, have also been included in
the Werkmeister/Kirnberger tunings.
Both tunings are interesting to use for works from the baroque
period (e.g. J. S. Bach). Werkmeister is a popular tuning for
organ works.
The following section describes how to change the tuning of the
CDP2400USB.
Please enter EDIT mode (see chapter 5.1) and select the
◊
following function.
Function: E2.1
Value: 1 . . . 7
Description:
1: Equal tuning (default setting)
2: Pure major tuning
3: Pure minor tuning
4: Pythagorean tuning
5: Meantone tuning
6: Werckmeister tuning
7: Kirnberger tuning
With the exception of equal tuning, all tunings must be marked by
a basic note.
Here’s how to set the basic note:
Function: E2.2
Value: C . . . B
Description:
Altered notes are marked by dashes above or below the note name.
A dash above the note name raises a note, a dash below the note
lowers it.
The display shows:
c-: c sharp (C#)
e-: e flat (Eb)
Saving parameter settings5.5.5
The CDP2400USB allows you to save the changes made to the
instrument’s settings, so that they won’t get lost when the unit is
powered down. When the save function is not active, all changes
made to the settings – except for the music sequencer data – will
be lost when you switch the piano off. When switched back on, the
CDP2400USB recalls the factory default settings.
The save function can be activated separately for the following
groups of functions: sounds, MIDI, tuning and damper pedal.
Please enter EDIT mode (see chapter 5.1) and select the
◊
following function.
Sounds
•
You can save the following settings for this group of functions:
Sounds (see chapter 2.4)
•
Layer mode settings (see chapters 4.1 and 5.3)
•
Type of room effect and intensity (see chapter 4.2.2)
•
Type of modulation effect and intensity (see chapter 4.2.3)
•
Key velocity (see chapter 5.6.1)
•
Metronome meter and tempo (see chapter 5.4)
•
Dimmed volume (see chapter 5.5.5)
•
Function: E8.1
Value: On, Off
Description:
Off: Save function for sounds is disabled
(default setting)
On: Save function for sounds is enabled
MIDI
•
You can save the following settings for this group of functions:
All MIDI settings (see chapter 6.3.3)
•
Function: E8.2
Value: On, Off
Description:
Off: Save function for MIDI settings is disabled
(default setting)
On: Save function for MIDI settings is enabled

ENGLISH
CONCERT CDP2400USB User Manual
20
Tuning
•
You can save the following settings for this group of functions:
Transposition (see chapter 5.2)
•
Fine tuning (see chapter 5.6.3)
•
Tuning (see chapter 5.6.4)
•
Function: E8.3
Value: On, Off
Description:
Off: Save function for tuning settings is disabled
(default setting)
On: Save function for tuning settings is enabled
Soft pedal
•
You can save the following settings for this group of functions:
Soft pedal function (see chapter 5.5.8)
•
Soft pedal intensity (see chapter 5.6.2)
•
Function: E8.4
Value: On, Off
Description:
Off: Save function for soft pedal settings is disabled
(default setting)
On: Save function for soft pedal settings is enabled
Restoring the factory default settings5.5.6
Use the following procedure to recall the factory default settings.
Tip: All saved parameters as well as the music sequencer
◊
data will be lost during either one of the following
procedures.
Use the POWER switch to switch the instrument off (if not1)
already done).
Play and hold down the top C key on the keyboard, then2)
switch the CDP2400USB back on.
An alternative procedure is described below:
Use the POWER switch to switch the instrument off (if not1)
already done).
Press and hold down theTRACK 1 andTRACK 2 buttons, then2)
switch the CDP2400USB back on.
Let go of the TRACK buttons after about 5 seconds.3)
Connection to external6.
equipment
The CDP2400USB provides a variety of connectors for connecting
the instrument to external devices.
Caution!
Be sure that all devices are switched off before you make
◊
any connection.
NEVER connect the LINE IN connectors of the CDP2400USB
◊
to its LINE OUT connectors. This will cause a feedback loop
producing high volume levels which could damage both
the instrument and your hearing!
Connecting external sound sources6.1
The CDP2400USB is equipped with a stereo LINE IN connector
for connecting external sound sources to your digital piano.
These signals are reproduced through the internal loudspeakers
and connected headphones. If you wish to practice with musical
accompaniment, you can use this input to connect a CD player or
drum computer. In the same way, you could connect an external
synthesizer or sound module and use its sound generator with your
instrument. An additional MIDI connection enables you to play an
external sound generator from the keyboard of the CDP2400USB
(see chapter 6.3.1). The keyboard also has a MIC input for the
connection of dynamic or condenser microphones, and an AUX IN
jack for sound sources that use /" plugs.
+
+
Table of contents