Conductive Labs The NDLR User manual

1 | P a g e
The NDLR Quick Start Guide

2 | P a g e
Specifications:
USB 2.0 Powered, cable with USB Type B connector included.
5V DC, 100mA max, AC/DC power supply not included.
EU Declaration of Conformity available upon request.
Precautions, not limited to:
1. Read and follow all instructions.
2. Unplug before cleaning and only use a soft and dry cloth. Do not use any cleaners.
3. Do not use the instrument near water or moisture, such as a bathtub, sink, swimming pool or similar place.
4. Do not expose the instrument to hot sunlight.
5. Do not spill any kind of liquid onto the instrument.
6. Do not place the instrument in an unstable position where it might accidentally fall. Do not place heavy
objects on the instrument.
7. Do not open or insert anything into the instrument that may cause a fire or electrical shock.
8. Always contact Conductive Labs LLC if you have an issue. You will invalidate your warranty if you open and
remove the cover.
9. Do not use the instrument when there is a gas leak nearby.
10. Conductive Labs LLC is not responsible for any damage or data loss caused by improper operation of the
instrument.
Not following the above Precautions will void the manufacturer’s warranty.
This Quick Start Guide is a supplement to The NDLR User Manual, available on the Conductive Labs website at:
https://conductivelabs.com/download. For complete information on using The NDLR, please refer to the User
Manual. Hint: use the PDF viewer’s search function to locate a topic in the User Guide.
Support for The NDLR is provided by Conductive Labs and our experienced users on the Conductive Labs forums.
Please register on the forums for questions not answered in this guide or the User Guide. As part of forum
registration, you will receive a verification email. If you do not receive it within an hour check your spam folder, the
verification mails often end up there. If you experience any problem with registering on the forums, let us know
using the contact page on our website and we’ll get you set up. You can register on the forums here:
https://conductivelabs.com/forum

3 | P a g e
Getting Started
1. Plug in your MIDI synthesizer modules to The NDLR MIDI outputs, or use virtual synths on your PC using The
NDLR’s USB virtual MIDI ports.
a. There are two 5 pin DIN MIDI ports on The NDLR Out A and Out B, if you need more outputs, you can
use a common MIDI thru (splitter) or a MIDI router if you have a more elaborate studio setup.
b. You can “daisy-chain” MIDI connections if your synthesizers have a MIDI thru port. This typically
works well for a couple of hops, but can introduce latency or stuck notes with some synths.
c. For a computer DAW (Digital Audio Workstation), each one is different. Look at the DAW
documentation for setting up MIDI tracks for virtual instruments, such as VSTs. It’s the same as
setting up a MIDI keyboard, but there are four of them!
d. For stand-alone software synths running outside of a DAW, which you can execute individually on
your computer, you can use The NDLR’s four virtual MIDI ports, one for each synth.
2. Using The NDLR’s Knobs and Buttons
a. The 8 knobs labeled 1 through 8 are also switches. From the home screen, press the knobs to change
the current parameter, labeled on the inside of the knobs. The Triangle in the window will rotate to
indicate the current parameter. Some knobs have 2 choices, some have 3.

4 | P a g e
b. Press the Menu button once, then press the encoder corresponding to the Menu you want to see,
labeled on the outside of the knobs, such as SETTINGS 1, 2 or 3, or MOD MATRIX screens.
c. Press Shift and Menu together to access the screens labelled in the call outs, such as CHORD SEQ, or
PATTERN EDITOR. The last screen used will open. Press an encoder to select different screens.
3. Configure the MIDI Ports and Channels on The NDLR
a. The best advice we can give you is to label the MIDI channels on your synthesizers. You will need this
information for configuring The NDLR, and it comes in handy any time you make a change to the
MIDI configuration. Post-it notes make good label stickers.
b. On The NDLR, press the Menu button once, then press the encoder knob 6 labeled SETTINGS 1.
c. Select the MIDI port and channel for each of the parts you are using (Pad, Drone, Motif-1 and Motif-
2). They can all be on the same port using different channels, or each can be on any port of The
NDLR that your synths are connected to.
d. Press the corresponding Play/Pause button for each of the parts. The NDLR outputs MIDI notes just
like a MIDI keyboard. You can use port setting “ALL” to test that a synth is receiving message from
The NDLR. Change to the to the specific port you are using before saving.

5 | P a g e
4. Using The NDLR’s MIDI Inputs
a. You can use a MIDI keyboard or sequencer to control chord selection on The NDLR. See the User
Guide section labeled: “MIDI Controllers and MIDI Messages”. The NDLR also supports MIDI CC
(Control Change) for many parameters. See the User Guide Appendix A. “MIDI CC (Control Change)
Implementation”.
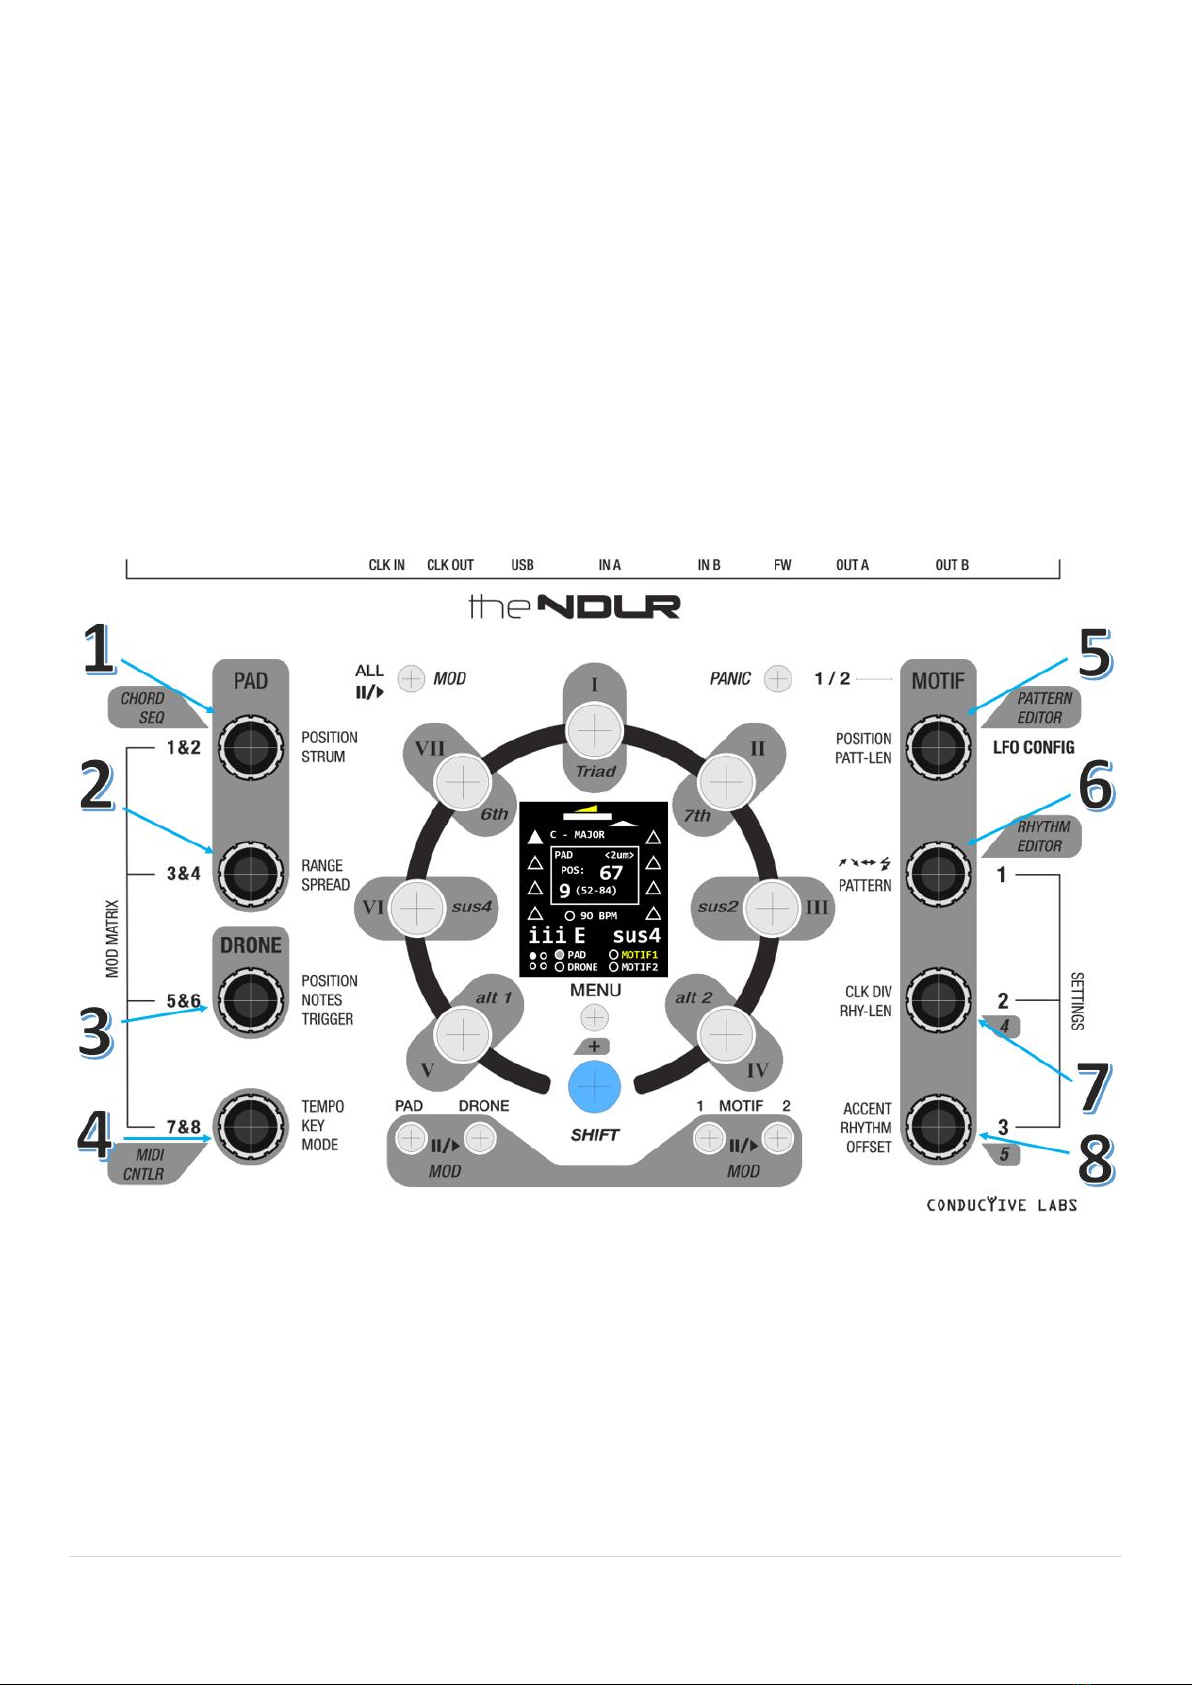
b. By default, The NDLR uses an internal clock for timing. Use encoder 4 labeled “TEMPO” to change
The NDLR BPM. This clock signal can also be sent on The NDLR MIDI Outputs and CV clock output.
Enable sending Clock Out by pressing the blue Shift button + MENU button while The NDLR is
booting up, which will bring you to the Boot Menu. Here you can enable “ClkOut” with the Motif-1
button, as well as choose whether to send clock on one USB virtual MIDI port or all of them, with the
Motif-2 button. Press the Panic button to exit the Boot menu.
c. For The NDLR to use an external clock, press the Menu button once, then press the SETTINGS 3
encoder 8. Change the Clock In parameter to The NDLR port the clock source is connected to. For
details, see the User Guide section labeled: “External MIDI Clock & Stop/Start/Continue Messages”.
d. The NDLR passes most MIDI messages thru from input to output, with the exception of SysEx
messages, messages on The NDLR Cntl channel, and note messages on the KB Transpose channel,
which are transposed and forwarded to the corresponding output.
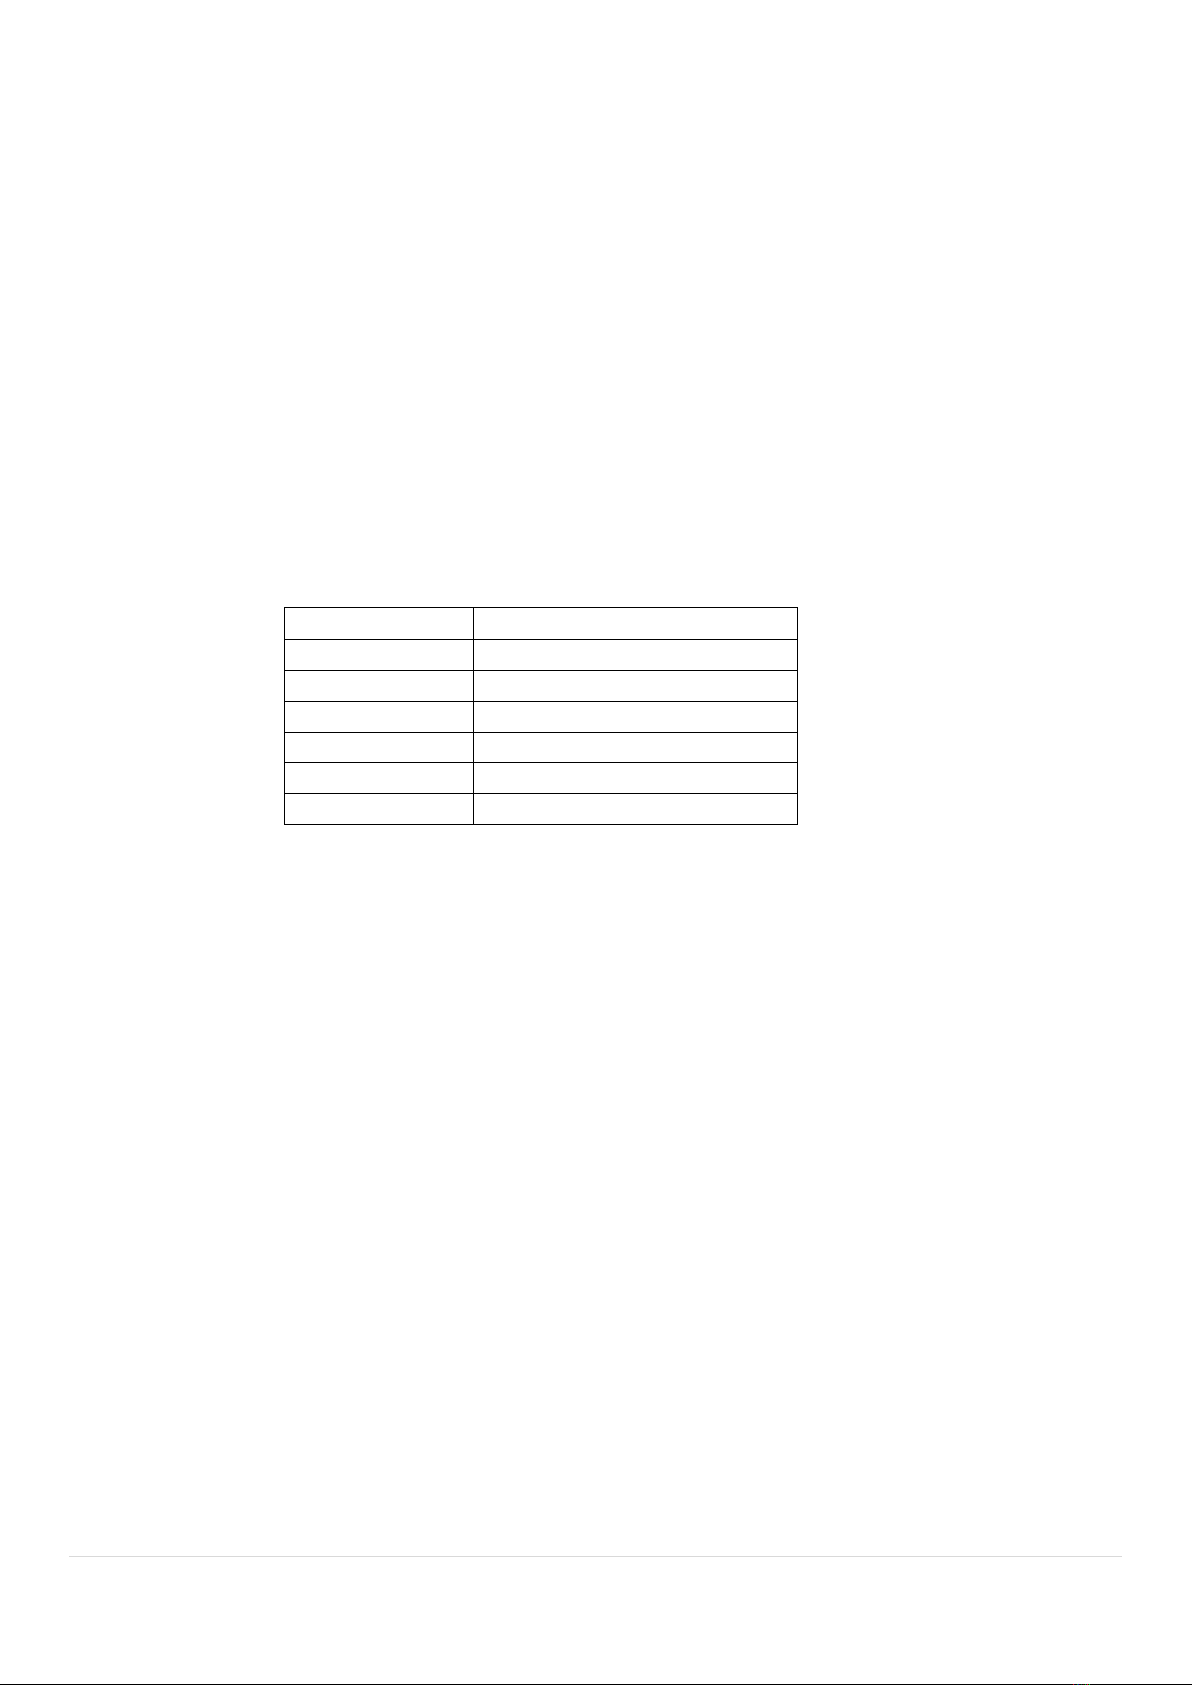
See the chart below for MIDI Note & Message Thru Port Mapping.
** MIDI messages: Stop, Start, & Continue are passed thru only on these input ports.
5. Saving your settings
a. Press the Menu button once. Press the SETTINGS 3 encoder 8. Turn encoder 5 to select a Global Save
slot. Press Shift and encoder 5 to save. You will see a box appear showing that it saved.
b. When you restart The NDLR, it will load the last saved Global Save.
6. Firmware Updates
a. Conductive Labs provides periodic firmware updates to enhance features or fix reported issues. You
can find the latest released firmware update on the Download section of the Conductive Labs
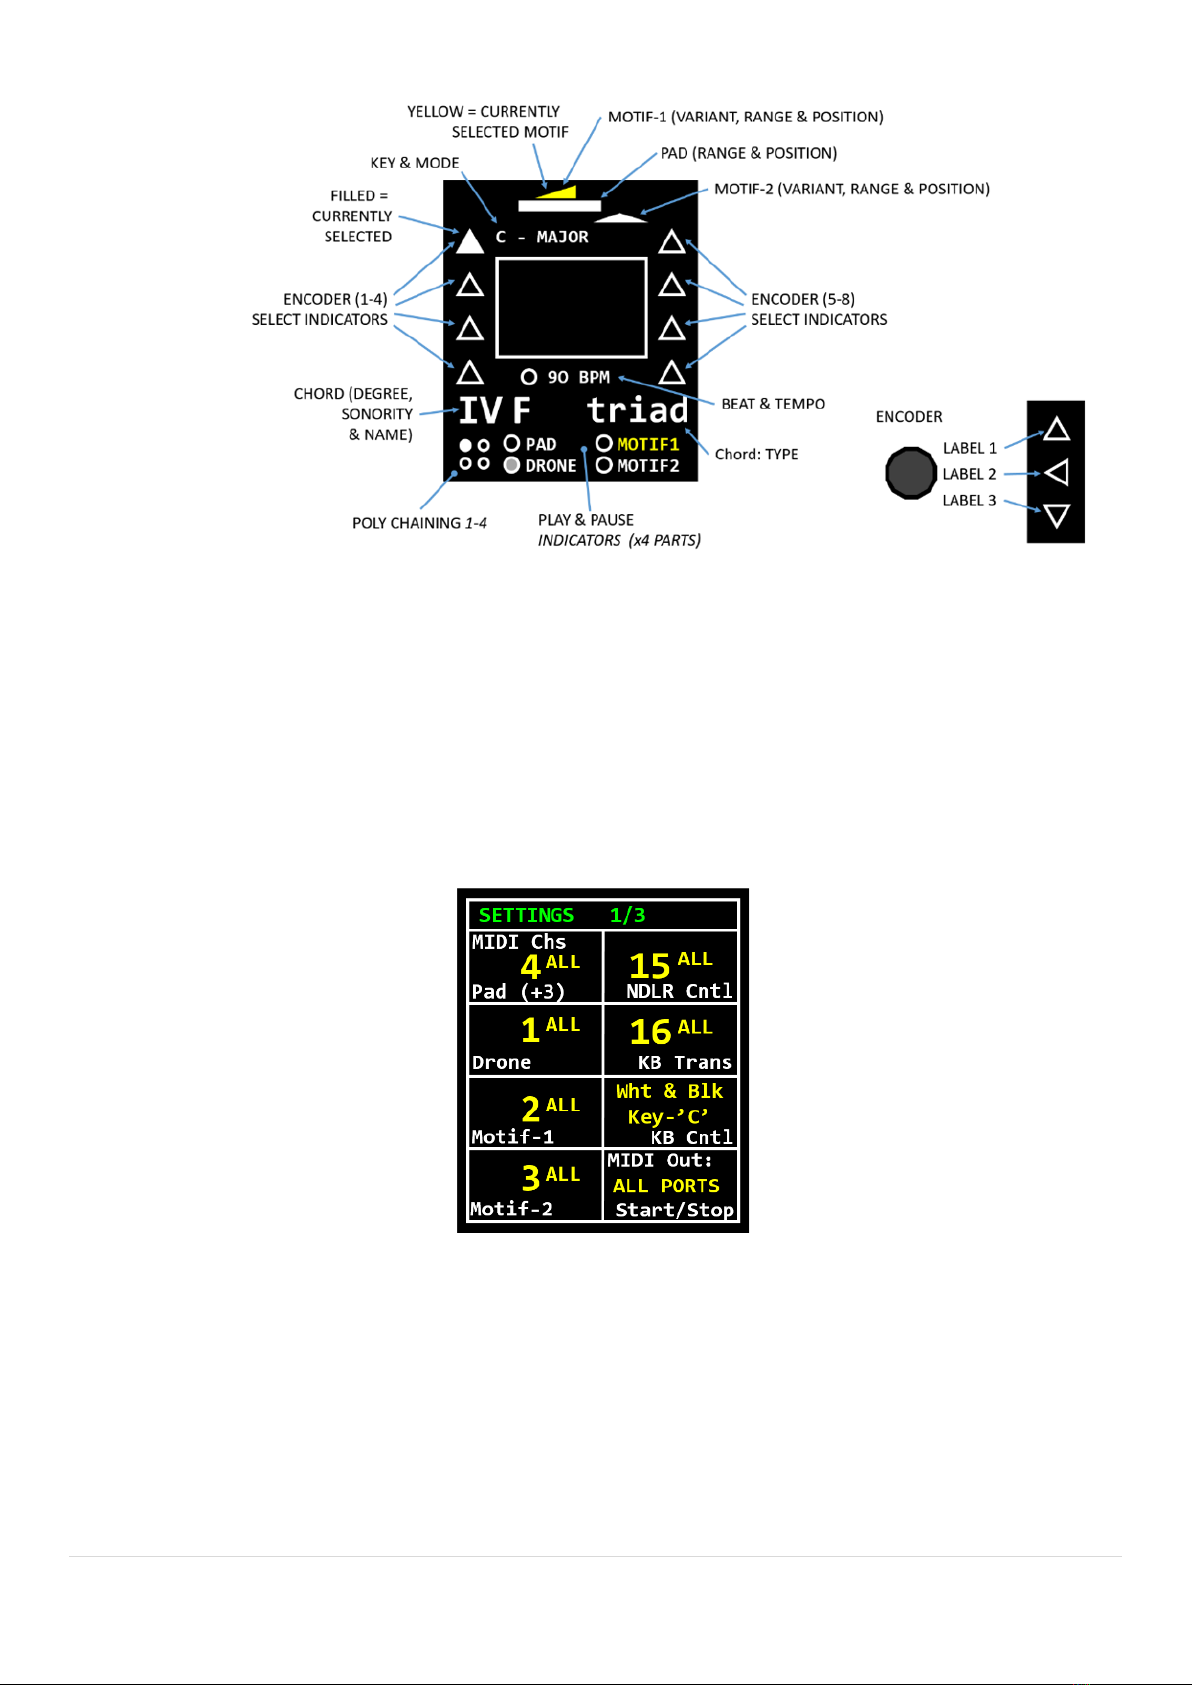
website. Before updating your firmware, check the version you are currently using by pressing the
Menu button, then press the SETTINGS 3 encoder 8. Rotate encoder 8 to view the serial number and
firmware version in the bottom right corner of the screen. There’s no need to update if you already
have the latest version.
b. Typically, firmware updates will not overwrite your saved settings, patterns, etc.
c. Registered users of the Forum can download pre-release (beta) versions of firmware when available.
We appreciate our users help in testing changes and enhancements. Please report your success or
issues with pre-release firmware on the forums.
d. Instructions for updating firmware are on the Download page of the website.
In Port
Out Port(s)
5 Pin A
5 Pin A & USB Port(1)
5 Pin B**
5 Pin B & USB Port(2)
USB Port(1)
5 Pin A & USB Port(1)
USB Port(2)**
5 Pin B & USB Port(2)
USB Port(3)
USB Port(3)
USB Port(4)
USB Port(4)

6 | P a g e
Thank you so much for supporting our project The NDLR! We really appreciate it! And if you would be so kind, share
your work on our forums in the “Show me what you got!” section. Tag your social media posts with #NDLR so we can
find them. We would love to see what you can do with The NDLR!
All the best,
Steve and Darryl
Conductive Labs LLC, a Corporation registered in the State of Oregon USA.
Owners: Darryl McGee and Steve Barile
Address:
Conductive Labs LLC
11340 NW Anderson St.
Portland, OR 97229
USA
COPYRIGHT @ CONDUCTIVE LABS LLC 2020. ALL RIGHTS RESERVED.
All documentation, images, software, firmware, user interface, industrial design and hardware design is protected by
copyright law and international treaties. The firmware is licensed (not sold), and its use is subject to a License
Agreement. Unauthorized use, copying or distribution of any of the above material or any of its components may
result in severe criminal or civil penalties, and will be prosecuted to the maximum extent under the law.
All trademarks and registered trademarks used in this documentation are the property of their owners.
Version 1.0 May 2020
Other manuals for The NDLR
1
Table of contents