Convaid Cruiser 10 Manual

Cruiser 10
Convaid Replacement Parts & Accessories Manual

Cruiser 10
www.convaid.comii 888-Convaid (266-8243) iii
Cruiser 10
FRAME
REPLACEMENT PARTS
FOOTPLATES
WHEELS
UPHOLSTERY
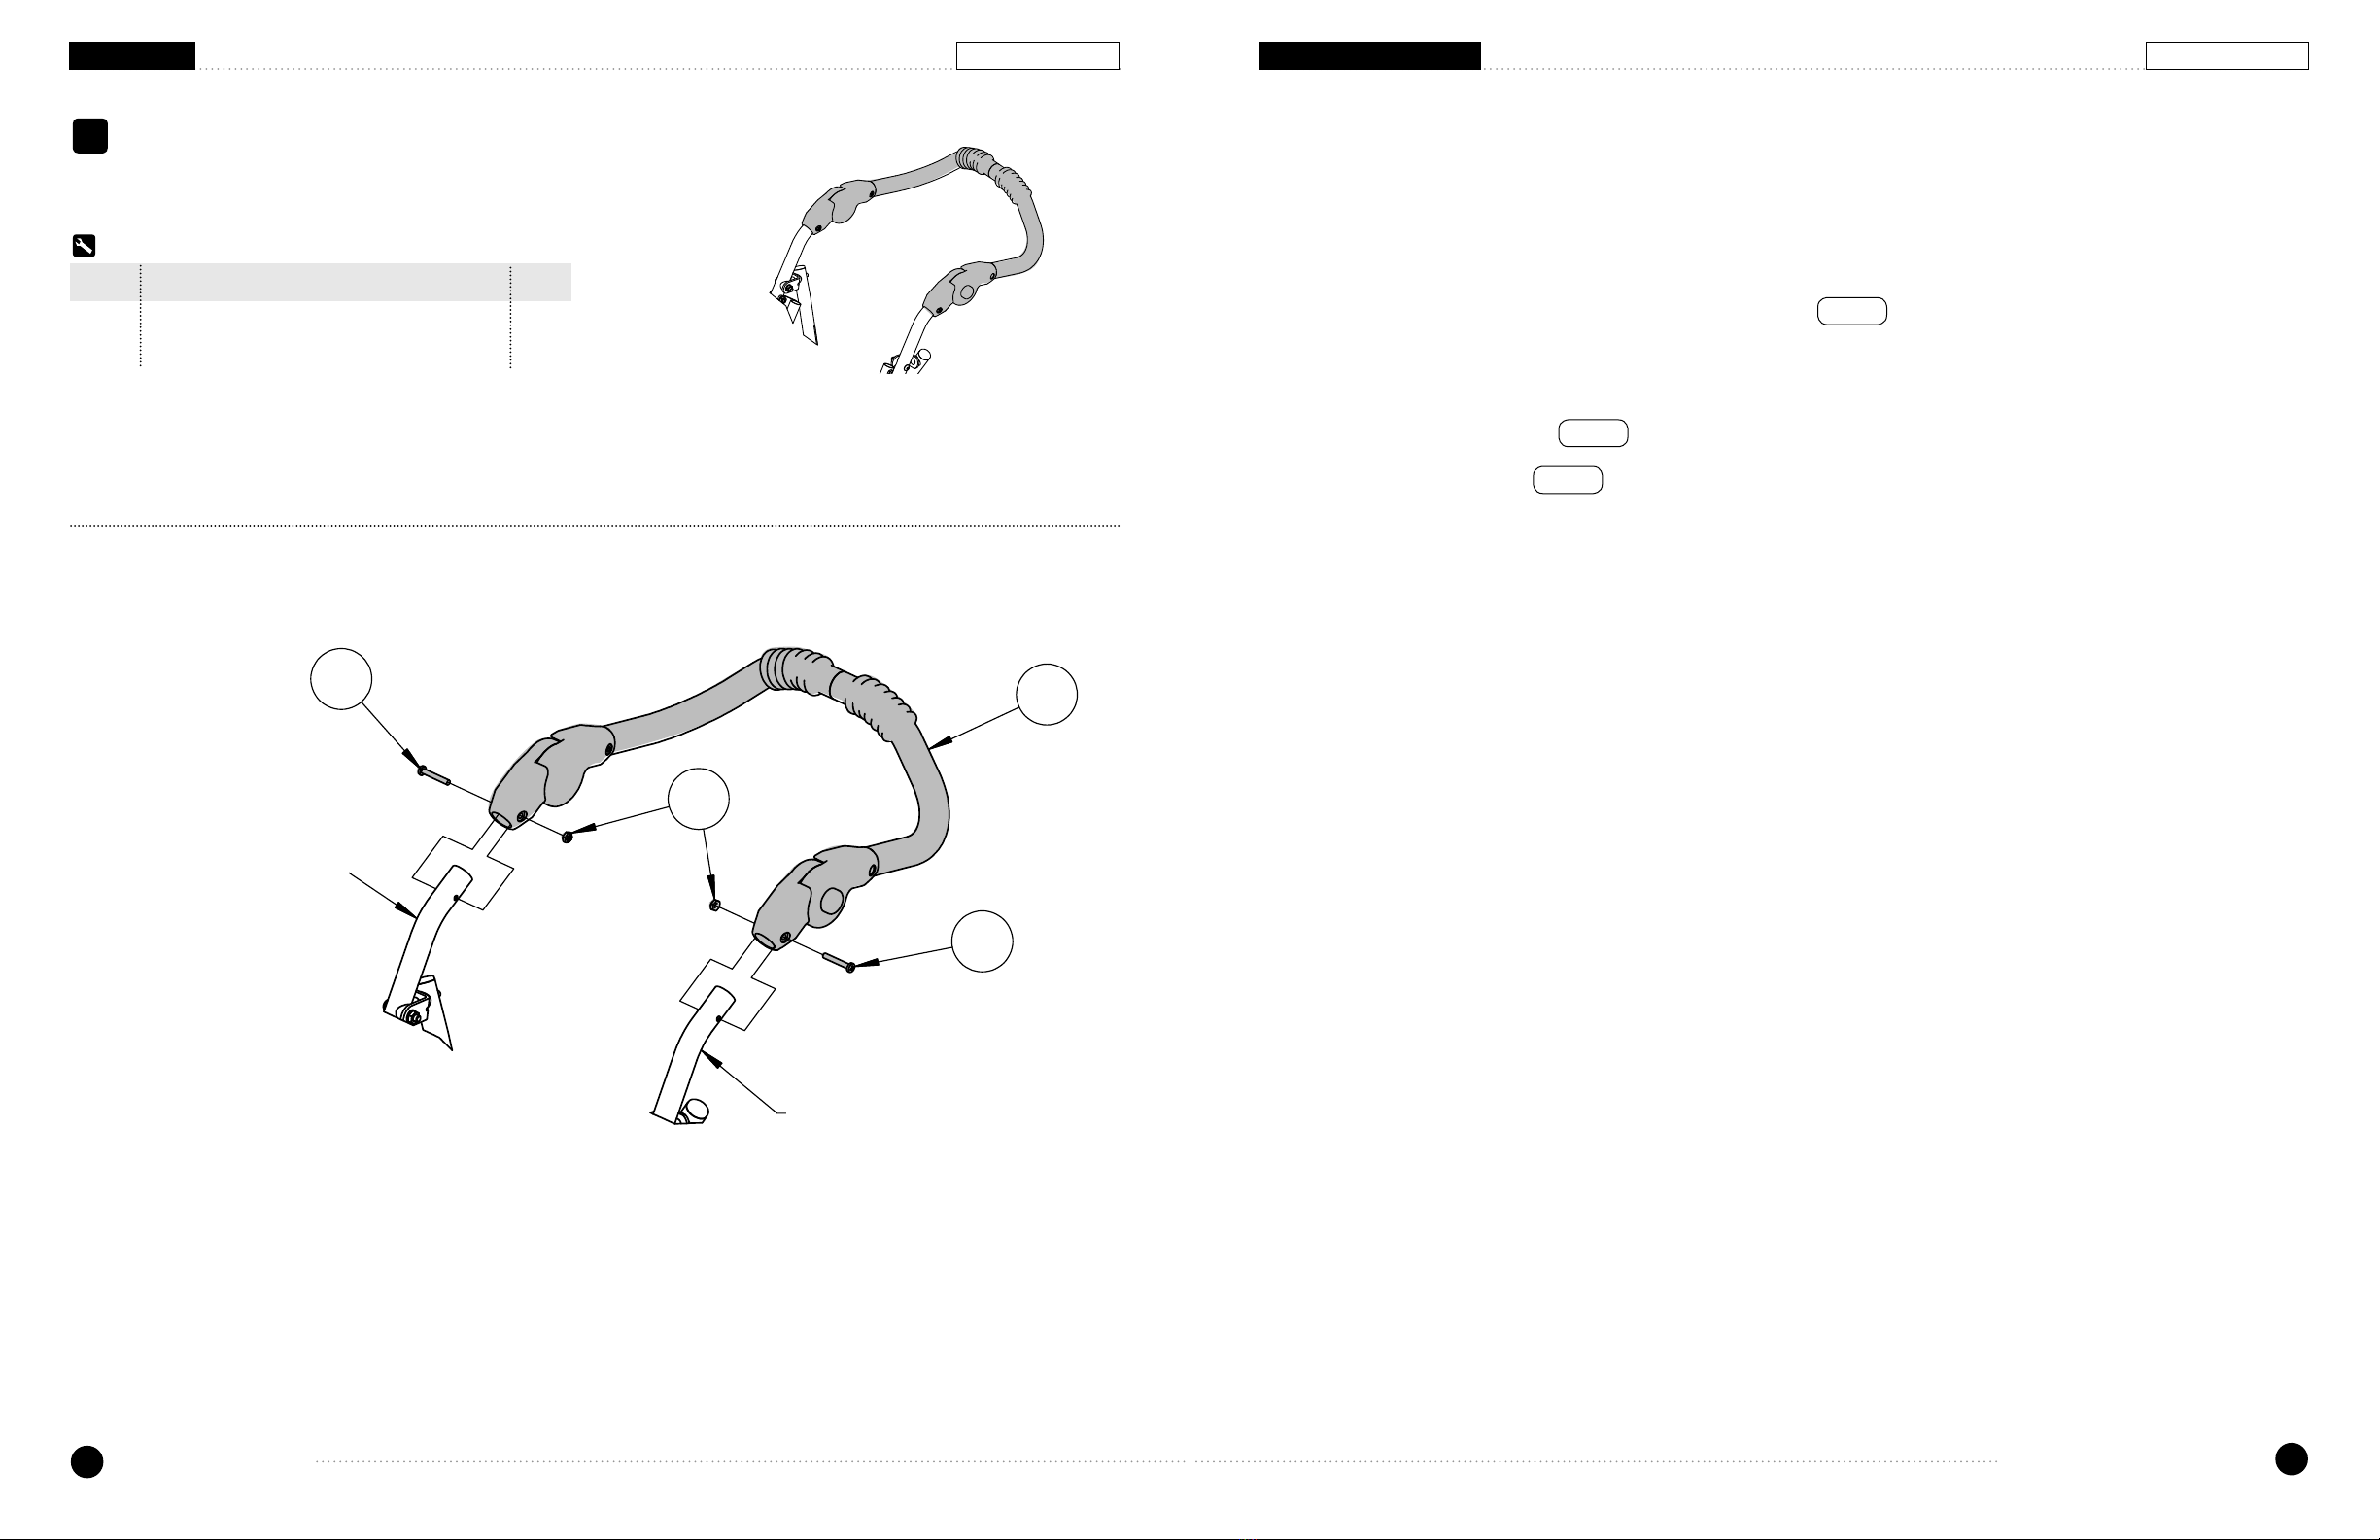
One Piece Height Adjustable Push Handle ·················································································· 2
One Piece Height Adjustable Push Handle with Attendant Handbrake ············································· 4
991388
995914
991316
991396
991318
991397
991394
991398
991395
991399
995915
995916
995917
995918
992658
992659
994757
994758
996010
996011
996012
996013
994749
994750
996009
995690
994746
994747
994748
996005
996006
996007
996008
Standard Footplate - Left ········································································································ 6
Standard Footplate - Right······································································································· 8
Angle Adjustable Footplate - Left ····························································································· 10
Angle Adjustable Footplate - Right ·························································································· 12
Standard Footplate Assy Kit - Left···························································································· 14
Standard Footplate Assy Kit - Right·························································································· 16
Angle Adjustable Swing Away Footplate Assy Kit - Left································································ 18
Angle Adjustable Swing Away Footplate Assy Kit - Right ····························································· 20
Part#
Part#
Part#
Part#
7.5" x 2" Front Solid Wheel Assy - Each···················································································· 22
7.5" x 2" Front Pneumatic Wheel Assy - Each ············································································ 24
Caster Fork Assy for 7.5" x 2" Front Rolko Tire - Each································································ 26
Caster Fork Assy with Caster Lock for 7.5" x 2" Front Rolko Tire - Pair ········································· 28
11.5" x 2.5" Rear Solid Wheel Assy - Each ················································································ 30
12.5" x 2" Rear Solid Knobby Wheel Assy - Each ······································································· 32
12.5" x 2" Rear Pneumatic Knobby Wheel Assy - Each ······························································· 34
Brake Assy for Rolko Wheel - Left ···························································································· 36
Brake Assy for Rolko Wheel - Right ························································································· 38
Brake Assy for Rolko Attendant Brake - Left ·············································································· 40
Brake Assy for Rolko Attendant Brake - Right ············································································ 42
Cordura Seat Bottom Upholstery ····························································································· 46
Cordura Back Upholstery ······································································································· 46
Heavy Duty Cordura Seat Bottom Upholstery ············································································ 48
Heavy Duty Cordura Back Upholstery ······················································································· 48
Textilene Seat Bottom Upholstery ··························································································· 50
Textilene Back Upholstery ······································································································ 50
Heavy Duty Textilene Seat Bottom Upholstery ·········································································· 52
Heavy Duty Textilene Back Upholstery ····················································································· 52
Cordura Upholstery with +3" Seat Depth Extension···································································· 54
Heavy Duty Cordura Upholstery with +3" Seat Depth Extension··················································· 56
Textilene Upholstery with +3" Seat Depth Extension ·································································· 58
Heavy Duty Textilene Upholstery with +3" Seat Depth Extension ················································· 60
TABLE OF CONTENTS
HEAD SUPPORT
TRUNK POSITIONING
995927
995928
995932
995933
996610
995925
995926
996636
995935
995936
995938
Part#
Part#
Headrest Extension - Curved Cordura······················································································· 62
Headrest Extension - Rectangular Textilene··············································································· 62
Occi Headwings ···················································································································· 64
Padded Headwings················································································································· 64
H-Harness with Padded Cover ································································································ 66
Full Torso Support Vest for Cordura Upholstery ········································································· 68
Full Torso Support Vest for Textilene Upholstery ········································································ 68
Reducer Seat Insert ·············································································································· 68
Soft Adjustable Lateral Support - Single Flap············································································· 70
Soft Adjustable Lateral Support - Double Flap············································································ 70
Upper Extremity Support Surface Tray (Hardware Included) ························································ 72
PELVIC POSITIONING
995683
994716
995919
995920
995921
995929
995930
996638
996639
Part#
3 Point Belt with Depth Adjustable Crotch Strap········································································· 74
Adjustable Crotch Strap for 3 Point Belt ··················································································· 74
Support Seat Cushion Assy ····································································································· 76
Align Seat Cushion Assy ········································································································· 78
Position Seat Cushion Assy ····································································································· 80
Lateral Thigh Support - Adductor ····························································································· 82
Medial Thigh Support - Abductor······························································································ 82
Q'Straint Transit Lap Belt ········································································································ 84
Sure-Lok Transit Lap Belt········································································································ 84
FOOT & LEG POSITIONING
996615
996616
996617
996618
996619
Part#
Calf Panel ····························································································································· 86
Foot Positioner - Small ·········································································································· 86
Foot Positioner - Medium ······································································································· 86
Foot Positioner - Large ·········································································································· 86
Footplate Securement Strap···································································································· 86
ACCESSORIES
995922
995923
995924
996623
996625
996620
996621
995937
996622
994764
995688
Part#
Headrest Cover (Canopy) ······································································································· 88
Extended Headrest Cover - No Windows (Canopy) ····································································· 88
Extended Headrest Cover - With Windows (Canopy) ·································································· 88
Mosquito Net ························································································································ 90
Rain Cover ··························································································································· 90
Saddle Bag - Pair··················································································································· 92
Wheelchair Travel Bag············································································································ 94
Under Seat Storage Basket ···································································································· 94
Utility Bag ···························································································································· 94
Frame Armrest Cover - Pair····································································································· 96
Rear Anti-Tip Tube - Pair········································································································· 98
Upholstery Colors ·······························································································································44

888-Convaid (266-8243) 1
Convaid, the company that invented the compact folding adaptive assisted wheelchair,
has helped special needs children and their families live fuller, more productive lives
since 1976. Convaid produces high-performance, easy-to-use and attractive mobility
products for all stages of a young person’s life, from infancy to young adulthood. Each
product is custom-built to individual specications to provide the optimum comfort,
safety, and convenience.
Convaid meets the assisted mobility needs of thousands of special needs families every
year by manufacturing pediatric push wheelchairs in a variety of sizes and models,
and backs its products with one of the best warranties in the industry and a highly
responsive customer service department. The patented compact folding mechanism
allows custom wheelchairs to be easily carried up stairs, placed in the trunk of most
compact cars, or used while traveling. Convaid’s chairs provide the optimal combination
of corrective positioning, comfort, durability and safety for the user in a product that is
both attractive and easy-to-use for the caregiver.
www.convaid.com

INSTRUCTIONS
888-Convaid (266-8243)
www.convaid.com
23
Cruiser 10 Cruiser 10
Close-up
One Piece Height Adjustable Push Handle
1. Using a phillips screwdriver and a 3/8” wrench, remove the screw attaching the
handle tube assembly from the Cruiser Back Tubes.
2. Slide existing handle assembly off.
3. Slide new handle assembly onto the back tube. Item 1
4. Align the holes on the plastic pivot joint of the handle tube assembly with the holes of
the back tubes.
5. Insert new screw Item 3 into pivot joint.
6. Attach the nut Item 2 and tighten using a phillips screwdriver
and a 3/8” wrench.
991388
QTYDESCRIPTION
PART NUMBERITEM
1CX10 Single Pc Handle Assy5067641
2
Locknut #10-24 Jam Flexlock
1001182
2Screw #10-24 x 1-1/4" Phil Pan1003333
1
3
2
3
Cruiser Back Tube
Cruiser Back Tube
Cruiser 10 One Piece Push Handle
Assembled
Exploded
One Piece Height Adjustable Push Handle
FRAME
Item Description Qty
1 CX10 Single Pc Handle Assembly 1
2 Locknut #10-24 Jam Flexlock 2
3 Screw #10-24 x 1-1/4" Phil Pan 2
Assembled
Cruiser Back Tube
Cruiser Back Tube
991388
Kit Includes
#
FRAME
991388
QTYDESCRIPTION
PART NUMBERITEM
1CX10 Single Pc Handle Assy5067641
2
Locknut #10-24 Jam Flexlock
1001182
2Screw #10-24 x 1-1/4" Phil Pan1003333
1
3
2
3
Cruiser Back Tube
Cruiser Back Tube
Cruiser 10 One Piece Push Handle
Assembled
Exploded
3
3
1
2

INSTRUCTIONS
888-Convaid (266-8243)
www.convaid.com
45
Cruiser 10 Cruiser 10
Close-up
One Piece Height Adjustable Push Handle with Attendant
Handbrake
1. Remove cable from lever by pulling the cable away from the lever & routing the inner
cable off the lever.
2. Using a phillips screwdriver and a 3/8” wrench, remove the screw attaching the
handle tube assembly from the Cruiser Back Tubes.
3. Slide existing handle assembly off.
4. Slide new handle assembly onto the back tube. Item 1
5. Align the holes on the plastic pivot joint of the handle tube assembly with the holes of
the back tubes.
6. Insert new screw Item 3 into pivot joint.
7. Attach the nut Item 2 and tighten using a phillips screwdriver and a 3/8” wrench.
Attached cable onto the lever on the new handle.
3
2
31
One Piece Height Adjustable Push Handle
with Attendant Handbrake
Assembled
Cruiser Back Tube
Cruiser Back Tube
FRAME
Item Description Qty
1 CX-10 Attendant Brake Handle Assembly 1
2 Locknut #10-24 Jam Flexlock 2
3 Screw #10-24 x 1-1/4" Phil Pan 2
995914
#
Kit Includes
3
3
1
2

INSTRUCTIONS
888-Convaid (266-8243)
www.convaid.com
67
Cruiser 10 Cruiser 10
Close-up
992658
QTYDESCRIPTIONPART NUMBERITEM
1
CX-10 Footrest Assembly, LH
5049871
1
Cruiser 10-12 Small Footplate Assembly LH
Assembled
Exploded
Standard Footplate - Left
Assembled
FOOTPLATE
Item Description Qty
1 CX-10 Footrest Assembly, LH 1
992658
#
Standard Footplate - Left
1. Remove the exsiting footplate assembly by pressing the detent button then pulling the
footplate off.
2. Insert the new footplate assembly into the footplate adjustment tube then press the
detent button to allow the footplate assembly to slide in and lock in place.
992658
QTYDESCRIPTIONPART NUMBERITEM
1
CX-10 Footrest Assembly, LH
5049871
1
Cruiser 10-12 Small Footplate Assembly LH
Assembled
Exploded
Kit Includes

INSTRUCTIONS
888-Convaid (266-8243)
www.convaid.com
89
Cruiser 10 Cruiser 10
Close-up
992659
QTYDESCRIPTIONPART NUMBERITEM
1
CX-10 Footrest Assembly, RH
5049881
1
Cruiser 10-12 Small Footplate Assembly RH
Assembled
Exploded
Assembled
FOOTPLATE
992659
QTYDESCRIPTIONPART NUMBERITEM
1
CX-10 Footrest Assembly, RH
5049881
1
Cruiser 10-12 Small Footplate Assembly RH
Assembled
Exploded
Standard Footplate - Right
1. Remove the exsiting footplate assembly by pressing the detent button then pulling the
footplate off.
2. Insert the new footplate assembly into the footplate adjustment tube then press the
detent button to allow the footplate assembly to slide in and lock in place.
Standard Footplate - Right
Item Description Qty
1 CX-10 Footrest Assembly, RH 1
992659
#
Kit Includes

INSTRUCTIONS
888-Convaid (266-8243)
www.convaid.com
10 11
Cruiser 10 Cruiser 10
Close-up
994757
QTYDESCRIPTIONPART NUMBERITEM
1
CX-10 Pivot Footplate Assy LH
5048851
Cruiser 10-12 Small Angle Adjustable Footplate Assembly LH
Exploded
Assembled
Assembled
FOOTPLATE
994757
QTYDESCRIPTIONPART NUMBERITEM
1
CX-10 Pivot Footplate Assy LH
5048851
Cruiser 10-12 Small Angle Adjustable Footplate Assembly LH
Exploded
Assembled
992659
QTYDESCRIPTIONPART NUMBERITEM
1
CX-10 Footrest Assembly, RH
5049881
1
Cruiser 10-12 Small Footplate Assembly RH
Assembled
Exploded
Angle Adjustable Footplate - Left
1. Remove the exsiting footplate assembly by pressing the detent button then pulling the
footplate off.
2. Insert the new footplate assembly into the footplate adjustment tube then press the
detent button to allow the footplate assembly to slide in and lock in place.
Angle Adjustable Footplate - Left
Item Description Qty
1 CX-10 Pivot Footplate Assembly, LH 1
994757
#
Kit Includes

INSTRUCTIONS
888-Convaid (266-8243)
www.convaid.com
12 13
Cruiser 10 Cruiser 10
Close-up
994758
QTYDESCRIPTIONPART NUMBERITEM
1
CX-10 Pivot Footplate Assy RH
5044861
Cruiser 10-12 Small Angle Adjustable Footplate Assembly LH
Assembled
Exploded
1
Angle Adjustable Footplate - Right
Assembled
FOOTPLATE
994758
QTYDESCRIPTIONPART NUMBERITEM
1
CX-10 Pivot Footplate Assy RH
5044861
Cruiser 10-12 Small Angle Adjustable Footplate Assembly LH
Assembled
Exploded
1
Angle Adjustable Footplate - Right
1. Remove the exsiting footplate assembly by pressing the detent button then pulling the
footplate off.
2. Insert the new footplate assembly into the footplate adjustment tube then press the
detent button to allow the footplate assembly to slide in and lock in place.
Angle Adjustable Footplate - Right
Item Description Qty
1 CX-10 Pivot Footplate Assembly, RH 1
994758
#
Kit Includes

INSTRUCTIONS
888-Convaid (266-8243)
www.convaid.com
14 15
Cruiser 10 Cruiser 10
Close-up
996010
QTYDESCRIPTIONPART NUMBERITEM
1
CX-10 Footrest Assembly, LH
5049871
1
Footplate Adjustment Tube LH
5009692
1Footrest Extens. Housing Assy5006903
1Tube Connector 7/8" Heavy Duty100017
4
2Screw 1/4"-20 x 1-1/2" Flat Skt100262
5
1Detent Pin With Webbing Assembly5038796
1Thread Locker-Medium-Vibra-tite100690
7
6
4
57
2
1
Cruiser 10-12 Small Footplate Assembly Kit LH
Assembled
Exploded
Assembled
FOOTPLATE
Standard Footplate Assy Kit - Left
1. Pull out metal pin and remove the existing footplate extension tube. Item 2
2. Using a 5/32" allen wrench, remove both bolts from the housing bracket on the frame
and remove existing footplate assembly components.
3. If needed, install tube connector Item 4 into the front leg by hammering or pressing it
into the front leg tube.
4. Slide the loop portion of the detent pin with webbing assembly over the front x-brace
tube.
5. Align footrest extension housing Item 3 with the front leg.
6. Apply some thread locker Item 7 on the thread portion of the screws. Item 5
7. Using a 5/32" allen wrench, attach the footrest extension housing onto the front leg
using the screws provided. Item 5
8. Reattach the footplate adjustment tube and secure it with the
detent pin. Item 6
Standard Footplate Assy Kit - Left
Item Description Qty
1 CX-10 Footrest Assembly, LH 1
2 Footplate Adjustment Tube, LH 1
3 Footrest Extension Housing Assembly 1
4 Tube Connector 7/8" Heavy Duty 1
5 Screw 1/4"-20 x 1-1/2" Flat Skt 2
6 Detent Pin With Webbing Assembly 1
7 Thread Locker-Medium-Vibra-tite 1
996010
#
Kit Includes
3

INSTRUCTIONS
888-Convaid (266-8243)
www.convaid.com
16 17
Cruiser 10 Cruiser 10
Close-up
996011
QTYDESCRIPTIONPART NUMBERITEM
1
CX-10 Footrest Assembly, RH
5049881
1
Footplate Adjustment Tube RH
5009702
1Footrest Extens. Housing Assy5006903
1Tube Connector 7/8" Heavy Duty100017
4
2Screw 1/4"-20 x 1-1/2" Flat Skt100262
5
1Detent Pin With Webbing Assembly5038796
1Thread Locker-Medium-Vibra-tite100690
7
6
57
4
1
2
Cruiser 10-12 Small Footplate Assembly Kit RH
Assembled
Exploded
Assembled
FOOTPLATE
3
Standard Footplate Assy Kit - RightStandard Footplate Assy Kit - Right
Item Description Qty
1 CX-10 Footrest Assembly, RH 1
2 Footplate Adjustment Tube, RH 1
3 Footrest Extension Housing Assembly 1
4 Tube Connector 7/8" Heavy Duty 1
5 Screw 1/4"-20 x 1-1/2" Flat Skt 2
6 Detent Pin With Webbing Assembly 1
7 Thread Locker-Medium-Vibra-tite 1
996011
#
Kit Includes
1. Pull out metal pin and remove the existing footplate extension tube. Item 2
2. Using a 5/32" allen wrench, remove both bolts from the housing bracket on the
frame and remove existing footplate assembly components.
3. If needed, install tube connector Item 4 into the front leg by hammering or
pressing it into the front leg tube.
4. Slide the loop portion of the detent pin with webbing assembly over the front
x-brace tube.
5. Align footrest extension housing Item 3 with the front leg.
6. Apply some thread locker Item 7 on the thread portion of the screws. Item 5
7. Using a 5/32" allen wrench, attach the footrest extension housing onto the front
leg using the screws provided. Item 5
8. Reattach the footplate adjustment tube and secure it with the
detent pin. Item 6

INSTRUCTIONS
888-Convaid (266-8243)
www.convaid.com
18 19
Cruiser 10 Cruiser 10
Close-up
996012
QTYDESCRIPTIONPART NUMBERITEM
1
CX-10 Pivot Footplate Assy LH
5048851
1
Footplate Adjustment Tube LH
5009692
1Footrest Extens. Housing Assy5006903
1Tube Connector 7/8" Heavy Duty100017
4
2Screw 1/4"-20 x 1-1/2" Flat Skt100262
5
1Detent Pin With Webbing Assembly5038796
1Thread Locker-Medium-Vibra-tite100690
7
57
4
2
1
Cruiser 10-12 Small Angle Adjustable Footplate Assembly Kit LH
Assembled
Exploded
6
Angle Adjustable Swing Away Footplate Assy Kit - Left
Assembled
FOOTPLATE
Angle Adjustable Swing Away Footplate Assy Kit - Left
Item Description Qty
1 CX-10 Pivot Footplate Assembly, LH 1
2 Footplate Adjustment Tube, LH 1
3 Footrest Extension Housing Assembly 1
4 Tube Connector 7/8" Heavy Duty 1
5 Screw 1/4"-20 x 1-1/2" Flat Skt 2
6 Detent Pin With Webbing Assembly 1
7 Thread Locker-Medium-Vibra-tite 1
996012
#
Kit Includes
Angle Adjustable Swing Away Footplate Assy Kit - Left
3
1. Pull out metal pin and remove the existing footplate extension tube. Item 2
2. Using a 5/32" allen wrench, remove both bolts from the housing bracket on the frame
and remove existing footplate assembly components.
3. If needed, install tube connector Item 4 into the front leg by hammering or pressing it
into the front leg tube.
4. Slide the loop portion of the detent pin with webbing assembly over the front x-brace
tube.
5. Align footrest extension housing Item 3 with the front leg.
6. Apply some thread locker Item 7 on the thread portion of the screws. Item 5
7. Using a 5/32" allen wrench, attach the footrest extension housing onto the front leg
using the screws provided. Item 5
8. Reattach the footplate adjustment tube and secure it with the
detent pin. Item 6

INSTRUCTIONS
888-Convaid (266-8243)
www.convaid.com
20 21
Cruiser 10 Cruiser 10
Close-up
FOOTPLATE
996013
QTYDESCRIPTIONPART NUMBERITEM
1
CX-10 Pivot Footplate Assy RH
5044861
1
Footplate Adjustment Tube RH
5009702
1Footrest Extens. Housing Assy5006903
1Tube Connector 7/8" Heavy Duty100017
4
2Screw 1/4"-20 x 1-1/2" Flat Skt100262
5
1Detent Pin With Webbing Assembly5038796
1Thread Locker-Medium-Vibra-tite100690
7
2
57
4
1
Cruiser 10-12 Small Angle Adjustable Footplate Assembly Kit RH
Exploded
Assembled
6
996011
QTYDESCRIPTIONPART NUMBERITEM
1
CX-10 Footrest Assembly, RH
5049881
1
Footplate Adjustment Tube RH
5009702
1Footrest Extens. Housing Assy5006903
1Tube Connector 7/8" Heavy Duty100017
4
2Screw 1/4"-20 x 1-1/2" Flat Skt100262
5
1Detent Pin With Webbing Assembly5038796
1Thread Locker-Medium-Vibra-tite100690
7
6
57
4
1
2
Cruiser 10-12 Small Footplate Assembly Kit RH
Assembled
Exploded
Assembled
3
Angle Adjustable Swing Away Footplate Assy Kit - RightAngle Adjustable Swing Away Footplate Assy Kit - Right
Item Description Qty
1 CX-10 Pivot Footplate Assembly, RH 1
2 Footplate Adjustment Tube, RH 1
3 Footrest Extension Housing Assembly 1
4 Tube Connector 7/8" Heavy Duty 1
5 Screw 1/4"-20 x 1-1/2" Flat Skt 2
6 Detent Pin With Webbing Assembly 1
7 Thread Locker-Medium-Vibra-tite 1
996013
#
Kit Includes
1. Pull out metal pin and remove the existing footplate extension tube. Item 2
2. Using a 5/32" allen wrench, remove both bolts from the housing bracket on the
frame and remove existing footplate assembly components.
3. If needed, install tube connector Item 4 into the front leg by hammering or
pressing it into the front leg tube.
4. Slide the loop portion of the detent pin with webbing assembly over the front
x-brace tube.
5. Align footrest extension housing Item 3 with the front leg.
6. Apply some thread locker Item 7 on the thread portion of the screws. Item 5
7. Using a 5/32" allen wrench, attach the footrest extension housing onto the front
leg using the screws provided. Item 5
8. Reattach the footplate adjustment tube and secure it with the
detent pin. Item 6

INSTRUCTIONS
888-Convaid (266-8243)
www.convaid.com
22 23
Cruiser 10 Cruiser 10
Close-up
7.5" x 2" Front Solid Wheel Assy - Each
Assembled
WHEELS
1. Use a 6mm allen wrench and a 1/2" wrench to remove existing front wheel.
2. Be sure to follow schematic to place washers in the proper order when installing
new wheel.
994749
QTYDESCRIPTION
PART NUMBERITEM
1
7.5" x 2" Front Solid Tire on Grey Rim (ea)
1007631
1Bolt M8-1.25mm x 90mm Socket Cap Screw1007652
6Washer 5/16" x 9/16"1000703
1Locknut M8-1.25 Nylon Insert1007664
3
3
1
2
3
4
Cruiser 10-16 7.5" x 2" Wheel Assembly Front (each)
Assembled
Exploded
994749
QTYDESCRIPTION
PART NUMBERITEM
1
7.5" x 2" Front Solid Tire on Grey Rim (ea)
1007631
1Bolt M8-1.25mm x 90mm Socket Cap Screw1007652
6Washer 5/16" x 9/16"1000703
1Locknut M8-1.25 Nylon Insert1007664
3
3
1
2
3
4
Cruiser 10-16 7.5" x 2" Wheel Assembly Front (each)
Assembled
Exploded
7.5" x 2" Front Solid Wheel Assy - Each
Item Description Qty
1 7.5" x 2" Front Solid Tire on Gray Rim (ea) 1
2 Bolt M8-1.25mm x 90mm Socket Cap Screw 1
3 Washer 5/16" x 9/16" 6
4 Locknut M8-1.25 Nylon Insert 1
994749
#
Kit Includes

INSTRUCTIONS
888-Convaid (266-8243)
www.convaid.com
24 25
Cruiser 10 Cruiser 10
Close-up
7.5" x 2" Front Pneumatic Wheel Assy - Each
Assembled
994750
QTYDESCRIPTION
PART NUMBERITEM
1
Pneu Front Wheel w/3-Spokes 190mmx50mm Rolko
1007731
1Bolt M8-1.25mm x 90mm Socket Cap Screw1007652
6Washer 5/16" x 9/16"1000703
1Locknut M8-1.25 Nylon Insert1007664
Cruiser 10-16 7.5" x 2" Wheel Assembly Front Pneumatic (each)
Assembled
Exploded
4
3
2
13
3
994750
QTYDESCRIPTION
PART NUMBERITEM
1
Pneu Front Wheel w/3-Spokes 190mmx50mm Rolko
1007731
1Bolt M8-1.25mm x 90mm Socket Cap Screw1007652
6Washer 5/16" x 9/16"1000703
1Locknut M8-1.25 Nylon Insert1007664
Cruiser 10-16 7.5" x 2" Wheel Assembly Front Pneumatic (each)
Assembled
Exploded
4
3
2
13
3
WHEELS
7.5" x 2" Front Pneumatic Wheel Assy - Each
Item Description Qty
1 Pneu Front Wheel w/3-Spokes 190mmx50mm Rolko 1
2 Bolt M8-1.25mm x 90mm Socket Cap Screw 1
3 Washer 5/16" x 9/16" 6
4 Locknut M8-1.25 Nylon Insert 1
994750
#
Kit Includes
1. Use a 6mm allen wrench and a 1/2" wrench to remove existing front wheel.
2. Be sure to follow schematic to place washers in the proper order when installing
new wheel.

995690
QTY
DESCRIPTION
PART NUMBER
ITEM
2
Locknut 1/2"-20 Capped Nylon
1004051
2
"O" Ring Beuna-Nitrial
1001302
1Caster Lock Assembly LH5044603
1
Caster Lock Assembly RH
5044614
Bolt
3
4
1
2
Nut
Washer
Washer
Washer
Cruiser 10-14 Caster Fork Assy For Caster Lock (Rolko Tire)
Assembled
Exploded
Caster Lock
Wheel
INSTRUCTIONS
888-Convaid (266-8243)
www.convaid.com
26 27
Cruiser 10 Cruiser 10
Close-up
996009
QTYDESCRIPTION
PART NUMBERITEM
2
Locknut 1/2"-20 Capped Nylon
1004051
2
"O" Ring Beuna-Nitrial
1001302
1Balloon Caster Fork Assembly5009043
3
1
2
Cruiser 10-14 Caster Fork Assy (Rolko Tire)
Assembled
Exploded
Washer
Washer
Nut
Washer
Bolt
Caster Fork Assy for 7.5" x 2" Front Rolko Wheel - Each
Assembled
996009
QTYDESCRIPTION
PART NUMBERITEM
2
Locknut 1/2"-20 Capped Nylon
1004051
2
"O" Ring Beuna-Nitrial
1001302
1Balloon Caster Fork Assembly5009043
3
1
2
Cruiser 10-14 Caster Fork Assy (Rolko Tire)
Assembled
Exploded
Washer
Washer
Nut
Washer
Bolt
1. Use a 6mm allen wrench and a 1/2" wrench to remove existing from wheel.
2. Use a 3/4" wrench to remove top nut Item1 of the caster fork assembly.
3. Install new Caster Fork.
4. Be sure to follow schematic to place washers in the proper order when installing new
wheel.
WHEELS
Caster Fork Assy for 7.5" x 2" Front Rolko Wheel - Each
Item Description Qty
1 Locknut 1/2"-20 Capped Nylon 2
2 "O" Ring Beuna-Nitrial 2
3 Balloon Caster Fork Assembly 1
996009
#
Kit Includes

INSTRUCTIONS
888-Convaid (266-8243)
www.convaid.com
28 29
Cruiser 10 Cruiser 10
Close-up
995690
QTYDESCRIPTION
PART NUMBERITEM
2
Locknut 1/2"-20 Capped Nylon
1004051
2
"O" Ring Beuna-Nitrial
1001302
1Caster Lock Assembly LH5044603
1
Caster Lock Assembly RH
5044614
Bolt
3
4
1
2
Nut
Washer
Washer
Washer
Cruiser 10-14 Caster Fork Assy For Caster Lock (Rolko Tire)
Assembled
Exploded
Caster Lock
Caster Fork Assy with Caster Lock for
7.5" x 2" Front Rolko Wheel - Pair
Assembled
995690
QTYDESCRIPTION
PART NUMBERITEM
2
Locknut 1/2"-20 Capped Nylon
1004051
2
"O" Ring Beuna-Nitrial
1001302
1Caster Lock Assembly LH5044603
1
Caster Lock Assembly RH
5044614
Bolt
3
4
1
2
Nut
Washer
Washer
Washer
Cruiser 10-14 Caster Fork Assy For Caster Lock (Rolko Tire)
Assembled
Exploded
Caster Lock
1. Use a 6mm allen wrench and a 1/2" wrench to remove existing front wheel.
2. Use a 3/4" wrench to remove top nut Item1 of the caster fork assembly.
3. Install new caster fork.
4. Be sure to follow schematic to place washers in the proper order when installing
new wheel.
995690
QTY
DESCRIPTION
PART NUMBER
ITEM
2
Locknut 1/2"-20 Capped Nylon
1004051
2
"O" Ring Beuna-Nitrial
1001302
1Caster Lock Assembly LH5044603
1
Caster Lock Assembly RH
5044614
Bolt
3
4
1
2
Nut
Washer
Washer
Washer
Cruiser 10-14 Caster Fork Assy For Caster Lock (Rolko Tire)
Assembled
Exploded
Caster Lock
Wheel
WHEELS
Caster Fork Assy with Caster Lock for
7.5" x 2" Front Rolko Wheel - Pair
Item Description Qty
1 Locknut 1/2"-20 Capped Nylon 2
2 "O" Ring Beuna-Nitrial 2
3 Caster Lock Assembly, LH 1
4 Caster Lock Assembly, RH 1
995690
#
Kit Includes

INSTRUCTIONS
888-Convaid (266-8243)
www.convaid.com
30 31
Cruiser 10 Cruiser 10
Close-up
994746
QTYDESCRIPTION
PART NUMBERITEM
1
Rear Wheel 290mm x 60mm (Rolko)
5068421
Cruiser 10-16 11.5" x 2.5" Wheel Assy Rear Solid (each)
Assembled
Exploded
1
11.5" x 2.5" Rear Solid Wheel Assy - Each
Assembled
1. To remove, press down and hold the Rear Wheel Locking Pin. Grasp wheel and pull.
2. No tools are required to remove wheel.
Wheel Installation
Caution: Ensure the wheels are installed properly. You will hear a "click" when
wheel locks into place.
3. To install, slide wheel onto rear axle and push with ball of hand until it clicks into
place.
994746
QTYDESCRIPTION
PART NUMBERITEM
1
Rear Wheel 290mm x 60mm (Rolko)
5068421
Cruiser 10-16 11.5" x 2.5" Wheel Assy Rear Solid (each)
Assembled
Exploded
1
WHEELS
11.5" x 2.5" Rear Solid Wheel Assy - Each
Item Description Qty
1 Rear Wheel 290mm x 60mm (Rolko) 1
994746
#
Kit Includes

INSTRUCTIONS
888-Convaid (266-8243)
www.convaid.com
32 33
Cruiser 10 Cruiser 10
Close-up
994747
QTYDESCRIPTION
PART NUMBERITEM
1
12.5" Knobby Solid Rear Wheel (Gray Hub)
5068651
Cruiser 10-16 12.5" x 2" Wheel Assy Rear Solid Knobby (each)
Assembled
Exploded
994747
QTYDESCRIPTION
PART NUMBERITEM
1
12.5" Knobby Solid Rear Wheel (Gray Hub)
5068651
Cruiser 10-16 12.5" x 2" Wheel Assy Rear Solid Knobby (each)
Assembled
Exploded
12.5" x 2" Rear Solid Knobby Wheel Assy - Each
Assembled
1. To remove, press down and hold the Rear Wheel Locking Pin. Grasp wheel and pull.
2. No tools are required to remove wheel.
Wheel Installation
Caution: Ensure the wheels are installed properly. You will hear a "click" when
wheel locks into place.
3. To install, slide wheel onto rear axle and push with ball of hand until it clicks into
place.
WHEELS
12.5" x 2" Rear Solid Knobby Wheel Assy - Each
Item Description Qty
1 12.5" Knobby Solid Rear Wheel (Gray Hub) 1
994747
#
Kit Includes
1

INSTRUCTIONS
888-Convaid (266-8243)
www.convaid.com
34 35
Cruiser 10 Cruiser 10
Close-up
994748
QTYDESCRIPTION
PART NUMBERITEM
1
12.5" Knobby Pneu Rear Wheel (Grau Hub)
5068641
Cruiser 10-16 12.5" x 2" Wheel Assy Rear Pneu Knobby (each)
Assembled
Exploded
994748
QTYDESCRIPTION
PART NUMBERITEM
1
12.5" Knobby Pneu Rear Wheel (Grau Hub)
5068641
Cruiser 10-16 12.5" x 2" Wheel Assy Rear Pneu Knobby (each)
Assembled
Exploded
Assembled
12.5" x 2" Rear Pneumatic Knobby Wheel Assy - Each
1. To remove, press down and hold the Rear Wheel Locking Pin. Grasp wheel and pull.
2. No tools are required to remove wheel.
Wheel Installation
Caution: Ensure the wheels are installed properly. You will hear a "click" when
wheel locks into place.
3. To install, slide wheel onto rear axle and push with ball of hand until it clicks into
place.
WHEELS
12.5" x 2" Rear Pneumatic Knobby Wheel Assy - Each
Item Description Qty
1 12.5" Knobby Pneu Rear Wheel (Gray Hub) 1
994748
#
Kit Includes
1
Table of contents
Other Convaid Mobility Aid manuals
Popular Mobility Aid manuals by other brands

medi
medi protect.ROM manual

DELTA-SPORT
DELTA-SPORT 96822 Instructions for use

Patron
Patron TOM 5 user guide

Invacare
Invacare 2218 Assembly, installation and operating instructions

Top shelf Orthopedics
Top shelf Orthopedics 501811 Instructions for use

Aqua Creek Products
Aqua Creek Products Mighty 400 manual