Convaid Carrot 3 User manual

!
CARROT 3 - CHILD RESTRAINT SYSTEM
For Children with Special Needs
Instruction Manual

2
CARROT 3 CHILD RESTRAINT SYSTEM
The Carrot 3 is designed to provide additional support for children who have
difculty sitting correctly in conventional car seats. Always consult your doctor to
make sure that this restraint system is suitable for your child.
Your child’s safety is very important to us. To ensure that your restraint system is
installed correctly, please read all the instructions in this manual before use. If
you require additional assistance, please call Convaid at (888) 266-8243.
WARNINGS ..................................................................................................................4
SAFETY INFORMATION ..............................................................................................6
Certication .................................................................................................................6
Important Notes .......................................................................................................... 6
FEATURES ...................................................................................................................9
INSTALLATION ...........................................................................................................10
LATCH Installation .....................................................................................................10
Using LATCH Top Tether Strap ..................................................................................11
Securement Strap Installation .................................................................................13
Aircraft Installation ....................................................................................................14
PADS AND SEAT CUSHIONS ....................................................................................17
HEAD SUPPORT ........................................................................................................18
Head Support Depth Adjustment .............................................................................18
Head Support Contour Adjustment ..........................................................................18
Head Pillow Adjustment ............................................................................................18
SHOULDER SUPPORT ..............................................................................................19
Harness Strap Adjustment .......................................................................................19
Seatbelt Length Adjustment .....................................................................................19
Shoulder Strap Comfort Pad ....................................................................................20
Shoulder Protector Wing ...........................................................................................20
Shoulder Protector Wing Installation .......................................................................21
CHEST SUPPORT ......................................................................................................22
Chest Support Pad Adjustment ................................................................................22
Table of Contents
Table of Contents

3
Table of Contents
Harness Buckle - Fastening / Releasing .................................................................22
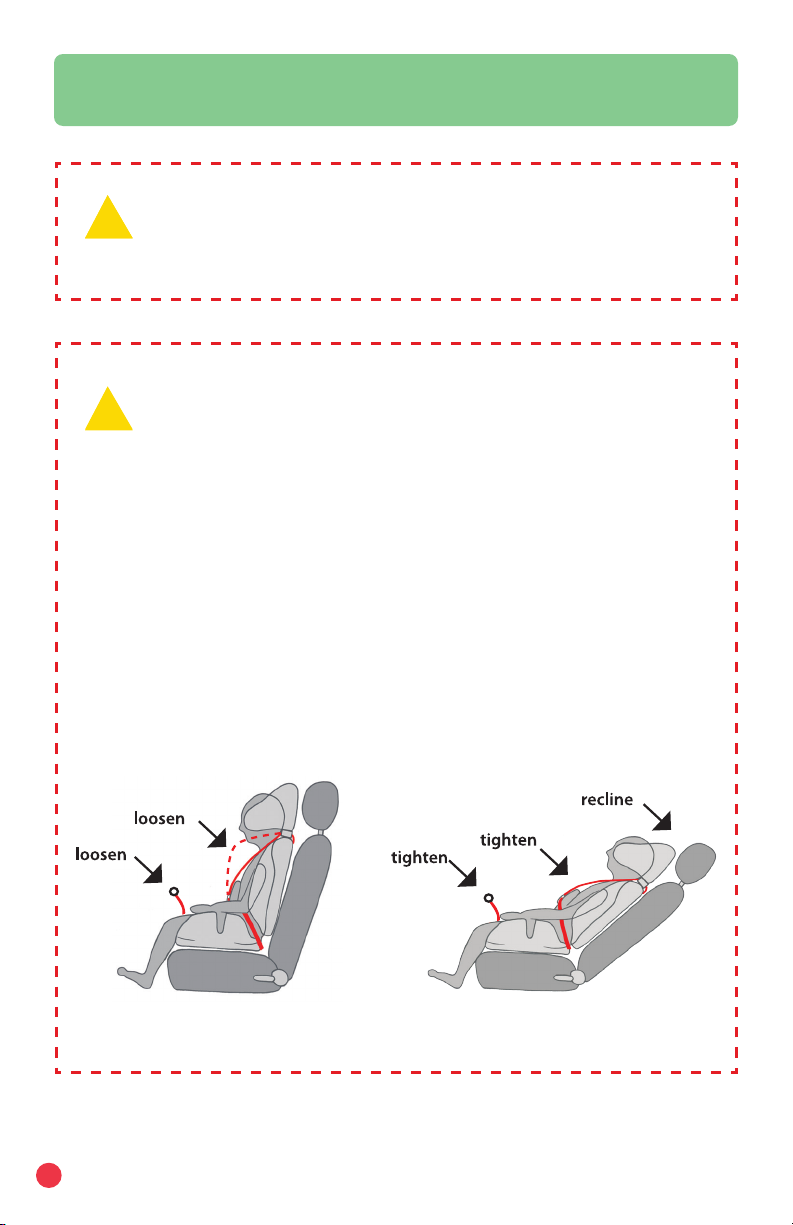
LATERAL SUPPORT ..................................................................................................23
Lateral Support Adjustment .....................................................................................23
BACKREST ................................................................................................................24
Backrest Height Adjustment .....................................................................................24
Backrest Extensions .................................................................................................24
SEAT ...........................................................................................................................25
Seat Depth Adjustment ............................................................................................25
Seat Extensions .........................................................................................................25
Rodded Seat Extension - Long .................................................................................26
Rodded Seat Extension - Short ................................................................................26
Pommel ......................................................................................................................27
Pommel Attachment .................................................................................................27
Footrest Adjustment (Small / Medium / Large) ......................................................27
Support Tray ..............................................................................................................28
Wedge Cushion .........................................................................................................28
Anti Adduction / Knee Separator Pad .....................................................................28
Removable Incontinence Receiver...........................................................................29
Anti-Escape Vest .......................................................................................................30
Hinge Lock Belt - for easy carrying ..........................................................................30
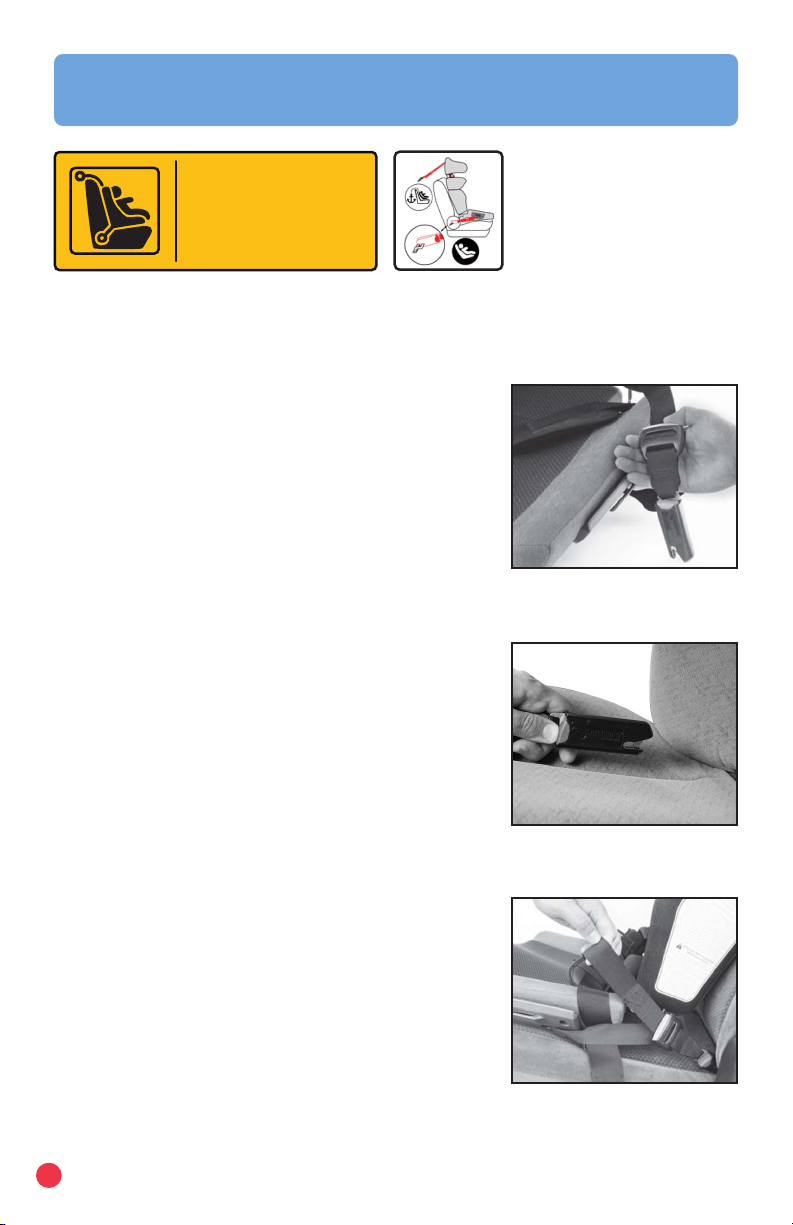
SECURING YOUR CHILD ..........................................................................................31
CARE AND MAINTENANCE ......................................................................................33
Upholstery, Cushions, Pillow & Pads ........................................................................33
Harness Buckle .........................................................................................................33
Harness & Straps ......................................................................................................33
WARRANTY ...............................................................................................................34
Consumer Information Record .................................................................................34
Warranty ....................................................................................................................35
Limitations .................................................................................................................35
Damages ....................................................................................................................35

4
• Failure to follow all instructions and product labels can result in serious
injury or death in a crash. Please read the instruction for the Carrot 3
carefully. If you have questions, contact Convaid at 1-888-CONVAID (266-
8243).
• Use only with children who weigh between 30 and 108 pounds (mass
between 13.6 and 49kg) and whose height is between 37 and 60 inches
(94 and 152 cm).
• Use only in a forward-facing position.
• Use Carrot 3 ONLY with forward-facing vehicle seats. Do not use restraint
with side- facing, rear-facing or ip-down vehicle seats.
• According to accident statistics, the National Highway Trafc Safety
Administration recommends the vehicle’s rear seat is the safest location for
a properly installed child restraint system.
• Do not use the Carrot 3 in the front seat of the vehicle unless the passenger
air bag is turned off. Serious injury or death can occur. Refer to your vehicle
owner’s manual for instruction, warnings, and precautions.
• Adjust the harnesses and belts for a comfortable and snug t around
your child. There should not be any slack or twist in the straps, and the
straps should not press on the child’s skin or push the child’s body into an
unnatural position.
• Never leave a child unattended in the vehicle even if they are secured in the
Carrot 3.
• Secure the Carrot 3 to the vehicle’s seat with the upper top tether strap and
lower anchor straps (LATCH).
• Use the Carrot 3 only with vehicles with lap shoulder 3-point safety belts
approved by FMVSS 209.
• Rigid items & plastic parts of the restraint system must be located and
installed so they do not become trapped by a movable seat or in a door of
the vehicle.
WARNING!
SERIOUS INJURY or DEATH can occur

5
• Discontinue use of your Carrot 3 if it has been involved in ANY type of
accident. It may no longer be effective and should be replaced immediately.
• The Carrot 3 must not be used in homes, boats or any other non-certied
applications.
• Always keep the Carrot 3 secured in the vehicle, even when not in use. In an
accident, an unsecured Carrot 3 may injure other occupants.
• Do not use the Carrot 3 in a vehicle with passenger air bags unless the
air bags are turned off. Death or serious injury can occur. Refer to your
vehicle’s owner’s manual for instructions, warnings and precautions.
• When using the Carrot 3 in a vehicle with side air bags, refer to your
vehicle’s owner’s manual for instructions, warnings and precautions.
• The Carrot 3 should not be used without an upholstery cover.
• Please use recommended manufactures when replacing the upholster
cover.
• Follow all instructions. The instruction manual can store in the pocket
behind backrest of the Carrot 3.
• Never use the adjustment straps to lift or carry the Carrot 3. This can
damage the mechanism and the webbing.
• Do not remove the harness and straps from the Carrot 3. Never remove the
buckles and/or the buckle clasps from the harness or the straps.
• The primary protection for occupants of a vehicle in a collision is the body
of the vehicle itself; a child restraint will not protect a child when a vehicle
is seriously impacted. However, correctly installed, a child Carrot 3 will
substantially improve chances for survival in most crashes. Make sure all
users fully understand the correct ways to use Carrot 3 in a vehicle.
• Please register your Carrot 3 with the manufacturer.
WARNING!
SERIOUS INJURY or DEATH can occur

6
Certication
The Carrot 3 conforms to U.S. Federal Motor Vehicle Safety Standard FMVSS 213 and
European Safety Standard ECE R44/04.
• Carrot 3 is certied for use in motor vehicles.
• Please register the Carrot 3 with the manufacturer.
The Carrot 3 could be recalled for safety reasons. To be reached directly in the event of a
recall, you must register your Carrot 3 with the manufacturer. Send your name, address,
email address if available, the serial number and manufacturing date to:
Convaid Product Registration
2830 California Street
Torrance, CA 90503
Or call Convaid at 1-844-US-MOBILITY (844-876-6245).
For recall information, call the U.S. Government’s Vehicle Safety Hotline at 1-888-327-
4236 (TTY: 1-800- 424-9153) or go to http://www.NHTSA.gov.
Important Notes
Correctly set up and install the Carrot 3 before using. Before each use, verify it is securely
installed to the vehicle seat and the harness is properly adjusted around child.
• Adjust harness to t securely around the Child's clothes. Remove bulky coats and/or
jackets before putting child in restraint system.
• Cover the Carrot 3 when vehicle is parked in direct sunlight. Parts of the Carrot 3
could become hot and cause injury to a child.
• Store the Carrot 3 in a safe place when not in use. Avoid placing heavy objects on
top of it.
• Never leave children alone in a vehicle, even for a short time.
• Do not attempt to disassemble any part of the Carrot 3 or modify it in any way that is
not described in this manual.
• Do not leave loose objects, e.g. books, bags, etc., in the back of a vehicle. In the
event of a sudden stop, loose objects will keep moving, potentially causing serious
injuries.
• Make sure vehicle seats that fold forward are securely locked in their open position.
• An unsecured vehicle seat back could prevent the Carrot 3 from protecting the child
completely.
• Do not use anything to raise Carrot 3 off vehicle seat except as described in this
manual. In an accident, the child restraint may not adequately protect the child.
• Do not allow children to play with this or any child restraint system.
• The Carrot 3 is recommended to be used in the upright position.
Safety Information

7
!
Safety Information
WARNING!
The Vehicle’s lap shoulder (3 point) safety belt MUST BE USED in
addition to the harness straps (5 point) of the Carrot 3.
DO NOT secure a child only with the harness straps (5-point) of
the Carrot 3; ALWAYS use the vehicle’s lap shoulder (3-point)
safety belt at the same time to secure the Carrot 3 and the child.
Not using vehicle’s lap shoulder (3-point) safety belt could cause
your child restraint to not perform as intended, and increase the
potential of serious injury or death.
Figure A. below illustrates a vehicle lap and shoulder (3-point
safety) belt secured over the Carrot 3. The Carrot 3 is shown at
its smallest and largest congurations.
IMPORTANT: Upper belt path should be above occupant’s
shoulder for proper securement.
Fig. A

8
!
!
Safety Information
!
!
WARNING!
The Carrot 3 must be used in a forward-facing position only.
WARNING!
Before reclining the back, you must release and loosen the
harness straps. Once reclined, re-tighten the harness straps.
Reclining the back without loosening the harness straps may
cause choking.
The Carrot 3 was tested at a 30º recline from vertical, and should
not be transported in a moving vehicle past this point.

9
Splitter Plate
Features: Carrot 3
Carrot 3 Standard Model
Carrot 3 with Shoulder Protector Wings

10
Fig. A
Fig. B
Fig. C
LATCH Installation
Carrot 3 system is recommended for use in a vehicle with LATCH anchors. Verify
that your vehicle is equipped with LATCH anchors. If your vehicle is not equipped
Anchor. Tether.
The next generation
of child safety.
LATCH
Lower Anchor and Tethers for Children
with LATCH anchors refer to page 13 regarding
installation and use of lower securement strap.
Lower LATCH Installation:
1. Press and hold the rst LATCH adjuster release
button, then pull the LATCH strap to full length.
Repeat for the remaining LATCH connector (Fig. A).
2. Place the Carrot 3 forward-facing on the vehicle
seat.
3. Attach one LATCH connector to its adjacent vehicle
LATCH anchor (Fig. B).
a. An audible click conrms attachment
b. Ensure that the LATCH strap is not twisted.
4. Attach the remaining LATCH connector to its
adjacent vehicle LATCH anchor.
a. An audible click conrms attachment
b. Ensure that the LATCH strap is not twisted.
5. Push the Carrot 3 into the vehicle seat while pulling
each LATCH strap tight (Fig. C).
NOTE:
If an audible click is not heard when connecting
either LATCH connector, the LATCH strap may
be twisted, or there may be debris in the LATCH
connector. Correct either situation before continuing
with the installation process.
IMPORTANT:
Ensure the LATCH strap does not fold into the LATCH
adjuster while tightening.
Vehicle Installation

11
Vehicle Installation
Carrot 3 Top Tether Strap Installation Guide
Installing top tether strap (if not factory installed):
1. Make a 2.5” horizontal cut approximately 3” below the top center at the
rear of the head rest to reveal the mounting area. (Figs. A and B)
Fig. A
Fig. C
Fig. F
Fig. B
Fig. D
Fig. G
Fig. E
2. Insert mounting bracket and secure with the screws provided. Make sure
bracket is positioned correctly as shown. (Figs. C, D, E, F, and G)

12
Vehicle Installation
Using LATCH Top Tether Strap
If your vehicle is equipped with LATCH Top
Tether Anchor points, you can use the Top
Tether Strap to attach the Head Support.
NOTE:
All vehicles manufactured since September 1,
2002 are equipped with tether anchors located
behind the rear seats.
1. Consult your vehicle owner’s manual to
locate the tether anchor points.
2. Pull and fully extend the top tether strap.
3. Locate the hook on the strap and loosely
attach the tether strap to the anchor
point.
4. Pull the tether strap to remove ALL slack
(Fig. A and B).
5. Make sure the tether strap is taut and
that the child seat is properly secured.
Fig. A (Car)
Fig. B (Van)
NOTE:
The Carrot 3 is secure when it cannot be moved front-to-back or side-to-side
more than 1 inch (2.5 cm) at the belt path. If the Carrot 3 is not secure, repeat
the installation process or use an alternate seating location.

13
Vehicle Installation
Installation in vehicles that are not equipped with LATCH anchor
points.
Use lower and top securement straps (not included in standard) to secure
Carrot 3 in the vehicle.
Seat Installation in Vehicle:
1. Place the Carrot 3 in the vehicle on the appropriate seat. (Fig. F)
2. Unbuckle lower securement strap and secure it around the lower part of
vehicle seat. (Fig. G)
3. Next, unbuckle top securement strap and secure it around the headrest
of the vehicle seat. (Fig. H)
Fig. E
Fig. F Fig. G Fig. H
Fig. A Fig. B
Fig. C Fig. D
Installing Lower Securement Strap:
1. Remove shoulder harness strap from the splitter plate. Retract harness
strap through shoulder harness openings. (Figs. A & B)
2. Pull and hold the black “D” shaped ring at the top of the backrest to
release lock and remove backrest. (Figs. C & D)
3. Thread the lower securement strap ends with loops over the metal bars.(Fig. E)
4. Reassemble the seat by reversing steps above.

14
Aircraft Installation
Most airlines allow the use of a child restraint if it has
been approved for airline use and properly ts into the
aircraft. Contact your airline about their child restraint
policy before traveling.
• This Carrot 3 is FAA certied.
• The FAA recommends that a child weighing up to 40
lbs (18.1 kg) use a certied harness child seat while
traveling on an aircraft.
• Install your Carrot 3 in a window seat to avoid
blocking the aisle.
• If the aircraft lap belt is too short, ask a ight
attendant for a belt extender.
• The Carrot 3 may not t in all aircraft. Contact your
airline prior to travel to verify t. The width of the
aircraft seats needs to be 18” minimum.
Securing Your Child
Restraint in Aircraft
Video
Securing Your Carrot 3 in Aircraft
The Federal Aviation Administration (FAA) recommends
that you secure your child for air travel in an appropriate
child restraint based on your child’s weight and size.
Turbulence can happen with little or no warning. When
turbulence occurs, the safest place for your child is in a
properly installed child restraint, not in an adult’s lap
or on the aircraft seat with its seat belt. Keeping your
child in a child restraint during the ight will help ensure
your family arrives safely at your destination.
The FAA recommends that a child weighing:*
• more than 18 kg (40 lbs) use an aircraft seat belt;
• from 9 to 18 kg (20 to 40 lbs) use a forward-facing
child restraint.
* Please note that these FAA recommendations may
vary from those applicable to the use of your child
restraint in a motor vehicle.
This Carrot 3 is
Certied for Use in
Motor Vehicles and
Aircraft.
Aircraft Installation

15
Installation of Carrot Fixing Strap
When you use the Carrot 3 in an aircraft, you will need to use the Carrot Fixing
Strap. This strap is long enough to tether the Carrot 3 around the Aircraft seat.
With this system you can fasten/unfasten and tighten/loosen the strap from
either side of the seat so that the Carrot 3 can be put at any seat in the aircraft.
Install Carrot Fixing Strap prior to boarding aircraft.
Visit https://youtu.be/DYpZPx__5A8 for installation tutorial video.
The set consists of three parts, two buckles and one center strap. No tools
required for the installation. (Fig. A)
• First, unfasten the harness buckle. (Fig. B)
• Then press and hold the black buttons and removed head support. (Fig. C & D)
• Put the buckle pieces on the rods. There is no left or right side, but make
sure the “PRESS” sign (in red) is facing upwards. (Fig. E)
• Put the head support back onto the shoulder. (Fig. F)
• Conrm secure xation with an audible click and response. (Fig. G)
Now you are ready to fasten/unfasten and tighten/loosen the center strap from
both sides. (Figs. H & I)
Fig. A Fig. B Fig. C
Fig. EFig. D Fig. F
Fig. G Fig. IFig. H
Aircraft Installation

16
Installing Carrot 3 Forward-facing in Aircraft
IMPORTANT: Before installing the Carrot 3, make sure
the aircraft seat is in a fully upright position.
Adjust the Carrot 3 to its upright position, then place it on
the aircraft seat forward-facing, as shown in Fig. A.
Make sure that the back of the Carrot 3 is rmly against
the aircraft seatback. Attach the Carrot Fixing Strap
around the back of the aircraft seat and tighten.
Visit www.youtube.com/watch?v=us8_c_Vm6hA&t=98s
for installation into aircraft.
Place child into the Carrot 3 and attach the harness refer
to page 31. Then install the aircraft seat belt through the
lower belt guides (Fig. B) and over the child. Pull on the
aircraft seat belt after securing the child, to ensure the
aircraft buckle clasps are secure.
Check your work. Try to move the Carrot 3 in all
directions. If you can move the Carrot 3 more than 2.5 cm
(1 in.) side to side or front to back at the forward-facing
belt path, the Carrot Fixing Strap is not tight enough, and
you MUST tighten the straps again until the seat is tight.
Fig. A
Fig. B
Aircraft Belt
Carrot Fixing Strap
Aircraft Installation

17
Pads and Cushions (STANDARD ACCESSORIES)
The following Pads and Cushions are provided as standard accessories, and
easily attach / adjust with Velcro®.
Head Pillow
Provides comfort and lateral head support.
Body Balance Pads
Used to balance / position the user.
Hip Pads
Provides proper positioning for balance, comfort and support.
Comfort Seat Cushion
Provides additional comfort and prevents the child’s pelvis from slipping forward.
Comfort cushions are required for occupants that are 40 lbs or less.
Body Balance Pads
Hip Pads
Comfort Seat Cushion
Head Pillow
Pads and Seat Cushions

18
Head Support Depth Adjustment
The Head Support can be adjusted forward or backward by 0.6” (1.5 cm)
increments to provide a better t and added protection for the occupant (Fig. A).
To Adjust: Remove screws on each side of the head support with a Phillips
screwdriver. Move the head support to selected position, and reinsert screws
(Figs. B & C).
Head Support Contour Adjustment
The head support can be contoured to better t and
protect the head. This adjustment must be performed
on limited bases (to not weaken the head support
structure) by the dealer.
Head Pillow Adjustment
The Head Pillow provides added comfort and
positioning.
To reposition: Grasp the head pillow and pull it away
from the head support. Place the head pillow where
desired and press down to afx Velcro®.
Fig. A Fig. B Fig. C (Use holes 1,2 or
3 on both sides)
Head Support

19
Shoulder Support
Harness Strap
Release Lever
(Red)
Harness Strap Adjustment
The Harness Strap comfortably positions the
child in place.
To tighten the shoulder harness strap, pull on the
harness adjustment strap (Fig. A).
To loosen the harness strap, press and hold the
harness release lever (Red), while pulling the
shoulder harness strap (Fig. B).
NOTE:
Do not pull on the padded covers or chest
support pad when loosening the harness strap.
Harness Strap Length Adjustment
If the backrest height is extended or the shoulder
protector wings are installed, the harness belt may
need to lengthened.
1. Turn knob counter clockwise and remove
(Fig. A).
2. Separate the Carrot seat from the back.
3. Pull harness strap off of seat rod.
4. Replace harness strap utilizing the lower loop.
Before replacing, fold the webbing loop inward
so the attachment area is not covered by the
strap (Fig. B).
5. Reattach knob. It is very important to make
sure that the backrest rod is in between
the seat’s rod and gray plastic cover before
reassembling (Fig. C).
Fig. C
Fig. B
Fig. A
backrest rod
seat rod
cover
Fig. A
Fig. B

20
Shoulder Strap Comfort Pad
The shoulder strap comfort pad can be moved by
readjusting the Velcro® attached to the back of the
Head Support.
Shoulder Protector Wing (OPTIONAL ACCESSORY)
The Shoulder Protector Wing provides additional
positioning support and trunk alignment and can
also be used to extend the height of the backrest
by 6”. The Shoulder Wing has up to 4” of width
adjustment.
To adjust the width, press/ hold the yellow button
on the back of the shoulder wing, and pull the
shoulder wing outward to the desired position.
(Fig. A).
IMPORTANT :
As your child grows and the Shoulder Protector
Wing is utilized. You may need to adjust the length
of the Harness Strap after adding the Shoulder
Protector Wing. (see page 19).
Fig. A
Shoulder Support
Other manuals for Carrot 3
5
Table of contents
Other Convaid Mobility Aid manuals
Popular Mobility Aid manuals by other brands

medi
medi protect.ROM manual

DELTA-SPORT
DELTA-SPORT 96822 Instructions for use

Patron
Patron TOM 5 user guide

Invacare
Invacare 2218 Assembly, installation and operating instructions

Top shelf Orthopedics
Top shelf Orthopedics 501811 Instructions for use

Aqua Creek Products
Aqua Creek Products Mighty 400 manual