CONVIV'HOME TCA-150EX User manual

1
ELECTRIC ESPRESSO COFFEE MACHINE
Instruction manual
Dear consumer, Please read these instructions carefully before use in
order to avoid damage due to incorrect use and to better understand the
functions of this product. Please pay particular attention to the safety
guide.
If you pass the device on to a third party, these Operating Instructions
must also be handed over.
Please keep them for future references.
TCA-150EX

2
IMPORTANT SAFEGUARDS
A warning of potential injury from misuse
The heating element surface is subject to residual heat after
use
Please read these instructions carefully before use.
Keep present instructions for future references.
Check that your mains voltage corresponds to that stated on
the appliance.
Only use the appliance for domestic purposes and household
or similar applications such as:
- staff kitchen areas, in shops, offices and other working
environments;
- By clients in hotels, motels and other residential type
environments;
- Environment type like : • Farm Houses • Bed and
Breakfast.
Only use the appliance in the way indicated in these
instructions.
Never use this unit near bathtub, shower, wash-hand basins
or other containers with water.
Never use this apparatus near water projections.
Never use this apparatus with the wet hands.
If, unfortunately the apparatus is wet, immediately withdraw
the cord of the socket-outlet.
Inform potential users of these instructions.
Never leave the appliance unsupervised when in use.
The appliance must be used only for its intended purpose. No
responsibility can be taken for any possible damage caused
by incorrect use or improper handling.
Children and persons with disabilities are not always aware of
the danger posed by the use of appliances.
This appliance can be used by children aged from 8 years
and above if they have been given supervision or instruction

3
concerning use of the appliance in a safe way and if they
understand the hazards involved.
This device is not a toy, do not leave small children or people
with disabilities to play with.
Cleaning and user maintenance shall not be made by
children unless they are older than 8 and supervised.
Keep the appliance and its cord out of reach of children aged
less than 8 years of age.
Appliances can be used by persons with reduced physical,
sensory or mental capabilities or lack of experience and
knowledge if they have been given supervision or instruction
concerning use of the appliance in a safe way and
understand the hazards involved. Children shall not play with
the appliance.
WARNING: The filling aperture must not be opened during
use
In order to ensure your children‘s safety, please keep all
packaging (plastic bags, boxes, polystyrene etc.) out of their
reach.
Caution ! Do not allow small children to play with the foil :
THERE IS A DANGER OF SUFFOCATION !
From time to time check the cord for damages. Never use the
appliance if cord or appliance shows any signs of damage.
Never immerse the appliance in water or any other liquid for
any reason whatsoever.
Never place it into the dishwasher.
Never use the appliance near hot surfaces.
Do not operate the appliance with a damaged cord or plug, or
after the appliance has been damaged in any manner.
If the supply cord or appliance is damaged, it must be
replaced by the manufacturer, its service agent or similarly
qualified person in order to avoid a hazard.
Disconnect the power source cable before any operation of
cleaning of maintenance and accessories assembly.

4
Never use the appliance outside and always place it in a dry
environment.
Never use accessories, which are not recommended by the
producer. They could constitute a danger to the user and
risk to damage the appliance.
Never use any other connector than the one provided.
Never move the appliance by pulling the cord. Make sure the
cord cannot get caught in any way.
Never wind the cord around the appliance and do not bend it
Ensure that the power cord does not come into contact with
hot parts of this unit.
Make sure the appliance has cooled down before cleaning
and storing it.
The temperature of accessible surfaces may be very high
when the appliance is operating. Never touch these parts, of
apparatus, to avoid burning itself.
Make sure the appliance never comes into contact with
flammable materials, such as curtains, cloth, etc...& the
power cord and plug do not come in contact with water.
Before cleaning, always unplug the appliance from the power
supply and let it cool down.
This appliance is not intended to be operated by means of an
external timer or separate remote-control system.
Always place the unit on a flat surface. Ensure, also, not to
cover the device and not to put anything on it.
Always remove the plug from the wall socket when the
appliance is not in use.
When using an extension lead always make sure that the
entire cable is unwound from the reel. Use solely CE
approved extension leads. Input power must be at least 16A,
250V, 3000W.
Incorrect operation and improper use can damage the
appliance and cause injury to the user.
This device, designed for home use, complies with standards
relating to this type of product.

5
The appliance must be used and rested on a table or flat &
stable surface.
The item must not be left unattended when it is connected to
main supply.
The item is not to be used, if it has been dropped or if there
are visible signs of damage or if it is leaking.
Regarding the instructions for cleaning, thanks to refer to the
below paragraph of the manual.
This appliance is only intended for household use.
(*) Competent qualified person : after sales department of the
producer or importer or any person who is qualified, approved
and competent to perform this kind of repairs.
GENERAL INFORMATION
The symbol "OPEN BOOK" means a recommendation
to read important things contained in the record.
The symbol "BIN" crossed out, abbreviation WEEE
(Waste of Electrical and Electronic Equipment) means
that at the end of life, it should not be discarded with
household waste, but filed to the sorting of the locality.
Waste recovery can help preserve our environment.
The symbol "CE" is the guarantee of compliance with
harmonized European standards, voluntary, reflecting
the essential requirements into technical
specifications. These standards are not mandatory
but are guarantees of compliance with essential
requirements.
The symbol "GLASS / FORK" means that the device is
compatible and can come into contact with foodstuffs.

6
The symbol ROHS (Restriction of use of some
Hazardous Substances) on the Environmental
Protection, certifies that for each of the five hazardous
substances • Lead • Mercury • (hexavalent) chromium
• products for protection against flames PBB and
PBDE, the peak concentration is equal to or less than
0.1% of the weight of homogeneous material, and
0.01% for the 6th • cadmium.
The symbol "TRIMAN" indicates that the consumer is
invited to dispose the product as part of a separate
collection (eg recycling bin, waste, voluntary intake
point).
For more information : http://www.quefairedemesdechets.fr

7
TO KNOW ITS UNIT
1. ON/OFF switch
2. Coffee/Hot water selector
3. Steam button
4. Red Pilot light
5. Green Pilot light
6. Steam control knob
7. Water tank cover
8. Water tank
9. Top cover & Cups heater
10. Steam nozzle
11. Foam tube
12. Main body
13. Bottom
14. Drip tray
15. Removable grid
16. Stainless Steel filter
17. Measuring spoon and tamper
18. Filter & Pod holder
19. Holder handle
20. Filter Ejection switch (press it to
take off the filter and avoid it
slipping out)

8
FIRST USE
Before first use, remove the device and all accessories.
• Clean the apparatus according to the instructions in "Cleaning" paragraph.
• Place the machine on a suitable flat, stable surface.
Unroll the power cord completely.
Check that the tension in force in the country where you are corresponds to that
indicated on the apparatus.
Connect the apparatus in a correct socket-outlet, (and connected to the ground
if the unit is Class I), to avoid any danger.
Disconnect the power source cable before any operation of cleaning of
maintenance and accessories assembly.
Never modify the appliance in anyway.
To ensure the first cup of coffee with excellent taste, it is better to rinse the coffee
holder with hot water as follows:
1. Pour half a tank of water into water tank, the water level should not exceed the
“MAX”mark in the tank.
Note: The appliance is supplied with a detachable tank for easy cleaning, you
can fill the tank with water firstly, and then put the tank into the appliance.
2. Then replace the water tank cover.
3. Set stainless steel filter into metal
filter holder (no coffee powder in it).
4. Introduce the filter holder in the machine

9
5. Turn right until the mark on the machine
is in front of the handle
6. Place a jug on removable grid.
Note: The appliance is not equipped with jug, Use
your own jug or coffee cup.
7. Make sure the Steam control knob (on A), the Steam button(5) and the
Coffee/Hot water (3) are on the “OFF”or “0”position.
8. Connect to power source, turn the ON/OFF button (1) to the “1”position. The
red pilot light (2) will light up.
9. Wait for the Green pilot light (4) turning on.
When the light is on,
10. Press the Coffee/Hot water selector (3) to the “1”position. the pump will pump
water, and will go out by the filter nose.
Note: If the Green pilot light (4) turns off, Press the Coffee/Hot water selector (3)
to the “0”position and wait for the green lamp lights again.
When the appliance is again pre-heated the green lamp is illuminated. (it

10
shows the pre-heating is finish). Pressing coffer/hot water selector to the “1”
position again, and water will flow out.
11. After water not dropping out any more, Press the Coffee/Hot water selector to
the “0”position.
12. Pour the water out then clean it thoroughly, now you can start brewing.
Note: There may be noise when the pump works on the first time, it is normal, the
appliance is releasing the air in the appliance. After about 20s, the noise will
disappear.
PRE-HEATING
To make a cup of good hot Espresso coffee, we recommend you preheating the
appliance before making coffee, including filter holder, filter and cup, so that the
coffee flavour can not be influenced by the cold parts.
1. Pour water into water tank.
Note: the water level should not exceed the “MAX”mark in the tank.
2. Replace the tank properly in the unit.
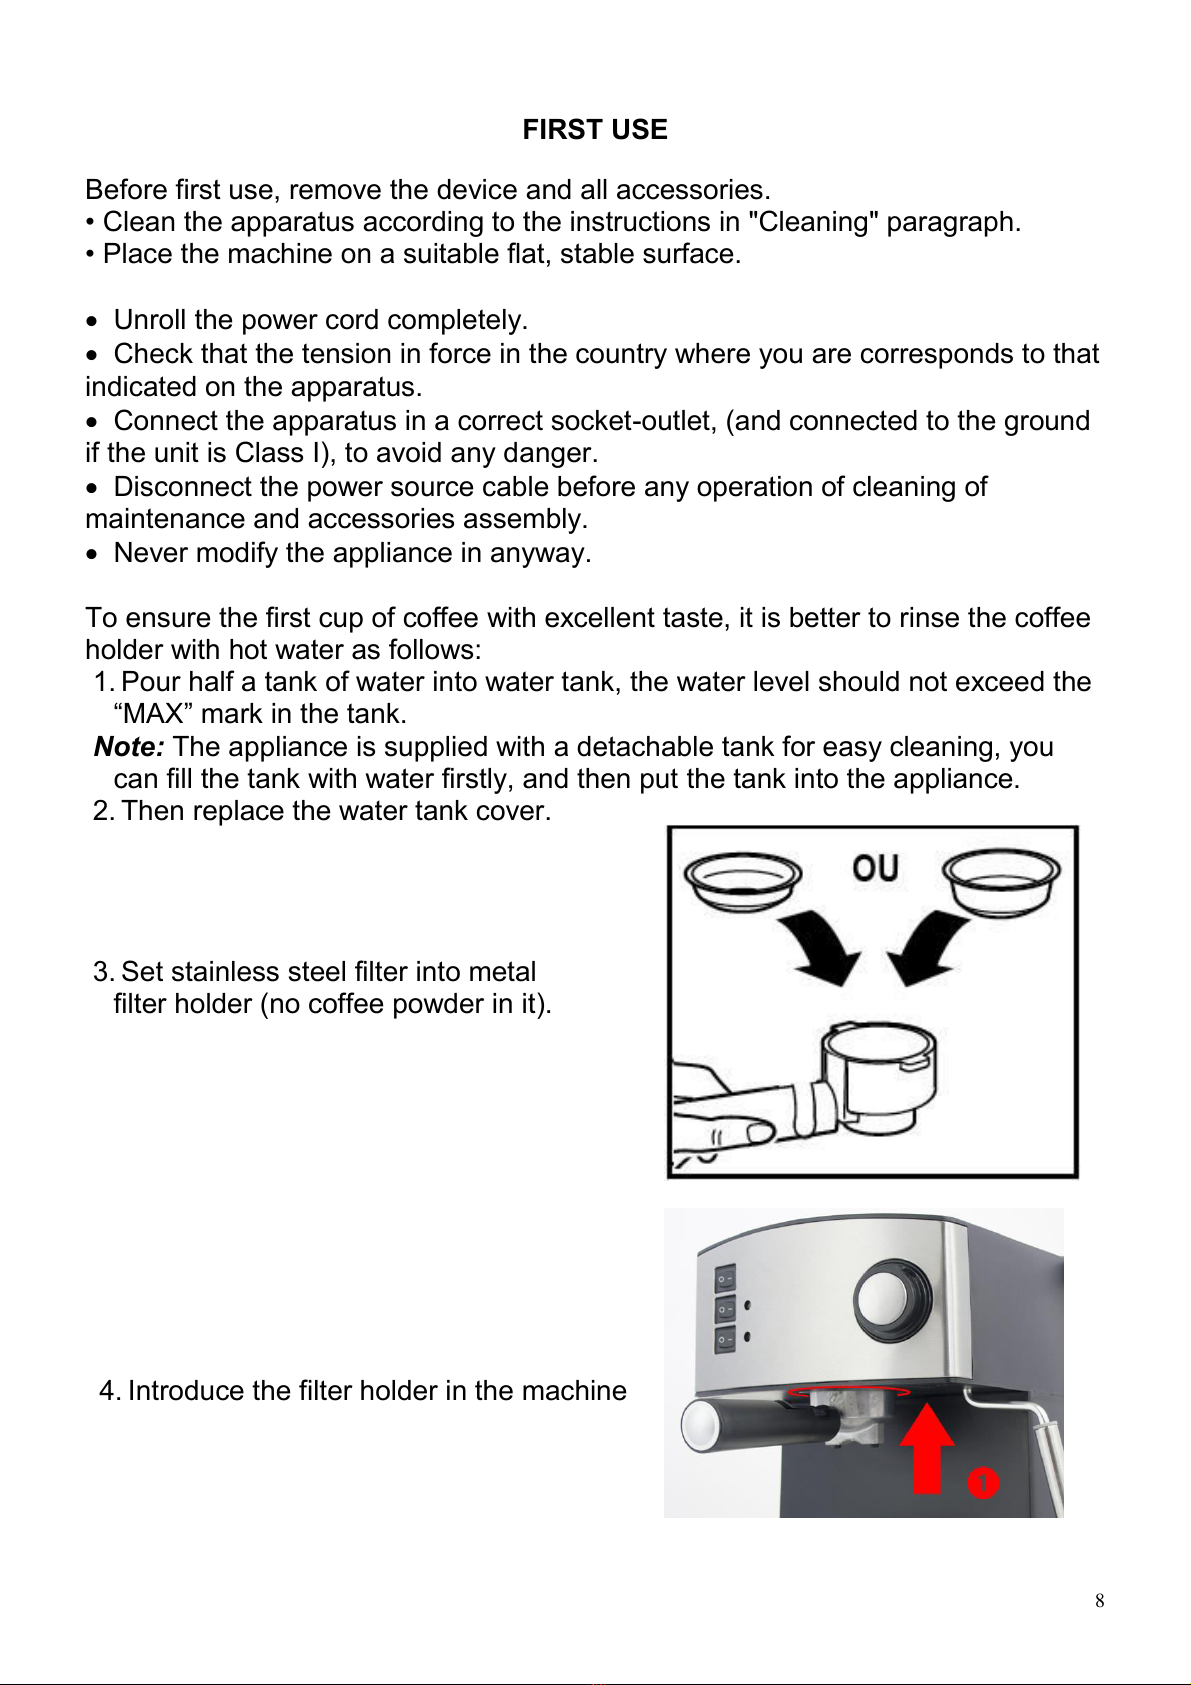
3. Select the one-cup or two-cup stainless steel filter & Set it into filter holder.
4. Introduce the filter holder in the machine
5. Turn right, until the mark, on the machine, is in front of the handle
6. Place a jug on removable grid.
7. Make sure the Steam control knob (on A), the Steam button(5) and the
Coffee/Hot water (3) are on the “OFF”or “0”position.
8. Connect to power source,
9. Turn the ON/OFF button (1) to the “1”position. The red pilot light (2) will light
up.
10. Wait for the Green pilot light turning on.
When the green light is on,
11. Press the Coffee/Hot water selector to the “1”position. the pump will pump
water, and will go out by the filter nose.
Note: If the Green pilot light turns off, Press the Coffee/Hot water selector (3) to
the “0”position and wait for the green lamp lights again.
When the appliance is again pre-heated the green lamp is illuminated. (it
shows the pre-heating is finish). Pressing coffer/hot water selector (3) to the “1”
position again, and water will flow out.
12. When the green pilot light turn off, Press the Coffee/Hot water selector (3) to
the “0”position. Pre-heating is over.
TO MAKE ESPRESSO
1. Pour water into water tank.
2. Note: the water level should not exceed the “MAX”mark in the tank.
3. Replace the tank properly in the unit.

11
4. Remove the filter holder by turning the handle clockwise.
5. Place in a stainless steel filters below, (previously set in the filter holder).
➢Stainless steel filter "2 cups" for ground coffee. 1.5 of the "measuring spoon"
for 1 cup and 2 "measuring spoon" for 2 cups of coffee.
➢Filter stainless marked "pod" for 1 flexible or E.S.E. pod of ground coffee
trade. (Size 44 / 55mm).
Notes: For the coffee powder, use the "dosing spoon" to fill and the other end
"Tamper" to lightly tamp the coffee.
A full spoon and a half of ground coffee, dosing, correspond to a cup of
premium coffee.
6. Introduce the filter holder in the machine
7. Turn right, until the mark, on the machine, is in front of the handle
8. Place a jug on removable grid.
9. Make sure the Steam control knob (on A), the Steam button(5) and the
Coffee/Hot water (3) are on the “OFF”or “0”position.
10. Connect to power source,
11. Turn the ON/OFF button to the “1”position. The red pilot light will light up.
12. Wait for the Green pilot light turning on.
When the green light is on :
13. Press the Coffee / Hot water selector to the “1”position. the pump will pump
water, and will go out by the filter nose.
When the desired coffee is obtained (or the colour of coffee becomes pale) :
14. Turn the hot water selector / coffee & the ON/Off button on the "0" position. The
red and green lights turn off and the coffee machine stops working.
15. Your coffee is ready.
Note: If the Green pilot light turns off during operation, Press the Coffee/Hot water
selector to the “0”position and wait for the green lamp lights again.
Warning: Do not leave the coffee machine unattended during use as it is, at times,
required a manual operation.
16. After you have finished making coffee, Remove the filter holder by turning the
handle to the left, and then pour the coffee grounds in a dustbin.
Warning not to throw away the stainless steel filter!
17. AFTER EACH USE, Allow cooling and rinsing filter and filter holder with
running water.
TO MAKE CAPPUCCINO / MILK FOAM
You get a cup of cappuccino when you top up a cup of espresso with frothing milk.
Method:
1. First, Prepare espresso according to the part “MAKE ESPRESSO COFFEE”,
with container big enough to receive the foam.
Note: Make sure the Steam control knob (on A), the Steam button(5) and the
Coffee/Hot water (3) are on the “OFF”or “0”position.
2. Turn the ON/OFF button to the “1”position. The red pilot light will light up.

12
3. Wait for the Green pilot light turning on.
When the green light is on,
4. Turn the Coffee/Hot water selector to the “1”position. the pump will pump
Note: To be sure that the steam control knob is at the “OFF”or “0”position.
5. Press Steam button to the “1”position,
6. Fill a jug with about 100 grams (10cl) of milk for each
cappuccino to be prepared, you are recommended to
use whole milk at refrigerator temperature.
Note: In choosing the size of jug, it is recommend that the
diameter is not less than 70mm, and, bear in mind that milk
increases in volume by 2 times when becoming foam.
Make sure the height of jug is enough.
7. Turn the steam control knob slowly in anti-clockwise,
steam will come out from the frothing device.
Note: Never turn the steam control button rapidly, as the
steam will accumulate rapidly in short time, which may
increase the potential of the risk of explosion.
During operation, if the green indicator is extinguished, you should :
turn the Steam control knob to “OFF”or “0”position (A).
Press Coffee/Hot water selector to the “1”position and pump water.
After about 30s, Close the pump by putting Coffee/Hot water selector to
the “0”position.
Then wait for until the green indicator is illuminated and turn, gently, the
Steam control knob in anti-clockwise (B), the steam will come out again.
8. Insert the frothing device into the milk about two centimetre, froth milk in the
way moving the jug round from up to down.
9. When the milk foam is formed, Turn the steam control button to “OFF”or “0”
position.
Note: Clean steam outlet with wet sponge immediately after using, but care not to
burn your hand.
10. Pour the frothed milk into the prepared espresso.
Sweeten to your taste
Sprinkle the froth with a little cocoa powder.
-Now the cappuccino is ready.
11. Press the ON/OFF switch to the “0”position to cut the power source off.
Note: we recommend you allow the Espresso machine to cool down, at least for 5
minutes, before making coffee again. Otherwise burnt odour may occur in your
Espresso coffee.

13
TO MAKE HOT WATER
With this function, you can directly make hot water eg for hot tea.
Also clean the cups, pre-heat your coffee cup. ( to ensure that the temperature of
the coffee will not decrease.)
Method:
1. Pour water into water tank.
Note: the water level should not exceed the “MAX”mark in the tank.
2. Replace the tank properly in the unit.
Make sure the Steam control knob (on A), the Steam button (5) and the
Coffee/Hot water (3) are on the “OFF”or “0”position.
3. Connect to power source,
4. Turn the ON/OFF button to the “1”position. The red pilot light will light up.
5. Wait for the Green pilot light turning on.
6. When the green light is on,
12. Turn the Steam control knob in anti-clockwise position (B). Rotate, at least,
135°.
13. Turn the Coffee/Hot water selector (3) to the “1”position. The pump will
pump and hot water will flow out from the steam nozzle.
Notes: If the Green pilot light turns off, Press the Coffee/Hot water selector to the
“0”position and wait for the green lamp lights again.
At first the hot water will scatter from the steam tube. May let the steam
wand outlet close to the coffee cup wall. From this moment, pay attention to the
projection of hot water. Splash may burns skin.
When jug is filled in:
14. Turn the Steam control knob in clockwise position on the "0" position (A).
15. Press the ON/OFF switch to the “0”position to cut the power source off.
Note: The red and green lights turn off and the coffee machine stops working.
PRODUCING STEAM TO HEAT LIQUIDS
The steam tube (without the frothing device) can be used to make hot
beverages like drinking chocolate, Hot water or Hot tea.
Method:
1. Pour water into water tank.
Note: the water level should not exceed the “MAX”mark in the tank.
2. Replace the tank properly in the unit.
Make sure the Steam control knob (on A), the Steam button (5) and the
Coffee/Hot water (3) are on the “OFF”or “0”position.
3. Connect to power source,
4. Turn the ON/OFF button to the “1”position. The red pilot light will light up.
5. Turn the Coffee/Hot water selector to the “1”position. The pump will pump,
when water will flow out, Close the pump by putting Coffee/Hot water

14
selector to the “0”position.
6. Immediately, put the Steam button (5) to the “1”position and wait for a
moment. the appliance begins to be heated until the green lamp is
illuminated, it shows the heating is finish.
Notes: If the Green pilot light turns off, Press the Coffee/Hot water selector to the
“0”position and wait for the green lamp lights again.
7. Remove the Foam tube device from the steam nozzle.
8. Dip the steam tube into the liquid to be heated.
9. Turn the Steam Control Knob (From A to B) in anti-
clockwise position, slowly to start making steam.
When the required temperature is reached,
10. Turn the Steam Control Knob in clockwise direction to
“OFF”or “0”position. (From B to A).
11. Press the ON/OFF switch to the “0”position to cut the power source off.
Notes: The red and green lights turn off and the coffee machine stops working.
Clean steam outlet with wet sponge immediately after using, but care not
to burn your hand.
CLEANING AND MAINTENANCE
Before cleaning, Always switch off the appliance, disconnect the apparatus and let
it cool.
Clean the outside of the apparatus with a sponge or slightly wet linen.
The parts (removable) in contact with food like plate, bowl, forks, Spatula etc. can
be washed in hot water with sponge and soft detergent or put in the dishwasher.
Never plunge the apparatus in water or all other liquid !
Do not use abrasive cleaners, gritting, or metal brush or another cutting object.
• Do not place any other parts of your coffee machine in the dishwasher.
• Remove the filter holder from the machine by turning it counter clockwise,
• AFTER EACH USE, empty the coffee grounds left inside the filter and clean it
carefully.
• Dry all accessories.
CLEANING MINERAL DEPOSITS
To ensure your coffee to work effectively, you need to clean the interior pipe;
Every 2 or 3 months, From Mineral deposits left, to maintain the flavour and aroma
of the coffee.
1. Fill the tank to the MAX level with water and descaler (the scale of water and
descaler is 4:1;) the detail refers to the instruction of descaler.
Please use “household descaler”, you can use the citric acid (obtainable from
chemist’s or drug stores) instead of the descaler (the one hundred parts of
water and three parts of citric acid).

15
2. According to the program of pre-heating, put the filter holder (with no coffee
powder in it) and jug in place.
Make sure the Steam control knob, the Steam button and the Coffee/Hot water
are on the “OFF”or “0”position.
3. Connect to power source,
4. Turn the ON/OFF button to the “1”position. The red pilot light will light up.
5. Wait for the Green pilot light turning on.
Note: If the Green pilot light turns off, Press the Coffee/Hot water selector to the
“0”position and wait for the green lamp lights again.
6. When the green lamp is illuminated, it shows the heating is finish. Press the
Coffee/Hot water selector to the “1”position and make two cups coffee (about
2Oz).
7. Then close the pump(putting the coffee/hot water selector to the “0”position)
and wait for 5s.
8. Press the Steam button to the “1”position, waiting for until the green indicator is
illuminated.
9. Make steam for 2min, turning the steam control knob to “ON”or “1”position
10. Then turn the steam control knob to “OFF”or “0”position to stop making steam.
11. Press the steam button to the “0”position to, immediately,
12. Press the ON/OFF switch to “1”position to stop the unit. Make the descaler
deposit in the unit at least 15 minutes.
7. Restart the unit and repeat the steps of 4-6 at least 3 times.
8. Then, Press the ON/OFF switch to “1”position, when the green lamp is
illuminated, press the coffee/hot water selector to the “1”position to brew until
no descaler is left.
9. Then brewing coffee (no coffee powder) with tap water in the MAX level, repeat
the steps of 4-6 for 3 times (it is not necessary to wait for 15 minutes in step of
6), then brewing until no water is left in the tank.
10. Repeat the step of 9 at least 3 times to make sure the piping is clean.
STORAGE
-Ensure the unit is completely cool and dry.
-Do not wrap the cord around the appliance, as this will cause damage.
-Keep the appliance in a cool, dry place and out of reach from children.

16
GUARANTEE
Before being delivered, all our products are subjected to a rigorous control.
This apparatus is guaranteed 24 months starting from the date of purchase by
the consumer.
The documents in proof of guarantee are :
• The invoice and
• The filled and stamped warrantee plate (located on side or bottom of the gift
box). Without these documents in proof, no free replacement, nor no free repair,
can be carried out.
During the warranty period, we deal for free, the defects of the apparatus or the
accessories, rising from a defect of materials or manufacture by repair or,
replacement. The services within the framework of the guarantee do not involve
any extension of the warranty period and does not give right to a new guarantee !
In the event of recourse to the guarantee, bring back the complete apparatus to
your retailer, in its original packing, accompanied by the proofs of purchase.
The breakage of parts out of glass or plastic is, in all the cases, not warranted.
Defects on the accessories or the wearing parts (for example: coals of engines,
hooks, drive belts, remote control of replacement, teeth brushes of replacement,
webs etc) as well as cleaning, maintenance or it replacement of wearing parts
are not guaranteed and are thus to pay !
In the event of foreign intervention, the guarantee becomes null and void.
After flow of the warranty period, repairs can be carried out, against payment, by
a specialized trade or a repair service.
SPECIFICATIONS
Power supply 220-240V~ 50/60Hz
Power 850W
Norm Class I
Made in PRC
The characteristics can change without preliminary preventing
EARTHING
This unit is equipped with an electrical outlet with earth and must be
earthed in an according plug.
Note : In the event of question concerning the earth or electric
connection, please consult a qualified personnel.
In the event of short-circuit, earthing reduces the risk of electric
shock while making possible the current to be evacuated by the wire
of ground.

17
CAUTION: In order to minimize the risks of electric shock, In the event of
breakdown, not to open the case but to call upon a qualified technician
for repairs.
This device complies with EC directives, it was controlled according to all current
European directives, applicable such as: electromagnetic compatibility (EMC) and
low voltage (LVD).
This device has been designed and manufactured in compliance with the latest
regulations and technical requirements for safety.
Imported by Sotech International
" LE PERIPOLE " N°A106 - A107
33, Avenue du Marechal de Lattre de Tassigny
94120 Fontenay sous bois - France
Table of contents