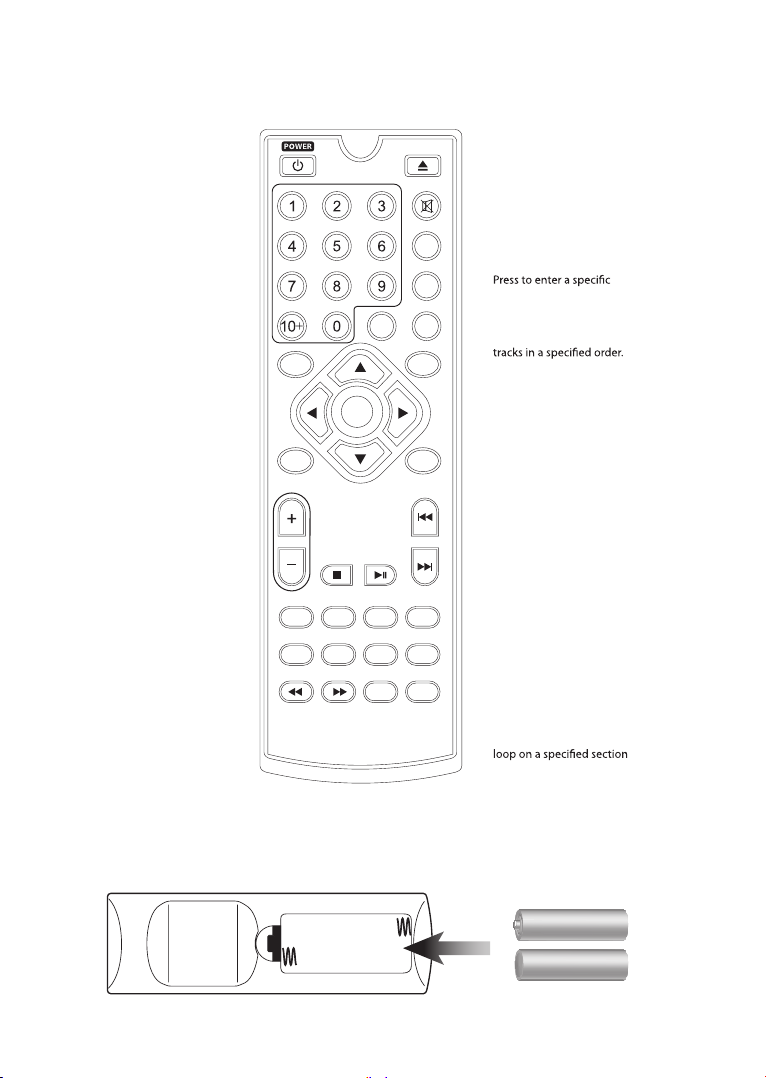
Cooau CU-P1 User manual

DVD PLAYER
USER MANUAL

1. Important Notes .......................................................................................................... 2
2. General Safety Instructions ........................................................................................ 3
3. Front Panel ................................................................................................................. 4
4. Rear Panel .................................................................................................................. 4
5. Remote Control ........................................................................................................... 5
6. Power .......................................................................................................................... 6
7. Connecting Video & Audio .......................................................................................... 6
8. Loading a DVD or CD ................................................................................................. 7
9. Troubleshooting .......................................................................................................... 8
Contents
ENG-1

Important Notes:
Read these safety instructions before using your device and store them for possible future
reference.
• If the cord is damaged, have it repaired by the manufacturer, its service or a similarly qualified
person in order to avoid any hazard.
• The cord should always be readily accessible.
• The apparatus shall not be exposed to dripping or splashing of water or liquids and that no
objects filled with liquids such as flowers vases shall be placed on the product.
• The normal ventilation of the product shall not be impended for intended use.
• Always leave a minimum distance of 10 cm around the unit to ensure sufficient ventilation.
• Open flame sources, such as candles, should not be placed on top of the device.
• The device is intended for use only in a temperate climate.
• The ventilation should not be impeded by covering the ventilation openings with items, such as
newspapers, table-cloths, curtains, etc.
• CAUTION: to avoid accident, this appliance must be fixed properly on the floor or on the wall
according to instructions for installation.
• CAUTION: Danger of explosion if batteries are incorrectly replaced or not replaced by the same
type or equivalent
• Batteries should not be exposed to excessive heat such as sunshine, fire or similar.
• Different types of batteries, new and used batteries should not be mixed.
• Batteries must be installed according to the polarity.
• If batteries are worn, they must be removed from the product.
• Batteries must be disposed of safely. Always use the collection bins provided (check with your
dealer) to protect the environment.
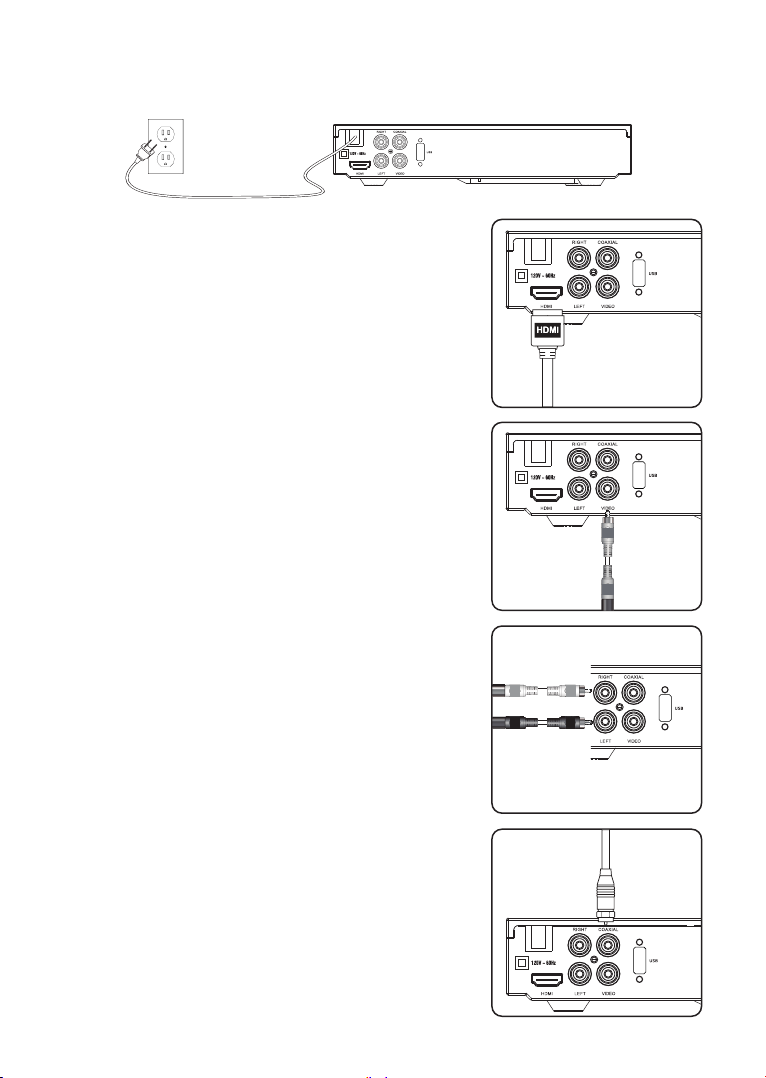
• If there is not following pictogram on the product , then it is class I apparatus. It must be
connected to an electrical power supply base connected to protective earth.
The lightning flash is intended to alert the user to the presence of dangerous
voltages within the product’s enclosure,and touching the inner parts may
result electric shock and personal injury.
The exclamation mark is intended to alert the user to the presence of
important operating instructions.
To prevent the risk of electric shock or fire, do not open the cover.
Refer servicing and repairs to qualified service personnel.
This mark indicates that this unit contains a class 1 laser product.The laser
beam may produce harmful radiation if it directly touches the human body.
ENG-2

General Safety Instructions:
● Please read this Instruction Manual carefully beforeconnecting and operating.
● Do not expose this DVD Home Theatre System to rain, moisture or direct sunlight
● Do not install near any heat sources, such as Radiators.heat registers,stoves or other
apparatu that produces heat,including amplifiers.
● Place the DVD Home Theatre System on a Horizontal, level surface.
● Do not obstruct the heat ventilations. Overheating may cause malfunctions.
● Clean the cabinet with a soft cloth.Detergents or alcohol should not be used.
● Do not remove any covers or attempt to gain access to the inside of the DVD Ho Theatre
System.
● Refer all servicing and repairs to qualified service Servicing is required when the DVD Home
Theatre System has been damaged in anyway, such as power supply cord or the power plug is
damaged, the DVD Home Theatre System has been exposed to rain or moisture and does not
operate normally or has been dropped.
● Unplug this DVD Home Theatre System during ightning storms or when not used for long
periods of time.
ENG-3

OPEN/CLOSE
DVD DOOR
REMOTE RECEIVER WINDOW
DISPLAY
HDMI OUTPUT
VIDEO OUTPUT
PLAY/PAUSE
STOP
POWER
(ON/OFF)
2 CH AUDIO OUTPUT
Coaxial Digital Audio Output
USB PORT
Front Panel
Rear Panel
ENG-4

Remote control
Battery compartment
Requires 2 AAA batteries.
ENG-5
A-B
OPEN/CLOSE
AUDIO
SETUPMENU
PROG
GOTO
MUTE
VOLUME
ENTER
TITLE
SUBTITLE
ANGLE
SLOWN/P
L/R REPEAT
STEP
WIDEOSDVIDEO ZOOM
Power
Number Keypad
Use to enter channel
or track numbers.
Angle
Press to view alternate
angles on supported DVDs.
Menu
Press to access the
loaded DVD’s menu.
Arrows/Enter
Press to make selections
in the on screen menus.
Title
Press to access the title
menu on a loaded DVD.
Volume
Stop
Press to halt play of the DVD.
Play/Pause
Press to play or pause the DVD.
Video
Press to switch between
Composite or S-Video.
OSD
Press to view the
on-screen display
L/R
Press to adjust the audio
mode on a supported DVD.
N/P
Press to switch between
NTSC and PAL.
Reverse/Fast Fwd
Press to search through an
individual chapter or track.
Open/Close Disc Tray
Mute
Audio
For TV play, press to turn
closed captioning ON or OFF.
For DVD play, press to adjust
audio settings for the DVD.
Go To
chapter and
Prog
Press to program a loaded
disc to play titles, chapters, or
Setup
Press to access the
setup menu.
Subtitle
Press to turn subtitles
ON or OFF.
Skip Back/Forward
Press to skip between
chapters or tracks.
Zoom
Press to zoom in or out
on a loaded DVD.
Repeat
Press to repeat a
chapter or track.
Wide
Press to switch screen
aspect ratio.
Slow
Press to play in slow motion.
Step
Press to advance one
frame at a time.
A-B
Press to create a repeating
of a loaded DVD..

Connecting Video & Audio
Power
Composite Video Output
Requires an RCA video cable (yellow, included).
1. Use an RCA video cable (included) to connect the
Composite Video Output on the DVD player to the
Composite Video Input on the television.
2. Adjust the television’s source input setting to
Composite Video.
HDMI Output
Requires a HDMI cable (not included).
1. Use a HDMI cable to connect the HDMI Output to
a HDMI input on a television.
2. Adjust the connected televisions input setting to
match the input used in the previous step.
3. Set the resolution by going to
SETUP > VIDEO > Resolution
Plug the attached AC cord into a standard AC power outlet to power the DVD player.
RCA Stereo Audio Output
Requires an RCA audio cable (white/red, included).
1. Use the RCA audio cable to connect the RCA
Stereo Audio Output on the DVD player to the RCA
Stereo Audio Input on the television.
2. Adjust the television’s source input setting to
Component Video (YPbPr) or Composite Video
depending on the video connection used above.
Coaxial Digital Audio Output
Requires an RCA audio cable (included).
1. Use the RCA audio cable to connect the Coaxial
Digital Audio Output to an coaxial digital audio input
on an audio system.
2. Adjust the connected audio system’s input setting to
match the input used in the previous step.
3. In the Digital Out portion of the setup menu, adjust to
PCM, RAW or OFF.
ENG-6

Loading a DVD or CD
Loading a Disc
1. Press the Open button to open the Disc Door.
2. Load a disc into the DVD player, label side facing up.
3. Manually close the Disc Door.
After a disc is loaded, it will begin playing automatically.
Playing a Loaded Disc
1. Follow the instructions for loading a Disc.
2. If the disc does not begin playing automatically, press the Play/Pause button.
Programming a Loaded Disc
1. Follow the instructions for Loading a Disc and Playing a Loaded Disc.
2. While the loaded disc is playing, press the Program button on the remote.
3. Use the Number Keypad to enter in the titles and chapters in the order you want to view
them.
DVD Titles and chapters or CD tracks will play in the order they are programmed.
4. Repeat step 3 until the desired DVD titles and chapters or CD tracks are programmed.
USB PORT
Connecting a USB Thumb Drive
Connect a USB Thumb Drive to the USB Port. Picture formats are supported (Jpeg).
Accessing the Content on a USB Drive
Press the DVD/USB button to enter DVD/USB mode.
ENG-7

Troubleshooting
ENG-8
Table of contents
Other Cooau DVD Player manuals