Coodmans GPS217PLLR User manual

For improvement purposes, specification and design are subject to change without notice.
STEREO CD/RADIO/CASSETTE RECORDER
GPS217PLLR
Instruction Manual
1 2 3 4
5 6 78
9 0
STOP/BAND PLAY/PAUSE
VOLUME
FUNCTION RANDOM
M-UP
DBBS
REPEAT
PROGRAM
EQ
INTRO/STEREO
TIMER SLEEP
MUTE POWER
BACK NEXT
M-DOWN

PRE FITTED MAINS PLUGS
For your convenience a mains plug has been fitted to this appliance. For your safety please
observe the following information.
1. Should the fuse in the plug fail remove the plug from the wall socket and replace the fuse
with a 3 Amp ASTA fuse approved to BS 1362.
2. Never use the plug without the fuse cover fitted. Replacement fuse covers are available
from your dealer or most electrical retail outlets.
3. If the cable of the mains plug is cut off the cable, rewire the replacement plug in accordance
with instruction given in this manual.
4. CAUTION: Under no circumstances should the discarded plug be inserted mains socket.
To prevent a shock hazard carefully dispose of the discarded plug. Do not leave the plug
lying around where children might see it.
IMPORTANT SAFEGUARDS
WARNING: To prevent fire or shock hazard do not expose this unit to rain or moisture.
The wires in this mains lead are coloured in
accordance with the following wiring codes:
Blue.................................................Neutral
Bown....................................................Live
The wires in this mains lead must be
connected to the terminals in the plugs as
follows:
Blue Wire....................................N or Black
Brown Wire...................................L or Red
Only a 3 Amp fuse should be fitted in the
plug or a 5 Amp fuse at the distribution board.
CAUTION: DANGEROUS VOLTAGES EXIST INSIDE THIS UNIT, DO NOT REMOVE
COVER (OR BACK). NO USER SERVICEABLE INSIDE, REFER SERVICING
TO QUALIFIED SERVICE PERSONNEL. DISCONNECT FROM MAINS SUPPLY
WHEN NOT IN USE.
PLUG WIRING DETAILS
WARNING: UNDER NO CIRCUMSTANCES MUST THE LIVE OR NEUTRAL WIRES BE
CONNECTED TO THE EARTH TERMINAL IN A 3-PIN MAINS PLUG.
This symbol means that this unit is double insulated.
An earth connection is not required.
CAUTION
CLASS 1 LASER PRODUCT
Use of Controls or adjustments or performance of procedures other than those specified herein
may result in hazardous radiation exposure.
LASER SAFETY
This unit employs a laser, only qualified service personnel should attempt repair.
DANGER: INVISIBLE LASER RADIATION WHEN OPEN AND
INTERLOCK FAILED OR DEFEATED. AVOID DIRECT
EXPOSURE TO BEAM.
CAUTION:HAZARDOUS LASER RADIATION WHEN OPEN AND
INTERLOCK DEFEATED.
CAUTION
CLEANING: Always disconnect unit from mains supply before attempting to clean it. Use soft
cloth moistened with soapy water, wipe gently. Do not use solvents or abrasive
materials.
1

1. IMPORTANT NOTES
2
Your hearing is very important to you and to us so please take care when operation this
equipment. The following guidelines are provided for your information.
ESTABLISH A SAFE SOUND LEVEL
•Over time your hearing will adapt to continuous loud sounds and will give the impression
that the volume has in fact been reduced. What seems normal to you may in fact be
harmful. To guard against this BEFORE YOUR HEARING ADAPTS set the volume at
a low level
•Slowly increase the level until you can hear comfortably and clearly and without distortion.
• Damage to your hearing is accumulative and is irreversible.
• Any ringing or discomfort in the ears indicates that the volume is too loud.
• Remember listening for prolonged period of time at high volume levels will harm you
hearing.
Once you have established a comfortable listening level, DO NOT INCREASE THE
SOUND LEVEL FURTHER.
The following list of typical sound levels may assist you in recognising just how loud you
have set the volume level.
DECIBEL
Level dB Example
30 dB Quiet library, soft whisper.
40 Living room, fridge freezer bedroom away from traffic.
50 Normal conversation, quiet office, light traffic.
60 Electric sewing machine,
70 Vacuum cleaner, hair dryer, noisy restaurant
THE FOLLOWING NOISE CAN BE HARMFUL UNDER CONSTANT EXPOSURE
80dB Average city traffic, alarm clock buzzer at 1 Metre, food mixer.
90 Motorcycle, heavy goods vehicle, petrol lawn mower.
100 Pneumatic drill, chain saw, garbage truck, discotec/night-club.
120 Rock band concert, thunderclap, fast train passing by.
140 THRESHOLD OF PAIN Gunshot, jet plane taking off.
180 Rocket Launching pad.

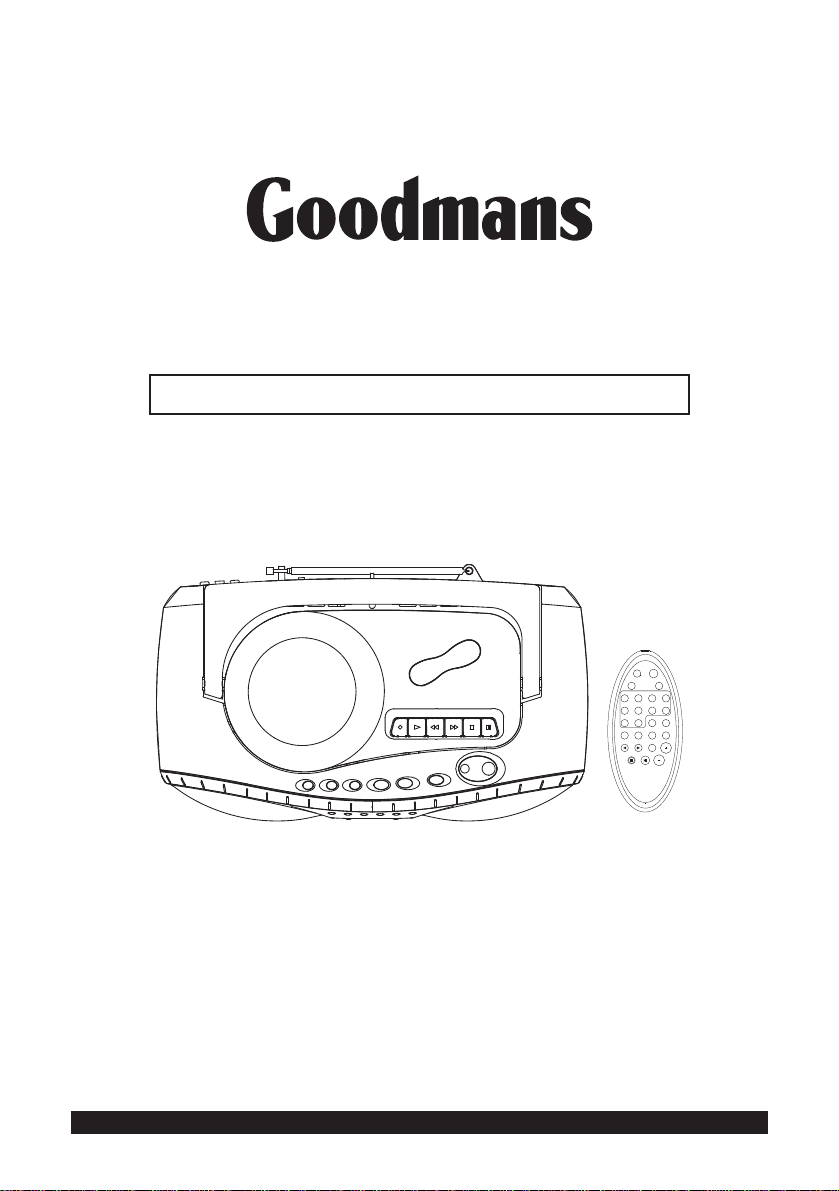
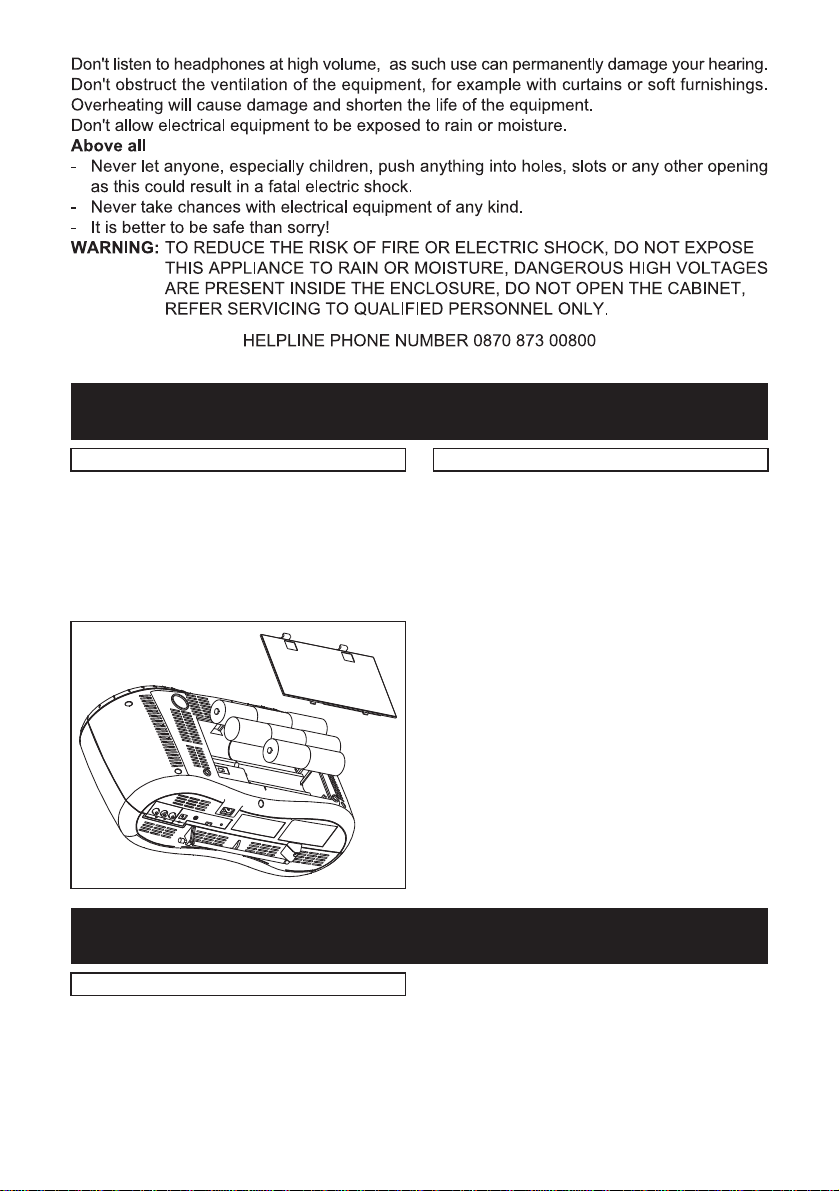
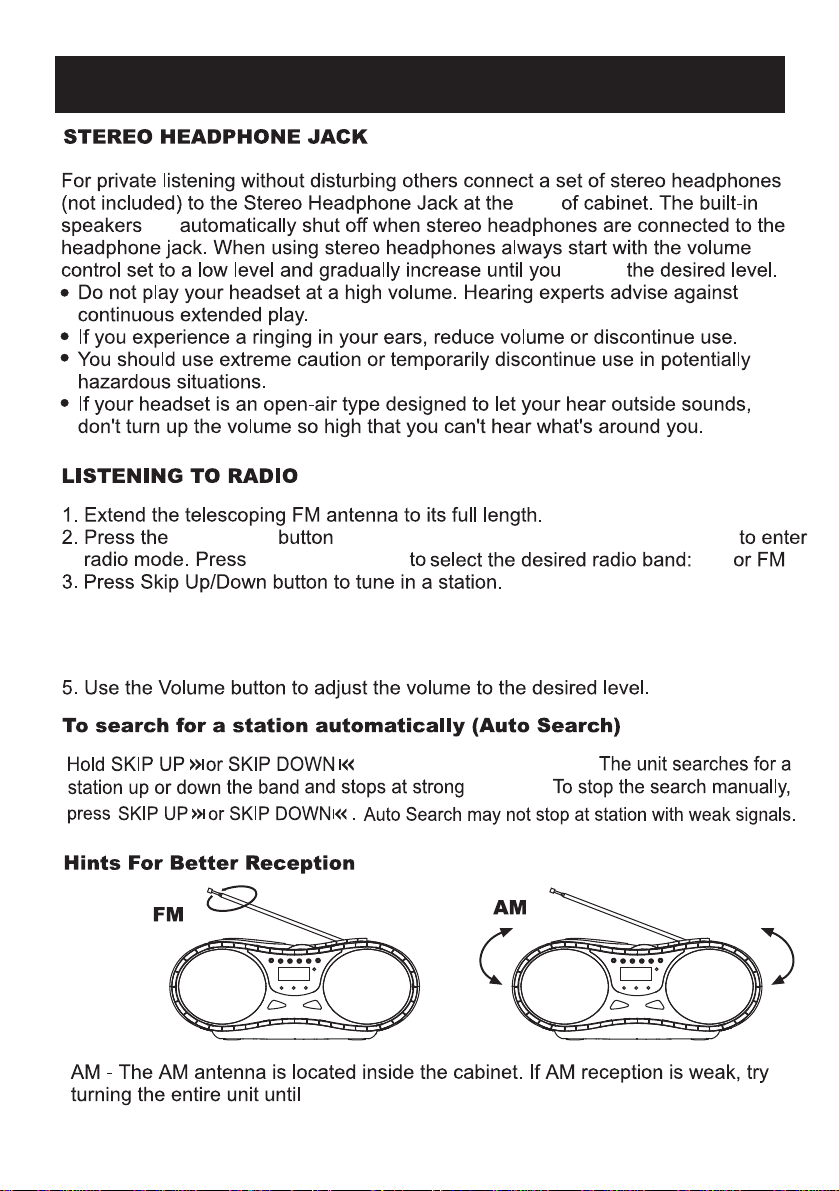
POWER SOURCES..........................................4
PLAYER MAINTENANCE..............................4
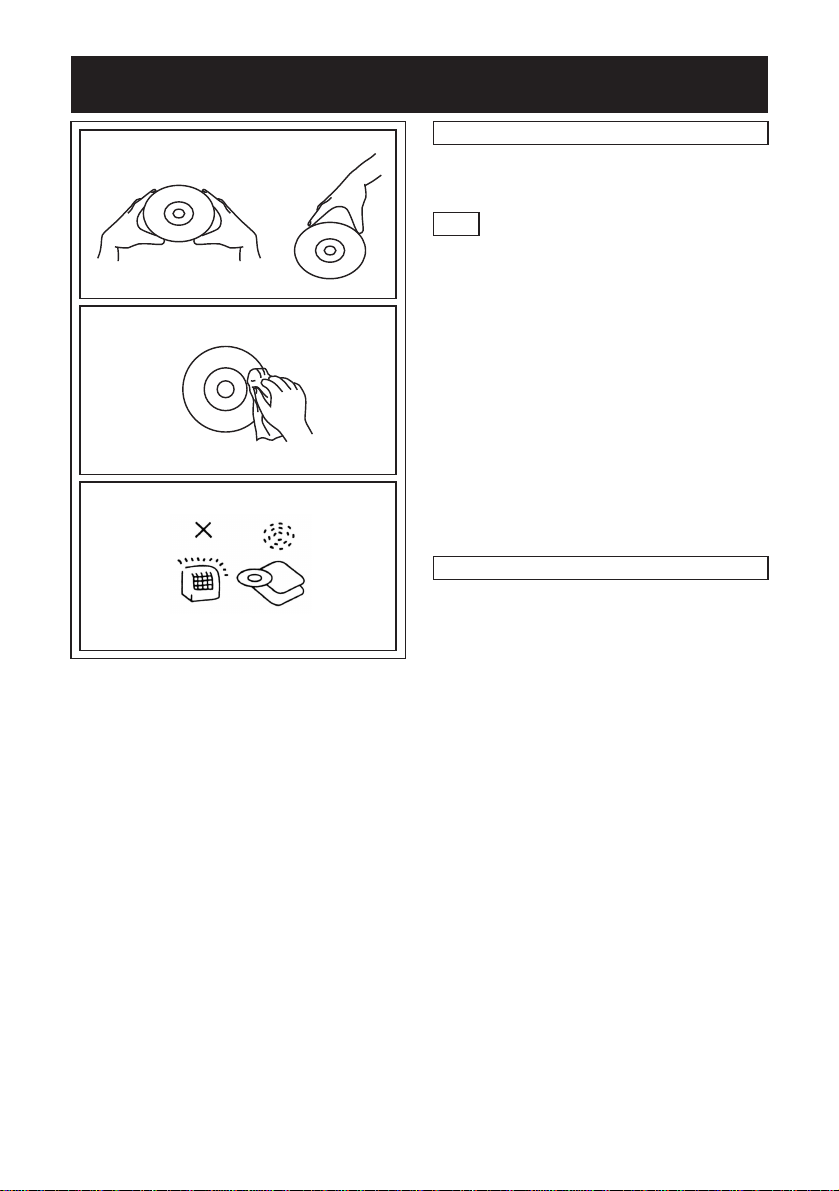
DISC CLEANING.............................................5
PLAYER OPERATION
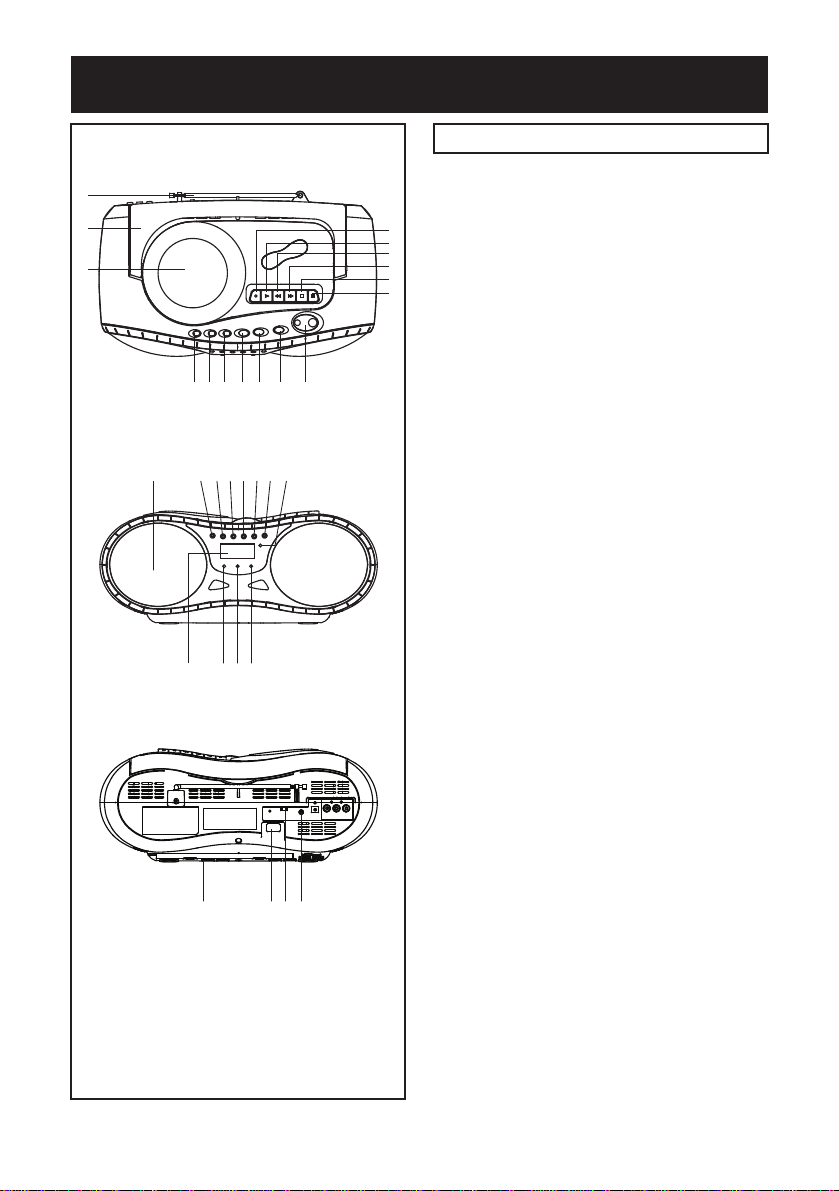
LOCATION OF CONTROLS....................6-7
OPERATING INSTRUCTIONS................8-12
CD REMOTE CONTROL OPERATION........13
CASSETTE TAPE OPERATIONS.........14-17
TROUBLESHOOTING GUIDE...................18
TECHNICAL SPECIFICATION...................19
TABLE OF CONTENTS
1. As the laser beam used in this compact
disc player is harmful to the eyes, do not
attempt to disassemble the casing.
2. Stop operation immediately if any liquid or
solid object should fall into the cabinet.
Unplug the unit and have it checked by
qualified personnel.
3. Do not touch the lens or poke at it. If you
do, you may damage the lens and the player
may not operate properly.
4. Do not put anything in the safety slot. If you
do, the LASER diode will be ON when the
lid is still opened.
5. This unit employs a LASER. The use of
controls or adjustments or performance of
precedures other than those specified herein
may result in exposure to hazardous
radiation.
WARNING
SAFETY PRECAUTIONS
SOME DO'S AND DONT'S ON THE SAFE USE OF EQUIPMENT
This equipment has been designed and manufactured to meet European safety standards
but like any electrical equipment, care must be taken if you are to obtain the best results and
safety is to be assured.
Do read the operating instructions before you attempt to use the equipment.
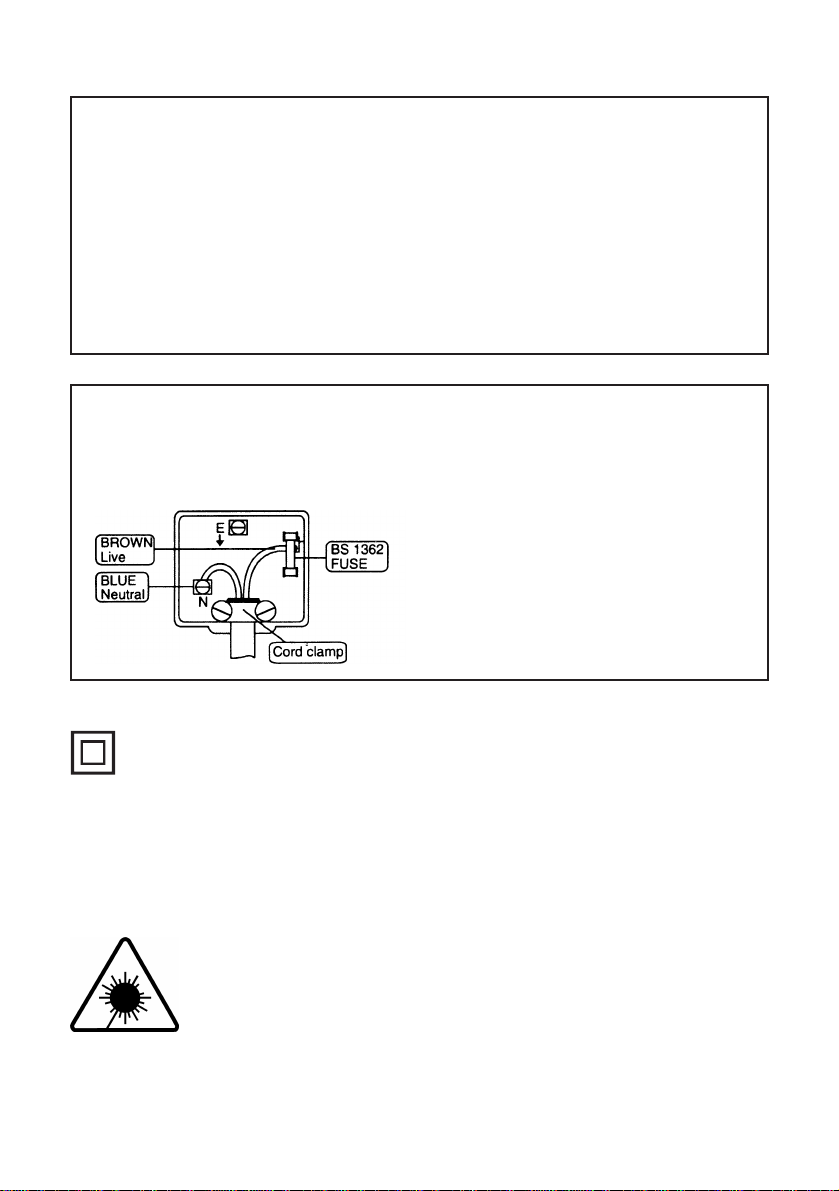
Do ensure that all electrical connections (Including the mains plug, extension leads and
interconnections between pieces of equipment) are properly made in accordance with the
manufacturer's instructions. Switch off and withdraw the mains plug when making or changing
connections.
Do consult your dealer if you are ever in doubt of the installation, operating, or safety of your
equipment.
Don't continue to operate the equipment if you are in any doubt about it working normally, or
if it is damaged in any way-switch off, withdraw the mains plug and consult your dealer.
Don't remove any fixed covers as this may expose dangerous voltages.
Don't leave equipment switched on when it is unattended unless it is specifically stated that it
is designed for unatttended operation or has a standby mode. Switch off using the switch on
the equipment and make sure that your family knows how to do this. Special arrangements
may need to be made for infirm or handicapped people.
To prevent fire or shock hazard, do not expose
the unit to rain or moisture.
Toavoid electricalshock, donot openthe cabinet.
Refer servicing to qualified personnel only.
3

AC MAINS
Insert the plug of AC power cord into wall
outlet and the connector into AC Socket Press
the Power On/Off Button to turn on the unit.
Battery power will be disconnected
automatically.
2. POWER SOURCES
BATTERY OPERATION
Remove the Battery Compartment Cover and
insert 8 pcs UM-1 (Size D) batteries, replace
the cover.
NOTE: ENSURE BATTERIES ARE
CORRECTLY INSTALLED
OBSERVING THE POLARITY AS
SHOWN.
NOTE: Old batteries may swell and leak. To
avoid damage to your portable
stereo, remove the batteries when
the unit is to be stored for long periods
of time, of if the batteries become
exhausted (the Power Indicator will
be faded if the batteries are
exhausted). And if radio sound is low
or distorted, your batteries probably
need replacing.
3. PLAYER MAINTENANCE
CLEANING THE TAPE HEADS
Clean the heads frequently to remove dust
and tape residue. Dirt on the heads will impair
the sound quality of both recording and
playback.
The simple method is to use a head-cleaning
cassette, which is available at most audio
stores. Follow the instructions supplied with
the cleaning cassette.
4

Cleaning the Disc
1. To handle a disc use only one of the two
manners illustrated.
Note Do not touch the rainbow - coloured
Side.
2. To wipe a disc, use only a soft cloth. Do
not use benzene or thinner which will
damage the disc. The disc should always
be wiped in a straight line from the centre
to the edge. It should never be wiped in a
circular motion.
3. Never place the disc on other equipment
or near any heat source. Avoid positions
where the disc would be subjected to direct
sunlight for long periods.
Maintenance and care
1. Electronic products should never be
subjected to extreme temperatures nor high
humidity to ensure good performance and
a long life-time. The portable stereo should
not be placed in bathing areas, or around
stoves and radiators, etc. Always leave
sufficient space around the unit for
ventilation.
2. If necessary, only clean the cabinet of the
unit with a soft dampened piece of cloth
(make sure the AC power cord is unplugged
from the Outlet) Never use a polish or a
strong detergent for cleaning since this can
damage the finish of the cabinet.
4. DISC CLEANING
5

5. LOCATION OF CONTROLS
32 29 30 31
17 18 19 20 21 22 23 24
27 25 26 28
1
2
3
4
5
6
7
8
9
10 11 12 13 14 15 16
LOCATION OF CONTROLS
6
1. Aerial
2. Handle
3. CD & Cassette Door
4. Record Key (Cassette)
5. Play Key (Cassette)
6. Rewind Key (Cassette)
7. Fast Forward Key (Cassette)
8. Stop Key (Cassette)
9. Pause Key (Cassette)
10. Preset EQ Button
11. Function Button
12. Stop/Band Button
13. Skip Down Button (CD/Tuner)
14. Skip Up Button (CD/Tuner)
15. Play/Pause Button
16. Volume Up/Down Button
17. Speaker
18. Power Button
19. Repeat/M-Up Button
20. Memory/Clock Button
21. Random/M-Down Button
22. Intro/Stereo Button
23. Timer Button
24. Stand-by Indicator
25. Sleep Button
26. Remote Sensor
27. Display
28. Snooze Button
29. AC Socket
30. Beat Cut Switch
31. Headphone Jack
32. Battery Compartment

6. LOCATION OF CONTROLS
BATTERY INSTALLATION
Insert (CR 2025) batteries into the battery compartment of the remote controller and close the
cover.
BATTERY REPLACEMENT
When the batteries become too weak, the operating distance of the remote controller is greatly
reduced and you will need to replace the batteries.
NOTES:
• If the remote control is not to be used for a long time, remove the batteries to prevent possible
damage through leaking batteries.
USING THE REMOTE CONTROLLER CORRECTLY
• Point the remote controller at the Remote Sensor.
• The functions of the buttons on the remote control are the same as the corresponding controls
on the main unit.
• When there is a strong ambient light source, the performance of the infrared Remote Sensor
may be degraded, causing unreliable operation.
• The maximum effective distance for remote control operation is about 15 feet.
7
1. Mute Button
2. Timer Button
3. Numeric Buttons
4. Function Button
5. Random/Memory Down Button
6. Tuning Down/CD Skip Button
7. Tuning Up/CD Skip Button
8. CD Stop/Band Button
9. CD Play/Pause Button
10. Volume
-
Down Button
11. DBBS Button
12. Volume + Up Button
13. Repeat/Memory Up Button
14. GEQ (Classic, Rock, POP, Jazz mode
Preset Equalizer in Cycle Order) Button
15. Intro/Stereo Button
16. Program (Memory) Button
17. Sleep Button
18. Power On/Off Button
19. CR2025 Button
1 2 3 4
5 6 78
9 0
STOP/BAND PLAY/PAUSE
VOLUME
FUNCTION RANDOM
M-UP
DBBS
REPEAT
PROGRAM
EQ
INTRO/STEREO
TIMER SLEEP
MUTE POWER
BACK NEXT
M-DOWN
15
1
2
3
5
4
6
7
8
9
18
17
16
14
13
12
11
10
19

7. OPERATING INSTRUCTIONS
8
rear
will
are at
FUNCTION
4.
repeatedly until FM or MW appears in display
MW
the BAND button
If there is a large amount of background noise(hiss) when listening to a station in
FM STEREO press the INTRO/STEREO button to listen to the station in MONO.
the reception is satisfactory.
for approximatly 1 second.
stations.

9
on the remote or MEMORY on the main unit
wareband.
Preset Stations
5or MEMORY key
Only 10FM and 10AM presets can be stored.
6
pause the disc.
/ Cassette
/ Cassette Door.
Press the Power button, the standby indicator will turn off.
/Cassette
Playback will begin automatically with track 1.
will

10
Repeatedly
subsequent
8.OPERATING INSTRUCTIONS
flash
Press
Repeatedly
from
Press and hold skip Up/Search Forward or Skip Down/Search Backward button to
Search Forwards or backwards at high speed for a specific passage of a track. Normal
playback will resume when the button is released.
appears steadly
previous

11
EQ OFF CLASSIC ROCK POP JAZZ
32
display. and
will resume.
playback in random order.
again and NORMAL play will resume.
on remote or MEMORY on main unit.
or MEMORY button to store the track . to be programmed
will shown on the
32
to be programmed

12
90, 80, 70, 60, 50, 40, 30, 20, 10, OFF.
CLOCK SETTING
1) Press the STANDBY/ON button to turn the unit to standby.
2) Press and hold the PROGRAM button on the remote or MEMORY button on the main
unit, 24Hr will appear on the display. Press the skip/search or button. To set
24 Hour or 12 hour time format.
3) Press the PROGRAM or MEMORY button ONCE. The Hour segments will flash.
4) Press the Skip/Search or button to select the current hour.
5) Press the PROGRAM or MEMORY button again and the minute segments will flash.
6) Press the Skip/Search or button to select the current minute.
7) Press the PROGRAM or MEMORY button once more. The display stops flashing and
the time is set.
TO SET THE TIMER
1) Press and hold TIMER button. The LCD display will change to TIMER mode and then
the Hour segments will flash.
2) Press the skip/search or button to select the wake-up hour.
3) Press the TIMER button again. The hour segment will stop flashing and the minute
segment flashes.
4) Press the Skip/Search or button to select to wake- up minute.
5) Press TIMER button again. The minute segment stop Flashing Off will show in the
display briefly. The hour segment will then flash.
6) Press the Skip/Search or to select turn off Hour.
7) Press TIMER button again. The Hour segment will stop Flashing and the minute segment
will Flash.
8) Press the Skip/Search or to select turn off minute.
9) Press TIMER button again to select source (Tuner/CD) to listen to when the unit turns on.
10)Press TIMER button again to set the volume level that should be used when the unit
turns on under timer.
11)Press TIMER button again to complete the timer setting.

13
In FM Radio Mode: Select Stereo/Mono reception when listen to an FM station.
3. INTRO/STEREO button
9. CD REMOTE CONTROL OPERATION
IN CD MODE: again to resume
7. DBBS button
Press DBBS button to boost bass sound level or turn off bass boost.
6.
Mute ON/OFF.
OFF

When the tape ends the Auto-Stop feature releases the Play button.
NOTE: Auto-Stop only operates in the Play or Record modes. Auto-Stop does not work
during Fast Forward or Rewind operation.
Making A Tape Recording
You can record directly from the radio or the CD player to the built in stereo cassette
recorder. No separate microphones or external connections are required. In addition, the
cassette recorder has an Automatic Recording Volume Level Control circuit that automatically
controls the recording volume level to prevent distortion. You may adjust the volume control
during recording, or turn the volume ‘off’ completely without affecting the recording.
1. Select the source you wish to record, Radio or CD Player, and follow the operating
instructions for that source.
2. Open the CD/Cassette door.
3. Insert a good quality blank cassette tape into the slots on the inside of the
cassette CD with the full reel on the left side. Close the cassette door.
Playing A Cassette Tape
1. Select the Tape function by pressing the FUNCTION button.
2. Open the Cassette Tape door.
3. Insert a cassette tape into the cassette deck with the full reel on the left side. Close
the CD/Cassette Door.
4. Press the Cassette Play button to begin playback.
5. Adjust the Volume and DBBS controls as desired.
6. To advance or rewind the tape rapidly, press the Fast Forward or Rewind
buttons. To resume normal playback press the Cassette Play button again.
7. To pause during playback, press the Cassette Pause button.Press Pause again to
resume playback.
8. To stop the tape before the end, press the Cassette Stop button .
9. To remove the tape open the door the door and press the tape Stop button to raise
the tape out of the mechanism and then lift the tape out.
14
10. CASSETTE TAPE OPERATIONS

Cassette Tape Recommendations
Standard tape lengths have 15(C-30) and 30(C-60) minutes of recording time on each
side. Longer length tapes of 45 (C-90) and 60 (C-120) minutes of
recording time on each side are available, but because longer tapes
in the same size package necessitate the use of thinner materials,
the chance for malfunction is much greater. Longer length tapes
are not recommended. Use only high quality tapes. If a problem
develops, check the unit first with another cassette to determine if
the problem is with the cassette, and not the unit.If there is any
slack in the tape in the cassette, it should be removed before
inserting the cassette. Place a pencil in one of the holes and rotate
until all slack is taken up.
4. Press the Cassette Record button. The Cassette Play button will also engage and
recording will begin.
If you wish to stop the tape temporarily to avoid recording certain material, press the
Cassette Pause button. Press again to resume recording.
5. When the recording has finished press the Stop button to stop the tape.
Fig.1
Fig.2
15

Safeguard Against Accidental Erasure
When a new recording is made, any program material previously recorded is automatically
erased and only the new recording remains. To safeguard valuable recordings from being
erased accidentally, the cassette and the deck are equipped with a tab.
On the back of the cassette there is an erase prevention tab on each side. To prevent
accidental erasing, break out these tabs with a screwdriver. If only one side of the tape
is to be protected, break out the tab on the left side with the side to be protected facing
you. To record on a tape in which the tab has been broken, place a piece of cellophane
tape over that area.
16

Cleaning The Unit
•To prevent fire or shock hazard, disconnect your unit from the AC power source when
cleaning.
• If the cabinet becomes dusty wipe it with a soft dry dust cloth. Do not use any wax
or polish sprays on the cabinet.
• If the cabinet becomes dirty or smudged with fingerprints it may be cleaned with a
soft cloth slightly dampened with a mild soap and water solution. Never use
abrasive cloths or polishes as these will mark the finish of your unit.
Caution:
Never allow any water or other liquids to get inside the unit while cleaning.
17

Should this unit exhibit a problem, check the following before seeking service.
Symptom
Radio
Noise or sound distorted
on AM or FM
broadcasts.
FM STEREO indicator
does not light.
AM or FM, no sound.
Cassette Player
CD Player will not play.
CD skips while playing.
Possible Cause
Station not tuned properly for
AM or FM.
FM: Aerial is not
extended.
AM: The bar aerial is not
positioned correctly.
FM station is mono or station
signal is weak.
Function is not set to Tuner.
Volume at minimum.
Function is not set to CD.
CD is not installed or installed
incorrectly.
Disc is dirty or scratched.
Solution
Retune the AM or FM station.
Extend FM aerial.
Reposition the unit best
reception is obtained.
Extend FM aerial. Try other
strong stations.
Use FUNCTION to select
tuner.
Increase Volume.
Press CD button to select CD
function.
Insert CD with label side up.
Wipe disc with cloth or use
another disc.
Increase Volume.
Clean the head.
Replace the tape.
Clean roller and capstan.
Volume at minimum.
Dirty head.
Tape old or worn.
Dirty roller and capstan.
No sound.
Sound distorted.
Speed varies.
Useing Cleaning Cassette Tape
Will not record.
Distorted sound on
playback.
Erase prevention tab removed.
Defective tape or dirty tap
head.
Cover hole with tape.
Replace tape or clean
tape head.
18
11. TROUBLESHOOTING GUIDE
pull out AC plug from AC outlet after few second
insert the plug into AC outlet.

Model : GPS217PLLR
Specification
Main Unit
FM section
Tuning range: 87.5 MHz – 108 MHz
Usable sens.: 20db
Antenna: telescopic
MW section
Tuning range: 522 kHz – 1620kHz
Usable sens.: 61dB/M
Antenna: Ferrite bar
Amplifier
Power output (at 10% THD): 2W
Max. output power 2.5W
Headphone: 32 ohms
Cassette deck section
Track format 4 tracks, 2 channels stereo
Frequency response Normal tape : 100 Hz to 10 KHz
Signal - to - noise ratio 45 dB
Recording system AC bias
Heads Recording/playback head x 1 erase
head x 1
CD section
Laser: Semiconductor laser (760-800nm)
S/N ratio: 50dB(1 kHz, 0 dB)
Harmonic distortion: 0.5%(1 kHz, 0 dB)
Wow and flutter: Immeasurable
General
Power requirement: AC230V, 50Hz
Max. Power consumption:
Dimension of main unit: 375 (L) x 198 (W) x 133 (H) mm
Weight of main unit:
Rrmote Control
Power requirement: DC: 3V (CR2025 lithium Battery Cell x 1)
Specifications and extemal appearance are subject to change without notice.
19
12. TECHNICAL SPECIFICATION
Table of contents
Other Coodmans Cassette Player manuals