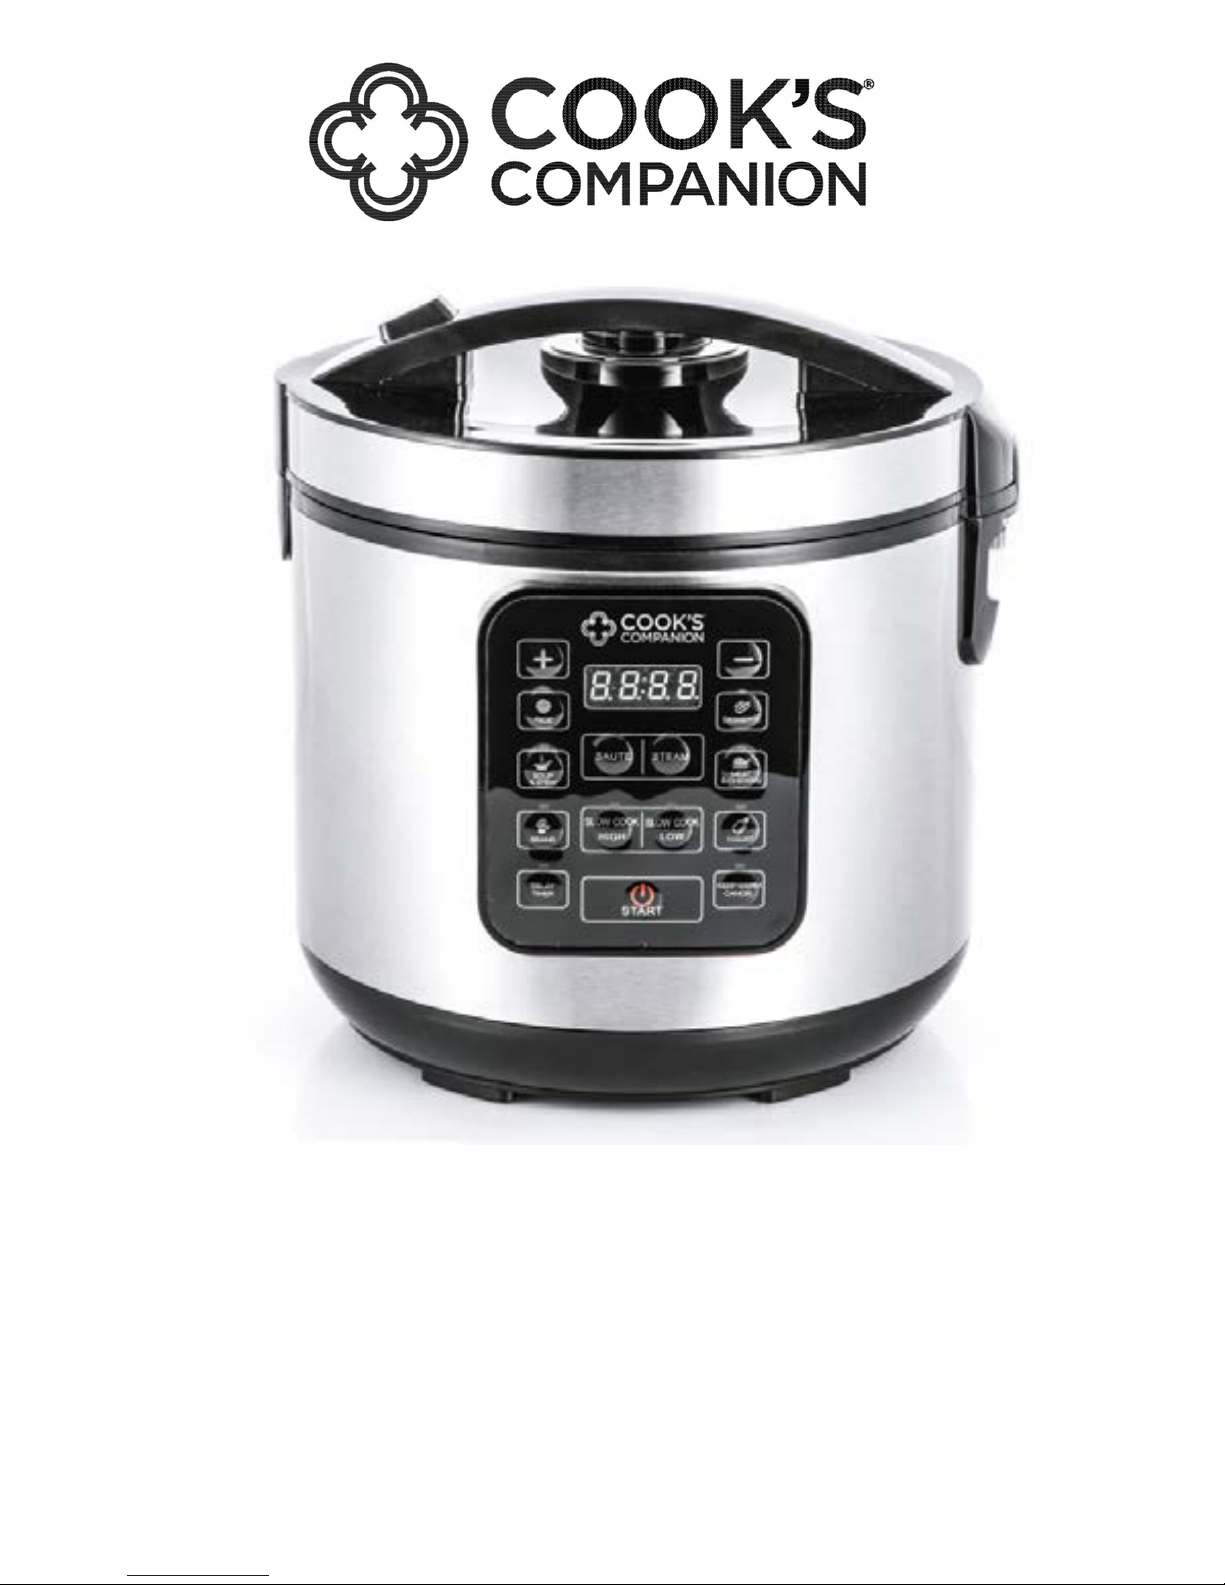
Cook's Companion CC5GT001 Technical specifications

5.3QT DIGITAL 11-IN-1
INSTACOOKER
Instruction Manual & Recipes
MODEL CC5GT001
1

WHAT’S INCLUDED
2
Instacooker
Inner Pot
Spoon, Steamer* & Condensation
Cup
Instruction Manual
& Recipes
*To use the steamer, liquid is
required in the inner pot to create
the steam, then place the
steamer inside the inner pot.

IMPORTANT SAFEGUARDS
When using electrical appliances, basic safety
precautions should be followed as follows:
• Read all instructions.
• Do not use for anything other than intended use.
• Do not place the unit on or near gas or another hot
environment to avoid damages.
• Use extreme caution when moving the unit.
• Do not use near an open flame or cook top.
• Never place food or liquids directly into the Instacooker
without first inserting the inner pot.
• Place the unit on a level surface away from walls and
cupboards. Do not let the cord hang over the edge of a
table or counter or touch hot surfaces.
• Do not immerse the unit in liquid or allow liquid to be in
contact with electrical parts.
• Do not let children operate the unit.
• Do not touch the control panel with any sharp
instruments.
• Do not block the air vent during cooking.
• To avoid scalding, never open the lid or put your hands
or face close to the steam vent while in operation.
• Do not touch the inner pot during or directly after
cooking as it will be extremely hot.
• Rice should not be rinsed in the inner pot as the non-
stick coating of the inner pot can be damaged.
• Unplug unit from outlet before cleaning and allow to cool
before cleaning, clean after every use.
3

• Do not use unit with an extension cord, always plug into
a wall outlet.
• To prevent electrical shock do not immerse cord, plugs,
or appliance in water or other liquid.
• Do not use the unit if the cord is damaged.
• Do not use outdoors.
• The use of accessory attachments not recommended by
the appliance manufacturer may cause injuries or
damage to the unit.
• Always attach the cord to appliance, then plug the cord
into a wall outlet. To disconnect remove plug from wall
outlet.
• Make sure to clean the lid and steam vent after each
use.
• SAVE THESE INSTRUCTIONS.
4

PARTS IDENTIFICATION
5
Main Body
Inner Pot
Cover Lid
Lid
Control
Panel
STEAM VENT
During the cooking process the steam vent should not
be blocked and
caution should be used as the steam will be extremely
hot. It is not
recommended to remove the steam vent from the lid.
CONDENSATION CUP
Attaches to the outside of the Instacooker to collect
condensation while
unit is in use. To clean the cup remove from the body
of the Instacooker.
Condensation
Cup
Steam Vent

BEFORE FIRST USE
1. Remove all packaging materials, stickers, and labels.
2. Clean the inner pot with hot water, dishwashing liquid,
and a non-abrasive sponge.
3. Wipe the inside and outside of the appliance with a
cloth.
USING THE APPLIANCE
Rice
To begin the rice function, press “Rice”. The screen
will show “0:20”, the rice indicator will light up. Press the
“Start” button and the unit will begin heating. The unit will
heat up and the “:” will begin to blink and the unit will begin
to countdown. Once the rice function is completed the
screen will display “bb” and the unit will go into Keep
Warm.
Note: Please use the measuring cup included. For every cup of washed
white rice added, 3/4 cups of water should be added to the inner pot. For
every cup of brown, red, or black rice, 2 1/2 cups of water should be added
to the inner pot. For every cup of wild rice, 4 cups of water should be added
to the inner pot.
HELPFUL RICE COOKING TIPS!
•Note that all measurements for water and rise is based on using a USA
cup measurement.
6

Soup & Stew
To begin the soup/stew function, press “Soup/Stew”. The
screen will show the default time of 60 minutes. If you want to
change the cooking time press “+” to increase in 1 minute
increments or “-” to decrease time in 1 minute increments. If
you want to delay the time on the soup function, press “Time
Delay”, then “+/-” to adjust the delay time in 30 minute
increments for up to 24 hours. After cooking, the unit will go
into the warm function.
Beans
To begin the beans function, press “Beans”. The screen
will show the default time of 40 minutes. If you want to change
the cooking time press “+” to increase in 1 minute increments
or “-” to decrease time in 1 minute increments. If you want to
delay the time on the bean function, press “Time Delay”, then
“+/-” to adjust the delay time in 30 minute increments for up to
24 hours. After cooking, the unit will go into the warm function.
NOTE: This function will begin to countdown once the
temperature has been reached.
Steam
To begin the steam function, press “Steam”. The screen
will show the default time of 5 minutes. If you want to change
the cooking time press “+” to increase in 1 minute increments
or “-” to decrease time in 1 minute increments. If you want to
delay the time on the steam function, press “Time Delay”,
then “+/-” to adjust the delay time in 30 minute increments for
up to 24 hours. After cooking, the unit will go into the warm
function.
7

Sauté
To begin the Sauté function, press “Sauté”. The screen
will show the default time of 30 minutes. This function does
not have an adjustable time. After cooking, the unit will go into
the warm function.
Slow Cook High
To begin the Slow Cook High function, press “Slow Cook
High”. The screen will show the default time of 4 hours. If you
want to change the cooking time press “+” to increase in 30
minute increments or “-” to decrease time in 30 minute
increments. After cooking, the unit will go into the warm
function.
Slow Cook Low
To begin the Slow Cook Low function, press “Slow Cook
Low”. The screen will show the default time of 6 hours. If you
want to change the cooking time press “+” to increase in 30
minute increments or “-” to decrease time in 30 minute
increments. After cooking, the unit will go into the warm
function.
Desserts
To begin the Desserts function, press “Desserts”. The
screen will show the default time of 30 minutes. If you want to
change the cooking time press “+” to increase in 1 minute
increments or “-” to decrease time in 1 minute increments. If
you want to delay the time on the dessert function, press
“Time Delay”, then “+/-” to adjust the delay time in 30 minute
increments for up to 24 hours. After cooking, the unit will go
into the warm function.
8

Meat & Chicken
To begin the meat function, press “Meat”. The screen
will show the default time of 25 minutes. If you want to
change the cooking time press “+” to increase in 1 minute
increments or “-” to decrease time in 1 minute increments.
If you want to delay the time on the meat function, press
“Time Delay”, then “+/-” to adjust the delay time in 30
minute increments for up to 24 hours. After cooking, the
unit will go into the keep warm function.
Yogurt
To begin the Yogurt function, press “Yogurt”. The
screen will show the default time of 12 hours. If you want
to change the cooking time press “+” to increase in 30
minute increments or “-” to decrease time in 30 minute
increments. If you want to delay the time on the yogurt
function, press “Time Delay”, then “+/-” to adjust the delay
time in 30 minute increments for up to 24 hours. After
cooking, the unit will not go into the Keep Warm function.
Time Delay
To use the “Time Delay” function, you will need to
press “Time Delay”. The screen will flash with the preset
time, press “+” or “-” to set the delay time desired (it is
adjustable up to 24 hours in 30 minute increments). After
the desired delay time is selected, press the desired
function and set the time for that function. The ingredients
will begin cooking after the delay time has elapsed. For
example: If your desired delay time is 6 hours, your food
will begin cooking after 6 hours.
9

+/-
By pressing “+” or “-” the time will be adjusted.
Keep Warm/Cancel
The Instacooker will automatically go into the warm
function after each cooking function or if the “ Keep Warm/
Cancel” button is pressed from stand-by mode. By
pressing this function when another function is selected or
during the current function it will be cancelled and the
Instacooker will switch to stand-by mode.
NOTE: Food will continue to cook during the Keep Warm
cycle. This cycle will need to be cancelled to turn it off by
pressing the “Keep Warm/Cancel” button.
CLEANING
Clean both the lid and cover lid, inner pot,
accessories and steam vent after each use. Allow
adequate time after cooking process to ensure unit is cool.
To clean the lid, cover lid, accessories and steam vent use
water and non-abrasive liquids and sponge, dry with a soft
cloth. Be sure that they are placed into the correct position
for next use. To clean the inner pot, use non-abrasive
liquids and sponges as to not damage the coating, dry
with a cloth.
STORAGE
1. Unplug the cord
2. Make sure all parts are clean and dry.
10

DEFAULT TIMES
11
FUNCTION
DEFAULT
COOKING TIME
COOKING TIME
RANGE
RICE
20 MINS.
15-45 MINS.
SOUP
60 MINS.
40-90 MINS.
BEANS
40 MINS.
20-60 MINS.
STEAM
5 MINS.
5-25 MINS.
SAUTÉ
30 MINS.
N/A
SLOW COOK HIGH
4 HOURS
2-6 HOURS
SLOW COOK LOW
6 HOURS
4-8 HOURS
DESSERT
30 MINS.
18-45 MINS.
MEAT
25 MINS.
20-40 MINS.
YOGURT
12 hour
8-24 HOURS
*All functions except Yogurt go into keep warm after they are finished cooking.

COOKING CHART
Ingredients
Suggested
Amount
Function
Time (Minutes)
Liquids/
Additional
Instructions
Rice
White Rice
3 cups rinsed
white rice
Rice
20 minutes
3 cups
water
Brown Rice
3 cups rinsed
brown rice
Rice
40 minutes
6 cups
water
Wild Rice
2 cups rinsed
Rice
60 minutes
6 cups
water
Vegetables
Asparagus
1 pound
Steam
10 minutes
1 cup water
Broccoli,
Flowerets
3/4 pound
Steam
12-14 minutes
1 cup water
Corn on the
Cob
4 ears
Steam
12"minutes
1 cup water
Poultry
Boneless
Skinless
Chicken Breast
2 4oz. chicken
breasts
Sauté
16 minutes
spritz with oil,"
turn once
Chicken
Thighs
4 bone in
Chicken Thighs
Sauté
25 minutes
cook for 15
minutes, turn
Chicken
Pieces
2 inch Chicken
Pieces
Sauté
12 minutes
stirring
Fish
Shrimp
1 pound
Steam
12 minutes
1/4 cup water
Clams
1 dozen
Steam
8 minutes
1/2 cup water
Salmon
2 4oz. filets
Steam
10 minutes
1/4 cup water
Beans
Navy beans
1 pound
Beans
soak - 1 hour
4 water
Black beans
12 ounces
Beans
soak - 1 hour
4 water
Red beans
1 pound
Beans
soak - 2 1/2 hours
6-8 water
12

Baked Goods
Cake Mix
1 box
Desserts
40 minutes
Rice Pudding
2 cups cooked
rice
Desserts
20 minutes
2 cups milk
Quick bread
1 box
Desserts
20 minutes
Beef/Pork
Ground Beef
1 pound
Sauté
15 minutes
Stew meat
1 pound
Soup
2 hours
1/2 cup broth
Pork Ribs
8 ribs
Meat
2 hours
1 cup water
Other
Steel Cut Oats
1 cup
Rice
20 minutes
2 1/2 cups
water
Pasta Ziti
2 cups
Rice
15-17 minutes
1 1/2 cups
water
Quinoa
3 cups rinsed
Rice
20 minutes
4 cups water
13

INSTACOOKER RECIPES
Yogurt
Yields 3 quarts
3-quarts whole milk
½cup whole plain yogurt
Select rice function, press start.
Add milk and heat until boiling, about 20 minutes; stir occasionally.
When cooking is complete, press cancel.
Milk should cool to 100-110 degrees using an instant read thermometer.
Whisk in yogurt; close lid.
Select yogurt function and press start.
12 hours later, strain through a cheesecloth if you desire an even stiffer yogurt.
Place yogurt in an airtight container and refrigerate.
Remember to save some yogurt from each batch to start a new batch.
Creamy Macaroni and Cheese
Serves 6
4 cups elbow macaroni
3 cups chicken stock
1 teaspoon salt
½teaspoon black pepper
1 1/2 cups cream
2 cups shredded mild Cheddar cheese
2 cups shredded Mozzarella cheese
1 cup grated parmesan
2 tablespoons melted butter
Place macaroni, stock, salt and pepper in the inner pot; close lid.
Select rice function, press minus button until time reaches 15 minutes and press start.
When cooking time is complete, stir in remaining ingredients.
Close lid and let rest on keep warm for 15 minutes.
Stir and serve warm.
White Rice
Serves 4-6
4 cups jasmine rice or basmati rice
4 cups water or stock
1 teaspoon salt
1 teaspoon extra-virgin olive oil
Place rice in a strainer and rinse rice until water runs clear.
Add rinsed rice and water to the inner pot close lid.
Select rice function, press start.
14

When cooking time is complete, fluff rice and serve warm.
Cuban Style Black Beans
Serves 6-8
1 bag (12-ounces) dried black beans
8 strands saffron
1 teaspoon ground cumin
4 cups beef stock
1 medium onion, dice
1 red bell pepper, diced
1 tablespoon chopped cilantro
2 ripe plum tomatoes, chopped
1 garlic clove, minced
1 10-ounce diced tomatoes with green chilis and lime
Sort and wash beans.
Place beans into inner pot, cover with water; soak for 2 hours.
Rinse the beans and place back in the inner pot.
Add remaining ingredients, close lid and select bean function. Press plus button until time
reaches 1 hour, press start. When cooking is complete, open lid, stir; close lid.
Select bean function, press plus button until time reaches 1 hour, press start.
When cooking is complete, open lid, stir and serve warm.
Thai Style Chicken Soup
Serves 4-6
1 tablespoons extra-virgin olive oil
1 small purple onion, thinly sliced
1 small red pepper, julienned
1 teaspoon freshly grated ginger
2 garlic loves, minced
1 can (6-ounces) bamboo shoots
2 tablespoons creamy peanut butter
2 tablespoons brown sugar
2 cups shredded chicken
1 can (13-ounce) coconut milk
2 cups chicken stock
1 teaspoon Chinese five-spice powder
1 tablespoon fish sauce
1 lemon, juice and zest
2 tablespoons green onion, chopped
2 tablespoons chopped cilantro
Place oil into cooker, select sauté function, press start, let oil heat 5 minutes.
Add onions and sauté for 5 minutes. Add pepper, ginger and garlic, and cook for an additional 2
minutes.
Add bamboo shoots, peanut butter and sugar, sir well;
15

Add remaining ingredients, except green onions and cilantro; close lid.
Press cancel button, select rice function and press start.
When cooking is complete, garnish with green onions and cilantro. Serve warm.
Chocolate Cake
Serves 8-10
1 box (18-ounces) devil’s food cake mix
1 cup mayonnaise
1 ½cups milk
Non-stick cooking spray
Using a hand mixer, combine all ingredients; mix until smooth
Spray cooker with non-stick spray and pour in batter; close lid.
Select dessert function and increase time to read 40 minutes.
Close lid and press start.
When cooking is complete, test doneness by inserting a toothpick into center. If it comes out
clean, it is done.
16

RECIPE NOTES
____________________________
____________________________
____________________________
____________________________
____________________________
____________________________
____________________________
____________________________
____________________________
____________________________
____________________________
____________________________
____________________________
____________________________
____________________________
____________________________
____________________________
____________________________
17

RECIPE NOTES
____________________________
____________________________
____________________________
____________________________
____________________________
____________________________
____________________________
____________________________
____________________________
____________________________
____________________________
____________________________
____________________________
____________________________
____________________________
____________________________
____________________________
18

RECIPE NOTES
____________________________
____________________________
____________________________
____________________________
____________________________
____________________________
____________________________
____________________________
____________________________
____________________________
____________________________
____________________________
____________________________
____________________________
____________________________
____________________________
____________________________
19

LIMITED ONE YEAR WARRANTY
This warranty covers all defects in workmanship or materials in the mechanical and
electrical parts, arising under normal use and care in this product for a period of 12
months from the date of purchase provided you are able to present a valid proof-of-
purchase. A valid proof-of-purchase is a receipt specifying item, date purchased, and
cost of item. A gift receipt showing item and date of purchase is an acceptable proof-of-
purchase. Product is intended for household use only. Any commercial use voids the
warranty.
This warranty covers the original retail purchaser or gift recipient. During the
applicable warranty period within normal household use, we will repair or replace, at our
discretion, any mechanical or electrical part which proves defective, or replace unit with
a comparable model. Shipping and handling costs are not included for warranty
replacements and are the responsibility of the customer.
To obtain service under the terms of this warranty, send an email to
this page when contacting us.
THIS LIMITED WARRANTY COVERS UNITS PURCHASED AND USED WITHIN
THE UNITED STATES AND DOES NOT COVER:
• Damages from improper installation.
• Damages in transit.
• Defects other than manufacturing defects.
• Damages from misuse, abuse, accident, alteration, lack of proper care
and maintenance, or incorrect current or voltage.
• Damage from service by other than authorized dealer or service center.
• Shipping and handling costs.
• This warranty gives you special legal rights and you may also have other
rights to which you are entitled which may vary from state to state.
Manufacturer does not assume responsibility for loss or damage for return
shipment. We recommend that you keep your original packaging should you require
repair service. Before returning product please contact our customer care department
for return authorization. When returning product for repair please include your full name,
return address, and daytime phone number. Also include a brief description of the
problem you are experiencing and a copy of your sales receipt or other proof of
purchase in order to validate warranty status.
MODEL CC5GT001
20
Table of contents
Other Cook's Companion Cooker manuals
Popular Cooker manuals by other brands

Sakura
Sakura SE-MH502B user manual

GIGA
GIGA ICPE4 Installation, operating, & maintenance instructions

Kenwood
Kenwood KDC506S19 Installation instructions manual

Fisher & Paykel
Fisher & Paykel HP90IHCB3 operating instructions

Tricity Bendix
Tricity Bendix 2000S OPERATING AND INSTALLATION Manual

Beper
Beper 90.380 use instructions