Coralife Turbo-Twist 3x User manual

Water Pump not Included.Water Pump not Included.
SPECIFICATIONS
PARTS DIAGRAM
HOSE LOCK NUT
O-RING GASKET
QUARTZ HOUSING
UVC LAMP
PLUG
FLAT O-RING
MAIN
BODY
O-RING
TANK
BRACKET
TURBO-TWIST
BRACKET
HOSE BARB
ADAPTER HOSE LOCK NUT
SUCTION
CUP
THREADED-CAP
INSTRUCTIONS
Always disconnect the unit from the power supply before
installing the Turbo-Twist.
The Turbo-Twist provides superior aquarium health and
appearance by eliminating most harmful microorganisms.
Set-up and positioning
Adjusting the hose barb
inlet and outlet.
The hose barbs can be
positioned in four different locations
to facilitate connections to other
applications.
QUARTZ SLEEVE
(PICTURE 1)
QUARTZ HOUSING
QUARTZ
HOUSING
MAIN
BODY
MAIN BODY (PICTURE 2)
(PICTURE 3)
(PICTURE 4)
(PICTURE 5)
Lift the red safelock and unlock the
quartz housing. (Picture 1)
Carefully twist the quartz housing
and the main body opposite of each
other. (Picture 2)
Combine the main body with the quartz
housing and rotate according to the
arrowhead "close". (Picture 4)
Press in the red safelock and the UV
Sterilizer is now ready to install.
(Picture 5)
The quartz housing can now be
rotated 360
o
. (Picture 3)
Adjust the orientation of the hose
barb and set the main body into the
quartz housing.
HOSE
BARB
OUTLET
HOSE
BARB INLET
Article Turbo-Twist 3x UV Sterilizer
UV Lamp 9 watt
Rated Voltage AC120V
Rated Cycle 60Hz
Rated Power 10.2 watt
Wavelength of UV Radiation 253.7mm
Life of UV Lamp Approx. 8000 hours
Aquarium Volume Tre ats up to 125 gallon saltwater or freshwater aquariums
Flow Rate 100-200 gallons per hour
Size of O-ring Inner 12/outer 16mm, inner 16/outer 22mm
Cord Length Approx. 9 ft.
Irradiation of UV Radiation 9,580 W/cm
2
(value @ 20mm distance from the UV lamp)
O-RING
HOSE BARB
ADAPTER
LAMP ON INDICATOR

TURBO-TWIST
BRACKET
THREADED-CAP UVC LAMP
RANGE OF THE CLAMP
TANK
BRACKET
PULL-OUT
SNAP-IN
SNAP-IN SNAP-IN
SNAP-IN
SUCTION CUP
PULL-OUT
PLACE ON
AQUARIUM
Adjust the tank bracket so that it
hangs on the outside of the aquarium.
UV Lamp installation
Remove threaded-cap, install UV lamp
into socket until lamp "clicks" into place.
Once step 2 is finished, snap the main
body into the bracket indicated by a
"click". Snap the other bracket with the
suction cup in the same way.
Slide the Turbo-Twist bracket onto the tank
bracket. Make sure the Turbo-Twist bracket
is securely fastened onto the tank bracket.
For horizontal positioning,
take the suction cup out
and snap the main body
into the brackets until it
locks with a "click".
Bracket Installation
Attaching the hose lock nuts
Position the hose lock nuts
on the hose-barb inlet/outlet.
Installing
the Turbo-Twist
Hang the unit using
the Turbo-Twist
bracket and suction
cup on the outside
of the aquarium.
Adjust the tank
bracket to secure
the Turbo-Twist
UV Sterilizer.
Place the O-ring on
hose barb inlet/outlet.
O-RING GASKET
HOSE LOCK NUT
O-RING
AQUARIUM
HOSE BARB ADAPTER
SMALL HOSE LOCK NUT
FLEXIBLE
TUBING
Make sure that the flat O-ring gasket is properly positioned
inside the threaded-cap (already installed in unit). Screw
the threaded-cap tightly back into place.
Note: The plug and cord
should be turned together
when screwing the threaded-
cap back into place.
Note: Do not
use O-ring when
larger hose barbs
are being used.
Note: Water will leak if the O-ring is not in place.
Use flexible tubing to connect the sterilizer
to the water supply. Turn the hose lock nut
counter-clockwise to tighten flexible tubing
onto the hose barb. Hose lock nuts require
only hand tightening.
Hand tighten the hose
barb adapter onto the
Turbo-Twist.
Use flexible tubing to connect
the sterilizer to the water supply.
Turn the hose lock nut counter-
clockwise to tighten flexible
tubing onto the hose barb.
Hose barb adapter installation
Attach Turbo-Twist bracket with screws on
a fixed surface.
Horizontal Positioning
O-RING

Water flow
outlet connection
HOSE BARB INLET
HOSE BARB
INLET
Warning:
Never install a
valve directly
on the tubing
between the
main body and
the aquarium.
Note: Make sure that the tubing is not carrying the weight of the Turbo-Twist UV Sterilizer.
Use the Turbo-Twist brackets to support the unit.
Note: When the Turbo-Twist is turned on, you may
see patterns on the body of the unit. This does not
affect the quality ot the unit.
Connect the tubing between the
water flow outlet and the hose
barb inlet.
It is recommended that a
prefilter be used with the
Turbo-Twist to limit the amount
of debris entering the sterilizer.
Cleaning the quartz sleeve
Be sure to disconnect power outlet and
turn off the pump and let the water drain
out of the Turbo-Twist UV sterilizer
before cleaning.
Turn on water supply to the Turbo-Twist. Once proper water flow has been established,
tilt the unit and let the air bubbles inside the tubing and the main body escape. Examine
the unit and check for any leaks.
Connect the Turbo-Twist to the power supply. Verify that the
UV lamp is working properly indicated by the light blue glow
emitted through the lamp on indicator. The light from the lamp
on indicator will not affect the skin or the eye.
WATER FLOW
WATER FLOW
MAINTENANCE
To ensure superior kill-rates of the sterilizer, the
quartz sleeve should be cleaned periodically.
(PICTURE 1)
SAFELOCK
Once clean, reinstall the quartz sleeve
into the main body and push the red
safelock into the lock position.
QUARTZ HOUSING
MAIN BODY (PICTURE 2)
(PICTURE 3)
QUARTZ SLEEVE
Lift the red safelock and unlock the
quartz housing. (Picture 1)
Carefully twist the quartz housing and
the main body opposite of each other.
(Picture 2)
Slide the quartz sleeve out of the main
body. (Picture 3)
Wipe the quartz sleeve using a soft,
damp cloth. Do not use household
cleaners or abrasive scrubbers to
clean the quartz housing.
Never look directly at the unshielded lamp as the ultraviolet
radiation is harmful.
Disconnect the unit from the power supply when installing or
repairing the UV sterilizer.
Never submerse the unit in water.
CAUTION
Never look directly at the unshielded lamp as the ultraviolet
radiation is harmful.
Disconnect the unit from the power supply when installing or
repairing the UV sterilizer.
Never submerse the unit in water.
CAUTION
CANISTER
FILTER
WATER FLOW OUTLET
LAMP ON
INDICATOR

TROUBLE SHOOTING
UV-C Lamp
is not working
Water leak
between the
main body and
hose lock nuts
The plug is not connected
to the power supply
Connect the plug to the
power supply
The hose lock nut is
loose
Tighten the hose barb or the
hose lock nut
The O-ring is not in
place
Install the O-ring
UV lamp base is loose
The lamp has expired Replace the UV-C lamp
Push the UV-C lamp onto the
socket until a "click"is heard
UV LAMP
SOCKET
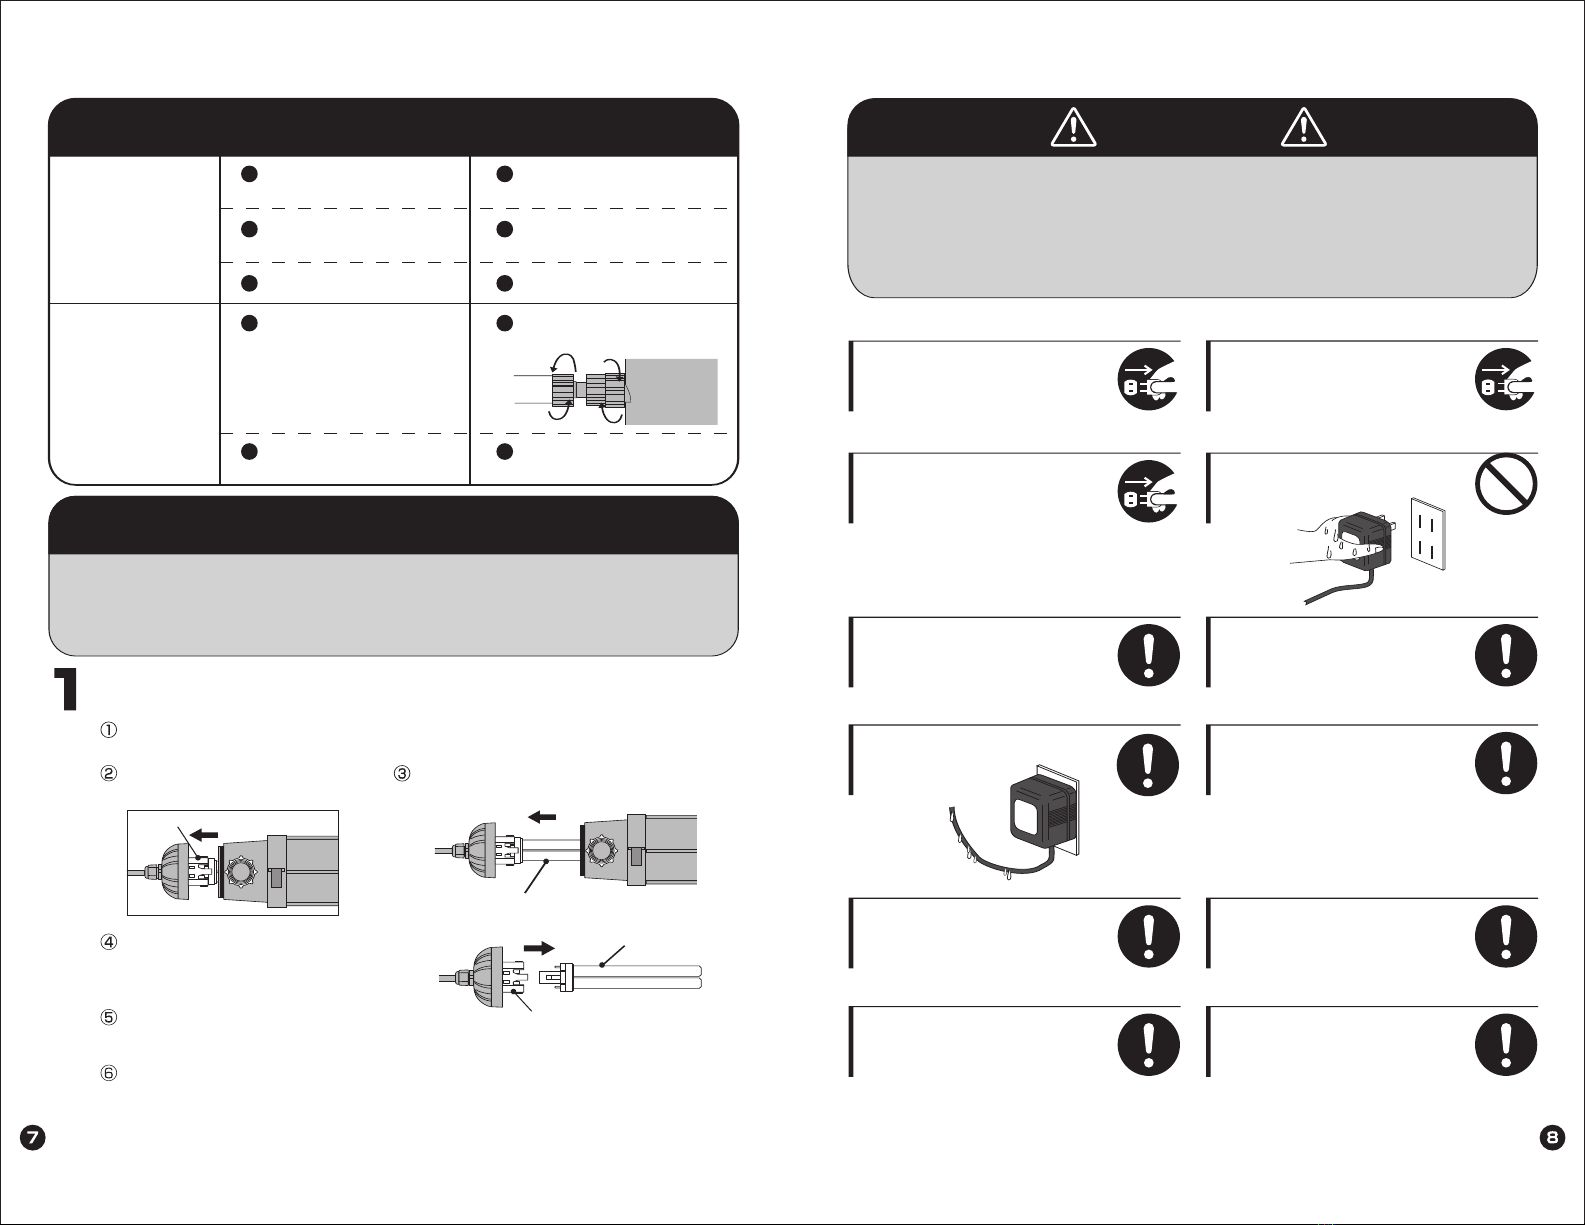
UV-C LAMP REPLACEMENT
The UV-C lamp has a useful life of about 8,000 hours.
To ensure effective performance, replace the UV-C lamp
before it expires.
How to replace the UV-C lamp
Disconnect the sterilizer from the power supply. (It is also necessary to disconnect the
power to the water pump).
Remove the threaded cap to
uncover the lamp socket.
Unplug the UV-C lamp out of the main body.
Pull the UV-C lamp out of the socket
(Be careful not to touch the lamp as it
may be hot).
Make sure that the pins of the lamp plugs
into the socket indicated with a "click".
Reverse steps 5-1 to reassemble the Turbo-Twist.
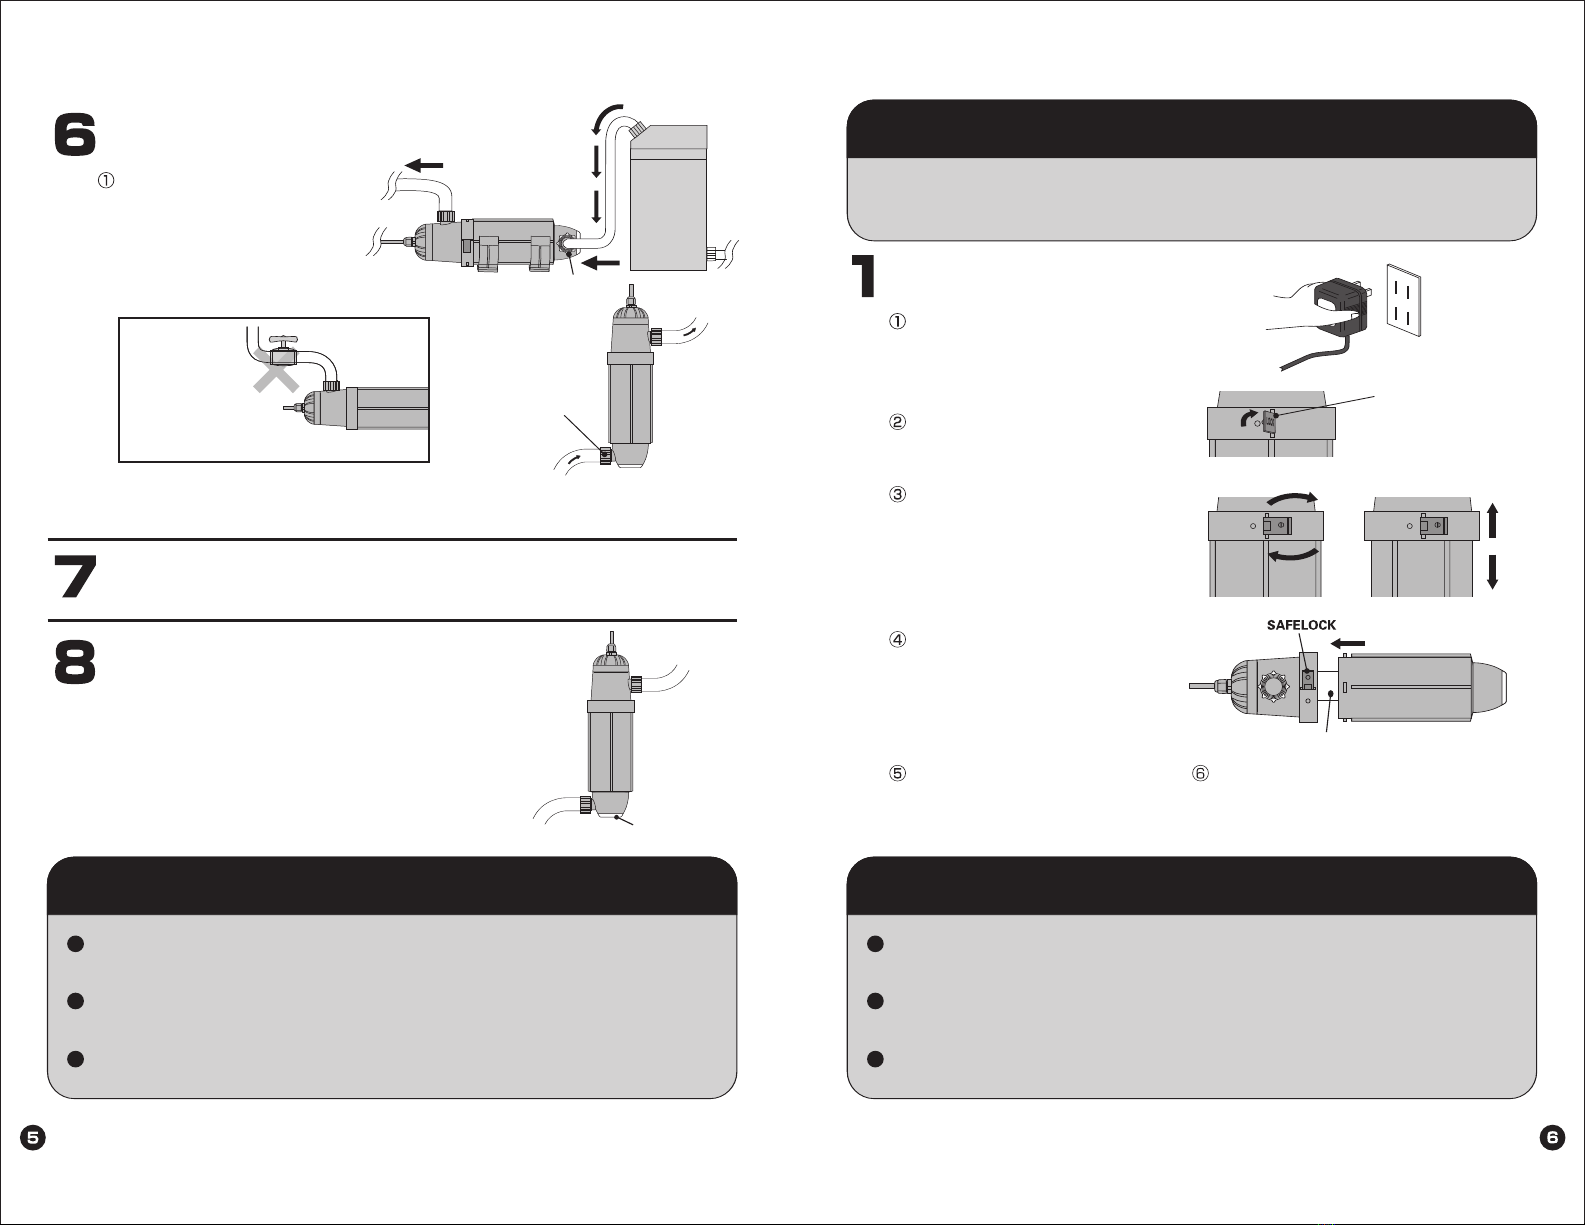
Please read the instructions in their entirety before
attempting to use this unit.
Never look directly at the unshielded
lamp as the ultraviolet radiation
emitted from the lamp can be harmful.
Do not pull cord to disconnect power.
Cut off the power and stop using if
the unit was submersed or dampened
by water
Cut off the power immediately if water
enters into the Quartz Housing.
Cut off the power if there is a burning
or smoking smell.
Never connect the sterilizer to the
power outlet while hands are wet.
Always leave a drip-loop in the power
cord to prevent water from running
down the length of the
cord and reaching
the power
outlet.
Though the Turbo-Twist is water
resistant, it should never be
intentionally submersed in water.
Always install the sterilizer in a location
where there is little likelihood of flooding
or water dripping directly onto the unit.
The water temperature flowing
through the unit should be below
105
o
F (40
o
C).
Make sure that appropriately sized
hose lock nuts are positioned on
hose barbs before attempting to
connect tubing.
Always disconnect the unit from the
power supply before shutting down
the flow of water to prevent the unit
from overheating.
Only a 120V (60 Hz) electrical
source should be used with the
Turbo-Twist.
WARNING
UV LAMP
SOCKET

55 gph
Parasites
121 gph
Algae
253 gph
Bacteria
44 66 88 110 132 154 176 198 220 242 264 286
SUGGESTED TUBING CONNECTIONS
Table of contents
Other Coralife Laboratory Equipment manuals
Popular Laboratory Equipment manuals by other brands

ThermoFisher Scientific
ThermoFisher Scientific Invitrogen iBlot 3 user guide

GE
GE AKTApure user manual

Waters
Waters Xevo G2-XS QTof Overview and maintenance guide

TSI Instruments
TSI Instruments AEROTRAK 9310 Operation manuals

Yamato
Yamato SI 401 instruction manual

Agilent Technologies
Agilent Technologies TS-5400 user manual