Mecmesin Vortex User manual

It is essential that you
familiarise yourself with the
contents of these instructions
before attempting to
operate the Vortex.
Vortex
Motorised Torque Test Frame
Operating Instructions


page 1
Contents
Operating Instructions 3
Communication with External Devices 4
Vortex Technical Specifications 7
Appendices 8
Introduction
Thank you for choosing this Mecmesin motorised torque testing system, with correct use it will give
many years of reliable service. Upon receiving the unit, please check that no obvious physical
damage has been sustained by the packaging material or the test frame itself. If any damage is
evident, or if any of the items in Appendix 1 are missing, please notify Mecmesin or their
authorised agent immediately.
These instructions should also be read in conjunction with the operating instructions for the
Advanced Force/Torque Indicator (Part No. 431-213).
Before Use
Appendix 2 gives guidance notes on the safe use of mains powered test frames, which should be
read before proceeding any further. Within the European Union (EU), a copy of this Appendix
will, if appropriate, be supplied in a language appropriate to your country by your Mecmesin
agent. Failure to adhere to the guidelines for safe use given in these operating instructions may
result in irreparable damage to the unit and/or personal injury to the operator.

page 2
INTRODUCTION TO
THE VORTEX
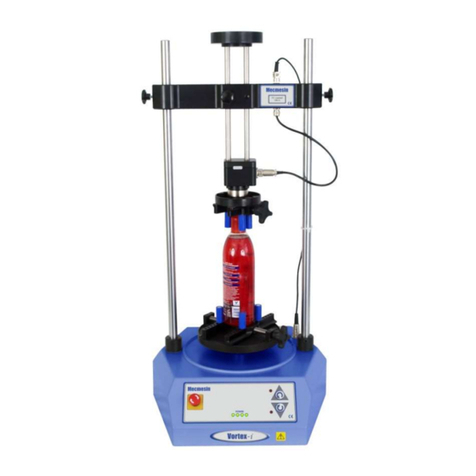
The Vortex is a twin-column motorised torque measurement
system with a load rating of up to 10 newton.metres (N.m) and
a speed range of 0.5 to 15rpm. It must not be used with load
ratings above 10N.m. Complemented by a Mecmesin AFTI
(Advanced Force / Torque Indicator) display unit, ‘smart’ static
torque transducer, and (if purchased) upper and lower
mounting tables (as illustrated in the photograph on the front
cover), it constitutes a key component in torque measurement
systems suitable for accurately testing a wide range of
products. It enables a repeatable and constant test speed to be
set, thus reducing variability in test results which can arise from
operators manually performing tests at different speeds.
There is one standard model of the Vortex. The dimensions,
speed range and capacity have been carefully optimised to
cover the test procedures and specimen sizes most often
needed by quality departments within many sectors of
manufacturing industry.
The Vortex has been designed and manufactured in a
controlled system to ensure compliance with all relevant
European Community Directives.
Before operating ensure that the Vortex has been assembled as
described in Appendix 2, ‘Installing the machine’.

Turn on the power to the Vortex by means of the rocker switch
at the rear of the base unit, the power LED (2) will illuminate.
The control panel of the Vortex has a rotary speed controller
(5) for both clockwise and anticlockwise rotation. Turning this
controller clockwise will increase speed, and turning it
anticlockwise will decrease it. Some test Standards place
particular requirements upon speed accuracy/reproducibility,
which may exceed the normal performance of the Vortex.
Under such circumstances calibration of each individual test
stand may be appropriate.
To rotate the lower mounting table, or whichever base fixture
is attached to the drive shaft adaptor (see (D), below), press
the green [Enable] button (7), then,
while still holding down
this button
, select either ‘Torque Applied’ or ‘Torque Released’
with the direction control switch (6) and
hold in this position
.
The base fixture will continue to rotate until one of the following
occurs:
a) The [Enable] button is released
b) The direction control switch is released
c) The power is disconnected
d) A pre-set alarm point is reached (see ‘Measuring &
Displaying Torque’, below)
The ‘two-handed operation’ of the Vortex is designed as a
safety feature to ensure that the operator’s hands are kept clear
of the rotating fixture.
Pressing the red [Emergency Stop] button (1) will, at any
time, cut power to the motor and stop the lower fixture rotating.
Power to the motor can be reconnected by twisting the button
either clockwise or anticlockwise.
It is advisable to check and
become familiar with the operation of the Emergency Stop
once the system is connected to the appropriate mains supply.
The LCD display on the control panel will allow either actual
speed (in revolutions per minute, i.e. rpm) or degrees of
rotation to be displayed. Pressing the [SEL] button (3) will
toggle between these two options. Angle and speed values
OPERATING
INSTRUCTIONS
Powering on
Speed Setting
Rotating the Lower Fixture
Note: that when ‘Torque
Applied’ is selected the base
fixture will be driven
anticlockwise, i.e. the upper
fixture will be twisted in a
clockwise direction relative to the
lower fixture.
Emergency Stop
Speed & Rotation Display
page 3

page 4
Measuring and Displaying
Torque
Note: torque transducers are
delicate pieces of equipment and
can easily be damaged irreparably
unless treated with care.
COMMUNICATION
WITH EXTERNAL
DEVICES
displayed do not distinguish between anticlockwise and
clockwise rotation, i.e. rotation at 2rpm in either direction will
be displayed as a positive value,
anticlockwise rotation will
not be displayed as a negative value.
Similarly, if the platen
is rotated two revolutions clockwise, then half a revolution
anticlockwise, 900˚ will be displayed, not 540˚, i.e.
it is the
total accumulated rotation, not the effective rotation which will
be displayed.
Pressing the [RST] button (4) will reset the degrees of rotation
displayed to zero.
Torque is measured on a Vortex by a ‘smart’ static torque
transducer mounted on the adjustable crosshead. The
transducer must be connected to an Advanced Force/Torque
Indicator (AFTI) mounted on one of the columns of the Vortex
(see illustration on front cover). The torque transducer is
connected to the 15pin female D-connector on the side of the
AFTI.
One way of causing irreparable damage would be to drive the
base fixture at high speed to a point where the transducer
encounters something ‘solid’. This is a risk when a user is, either
unfamiliar with operating a new test frame, or with the
characteristics of a new sample. It is recommended that an AFTI
to Vortex cable is fitted (see following section) and that a
suitable ‘alarm point’ is set; please refer to the AFTI operating
manual (Part 431-213).
There is an external control port (15pin female D-connector) at
the rear of the Vortex. This display unit interface enables the
Vortex to respond, via the appropriate Mecmesin cable (Part
351-062), to a signal from an AFTI via the 15pin male D-
connector on the top of the unit. With this cable connected, the
Vortex can stop rotating the lower platen when an alarm point
or sample break is detected. For further information please refer
to the AFTI operating manual (Part 431-213).
Some applications require a graphical representation of the test
data – if more than one peak reading is of significance, for
example. Mecmesin DataPlot software can be used to plot
torque values as a function of time, or as a function of angle

page 5
The 15pin connector on the top
of the AFTI is used for a number of
different purposes. If a cable is
connecting the AFTI directly to a
PC, then this port is not available
to connect the AFTI to the Vortex.
Adjusting Height of
Crosshead
port of a PC calculated from speed. This can be achieved in
one of two ways:
a) via a cable connecting the 9pin D-
connector at the rear of the Vortex to the RS232
b) via a cable connecting the AFTI directly to the
RS232 port of a PC
There is no hardware in the Vortex which can generate serial
data, this function is performed by the AFTI; consequently:
• Unless an appropriate cable is connecting the
AFTI and the Vortex, no RS232 data can be
downloaded from the 9pin port of the Vortex.
• Although a rotation value is displayed on the
Vortex, this cannot be downloaded to a PC
Before a specimen can be correctly located in the lower
gripping fixture, the crosshead will need to be adjusted to an
approximately suitable height. Use one hand to slacken off
both side adjuster knobs (B), while supporting the weight of the
crosshead with the other hand. Gently raise / lower the
crosshead and re-tighten the side adjuster knobs to secure.

page 6
Fine adjustments can subsequently be made by slackening the
central adjuster knob (C), raising / lowering the transducer
holding plate and carriage (D) and re-tightening.
Some testing applications require torque to be measured while
axial top-load is being applied to the specimen. Testing a
‘push-and-twist’ child-resistant closure according to ASTM
D3475 would be one example of such an application.
Ensure the central adjuster knob (C) is tightened sufficiently, and
add appropriate weight(s), up to 5kg, to loading dish (A).
Slacken off the central adjuster knob, while supporting the static
torque transducer and upper gripping fixture (not illustrated),
gently lower until this engages with the specimen and tighten
the upper mounting table grip, if necessary.
Do not re-tighten
the central adjuster knob.
The upper and lower mounting tables have been designed to
accommodate samples with a wide range of sizes, shapes and
symmetries. It is however necessary to avoid over-tightening
these fixtures such that the cap sample is distorted significantly.
Optimum results can be obtained for critical applications by
using a mandrel dedicated for use with each particular design
of cap, see (a) for example.
Setting-up Top-loading (if
required
Operation of Mounting
Tables

page 7
VORTEX SPECIFICATIONS
Load capacity of stand 10N.m/100kgf.cm/90lbf.in
Power consumption 80 watts (maximum)
Weight (stand & crosshead only) 20kg (44lb)
LOWER TABLE MOTION
Speed range 0.5 - 15rpm
Rotation direction setting Toggle switch
Rotation speed setting Potentiometer control
Rotation speed/cumulative angle indicated by LCD display
Stop on alarm point Yes, with AFTI & appropriate cable
Stop on sample break Yes, with AFTI & appropriate cable
Logging/plotting torque/time Yes, with DataPlot, PC & appropriate cable
Full computer-control No, Vortex-
i
required
Temperature range Normal laboratory ambient conditions
Humidity Normal laboratory ambient conditions
AFTI & ‘Smart’ Static Torque Transducer - Key Features
Transducer capacities available 10, 6 and 1.5N.m
Display resolution 1:5000
Accuracy ±0.5% of full scale
Internal sampling rate 5000Hz
Display update rate High 2000Hz, Medium 10Hz, Low 2Hz
Power source 5AAA NiMH rechargeable batteries
Charger supplied Yes
Battery life Approx 20 hours between charges
Calibration temperature 20±2˚C
Universal Fixtures* - Key Features
Lower mounting table 10 - 160mm diameter specimens
Upper mounting table 8 - 55mm diameter specimens
System headroom 350mm (with upper and lower tables fitted)
(*Not supplied as standard)

page 8
APPENDIX 1 SYSTEM COMPONENTS
Included with Basic Test Stand
• This operating manual
• Crosshead, without a ‘Smart’ static torque transducer
• Swivel mounting bracket for AFTI *
• Lower turntable drive shaft adaptor
• Appropriate power cable
• Translation of Appendix 2 (This does not apply to English-speaking countries, or
countries outside the European Union (EU))
• Calibration certificate, for torque only - if a torque transducer is also supplied (see
below)
Essential Complementary Equipment
• Advanced Force / Torque Indicator (Part 851-401) *
At least one of:
• ‘Smart’ 10N.m static torque transducer, attached to crosshead (Part 879-044) *
• ‘Smart’ 6N.m static torque transducer, attached to crosshead (Part 879-043)
• ‘Smart’ 1.5N.m static torque transducer, attached to crosshead (Part 879-042)
Optional Accessories
• Upper universal gripping fixture (Part 432-158) *
• Lower platen with universal gripping fixture (Part 432-232) *
• RS232 to USB converter cable (Part 432-228)
• AFTI to test stand cable (Part 351-062)
• DataPlot Software (Part 840-201)
• AFTI / Stand to PC (9 pin ‘D’) RS232 cable (Part 351-059)
* Illustrated on front cover

page 9
APPENDIX 2 GUIDE TO SAFE USE
Receiving & Unpacking
Upon receiving the Mecmesin test frame ensure adequate equipment and/or assistance is
available to lift safely the test frame and crosshead unit from the packaging. Trying to lift heavy
items without adequate assistance or the correct equipment may lead to accidental personal
injury.
We strongly recommend that all the packaging and fixings are retained for any future transit
requirements.
Once safely removed from the packaging, place the test base unit on a stable and level work
surface. Inspect this and the crosshead unit for any signs of obvious transit damage.
IF ANY DAMAGE IS DISCOVERED DO NOT GO ANY FURTHER WITH INSTALLATION,
AND DO NOT CONNECT TO MAINS SUPPLY UNDER ANY CIRCUMSTANCES.
Immediately contact your local supplier who will decide the most appropriate action to rectify
the situation as quickly as possible.
Installing the Machine
After placing the machine base unit on a stable and level work surface, a crosshead may
need to be installed. It will be necessary to refer to the photograph in the ‘Adjusting Height
of Crosshead’ section of this manual.
• Slide the AFTI swivel mounting bracket (G) onto one of the pillars, and
• tighten the knurled adjuster to secure
• Slacken off the side adjuster knobs (B)
• ensure that the loading dish (A) is facing upwards and,
• the central adjuster knob (C) faces forward (as illustrated),
• align the holes in the crosshead with the pillars of the base unit, and,
• ensuring that the crosshead remains horizontal,
• gently slide the crosshead down onto the pillars.
• Tighten both side adjuster knobs.
• The system is now ready to install any extra components which have been purchased:
Using an appropriate Allen key, attach a ‘smart’ static torque transducer to the
transducer holding plate (D) using the four M6 bolts supplied.
Attach an AFTI to its swivel mounting bracket (G) using the two M5 bolts supplied.
Connect the static torque transducer cable to the AFTI (see illustration on front cover).
Slide the lower platen turntable spacer (F) onto the drive shaft (E), and secure with the
two M8 grub screws provided; attach the lower mounting plate to this using the 2
M4 countersunk screws supplied.
Slide the upper mounting plate onto the square drive of the torque transducer and
secure with the two grub screws located in the mounting plate.
(The illustration on the front cover shows a system with all these extra components fitted)

Check that the mains inlet voltage corresponds to your electrical installation - either 230V or
110V AC. The machine has a label (see below) close to the mains inlet connector which
advises which voltage is appropriate. If the machine does not correspond to your supply,
inform your local Mecmesin supplier who will rectify the situation. Connecting a mains
powered test frame to the wrong supply will almost certainly cause extensive damage to the
equipment.
The Mecmesin test frames must only ever be connected to a mains power installation that has
a fully-installed earthing system.
CONNECTING A MAINS POWERED TEST FRAME TO AN ELECTRICAL POWER
OUTLET WITHOUT AN EARTH CONNECTION IS EXTREMELY DANGEROUS AND
COULD LEAD TO A RISK OF ELECTROCUTION.
After all the above points have been checked and confirmed to be correct, use the mains lead
supplied to connect the machine to the mains outlet.
When using the Vortex please ensure that the ventilation holes situated on the back of
the unit are not obstructed.
When power is applied with the ON/OFF switch in the ‘ON’ position the mains indicator
light (2) will illuminate. This shows power is reaching the machine and it is therefore ready for
use.
Check basic operation with reference to the ‘Operating Instructions’ section of this manual.
Operator Training
Each person who is to use the machine should be fully trained in the safe use of
motorised testing machines. The machine has the ability to generate forces large
enough to cause permanent damage to parts of the human body placed too near
to the rotating base fixture.
Note also that the crosshead must be firmly fixed before placing a hand beneath it.
Protective Clothing
Eye protection should always be used in the form of an approved pair of safety spectacles.
They should be replaced if they are scratched or damaged in any way. They should be
kept clean and clear to give maximum visibility to the user.
page 10

Extra bodily protection may be necessary if destructive testing or volatile failure of a test
piece is likely. A risk assessment should be carried out prior to using the test frame to ensure
that all necessary safety measures have been considered and carried out.
Machine Guarding
If, after the assessment, it is considered that machine guarding is needed, then contact your
local supplier who, through Mecmesin, can arrange the supply of a suitable guard for the
required level of protection.
Continued Safe Use
Once the machine is installed it should provide a reliable long term resource for torsional
testing. If however the machine fails, or appears to behave in an unusual manner, contact
your local supplier for support. Do not continue to use the machine until it has been
checked, and, if necessary, repaired and returned to a safe working condition.
If the machine is damaged in use, advise your local supplier and have the machine
repaired to restore it to a safe working condition. Do not use the machine until it has been
repaired.
Note: It may occasionally become necessary to clean the outside of the test stand. This can
be done by disconnecting it from the mains electricity supply, removing loose debris with a
soft brush, then wiping with a damp cloth.
Under no circumstances should organic solvents
or any other cleaning fluid be used.
Moving/Re-installing System
Please refer to the lifting instructions in the ‘Receiving & Unpacking’ section of this manual.
The Vortex must be powered off when attaching or disconnecting any
cable. When either communication port is not in use please ensure that it is
covered with the appropriate shield (supplied) at all times.
Note: no external cable should exceed 3 metres in length.
DDEECCLLAARRAATTIIOONNOOFFCCOONNFFOORRMMIITTYY::Please refer to the [Literature & FAQs] section of the
Mecmesin website for a copy of the EC Declaration of Conformity relevant to the Vortex.
If you have any feedback regarding Mecmesin, its products and services, which you
page 11

page 12
PACKING INSTRUCTIONS FOR VORTEX MOTORISED TEST FRAMES WHEN
RETURNING TO MECMESIN LIMITED
1 Remove AFTI display unit, AFTI swivel bracket, upper gripping fixture and lower gripping
fixture.
2 Set the top edge of the crosshead 100 to 225mm below the top of the side pillars to
tighten both the side adjuster wheels (B).
3 Set the loading dish (A) to the lowest possible position, and tighten the central adjuster
wheel (C).
4 Place the Vortex in the plastic 5 Place the Vortex and base unit collar into outer
foam base unit collar. box resting on two plastic foam spacers, as
illustrated.
6 Wrap gripping fixtures in bubble 7 Slide tongue of accessories sleeve between
wrap provided, place in accessories upper plastic foam spacer, and outer box.
box, and slide accessories box into
accessories sleeve.
.

page 13
8 Align edges of inner sleeve with long 9 Gently slide down inner sleeve until it is flush
sides of outer box. with outer box.
10 Close outer box and seal with suitable adhesive tape.
Note: If necessary, an AFTI can be returned in the same box as a Vortex, by wrapping AFTI and plastic
case in bubble wrap, and placing in outer box before inserting the Vortex, i.e. between stages (4) and
(5) above.

Additional products available from Mecmesin
The MultiTest 1 is a budget-priced, potentiometer-
controlled test stand with 1000 newton
capacity. When used with a Mecmesin force
gauge and appropriate fixtures this system is ideal
for relatively straightforward testing applications;
the force gauge captures maximum tensile and
compressive loads. (Also available in a 2500
newton capacity)
The MultiTest 2.5-
x
is a console-controlled 2500
newton stand, which can carry out simple test
procedures and data analyses. Features include:
cycling, load-holding, remote and running to a
precise load, displacement, time or break. (Also
available in a 1000, 5000, 10,000 and 25,000
newton capacity)
MultiTest
MultiTest-
x
The MultiTest 5-
i
is a fully computer-controlled
5000 newton testing machine. Mecmesin’s
Emperor software enables users to develop
sophisticated program routines and analyses to
meet precise requirements for testing particular
products. (Also available in a 1000, 2500,
10,000 and 25,000 newton capacity)
MultiTest-
i

The Vortex-
i
is a fully
computer-controlled
motorised torque testing system.
A Vortex improves
reproducibility by allowing
constant speed testing.
However, a Vortex-
i
will enable
complete control of the test procedure, analysis and
reporting by using a new torque version of Mecmesin’s
powerful, flexible and user-friendly Emperor software.
Vortex-
i
To view our range of accessories please request our brochure by
calling +44 (0) 1403 799979 or visit our website
(www.mecmesin.com) and download the brochure under ‘Literature &
FAQ’s’.
Mecmesin force gauges are
specifically designed to
measure forces in tension and compression with optimum
precision and performance. The Advanced Force Gauge
(AFG) is a flexible, fully-featured
instrument, designed for use from shop
floor production to R&D departments.
The Basic Force Gauge (BFG) is an
easy-to-use and precise measurement
instrument at an affordable price.
Force Gauges


431-008-02
Newton House
Spring Copse Business Park
Slinfold
West Sussex
RH13 0SZ
England
General Enquiries: t: +44 (0) 1403 799979
f: +44 (0) 1403 799975
Service & Calibration t: +44 (0) 1403 799920
f: +44 (0) 1403 799925
i: www.mecmesin.com
Other manuals for Vortex
1
Table of contents
Other Mecmesin Laboratory Equipment manuals
Popular Laboratory Equipment manuals by other brands

Tuttnauer
Tuttnauer LABSCI 11LV ELVC Operation and maintenance manual

Selecta
Selecta GRAS N 2p instruction manual

Lauda
Lauda H 2 P operating instructions

IKA
IKA Vibrax VXR basic operating instructions

PCE Health and Fitness
PCE Health and Fitness DPS 25 quick start guide

Oxford Nanopore
Oxford Nanopore PromethION48 quick start guide