Corken Coro-Flo FF060 Instruction manual

Installation, Operation
& Maintenance Manual
Regenerative Turbine Pumps
for LPG, NH3, and Many Other Liquefied Gases and Thin Liquids
All Models 060, 075, and 150
ORIGINAL INSTRUCTIONS IF102H
Direct Mount
ASME Class 300 RF (ANSI) Flange (DLF) and DIN Flange (DLD)
Frame Mount
ASME Class 300 RF (ANSI) Flange (FF) and DIN Flange (FD)
Warning: (1) Periodic inspection and maintenance of Corken products is essential. (2) Inspection, maintenance and installation of
Corken products must be made only by experienced, trained and qualified personnel. (3) Maintenance, use and installation of Corken
products must comply with Corken instructions, applicable laws and safety standards. (4) Transfer of toxic, dangerous, flammable or
explosive substances using Corken products is at user’s risk and equipment should be operated only by qualified personnel according
to applicable laws and safety standards.
Scan QR code to view list
of maintenance videos.
Solutions beyond products...

Warning
Install, use and maintain this equipment according to Corken’s instructions and all applicable federal, state, local laws
and codes. Periodic inspection and maintenance is essential.
Corken One Year Warranty
CORKEN, INC. warrants that its products will be free from defects in material and workmanship for a period of
one year from date of installation, provided that the warranty shall not extend beyond twenty-four (24) months from
the date of shipment from CORKEN. If a warranty dispute occurs, the DISTRIBUTOR may be required to provide
CORKEN with proof of date of sale. The minimum requirement would be a copy of the DISTRIBUTOR’S invoice to
the customer.
CORKEN products which fail within the warrant period due to defects in material or workmanship will be repaired
or replaced at CORKEN’s option, when returned, freight prepaid to CORKEN, INC., 9201 North I-35 Service Road,
Oklahoma City, OK. 73131
Parts subject to wear or abuse, such as mechanical seals, blades, piston rings, valves and packing, and other parts
showing signs of abuse, neglect or failure to be properly maintained are not covered by this limited warranty. Also,
equipment, parts and accessories not manufactured by CORKEN but furnished with CORKEN products are not
covered by this limited warranty and the purchaser must look to the original manufacturer’s warranty, if any. This
limited warranty is void if the CORKEN product has been altered or repaired without the consent of CORKEN.
All implied warranties, including any implied warranty of merchantability or fitness for a particular purpose, are expressly
negated to the extent permitted by law and shall in no event extend beyond the expressed warrantee period.
CORKEN DISCLAIMS ANY LIABILITY FOR CONSEQUENTIAL DAMAGES DUE TO BREACH OF ANY WRITTEN OR
IMPLIED WARRANTY ON CORKEN PRODUCTS. Transfer of toxic, dangerous, flammable or explosive substances
using CORKEN products is at the user’s risk. Experienced, trained personnel in compliance with governmental and
industrial safety standards should handle such substances.
Important notes relating to the European Union (EU) Machinery Directive
Pumps delivered without electric motors are not considered as machines in the EU Machinery Directive. These
pumps will be delivered with a Declaration of Incorporation. The fabricator of the machinery must assure and declare
full compliance with this Directive before the machine in which the pump will be incorporated, or of which it is a part,
is put into service.
Contacting the Factory
Before contacting the factory, note the model and serial numbers. The serial number directs Corken personnel to a
file containing all information on material specifications and test data applying to the product. When ordering parts,
the Corken service manual or Installation, Operations, and Maintenance (IOM) manual should be consulted for the
proper part numbers. ALWAYS INCLUDE THE MODEL NUMBER AND SERIAL NUMBER WHEN ORDERING PARTS.
The model and serial numbers are shown on the nameplate of the unit. Record this information for future reference.
Model No.
Serial No.
Date Purchased
Date Installed
Purchased From
Installed By
2

Table of Contents
Principles of the Coro-Flo®Pump................................................................4
Exclusive Features of the Coro-Flo®Pump ........................................................4
Chapter 1—Installation.........................................................................5
1.1 Location .................................................................................5
1.2 The Inlet Should Include the Following .........................................................5
1.3 The Outlet Piping Should Include the Following ..................................................5
1.4 The Bypass System Must Include the Following..................................................5
1.5 Pump Foundation for Frame Mounted Models ...................................................6
1.6 Level Base ...............................................................................6
1.7 Coupling Alignment—F-Models ...............................................................6
1.8 Driver Installation ..........................................................................6
1.9 Wire Sizing Chart ..........................................................................7
Chapter 2—Operation. . . . . . . . . . . . . . . . . . . . . . . . . . . . . . . . . . . . . . . . . . . . . . . . . . . . . . . . . . . . . . . . . . . . . . . . . . 7
2.1 Filling New Cylinders and Tanks ..............................................................7
2.2 Pumping From Underground Tanks............................................................8
Chapter 3—Preventative Maintenance ...........................................................8
Chapter 4—Repair Service ....................................................................10
Chapter 5—Seal Replacement Instructions (NOTE: Models Beginning with Serial Number Prefix YU) .....11
Appendices
A. Model Number Identification Code and Available Options..........................................16
B. Specifications ............................................................................19
C. Performance .............................................................................20
D. Outline Dimensions ........................................................................23
E. Parts Details .............................................................................25
F. Troubleshooting Guide......................................................................27
G. Extended Storage .........................................................................28
H. Installation and Piping Instructions............................................................29
3

Principles of the Coro-Flo®Pump
The Corken Coro-Flo®is a special type of pump known as
a regenerative turbine. The liquid flows through the inlet
nozzle and passageways on each side of the impeller (the
rotating element) and is recirculated constantly between
the teeth of the impeller and passageways as the
impeller rotates. The fluid makes a complete revolution
inside the pump case before it is diverted through the
outlet nozzle. As the differential pressure increases,
the horsepower required to drive the pump increases
but the capacity decreases. Differential pressure is the
difference between the pressure at the inlet and outlet
of the pump.
The impeller is the only moving part and does not contact
the pump casing. Consequently, there is very little
impeller wear when pumping volatile liquids with little to
no lubricating qualities such as LP-Gas and ammonia.
Exclusive Features of the
Coro-Flo®Pump
Pumping volatile liquids is one of the most difficult
applications. Unlike other pumping operations, more
attention must be given to the design, manufacture,
installation, and operation of the pump.
In addition to being well suited for handling volatile
liquids, the Coro-Flo®pump has several other features
that make it easier to operate and maintain.
• The pump models listed in this manual are mounted
directly to an electric motor (direct mount) or to a
separate frame (frame mount) that connects to the
motor using a flexible coupling.
• Underwriters’ Laboratories, Inc. has tested and
inspected all of the pumps listed in this manual and
approved them for use in LP-Gas and ammonia
applications. The nameplate on the pump shows the
UL label.
• Ductile iron, a metal with the strength of steel, is used
for all parts under pressure of the liquid.
• The impeller floats on a shaft and can be easily
replaced without disturbing the piping or driver by
simply removing the pump cover. No special tools
are needed.
• The mechanical seal assembly can be replaced
without disturbing the piping or driver and no special
tools are required.
• Pressure gauge connections with 1/4" pipe thread are
located on the inlet and outlet nozzles.
High strength
metric fasteners.
Case and cover of
ASTM A536 ductile
iron, providing
maximum thermal
shock protection.
Self-aligning, free-floating,
precision machined
impeller, incorporating
proprietary design,
optimizes flow and
provides quiet non-
pulsating transfer.
Maximum sealing
provided by a single
balanced, precision
lapped, mechanical seal.
Designed for ease
of service. Seal
can be replaced in
minutes by simply
removing the cover.
ASME Class 300 RF (ANSI) and DIN
flanges provide optimal leak control
and enhances structural integrity.
Pressure gauge connections
help simplify analysis of
system performance.
Heavy-duty ball bearings rated for
continuous duty service provide
maximum life.
Three mounting options available:
direct drive with coupling, belt
drive, and direct mounted with
C-face electric motor.
OUTLET
INLET
4

Chapter 1—Installation
1.1 Location
NOTE: Must be installed in a well ventilated area.
The installation of a Coro-Flo®pump is a simple matter.
However, in order for the pump to deliver the performance
expected, the principles discussed in this book must be
followed exactly. The piping instructions in Appendix H
illustrate methods proved by hundreds of installations.
Different installations may require slight variations but
should not compromise the method.
No pump can discharge more liquid than it receives, so
the location and the inlet piping must be given careful
attention. If the inlet piping does not meet the demand of
the pump, expect trouble!
The pump must be located as near the storage tank as
possible. The complete inlet line, including the vertical
line from the tank must not exceed 12 feet in length.
The bottom of the tank should not be less than two
feet above the pump inlet nozzle. Four feet above the
pump nozzle is standard.
For the transfer of flammable liquids like LPG, the pump
assembly must be installed according to the applicable
local safety and health regulations. The installer and/or
user must take into account the following:
• Potential risk due to local conditions regarding the
installation and operation (e.g. poor ventilation and
additional risks due to other elements in the vicinity etc.)
• Qualification of the personnel
• Type of liquid being transferred
• Specific safety measures to be applied (e.g. gas
detection, automatic shut-off valves, personal
protection equipment etc.)
The following table shows the weight of the bare pump
for each model. For handling a bare pump, lifting slings
should be placed around the inlet and outlet flange neck
of the pump. To minimize damage to the paint, web slings
are preferred over metal slings.
Pump Weights
Model Shipping Weight in lbs (kg)
Frame mount 63 (28.6)
Direct mount 75 (34.0)
1.2 The Inlet Should Include
the Following
1. The tank Excess Flow Valve (EFV) should have a flow
rate of 1-1/2 to 2 times the capacity of the pump. Do
not use an EFV without knowing its flow capacity.
2. Pressure gauge at pump suction nozzle.
3. The tank shutoff valve should be a full port ball or
internal valve.
4. A “Y” type strainer with a 20 mesh screen should be
placed on the inlet line of the pump.
5. To accommodate piping strains, a flexible connection
should be used on the pump inlet and outlet.
6. To change line size, an eccentric swage at the pump
inlet nozzle is recommended (flat side up, to avoid
vapor formation.)
7. The inlet line must be level or slope downward to
the pump.
1.3 The Outlet Piping Should
Include the Following
1. A pressure gauge should be installed in the opening
provided on the outlet nozzle or in the outlet piping
near the pump. This pressure gauge shows how the
pump is operating on the inside so be sure to have
one installed.
2. A hydrostatic relief valve is required to be installed in
the outlet piping.
3. If the outlet piping exceeds 50 feet in length, a check
valve should be installed near the pump outlet.
1.4 The Bypass System Must
Include the Following
1. A bypass system for the pump must be installed. Without
this system, the pump has little chance of performing.
2. A Corken B166 bypass valve allows the pump to vent
vapors from the pump and act as a differential relief
valve making it ideal for the bypass system.
3. The bypass line must rise uninterrupted to an
opening in the vapor section of the storage tank. The
tank fitting must be either an excess flow valve or a
vapor return valve. It should never be a filler or back
check valve.
4. To meet the specifications for Underwriters
5

Laboratories (UL), an external bypass valve must be
connected in the piping between the pump discharge
nozzle and the supply tank for pump recirculation. When
bypassing the full output of the pump, the external bypass
valve should be set according to the latest UL guidelines.
1.5 Pump Foundation for Frame
Mounted Models
The pump assembly must be secured to a concrete
foundation using all of the mounting holes in the baseplate.
The total weight of the concrete foundation should be
approximately twice the weight of the pump assembly.
The foundation must be level and deep enough to get
below the frost line in the region. There are many ways
to construct a foundation so the example in figure 1.5 is
only a suggestion.
Anchor bolts
Forms
Level
Blocks
Carpenter level
Forms for concrete
Forms to be level with
bottom of pump case
Figure 1.5
1.6 Level Base
After the concrete has set, confirm the pump mounting is
level. If necessary place metal shims under the baseplate
near the anchor bolts as shown in figure 1.6. Tighten the
anchor bolts once again and confirm the base is level.
Repeat this process until the pump mounting is level side
to side and front to back.
Pump base
1/2" x 8" anchor bolt
Metal wedge
Large washer
Concrete
Figure 1.6
1.7 Coupling Alignment—F-Models
For a long service life, the coupling alignment must be
near perfect. The shafts of the pump and driver are
carefully aligned at the factory but should always be
checked after the pump is installed and before the
initial operation.
Lay a straight edge across both coupling halves on the
top and side. For proper alignment, both coupling faces
must be parallel and concentric (figure 1.7).
If misalignment exists, adjust the shims between the pump
and baseplate until exact alignment is accomplished.
Parallel Misalignment
Coupling faces are parallel but not concentric
Straight Edge
Angular Misalignment
Coupling faces are not parallel.
Straight Edge
If gap is more than 0.015",
then coupling alignment is out of tolerance
Proper Alignment
Coupling faces are parallel and concentric.
Straight Edge
Straight Edge
Figure 1.7
Scan QR Code and refer to the maintenance video titled
“How to Align the Coupling Between the Motor and Pump”.
1.8 Driver Installation
Wiring the electric motor correctly is extremely
important. An improperly wired motor causes expensive
motor difficulties so a competent electrical contractor
is recommended. The wire sizing chart indicates the
minimum standards for wire sizes.
Wiring the motor for the proper voltage is critical as well.
If low voltage is suspected, call the local power company
and confirm the voltage provided and wire accordingly.
Connecting to improper voltage will completely destroy
the motor.
6

With explosion-proof motor applications in humid climates,
the normal breathing and alternating temperatures of the
motor (i.e. warm during operation and cold when stopped)
often cause moist air to be drawn into the motor housing.
The moist air condenses and may eventually add enough
free water to the inside of the motor causing it to fail. To
prevent this, make a practice of running the motor and pump
at least once a week on a bright, dry day for at least an
hour using the pump's bypass system. During this time, the
motor heats up and vaporizes the condensed moisture. No
motor manufacturer guarantees an explosion-proof or totally
enclosed motor against damage from moisture.
Engine drivers require special consideration so the
manufacturer's instructions must be followed. When the
Coro-Flo®Pump is equipped with an engine from the
factory, the engine speed should normally not exceed 3600
rpm. Excessive engine speed will overload the engine and
cause early failure. The engine loses 3% of its power for
every 1,000 feet above sea level, so if the installation is at a
higher altitude than normal, consult the factory.
1.9 Wire Sizing Chart
Motor Recommended wire size, AWG
1
Hp Motor
Phase
Volts Approximate Full
Load Amperes
Length of Run (ft)
0–100 to 200 to 300
Pump must rotate clockwise when viewed from the motor. If not, switch any
two of the three incoming 3 phase lines.
3 1 115 34.0 6 4 2
230 17.0 12 8 8
3230 9.6 12 12 12
460 4.8 12 12 12
5 1 115 56.0 4 1 1/0
230 28.0 10 6 4
3230 15.2 12 12 10
460 7.6 12 12 12
7-1/2 1230 40.0 8 6 4
3230 22.0 10 10 8
460 11.0 12 12 12
10 3230 28.0 8 6 4
460 14.0 12 12 10
15 3230 42.0 6 4 4
460 21.0 10 10 8
20 3230 54.0 6 6 4
460 27.0 10 10 10
1 Each country may use a different form of wire size measurement (AWG, SWG,
mm2 etc.). The above wiring size chart is based on the United States National
Electrical Code (NEC) guidelines for America Wire Gauge (AWG) sizes. These
wire sizes and distances are based on nominal supplied voltages. Additional
derating is necessary when the voltage is less than that shown. Consult local
standards and regulation for specific wiring requirements.
Chapter 2—Operation
The pump operator should be fully informed of the
recommended operation procedures and safety
precautions. See Appendix B and Appendix C for
operating specifications and performance curves. The
operator must be made aware of the specific risks
generated by the product handled and familiar with
the purpose and function of all piping, valves, and
instrumentation of the installation.
The following steps should be performed before and
during the initial pumping operation:
1. Close shutoff valve on the end of the delivery hose.
2. Open the storage tank bottom shutoff valve.
3.
Open the storage tank shutoff valve of the bypass system.
4. Check the motor for the proper voltage. (See
instructions in section 1.8 Driver Installation.)
5. Record pressure gauge readings on suction of pump.
6. Start the pump and circulate liquid through the
bypass system.
7. Adjust the B166 bypass valve by turning the adjusting
screw out until the pump pressure gauge shows
nearly the same pressure it did prior to starting
the pump. Screw the adjusting screw in until the
pressure gauge indicates the pump is starting to
lose discharge pressure and the pointer is rapidly
fluctuating. Then back the adjusting screw out a turn
or two until the pressure gauge again indicates a
steady pressure. Tighten the lock nut and permit the
pump to circulate liquid for a half hour or more. If the
motor overload protection device stops the motor
during this period, this indicates the bypass system
valve is set too high and should be readjusted by
turning the adjusting screw out until the motor can
run constantly for this period of time.
When properly installed and operated, Coro-Flo®
pumps should not exceed a 80 dBA noise level at a
distance of one meter (3.281 ft.) from the surface of
the pump.
2.1 Filling New Cylinders and Tanks
All new containers are full of air and since air will not
liquefy under reasonable filling pressures, it must be
purged. To ensure containers are filled easily and
the proper amount of gas is supplied to burners and
carburetors, purging the air is essential.
Some cylinders are difficult to fill when equipped with a
fill tube that extends down into the liquid portion of the
7

container. If possible, these cylinders should be refitted
so the incoming liquid enters the vapor section of the
cylinder. If refitting is impossible or impractical, rock the
cylinder as it is being filled so that liquid will splash up into
the vapor section. This will help keep the cylinder filling
pressure down to a reasonable limit. A properly fitted
cylinder and filling manifold will permit filling a cylinder at
no more than 50 to 60 psi differential pressure. When the
pump is new, it is recommended to record the flow rate,
discharge pressure, and suction pressure.
2.2 Pumping From
Underground Tanks
Pumping boiling liquids, like LPG and other liquefied
gases, offers a unique set of challenges for underground
tank installations. When the piping system is designed
to function with a pump, Coro-Flo pumps offer superior
performance in these applications. Liquefied gases are
stored at exactly their boiling points. Any increase in
temperature, as well as any decrease in pressure, cause the
product to boil and form vapor. To minimize the amount of
vapor formation at the pump’s suction, properly designed
suction piping is critical. For boiling liquids, the net positive
suction head available (NPSHA) of an installation is reduced
to the height of the liquid level above the pump minus the
frictional losses. With an underground tank where the pump
is located above the liquid level, the net static suction head
becomes the net suction lift, which is negative not positive.
This means the installation NPSHA is always negative so
the pump will always have vapor in the liquid stream.
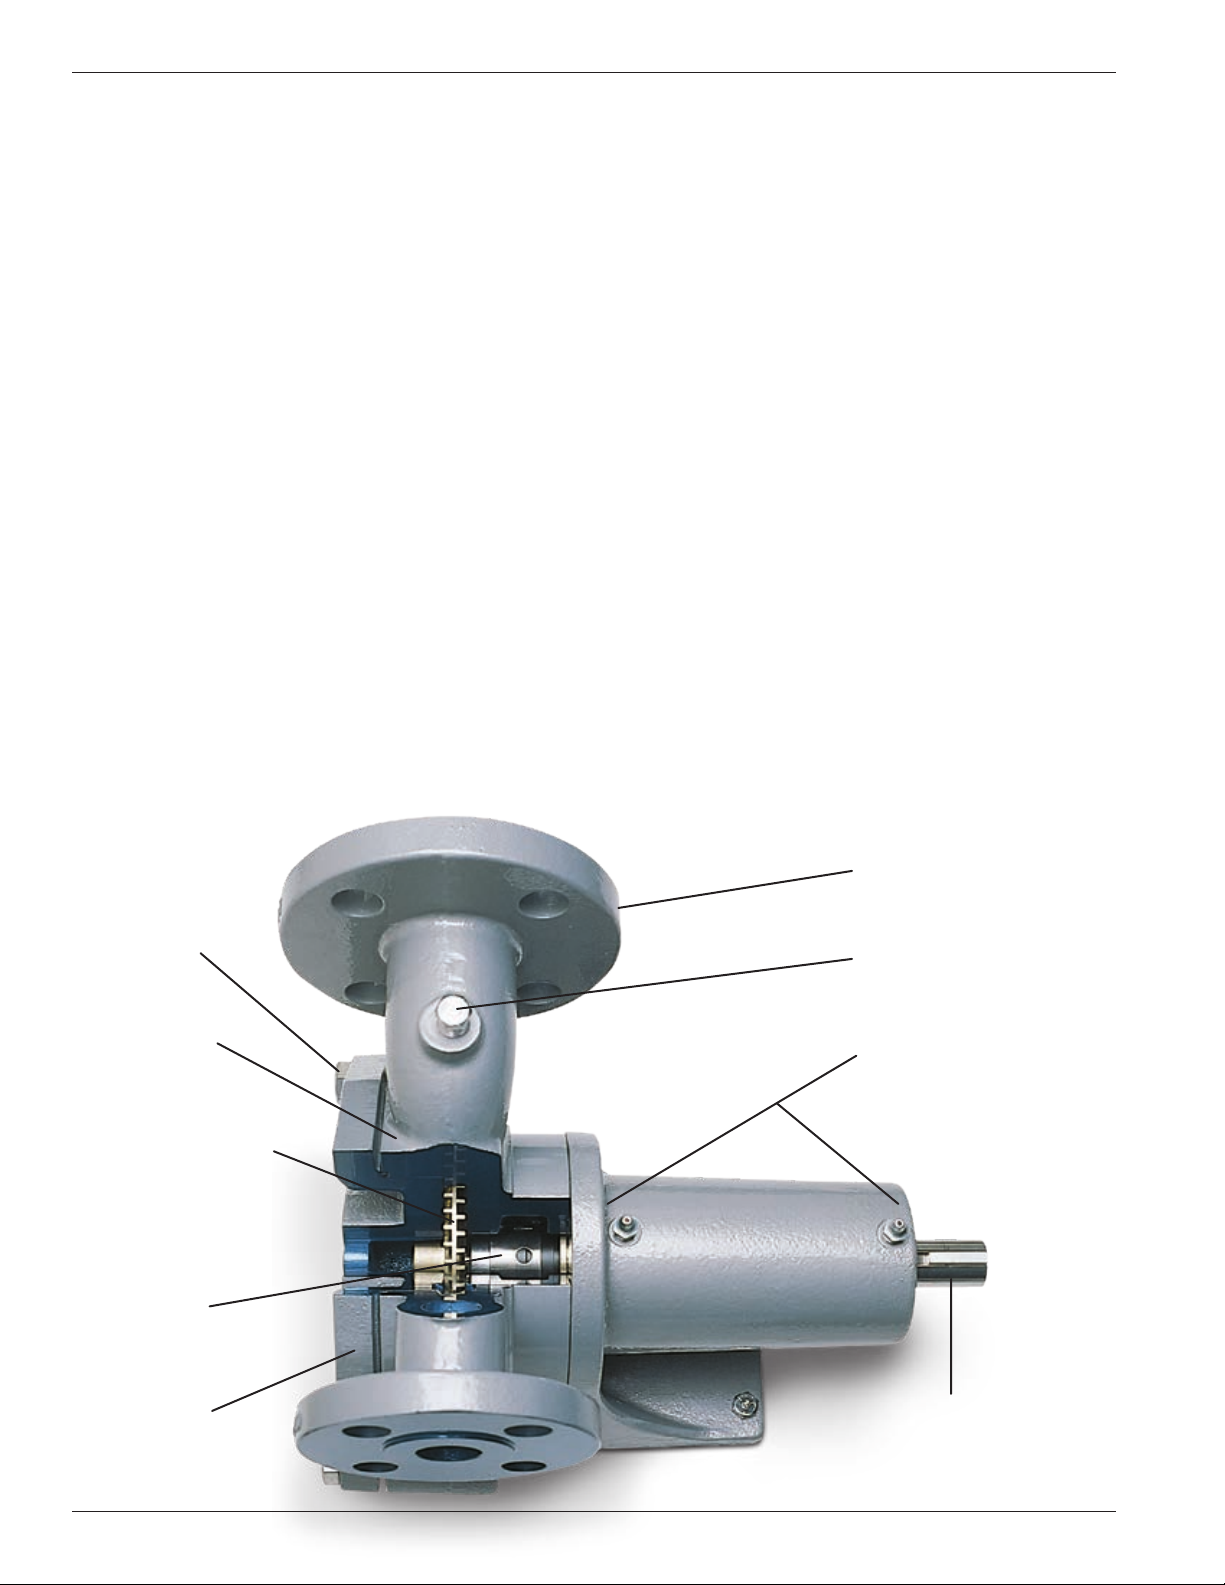
Coro-Flo regenerative turbine pumps are designed to
handle some vapor without the damaging effects of
cavitation. They are designed with a free floating impeller
that helps minimize wear and noise in this type of
application. When properly installed, Coro-Flo pumps
provide excellent service in underground tank applications.
Design Criteria for Underground Applications
• Minimize frictional losses:
— Pump should be as close as possible to the tank’s
liquid outlet connection.
— Use a minimal number of fittings and elbows.
— No strainer is necessary since the tank itself acts
as a gravity collector.
— Use full-port ball or low restriction valves.
— Use adequate piping sizes and do not go below
the inlet and outlet size of the pump.
• Limit the net static suction lift to approximately 14 feet
(4.3 meters) maximum.
• Use vapor eliminator valves and return to the vapor
space of the tank. A Corken B166 bypass valve has
this feature.
• An excess flow valve should be used in parallel for
additional vapor elimination.
• Always use back-pressure check valves downstream of
the pump.
• Limit the capacity of the pump to a maximum of 1.5%
of the tank’s capacity. For example, with a 1,000 Gal
(3,785 L) tank, limit the capacity of the pump to 15 gpm
(56.8 L/min).
For more details on underground piping systems, see
Appendix H.
Chapter 3—Preventative
Maintenance
Purpose
An effective preventive maintenance program minimizes
downtime and manpower requirements while maximizing
the performance of the equipment.
Scope
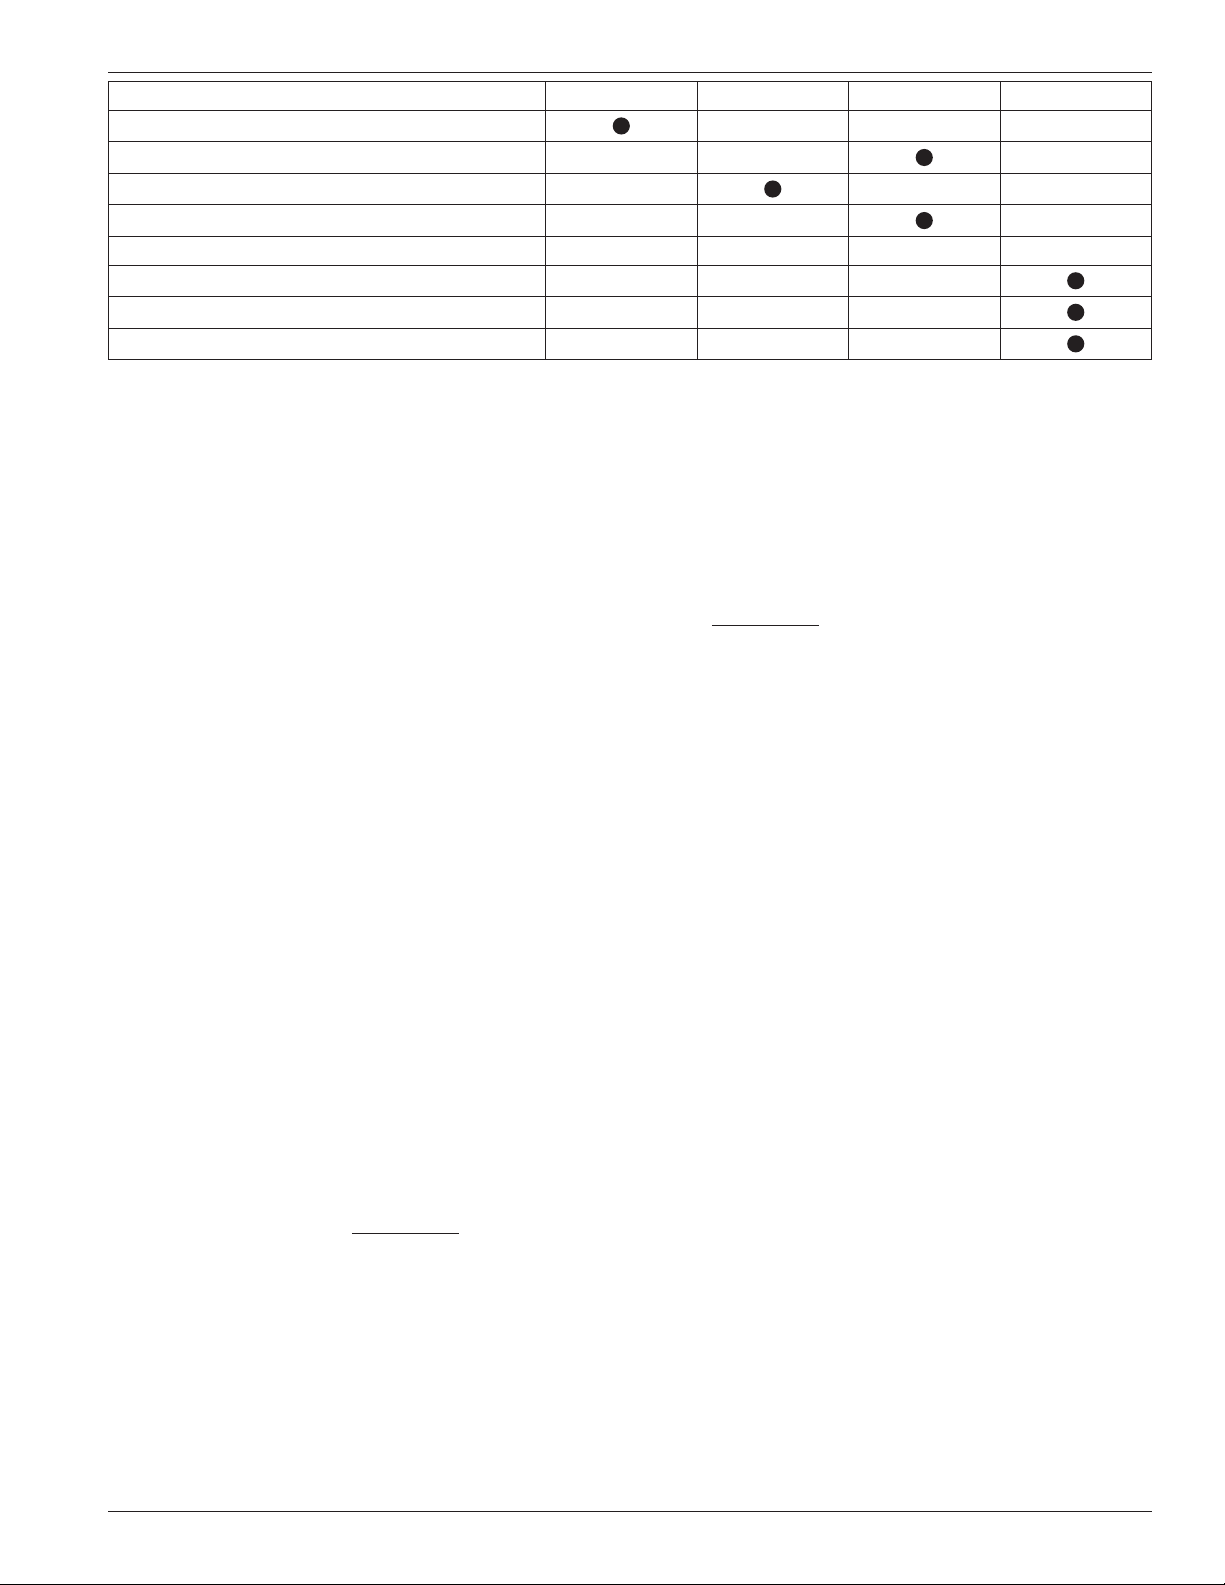
The preventive maintenance chart in figure 3.1 includes
items to be inspected with a recommended time schedule.
These are basic maintenance recommendations so
each company should develop a comprehensive
preventive maintenance schedule based on operational
requirements for the application.
Only a properly trained technician that follows all of the
applicable safety procedures should perform maintenance.
Procedures
Every procedure herein recommended must be performed
in a safe manner utilizing tools and/or equipment free of
hazards. Be certain to follow the safety codes of practice
set by the authorities having jurisdiction. These are
general guidelines and are not intended to cover all the
safety aspects that must be considered and followed
while performing these procedures.
1. Visual inspection:
This includes checking for leaks, corroded areas,
condition of hose, piping and fittings, and any
unsafe conditions which may hinder the safety of the
personnel and/or the facility.
2. Clean inlet strainer screen:
A clogged strainer screen restricts flow causing
vapor to form and leads to cavitation. The presence
of cavitation reduces the pump’s capacity and
accelerates wear on internal parts.
8

3. Inspect drive coupling and guard:
Check the coupling alignment and realign if necessary.
Inspect the rubber spider gear for cuts, broken
sections, excessive wear and replace if necessary.
4. Lubricate pump bearings:
Use only ball bearing grease, applied with a manual
lubrication pump or gun. Always clean the grease
openings thoroughly before inserting any grease.
NOTE: A low temperature ball bearing grease with
a minimum rating of at least -25°F to 250°F is
recommended. The lubricant used by the factory is
Mystik JT-6 Low Temperature Extreme Grease.
5. Lubricate motor bearing:
Follow the recommendations of the electric motor
manufacturer for the type of grease to use and the
lubrication frequency.
6. Performance test:
A. While transferring liquid with the pump, check the
pressure at the pump’s inlet port. The pressure drop
in the inlet piping should not be greater than 3 psi.
B. Again, while transferring liquid with the pump,
close the discharge valve(s) so the full flow will
be directed back to the storage tank through
the bypass valve. Then slowly close the valve
downstream of the bypass valves. The discharge
pressure of the pump should increase to the
maximum differential pressure of the pump at zero
flow conditions (see Appendix C).
C. If the maximum differential pressure is not obtained,
the pump should be serviced. Refer to the seal
replacement instructions in this manual and visually
inspect the pump’s impeller.
Replace the impeller if damaged, warped, or
shows signs of excessive wear.
Uniform wear of the impeller is not visually detected. If
the impeller has no visible damage, it can be re-used
as long as the pump's performance has not fallen off.
Item to Check Daily Monthly Three Months Six Months
1. Visual inspection; leaks, hoses, pipes, etc.
2. Clean inlet strainer screen
3. Inspect drive coupling and guard
4. Lubricate pump’s bearing 1
5. Lubricate motor’s bearing 2
6. Performance test
7. Re-tighten bolts
8. Inspect motor starter points
1 If the pump runs continuously, it should be lubricated more frequently.
2 Follow the motor manufacturer’s recommendations.
Figure 3.1: Preventive Maintenance Chart for Coro-Flo®Pumps
7. Re-tighten all hold down bolts.
8. Inspect motor starter contact points:
Note: This must be performed by an authorized
electrician according to the guidelines of the electric
motor manufacturer.
9. See Appendix G, for extended storage procedures.
9

Chapter 4—Repair Service
CAUTION: Relieve system pressure before
performing any maintenance to the pump. All
maintenance must be performed in a safe manner by
qualified personnel. Maintenance personnel should
utilize tools and/or equipment free of hazards and
follow the applicable safety codes of practice set by
the local authorities having jurisdiction.
After a long service life, repairs are limited to replacing
the impeller or mechanical seal.
Since the only wear part influencing the pumping action
is the impeller, perform pumping efficiency test prior to
attempting any repairs. The trouble may lie in the piping
system rather than with the pump. If the pump produces
as much differential pressure when circulating through
the bypass system as it did when it was new, the problem
is elsewhere. Conversely, if the pump does not produce
as much pressure as it did new, remove the cover and
inspect the impeller.
Generally, uniform wear of the impeller is not visually
detected. If the impeller has no visible damage, it can be
re-used. Newer models starting with serial number prefix
YU no longer use a shim for clearance. The impeller
is locked in place with two retainer clips: one in front
and one behind the impeller. Generally, the only time
the impeller is replaced is when foreign material enters
the pump casing causing damage to the impeller or
performance is less than what it was new.
NOTE: On older models prior to serial number prefix YU,
undetected impeller wear is compensated by removing
the adjustment shim between the pump casing and
cover. This tightens the tolerance between the pump's
casing, impeller, and cover. If the pump is not performing
like it did when new, remove the adjustment shim and
re-tighten the pump cover. If the pump rotates freely, this
should improve performance. If the pump does not rotate
freely after removing the shim, install a new impeller for
better performance.
If visual inspection indicates the impeller is in good
condition, remove the shim and reinstall the cover
and make sure the pump spins freely. Many times this
procedure adjusts for slight impeller wear. If the pump
does not spin freely or the impeller is badly damaged or
scored, it must be replaced.
This is a matter of removing the cover and the old
impeller from the shaft. If the old impeller does not slide
off the shaft, the threaded bolt holes in the impeller can
be used for jacking/pulling. The new impeller should slide
freely over the shaft. If it does not “float” on the shaft,
sand the shaft lightly to achieve the proper fit.
Replacing the mechanical seal is simple procedure.
The pumps are configured with a variety of O-rings.
Selection of O-ring materials is based on the product
being transferred. The most compatible O-ring materials
must be selected. Consult the factory or distributor
for recommendations if the pump is not handling the
product for which it was initially purchased. The model
identification code on the nameplate indicates the
materials of construction. Refer to Appendix A and
Appendix B for details.
10

Chapter 5—Seal Replacement
Instructions (NOTE: Models
Beginning with Serial Number
Prefix YU)
Caution
Bleed all pressure from the pump and piping before
installing a new seal assembly.
Scan QR code to view list of
maintenance videos.
Cleanliness
The smallest amount of dirt on a new seal can cause
premature seal failure. Keep all parts, tools, and hands
clean while handling the seal. Avoid touching the smooth
lapped faces of the carbon rotor or seal seat. When
pumping LP-gas, anhydrous ammonia, and similar light
liquids, the fluid is five to ten times thinner than water so
the new seal needs to be as clean as possible.
Workmanship
This pump is a precision piece of equipment with very
close tolerances so treat it with care and never use
excessive force during disassembly and re-assembly.
DISASSEMBLY:
STEP 1
Remove the pump cover: Remove
the bolts and pull the pump cover
and O-ring from the pump case.
NOTE: On older models there is a
clearance shim as well. This is a
close tolerance fit so if the cover
does not slide out easily, use two
flathead screwdrivers to carefully pry
the cover from the pump casing.
STEP 2
Remove the retainer ring, impeller,
and impeller key: Using a pick or
small flathead screwdriver, carefully
remove the retainer ring from the pump
shaft. NOTE: A retainer ring is not
used on older models prior to serial
number 226858AG. If the impeller does
not slide off the shaft freely, insert
two cover bolts in the threaded holes
and gently pull outward as shown.
Forceful removal can warp the impeller
or damage the case O-ring groove
so use care during this step. Lastly,
remove the impeller key. If the impeller
key does not slide off the shaft freely,
use a pair of side cutters, pick, or small
screwdriver to pry the key out of the
key way at the end of the pump shaft.
STEP 3
Remove retainer ring: Using a
flathead screwdriver or pick, pry
up the rear retainer ring from the
groove and slide off the shaft. Do not
damage the shaft while removing the
retainer ring.
Pick
placement
Pick placement
Pull
outward
11

STEP 4
Remove seal sub assembly: Slide
the seal sub assembly (seal and seal
sleeve) off the shaft and remove the
seal sleeve O-ring from the shaft.
STEP 5
Remove seal housing: Using a 90°
pick or hook tool inserted behind
the face of the seal housing, slowly
pull out around the circumference
of the seal housing until it can
removed from the pump casing.
STEP 6
Remove seal housing O-ring and
inspect the bearings: Use a pick to
remove the old seal housing O-ring
inside the pump casing. Clean the
O-ring groove and shaft and remove
any burrs around the keyway. Inspect
the pump shaft bearings for wear by
applying up and down and in and out
movement. Since the seal assembly
resides on the pump shaft, excess
movement can cause a seal leak.
Lastly, turn the shaft and check
the bearings for any roughness.
Change the bearings if roughness or
movement is present.
STEP 7
Remove seal seat: The seal seat
is located inside of the seal housing
and is removed using a pick or
small screwdriver. Enter the inner
circumference on the back side
of the seal housing assembly and
gently pry out the seal seat evenly
as shown. NOTE: Clean the seal
housing assembly before inserting
the new seal seat.
O-ring
removal
O-ring
removal
Pick
placement
12

ASSEMBLY
STEP 8
Verify the contents of the new
3189-1X_6 seal assembly and clean
pump shaft before installation.
NOTE: Install the two locator pins
before proceeding to STEP 9. One
goes into the seal sleeve and one
goes into the seal housing. Use the
old seal assembly for reference.
STEP 9
Assemble the seal housing and
seal seat: Make certain the locator
pin is installed inside the hole on the
seal housing. Clean the seal housing
inside and out before inserting the
new seal seat. Place a light coat of
oil on the seal seat O-ring. Insert
the seal seat with the notch pointing
down and in line with the locator pin
inside the seal housing as shown.
To protect the seal seat during
installation, cover the seal seat with
the small cardboard disk that came
with the new seal assembly. Make
sure the cardboard disk is clean.
Gently push on the cardboard disc
to install the seal seat. NOTE: Make
sure the locator pin is aligned with the
notch in the seal seat.
STEP 10
Install the seal housing O-ring
and seal housing: Apply a thin
coat of oil to the new seal housing
O-ring before installation. NOTE:
Insert the O-ring into the groove of
the pump casing and hold in place
with one finger. With a pick or small
screwdriver in one hand, use the
other hand to seat the O-ring using
a circular motion. Apply a thin coat
of oil to the seal housing and press
evenly into the pump casing until it
snaps into the groove.
Align notch and
locator pin
Clean inside and outside
Push inward
13

STEP 11
Install the seal sleeve O-ring: Clean
the pump shaft and install the new
seal sleeve O-ring. Make sure it is
seated on the shoulder of pump shaft.
STEP 12
Assemble the seal and seal sleeve:
Apply a thin coat of oil to the face of
the rotating carbon and the O-ring that
goes behind the rotating carbon. Insert
the seal sleeve into the seal by aligning
the locating pin on the seal sleeve with
the notch/hole on the seal. NOTE: The
current and previous seal assemblies
are shown to the right. Although the
installation photos show the new seal
design, the assembly instructions are
the same for the previous design.
STEP 13
Install the seal: Before installing the
new seal, make sure hands are clean.
Small debris or contamination can
cause the seal to leak. Align the seal
drive pin with the pump shaft keyway
and slide the seal assembly onto the
shaft until the seal assembly snaps
into place.
STEP 14
Install the first retainer ring: Install
the first retainer ring at the rear of the
shaft near the seal sleeve. NOTE: In
order to seat the retainer ring inside the
retainer ring groove, use the impeller
to compress the seal assembly. Place
the impeller on the shaft backwards
(hub side in) and push inward until the
retainer ring snaps into the groove on
the pump shaft. After the retainer ring
is seated into the groove, remove the
impeller. For quick removal, insert one
of the cover bolts into the impeller and
remove it from the shaft.
Current design: Part #3189-1X_6 Previous design: Part #5264-X_6
O-ring
placement
O-ring
Align locator pin
and hole
Press impeller
Pull bolt
to remove
impeller
14

STEP 15
Install the rear impeller key: Install
a new impeller key into the keyway
slot located at the front end of the
pump shaft. Next, install the impeller
with the hub side out. The impeller
should slide freely on the shaft. If
it does not slide freely, carefully
remove any burrs from the impeller
key and/or keyway using a small file.
Remove all fillings from the pump
shaft and casing.
STEP 16
Secure the impeller and key with
the second retainer ring: Make
certain the impeller is pushed back
to the pump casing. To ensure the
impeller and key stay in place, install
the second retainer ring into the
groove located at the front of the
pump shaft.
STEP 17
Install the cover: Install the O-ring,
and pump cover. Torque each
cover bolt to 60 ft•lbs. Be certain
the Corken label on the cover is
horizontal and right side up. Rotate
the pump shaft and ensure the
impeller turns freely. NOTE: On older
models prior to serial number YU,
it may be necessary to install a
clearance shim if the pump does not
turn after installing the cover.
Before operating the pump,
pressurize the pump case with
vapor. After the pump has been
pressurized, slowly add liquid.
Scan QR code to view list of
maintenance videos.
Retainer ring
installation
Push
inward
15

Appendix A—Model Number Identification Code and Available Options
Model 060 Coro-Flo®Pumps
Appendices
A. Model Number Identification Code and Available Options
Base Model Number Frame Mount Direct Mount
FF060 FD060 DLF060 DLD060
Inlet 1½" ASME a 40 mm DIN b 1½" ASME a 40 mm DIN b
Outlet 1" ASME a 25 mm DIN b 1" ASME a 25 mm DIN b
Weight, bare pump lbs (kg) 63 (28.6) 63 (28.6) 75 (34.0) 75 (34.0)
Description Frame
mounted
Frame
mounted
Direct mount
pump with
C-face frame c
Direct mount
pump with
C-face frame c
Specification Fields
Motor No integral motor
Standard NEMA C-face frame (3–10 hp)dC
Not available
IEC/132 C-face frame
( 2. 2 –7. 5 k W )
dM
Impeller, Seal
Sleeve, Seal
Housing, and
Shaft Material
Bronze impeller
Stainless steel seal sleeve
Stainless steel seal housing
Steel shaft
Standard D
Stainless steel impeller
Stainless steel seal sleeve
Stainless steel seal housing
Stainless steel shaft
Charge option E
Steel impeller
Stainless steel seal sleeve
Stainless steel seal housing
Steel shaft
Charge option F
Steel impeller
Stainless steel seal sleeve
Stainless steel seal housing
Stainless steel shaft
Charge option G
Seal Seat
Material Silicon carbide Standard 6
O-ring Material
Buna-N Standard A
Neoprene®e No charge option B
Viton®e Charge option D
Ethylene propylene Charge option G
Kalrez®e Charge option K
Mounting Options
Description
Model
Reference
Number
Part
Number
Maximum
Motor
Frame
Size
Ship
Weight
lbs (kg)
Mounting setup for direct drive.
Includes steel baseplate, flexible coupling, and coupling guard.
PUMP AND MOTOR NOT INCLUDED.
FF060
FD060 101-14 f
184T
128 (58)215T
256T
Part Options
Part Number Description
1345-2X Coupling for DLF060 (182/184 TC NEMA frame size)
1345-1X Coupling for DLF060 (213/215 TC NEMA frame size)
a Class 300 RF (ANSI) flange.
b Part number 40 DIN 2635.
c This direct mount will accommodate NEMA motors up to and including 10 hp (215 TC frame size). Special frame or adapter
required for IEC motors over 7.5 kW. Consult factory for assistance.
d Motor is not included.
e Registered trademark of the DuPont company.
f Motor frame size.
16
Model Number
Base X X X X

Appendix A—Model Number Identification Code and Available Options
Model 075 Coro-Flo®Pumps
Base Model Number Frame Mount Direct Mount
FF075 FD075 DLF075 DLD075
Inlet 1½" ASME a 40 mm DIN b 1½" ASME a 40 mm DIN b
Outlet 1" ASME a 25 mm DIN b 1" ASME a 25 mm DIN b
Weight, bare pump lbs (kg) 63 (28.6) 63 (28.6) 75 (34.0) 75 (34.0)
Description Frame
mounted
Frame
mounted
Direct mount
pump with
C-face frame c
Direct mount
pump with
C-face frame c
Specification Fields
Motor No integral motor
Standard NEMA C-face frame (3–10 hp)dC
Not available
IEC/132 C-face frame
( 2. 2 –7. 5 k W )
dM
Impeller, Seal
Sleeve, Seal
Housing, and
Shaft Material
Bronze impeller
Stainless steel seal sleeve
Stainless steel seal housing
Steel shaft
Standard D
Stainless steel impeller
Stainless steel seal sleeve
Stainless steel seal housing
Stainless steel shaft
Charge option E
Steel impeller
Stainless steel seal sleeve
Stainless steel seal housing
Steel shaft
Charge option F
Steel impeller
Stainless steel seal sleeve
Stainless steel seal housing
Stainless steel shaft
Charge option G
Seal Seat
Material Silicon carbide Standard 6
O-ring Material
Buna-N Standard A
Neoprene®e No charge option B
Viton®e Charge option D
Ethylene propylene Charge option G
Kalrez®e Charge option K
Mounting Options
Description
Model
Reference
Number
Part
Number
Maximum
Motor
Frame
Size
Ship
Weight
lbs (kg)
Mounting setup for direct drive.
Includes steel baseplate, flexible coupling, and coupling guard.
PUMP AND MOTOR NOT INCLUDED.
FF075
FD075 101-14 f
184T
128 (58)215T
256T
Part Options
Part Number Description
1345-2X Coupling for DLF075 (182/184 TC NEMA frame size)
1345-1X Coupling for DLF075 (213/215 TC NEMA frame size)
a Class 300 RF (ANSI) flange.
b Part number 40 DIN 2635.
c This direct mount will accommodate NEMA motors up to and including 10 hp (215 TC frame size). Special frame or adapter
required for IEC motors over 7.5 kW. Consult factory for assistance.
d Motor is not included.
e Registered trademark of the DuPont company.
f Motor frame size.
17
Model Number
Base X X X X

Appendix A—Model Number Identification Code and Available Options
Model 150 Coro-Flo®Pumps
Base Model Number Frame Mount Direct Mount
FF150 FD150 DLF150 DLD150
Inlet 1½" ASME a 40 mm DIN b 1½" ASME a 40 mm DIN b
Outlet 1" ASME a 25 mm DIN b 1" ASME a 25 mm DIN b
Weight, bare pump lbs (kg) 63 (28.6) 63 (28.6) 75 (34.0) 75 (34.0)
Description Frame
mounted
Frame
mounted
Direct mount
pump with
C-face frame c
Direct mount
pump with
C-face frame c
Specification Fields
Motor No integral motor
Standard NEMA C-face frame (3–10 hp)dC
Not available
IEC/132 C-face frame
( 2. 2 –7. 5 k W )
dM
Impeller, Seal
Sleeve, Seal
Housing, and
Shaft Material
Bronze impeller
Stainless steel seal sleeve
Stainless steel seal housing
Steel shaft
Standard D
Stainless steel impeller
Stainless steel seal sleeve
Stainless steel seal housing
Stainless steel shaft
Charge option E
Steel impeller
Stainless steel seal sleeve
Stainless steel seal housing
Steel shaft
Charge option F
Steel impeller
Stainless steel seal sleeve
Stainless steel seal housing
Stainless steel shaft
Charge option G
Seal Seat
Material Silicon carbide Standard 6
O-ring Material
Buna-N Standard A
Neoprene®e No charge option B
Viton®e Charge option D
Ethylene propylene Charge option G
Kalrez®e Charge option K
Mounting Options
Description
Model
Reference
Number
Part
Number
Maximum
Motor
Frame
Size
Ship
Weight
lbs (kg)
Mounting setup for direct drive.
Includes steel baseplate, flexible coupling, and coupling guard.
PUMP AND MOTOR NOT INCLUDED.
FF150
FD150 101-14 f
184T
128 (58)
215T
256T
Part Options
Part Number Description
1345-2X Coupling for DLF150 (182/184 TC NEMA frame size)
1345-1X Coupling for DLF150 (213/215 TC NEMA frame size)
CF Coupling for FF/FD150 (254/256 TC NEMA frame size)
a Class 300 RF (ANSI) flange.
b Part number 40 DIN 2635.
c This direct mount will accommodate NEMA motors up to and including 10 hp (215 TC frame size). Special frame or adapter
required for IEC motors over 7.5 kW. Consult factory for assistance.
d Motor is not included.
e Registered trademark of the DuPont company.
f Motor frame size.
18
Model Number
Base X X X X

Appendix B—Material and Mechanical Specifications for Models 060,
075, and 150 Coro-Flo®Pumps
Equipment Type and Options
Regenerative turbine pump
Foot mounted (FF060, FF075, FF150, FD060, FD075, or FD150)
Direct mounted (DLF060, DLF075, DLF150, DLD060, DLD075,
or DLD150)
Available with ASME Class 300 RF or DIN flanges
Features and Benefits
Regenerative turbine type: Able to handle liquefied gases without flashing
High flows and differential pressures: Ideal for dual hose dispensers and multiple dispensers
Heavy duty bearings: Long bearing life
Single mechanical seal: Silicon carbide seal seat requires less maintenance
Floating impeller: Minimizes wear and lasts longer
ASME or DIN, metric fasteners optional: Usability for US or overseas applications
Runs at 50 or 60 cycle (Hz): Usability for US or overseas applications
Two mounting options: Installation versatility
Operating Specifications
Inlet: 1-1/2" ASME Class 300 RF (DIN optional) Max. diff. press. for Model 060: 150 psig (10.3 bar) @ 60 Hz1
Outlet: 1" ASME Class 300 RF (DIN optional) Max. diff. press. for Model 075: 200 psig (13.8 bar) @ 60 Hz1
RPM: 3450 @ 60 Hz, 2880 @ 50 Hz Max. diff. press. for Model 150: 250 psig (17.2 bar) @ 60 Hz1
Maximum working pressure: 400 psig (27.6 bar) Flow range for Model 060: 7–22 gpm (26.5 to 83.3 L/min)
Maximum driver: 20 hp (15 kW) Flow range for Model 075: 10–40 gpm (37.9 to 151.4 L/min)
Temperature range: -25° to 225°F (-32° to 107°C) Flow range for Model 150: 12–58 gpm (45.4 to 219.6 L/min)
Material Specifications
Part Model Standard Material Optional Material
Case, cover All Ductile iron ASTM A536
Impeller All Copper alloy CA-836 Steel, stainless steel
Impeller key All Steel, zinc plated
Seal seat All Silicon carbide
Seal rotor All Carbon
Seal metal parts All Stainless steel
Seal sleeve All Stainless steel
Seal housing All Stainless steel
Shaft All Steel Stainless steel
Frame FF/FD Ductile iron ASTM A536
DLF/DLD Ductile iron ASTM A536
Bearing cap All Ductile iron ASTM A536
O-rings All Buna-N Neoprene®, Viton®, ethylene propylene,
Kalrez®2
Retainer rings All Steel
Bearings All Ball
1 Maximum discharge pressure should be limited to the maximum system pressure rating.
2 Registered trademark of the DuPont company.
B. Specifications
Applications
Under and aboveground autogas dispensing
Multiple cylinder filling stations
Vaporizer feed—high pressure
Direct, high pressure asphalt burner feed
19

C. Performance
Differential pressure:
10.0 bar
145.0 psi
Flow:
32.2 L/min
8.5 gpm
Power required:
3.8 kW
5.15 hp
3450 RPM @ 60 Hz
gpm
0
510 15 20
0
10 20 30 40 80 9050 60 70
0
3
2
1
4
5
6
7
8
9
10
10
11
0
20
40
60
80
100
120
140
160
0
1
2
3
4
5
6
7
8
0
0.75
1.50
2.25
3.00
3.75
4.50
5.25
6.00
psi bar kW hp
L/min
Power Required
Differential Pressure
Flow Rate
Appendix C—Performance Curves
Model 060 Coro-Flo®Pumps
1
1 The performance curves are based on aboveground LPG installations. Performance curves for underground LPG tanks will vary based on the specific
installation. Consult factory.
20
This manual suits for next models
11
Table of contents
Other Corken Water Pump manuals
Popular Water Pump manuals by other brands

Eaton
Eaton Vikers V200 Series Overhaul manual

Wilden
Wilden Advanced P100 Series Engineering, operation & maintenance

Becker
Becker VT 3.6/08 operating instructions

Graco
Graco Reactor 2 Series Operation

VTS Medical Systems
VTS Medical Systems WPG Series Technical documentation

Danfoss
Danfoss PAH Series instructions