11 4
96
7 8
10
Permanent Override Mode:
<PRG>
Sleep Mode:
The room temperature will be maintained at the
Override temperature until Override mode is
released.
Press to release the Permanent Override
mode.
1.Press the < > to select the sleep mode and
control off mode.The sequence is as below:
Normal Mode Sleep Mode Control Off Mode
Normal Mode
2.Press any other keys to exit the control off / sleep
mode and return normal mode.
At sleep mode, < > icon is displayed. DRT 2 stops
measuring and displaying the temperature. Only the
current time is shown. The heater/cooler is turned
off, irrespective of the current setting temperature.
H. Control Off / Sleep mode:
Y Y
Y...
Install or replace the battery:
Caution: Turn off the electrical devices and
disconnect the supply to the appliances before
replacing the batteries. Replace only with the same
or equivalent type of batteries. Do not dispose the
used batteries with household waste. Refer to your
local area for the proper disposal.
1.Pull out the battery drawer
2.Place the new batteries according to the marking
on the battery drawer.
3.Dispose the old batteries properly.
4.Slide the battery drawer back to its position.
5.Check if the thermostat works properly or not.
Press if necessary." "Reset
1
2
3
3
4
4
DRT 2 Installation
5
B. Start/Reset:
1.After wiring and mounting, switch off all the
connected devices. Place 2 new AAA 1.5V alkaline
batteries according to the polarities marked.
LCD display will be switched on.
2.Press 'RST' to reset. The DRT 2 will be ready to
control the heater / cooler.
3.Switch ON the heater/cooler. The heater/cooler
will remain OFF until DRT 2 activates the output
ON with / displayed on LCD.
1.Temperature detection starts and LCD displays
the room temperature.
2.If Battery is LOW, will be flashing. If has
been flashing for 48 hours without new batteries
replaced, DRT 2 will stop to measure and display
the temperature. DRT 2 will also turn off the heater
/ cooler irrespective of the current control
temperature setting. The old batteries must be
replaced with new one immediately.
C. Normal Time Mode:
F
2.Press again, the mode changes from
Temporary Override to Permanent Override mode.
icon will be displayed.
3.Press once, the mode changes from
Permanent Override to normal mode.
1.Press / ,the Override temperature is shown.
2.Hold the / for 2 seconds, the Override
temperature will flash.
3.Press / to adjust the Override temperature.
4.Press to exit the Override temperature
setting.
Or DRT 2 will auto-return to normal mode after 10
seconds.
Temporary Override mode maintains until next
program time is met.
< >
< >
Review and adjust the Override temperature:
Temporary Override Mode:
< > < >
< > < >
< > < >
< >
Q
Q
Q
Q
Q
QQQQQ
Q
Q
Q
Q
QQQQQQQ
Q
Q
Q
Q
QQQQQ
Q
Q
Q
Q
QQQQQQ
Q
Q
Q
Q
Q
QQQQQ
Q
Q
Q
Q
QQQQQQQ
Q
Q
Q
Q
QQQQQ
Q
Q
Q
Q
QQQQQQQ
Q
Q
Q
Q
QQQQQ
Q
Q
Q
Q
QQQQQQQ
Q
Q
Q
Q
QQQQQ
Q
Q
Q
Q
QQQQQQ
Q
Q
Q
Q
Q
QQQQQ
Q
Q
Q
Q
QQQQQQQ
Q
Q
Q
Q
QQQQQ
Q
Q
Q
Q
QQQQQQQ
Q
Q
Q
Q
QQQQQ
Q
Q
Q
Q
QQQQQQQ
Q
Q
Q
Q
QQQQQ
Q
Q
Q
Q
QQQQQQ
Q
Q
Q
Q
Q
QQQQQ
Q
Q
Q
Q
QQQQQQQ
Q
Q
Q
Q
QQQQQ
Q
Q
Q
Q
QQQQQQ
Q
Q
Q
Q
Q
QQQQQ
Q
Q
Q
Q
QQQQQQQ
Q
Q
Q
Q
QQQQQ
Q
Q
Q
Q
QQQQQQQ
Q
Q
Q
Q
QQQQQ
Q
Q
Q
Q
QQQQQQQ
Q
Q
Q
Q
QQQQQ
Q
Q
Q
Q
QQQQQQ
Q
Q
Q
Q
Q
QQQQQ
Q
Q
Q
Q
QQQQQQQ
Q
Q
Q
Q
QQQQQ
Q
Q
Q
Q
QQQQQQQ
Q
Q
Q
Q
QQQQQ
Q
Q
Q
Q
QQQQQQQ
Q
Q
Q
Q
QQQQQ
Q
Q
Q
Q
QQQQQQ
P
4.Press to set the next program.
5.The program setting sequence is as below:
Mon~Fri (P1 P2 P3 P4) Sat (P1 P2 P3
p4) Sun (P1 P2 P3 P4)
6.Press to exit the program setting mode and
return to the normal mode.
Or DRT 2 will auto-return to normal mode after 10
seconds.
There are two modes in the override mode
(Temporary override and Permanent override
mode). Press to select the override mode.
The sequence is as below:
Normal Temporary Override Permanent
Override Normal
<PRG>
< >
< >
G. Temporary / Permanent Override Mode:
Selecting the Temporary/ Permanent Override
Mode
1.Press < > to change the mode from normal to
Temporary Override. icon will be displayed.
Y Y Y Y Y Y
Y Y Y Y Y Y
Y Y Y
Y Y
...
...
Q
Q
Q
Q
Q
QQQQQ
Q
Q
Q
Q
QQQQQQQ
Q
Q
Q
Q
QQQQQ
Q
Q
Q
Q
QQQQQQ
Q
Q
Q
Q
Q
QQQQQ
Q
Q
Q
Q
QQQQQQQ
Q
Q
Q
Q
QQQQQ
Q
Q
Q
Q
QQQQQQQ
Q
Q
Q
Q
QQQQQ
Q
Q
Q
Q
QQQQQQQ
Q
Q
Q
Q
QQQQQ
Q
Q
Q
Q
QQQQQQ
Q
Q
Q
Q
Q
QQQQQ
Q
Q
Q
Q
QQQQQQQ
Q
Q
Q
Q
QQQQQ
Q
Q
Q
Q
QQQQQQQ
Q
Q
Q
Q
QQQQQ
Q
Q
Q
Q
QQQQQQQ
Q
Q
Q
Q
QQQQQ
Q
Q
Q
Q
QQQQQQ
Q
Q
Q
Q
Q
QQQQQ
Q
Q
Q
Q
QQQQQQQ
Q
Q
Q
Q
QQQQQ
Q
Q
Q
Q
QQQQQQ
Q
Q
Q
Q
Q
QQQQQ
Q
Q
Q
Q
QQQQQQQ
Q
Q
Q
Q
QQQQQ
Q
Q
Q
Q
QQQQQQQ
Q
Q
Q
Q
QQQQQ
Q
Q
Q
Q
QQQQQQQ
Q
Q
Q
Q
QQQQQ
Q
Q
Q
Q
QQQQQQ
Q
Q
Q
Q
Q
QQQQQ
Q
Q
Q
Q
QQQQQQQ
Q
Q
Q
Q
QQQQQ
Q
Q
Q
Q
QQQQQQQ
Q
Q
Q
Q
QQQQQ
Q
Q
Q
Q
QQQQQQQ
Q
Q
Q
Q
QQQQQ
Q
Q
Q
Q
QQQQQQ
T
3.Defrost function is activated with displayed
when temperature is 5 C or below. Output will be
forced to ON @ Heat & OFF @ Cool.
4.Below 0 C, DRT 2 will display
5.Above 40 C, DRT2 will display .
1.Press the Day of Week (1-7) will flash,
press to select the current Day of
Week.
2.Press the Hour will flash, press
to set the Hour.
3.Press , the Minute will flash, press
to set the Minute.
4.Press will jump back to the step 1.
5.Press to confirm the settings and return to
Normal Mode.
Or DRT 2 will auto-return to normal mode after 10
seconds.
LO.
HI
< >,
< >, < >
< >, < >, < >
< > < >,
< >
< >
< >
D. Normal Time Setting Mode:
°
°
°
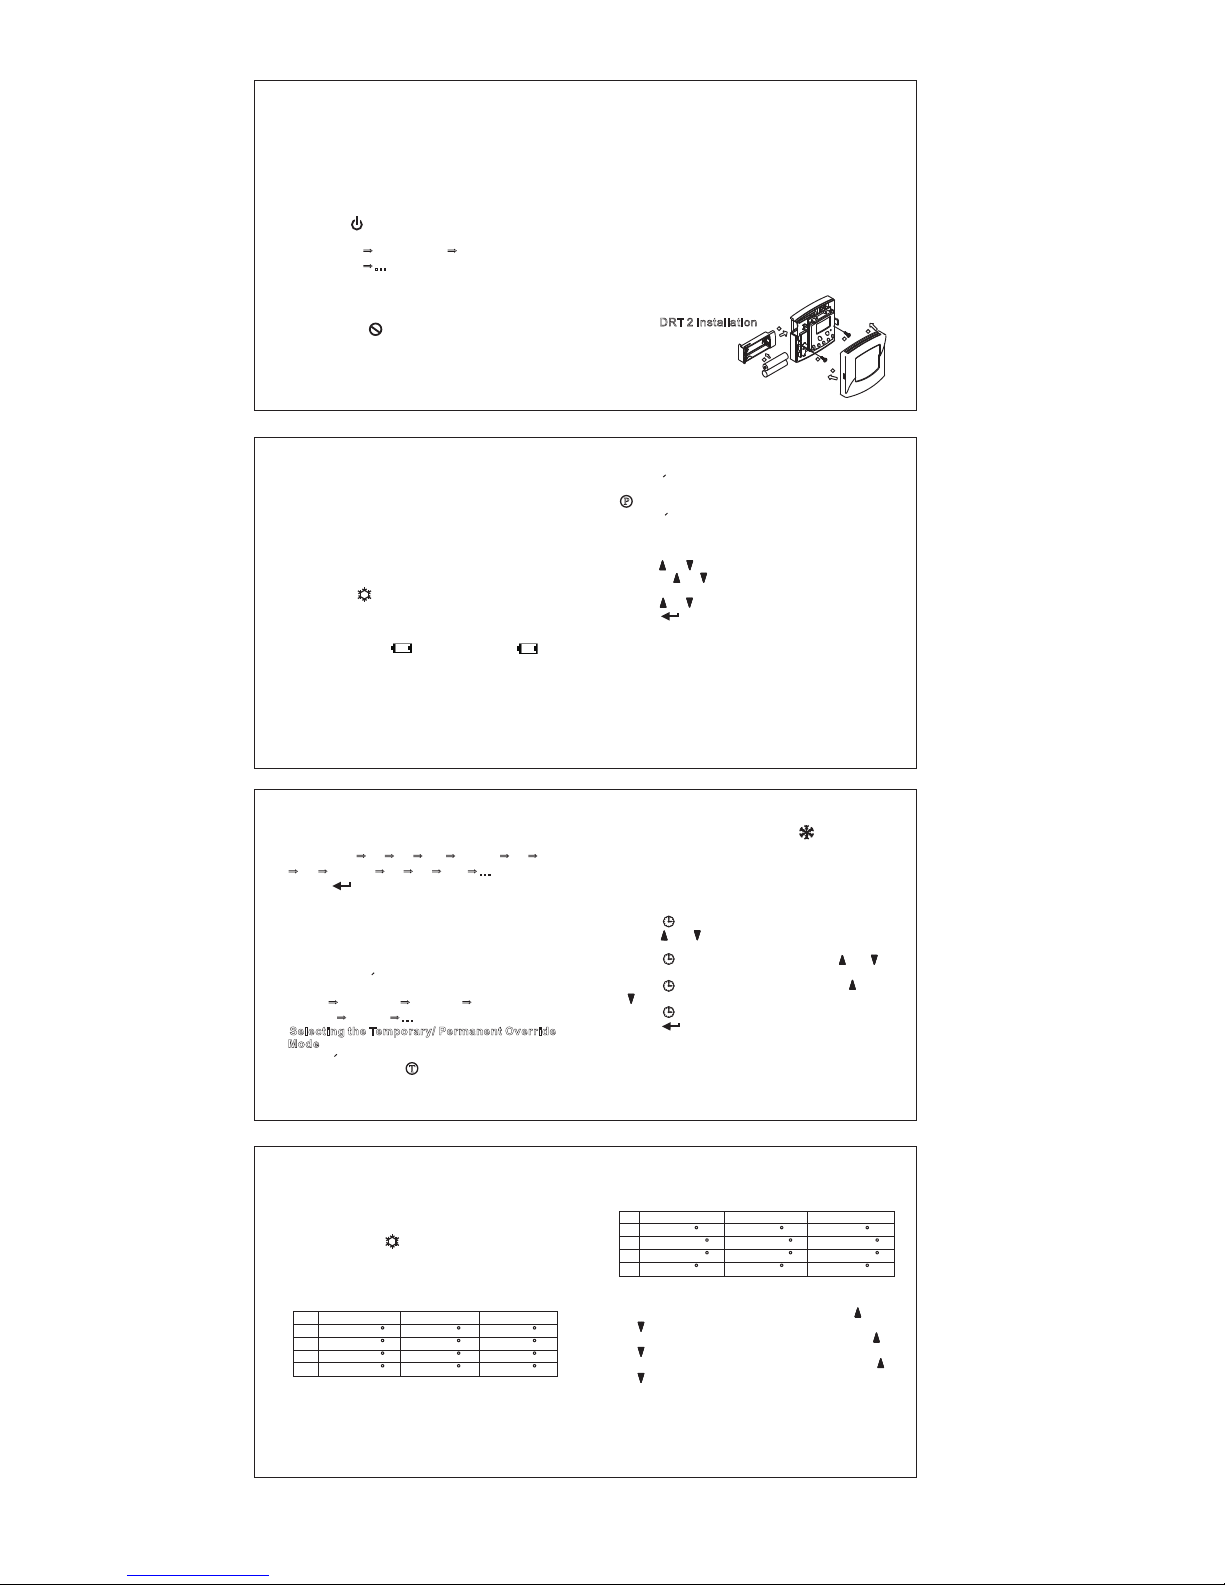
E. Factory Defined Programs:
The heater/cooler turns on according to the
activated program and the control temperature
setting.When the heater/cooler is On,Program
number and icons are shown.
The pre-defined programs are as below:
Heater mode:
Mon ~ Fri Sat Sun
P1 06:00 (21 C) 08:00 (21 C) 08:00 (21 C)
P2 08:00 (16 C) 10:00 (16 C) 10:00 (16 C)
P3 18:00 (21 C) 18:00 (21 C) 18:00 (21 C)
P4 22:00 (16 C) 23:00 (16 C) 23:00 (16 C)
/F
° ° °
° ° °
° ° °
° ° °
Cooler mode:
F. Set Program:
1.Press the hour will flash, press
to change the hour setting.
2.Press the minutes will flash, press
to change the minutes setting.
3.Press temperature will flash, press
to change the setpoint.
<PRG>,
<PRG>,
<PRG>,
< >,
< >
< >,
< >
< >,
< >
Mon ~ Fri Sat Sun
P1 06:00 (24 C) 08:00 (24 C) 08:00 (24 C)
P2 08:00 (29.5 C) 10:00 (29.5 C) 10:00 (29.5 C)
P3 18:00 (29.5 C) 18:00 (29.5 C) 18:00 (29.5 C)
P4 22:00 (26 C) 23:00 (26 C) 23:00 (26 C)
° ° °
° ° °
° ° °
° ° °
(Figure 1)