Corsa 14172 User manual

(2) 3” Clamps
XO-Pipe
Assembly (1) Anti-Seize
Lube Pouch
Please take time to read and understand these installation instructions.
CORSA recommends that installation of this system be performed by a qualified service center or professional
muffler installer who has the necessary equipment, tools and experienced personnel. However, if you decide
to perform this install, the use of a hoist and an additional person will be required.
CAUTION: Never work on a hot exhaust system. Allow time for the vehicle to cool. Always wear eye protection
when working under a vehicle.
Recommended Tools:
• Safety Glasses
• 13mm Socket
• 15mm Wrench
• 15mm Socket
• 18mm Socket
• Grommet Pullers
• 3/8” Ratchet
• 12” Ratchet Extension
• Torque Wrench
• Saw or Chain-Style Pipe
Cutter
Please confirm that all parts are present before
beginning the factory exhaust system removal
and CORSA exhaust system installation.
PN14172 & PN 14164
Bill of Materials:
• Driver Side Rear Muffler Assembly
Single Pro-Series Tips
PN14172 (16CS2037)
PN14164 (16CS2047)
• Passenger Side Rear Muffler Assembly
Single Pro-Series Tips
PN14172 (16CS2036)
PN14164 (16CS2046)
• Driver Side Over the Axle Pipe
(16CS4021)
• Passenger Side Over the Axle Pipe
(16CS4020)
• (2) 3” Clamps
• (1) Anti-seize Lube Pouch
• (2) Vacuum Caps
PN14173
Bill of Materials:
• XO-Pipe Assembly
(16CS4028)
• (2) 3” Clamps
• (1) Anti-seize
Lube Pouch
(1) Anti-Seize
Lube Pouch
(2) Vacuum
Caps
Driver Side
Rear Muffler
(16CS2047)
Passenger Side
Rear Muffler
(16CS2046)
Driver Side
Rear Muffler
(16CS2037)
Passenger Side
Rear Muffler
(16CS2036)
(2) 3” Clamps
Driver Side
Over the Axle Pipe
(16CS4021)
Passenger Side
Over the Axle Pipe
(16CS4020)
INSTALLATION INSTRUCTIONS / CAT-BACK EXHAUST SYSTEM
2006 Chevrolet Corvette Z06 Axle Back System
With Single Pro-Series 4.0” Tips PART NUMBER 14172
2006 Chevrolet Corvette Z06 Axle Back System
With Twin Pro-Series 4.0” Tips PART NUMBER 14164
2006 Chevrolet Corvette Z06 XO-Pipe PART NUMBER 14173

FIG. A
FIG. B
FIG. C
FIG. FFIG. EFIG. D
Factory Exhaust System Removal:
1. Unbolt the rear sway bar brackets from the rear cross member using
an 18mm socket on the top and bottom bolts. A 15mm wrench will be
needed to hold the lower bolt from turning while the nut is removed.
(See Fig. A). Do not remove lower bolt from suspension.
NOTE: All factory nuts and bolts will be reused to install your CORSA
system, do not discard.
2. Pull the sway bar towards the rear of the car to clear the studs and
rotate it down on the end links. This will give the necessary clearance
to remove the stock mufflers. (See Fig. B)
NOTE: Due to a mid-year change by Chevrolet, vehicles delivered later
in the 2006 model year and beyond MAY NOT need to make the cut
mentioned in Step 3. After completing Steps 4-10, the stock system may
be removed in one piece by rotating the rear muffler to gain clearance as
needed; the cut will make removal of the stock system easier, but is not
required.
3. The passenger side pipe needs to be cut to remove the stock system.
Measure 2.75” to the rear from the clamp on the exit end of the factory
H-pipe and mark the pipe at this distance. Using a chain style pipe
cutter, cut the pipe along the mark. (See Fig. C)
4. Loosen both driver and passenger clamps at rear of stock H-pipe using
a 15mm socket. (See Fig. D)
5. Remove both nuts that hold the H-pipe hanger using a 13mm
socket. An extension may be needed to access these nuts. (See
Fig. E)
6. Remove the 4 nuts and bolts attaching the inlet of the factory H-pipe
to the flanges downstream of the catalytic converters using a 15mm
socket. (See Fig. F)
INSTALLATION INSTRUCTIONS / CAT-BACK EXHAUST SYSTEM
2006 Chevrolet Corvette Z06 Axle Back System
With Single Pro-Series 4.0” Tips PART NUMBER 14172
2006 Chevrolet Corvette Z06 Axle Back System
With Twin Pro-Series 4.0” Tips PART NUMBER 14164
2006 Chevrolet Corvette Z06 XO-Pipe PART NUMBER 14173

CORSA Exhaust System Installation:
NOTE: Apply the anti-seize lubricant (supplied) to the threads ONLY of all the clamps and flange bolts. Failure
to follow this procedure can cause nuts to seize on clamps and potentially destroy threads. After applying anti-seize
lubricant, be sure to thoroughly clean hands as lubricant will tarnish stainless steel.
All clamps should be tightened using a properly calibrated Torque Wrench. Using an air impact gun will damage the
clamp and reduce its ability to effectively seal the joint. It may also cause the joint to separate thereby causing
damage to your exhaust system and your vehicle.
7. Slide the now loose flanges on the H-pipe towards the rear of the car
until they clear the studs and pull the entire H-pipe assembly out of
the car. The driver side pipe, leading to the muffler, should slide from
the clamp that was loosened in step 4. (See Fig. G & H)
NOTE: Push H-pipe towards rear to avoid damaging donut gasket.
8. Locate the vacuum lines attached to the outlet side of each muffler, near
the tips. Detach line from each muffler. No tools are required. (See Fig. I)
9. Starting with the passenger side, remove the rear mufflers from the
two rubber grommets holding each muffler in place. Use soapy water
to facilitate removal. (See Fig. J)
10. The muffler is now free and should be removed from the car by pulling
the muffler down while the attached pipe goes over the axle. (See
Fig. K & L)
11. Repeat steps 9&10 for the driver side.
12. Remove the soft rubber end from vacuum line if it did not stay attached
to the muffler assembly. (See Fig. I)
FIG. G
FIG. H
FIG. I FIG. J FIG. K FIG. L
INSTALLATION INSTRUCTIONS / CAT-BACK EXHAUST SYSTEM
2006 Chevrolet Corvette Z06 Axle Back System
With Single Pro-Series 4.0” Tips PART NUMBER 14172
2006 Chevrolet Corvette Z06 Axle Back System
With Twin Pro-Series 4.0” Tips PART NUMBER 14164
2006 Chevrolet Corvette Z06 XO-Pipe PART NUMBER 14173

FIG. M
FIG. N
CLAMP
Position slot
90°off of bolt
Position
clamp at
end of
expanded
tube
FIG. O
FIG. RFIG. QFIG. P FIG. S
CORSA Exhaust System Installation:
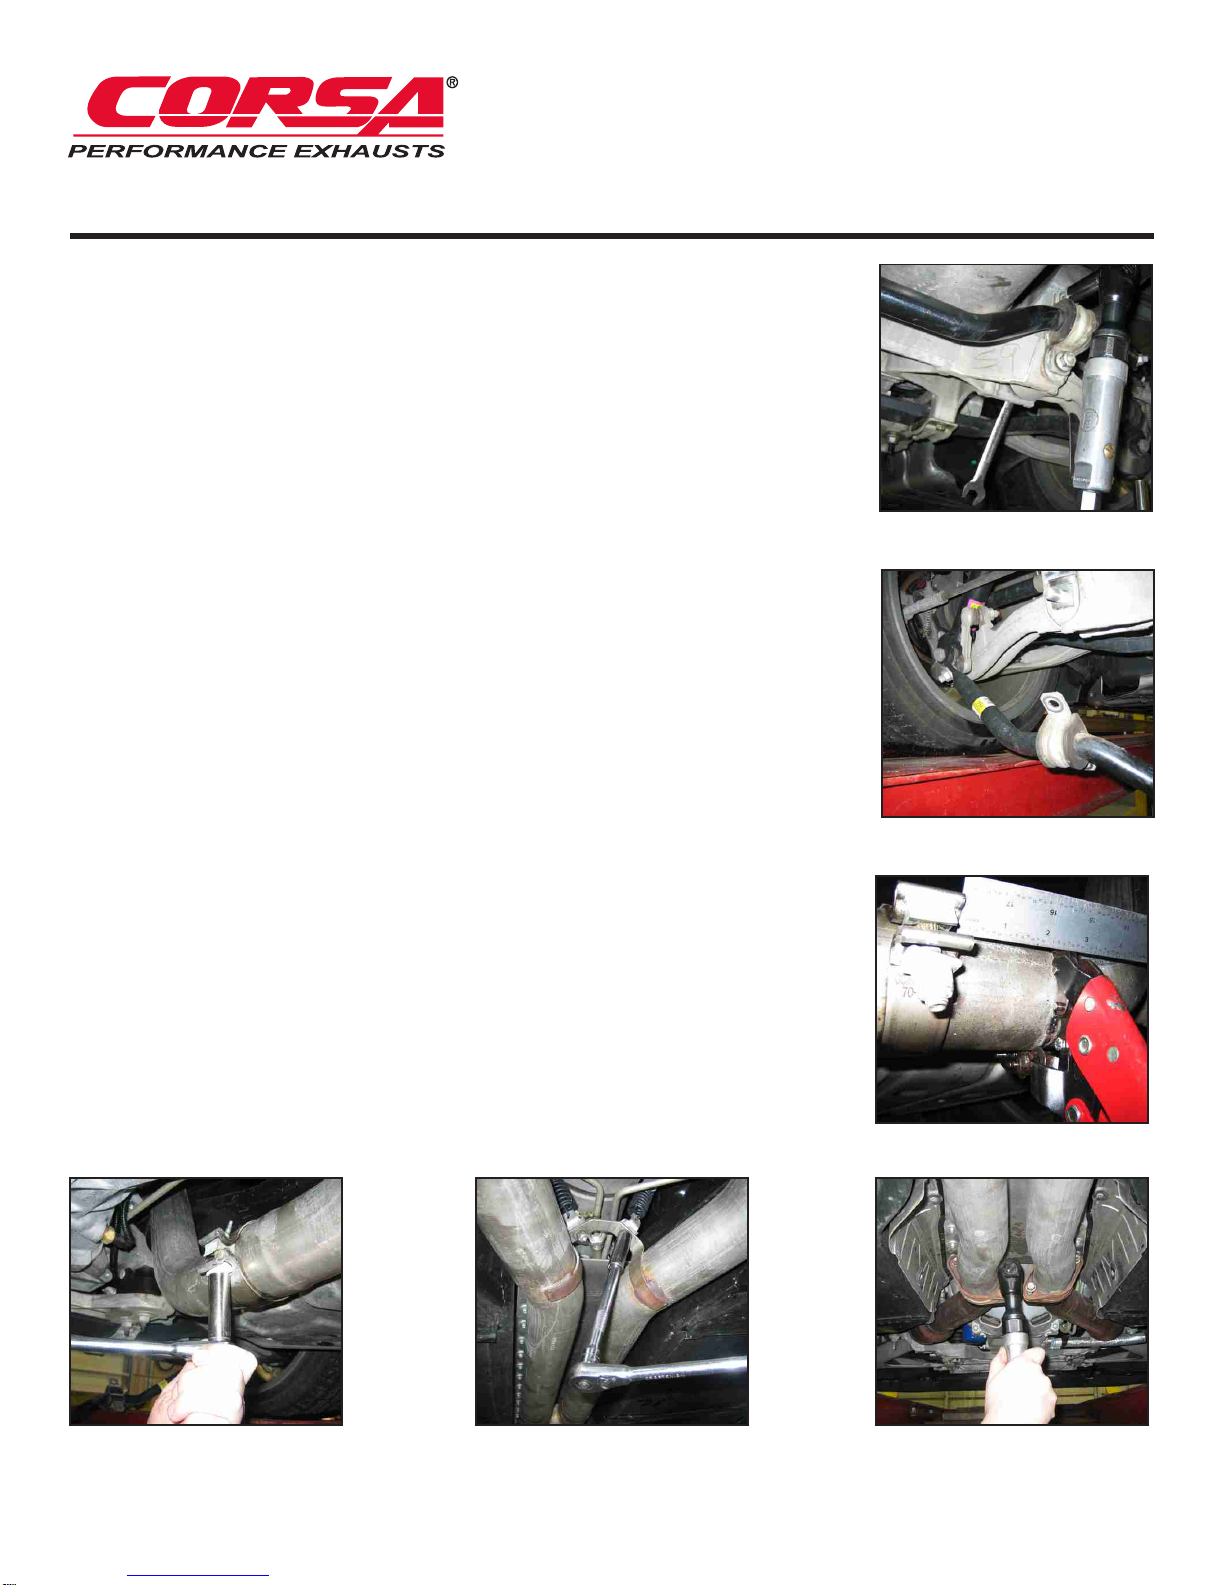
1. Hand tighten the front of the CORSA XO-pipe (or stock H-pipe if
reusing) to the flanges using the nuts and bolts previously removed.
(See Fig. M)
2. Fully tighten the nuts to the spring loaded hanger bolts after sliding
the bolt threw the hanger hole. (See Fig. N)
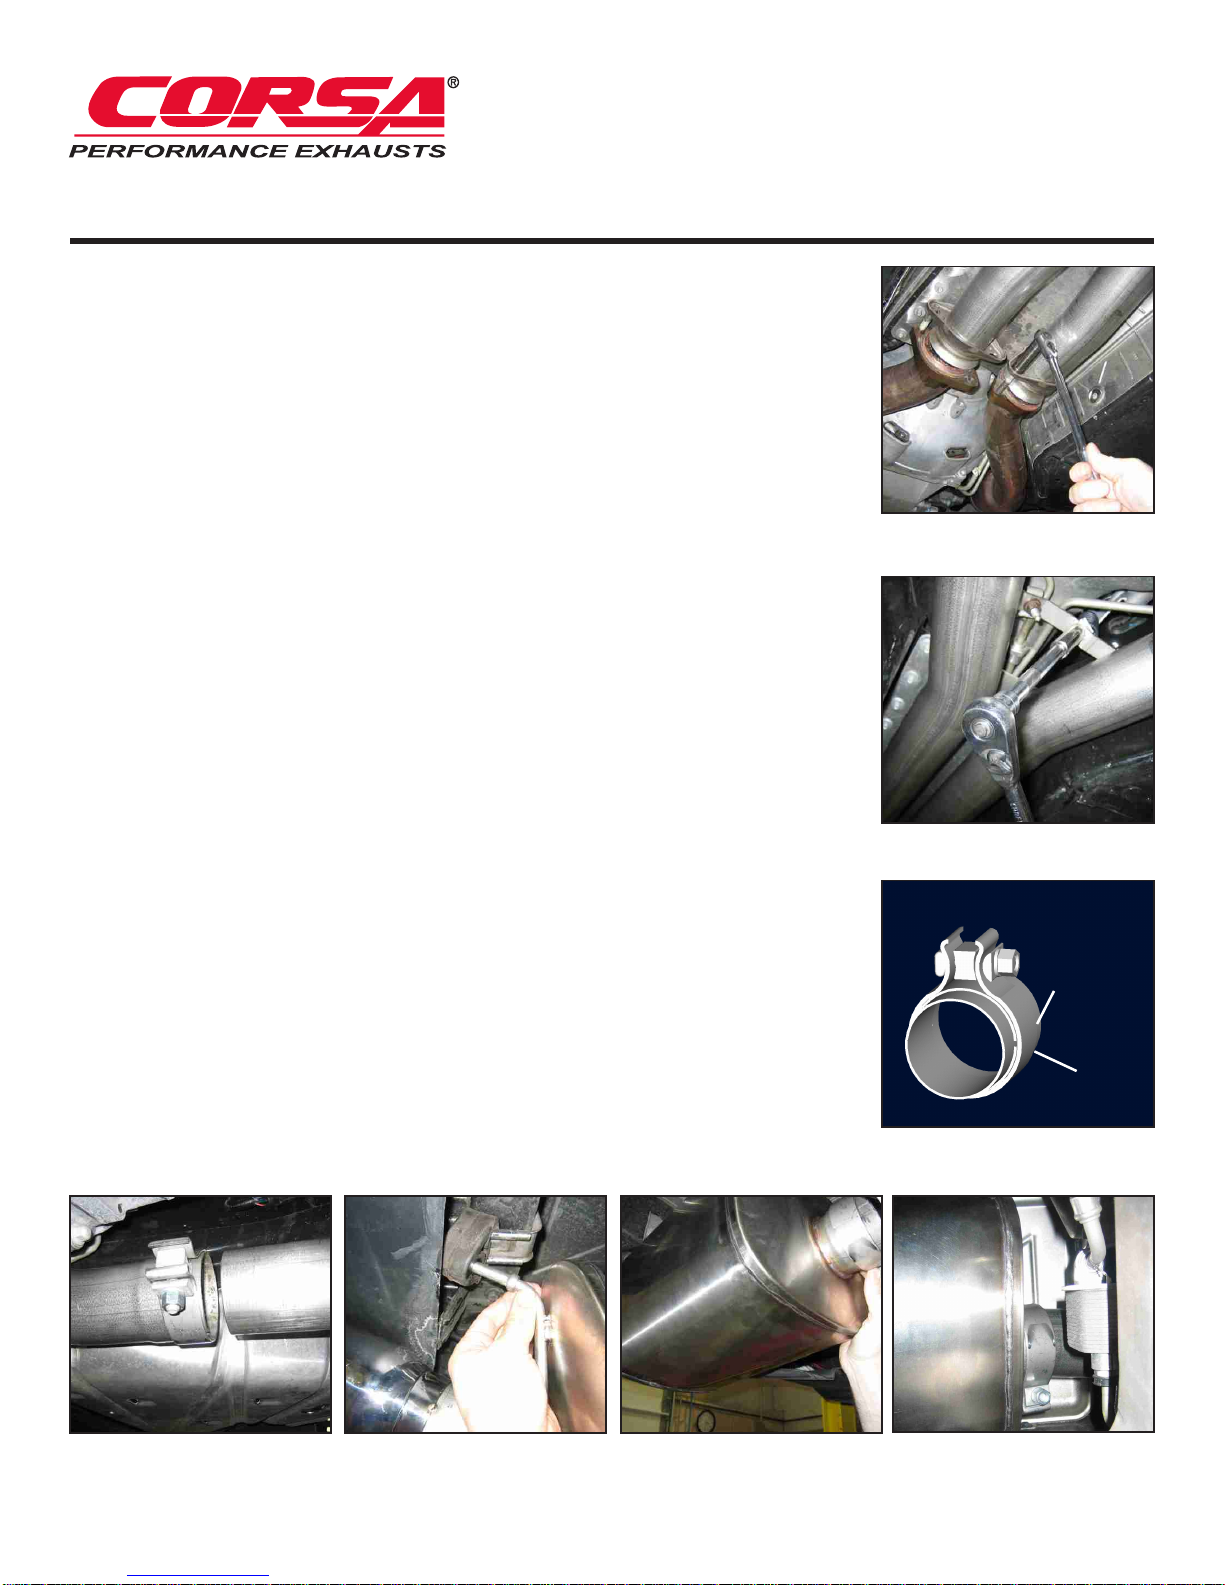
Skip Step 3 if reusing stock H-PIPE.
3. Place supplied TORCA clamp over the expanded end of XO-pipe.
Make sure the orientation is correct (See Fig. O).
4. Slide the passenger side axle pipe labeled 16CS4020 into the
expansion. Do not tighten clamp at this time. (See Fig. P)
Repeat on the driver side using axle pipe labeled 16CS4021.
5. Before installing the rear mufflers, cap both vacuum lines in the rear
bumper with the supplied rubber caps.
6. Starting on the driver side, push the rear hangers on the muffler
into the rubber grommets. (See Fig. Q)
7. Place TORCA clamp on inlet side of driver side muffler in the correct
orientation and with the bolt to the outside of the car. Tighten the
clamp so it has a light snug fit on the muffler, just enough to prevent
spinning during assembly. (See Fig. R)
8. Align the muffler inlet with the axle pipe and slide the pipe into the
expanded muffler inlet. (See Fig. S)
9. At this point, the axle pipe is free to rotate and should be adjusted so
it does not come in contact with the frame rail to the outside or the
transmission lines to the inside. After the pipe is centered and free
of obstructions, continue to next step.
INSTALLATION INSTRUCTIONS / CAT-BACK EXHAUST SYSTEM
2006 Chevrolet Corvette Z06 Axle Back System
With Single Pro-Series 4.0” Tips PART NUMBER 14172
2006 Chevrolet Corvette Z06 Axle Back System
With Twin Pro-Series 4.0” Tips PART NUMBER 14164
2006 Chevrolet Corvette Z06 XO-Pipe PART NUMBER 14173

EXHAUST SYSTEMS
CORSA PERFORMANCE EXHAUST
This manual suits for next models
2
Other Corsa Ventilation Hood manuals
Popular Ventilation Hood manuals by other brands

KitchenAid
KitchenAid KXW4436YSS Installation Instructions and Use & Care Guide

Ore
Ore CH60A-T1B instruction manual

Bosch
Bosch DKE 645 Operating and installation instructions

Pelgrim
Pelgrim MSK630RVS Instructions for use

Malloca
Malloca H214.6 user manual

Franke
Franke GALAXY PLUS INOX - FGPL 1200 user manual