Cosco Fitness 170ER User manual

1
1
Attention:
Please read all
instructions carefully
before using the
product.
Contents
Safety Information
Components-Parts
Assembly Instructions
Computer Operation
Parts List
Model:
170ER
Retain this
manual for
reference
2020-12-13
OWNER’S
MANUAL
170ER
Upright Bike

2
Contents
Safety Information
3
Components - Parts
4-6
Assembly Instructions
7-14
Computer Operation
15-22
Maintenance
23
Parts List
24-25

3
、
1. Please read the entire instruction before starting using this machine.
2. It is the responsibility of the owner of this machine to inform all users of all preventive measures.
Follow the instruction strictly.
3. Please place this machine on a flat ground, away from moisture and dust. Place a mat under the
machine to protect the floor and carpet. For safety reasons, make sure you keep at leas 0.5m of
free space around your equipment.
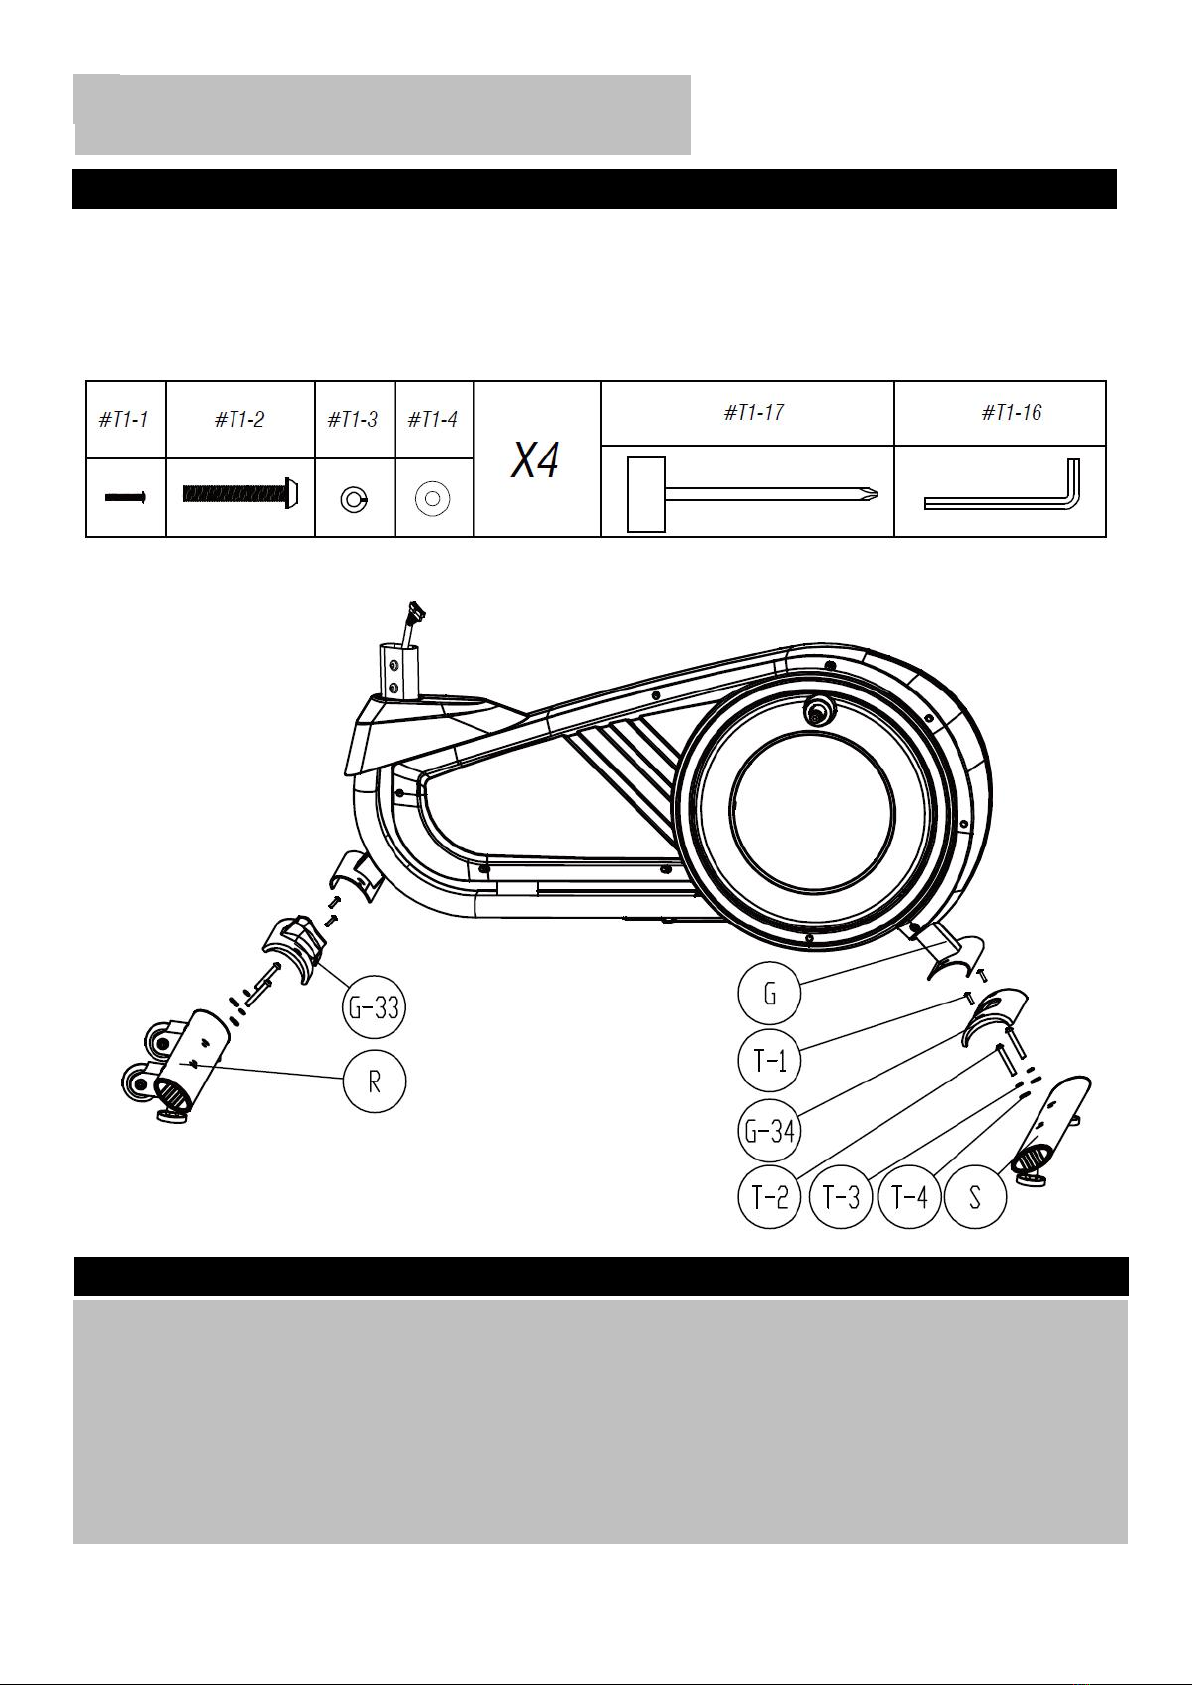
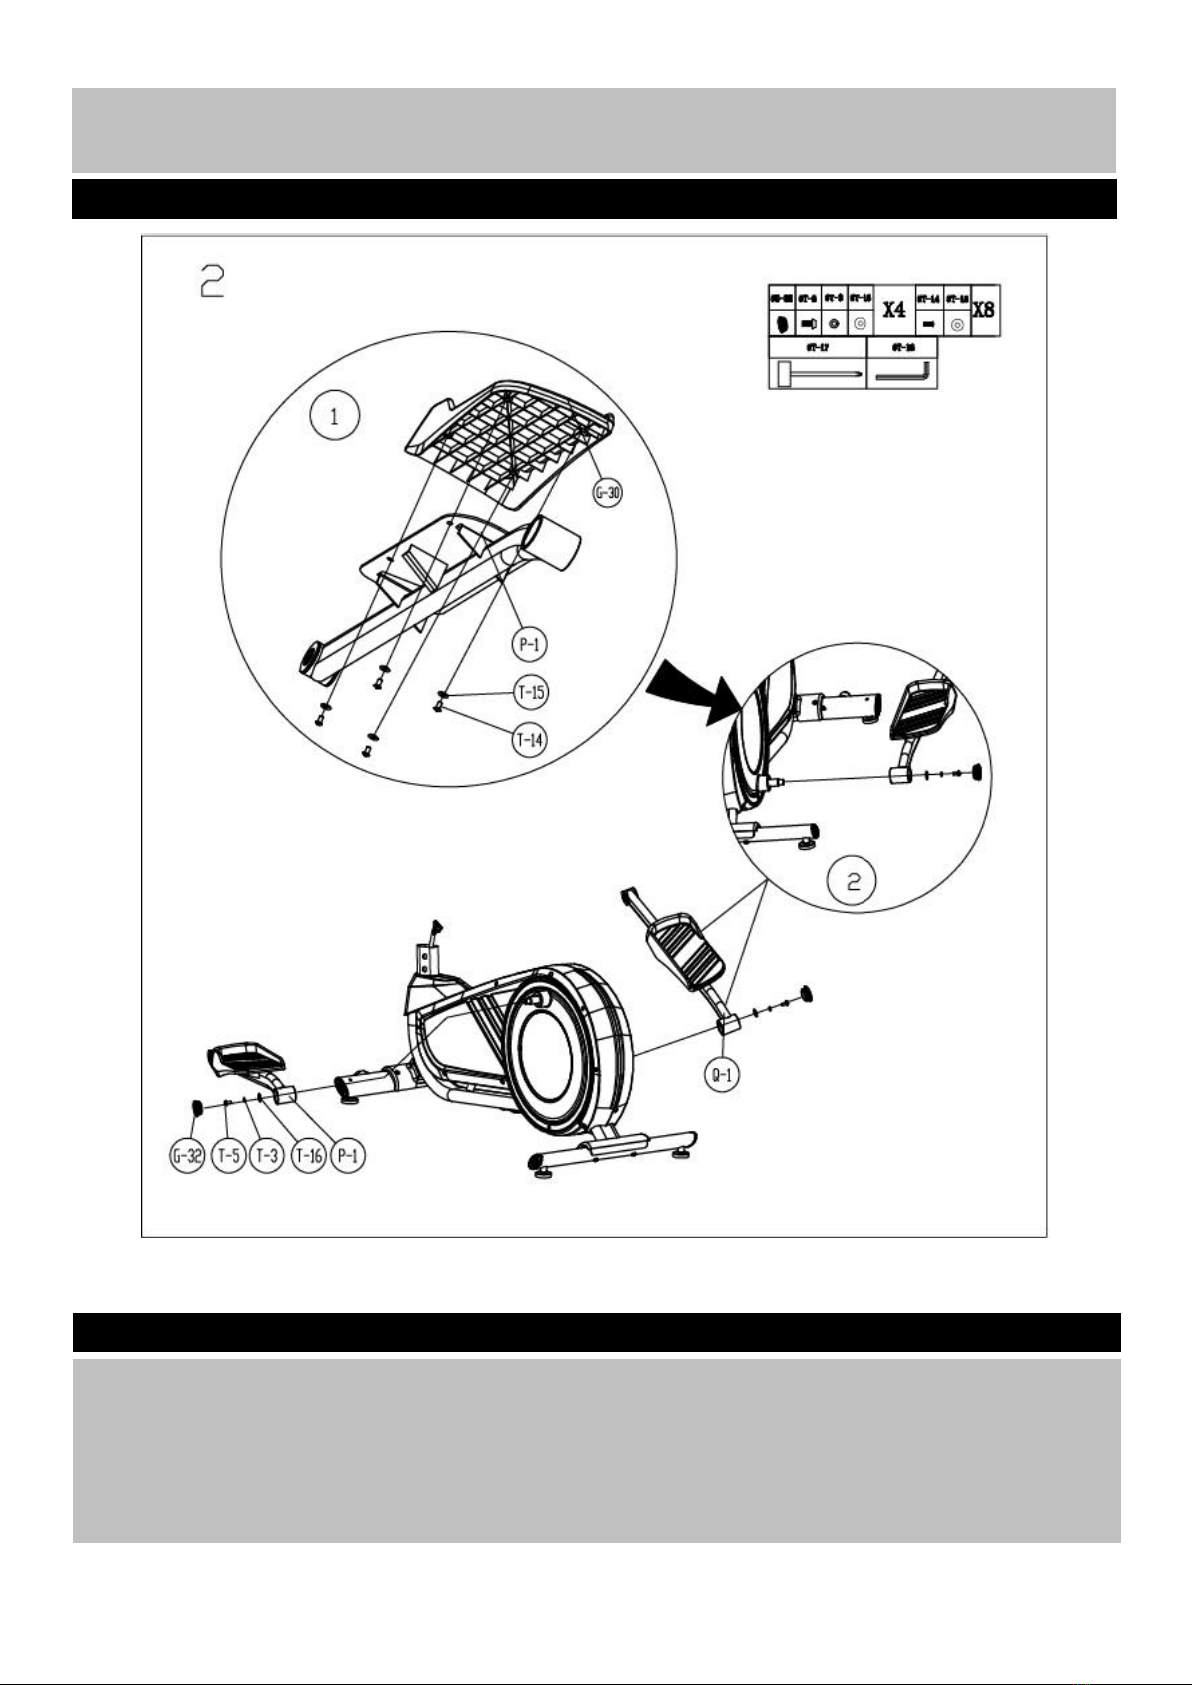
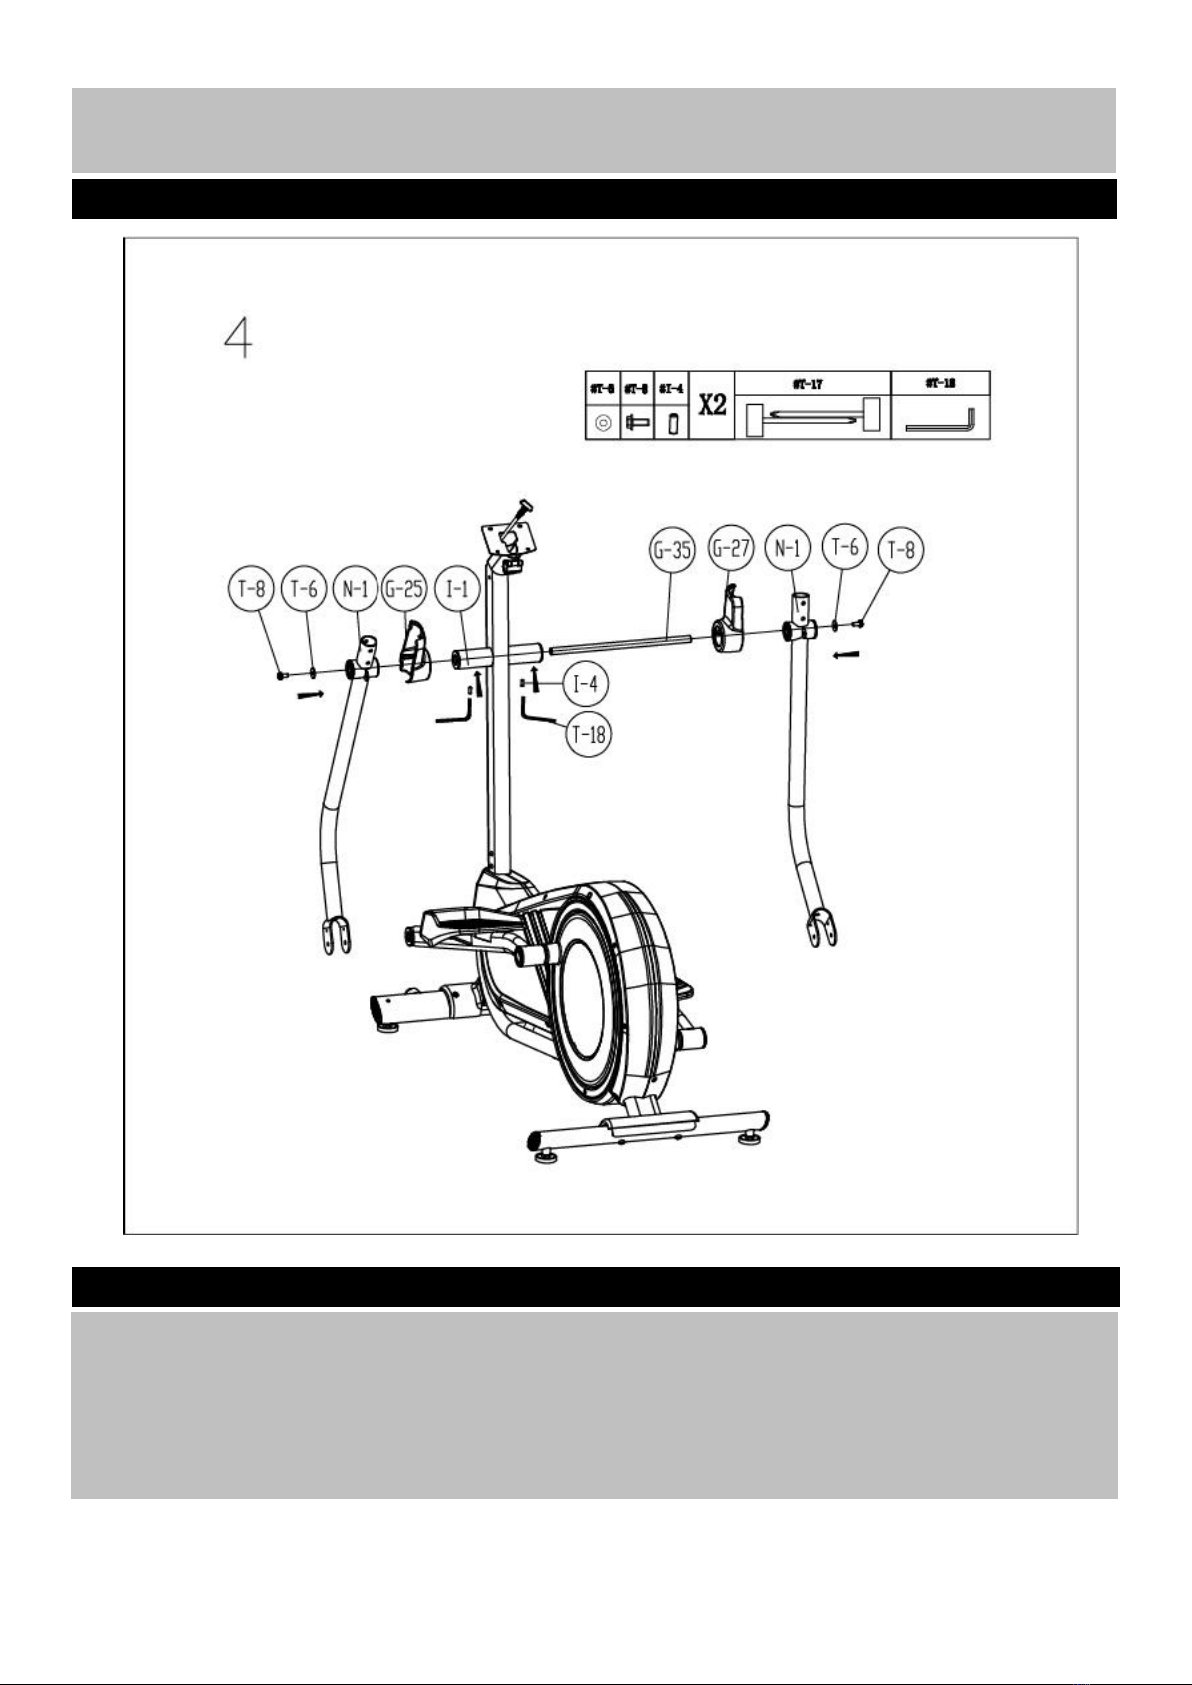
4. Before use, please make sure that all screws and nuts are locked tightly, and tighten the screws
immediately after routine inspection and assembly of all parts.
5. Children should not be near the device. Don't leave your child unattended in a room with a
stationary bike.
6. Please wear appropriate sportswear when using this machine. Do not wear loose clothing to avoid
getting involved in the machine.
7. If you feel pain or dizziness while exercising, stop exercising immediately and do some soothing
exercises.
8. Pulse sensors are not medical devices. Many factors, including exercise, may affect the heart rate
display.The pulse sensor is only used as an auxiliary device to measure the approximate heart rate.
1. Two or more people are not allowed to use this device at the same time.
2. If you feel unwell, please use it under the guidance of a doctor.
3. The heart rate data is for reference only, not for medical use.
4. Children, disabled person and pets should keep away from this equipment to avoid accidents.
Safety Information
WARNING:
This exercise bike is designed and constructed to meet safety
standards. However, some precautions should be taken when using sports
equipment. Read the instructions and the following safety precautions
thoroughly before installing and using the rowing machine.

4
Components - Parts
Please check you have all parts listing below

5
Please check you have all parts listing below
Components - Parts

6
Components - Parts

7
Assembly Instructions
1. Attach (S) to (G) and secure by using 2pcs (T-2), (T-3) and (R-4).
2. Attach (G-34) to (S) and secure by using 2pcs (T-1).
3. Repeat above step to install (R) and (G-33).
Step 1

8
1. Attached (G-30) to ( P-1) and secure with fore (T-14) and ( T-15 ) .
2. Repeat above step to install one (G-30) to (Q-1) .
3. Attach (P-1) to the right side axle of (G). Secure with (T-6), (T- 3)
4. Repeat above step to install (Q-1) to right side of (G).
Step 2
Assembly Instructions

9
Attach ( I-2) to (G-37), Attach (I-10)to (G) and secure with 4pcs (G-39), (G-42) and (G-40).
Step 3
Assembly Instructions

10
1. Attach (G-25) and (G-35) to (I-1), Secure each of them with 1pcs (I -4).
2. Attach (N-1) to (I-1) and Secure with (T-8) and (T-6).
3. Attach (N-1) to (P-1) and secure each of them with 2pcs (T-5) and ( T-4).
4. Attach (G-28) and (G-29) to the Joint place of the (N-1) and (P-1) and secure with 2pcs (T-1).
Step 4
Assembly Instructions

11
1. Insert (L) to (N-1) and secure with 4pcs (T-5), (T-3) and (T-7).
2. Repeat above step to install (M) to (N-1).
Step 5
Assembly Instructions

12
1. Attach (G-24) to (G-25) and secure with 2pcs (T-9).
2. Repeat above step to install (G-26) to (G-27).
Step 6
Assembly Instructions

13
1. Attach (K) to ( I-1) and secure with (T-11), ( T-13) and (T-12).
Step 7
Assembly Instructions

14
Assembly Instructions
1. Attach (K-5) and (I-2) to Wires from Console (A), then attach Console (A) to (I-1) and Secure with 4pcs
(A-1)
2. Attach (G-23) and ( G22) to the (I-1), and secure each of them with 2pcs (T-10) and 1pcs (T-5).
Step 8

15
A) Function Description:
1. MANUAL:Basic training, you can set the TIME、CAL、DIST、PULSE target manually.
2. PROGRAM:P1~P12 ,12 sets of different programs
3. CALORIES PROGRAM:Low, Medium, High, three different levels of target Calories program
4. INTERVAL:3 sets of different Interval programs
5. WATT PROGRAM:3 sets of different Watt programs
6. WATT CONSTANT:Manual setting for Watt training
7. H.R.C.:55%、75%、90%、3 different TARGET setting of heart rate mode, use heart rate to
control LOAD auto-adjustment.
8. USER PROGRAM:User can set multiple LOAD setting
B) Button Description:
:Confirm function, settings
:During pause, select workout mode by short press the key, restart the system by extended press
the key
:Pause
:Start
:Turn up the value / resistance level
:Turn down the value / resistance level
MANUAL QUICK KEY:Under the workout mode,press the button and enter MANUAL mode
PROGRAM QUICK KEY:Under the workout mode,press the button and enter PROGRAM mode
CALORIES PROGRAM QUICK KEY :Under the workout mode ,press the button and enter
CALORIES PROGRAM mode
INTERVAL QUICK KEY:Under the workout mode,press the button and enter INTERVAL mode。
WATT PROGRAM QUICK KEY :Under the workout mode ,press the button and enter WATT
PROGRAM mode。
Computer Instruction

16
WATT CONSTANT QUICK KEY:Under the workout mode,press the button and enter WATT
H.R.C. QUICK KEY :Under the workout mode ,press the button and enter H.R.C. mode 。
USER PROGRAM QUICK KEY :Under the workout mode ,press the button and enter USER
PROGRAM mode。
C. Operational instruction:
1. As the system is power on, the full screen will be lightened up for 2 seconds after a long beep
(Drawing1),the Wheel diameter/Metric system will appear for 1second (Drawing2), then enter the
Age setting (Drawing 3). Use [Plus/Minus] to set the age, press [Enter] to enter the Workout Mode
(Drawing 4)
2. After entering Workout Mode, use [Plus/Minus] to select the workout program, including MANUAL、
PROGRAM、CALORIES、INTERVAL、WATT PROGRAM、WATT、H.R.C.、USER PROGRAM. Press
[enter] or [Function quick key] to confirm the program.
Drawing 1 Drawing 2 Drawing 3
3. Manual Mode: use [Plus/Minus] to select the Manual Mode, press [enter] to enter the Manual Mode
(Drawing 4). You can also press [Manual] button to enter the mode directly, and set TIME、DIST、
CAL、PULSE value accordingly. (Drawing 5~8). Use [Plus/Minus] to adjust the value, and press [Enter]
to enter the next value. Press [Start] to start the training after you finish the setting. During the
workout, press [Plus/Minus] to adjust Level. The workout program will be stopped after pressing [Stop]
or when you reach the target. Press [Reset] to exit the mode.
Computer Instruction

17
Drawing 4 Drawing 5 Drawing 6
Drawing 7 Drawing 8
4. Program Mode: use [Plus/Minus] to choose the Program(Drawing 9) , press [enter] to enter the
Program Mode. You can also press [Program] button to enter the mode directly. Firstly choose
Program pattern(Drawing 10), there are 12 sets of different Program patterns. Press [Enter] to
confirm the pattern, and set Time (Drawing 11). Use [Plus/Minus] to adjust the value. Press [Start] to
start the training. During the workout, press [Plus/Minus] to adjust Level. The workout program will
stop after pressing [Stop] or when you reach the target. Press [Reset] to exit the mode.
Drawing 9 Drawing 10 Drawing 11
5. CALORIES Mode: use [Plus/Minus] to choose the CALORIES mode(Drawing 12) , press [enter] to
enter the CALORIES Mode. You can also press [CALORIES] button to enter the mode directly. Firstly
choose CALORIES Program pattern(Drawing 13), there are 3 sets of different CALORIES Program
targets (300, 600, 900). Press [Start] to start the training. When the CALORIES target was reached
the program will proceed to next level. The workout program will stop after pressing [Stop] or when
you reach the target. Press [Reset] to exit the mode.
Computer Instruction

18
Drawing 12 Drawing 13
6. Interval Mode: use [Plus/Minus] to choose the Interval (Drawing 14) , press [enter] to enter the
Interval Mode. You can also press [Interval] button to enter the mode directly. Firstly choose Interval
(Drawing 15), there are 3 sets of different Interval. In Interval 1 & 2, press [Start] to start the workout,
In Interval 3, press [Enter] to set Interval time and Cycles. Press [Start] to start the training after you
finish the setting. There will be 3 minutes of warm up after starting the workout, the Interval will start
after the warm up. Use [Plus/Minus] to adjust the level. The workout program will stop after pressing
[Stop] or when the cycle is complete. Press [Reset] to exit the mode.
Drawing 14 Drawing 15
7. Watt Mode: use [Plus/Minus] to choose the Watt Program (Drawing 16) , press [enter] to enter the
Watt Program. You can also press [Watt] button to enter the mode directly. Firstly choose Watt
Program pattern(Drawing 17), there are 3 sets of different Watt Program patterns. Press [Enter] to
enter time setting. Use [Plus/Minus] to adjust Watt value. The level will change accordingly. The
workout program will stop after pressing [Stop] or when time runs out. Press [Reset] to exit the mode.
Drawing 16 Drawing 17
Computer Instruction

19
8. Watt Constant Mode: use [Plus/Minus] to choose the Watt Constant (Drawing 18) , press [enter] to
enter the Watt Constant Program. You can also press [Watt Constant] button to enter the mode
directly. Use [Plus/Minus] to adjust value. Press [Enter] to enter time setting. During the training,
press [Plus/Minus] to adjust the Watt LOAD. The workout program will stop after pressing [Stop] or
when time runs out. Press [Reset] to exit the mode.
Drawing 18 Drawing 19 Drawing 20
9. H.R.C Mode: use [Plus/Minus] to choose the H.R.C mode(Drawing 21) , press [enter] to enter the
H.R.C Mode. You can also press [H.R.C] button to enter the mode directly. Use [Plus/Minus] to
choose among 55%(Drawing 22)、75%、90%、TAG. TAG means you can set the H.R.C value
manually. Press [enter] to enter the H.R.C Mode and set the time. Press [Start] to start the training.
The Load will change according to the Heart Rate. The workout program will stop after pressing [Stop]
or when time runs out. Press [Reset] to exit the mode.
Drawing 21 Drawing 22
10. User Mode: use [Plus/Minus] to choose the User Program (Drawing 23) , press [enter] to enter the
User Program. You can also press [User] button to enter the mode directly. You can set the Level
Pattern manually (16 options), the word Level will appear during the setting. (Drawing 24) Press
[Enter] to enter the next line, there are 16 cycles. After finishing Level setting, extended press [Enter]
to enter Time setting (Drawing 25). Press [Start] to start the training. During the workout use
[Plus/Minus] to adjust Level. The workout program will stop after pressing [Stop] or when time runs
out. Press [Reset] to exit the mode.
Computer Instruction

20
Drawing 23 Drawing 24 Drawing 25
D、Remarks
1. Program Patterns:
2. Calories Patterns:
Computer Instruction
Table of contents
Other Cosco Fitness Exercise Bike manuals
Popular Exercise Bike manuals by other brands

Pro-Form
Pro-Form PFIVEX86012.0 user manual

Star Trac
Star Trac V-Bike owner's manual

Pro-Form
Pro-Form 325 CSX+ user manual

Pro-Form
Pro-Form 300 Zlx Bike Manuel de l'utilisateur

Skandika
Skandika WIRY Series Assembly instructions and user guide

Fitness Benelux
Fitness Benelux Virtufit iBiking Folding Bike user manual