Costway EP24460DE User manual

THIS INSTRUCTION BOOKLET CONTAINS IMPORTANT SAFETY INFORMATION. PLEASE READ AND KEEP FOR FUTURE REFERENCE.
EN DE FR ES IT PL
USER'S MANUAL/HANDBUCH
/MANUEL DE L'UTILISATEUR/MANUAL DEL USUARIO
0$18$/(87(17(,16758.&-$2%6à8*,
EP24460DE
Automatic Washing Machine / Automatische Waschmaschine
/ Machine à Laver Automatique / Lavadora Automática
/ Lavatrice Automatica / Pralka automatyczna

Parts name
Top lid
Top frame
Lint filter
Control panel
Inner tub
Pulsator
Body
Base
Adjustable foot
Feed valve Handle
Power cord
Back cover
Drainpipe
Fixing foot(3pcs)
Accessories
The end connecting to the
appliance
Bottom cover (1pc) Water inlet hose (1pc)
water inlet hose connector (1pc) Tapping screw
ST4X14mm (8pcs)
The end connecting to
water inlet hose connector
Symbol definition
Warning symbols Pay special attention to the warning symbols. There may be
serous risks to personal body safety or damages to the washing
machine If warnings are not followed.
Forbidden symbols Please stop doing the contents with this symbol, otherwise
it will damage the appliance or injure your personal body.
EN
02

Cautions
Please insert the plug into the power socket with rated
voltage 220-240V AC. Always unplug the appliance and tum off the water
when the power is cut, moving or cleaning the
washing machine, or it is not in use. Do not insert
or pull off the plug with wet hands.
Do not make the electric cable bent, stretched, twisted, strapped or changed,
pressed or nipped. If the electric cable or plug is damaged or the socket
becomes loose, it must be repaired or changed by the professionals to avoid
danger. The pin of the plug must remain clean.
Please clean it carefully with a dry cloth if it is dirty.
Don't install the washing machine in bathroom or
damp places. Do not wash the machine with water,
do not put wet clothes on the control panel film.
If the machine is situated on a carpeted floor, please
adjust the feet in order to allow air to circulate freely.
Do not share the same socket with other electric
appliances.
Do not use the damaged plug or loose socket.
Do not wash raincoat, bike cover, feather dress and
such waterproof laundries, which will cause
abnormal vibration of the washing machine during
the spin.
Do not use water hotter than 50°C
Soft item
Ventilation holes
at the bottom
EN
03

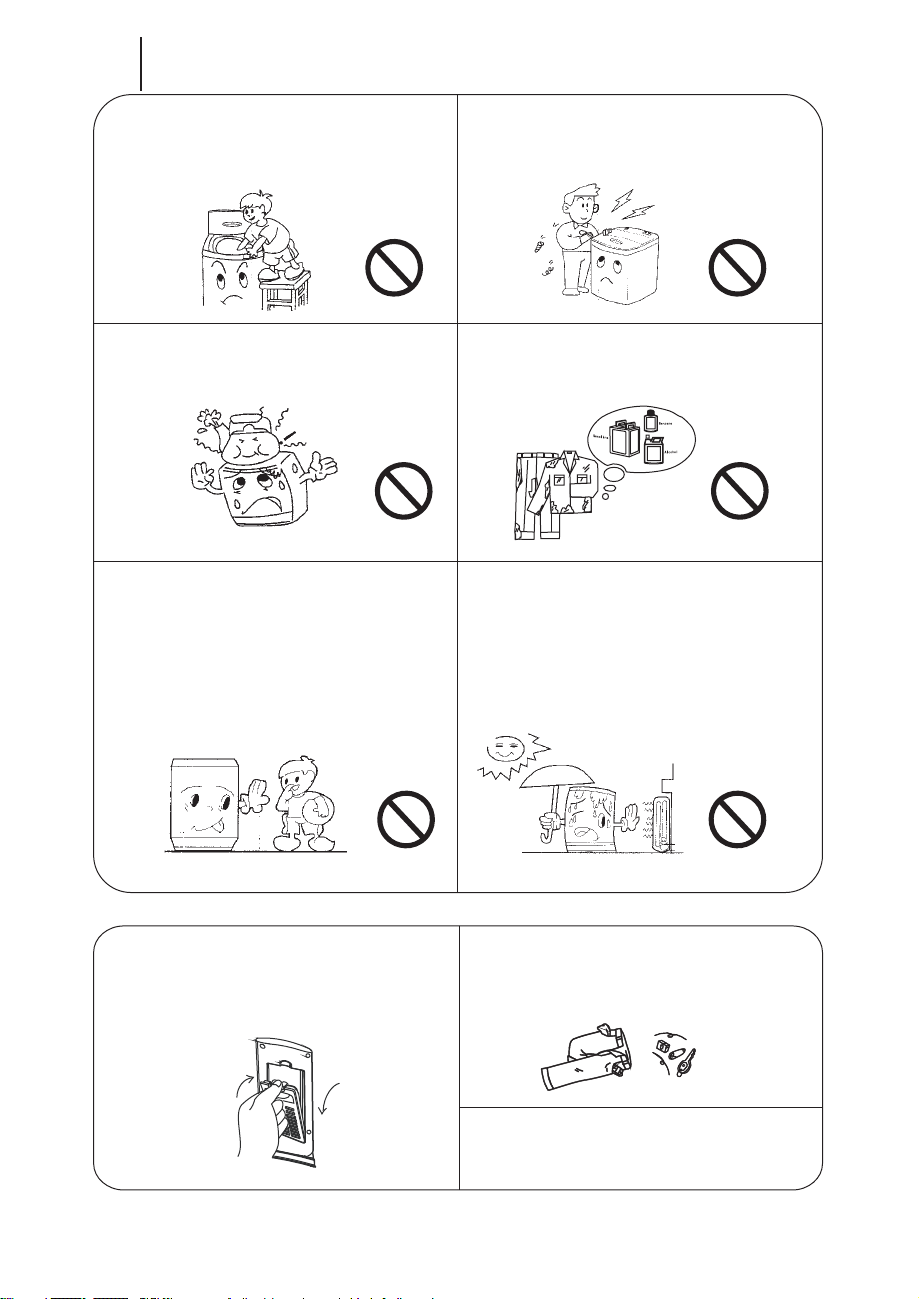
Do not put hands into the working machine.
It is dangerous even if the speed is very slow.
Take special care of the children, and forbid
them to climb on the washing machine.
It is dangerous to alter the specifications or
attempt to modify this product in any way.
This appliance is not intended for use by
persons(including children) with reduced
physical,sensory or mental capabilities,or lack of
experience and knowledge,unless they have been
given supervision or instruction concerning use of
the appliance by a person responsible for their
safety. Children should be supervised to ensure
that they do not play with the appliance.
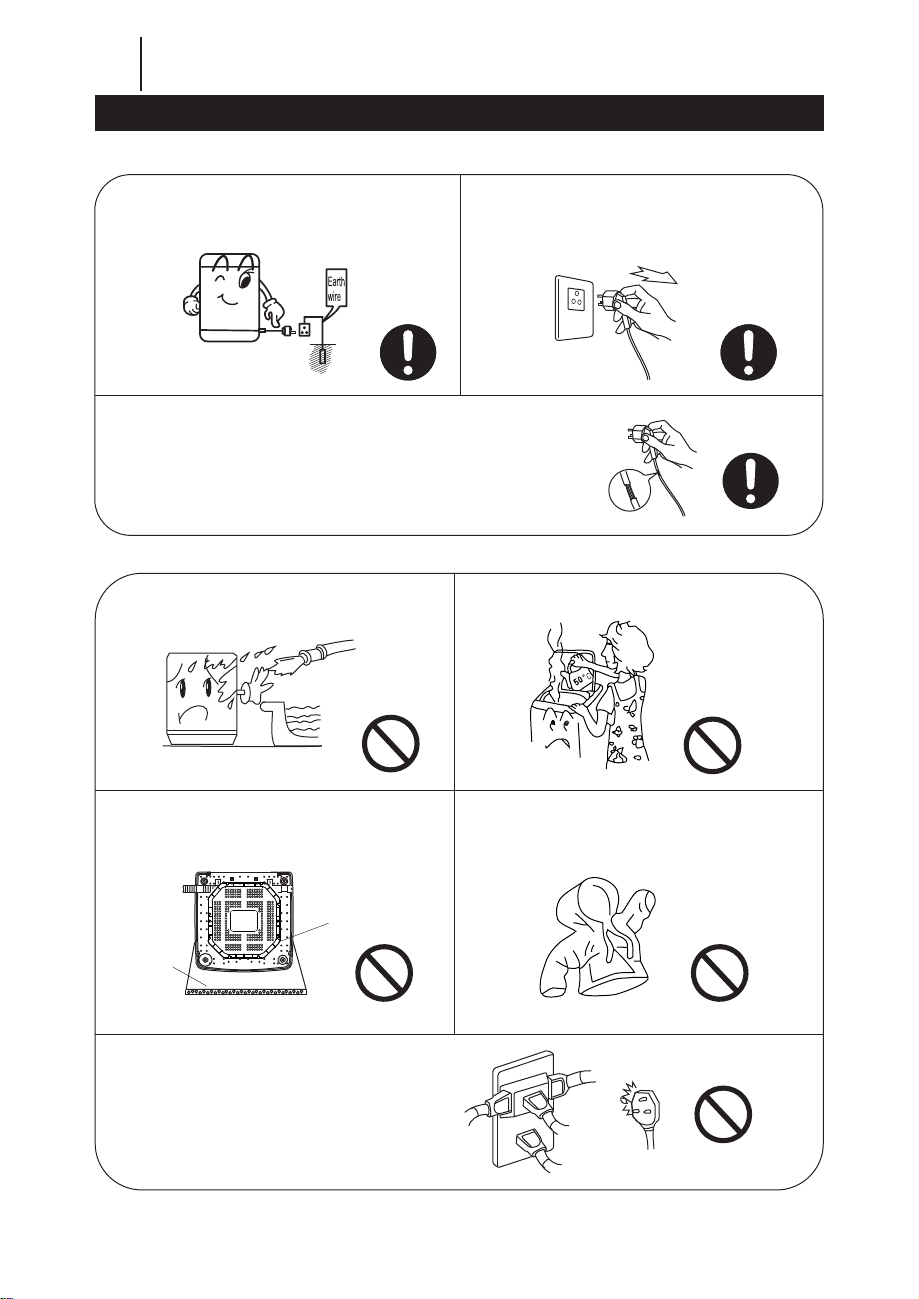
Keep the appliance away from direct
sunlight and heat sources like the heater.
Any objects such as coins, safety pins, nails,
screws, stones or any other hard, sharp material
can cause extensive damage and must not be
placed into to the machine.
ł%HIRUHZDVKLQJSOHDVHHQVXUHWKHWDSLVRSHQ
and the inlet hose is installed properly.
ł,WLVVXJJHVWHGWRXVHORZIRDPZDVKLQJSRZGHU
Do not overload the appliance or put any hot
goods (such as the kettle with hot water) on the
washing machine.
To prevent the lint from blocking cascade outlet
during washing, please keep the lint filter in good
condition, install it to proper position and clean it
in time.
Garments which have been in contact with
volatile petroleum products should not be
machine washed.
EN
Close Open
04

Installation and adjustment
Please install and adjust the machine according to the requirements of the
manual.
It is very important to your safety and correct operation.
ł8QSDFNWKHFDUWRQDQGWDNHRXWWKHERWWRPSDQHO
ł2SHQWKHWRSOLGRIZDVKLQJPDFKLQHDQGWDNHRXWDOORIWKHDFFHVVRULHV
ł5HPRYHDOOZUDSSHUVLQFOXGLQJWKHSRO\VW\UHQHEDVH
You are advised to keep all the packaging for reuse in case the machine is to be
transported again.
ł$VWKHULJKWSKRWRSXWGRZQWKHPDFKLQHIURP
side, put down the machine on some soft thing,
please let the remarkable face outside, the arrow
direction is
machine front side.
ł$OLJQWKHVFUHZKROHEHWZHHQERWWRPDQG
bottom cover, use the appendix screw to fasten
the bottom cover.
Unpacking
Installing the bottom cover
The distance between the washing machine and
the wall should be more than 50mm, and the
maximum allowed angle of the shank base of the
machine is 1°.The slanting or rough ground may
cause operating stopped or unstable, please
adjust it with the following methods:
łMake it horizontal
Use a tied thread with plumb to check if it is
horizontal.
łAdjust the adjustable foot
Lift up the adjustable foot gently, loose the
adjustable nut and twist the adjustable foot.
Fasten the nut after adjustment.
Positioning
EN
05

How to use drainpipe
ł7KHGUDLQSLSHPXVWEHKXQJGXULQJXVHDQGWKHKHLJKWVKRXOGQRWH[FHHG
1.2m to avoid water leakage or stop. If the drainage time is too long, the
machine will stop running.
ł<RXFDQDGMXVWWKHVLWXDWLRQRIWKHHOERZEHQGSLSHWRFKDQJHWKHKHLJKWRI
the drainpipe.
ł'RQRWH[WUXGHWKHGUDLQSLSHWRHQVXHGUDLQLQJVPRRWKO\
Elbow
Drainpipe Less than 1.2m
EN
06

ł'RQRWWDNHRIIWKHZDWHUDEVRUSWLRQ
cushion. Please check if the cushion is
dropped or damaged before each usage. If
it is, contact the seller immediately.
ł3XWWKHLQOHWKRVHQXWRQWKHLQOHWYDOYH
connector.
ł)DVWHQWKHLQOHWKRVHQXWDQGVZLQJLW
gently to make sure if it is suitable.
Water inlet installation
ł6ZLQJWKHLQOHWKRVHJHQWO\WRFRQILUPLILW
is fastened.
ł$IWHULQVWDOODWLRQRSHQWKHWDSDQGFKHFN
if it leaks.
ł'RQRWEHQGWKHLQOHWKRVHZLWK
overstraining.
ł%HIRUHHDFKXVDJHFKHFNWKHFRQQHFWLRQ
between inlet hose connector and the tap.
Make sure they are firmly fitted to prevent
dropping from improper installation
position.
ł7KHIURQWHQGVKRXOGEHORQJHUWKDQFP
The tap exit end face should be flat and
smooth, if not , file it to avoid leakage
Tap selection
Check the connection between
inlet hose connector and the
tap
Connect the inlet hose with the
washing machine
Suitable tap Not suitable tap
EN
07

Preparation before operation
A. Make sure the laundries are washable.
B. It is essential to wash new colored items separately when washing for the first
time. White items should not be washed with colored items.
C. Please immerge the non-absorbable laundries by hand.
D. Some stains such as fruit, wine, grass, rust etc. are difficult to remove and
should be treated before washing with specific products, which can be found in
most household shops. In some cases it may help to soak the stain before washing
with a special pre soak product or biological detergent.
E. Overturn the nap fabric and long floss laundries before putting them into the
machine.
F. Do not put the laundries polluted by chemicals into the machine directly.
G. Very small item(handkerchiefs, ribbons, socks, etc) should be washed in a
washing bag or a pillow case.
ł&RQQHFWWKHLQOHWKRVHDQGRSHQWKHWDS
ł7KLVDSSOLDQFHPXVWEHHDUWKHG&RQILUPWKH
socket is earthed reliably and insert the power
plug. The earth terminal should not link to gas
pipeline, tap pipeline etc.
ł3XWXSWKHGUDLQSLSH
Warning: the temperature of the water should
be less than 50˽!
Preparation before washing
Before washing the laundries, please pay attention to the
followings:
Make sure if
there is
special
requirements
for the
laundries
Knot the long
band, fasten the
buttons and close
the zippers.
Sort the laundry
according to the type
of fabric,
color-fastness and
how dirty it is. Put thin
laundries, woolens
and such prone to
wean and tear
laundries into washing
bag.
Before washing,
empty all pockets of
small objects which
may have been left
inside (coins, keys,
screws etc.) As these
could damage the
drain pump.
Do not overload the
machine. Load the
laundry loosely
alternating large
items with small
ones.
EN
08

Control panel instruction
ł3UHVVWKLVEXWWRQWR
select one cycle from
'wash-rinse-spin',
'soak-wash-rinse -spin',
'wash', 'wash-risne',
'rinse-spin', 'spin'
ł$WWKHEHJLQQLQJRI
start, the process setting
is 'wash-rinse-spin'.
ł$IWHUVHOHFWLQJSURFHVV
and water level, press this
button to start.
ł3UHVVWKLVEXWWRQWR
pause during working,
press again to rework.
ł$WWKHEHJLQQLQJRIVWDUWSUHVV:$7(5/(9(/WR
select water level, you can select appropriate water
level according to your laundries quantity.'L' is low
water level, 'M' is middle water level, 'H' is high
water level.
ł'XULQJZDVKLQFOXGLQJULQVHLI\RXQHHGWRDGG
water, press WATER LEVEL button to add water and
release the button to stop adding. Or PAUSE the
washing machine and press WATER LEVEL to select
higher water level, then press START/PAUSE
button, the washing machine will add the water to
setting level automatically and continue working. If
your resetting water level is lower than present
water level, the lower water Level will valid in next
water inlet.
ł$XWRPDWLFDOO\DGGZDWHUGXULQJ62$.:$6+
and RINSE process, if the washing machine check
the water level is lower than setting water level,
the washing machine will pause and add water to
setting water level automatically.
ł:KHQZDVKLQJWKH
digital timer shows the
rest time of washing,
unit is MINUTES.
ł:KHQWURXEOH
encountered, the digital
time shows trouble
code.
Mode and meaning of the indicator light
on: indicate the selected mode
flashing: indicate the program is running
ł7RFRQWUROWKHZDVKLQJ
machine in working state or
waiting state.
EN
09

Load laundries
Reference weight of the laundries
ł7KHFDSDFLW\RIZDVKLQJDQGVSLQQLQJRIWKH
machine refers to the largest weight of the
standard laundries under dry conditions. Washing
quantity shall be lower than the rated capacity.
ł'LIIHUHQWWKLFNQHVVHVVL]HVDQGW\SHVRIWKH
laundries will influence the actual washing
capacity. It is suitable that the laundries can be
turned around normally during washing.
ł'RQWVHOHFWKLJKZDWHUOHYHOZKHQODXQGULHVDUH
less than 1KG to avoid water splashing.
Working suit (up, down)
(cotton, about 1.13KG) Jeans (about 0.82KG)
Blanket (cotton,
about 0.91KG)
Blending coat
(about 0.82KG)
Pajamas (cotton,
about 0.08KG)
shirt (cotton
about 0.3KG)
Jacket (cotton
about 0.82KG)
undershirt (cotton
about 0.18KG) underpants (cotton
about 0.05KG)
socking (blending, about
0.05KG)
Single bed sheet
(cotton, about 0.59KG)
EN
10

Use of detergent
ł3XWWKHGHWHUJHQWSRZGHULQWRWKHWXE
as the right figure.
ł7KHQFORVHWKHZDVKOLG
ł:HVXJJHVWXVLQJORZVXGVLQJ
detergent powder
ł'LVVROYHLQWKHPDFKLQHGLUHFWO\
1. Low water level.
2. Add the washing powder, and run for 30 seconds to dissolve it
completely.
3. Put laundries in, select suitable water level.
ł7KHLQVWDQWGLVVROYLQJRIWKHZDVKLQJSRZGHU
1. Prepare warm water of 30"C in a container.
2. Pour the powder while stirring to fully dissolve it.
ł7KHZDVKLQJSRZGHULVPRUHSURQHWRSROOXWHWKHODXQGULHVWKDQWKH
detergent, therefore, please use it with proper quantity.
How to use the washing powder
ł)LOOZDWHUWRWKHVHOHFWHGOHYHOGLOXWHWKHEOHDFKLQWKHFRQWDLQHUDQG
pour it slowly into the washing tub.
ł'RQRWXVHEOHDFKIRUFRORUHGRUILJXUHGODXQGULHVDVWKH\DUHSURQHWR
lose colors.
ł'RQRWSXWEOHDFKWRODXQGULHVGLUHFWO\
ł5HIHUWRWKHPDQXDOIRUWKHXVDJHDQGTXDQWLW\RIWKHEOHDFK
ł3OHDVHGLVVROYHSRZGHUEOHDFKEHIRUHXVH
ł)RUWKHTXDQWLW\RIWKHFRQFHQWUDWHGZDVKLQJSRZGHUSOHDVHUHIHUWRLWV
manual.
ł5HPDUNVDYRLGVSODVKLQJRIZDWHUDQGZDVWHRIZDVKLQJSRZGHUZDWHU
level should not be too high if laundries are too small.
How to use bleach
EN
11

Operation steps
1. Press power switch, put through power, the machine is in state of beginning:
2. Press “process” button to begin process selection.
Remarks: press Process button continually, the above mode will be
cycled in turn.
3. Select appropriate water level according to your laundries quantity.
4. Close the top lid, press Start/Pause, the washing machine is working.
5. When the washing is finished, buzzer alarm, and power supply are cut off
automatically.
0
1
2
3
4
5
Wash, rinse, spin
Wash
Wash, rinse
Rinse, spin
Spin
Times of
pressing
the
“process”
button
Selected
procedure
program
Applicable
procedure
when using
detergent repeatedly
No need to spin
for laundries
creased easily
Wash by hand
and need to
rinse and spin
Wash by hand
and only need
to spin
Contenls (the
lighled
indicator
indicates the
programs
about to run)
Wash rinse and
spin lights are
on
Soak, wash, rinse
and spin lights
are on
Wash and rinse
lights are on
Rinse and spin
lights are on
Soak, wash,
rinse, spin
Wash light is on
Spin light is on
Standard program
For dirty laundries
EN
12

Maintenance
Maintenance methods
After the end of the programme
ł7KHPDFKLQHVWRSVDXWRPDWLFDOO\DQGPXVLFEX]]HU
will remind you to take out the laundries or start
again.
ł2QFH\RXKDYHILQLVKHGXVLQJWKHPDFKLQH\RXDUH
advised to unplug it and turn off the water taps to
avoid unexpected leak or fire.
Clean the lint filter
ł,WLVQHFHVVDU\WRXVHOLQWILOWHUGXULQJZDVKLQJ
ł$IWHUZDVKLQJSOHDVHFOHDQWKHOLQWILOWHULQWLPH
Clean the lint filter according to the
following steps:
1. Pull out the lint filter. (see Illustration 1)
2. Open the lint filter and wash it. (see Illustration 2)
3. Close the lint filter and install it to proper position.
1. Once you have used the machine, you are advised to turn off the water taps. (if
necessary, pull out the inlet hose)
2. Do not keep water in tub for a long time. When washing is finished, drain it right away.
3. Once you have finished using the machine, you are advised to unplug it.
4. Put the electric cable and the drain hose in order.
5. Wipe the water on the surface and in tub with soft cloth and keep the top lid opening
for a while. It helps to prevent mold and stagnant smells forming inside the appliance.
If the water in the inner tub has possibility to freeze, please do like below:
1. In winter, if the remaining water freezes, it will cause problems in the washing
machine, please take off the water inlet hose and drain out the water in the hose and
inner tub.
2. If the water freezes, please don't operate the washing machine. Put 40°C hot water in
the tub, the hot water should submerge the pulsator, after a few minutes, rotate the
pulsator by hand gently, then you can operate the washing machine.
External cleaning
Clean the exterior cabinet of the appliance with
soft cloth. Do not use cleanser, volatile chemical
materials to clean the machine, which will
damage plastic parts and the surface.
Clean inlet gate
It is possible that the inlet filter net can be blocked
by the dust, please clean it according to the following
steps:
1. Close the tap and turn on the power switch.
2. Start the washing machine for 5 seconds (make
the water in the inlet hose flows to the tub), and cut
off the power supply.
3. Pull off the inlet hose, remove and clean the inlet
valve and the inlet net, and install again.
EN
13
Illustration 1 Illustration 2

Troubleshooting
Before contacting the technicians, please make the
following checks:
Notes: If there is still a fault after the above checks, please pull out the plug and contact
the customer service right away, It is dangerous to repair this product by yourself.
Plug is not inserted tighty
No electricity in the socket
Power switch is not turned on
Power supply is cut off
Insert the plug tightly
Check the socket or
change to another socket
Press power switch
Check power supply
Install the inlet hose
again Tighten the
connector of the machine
The height of the
drainpipe should be less
than 1.2m Straighten or
clean the drainpipe
The machine is adjusting
automatically
Close the top lid
Close the top lid
Normal
Normal
Restart when water
supply is resumed
Open the tap
Clean the filter and inlet
gate
Inlet hose connector(connecting
with the tap)is not fxed tightly.
Inlet hose and washing machine
connector is loose
Water outlet of drainpipe is higher
than 1.2m
Drainpipe is bended or get blocked
Do not close the top lid when drain
is finished
Open up the top lid when starting
drain
Balance the laundries to reach to
the best spin eflect
Water left during factory testing
No water supply
Tap is not open
Inlet hose gets blocked
Too many or too few laundries, or
the machine is not placed stably
Possible reason SettlementPhenomena
Control panel
has no any
display
Inlet hose leaks
It does not
drain water
It does not
inlet water
Spin stops and
begins to inlet
water during spin
program
Press the program
button to select
SPIN, but It does
not spin
The spin is
intermittent when
spin starts
First time to use,
some water flows
from the drain
hose
EN
14

Other functions
*LYHDQDODUP
2. Imbalance adjustment
During spinning, if the laundries are not placed equally in the tub, it would
cause violent vibration. This machine has imbalance adjustment function, and
the vibration testing system will supervise the running. Once vibration is
beyond certain level, the adjustment system will start automatically to adjust
the imbalance.
3. Power supply is cut off automatically
(1)If do not press START/PAUSE in 10 minutes after pressing POWER, power
supply will cut off automatically.
(2) Washing finished, power supply will cut off automatically .
E1
E2
E3
E4
E6
F1
After draining 5 minutes, it
still does not reach to water
level
The top lid is open when
spinning
Spin does not balance
Inlet water for 50 minutes,
but it still does not reach to
the setting water level
The water level is more
than overflowing water
level.
Water level sensor is wrong
Open top Jid, according to previous
troubleshooting and settlement to
settle it ,then close the top lid and
clear up the alarm.
Close the top lid and clear up the
alarm
Open the top lid ,make the laundries
place equally, then close it and clear
up the alarm
Open top lid, according to previous
troubleshooting and settlement to
settle it. Then close the tip lid and
clear up the alarm
Drain the water until the water level
reaches the highest water level.
Cut the power supply and call the
technicians
Explanation SettlementDisplay
EN
15

Specifications
Rated voltage and frequency
Rated capacity of wash and spin
Water level/water volume (about)
Inlet pressure
Rated input power
Dimensions
220-240V~ 50Hz
3,5kg (dry laundries weight)
L/16L M/23L H/30L
0,03MPa~0,85MPa
Wash: 240W spin: 210W
W429mm D433mm H747mm
Model EP24460DE
EN
16

Teilname
Zubehör
DE
Deckel
Oberer Rahmen
Flusensieb
Bedienfeld
Innenwanne
Pulsator
Gehäuse
Gerätesockel
Verstellbarer
FuB
Zulaufventil Handgriff
Netzkabel
Rückseitige
Abdeckung
Fixierfuß (× 3)
Abflussrohr
Das Ende, das an das Gerät
angeschlossen wird
Anschlussende für den
Wasserzulaufschlauch
Untere
Abdeckung Wasserzulaufschlauch (x1)
Wasserzulaufschlauchanschluss (x1) Blechschraube
ST4X14 mm (x8 )
Symboldefinition
Warnsymbole Achten Sie besonders auf die Warnsymbole. Bei Nichtbeachtung
der Warnsymbole kann es zu ernsthaften Risiken für die
Sicherheit von Personen oder zu Schäden an der Waschmaschine
kommen.
Bitte unterlassen Sie die mit diesem Symbol gekennzeichneten
Arbeiten, da sonst das Gerät beschädigt wird oder Sie sich
verletzen können.
Verbotene Symbole
17

Bitte stecken Sie den Stecker in eine Steckdose mit
Nennspannung 220-240V AC. Ziehen Sie immer den Netzstecker und stellen Sie
das Wasser ab, wenn die Stromversorgung
unterbrochen, die Waschmaschine bewegt oder
gereinigt wird oder wenn sie nicht benutzt wird.
Stecken oder ziehen Sie den Stecker nicht mit
nassen Handen ab.
Das Kabel darf nicht gebogen, gedehnt, verdreht, umreift oder verandert,
gepresst oder gequetscht werden. Wenn das elektrische Kabel oder der
Stecker beschadigt ist oder sich die Steckdose lockert, mussen sie repariert
oder ausgetauscht werden, um Gefahren zu vermeiden.
Der Stift des Steckers muss sauber bleiben. Bitte reinigen Sie ihn sorgfaltig
mit einem trockenen Tuch, wenn es schmutzig ist.
Stellen Sie die Waschmaschine nicht in
Badezimmern oder an feuchten Orten auf. Waschen
Sie die Maschine nicht mit Wasser, legen Sie keine
nassen Kleidungsstücke auf die Bedienfeldfolie.
Wenn sich die Maschine auf einem Teppichboden
befindet,stellen Sie bitte die FuBe so ein, dass die
Luft frei zirkulieren kann.
Teilen Sie die Steckdose nicht mit anderen
Elektrogeräten.
Verwenden Sie keinen beschädigten Stecker oder
eine lockere Steckdose.
Waschen Sie keine Regenmäntel, Fahrradhüllen,
Federkleider und ähnliche wasserdichte
Wäschestücke, da diese beim Schleudern abnormale
Vibrationen in der Waschmaschine verursachen
können.
DE Vorsichtsmaßnahmen
Belüftungslöcher
an der Unterseite
Weicher
Gegenstand
Verwenden Sie kein Wasser, das heiBer als 50°C ist
18

Stecken Sie nicht die Hände in die
Arbeitsmaschine.
Es ist gefährlich, auch wenn die Geschwindigkeit
sehr gering ist.
Achten Sie besonders auf Kinder, und verbieten Sie
ihnen, auf die Waschmaschine zu klettern.
Es ist gefährlich, die technischen Daten zu ändern
oder zu versuchen, das Gerät in irgendeiner Weise
zu modifizieren.
Dieses Gerät ist nicht für die Benutzung durch
Personen (einschließlich Kinder) mit
eingeschränkten körperlichen, sensorischen oder
geistigen Fähigkeiten oder mangelnder Erfahrung
und Kenntnis bestimmt, es sei denn, sie werden
von einer für ihre Sicherheit verantwortlichen
Person beaufsichtigt oder in die Benutzung des
Gerätes eingewiesen. Kinder sollten beaufsichtigt
werden, um sicherzustellen, dass sie nicht mit
dem Gerät spielen.
Halten Sie das Gerät von direkter
Sonneneinstrahlung und Wärmequellen wie der
Heizung fern.
Gegenstände wie Münzen, Sicherheitsnadeln, Nägel,
Schrauben, Steine oder andere harte, scharfe Materialien
können schwere Schäden verursachen und dürfen nicht
in die Maschine gesteckt werden.
ł9HUJHZLVVHUQ6LHVLFKYRUGHP:DVFKHQGDVVGHU
Wasserhahn geöffnet und der Zulaufschlauch richtig
installiert ist.
ł(VZLUGHPSIRKOHQVFKDXPDUPHV:DVFKSXOYHU]X
verwenden.
Überlasten Sie das Gerät nicht und stellen Sie
keine heißen Gegenstände (z. B. einen
Wasserkocher mit heißem Wasser) auf die
Waschmaschine.
Um zu verhindern, dass Flusen den Abfluss
während des Waschvorgangs verstopfen, halten
Sie das Flusensieb in gutem Zustand, setzen Sie es
an der richtigen Stelle ein und reinigen Sie es
rechtzeitig.
Kleidungsstücke, die mit flüchtigen Erdölprodukten
in Berührung gekommen sind, sollten nicht in der
Maschine gewaschen werden.
DE
Schließen Öffnen
19

Bitte installieren und einstellen Sie die Maschine entsprechend den Vorgaben in
der Bedienungsanleitung.
Dies ist sehr wichtig für Ihre Sicherheit und den korrekten Betrieb.
ł3DFNHQ6LHGHQ.DUWRQDXVXQGQHKPHQ6LHGLH%RGHQSODWWHKHUDXV
łgIIQHQ6LHGHQREHUHQ'HFNHOGHU:DVFKPDVFKLQHXQGQHKPHQ6LHGDV
gesamte Zubehör heraus.
ł(QWIHUQHQ6LHDOOH9HUSDFNXQJHQHLQVFKOLHOLFKGHV6W\URSRUERGHQV
Wir empfehlen Ihnen, alle Verpackungen für einen eventuellen erneuten
Transport der Maschine aufzubewahren.
ł/HJHQ6LHGDV*HUlWZLHDXIGHPUHFKWHQ)RWR
von der Seite auf eine weiche Unterlage, so dass
die bemerkenswerte Seite nach außen zeigt, die
Pfeilrichtung ist die Vorderseite des Geräts.
ł5LFKWHQ6LHGDV6FKUDXEHQORFK]ZLVFKHQ%RGHQ
und Bodenabdeckung aus und verwenden Sie die
beigefügte Schraube, um die Bodenabdeckung zu
befestigen.
Auspacken
Anbringen der unteren Abdeckung
Der Abstand zwischen der Waschmaschine und
der Wand sollte mehr als 50 mm betragen, und
der maximal zulässige Winkel des Sockels der
Maschine ist 1°.Der schräge oder raue Boden
kann dazu führen, dass der Betrieb gestoppt
oder instabil, bitte passen Sie es mit den
folgenden Methoden:
ł+RUL]RQWDODXVULFKWHQ
Benutzen Sie einen gebundenen Faden mit
einem Lot, um zu prüfen, ob er horizontal ist.
łJustieren Sie den verstellbaren Fuß
1. Heben Sie den verstellbaren Fuß vorsichtig
an, lösen Sie die Einstellmutter und drehen Sie
den verstellbaren Fuß.
2. Ziehen Sie die Mutter nach der Einstellung
wieder fest.
Aufstellen
DE
Sockel
Weiche
Unterlage Bodenabd
eckung
Installation und Einstellung
20
Table of contents
Languages:
Other Costway Washer manuals